
Studiophile SBX - Audio M-AUDIO - Free user manual and instructions
Find the device manual for free Studiophile SBX M-AUDIO in PDF.


| Product Type | Active Studio Monitor Speaker |
| Woofer Size | 5 inches (127 mm) polypropylene cone |
| Tweeter Size | 1 inch (25 mm) silk dome |
| Amplifier Power | 50 Watts RMS per speaker (bi-amplified) |
| Frequency Response | 50 Hz – 22 kHz (±3 dB) |
| Input Type | 1 x XLR, 1 x 1/4" TRS balanced, 1 x RCA unbalanced |
| Dimensions (H x W x D) | 12.2 x 8.3 x 10.2 inches (310 x 210 x 260 mm) |
| Weight | 15.4 lbs (7.0 kg) each |
| Power Supply | 100-240 VAC, 50/60 Hz, internal switching power supply |
| Enclosure Type | Bass-reflex with front-firing port |
| Protection | RF interference, output current limiting, over-temperature, transient, subsonic filter |
| Controls | Volume, high-frequency shelf (HF), low-frequency shelf (LF) trim |
| Indicators | Power LED (front), illumination ring |
| Cabinet Material | Vinyl-laminated MDF |
| Placement | Vertical or horizontal (with isolation pads) |
| Included Accessories | Power cord, audio cable (RCA to 1/8"), user manual |
| Cleaning | Wipe with dry cloth; avoid solvents or abrasives |
| Safety | Class II equipment; do not expose to rain or moisture |
| Repairability | Replacement parts available through M-Audio service centers |
Frequently Asked Questions - Studiophile SBX M-AUDIO
User questions about Studiophile SBX M-AUDIO
0 question about this device. Answer the ones you know or ask your own.
Ask a new question about this device
Download the instructions for your Audio in PDF format for free! Find your manual Studiophile SBX - M-AUDIO and take your electronic device back in hand. On this page are published all the documents necessary for the use of your device. Studiophile SBX by M-AUDIO.
USER MANUAL Studiophile SBX M-AUDIO
First Things First 3
In the Box 3
Correct Power Operation .... 3
Positioning the Subwoofer in the Studio ....3
Rear Panel Features: 4
Connecting the SBX and Your Main Speakers ....6
Using the SBX with Stereo Bass Management 6
Using the SBX without Stereo Bass Management ....7
Connecting an Additional Subwoofer ....8
Operation 8
Power Modes 8
Setting the HPF Bypass Switch 8
Optimizing the Rear Panel Settings 9
Setting the Level Control 9
Setting the Phase Control 9
Setting the Subwoofer LPF and the Satellites HPF .....10
Troubleshooting & Technical Support 12
Avoiding Problems with Turntables .....12
Replacing the Fuse ....13
Support 13
Warranty Information ....13
Contact Information ....14
Technical Specs 15
Your Studiophile SBX
The SBX is a high-quality subwoofer designed to deliver extremely low frequencies in conjunction with stereo pairs of studio reference monitors such as the M-Audio Studiophile BX8 or BX5. In fact, so many consumers have subwoofers in their home and car entertainment systems that you're not really mixing accurately without having a sub yourself.
M-Audio's engineers designed the SBX to meet professional quality performance standards and to provide superior value. Your SBX is constructed using high-quality components such as the 8-inch mineral filled polypropylene woofer cone. We use only selected grade components throughout the circuit design, placing special emphasis on components within the audio path to assure stable, consistent performance. We've built in a unique smooth-clipping circuit to deliver a warm musical sound similar to a vacuum tube. This circuit also provides overload protection for safe and high volume performance.
The SBX incorporates a unique Stereo Bass Management System. When subwoofers are added to many systems, all frequencies are routed to both the main monitors and the sub. The problem is that both the main monitors and the sub are still trying to put out the same low frequencies, duplicating the playback of some of the low frequencies and thereby compromising monitoring accuracy.
Our Stereo Bass Management System solves that and delivers optimal fidelity. The SBX's internal crossover network splits the signal at a user-defined crossover frequency, routing everything below it to the internal sub and everything above it to the main outputs. This significantly improves fidelity because the sub and mains aren't tripping over each other to reproduce the same frequency—and each component only has to reproduce frequencies to which it is ideally suited.
Your SBX also features auto-muting circuitry that automatically turns the subwoofer on when it senses a program signal while turning it off to conserve power when no signal is present. Various controls also allow you to adjust the performance of the SBX in conjunction with the rest of your system. While the SBX is easy to operate, we suggest that you take a few minutes to read the rest of this manual in order to derive optimal audio quality from your new subwoofer. Enjoy!
First Things First
In order to avoid risk of damage and insure optimum performance from your SBX Subwoofer, please take time to read this manual before you proceed to unpack and install it.
In the Box
Carefully remove the SBX from the carton, paying extra attention to avoid touching or damaging the speaker cone. If the system is damaged in any way or does not contain all parts, contact your dealer immediately. We recommend that you save the carton in the event that you need to transport or ship the product in the future. Within the SBX package you should find:
- This manual
• The SBX Subwoofer
• One (1) standard AC Power cable
Correct Power Operation
Since the SBX contains its own amplifier, it must be connected to a power outlet using the detachable AC cable provided. Before connecting power, please make sure that the Voltage-Select Switch, located on the speakers rear panel is set to the appropriate position, as described in the rear-panel features list appearing earlier in this manual.
Note: - WARNING! - Use of improper voltage/ selector switch combinations may result in hazardous conditions and/or damage to speaker components not covered by speaker warranty.
Positioning the Subwoofer in the Studio
In theory, the best position for the SBX subwoofer is midway between the satellite speakers, with its front facing forward and in the same plane as the fronts of the satellite speakers. However, due to the fact that low bass frequencies are somewhat non-directional, you may locate the SBX quite far from this position without any detrimental effect on the sound reproduction.
Each room is different in acoustic properties, so please feel free to experiment with placement. Different positions of the SBX in relation to walls will affect its efficiency, as well as the room's overall influence on the frequency response. You can compensate for this by readjusting the filter settings (see section, "Setting the Subwoofer LPF and the Satellites HPF").
Rear Panel Features:
- Power Mode LED: This LED indicates the power status. If the auto-muting circuitry is engaged, this LED will be amber if there is no audio signal to the SBX, and green when the SBX receives a signal. If "Auto-Power" is switched off, then this LED will remain green.
- "Level" control knob: This knob controls the amplifier level of the SBX. The gain range is from minimum to maximum, labeled "Min" and "Max," with Min being full attenuation and Max being full volume.
- Phase control knob: This knob controls phase of the crossover frequencies of the Subwoofer and the Satellites from 0 to 180 degrees.
- "Subwoofer" LPF control knob: This knob designates the cutoff frequency of the SBX using a LPF, or low-pass filter. This setting will determine the highest frequency that the SBX will reproduce.
- "Satellites" HPF control knob: This knob determines the HPF, or high-pass filter cutoff frequency for the Satellite speakers while using the SBX's Stereo Bass Management System. The Satellites control knob is functional only when the HPF Bypass switch is set to Off.
- Input section: This section provides two balanced XLR inputs and two 1/4" TRS connectors that may be used for balanced (TRS) or unbalanced (TS) operation. Either XLR or TRS may be used as your audio input. These inputs are designated as "L" and "R" for operation in bass management mode. When bass management is not used, either the L or R input may be used to input signal to the SBX.
- Auto Power On/Off Switch: When this switch is set to "On," Auto Power mode is engaged. Switching to "Off" will defeat Auto Power mode.
- HPF Bypass switch: Switching HPF Bypass to "On" will bypass the Satellites HPF control knob, effectively defeating the SBX's Stereo Bass Management System. With HPF Bypass switched off, the "Satellites" HPF cutoff frequency control knob is engaged and bass management is operational.
- Output section: This section provides three balanced XLR outputs labeled "Extra Sub" and "L" & "R." The Extra Sub output gives you throughput directly from the inputs for the purpose of connecting an additional subwoofer. The L and R outputs are to be used for connecting Satellite speakers (your left and right mains) when using the Bass Management System.
- Power cable socket: This socket accepts a standard grounded AC cable.
- Fuse holder: This fuse holder allows the replacement of a fuse for the purpose of circuit protection.
- Power On/Off switch: Switching to "On" will power the SBX subwoofer. Switching to "Off" will power the unit down.
- Manufacturer's Label: This section gives the model number and manufacturer information, including important power requirement information. See section, "Correct Power Operation."
- Voltage-Select Switch: Provides 2 selections - 115VAC (120VAC) and 230VAC, and should be set to match the "house current" (receptacle) voltage of the country/location in which the speaker is used. The 115V (120V) setting is correct for the USA and the 230V setting correct for most of the UK and Europe.

Connecting the SBX and Your Main Speakers
Most applications will utilize the SBX's internal Stereo Bass Management System to realize maximum benefit. There are, however, two possible operational modes that you may use when connecting your SBX and your Mains, or "Satellite" stereo speakers, i.e., 1) using the SBX with bass management and 2) using the SBX without bass management.
Using the SBX with Stereo Bass Management
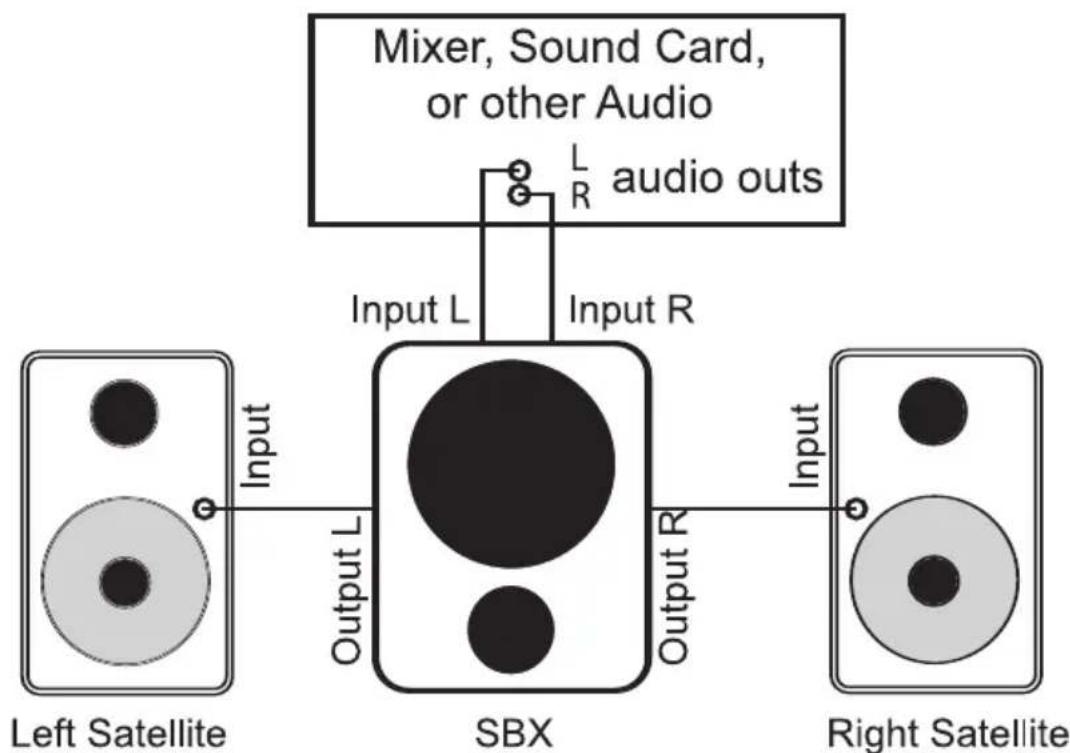
To take advantage of the SBX's internal Stereo Bass Management System, your main monitors become satellites of the subwoofer. Connect the left and right main or control room outputs of your mixer, sound card, or other audio source to the Input-L and Input-R jacks of the SBX (#6) respectively. (You may use either the XLR or TRS inputs, depending upon your cabling needs.) Then, connect Output-L and Output-R (#9) XLR jacks on the SBX to the inputs on the left and right satellites.
flowchart
graph TD
    A["Left Satellite"] -->|Input| B["SBX"]
    B -->|Output L| C["Right Satellite"]
    B -->|Output R| D["Mixer, Sound Card, or other Audio"]
    D -->|L R audio outs| E["Top Radio"]
    B -->|Input L| F["Top Radio"]
    B -->|Output R| G["Top Radio"]
Once you have completed this setup, you must set the Subwoofer LPF control knob and the Satellites HPF control knob for your particular needs. Please see the section, "Optimizing the Rear Panel Settings" for information on how to do this. Also note that the HPF Bypass switch is set to "Off" in this scenario.
Using the SBX without Stereo Bass Management
You may wish to use the SBX with an existing external bass management system, or with bass management defeated on the SBX. See section, "Setting the HPF Bypass Switch" for more information on defeating bass management.
With bass management defeated, you may still use the speaker setup illustrated above. With the HPF Bypass switch set to "On," the L & R XLR Outputs will operate in a "Thru" mode, passing the original signal at the Input section directly through to the outputs. In this setup, you will want to set the Subwoofer LPF control knob to the desired cutoff frequency for the SBX. The Satellites HPF control knob is not operational with the HPF Bypass switch set to "On."
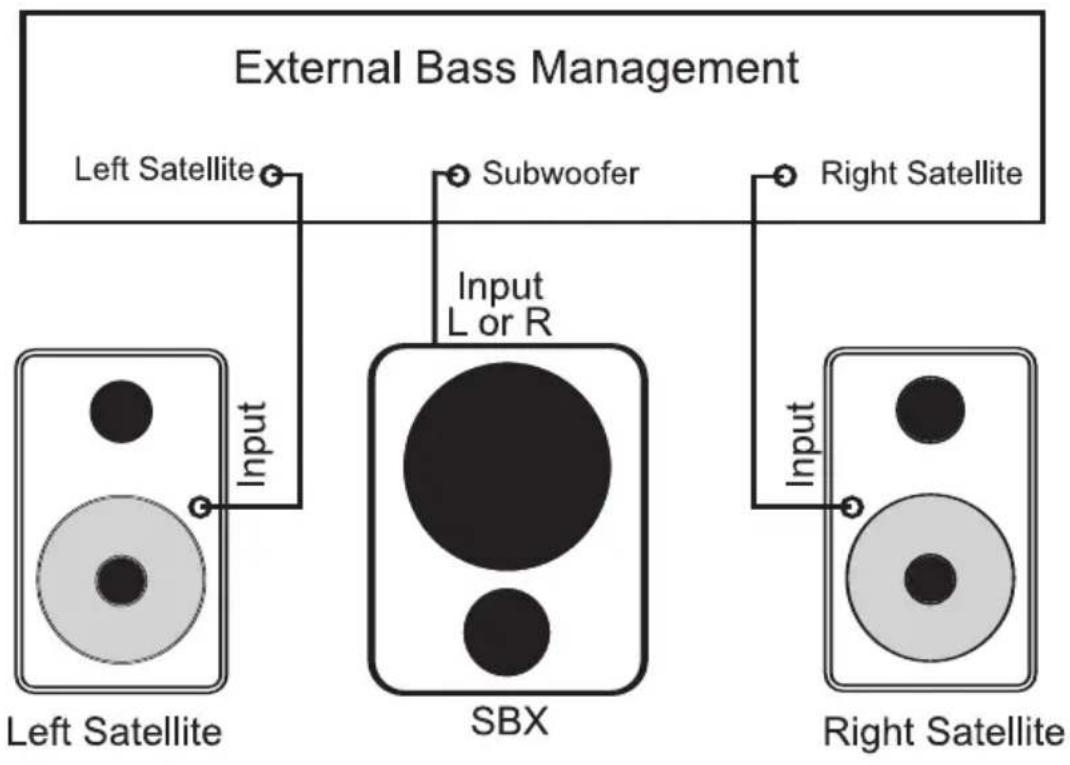
If you are using an external bass management device, or if you have an auxiliary or subwoofer output send, you may want to connect this directly to the SBX while connecting your main L & R outputs directly to your "Mains," or stereo L & R speakers. In this instance, you may use either the Input-L or Input-R connections on the SBX.
flowchart
graph TD
    A["External Bass Management"] --> B["Left Satellite"]
    A --> C["SBX"]
    A --> D["Right Satellite"]
    B -->|Input| E["Left Satellite"]
    C -->|Input L or R| F["SBX"]
    D -->|Input| G["Right Satellite"]
    C --> H["Subwoofer"]
    D --> I["Right Satellite"]
In this setup, you will want to set the Subwoofer LPF control knob to the desired cutoff frequency for the SBX. Once again, the Satellites HPF control knob is not operational with the HPF Bypass switch set to "On."
Connecting an Additional Subwoofer
If you have a large monitoring environment requiring greater subwoofer sound pressure, you can connect as many SBX cabinets as desired in a daisy chain. Simply connect the Extra Sub Output (located in the Output section) to the Input-L or Input-R input of second SBX (you may use the Extra Sub Output to connect to another brand of subwoofer). In this instance, you will want to have the HPF Bypass switch set to "On" on the second SBX subwoofer so that bass management is not repeated in the second sub.
Operation
Power Modes
The SBX's main Power switch (#12) must be switched "On" in order for the SBX to operate. The subwoofer is designed to operate continuously in Power "on" mode. (The SBX uses less than 3 VA in power mode.)
When the Auto Power mode is engaged, in conjunction with Power "on", the subwoofer automatically becomes operational when a signal is present and returns to Standby mode when a signal has not been detected for five minutes.
To operate in Auto Power mode, turn the Auto Power On/Off switch (#7) to the "On" position. The Power mode LED (#1) indicates the current status of the Auto Power circuit, glowing amber when in Standby and green when fully operational. When Auto Power is engaged, it is not necessary to turn the Power switch on or off each time you wish to use the SBX.
In special situations where you intend to play the system at very low volume or if Auto Power mode will not meet your application for any other reason, you can switch the Auto Power On/Off switch to the "Off" position. When Auto Power Mode is turned off you must turn the SBX on or off manually using the Power switch.
Note: If you intend not to use the system for a long period of time (such as a vacation), it is advisable to manually turn the system off via the Power switch.
Setting the HPF Bypass Switch
In normal operation, the HPF Bypass switch should be left in the "Off" position. When the HPF Bypass switch is in the Off position, the SBX Stereo Bass Management System is operational. In this case, the "Satellites" control knob, which sets the cutoff frequency of the HPF, is also operational.
When you want to bypass the SBX Stereo Bass Management System, engage the HPF Bypass by switching it to the "On" position. This will defeat the "Satellites" control knob and the HPF.
Optimizing the Rear Panel Settings

There are four control knobs on the rear of the SBX: "Level," "Phase," "Subwoofer" LPF cutoff frequency, and "Satellites" HPF cutoff frequency. These combined controls make it possible to optimally match the low bass frequencies from the subwoofer to your unique combination of satellite speakers, room characteristics and subwoofer position. Because of these variables, there is no single recipe for obtaining the best audio results. While you can certainly apply sound meters and other analysis equipment in establishing the right settings, most people use their ears and a few familiar recordings to determine the best settings.
Setting the Level Control
Use the Level control (#2) to adjust the volume of the subwoofer to properly match that of the satellite speakers. We suggest starting with this knob in the 12 o'clock position.
Note: Placement has a great deal to do with how the Level knob is set. If the SBX is placed on the floor against one wall in a normal room, for example, the resulting sound pressure may be as much as 3dB greater than if the subwoofer stands alone. Placement in a corner could add another 3dB of sound pressure over placement against a wall alone.
Setting the Phase Control
The purpose of the Phase control (#3) is to match the phase of the Satellite HPF cut off frequency to the phase of the Subwoofer LPF cutoff frequency. Adjust the Phase in order to make sure that the Subwoofer and Satellites are in phase at the selected crossover frequency. This will allow you to achieve the maximum sound pressure and the most accurate sound quality from the whole system. A little experimentation here may be in order. When signals are out of phase, they tend to cancel each other. This is most likely to occur when using bass management, in which case both the "Subwoofer" and "Satellites" cutoff frequencies are set to the same frequency settings (see the next two sections for more information). Rotate the Phase control knob until the SBX sounds the most robust, or return it to the 0 degree position if that is the optimum setting or if you hear no difference.
Setting the Subwoofer LPF and the Satellites HPF
The fundamental concept behind the Stereo Bass Management System is to isolate the upper and lower frequency ranges and direct them respectively to the component best suited to reproduce them. In order to accomplish this, the SBX utilizes a crossover network to determine how different frequency ranges are distributed to the subwoofer and satellite monitors.

line
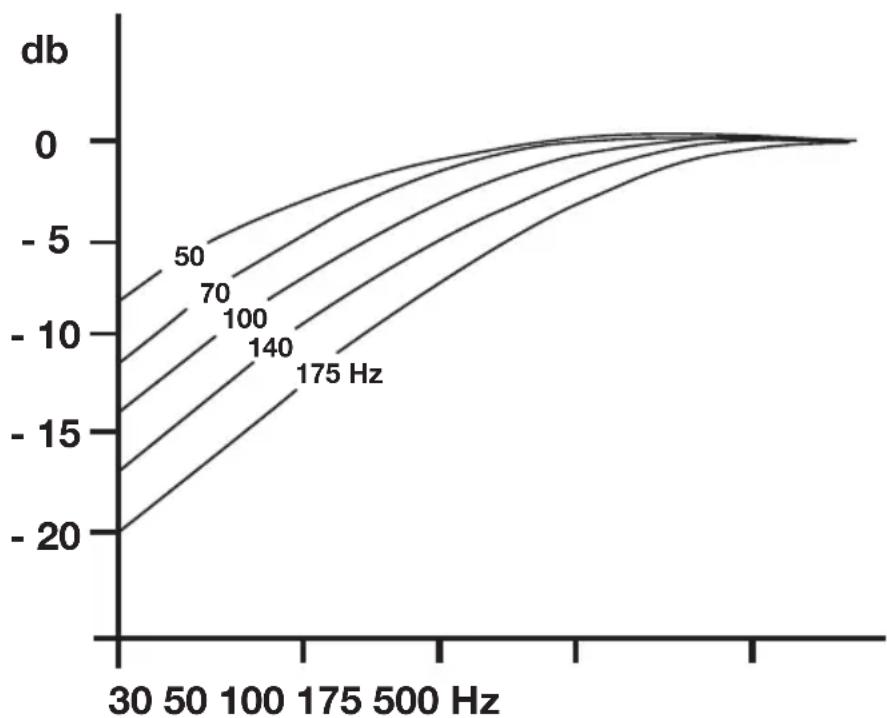
| Frequency (Hz) | Value (db) | | -------------- | ---------- | | 30 | -2 | | 50 | -1 | | 100 | 0 | | 175 | -1 | | 500 | -2 | | 1000 | -1 | | 1750 | -2 |This crossover network consists of two main components: a 2nd order (12 db/octave) low-pass filter that limits the upper frequencies that the subwoofer has to reproduce (shown above), and a high-pass filter that limits the lower frequencies the satellite monitors have to reproduce (shown below). The Subwoofer LPF cutoff frequency (#4) and Satellite HPF cutoff frequency (#5) controls adjust frequencies of the low- and high-pass filters, respectively. Both have a range of 50 to 180 Hz.
line
| Frequency | Value (db) | | --------- | ---------- | | 50 | -20 | | 70 | -15 | | 100 | -10 | | 140 | -5 | | 175 | 0 |You will need to use your ears to determine the best settings for these filters. The frequency markings shown next to each control knob may give you some guidelines. 50Hz (or above) might be used as a setting for music production. 80Hz is the proposed setting for Dolby Digital playback, while 100Hz is the proposed setting for THX.
If your satellites are properly damped at the bass response as shown in curve "a," set the two crossover frequencies to be identical. If your satellite speakers are under-damped (boomy sounding) as shown in curve "b," experiment with setting the Satellite crossover frequency control higher. If they are over-damped (dry sounding) as shown in curve "c," experiment with a lower setting. You may want to note the final control settings in case they are accidentally altered.

line
| Hz | db (a) | db (b) | db (c) | | --- | --- | --- | --- | | 0 | -20 | -20 | -20 | | 1 | -5 | 0 | -5 | | 2 | 0 | 5 | 0 | | 3 | 0 | 0 | -5 | | 4 | 0 | 0 | 0 | | 5 | 0 | 0 | 0 |Note: In the event that you do choose an external form of bass management, you will likely need to set the Subwoofer LPF cutoff frequency to 180Hz. If you choose not to use the SBX internal bass management or an external form of bass management, you may want to begin with a Subwoofer LPF cutoff frequency of 120Hz and experiment up or down until you reach your desired sound.
Troubleshooting & Technical Support
Avoiding Problems with Turntables
Since the SBX can produce a considerable output level at low frequencies, acoustic feedback via a turntable can occur. To ensure that this is not the case, perform the following test at installation of the SBX.
Set up the equipment for playing a record. Place the stylus on a non-rotating record (disconnect the turntable power cord if necessary). Tap the turntable
while gradually increasing the volume of your audio system. If you begin to hear a sustaining sound quality before you are able to advance the volume control to a setting representing loud listening, acoustic feedback is a problem. You may need to move either the turntable or the SBX to remedy this problem. Alternately, try placing an anti-vibration pad under the turntable.
Replacing the Fuse
The SBX is protected from power anomalies by a fuse. In the event that the SBX does not seem to have power even though connected to AC, check the condition of the fuse in the fuse holder (#11). If the fuse needs replacing, it is critical to use only a fuse with an identical rating.
Support
The M-Audio.com website (www.m-audio.com) contains the latest troubleshooting information. This should be your first stop for up-to-date information on the latest drivers, FAQ's, and extensive how-to guides.
If you need additional assistance, after reading the following paragraphs and visiting our website, you may contact M-Audio's Technical Support department by phone (626-633-9055, 9-5 PST M-F), by fax (626-633-9060) or by e-mail (techsupt@m-audio.com).
Warranty Information
Terms
M-Audio warrants products to be free from defects in materials and workmanship, under normal use and provided that the product is owned by the original, registered user. Visit www.m-audio.com/warranty for terms and limitations applying to your specific product.
Registration
Thank you for registering your new M-Audio product. Doing so immediately both entitles you to full warranty coverage and helps M-Audio develop and manufacture the finest quality products available. Register online at www.m-audio.com/register to receive FREE product updates and for the chance to win FREE M-Audio gear.
Contact Information
If you have any questions, comments or suggestions about this or any M-Audio product, we invite you to contact us by using the following information:
M-AUDIO U.S.
5795 Martin Road, Irwindale, CA 91706-6211, U.S.A.
Sales Information:
626-633-9050
Sales Information (email): info@m-audio.com
Tech Support: 626-633-9055
Tech Support (email): techsupt@m-audio.com
Fax: 626-633-9060
Internet Home Page: http://www.m-audio.com
M-AUDIO Deutschland (Germany)
Kuhallmand 34, D-74613 Ohringen, Germany
Sales Information:
49 7941 98 7000
Sales Information (email):
info@m-audio.de
Technical Support:
49 7941 98 70030
Technical Support (email):
support@m-audio.de
Fax:
07941 98 70070
Internet Home Page:
http://www.m-audio.de
M-AUDIO U.K.
Unit 5, Saracen Industrial Estate, Mark Road,
Hemel Hempstead, Herts HP2 7BJ, England
Sales Information (phone): 44 (0) 1442 416590
Sales Information (fax): 44 (0) 1442 246832
Sales Information (email): info@maudio.co.uk
Technical Support (PC): 44 (0) 1309 671301
Technical Support (Mac): 44 (0) 1765 650072
Technical Support (email): richard@maudio.freeserve.co.uk
Internet Home Page: http://www.maudio.co.uk
M-AUDIO Canada
1400 St-Jean Baptiste Ave. #150
Quebec City, QC G2E 5B7, Canada
Tel:
418-872-0444
Fax:
418-872-0034
Email:
midimancanada@m-audio.com
Internet Home Page:
http://www.m-audio.ca
M-AUDIO France
Unit 5, Saracen Industrial Estate, Mark Road
Hemel Hempstead, Herts HP2 7BJ, England
Sales Information: 0810 001 105
Sales Information (email): info@m-audio-france.com
Technical Support: 0820 00 731
Technical Support (email): support@m-audio-france.com
Fax:
44 (0) 144 224 6832
Internet Home Page: http://www.maudio.co.uk
M-AUDIO Japan
Annex Buliding 6F, 2-18-10 Marunouchi
Naka-Ku, Nagoya 460-0002, Japan
Tel:
81 52 218 3375
Fax:
81 52 218 0875
Technical Support:
0820 00 731
Email:
info@m-audio.co.jp
Internet Home Page:
http://www.m-audio.co.jp
Technical Specs
Studiophile SBX Specifications\* :
- Type : Bass-reflex powered subwoofer
- Woofer Driver : 8-inch mineral-filled polypropylene cone with high-temperature voice coil and damped rubber surround
• Frequency Response : 30Hz — 180 Hz - Low-Pass Filter : Butterworth —12dB/octave <325Hz, -24dB/octave > 325Hz
• Crossover Frequency : Adjustable 50Hz - 180Hz
• Input Sensitivity : 89dB
• Amplifier Power : 100W @100Hz, 4 ohm, 0.1% THD
• Dynamic Power : 120W
• S/N Ratio : > 100dB below full output, 100Hz - Input Connectors: Two XLR balanced inputs; two TRS balanced/ unbalanced inputs
- Output Connectors : Two XLR balanced outputs for satellites, one XLR balanced output for additional subwoofer
• Controls: Level : Phase; Subwoofer Frequency; Satellite Frequency - Switches : Auto on/off; Satellite high-pass output bypass
- Input Impedance : 20k ohms balanced, 10k ohms unbalanced
- Input Sensitivity : 150mV input produces full output with volume control at maximum
- Protection : Over temperature, turn-on/off transient, subsonic filter, external mains fuse, ALC (avoid from hard clipping)
- Indicator : Power On (green) or Stand-by/Protection (Amber)
- Power Requirements : Dual-voltage (selectable by rear-panel switch) for either 120V/\~60Hz, 230V/\~50Hz; powered via detachable 3-circuit line cord
• Cabinet : Vinyl-laminated MDF
• Dimension : 15.6 in. (h) x 10.63 in. (w) x 12 in. (d)
• Shipping Weight : 36 lbs.
* Specifications subject to change without notice.
SBX-050604

- Your Studiophile SBX
- First Things First
- In the Box
- Correct Power Operation
- Positioning the Subwoofer in the Studio
- Rear Panel Features:
- Connecting the SBX and Your Main Speakers
- Using the SBX with Stereo Bass Management
- Using the SBX without Stereo Bass Management
- Connecting an Additional Subwoofer
- Operation
- Power Modes
- Setting the HPF Bypass Switch
- Optimizing the Rear Panel Settings
- Setting the Level Control
- Setting the Phase Control
- Setting the Subwoofer LPF and the Satellites HPF
- Troubleshooting & Technical Support
- Avoiding Problems with Turntables
- Replacing the Fuse
- Support
- Warranty Information
- Terms
- Registration
- Contact Information
- M-AUDIO U.S.
- M-AUDIO Deutschland (Germany)
- M-AUDIO U.K.
- M-AUDIO Canada
- M-AUDIO France
- M-AUDIO Japan
- Technical Specs
- Studiophile SBX Specifications\* :
Brand : M-AUDIO
Model : Studiophile SBX
Category : Audio