
RC300 - Dash cam ADATA - Free user manual and instructions
Find the device manual for free RC300 ADATA in PDF.


| Product Type | Dash Cam |
| Brand | ADATA |
| Model | RC300 |
| Dimensions | Approximately 90 x 55 x 30 mm |
| Weight | Approximately 80 g |
| Power Source | 12-24V vehicle cigarette lighter adapter |
| Battery | Built-in rechargeable lithium battery (200 mAh) |
| Recording Resolution | Full HD 1080p (1920x1080) at 30 fps |
| Lens | Wide angle, 140° |
| Storage | MicroSD card up to 128 GB (Class 10 or higher) |
| Loop Recording | Yes, overwrites oldest files when card is full |
| G-Sensor | Built-in 3-axis accelerometer for impact detection |
| Parking Mode | Monitors while parked (requires hardwire kit) |
| Night Vision | Low light performance with WDR technology |
| Display | 2.0-inch LCD screen |
| Mounting | Suction cup mount for windshield |
| Connectivity | USB 2.0 for data transfer and charging |
| Maintenance | Clean lens with soft cloth; format SD card periodically |
| Safety | Do not block airbags; use adhesive mount for secure attachment |
| Spare Parts | Replacement suction mount, car adapter, USB cable available |
| Repairability | Non-user serviceable; contact ADATA support |
Frequently Asked Questions - RC300 ADATA
User questions about RC300 ADATA
0 question about this device. Answer the ones you know or ask your own.
Ask a new question about this device
Download the instructions for your Dash cam in PDF format for free! Find your manual RC300 - ADATA and take your electronic device back in hand. On this page are published all the documents necessary for the use of your device. RC300 by ADATA.
USER MANUAL RC300 ADATA
Drive Recorder: RC300
Quick Start Guide RC300 Dash Recorder
Button layout and functions


Up/Zoom In/File lock:
Press while in camera mode to zoom in. Tap to lock selected video file.

Down/Zoom Out/Video Mute:
Press while in camera mode to zoom out. Tap while in video mode to mute sound.

OK/Back:
Tap while in video mode to start recording. Tap while in camera mode to take a picture. Press and hold 2 seconds for a contextual menu in any device mode.

Power/Menu:
Press once to turn device on. With device on, tap to enter the menu. Press and hold 2 seconds to turn device off.
Preface
About this manual
Thank you for purchasing the ADATA RC300. In order to make sure you get the best usage out of your new ADATA product, we recommend you take the time to read this manual to become fully acquainted with all features and functions. In the event of any discrepancies between drive recorder data and this manual, drive recorder data should be taken as the prevailing version. ADATA reserves the right to amend this manual without prior notice. All rights reserved.
ADATA accepts no liability for device issues, whether software or hardware-related, stemming from misuse, data corruption or errors, battery replacement, or other
unforeseen personal circumstances that lead to damage. This manual should not be misconstrued as acceptance of liability, nor does it imply a means to completely avert device failure or issues outside of stated product warranty. ADATA is not liable for third party claims arising from the use of the device, irrespective of manual contents.
Installation notes
◇ Product should be installed near the rear-view mirror of the vehicle for the best field of view
◇ Through the on-screen display, adjust the device to make sure the camera lens views the full width of the windshield and windshield wipers
◇ Avoid touching the lens with your fingers, as oily residue and fingerprints may cause image quality deterioration
◇ Clean the lens at regular intervals to maintain optimal performance
Warnings
★ Only use authorized chargers by ADATA
★ Do not disassemble the device
★ Do not attempt to access the interior of the device
★ Exposing the battery to fire or extreme heat may cause an explosion
★ Always comply with local laws and regulations. The device is not meant as a replacement for lawful conduct. Do not use the device interface while operating a vehicle
General precautions
- The device may be damaged if stored or operated in dusty environments
- Avoid exposing the device to extreme heat beyond its safe operating range. Heat may shorten product longevity and battery life, and may cause component deformation or even battery combustion
- Avoid exposing the device to extreme cold beyond its safe operating range. Exposure to extreme cold can
cause moisture to build up inside the device when it reaches operating temperature, which over time may cause device failure
- Do not attempt to open the device or repair it yourself. Doing so carries the risk of electric shock, which may lead to injury or even death
- Avoid exposing the device to shocks, falls, and drops, as these may damage components and lead to failure
- Do not use chemicals or detergents to clean the lens and the device overall. To clean the lens and device, only use a clean, soft cloth
- Should the device or accompanying accessories have any technical issues, take them only to official service provider for repairs
Product features
◆ Wide angle photographic lens
◆ Full HD 1920 x 1080p display
◆ Up to 4032 x 3024 capture
◆ 4X digital zoom
◆ Unlimited focal length from 50cm and beyond
◆ 2” high resolution LCD with simultaneous video and still photo display
◆ SOS emergency file lock prevents content deletion
◆ G-Sensor tri-axial accelerometer automatically saves video should the vehicle experience a collision or any sudden, violent movements
◆ Robust data protection saves video in the event of power loss, device damage, or other disruptions
◆ Gapless continuous recording captures all information without pause
◆ Powered by standard 12V/24V in-car outlet, with auto record start when vehicle is turned on, and auto file save when the ignition is turned off
◆ HDMI output to compatible TVs and monitors, plus USB data read mode
◆ Smooth 30 frames per second
◆ Auto loop recording, with per-task configurable loop duration
◆ Time and date display does not need to be re-set after device reboot
◆ User friendly interface
◆ microSD storage up to 128GB
Product layout and schematics
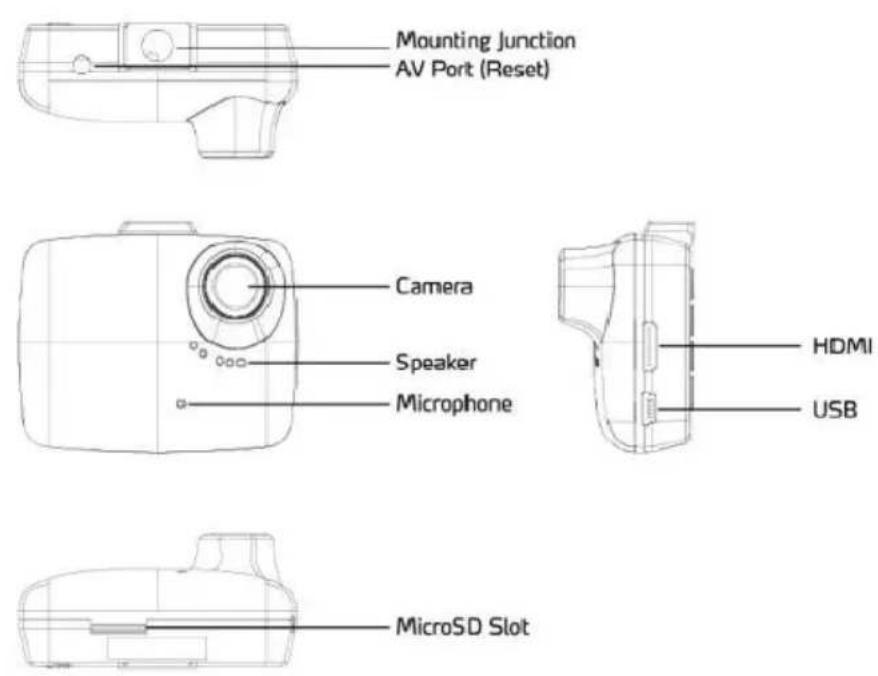
Guide to icons
- Make sure to identify and understand all indications before use
- Indicator lights
Green - Battery Charging
Blue - Operating
Red - Standby
  o Mode o Mode |  Image Quality Image Quality |
  Recording Recording |  Baery Baery |
 S S  shot Mode shot Mode |  SO Value SO Value |
[WABG] A  m (Playback) m (Playback) |  WDR WDR |
 MicroSD card MicroSD card |  Loop Recording Loop Recording |
 Microphone Microphone |  White Balance White Balance |
 G Sensor G Sensor |  Sele Timer Sele Timer |
 An-shake An-shake |  EV Value EV Value |
 File Locked File Locked |  Video File Video File |
 “OK” Funcon in Album “OK” Funcon in Album | ‘1080FHD’ Resoluon |
 Up/Zoom In Up/Zoom In |  Down/Zoom Down/Zoom |
| Out | |
| OK OK | Power/Menu |
3. Menu options
Settings
- Date/Time: 2013/01/01 - 12:00:00 - YY/MM/DD (hold the OK button for 2 seconds to complete setup)
- Beep Sound: Off/On
- Language: English/Simplified Chinese/Traditional Chinese/Russian/Japanese/French/Spanish/Portuguese/German/Italian
- TV Mode: NTSC/PAL
- Frequency: 50Hz/60Hz
- Format: cancel/OK
- Default Setting: cancel/OK
-
Screen Saver: Off/3 minutes/5 minutes/10 minutes
-
Version: displays system version number
Video Menu (in snapshot mode, tap the power button)
- Resolution:
1080FHD (1920X1080)/720P (1280X720)/WVGA (848X480P)/VGA (640X480)
-
Loop Recording: off/1 minute/3 minutes/5 minutes
-
WDR: Off/On
-
Exposure:
$$ \begin{array}{l} + 2. 0 + 5 / 3 + 4 / 3 + 1. 0 + 2 / 3 + 1 / 3 + 0. 0 - 1 / 3 - 2 / 3 - 1. 0 \ - 4 / 3 - 5 / 3 - 2. 0 \ \end{array} $$
-
Record Audio: Off/On
-
Date Stamp: Off/On
GSENSOR: Off/Low sensitivity/Middle sensitivity/ High sensitivity
Snapshot Mode
(Hold the OK button for 2 seconds, and then mode-selection menu pops up)
Snapshot Menu (in snapshot mode, tap the power button)
- Capture Mode: Single/2S Timer/5S Timer/10S Timer
- Resolution:
12M 4032x3024/10M 3648x2736/8M 3264x2448/
5M 2592x1944/3M 2048x1536/2MHD
1920x1080/1.3M 1280x960/VGA 640x480 - Sequence: Off/On
- Quality: Fine/Normal/Economy
- Sharpness: Strong/Normal/Soft
- White balance:
Auto/Daylight/Cloudy/Tungsten/Fluorescent - Color: Color/Black&White/Sepia
-
ISO: Auto/100/200/400
-
Exposure: +2.0 +1.7 +1.3 +1.0 +0.7 +0.3 +0.0 -0.3
-0.7 -1.0 -1.3 -1.7 -2.0 - Anti-Shaking: Off/On
- Date Stamp: Off/Date/ Date/Time
Album Mode
(Hold the OK button for 2 seconds, and then mode-selection menu pops up)
Album Menu (in snapshot mode, tap the power button)
- Delete: current file/all files (press the power button to enter).
- Protect: Lock current/Unlock current/Lock all/Unlock all.
- Slide Show: Off/OK/8 seconds.
Operating Guide
- Battery charging
The device can be used with the provided charger or with any powered USB port, for example on your PC.
- When connected to a 12V/24V in-car outlet:
Set the device to “1 minute/3 minutes/5 minutes” recording time to auto-start recording when the car engine is turned on. Recording stops automatically and content is saved when you turn the ignition off
Caution: the provided power supply converts 12V/24V in-car output to 5V input to the device. Using other chargers or any input greater than 5V to the device may cause the drive recorder to fail due to burnout
- Installing and removing memory cards
[1] Only insert memory cards in the direction indicated by the card manufacturer. Improper insertion may damage the device and the card.
[2] For best performance, use high-speed SDHC/SDXC cards with the CL6 or CL10 logos imprinted.
[3] The device can format incompatible memory cards so that they can be used. However, these cards may later be unreadable by other devices.
4. Time and date settings
After turning on the device and booting, press ⏻ (power button) twice to enter the menu, then adjust the time and date using the up and down keys. Press OK to confirm your selection
5. Language settings
After turning the device on and booting, press ⏻ (power button) twice to enter the menu, scroll through available languages with the up and down keys, then press OK to confirm your selection
- Camera on/off
Hold the power button for 3 seconds to turn the camera on and off
- Shooting modes
[1] Selecting a resolution: press ⚙(power button) to enter the menu. Resolution is the first item. Choose from 1080P FHD (1920x1080P)/720P (1280x720P)/WVGA (848x480P)/VGA (640x480P). We recommend 1080P FHD.
[2] Press OK to begin recording, and press OK again to stop. When recording, the icon will appear at the top of the device display.
- Capture mode
[1] Camera supports up to 4034x3024 pixels
[2] Tap OK to take a photo
9. Playback mode
[1] Press OK to enter the menu and navigate to video playback. You can also long press OK anytime to enter photo mode, then long press OK again to enter playback mode.
[2] In file preview mode, use the down key to select a file, then press OK to play/pause video.
[3] While in playback mode, press (power button) to enter the menu, then select delete, protect, or slideshow. Press OK to confirm your selection.
10. Protect/unprotect content
[1] Tap (power button) to protect or unprotect highlighted files within the menu. Protected files have the icon next to them. The protect status locks the file against deletion. To delete a file, you need to first change its status to unprotected.
[2] G-Sensor automatic shock protection: should the vehicle experience any sudden and severe shock or change in velocity or direction, G-Sensor technology auto-engages to save content against deletion. The
icon appears on the device display when this protection is engaged.
[3] Manual SOS emergency protection: while recording, press the OK button to engage SOS emergency protection. The icon will appear on the display.
- Loop recording
Select from off/1 minute/3 minutes/5 minutes
11.1 When choosing the off setting:
[1] Recording does not automatically activate when the device is powered on
[2] If device storage is full, the system will prompt you to manually delete content or format a new memory card. Until then, loop recording cannot be used and content in general cannot be saved.
11.2 When choosing the 1 minute/3 minutes/5 minutes settings.
[1] Recording automatically starts when the device is powered on.
[2] If device storage is full, loop recording overwrites unprotected/unlocked content and continues to work and cycle uninterrupted.
- Record date stamp: select on/off
Product specifications
| Camera sensor | 1/3” CMOS sensor |
| Display | 2.0” LCD |
| Controller | Novatek full HD 1920x1080P |
| Storage | microSD (up to 128GB) |
| Lens | Japan-made A-Class Coated Glass |
| Image formats and resolutions | Formats: JPEG (EXIF2.2), DCF Resolutions: 12MP (4032x3024)/10MP (3648x2736)/8MP (3264x2448)/5MP (2592x1944)/3MP (2048x1536)/2MP (1920x1080)/1.3MP (1280x960)/ VGA(640x480) |
| Video formats and resolutions | Format: MOV(H.264) Resolutions: 1080FHD (1920X1080)/1080P(1440X1080)/720P(1280X720)/WVGA(848X480)/VGA(640X480)/QV GA(320X240) |
| Zoom | Video: 4X digital zoom, 1280x720, 30 frames per second Image: 8X digital zoom (max) |
| Audio | Integrated microphone and speaker (AAC) |
| Exposure | -2.0EV to +2.0EV |
| SOS mode | Emergency video file locking |
| Loop | Off/1 minute/3 minutes/5 minutes |
| recording | |
| USB | USB 2.0 port |
| Video output | AV out : NTSC/PALHD TV out: HDMI out, full HD1920x1080 50 frames per second or1920x1080 60 frames per second |
| Power supply | Internal 300mAh high temperature range rechargeable lithium batteryInput: 5V, 1A |
| Operating temperatures | -20°C to 70°C |
| Dimensions | Please refer to packaging |
| Weight | Please refer to packaging |
Troubleshooting
Please refer to this section for resolving several basic technical issues that may be encountered during normal operation
◎Photos/images cannot be taken
Make sure there is enough free storage and check for protected/locked files
◎Does video automatically stop at some point while recording?
Storage space may not be sufficient. Due to the large file size of high definition video, we recommend SDHC/SDXC high speed and large capacity memory cards, class 6 or higher
◎When playing recorded video or viewing stored images, a file error prompt appears
This may be due to a file error. If rebooting does not resolve this, the storage card needs to be reformatted
◎No image when outputting to a high definition TV or monitor
Check that all cables are properly connected and secured, and that the TV is set to the correct source (AV, HDMI, etc.)
◎Images appear blurry or hazy
Make sure the lens is clean- wipe it with a soft cloth.
Also make sure the windshield is clean inside out
◎Images have vertical and/or horizontal interference lines
This is caused by selecting an incorrect refresh rate.
Adjust the device to 50Hz (frames per second) or 60Hz (frames per second)
◎After connecting the device to the car charger, recording does not automatically start
This function is only available with loop recording enabled in settings, so double check that the feature is not set to off
◎If the device simply stops working, is there something I can do?
Before contacting an authorized service center, try factory resetting the device using the hard reset button (requires a pin or pen tip to access)
Package contents
 RC300 RC300 |  Free Premier UHS-I16GB CL 10 MLC microSD card Free Premier UHS-I16GB CL 10 MLC microSD card |
 Car Adapter Car Adapter |  Mounting Bracket(adhesive mount) Mounting Bracket(adhesive mount) |
| Quick Start Guide |  Cable (3m) Cable (3m) |
For illustration purposes only – actual items may differ in appearance
Quality and service guaranteed
Made In Taiwan
- Drive Recorder: RC300
- Quick Start Guide RC300 Dash Recorder
- Preface
- About this manual
- Installation notes
- Warnings
- General precautions
- Product features
- Product layout and schematics
- Guide to icons
- Menu options
- Settings
- Album Mode
- Operating Guide
- Time and date settings
- Language settings
- Playback mode
- Protect/unprotect content
- Troubleshooting
Brand : ADATA
Model : RC300
Category : Dash cam