
Xcellis QXS-412 - Disk array QUANTUM - Free user manual and instructions
Find the device manual for free Xcellis QXS-412 QUANTUM in PDF.


| Product Type | Disk Array |
| Brand | Quantum |
| Model | Xcellis QXS-412 |
| Form Factor | 2U Rackmount (12-drive chassis) |
| Drive Form Factor | 3.5" LFF (Large Form Factor) |
| Maximum Drive Capacity | 12 drives (HDD or SSD) |
| Controllers | Dual redundant controllers |
| Host Interface | CNC (FC, iSCSI 10GbE, iSCSI 1Gb) or SAS |
| Power Supplies | 2 redundant power supplies |
| Cooling | Integrated fan modules |
| RAID Levels | RAID1, RAID6 (various stripe sizes: 128k, 256k) |
| Management | Web-based Disk Management Utility (V2/V3), CLI |
| Included License | Q-Tools license |
| Supported Drive Types | HDD and SSD, can be mixed |
| Self-Encrypting Drives (SED) | Supported |
| Serial Number Location | Label on chassis upper right front corner |
| Included Accessories | 2 Cat6 cables, documentation kit |
| Regulatory Compliance | Refer to QX and QXS Series Product Regulatory Compliance and Safety document |
| Warranty Support | Contact Quantum Support (www.quantum.com/support) |
Frequently Asked Questions - Xcellis QXS-412 QUANTUM
User questions about Xcellis QXS-412 QUANTUM
0 question about this device. Answer the ones you know or ask your own.
Ask a new question about this device
Download the instructions for your Disk array in PDF format for free! Find your manual Xcellis QXS-412 - QUANTUM and take your electronic device back in hand. On this page are published all the documents necessary for the use of your device. Xcellis QXS-412 by QUANTUM.
USER MANUAL Xcellis QXS-412 QUANTUM
QX and QXS Getting Started Guide
This document contains the following topics:
QX and QXS Systems 2
Related Documentation 2....
Systems and Included Hardware 3
Installation and Product Setup.7....
Contacting Quantum Support 13
© 2017 Quantum Corporation. All rights reserved. Your right to copy this manual is limited by copyright law. Making copies or adaptations without prior written authorization of Quantum Corporation is prohibited by law and constitutes a punishable violation of the law. Artico, Be Certain (and the Q brackets design), DLT, DXi, DXi Accent, DXi V1000, DXi V2000, DXi V4000, DXiV-Series, FlexSpace, FlexSync, FlexTier, Lattus, the Q logo, the Q Quantum logo, Q-Cloud, Quantum (and the Q brackets design), the Quantum logo, Quantum Be Certain (and the Q brackets design), Quantum Vision, Scalar, StorageCare, StorNext, SuperLoader, Symform, the Symform logo (and design), vmPRO, and Xcellis are either registered trademarks or trademarks of Quantum Corporation and its affiliates in the United States and/or other countries. All other trademarks are the property of their respective owners. Products mentioned herein are for identification purposes only and may be registered trademarks or trademarks of their respective companies. All other brand names or trademarks are the property of their respective owners. Quantum specifications are subject to change.
QX and QXS Systems
This Getting Started document provides an overview of setup tasks and shows where to find information on each task.
This information can be used for the following systems:
- QXS-312/QXS-412
• QXS-324/QXS-424
• QXS-448/QXS-648
• QXS-456/QXS-656
• StorNext QXS-1200 or QX-1200
• StorNext QXS-2400 or QX-2400 - StorNext QXS-5600
Related Documentation
For information about See
| Web links to download Quantum QX and QXS Storage guides listed below, but not shipped with the product | QX and QXS Documentation Sheet* |
| Enhancements, known issues, and late-breaking information not included in product documentation | QX or QXS Release Notes |
| Product overview and overview of setup tasks QX and QXS Getting Started Guide | |
| Site planning at your storage location QXS Site Planning Guide | |
| Regulatory compliance and safety and disposal information QX and QXS Series Product Regulatory Compliance and Safety * | |
| Using a 12- and 24-drive rackmount bracket kit to install an enclosure into a rack | QX/QXS 12- and 24-Drive Rackmount Bracket Kit Installation Guide |
| Using a 48-drive rackmount bracket kit to install an enclosure into a rack | QXS 48-Drive Rackmount Bracket Kit Installation Guide |
| Using a 56-drive rackmount bracket kit to install an enclosure into a rack | QXS 56-Drive Rackmount Bracket Kit Installation Guide |
For information about See
| Installing the front bezel on a QX and QXS system QX and QXS Bezel Installation Guide | |
| Product hardware setup and related troubleshooting QX and QXS Setup Guide | |
| Using the CLI to configure and manage the product QX and QXS CLI Reference Guide | |
| Identifying and installing or replacing CRUs QX & QXS CRU Installation and Replacement Guide | |
| Events that the QX and QXS Series may report, and recommended actions to take in response to those events | QX and QXS Event Descriptions Reference Guide |
| Managing a QXS system by using its primary web interface (V3), the Disk Management Utility | QXS Disk Management Utility User Guide V3 |
| Managing a QX and QXS system by using its secondary web interface (V2), the Disk Management Utility | QX and QXS Disk Management Utility User Guide V2 |
| Selecting the applicable host bus adapter (HBA) for the QXS systems | QXS Interoperability Martix |
* Printed document included with product

Note: For additional information, go to Quantum's website.
Systems and Included Hardware

Caution: Retain original packaging materials for use with returns. For chassis returns, the master container must ship on a pallet (non-compliance could void warranty).
Available Systems
Table 1 below provides the available QX and QXS systems supported.
Table 1: Available QXS Systems
| Model Host Interface Drives | Form Factor | Number of | Controllers | |
| QXS-312/QXS-412 | CNC* or SAS | 3.5" LFF (12 drives) | 2U12 | 2 |
| Model Host Interface Drives Form Factor Number of Controllers | ||
| QXS-324/QXS-424 | CNC* or SAS 2.5" SFF (24 drives) | 2U24 2 |
| QXS-448/QXS-648 | CNC* or SAS 2.5" SFF (48 drives) | 2U48 2 |
| QXS-456/QXS-656 | CNC* or SAS 3.5" LFF (56 drives) | 4U56 2 |
| StorNext QXS-1200 or QX-1200 | FC only 3.5" LFF (12 drives) | 2U12 2 |
| StorNext QXS-2400 or QX-2400 | FC only 2.5" SFF (24 drives) | 2U24 2 |
| StorNext QXS-5600 | FC only 3.5" LFF (56 drives) | 4U56 2 |
| *CNC (converged network controller) allows for FC, iSCSI (10GbE), iSCSI (1 Gb) host interface connections using SFPs. | ||
| Note 1: Air management solution (AMS) inserts must be installed within the QXS-448 and QXS-648 chassis in the unpopulated drive slots to ensure system cooling. | ||
| Note 2: The QXS-312/QXS-412 and QXS-456/QXS-656 systems can use hybrid sleds with the SFF drives for placement into the LFF chassis. | ||
| Note 3: When addressing drives within a system, the word drive(s) indicates HDDs or SSDs. | ||
RAID Chassis Hardware
If you purchased a RAID chassis, verify that you received the following hardware.
| Item | Quantity |
| RAID chassis with the following components:- 2 controller I/O modules- 2 power supplies- 2 fan modules (56-drive system only) | 1 |
| Cat6 | 2 |
| Doc kit | 1 |
Expansion Chassis Hardware
If you purchased a expansion chassis, verify that you received the following hardware:
Item Quantity
Expansion chassis with the following components: 1
- 2 expansion I/O modules
- 2 power supplies
- 2 fan modules (56-drive system only)
SAS cables (mini-SAS or HD mini-SAS) 2
Doc kit 1
Connectivity Options
Connectivity options include the following hardware:
- FC or iSCSI is selected using a connectivity option where the proper SFPs are selected.
- Connectivity kit includes SFPs (for CNC) and cables.
- Appropriate cables are also included in the connectivity option.
Note: Mini-SAS or HD mini-SAS cables are shipped with the RAID chassis for the applicable SAS controller I/O modules.
Drive Options
Drive options include the following hardware:
- Drives do ship installed within the "classic systems" (QXS-1200 and QXS-2400).
- Drives do not ship installed within the "transition systems" (QXS-1200 and QXS-2400).
- Drives do not ship installed within any of the Hybrid QXS-3/4/6 Series systems.
-
Drives are selected separately.
-
LFF chassis supports LFF and LV2 sleds.
- SFF accepts SFF sleds.
- Drive types can be mixed.
- Self-encrypting drives (SEDs) are not supported in the QXS-312 and QXS-324 systems.
- SEDs are supported in the QXS-412/424/448/456 and QXS-648/656 systems.
Note: When addressing drives within a system, the word drive(s) indicates HDDs or SSDs.
Licensing
Licensing is as follows:
• Q-Tools license ships with the following systems:
QXS-312 and QXS-324
QXS-412, QXS-424, QXS-448, and QXS-456
QXS-648 and QXS-656
• Quantum's tiering license, Q-Tier, is not available for use with the QXS-312 and QXS-324 systems.
• Other add-on licensing available separately.
• See licensing certificates and disk management utility guide(s) for more instructions.
Locating System Serial Number
Note: If you need Quantum support, you will need your system serial number. Refer to Contacting Quantum Support on page 13.
The system serial number is located on a label attached to the chassis (upper right-hand front corner, top of the chassis) as shown here, outlined in red (12-drive chassis shown):
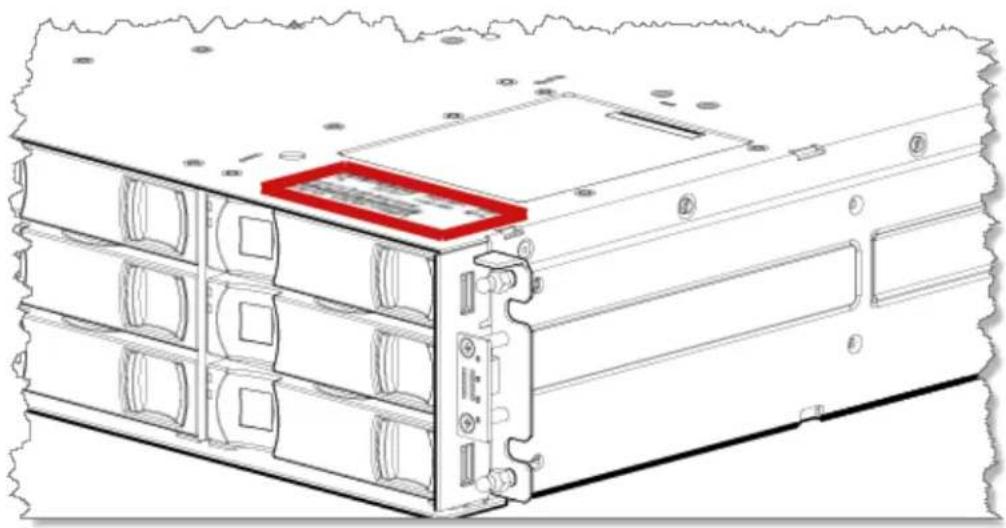
natural_image
Technical line drawing of a server rack unit with a red highlighted component (no text or symbols)The following illustration provides a representative example of a serial number label on a chassis.

P/N:
8-01532-01
Assembled in
United States
REV:A
Service Call System Serial Number

System S/N:
QTMCHOU-12345AB678
System serial number in the example: QTMCHOU-12345AB678
Installation and Product Setup
Introduction
Quantum assumes that the person using these instructions is qualified in the installation and servicing of storage products. If you need help, contact Quantum support, as detailed in Contacting Quantum Support on page 13
General Information
When contacting Quantum Support, you will be asked to provide the following information to open a support case: issue subject, detailed issue description, product type, serial number, part number, and system logs. To get logs, see the Disk Management Utility Users Guide.
You must supply the following items if they are not present in your ship kit:
• Antistatic protection devices
• #2 Phillips screwdriver
• Straight blade screwdriver
- Torque bit set (Torx T15 bit)
Installation Overview
The following table provides an overview of the product setup/installation tasks.
Step Task Document Reference and Notes
| 1 Verify that the installation site meets product requirements Product Regulatory Compliance and Safety; Setup Guide Appendix B | |
| 2 Prevent electrostatic discharge Setup Guide Appendix C | |
| 3 Install the controller enclosure and optional drive enclosures in a rack, and attach the enclosure bezel | |
| a. Install the rail kit provided with the controller enclosureb. Install enclosures and secure them into the rack | Instructions provided in the rackmount bracket kit |
| c. Install the drive modules into the enclosure(s).d. Connect the enclosures.e. Install enclosure bezels | Setup Guide |
| 4 Install additional drives and options, including qualified SFP transceivers | Setup Guide |
| 5 Connect power cords | |
| 6 Test enclosure connectivity | |
| 7 Connect hosts | |
| 8 Connect remote management hosts | |
| 9 Use the CLI to set IP values for controller network ports.* | |
| 10 Use the CLI to set the host interface protocol | |
| 11 Use the web-browser interface to update firmware | |
| 12 Use the web-browser interface and/or command line interface (CLI) to configure and provision the storage systemNote: Might need to apply the proper profile set through a QSP | Disk Management Utility Guide |
| 13 If licenses are required, complete the following:a. Acquire the license authorization code(s) and file(s).b. Apply the license files. | Disk Management Utility Guide |
*If you cannot access the QX and QXS Setup Guide, use the following quick-reference information.
| Terminal emulator settings to access the CLI Default user name, password | Controller IP values | |
| Display settings: mode: VT100 or ANSI; font: Terminal; translation: None; columns: 80 | manage, !manage | Default values: controller A IP address 10.0.0.2; controller B IP address 10.0.0.3; netmask 255.255.255.0; gateway 10.0.0.1 |
| Connection settings: port: COM3 (for example); baud (bit/sec): 115,200; data bits: 8; parity: None; stop bits: 1; flow control: None | Syntax to set IP values for controller A: set net ip IP-address netmask subnet-mask gateway gateway-address controller a | |
Important Firmware Notes
Note: The firmware bundle for the QXS-312, QXS-324, QXS-412, QXS-424, QXS-448, and QXS-456 systems is different from the QXS-648 and QXS-656 systems.
Always check the release notes before installing firmware.
Always update controller firmware when:
• Installing a new system
- Adding drive expansion(s)
- Replacing a controller I/O module(s) or expansion I/O module(s)
Note: Updating controller firmware with expansion I/O modules active ensures that the controller firmware and expansion I/O module firmware are at a compatible level.
Firmware Files
If you need to update firmware, make sure to download the firmware files from the Quantum website:
- Go to: Support Tab > Download Software, Firmware, Drivers, and Documentation:
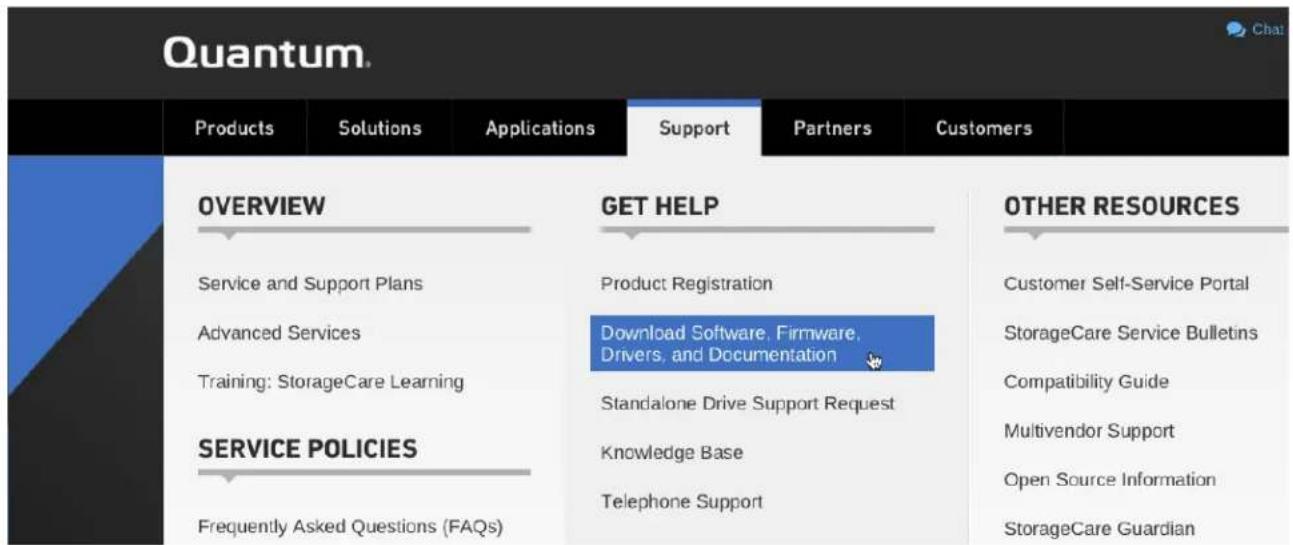
- Select, StorNext Scale-Out Storage and StorNext Q-Series form the drop-down menus:

Download Software, Firmware, Drivers, and Documentation for Your Product

Refer to the following documents and sections for firmware updates.
- Disk Management Utility Guide V3, Updating controller module firmware section
- Disk Management Utility Guide V2, Updating firmware section
Basic Operations and Troubleshooting
For detailed information on troubleshooting steps and fault isolation, refer to the "Troubleshooting" chapter in the QX and QXS Setup Guide. Use "Appendix A LED description" for the location and definition of chassis LEDs.
LEDs visible from the front, include:
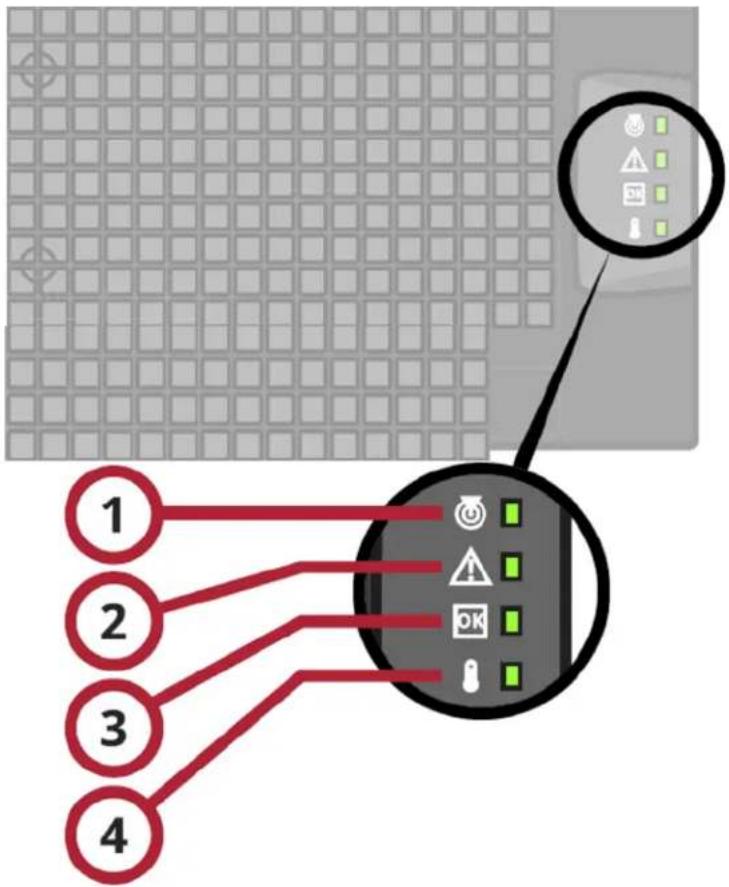
LEDs Description Definition
| 1 Unit Locator White blink — Enclosure is identifiedOff — Normal operation | |
| 2 Fault/ServiceRequired | Amber — OnEnclosure-level fault condition exists. The event has been acknowledged but the problem needs attention.Off — No fault condition exists. |
| 3 FRU OK Green — On | The enclosure is powered on with at least one power supply operating normally.Off — Both power supplies are off; the system is powered off. |
| 4 TemperatureFault | Green — OnThe enclosure temperature is normal.Amber — OnThe enclosure temperature is above threshold. |
Provisioning the System/Storage Profiles
You can provision your system by using one of the following methods:
- Using the One Button Configuration Feature: This feature is designed to set up drive profiles that make efficient use of the number of drives and SSDs in the QXS systems. It provides a convenient method for creating StorNext volumes. You will select the profile for the desired volume and click a button. The following events are triggered:
• A RAID vdisk is created.
• A volume or volumes are created.
- The logical unit LUN is mapped to the host ports.
- A StorNext label is written to the volume(s) for the default profiles.
- New profiles can be created to meet customer needs/requirements.
- A StorNext label is not written to new profiles.
- New profiles might issue a warning if the number of global spares is not configured.
- StorNext default profiles do not use this functionality.
• Refer to the disk management utility guide for information on global spares.
- Using the Provisioning Wizard: The Provisioning Wizard helps you create a vdisk with volumes and to map the volumes to hosts.
- Before using this wizard, read documentation for your product to learn about vdisks, volumes, and mapping.
- Then plan the vdisks and volumes you want to create and the default mapping settings you want to use.
Note: You must use the command line interface (CLI) to set up read cache for the QXS-312 and QXS-324 systems.
Refer to the QX and QXS CLI Reference Guide for additional information.
One-button Configuration Features
The One-Button Configuration is a feature that provides a:
- User-initiated one-button configuration for Quantum's QXS arrays
- Quick customer-initiated set-up of StorNext volumes
• Quantum-exclusive feature
• WBI to be used with the QXS systems - All default profiles are StorNext profiles.
- Default profiles can be replaced as needed.
- Normally, default profiles are set up at installs.
Table 2 below provides the One Button Configuration for the nine default storage profiles:
Table 2: Storage Profiles (Default)
| Profile Vdisk Chunk | size | 12-Drive System | 24-Drive System | 48-Drive System | 56-Drive Systems |
| StorNext Metadata 1+1 RAID1 N/A Yes Yes Yes Yes | |||||
| StorNext Data 10+2 RAID6 256k Yes Yes Yes Yes | |||||
| StorNext Data 12+2 RAID6 256k No No No | Yes | ||||
| StorNext Data 4+2 | RAID6 256k Yes Yes Yes Yes | ||||
| StorNext Data 5+2 | RAID6 256k Yes Yes Yes Yes | ||||
| StorNext Data 8+2 | RAID6 128k Yes Yes Yes Yes | ||||
| StorNext MultiVolume 10+2 | RAID6 256k Yes Yes Yes Yes | ||||
| StorNext MultiVolume 12+2 | RAID6 128k No No No | Yes | |||
| StorNext Archive MultiVolume 10+2 | RAID6 128k Yes Yes Yes Yes | ||||
Note: The QXS system can use the nine pre-defined profiles if the correct number of drives are installed to support the RAID type.
One-button Configuration Documents
Refer to the following documents and sections for the provisioning process.
- Disk Management Utility User Guide V3, Using the One Button Configuration section
- Disk Management Utility User Guide V2, Using the One Button Configuration section
Contacting Quantum Support
More information about this product is available on the Service and Support website at www.quantum.com/support.
The Service and Support Website contains a collection of information, including answers to frequently asked questions (FAQs). For further assistance, or if training is desired, contact Quantum:
| North America 1-800-284-5101 (toll free) | +1-720-249-5700 |
| Europe, Middle East, and Africa (EMEA) +800-7826-8888 (toll free) | +49-6131-3241-1164 |
| Asia Pacific (APAC) +800-7826-8887 (toll free) | +603-7953-3010 |
| India 000-800-001-6014 (toll free) | +603-7953-3010 |
| For additional contact information: www.quantum.com/support | |
| To open a Service Request: www.quantum.com/osr | |
For the most updated information about Quantum Global Services, please visit www.quantum.com/support.
- QX and QXS Getting Started Guide
- QX and QXS Systems
- Related Documentation
- Systems and Included Hardware
- Available Systems
- RAID Chassis Hardware
- Expansion Chassis Hardware
- Item Quantity
- Connectivity Options
- Drive Options
- Licensing
- Licensing is as follows:
- Locating System Serial Number
- Installation and Product Setup
- Introduction
- General Information
- Installation Overview
- Important Firmware Notes
- Firmware Files
- Download Software, Firmware, Drivers, and Documentation for Your Product
- Basic Operations and Troubleshooting
- Provisioning the System/Storage Profiles
- One-button Configuration Features
- One-button Configuration Documents
- Contacting Quantum Support
Brand : QUANTUM
Model : Xcellis QXS-412
Category : Disk array