
SC5295-E - Uncategorized INTEL - Free user manual and instructions
Find the device manual for free SC5295-E INTEL in PDF.


| Product Type | Entry Server Chassis |
| Model | SC5295-E |
| Brand | Intel |
| Form Factor | 5U Rackmount |
| Dimensions (H x W x D) | 8.75 x 17.2 x 19.6 inches |
| Weight | Approximately 25 lbs (11.3 kg) |
| Supported Server Boards | Intel® Server Boards SE7320EP2, SE7520RP2, SE7525RP2, etc. |
| Drive Bays | Up to 4 hard drives, 1 CD-ROM/DVD-ROM, 1 floppy drive |
| Power Supply | Standard ATX power supply (not included) |
| Cooling | System fan (removable) |
| Front Bezel | Removable with clips |
| Side Cover | Sliding with latch and shipping screws |
| PCI Card Guide | Removable with blue bars |
| CPU Ducts | Two ducts for optimal airflow |
| Hard Drive Cage | Removable for easy installation |
| Maintenance | Clean dust from vents and fans regularly |
| Safety Precautions | Observe ESD procedures; service only by qualified personnel |
| Warranty | 3-year limited warranty with Advanced Replacement |
| Year Released | 2005 |
| Compliance | RoHS compliant (assumed) |
Frequently Asked Questions - SC5295-E INTEL
User questions about SC5295-E INTEL
0 question about this device. Answer the ones you know or ask your own.
Ask a new question about this device
Download the instructions for your Uncategorized in PDF format for free! Find your manual SC5295-E - INTEL and take your electronic device back in hand. On this page are published all the documents necessary for the use of your device. SC5295-E by INTEL.
USER MANUAL SC5295-E INTEL
Intel® Entry Server Chassis SC5295-E UP/DP/WS/BRP Quick Start User's Guide
Thank you for buying the Intel® Entry Server Chassis SCS296-E. The following information will help you to prepare your chassis for integration with your selected Intel® Server Board.
These guides and other supporting documents (including a list of supported server boards) are located on the web at http://support.intel.com/support/motherboards/server.
If you are not familiar with ESD (Electrostatic Discharge) procedures used during system integration, please see the Intel® Entry Server Chassis SC6295 E User Guide, available on the CD or at http://support.intel.com/gx/serverbuilder.
Warning
Read all caution and safety statements in this document before performing any of the instructions. Also see the Intel® Server Board and Server Chassis Safety Information document at http://support.ltl.com/support/mathorboard/sower/sbys-610/70.htm for complete safety information.
Warning
installat or and service this product to be scored only by qualified service personnel to avoid risk of injury from electrical shock or energy hazard.
Caution
Observe normal ESD (Electrostatic Discharge) procedures during system integration to avoid possible damage to server board and/or other components.
Tools Required

Intel® Server Board Guide
| InteGO Server BoardPro | |
| SOS235UP | S1/7508H11 |
| SOS235DP | S1/7508P2, S1/7508P2 |
| SOS235AS | S1/7508RP2 |
| SOS235BIP | S17320E72, S17320B32 |
Building Value With Intel Server Products, Programs and Support
Got Inc high value server solutions you need by taking advantage of the outstanding value into products to system integrators: • High-qua by server building blocks • Features broadband and server building blocks • Solutions and looks to enable e-Business • Intel Server Management • Comprehensive training services • Worldwide 20k/technical support (M&T Country Code - 1308 Bbl 600) • We list-class service, including a three-year limited warranty and Advanced Warranty Replacement! For more information on Intel's works-value server offerings visit, the Intel Server Button website as www.intel.comwarebu.edu
Int'l ServerBuilder is your one else shop for information about all other Server Building Blocks such as: - Product Information, including product risks and technical product specifications - Sales data, such as revenue and presentations - Training information, such as the risk® Online Learning Center - Support recommendation and much more
Available role in Irish Channel Process Habors, Helvians, Hohens, Wodans, Wink
2
Remove Front Bezel Assembly
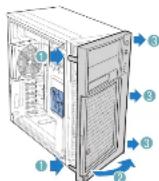
1 Change up hot local hits from bellside of chasmis. 2 Roll a left side of front head assembly to have a nightly. 3 Change up heat band clips that shall still a right side of the belt to the right side of the channels and remove.
1
Remove Side Cover
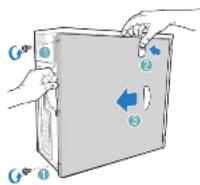
1 Remove two shipping screws. 2 Push in latch. 3 Slide side cover return and
3
Remove Hard Drive Cage
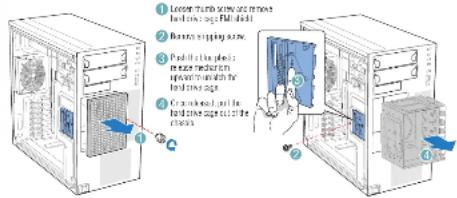
4
Install CD-ROM or DVD-ROM Drive
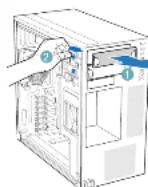
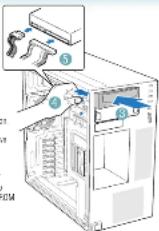
5
Install Floppy Drive
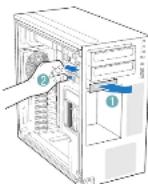
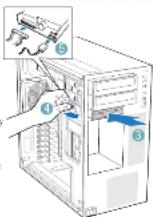
6
Remove System Fan
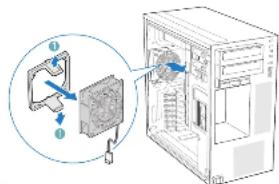
1 Press two trackel labs outward and remove system fan.
7
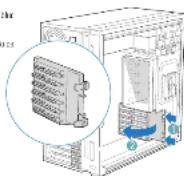
Remove PCI Card Guide

1 Press in on two blue bars. 2 Pull PCI Card Stores forward and remove from close.
8
Install Server Board

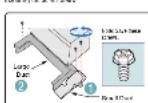
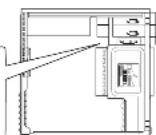
1 Remove the small dual (one screw). 2 Remove the large dual (two screws).
Part A: Remove GPU Duds Note: The CPU utilization is not useful for intelligence was hard.
Farl E: Install Server Burani
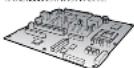
See your Info® Server Bond Guide for Start User's Guide for server board installation instead one and installation of the back panel (V) slot 2.
Use the mounting stews, burpers and skor cells [I necessary] that come with your chADS to serve the snow heart in the chADS.
Open the IMAP Server Board No. Follow the instructions in the workload for a Server Board Quick Start User's Guide and return to the document and EBITDA.
Part C: Install CPL Duots

DO NOT USE WITH A PERSPECTRICAL SERVICE OF THE
HIN® Protection During 31
1. I have the hope: 25% find a choice set like 1 and 2 low number being in place
② Attach to chassis using the two screws you saved two Pcs.4.
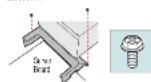
Only required for Intel ^® Server Boards SE7320EP2 and SE752SRP2.
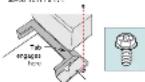
- Lower the small C-U dust in to debris and line up with mounting hole in cross-
Note: Tab on serial CPU must engage corresponding spacing in bits: C^2 will find. - A disc in close using the single screw tool saved from Part A.
In this case, the information of Intel Corporation for the subsidiaries in the United States and other countries. "Cite" means and bonds may be deemed as the security of them. Copyright © 2005, and Corporation. All rights reserved.

Brand : INTEL
Model : SC5295-E
Category : Uncategorized