
e121 - Mobile Phone NEC - Free user manual and instructions
Find the device manual for free e121 NEC in PDF.


| Product Type | Mobile Phone |
| Brand | NEC |
| Model | e121 |
| Dimensions | Approx. 100 x 45 x 15 mm |
| Weight | Approx. 75 g |
| Battery Type | Li-Ion removable |
| Battery Capacity | 600 mAh |
| Display Type | Monochrome LCD |
| Display Size | 1.5 inch |
| Camera | No |
| Connectivity | GSM 900/1800 |
| Memory | Internal: 1 MB, No expansion slot |
| Operating System | Proprietary |
| Charger Connector | Proprietary |
| Headphone Jack | 2.5 mm |
| Materials | Plastic |
| Maintenance | Clean with dry soft cloth. Do not use liquids. |
| Safety | Turn off in hospitals, aircraft, and gas stations. |
| Spare Parts | Battery and charger only |
| Repairability | Limited; battery and SIM accessible |
Frequently Asked Questions - e121 NEC
User questions about e121 NEC
0 question about this device. Answer the ones you know or ask your own.
Ask a new question about this device
Download the instructions for your Mobile Phone in PDF format for free! Find your manual e121 - NEC and take your electronic device back in hand. On this page are published all the documents necessary for the use of your device. e121 by NEC.
USER MANUAL e121 NEC
| Important Information 5 | |
| Safety And Precautions 6 | |
| Before You Start 9 | |
| Getting Started 16 | |
| Basic Calls and Phone Use 21 | |
| Call Options 27 | |
| Personalizing Settings 29 | |
| Text Entry 42 | |
| Message | 45 |
| WAP Service 54 | |
| Camera | 58 |
| My data 61 | |
| Phonebook | 65 |
| JavaTM | 72 |
| Accessory | 75 |
| Index | 83 |
Important Information 5
Read this information before using your phone .... 5
Safety And Precautions 6
Emergency services 6
General care 6
Aircraft safety 6
Hospital safety 6
General safety 6
Road safety 7
Vehicles equipped with an air bag 7
Third party equipment 7
Service 7
Non-ionizing radiations 7
Efficient use 7
Radio frequency energy 7
Exposure to Radio Frequency Energy 7
Before You Start 9
Cellphone system structure 9
Parts and functions 10
Display information 10
Key functions 11
Main menu 11
Keypad shortcuts 12
Main phone features 13
Displayed icons for LCD 14
Overview of menu function 15
Getting Started 16
SIM card 17
Preparing the battery 18
Powering on the phone 20
Basic Calls and Phone Use 21
Making an emergency call 21
Dialing calls 21
Ending a call 21
Using handsfree 22
Receiving calls 22
Placing a call on hold 23
Making a second call 23
Receiving a second call (subscription dependent) .....23
Making multi-party calls (subscription dependent) .....23
Unsuccessful calls/Auto redial ....23
International dialling service 24
Scratchpad number 24
Call features 25
Keylock/Auto key lock 26
Screen Saver 26
Call Options 27
Dialed calls 27
Call lists 27
Time/charge 28
Charge settings 28
Personalizing Settings 29
Voice volume 29
Answer options 29
Minute reminder 29
Auto key lock 30
ALS setup 30
Time/date 30
FAK setting 31
Language 31
Phone modes 32
Power on greetings/animations 34
Wallpaper 34
Color style 35
Animation 35
Brightness 35
Contrast 35
Calls 36
Security 38
Network 40
T9 input 41
Reset settings 41
Text Entry 42
Mode change 42
Text edit screen options menu 42
T9 language 43
Normal text input 44
Message 45
Message overview 45
Receiving and reading a message ....47
Predefined text ....50
Message settings ....50
Memory status ....52
Cell broadcast ....52
WAP Service 54
WAP setup ....54
Logging on to WAP site 56
WAP push ....57
GPRS info ....57
Transfer rate ....57
Camera 58
Taking a picture ....58
Camera (before taking a picture) 59
Camera options menu (after saving a picture) .....60
My data 61
Photos and pictures ....61
Sounds 62
Record voice 63
Memory status 64
Phonebook 65
Lists 65
Creating a new phonebook record 66
Calling phone numbers from phonebook 69
Editing phonebook entries 70
Java™ 72
Java™ 72
Folders options menu 73
Playing games 73
Accessory 75
Camera 75
Scheduler 75
ToDo list 76
Notepad 77
Alarm clock 78
Auto off 79
Auto on 79
Countdown 79
Stopwatch 79
Calculator 80
Currency converter 81
Composer 81
Voice memo 81
Index 83
Important Information
Read this information before using your phone
Conditions of Use
Operation of this NEC mobile phone is subject to the following two conditions; (1) this device may cause harmful interference, and (2) this device must accept any interference received, including interference that may cause undesired operation. This NEC mobile phone generates, uses and can radiate radio frequency energy and, if not installed and used in accordance with the instructions, may cause harmful interference to radio or television reception, which can be determined by turning the device on and off, the user is encouraged to try to correct the interference by one or more of the following measures:
1 Reorient or relocate the receiving internal antenna.
2 Increase the distance between the device and receiver.
3 Connect the device into an outlet on a circuit different from that to which the receiver is connected.
4 Consult the dealer or an experienced radio/TV technician for help. The radiated output power of this internal wireless radio is far below the FCC radio frequency exposure limits. Nevertheless, the wireless radio shall be used in such a manner that the radio is 2.5 cm or further from the human body. However, the user of wireless radios may be restricted in some places or situations, such as aboard airplanes. If you are unsure of restrictions, you are encouraged to ask for authorization before turning on the wireless radio. Several restrictions and cautions of using mobile phone are listed in the Safety and Precautions in the next chapter.
FCC RF Exposure Information
In August 1996 the Federal Communication (FCC) of the United States with its action in Report and Order FCC 96-326 adopted an updated safety standard for human exposure to radio frequency (RF) electromagnetic energy emitted by FCC regulated transmitters. Those guidelines are consistent with the safety standard previous set by both U.S. and international standards bodies. The design of this phone complies with the FCC guidelines and these international standards.
Use only the supplied or an approved internal antenna. Unauthorized antennas, modifications, or attachments could impair call quality, damage the phone, or result in violation of FCC regulations.
Body-worn Operation
This device was tested for typical body-worn operations. To comply with FCC RF exposure requirements, a minimum separation distance of 0.6 inches (1.5 cm) must be maintained between the user's body and the phone, including the antenna. Third-party belt-clips, holsters, and similar accessories used by this device should not contain any metallic components. Body-worn accessories that do not meet these requirements may not comply with FCC RF exposure requirements and should be avoided.
For more information about RF exposure, please visit the FCC website at www.fcc.gov.
Declaration of Conformity
The product was shown to meet the requirements of the R&TTE Directive through third party tests to harmonized standards.
Hereby, Quanta Computer Inc., declares that this NEC mobile phone is in compliance with the essential requirements and other relevant provisions of Directive 1999/5/EC.
Safety And Precautions
Emergency services
To make an emergency call in any country:
• Press 112, the worldwide emergency number.
- Ask the operator for the service which you require: Police, Ambulance, Fire Brigade, Coastguard or Mountain Rescue Services. Give your location and, if possible, remain stationary to maintain phone contact.
The 112 emergency number service is available on every digital network service. The number 999 is an alternative emergency number for UK only, and can only be used with a valid SIM card.
- Due to the nature of the cellular system, the success of emergency calls cannot be guaranteed.
- For customized local emergency numbers, please check with your local units for the number.
General care
A cellphone contains delicate electronic circuitry, magnets, and battery systems. You should treat it with care and give particular attention to the following points.
- Do not allow the phone or its accessories to come into contact with liquid or moisture at any time.
- Do not place anything in the phone.
- Do not expose your phone to extreme high or low temperatures.
- Do not expose your phone to naked flame, cigars or cigarettes.
- Do not paint your phone.
- Do not drop or subject your phone to rough treatment.
- Do not place the phone alongside computer disks, credit cards, travel cards and other magnetic media. The information contained on disks or cards may be affected by the phone.
- Do not leave the phone or the battery in places where the temperature could exceed 60 degrees celsius; e.g. on a car dashboard or on a window sill, behind glass in direct sunlight, etc.
- Do not remove the phone's battery while the phone is switched on.
- Take care not to allow metal objects, such as coins or key rings, to contact or short-circuit the battery terminals.
- Do not dispose battery packs in a fire. Your phone's Li-ion batteries may be safely disposed at Li-ion recycling points.
- Do not put your phone's battery in your mouth as battery electrolytes may be toxic if swallowed.
-
Do not attempt to dismantle the phone or any of its accessories.
-
This equipment is fitted with an internal battery that can only be replaced by a qualified service engineer. There is a risk of explosion if the battery is replaced by an incorrect type. Disposal of used battery must be in accordance with the manufacturer's instructions.
- Using any battery pack, AC adapter or vehicle power adapter (option) not specified by the manufacturer for use with this phone creates a potential safety hazard.
- The earpiece may become warm during normal use and the unit itself may become warm during charging.
- Use a damp or anti-static cloth to clean the phone. Do NOT use a dry cloth or electrostatically charged cloth. Do not use chemical or abrasive cleaners as these could damage the casing.
• Recycling: the cardboard packaging supplied with this phone is ideal for recycling. - Do not leave the battery pack empty or disconnected for a long time, otherwise certain data may be initialized.
- Your phone contains metal which may cause itching, rashes or eczema depending on your constitution or physical condition.
- Take care not to put your phone in the back pocket of your trousers or skirt and then sit on it. Also, do not put your phone at the bottom of a bag which may be subjected to excessive weight or pressure. Doing so may damage the LCD and camera lens and cause them to malfunction.
Aircraft safety
- Switch off your cellphone and remove its battery when inside or near the aircraft. The use of cellphones in the aircraft is illegal. It may be dangerous to the operation of the aircraft and may disrupt the cellular network.
Failure to observe this instruction may lead to suspension or denial of cellphone service to the offender, or legal action, or both. - Do not use your phone on the ground without the permission of the ground crew.
Hospital safety
- Switch off your phone in areas where the use of cellphones is prohibited. Follow the instructions given by the respective medical facility regarding the use of cellphones on their premises.
General safety
- Observe "Turn off 2-way radio" signs, such as those near stores of fuel, chemicals or explosives.
- Do not allow children to play with the phone, charger or batteries.
- Small parts are included in your phone. Keep them out of reach of small children, for whom it could cause a choking hazard.
-
The operation of some medical electronic devices, such as hearing aids and pacemakers, may be affected if a cellphone is used next to them. Observe any warning signs and manufacturer's recommendations.
-
If you have a weak heart, you should take extra precautions when setting functions such as the Vibrator and Ringer volume functions for incoming calls.
- If you set the Vibrator setting to anything other than OFF, be careful that the phone is not near a source of heat (e.g. a heater) and that it does not fall from a desk due to the vibration.
Road safety
- You MUST exercise proper control of your vehicle at all times. Give full attention to driving.
- Observe all the recommendations contained in your local traffic safety documentation.
- Pull off the road and park before making or answering a call if driving conditions so require.
- You MUST NOT stop on the hard shoulder of a motorway to answer or make a call, except in an emergency.
- Switch off your cellphone at the refuelling point, such as a petrol station, even if you are not refuelling your own car.
- Do not store or carry flammable or explosive materials in the same compartment where a radio transmitter is placed, such as a cellphone.
- Electronic vehicle systems, such as anti-lock brakes, speed control and fuel injection systems are not normally affected by radio transmissions. The manufacturer of such equipment can advise if it is adequately shielded from radio transmissions. If you suspect vehicle problems caused by radio transmissions, consult your dealer and do not switch on your phone until it has been checked by qualified and approved installers.
Vehicles equipped with an air bag
An air bag inflates with great force. Do not place objects, including either installed or portable wireless equipment, in the area over the air bag or in the air bag deployment area. Improper installation of wireless equipment in vehicle could result in serious injury when the air bag inflates.
Third party equipment
The use of third party equipment, cables or accessories, not manufactured or authorised by NEC, may invalidate the warranty of your cellphone and also adversely affect the phone's operation. For example use only the NEC mains cable supplied with the AC charger.
Service
The cellphone, batteries and charger contain no user-serviceable parts. We recommend that your NEC cellphone be serviced or repaired by an NEC authorised service centre. Please contact your service provider or NEC for advice.
Non-ionizing radiations
The radio equipment shall be connected to the antenna via a non-radiating cable (e.g. coax). The antenna shall be mounted in a position such that no part of the human body will normally come into contact with any part of the antenna unless there is an intervening metallic screen, for example, the metallic roof.
Use only the internal antenna that has been specifically designed for your phone. Use of unauthorized antennas, modifications or attachments could damage the mobile phone and may violate the appropriate regulations, causing loss of performance and radio frequency (RF) energy above the recommended limits.
Efficient use
For optimum performance with minimum power consumption, please note the following:
- Your phone has the internal antenna. Do not cover part of the internal antenna of the phone with your hands. This affects call quality, may cause the mobile phone to operate at a higher power level than needed and may shorten talk and standby times.
Radio frequency energy
Your phone is a low-power radio transmitter and receiver. When it is turned on, it intermittently receives and transmits radio frequency (RF) energy (radio waves). The system that handles the call controls the power level at which the phone transmits.
Exposure to Radio Frequency Energy
Your phone is designed not to exceed the limits for exposure to RF energy set by national authorities and international health agencies. * These limits are part of comprehensive guidelines and establish permitted levels of radio wave exposure for the general population. The guidelines were developed by independent scientific organizations such as ICNIRP (International Commission on Non-Ionizing Radiation Protection) through periodic and thorough evaluation of scientific studies. The limits include a substantial safety margin designed to assure the safety of all persons, regardless of age and health, and to account for any variations in measurements.
*Examples of radio frequency exposure guidelines and standards that your phone is designed to conform to:
- ICNIRP, “Guidelines for limiting exposure to time-varying electric, magnetic, and electromagnetic fields (up to 300 G Hz)-International Commission on Non-Ionizing Radiation Protection (ICNIRP)”. Health Physics, vol. 74. pp, 494-522, April 1998.
- 99/519/EC Council Recommendation on the limitation of exposure to the general public to electromagnetic fields 0 Hz-300 GHz, Official Journal of the European Communities, July 12, 1999.
- ANSI/IEEE C95.1-1992. "Safety levels with respect to human exposure to radio frequency electromagnetic fields, 3kHz to 300 GHz". The Institute of Electrical and Electronics Engineers Inc., New York, 1991.
• FCC Report and Order, ET Docket 93-62, FCC 96-326, Federal Communications Commission (FCC), August 1996.
- Radio communications (Electromagnetic Radiation Human Exposure) Standard 2003, Australian Communications Media Authority.
Licenses
- T9® Text Input and the T9® logo are registered trademarks of Tegic Communication. "T9® Text Input is licensed under one or more of the following: U.S. Pat. Nos. 5,187,480, 5,818,437, 5,945,928, 5,953,541, 6,011,554, 6,286,064, 6,307,548, 6,307,549, and 6,636,162, 6,646,573; Australian Pat. Nos. 727539, 746674, and 747901; Canadian Pat. Nos. 1,331,057, 2,302,595, and 2,227,904; Japan Pat. No. 3532780, 3492981; United Kingdom Pat. No. 2238414B; Hong Kong Standard Pat. No. HK1010924; Republic of Singapore Pat. No. 51383, 66959, and 71979; European Pat. Nos. 0 842 463 (96927260.8), 1 010 057 (98903671.0), 1 018 069 (98950708.2); Republic of Korea Pat. Nos. KR201211B1 and
KR226206B1. People's Republic of China Pat. Application Nos. 98802801.8, 98809472.X and 96196739.0; Mexico Pat. No. 208141; Russian Federation Pat. No. 2206118; and additional patents are pending worldwide"
• OPENWAVE™ is a registered trademark of Openwave Systems Inc.

OPENWAVE
②1991-2402
RSA RSAE Enablod

• JBed _+ Copyright 2000-2004 Esmertec, AG.
- J a V ^TM and all Java-based trademarks and logos are trademarks or registered trademarks of Sun Microsystems, Inc. in the U.S. and other countries.
For the purpose of improvement, the specifications for this product and its accessories are subject to complete or partial change without prior notice.
Before You Start
Cellphone system structure
Every time you use your phone, there are several components involved for the phone to operate successfully and to process a call:

flowchart
graph LR
    A["NEC Mobile Phone"] --> B["Service provider Network"]
    B --> C["WAP Service Provider"]
    A <--> B
    C -.-> B
    style A fill:#f9f,stroke:#333
    style B fill:#ccf,stroke:#333
    style C fill:#cfc,stroke:#333
All the features described in this user manual are supported by your phone. However, for all these features to work, you must have a valid SIM card (supplied by your service provider) that also supports these features. If the network that transmits your calls does not support a certain feature, the feature will not work even if you have a fully featured SIM card. This last point is especially important when you are roaming networks.

User guide legend
This type of paragraph contains important information.
This type of paragraph contains information worth noting.
This type of paragraph contains details of where to find related information to the topic being explained.
Parts and functions

The phone supports a number of languages and the keyboard symbols have been chosen for world-wide operation.
Display information
LCD graphic display area
This area contains the greetings graphic on power up, status graphics, as well as information when searching for networks and making calls. The standby screen shows the current network, vibrator status, current active mode, current time and date and whatever you have keyed using the phone's keypad.
Status icon area
This area contains icons that indicate battery strength, new SMS or MMS messages received, new voice mail or WAP status messages received, whether GPRS is activated, connection status, network signal strength, etc.
Help and softkey area
Depending on the current mode, this area contains applicable information or context dependent softkey functions. When "Menu" is displayed above the Left Softkey area of the LCD, press Left Softkey to access the available options under "Menu".
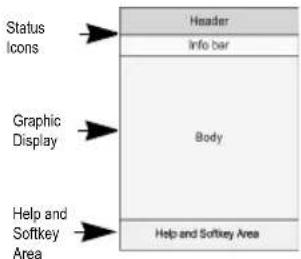
flowchart
graph TD
    A["Status Icons"] --> B["Header"]
    A --> C["Info bar"]
    D["Graphic Display"] --> E["Body"]
    F["Help and Softkey Area"] --> G["Help and Softkey Area"]
The title of the selected options will be displayed in the header.
Key functions
The following describes the key functions of the navigation keys and left/right Softkeys and other keys of your phone:
▶ navigation key: Press to scroll left or move the cursor to the left of the screen. Also serves as a shortcut key to Message menu from the standby screen.
▶ navigation key: Press to scroll right or move the cursor to the right of the screen. Also serves as a shortcut key to Phonebook menu from the standby screen.
▲ navigation key: Press to scroll up or move up the cursor. Also serves as a shortcut key to Phone modes menu from the standby screen.
▼ navigation key: Press to scroll down or move down the cursor. Also serves as a shortcut key to My data menu from the standby screen.
☐ Centre key: Press to confirm the function or toggle your desired function On/Off in the each menu screen. Also serves as a shortcut key to Camera menu from the standby screen.
(End or On/Off) key: Press to return to the standby screen in a function or end a call. Press and hold to power on/off the phone.
(Call) key: Press to make a call. Press from the standby screen to display the Dialed calls list.
Left Softkey: Press to activate the function displayed on the screen directly above it (bottom left of the screen). Also serves as a shortcut key to the main menu from the standby screen.
Right Softkey: Press to activate the function displayed on the screen directly above it (bottom right of the screen). Also serves as a shortcut key to Browser from the standby screen.
The phone will return to standby mode when 6 key is pressed, but not when the phone is in the following functions: SMS/MMS/JAVA ^™ editor, MFE (Multi-field editor), Call control, etc.
Main menu
The menu structure starts with the main menu. Main menu consists of nine different display screens that indicate main functions. To access each main menu function, press 🔒 key from the standby screen. When the settings screen is displayed, use the ▲ and ▼ navigation keys to scroll through the main menu functions or press number keys (1-9) to access the following menus.
The following describes the main menu screens in the order of appearance:
1 Settings: provides various settings of your phone. Refer to page 29 for details.
2 My data: displays the list of sound and picture files stored in your phone. Refer to page 61 for details.
3 Message: provides messaging functions. Refer to page 45 for details.
4 Browser: provides access to WAP network. Refer to page 54 for details.
5 Camera: provides access to the camera function. Refer to page 58 for details.
6 Phonebook: displays, adds and edits the list of phonebook entries. Refer to page 65 for details.
7 Java ^™ : provides access to Java ^™ . Refer to page 72 for details.
8 Accessory: provides appointments, notes and more functions. Refer to page 75 for details.
9 STK: provides SIM related functions (This menu will not appear if your SIM card does not support the STK function).
Main menu screens, menus, check boxes/radio buttons
The different functions and settings of your phone can be accessed by selecting Options menus, and check boxes / radio buttons:
- Main menu screens
A screen represents a category or a particular function. To access each main menu function, press ☐ key from the standby screen. When the settings screen is displayed, use the ▲ and ▼ navigation keys to scroll through the main menu functions. Then press ☐ key/Left Softkey to confirm. Alternatively, press the number keys when the Settings screen is displayed.
- Options menus
A menu is a named link to a function or setting. The different types of Options menu operations include: accessing a function, adjusting levels, selecting an option, and to toggle a function on or off. To select a menu, move the navigation key to highlight the required option and press Left Softkey or the corresponding shortcut number key designated for the Options menu.
- Check box/ Radio button
A check box enables / disables an option as displayed in the Options menu and multiple check boxes can be selected at the same time. Selecting a radio button automatically cancels the previous selection, hence only one radio button can be selected at one time. A check box / radio button option can be selected / canceled by highlighting it and pressing Left Softkey.
Options menu operation example
Changing of the phone modes using the Options menu is carried out as follows:
• From the standby screen, press ▲ key.
- Press Left Softkey to access the Options menu for Phone modes.
- Select Activate to activate the phone mode, or Change settings to edit the phone mode settings.
Keypad shortcuts
The following single key shortcuts are available from the standby screen (the screen that automatically appears when the phone is on and not in use)
- Press the ◀ navigation key to access Message.
- Press the ▶ navigation key to access the phonebook.
- Press the ▲ navigation key to access Phone modes.
- Press the ▼ navigation key to access My data.
- Press the key to access Camera.
- Press the Left Softkey to access the main menu.
- Press the Right Softkey to access Browserunless you have a missed call/appointment/alarm or a new message to read.
- Press key once to access the Dialed calls list.
- Press key twice to redial the last called number.
-
Press and hold the ▲ navigation key to switch on/off all signal tones.
-
Press and hold 0 to enter + when making an international call.
- Press and hold 1 to call the voice mail centre.
- Press and hold # to lock/unlock the keypad.
- Press and hold * to access the ALS setup screen.
- Press and hold 2-9 number keys to access already set FAK (fast access key) functions. For FAK setting, please see page 31.
Main phone features
The GSM/GPRS phone can be used in almost any part of the world with the Tri-band (GSM 900/1800/1900 bands) features.
Your phone has the following features:
• 2 Softkeys
- Li-ion Battery
• Alternate Line Service (ALS) compatible
- Calculator
- Caller ID alert and vibrator
- Currency converter
• Date, Time & Alarm functions
• Phonebook pictures and ring tones
• LCD screen: 128 (width) by 160 (height) pixels with 65,000 colours
- Camera: 300,000 pixels
- Messaging (SMS, EMS, MMS)
- Short Messaging Service (SMS)
• Enhanced Messaging Service (EMS)
• Multi-media Messaging Service (MMS)
• Multi-party call capability (conference call)
- Scheduler, ToDo list, Notepad
- Alarm clock, Auto off, Auto on, Countdown, Stopwatch
- Composer
- Voice memo
• 40-layer polyphonic ring tones - Wallpapers
• Power on animations - Picture caller ID
• Phonebook (can store up to 250 records) - SIM memory phonebook (can store up to 255 records, depending on the SIM capacity)
- T9® Text Input
• Phone mode settings (Normal, Meeting, Pocket and Car) - Voice mail
- WAP browser
• Java ^TM
Displayed icons for LCD
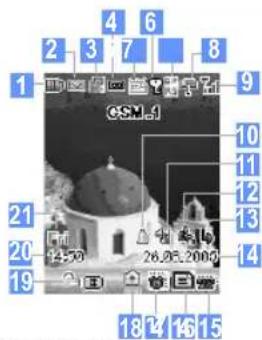
1 Indicates the battery level.
Appears when charging.

Indicates the battery charging status (error, stopped).
2 New message on server



3 MMS over CSD on server


4 (red) New voice messages in voice mail (No ALS or ALS1)

New voice messages in voice mail (ALS2)
5 WAP Alert
6 Indicates secured communication on SSL.
7 |G P (blue)
|P S|
GPRS attached
|G P (pink)
|P S|
PDP context activated
8 Line status GSM (No ALS or ALS1) Line status GSM (ALS2)
9 T × Out of range T T T T T T Signal strength
10 Alarm setting
11 Vibrate mode ON Silent indication Vibrate ON, Silen
12 Meeting mode Pocket mode Car mode
No icon appears for the Normal mode. Call diversion
14 Date 15 Indicates that there is a missed call.
16 Indicates that there is a missed schedule.
17 Indicates that there is a missed alarm.
18 Camera
19 Indicates that the key lock is enabled.
20 Time 21 Day
Overview of menu function

To access each main menu function, press key from the standby screen and use the ▲ and ▼ keys to scroll through the main menu functions. Press key to confirm the main menu. Alternatively, press the main menu key number directly (see the following table). Pressing 0 from the main menu will display your own number.
Key Main menu 2nd Level menu
| 1 Settings Phone | |
| Phone modes | |
| Display | |
| Calls | |
| Security | |
| Network | |
| T9 input | |
| Reset settings | |
| 2 My data Photos | |
| Pictures | |
| Sounds | |
| Record voice | |
| Memory status |
Key Main menu 2nd Level menu
| 3 Message Create | |
| Inbox | |
| Draft | |
| Outbox | |
| Predefined text | |
| Settings | |
| Memory status | |
| Cell broadcast | |
| 4 Browser Homepage | |
| Favorites | |
| WAP push | |
| 5 Camera |
Key Main menu 2nd Level menu
| 6 Phonebook Lists | |
| Call options | |
| 7 JTM a | |
| 8 Accessory Camera | |
| Organizer | |
| Clock | |
| Calculator | |
| Composer | |
| Voice memo | |
| 9 STK (SIM related functions) or None |
Getting Started
Your phone is equipped with a battery and a charger. Other optional accessories can customize your phone for maximum performance and mobility. All the features described in this user guide are supported by your phone.
For all the features to work, you must have a valid SIM card (included in the package supplied by your service provider) that also supports these features.
Even if you have a fully featured SIM card, any feature not supported by the network transmitting your call will not work. This last point is especially important when you are roaming among networks.
Before you attempt to use your phone, check if you have:
• A valid SIM card inserted in the phone
- Fully charged battery
Service activation
Before you can use your new NEC phone, the service must be activated by your service provider. Please contact your local service provider regarding phone activation.
Voice mail messaging and text messaging
Voice mail messaging and text messaging services, when available, are provided by your service provider. Before you can receive voice or text messages with your phone, you must subscribe to these service options. Contact your service provider for information on the availability and setup of these services.
Phone password
When your service is activated, a 4-8 digit PIN is programmed into the SIM. The PIN locks and unlocks your phone, and provides access to restricted phone settings. Check with your service provider for additional information on your security PIN.
SIM card
Before using your phone, you must sign-up/register with a wireless network service provider to receive a personal SIM (Subscriber Identity Module). The SIM card contains a computer chip that keeps track of your phone number, the services included in your subscription, and your SIM phonebook information. It is stored in a recess in the battery compartment.
The phone is unusable (except for emergency calls) until a valid SIM card is inserted. It is possible to transfer your SIM card to another compatible phone and access your network services. Your phone will display a warning message if the SIM card is not inserted properly.
The SIM card contains personal data such as your electronic phonebook, messages, as well as details of the network services you have subscribed to. The phone will not work (except for emergency calls on some networks) unless a valid SIM is inserted.
If the phone or the SIM card is lost or stolen, you should contact your service provider immediately in order to prevent unauthorized use.
Be sure to turn the phone off before inserting and removing a SIM card. Otherwise, damage to the SIM card can occur.
Inserting a SIM card
Before inserting a SIM card, make sure the power is switched off.
1 Press down the slit of the rear cover.
2 While pressing down the rear cover, slide the rear cover about 3 mm in the direction indicated by the arrow.
3 Remove the rear cover.
4 Press the slit of the battery in the direction shown by the arrow.
5 While pressing the battery, lift the battery in the direction shown by the arrow.
7 Make sure that the SIM card is inserted in the holder.
6 Press down the SIM card gently. With the metal part facing down, insert the straight end of the SIM card under the holder in the direction shown by the arrow.


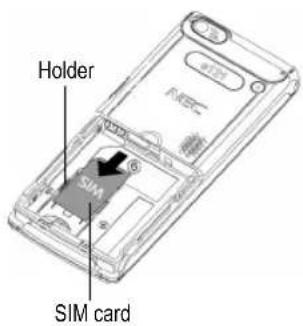
Do not bend or scratch your SIM card.
If the SIM card is not fully inserted when the battery is replaced, damage to the SIM card can occur.
Be careful not to damage electric parts of the SIM card holder when inserting a SIM card.
Do not apply extreme stress to the rear cover. Damage may occur to the rear cover, LCD, or keypads of the phone.
Removing a SIM card
1 Press the straight end of the SIM card gently in the direction shown by the arrow.
2 While pressing the SIM card, slide the SIM card in the direction shown by the arrow.
3 Remove the SIM card.

SIM card holder

If the SIM card is already inserted, see "Powering on the phone" on page 20.
Preparing the battery
Using any battery pack or AC adapter not specified by NEC with this phone may be dangerous and may invalidate any warranty and approval given to the phone. Do not leave the charger connected to the power supply when it is not in use.
Charging the battery for the first time
Your phone is powered by a rechargeable battery. A new phone battery must be fully charged before using your phone for the first time.
- Before attempting to use your phone, insert the phone's battery. Place the battery metallic end towards phone's metallic part. Lower the battery towards the phone to lock into place and slide back the rear cover until you hear a click. Please see "Changing the battery" on page 20.
- Connect the NEC battery charger supplied with your phone to a suitable main power socket.
- Connect the charger plug into the connector.
- Check that the battery icon becomes animated on the LCD. Leave the phone charging until the battery charge
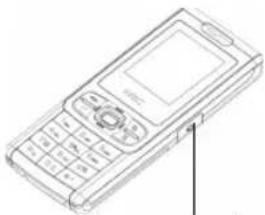
natural_image
Line drawing of a mobile phone with keypad and screen (no text or symbols)Charger connector
complete icon is displayed to ensure that the battery is fully charged.
DO NOT connect a charger or any other external DC source if the phone's battery is not inserted.
Checking the battery
The battery charge indicator shows the approximate charge level of the battery while the phone is in use and not being charged.
- Check the icon at the top left corner of the screen.
The blocks on the display show the charge status of your battery pack.
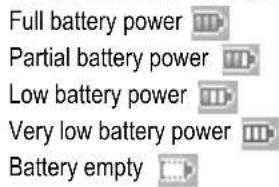
Low battery indication
When the battery voltage falls below the working level, a message "Battery is low" will be displayed along with an empty battery icon on the top left corner of the screen. When displaying battery low notification, the phone also emit a short alert tone. Once these indicators are observed, the phone battery has approximately one minute of use remaining, after which, the phone powers off automatically.
Please charge the battery as much as possible when the battery is very low.
Charging the battery
The charger unit begins to restore the battery power when it is connected to the phone.
- Connect the charger plug to the connector as shown.
- Check that the battery icon is displayed and the screen is lighted up.
During charging, the battery icon becomes animated on the LCD. Leave the phone charging until the battery charge complete icon is displayed to ensure that the battery is fully charged.
Do not connect/disconnect the charger plug forcibly. Damage to the charger connector can occur.
When disconnecting the charger, hold the plug, not the cord.
Do not try to charge the battery if the temperature is below 5^ C(41F) or above 35^ C(95F).
It is recommended to switch off the phone while charging. If you need to receive calls, your phone can be switched on and left in standby while being charged, although the total time taken to charge is then increased.
The phone is designed to be charged with NEC equipment listed with the specifications of your phone.

Changing the battery
Make sure the phone is switched off. Some settings, stored numbers, and messages may be lost if the battery is removed while the power is on.
1 Press down the slit of the rear cover.
2 While pressing down the rear cover, slide the rear cover about 3 mm in the direction indicated by the arrow.
3 Remove the rear cover.
4 Put the new battery into place in the direction indicated by the arrow, making sure that the metallic part in the right direction and the tab of the battery fit properly into the notch in the phone.
5 Lower the battery towards the phone to lock into place.
6 Place the rear cover about 3 mm away from the end with the notches and slide the rear cover in the direction indicated by the arrows until a click is heard.

Powering on the phone
Switching the phone on
Press and hold key for at least two seconds to switch on.
The screen is either blank, displays an animation, or displays a greetings message during the powering on process. After the powering on process, the phone displays the standby screen.
You may need to enter your PIN code or password.
The greetings message may not be as indicated if any locks have been set or the wrong SIM has been inserted.
Switching the phone off
Press and hold key for at least two seconds to switch off.
When you switch off and switch on your phone, the data in the phonebook list and messages folder will take some time to initialise before they can be properly displayed.
Basic Calls and Phone Use
You can make a call in the same way as a normal push-button phone. Press 📄 key after entering the area code and phone number.
Making an emergency call
You may make an emergency call when your SIM card is not inserted in your phone. Simply power on your phone and dial the emergency number of your local region. For local emergency number, please contact your local authorities.
Dialing calls
Use the full STD area code even if you are calling to a person in the same town.
- Enter the phone number in the standby screen and check the number on the display.
- Press key to dial the number.
- To end the call at any time, press key to return to the standby screen.
When you use a handsfree, you can also end the call by pressing or holding the button on it.
During the call, the screen displays either the phone number dialed and a connection graphic, or the name and picture ID of the called party, if they have been previously allocated to the number dialed.
The number dialed and its related information will be stored in the Dialed calls list.
Each time a call is made after the Dialed calls list is full, the oldest call information will automatically be replaced by the latest call made and be placed at the top of the list.
Accessing the dialed calls list
- Press key from the standby screen to access the Dialed calls list.
Highlight the number to be dialed by pressing the ▲ and ▼ navigation keys and press 🔒 key to start dialing.
Press Left Softkey to display the Options menu for the Dialed calls list. Select to either Extract number, Copy to... the phonebook, Delete the individual number or Delete all the numbers in the call list.
Accessing the other dialed lists
- Press key from the standby screen and the ◀ and ▶ navigation keys to access Received calls and Missed calls.
Ending a call
- Press 📄 key to end a call and return to the standby screen.
If you hold down 8 key, your phone will be switched off.
When you use a handsfree, you can also end a call by pressing or holding the button on it.
Using handsfree
Insert the handsfree to the charger connector/earphone jack at the side of the phone. When there is an incoming call:
• Under Car mode with Auto answer mode setting on, the call will be connected automatically.
- Under manual answering mode, press □ key or the button on the handsfree to connect the call.
Receiving calls
When you receive a call:
• The phone rings (if ring tone is set to ON).
- The number of the calling party may be displayed on the screen if the caller has activated calling line identification.
- The calling party's number along with the name and caller ID picture may be displayed if the caller's information is already stored in the phonebook.
If the caller has withheld his/her caller ID, the message "Restricted" is displayed to show that the number is being withheld. If the network service provider cannot identify the number, the message "Unknown" is displayed to show that number is not known.
When your phone is receiving MMS, the incoming call signal may be ignored. The caller may be notified that the line is currently unavailable.
If a call is received but not answered, the caller's information is stored in Missed calls.
- SelectPhonebook > Call options > Missed calls from the main menu to access the Missed calls list.
Alternatively, press key from the standby screen to access the Dialed calls list and press navigation key to display Missed calls.
Accepting a call
- Press key or Left Softkey.
When you use a handsfree, you can accept a call by pressing or holding the button on it.
You can set your phone to answer a call by pressing any key except B key. See "Answer options" on page 29.
If you are making a call, the phone gives priority to receiving a call unless you have already pressed key.
Rejecting a call
- Press key or Right Softkey. The call will be transferred to the voice mail automatically. You can also choose to put your calls on hold or to activate Call waiting or Call diversion. These options are dependent on your network and subscription plans with your local service provider.
If a call is received but not answered, the screen will display a telephone-shaped icon.
Information of received and answered calls are stored in Received calls.
Calling line identification is subscription dependent. If you have subscribed to the service and the caller has allowed his number to be
transmitted over the network, the number of the caller or the corresponding name will be displayed on the LCD screen.
Placing a call on hold
You can place a received or dialed call on hold by pressing Right Softkey. Press Right Softkey again to return to the call.
Making a second call
Dial the second call while on the first call. This will put the first call on hold.
- To toggle between the first and second call, selectSwap by pressing Right Softkey.
- To end one of the calls, press Left Softkey to display Menu, select End, highlight the call to end, and press Left Softkey.
- To end both calls, press Left Softkey to display Menu, select Hang up all and press Left Softkey or press key.
Receiving a second call (subscription dependent)
You can answer a second call while already on the first call if you have subscribed to call waiting service. Your phone will emit a tone to alert you if there is a second incoming call.
- To accept the second call, press 📄 key to put the first call on hold and answer the second call.
- To toggle between the first and second call, selectSwap by pressing Right Softkey.
• To end the active call, press key. - To end one of the calls, press Left Softkey to display Menu, select End, highlight the call to end, and press Left Softkey.
- To end both calls, press Left Softkey to display Menu, select End, select Hang up all and press Left Softkey, or press key.
Making multi-party calls (subscription dependent)
You may hold a conversation with up to two parties at the same time in a conference.
- Make a call to the first party. When it is connected, proceed to dial the second call (second party). The first call is put on hold.
- When the second call is connected, press Left Softkey to display Menu, then highlight Conference and press Left Softkey.
• The first and second party are now connected. - To split the call, press Left Softkey to display Menu, then highlight Private calland press Left Softkey.
- Highlight any number on the list and press Left Softkey and the call will be splitted.
• To end the multiparty call, press key.
Multi-party call facilities are SIM card and network dependent.
Unsuccessful calls/Auto redial
With Auto redial activated, your phone will redial a number up to 10 times if the first attempt is not successful. For the procedures to activate Auto redial, see "Auto redial" on page 37.
When a dialed number cannot be connected, a tone is heard and an alert message will be shown on the display. The phone returns to the standby screen and the number will be automatically dialed again after a short delay. The phone will try to redial the number up to 10 times. Failure to connect a call might be due to network problems or if the party you are calling is busy.
To end a redial attempt, press Right Softkey.
To redial the last number you have called, press key twice.
International dialling service
When you make an international call from any country, you must start by dialling a special international access code. Your phone has the facility to prefix a + symbol to the numbers, so that you need not enter the access code for the country that you are calling from.
Entering international dialling codes
- Hold down 0. A + character is displayed.
• Key in the location code, area code, and phone number that you wish to call. - To select a location code, press Left Softkey to access the +List menu and select the desired location.
For example, the UK country code is always 44, no matter what country you are dialling from. A typical UK number of 0131 1234567 is entered as:
| International access | location code | area code | phone number |
| + 44 131 1234567 |
Scratchpad number
Your phone has a scratchpad function that enables you to key in a telephone number even during a call and to dial it after the current call ended. This scratchpad number can also be saved for future use.
Noting & calling a scratchpad number
- During a call, key in the number using the keypad. The number is displayed on the display screen.
- Press 📄 key to end the current call. The number that was keyed in is still displayed.
- Press key to dial the number.
Storing a scratchpad number
- With the scratchpad number still displayed, press Left Softkey to display the Options menu. Then select memory to where the phonebook entry will be saved.
• Key in the necessary details and press Left Softkey to save the name entry.
For more information on the phonebook, refer to "Phonebook" on page 65.
Call features
Fast dial
Fast dials can be activated in the Abbreviated Dialing Numbers by entering a number between 1 to 255 (depending on your SIM card) and pressing #. The phone details that correspond to the record number will be displayed. Press 📄 key to dial.
Voice mail
Most service providers offer this external voice mail service to their subscribers. The voice mail function enables you to divert received calls to a voice mail centre where callers can leave voice messages in the voice mail under the following circumstances:
- if your phone is switched off or is not able to receive signals;
- if you did not answer the call;
- if you are currently on the phone and did not activate Call waiting.
You will be notified of a voice mail message by an icon in the standby screen. If voice mail service is not included in your service provider's package, you will have to subscribe to the service separately and configure the settings manually.
The voice mail service is SIM card and network dependent. Contact your service provider for details on your voice mail number.
To set the voice mail number
From the standby screen, press ▶ navigation key until the Voice mail screen is displayed or from the main menu, select Phonebook > Lists, then press ▶ navigation key until the Voice mail screen is displayed.
Highlight Number and press Left Softkey to edit the voice mail number. Press Left Softkey to confirm and return to the Voice mail screen.
To retrieve a voice mail
Use the ▼ navigation key to highlight Voice mail and press Left Softkey to call the voice mail centre.
Alternatively, press and hold 1 in the standby screen to call your Voice mail directly.
To divert a received call to the voice mail centre
Make sure the correct voice mail number is set beforehand. When you receive a call you wish to divert, press key or Right Softkey to divert the call to the voice mail centre.
Volume control
To adjust the earpiece volume during a call, use the ▲/▶ navigation key to increase volume and the ▼/◀ navigation key to decrease volume.
Keylock/Auto key lock
To lock/unlock the key pad, press and hold the # key. To automatically lock the keypad, from the main menu, select Settings > Phone > Auto key lock. Press Left Softkey to activate the function and the phone locks the keypad when the standby screen is displayed for 30 seconds.
You can make an emergency call even if the keypads are locked.
For details, see "Auto key lock" on page 30.
Screen Saver
The phone is designed with the screen saver function. When the standby screen is displayed for 35 seconds, the screen saver activates automatically.
If the keylock/auto key lock function is also activated, the screen saver activates 35 seconds after the activation of keylock.
Call Options
From the main menu, select Phonebook > Call options to access this function.
A quick way to view Dialed call, Missed calls and Received calls list from the standby screen is to press key and scroll to the respective lists using the ◀ and ▶ navigation keys.
If you miss a call, you can check it by pressing Right Softkey from the standby screen when there is a telephone-shaped icon displayed in the Softkey area.
Dialed calls
The Dialed calls screen will display the date and time of the last 15 calls made on your phone.
From the main menu, select Phonebook > Call options > Dialed calls.
- Press Right Softkey to return to Call options screen.
Call lists
There is a total of 3 call lists in your phone's memory:
- Dialed calls
- Missed calls
- Received calls
From the main menu, select Phonebook > Call options.
- Press 1 for Dialed calls, 2 for Missed calls and 3 for Received calls.
In the Dialed calls list, press Left Softkey to display the Options menu. Use the ▲ and ▼ navigation keys to highlight an option in the list and press Left Softkey on the following menus:
- Extract number to display the phone number. Press Left Softkey to store the number in the SIM/Phone phonebook.
- Copy to ... to store the number in the SIM/Phone phonebook.
- Delete to delete the number.
- Delete all to delete all the numbers in the list.
Time/charge
The Time/charge screen will display the duration and costs of the different types of calls made from your phone.
Time/charge service is SIM card dependent.
From the main menu, select Phonebook > Call options > Time/charge.
- Use the ▲ and ▼ navigation keys to highlight and press Left Softkey to view the time/charge information for the following: Last call, All voice calls, Total incoming , Total outgoing and Cost left. You can press Right Softkey to Reset the calls counter or Left Softkey to return to the Time/charge screen.
Charge settings
The Charge settings feature enables you to set a limit in units so your phone cannot be used once the limit is reached.
The charge settings service is SIM card and network dependent.
From the main menu, select Phonebook > Call options > Charge settings.
- Select Currency to edit the unit price of each call. You will have to enter your PIN2 before changes can be made.
- Select Cost/unit to set the cost per unit and per min. You will have to enter your PIN2 before changes can be made.
- Select A/c limit to edit Display credit and Max cost. You will have to enter your PIN2 before changes can be made.
- Select Auto display to toggle On/Off the display of call duration and charges after each call is made. When this function is activated, a tick will appear in the check box.
Personalizing Settings
Voice volume
To adjust the volume during a call, use the ▲/▶ navigation key to increase volume and the ▼/◀ navigation key to decrease volume.
When you are not making any calls, use the following procedure:
From the main menu, select Settings > Phone > Voice volume to display the Volume screen with a volume slider.
- Use the ▲/▶ navigation key to increase, or use the ▼/◀ navigation key to decrease the volume to the required level.
- Press Left Softkey to save the current setting and return to Phone menu.
- Press Right Softkey to reject any volume changes and return to Phone menu.
- Press 📄 key to reject any volume changes and return to the standby screen.
Voice volume can also be adjusted by pressing the number key on the Volume screen.
Answer options
Your phone allows you to select one or more of the following two answer modes:
- Any key answer
- Ring silencer
Any key answer
When this feature is enabled, you can answer an incoming call by pressing any key except key.
From the main menu, select Settings > Phone > Answer options.
- Highlight Any key answer and press Left Softkey to toggle Any key answer On/Off. A tick will appear in the check box beside the option.
- Press Right Softkey to accept changes and return to the Phone menu.
Ring silencer
When this feature is enabled, the phone is switched to silent mode.
- From the main menu, select Settings > Phone > Answer options
- Highlight Ring silencer and press Left Softkey to toggle Ring silencer On/Off. A tick will appear in the check box beside the option.
- Press Right Softkey to accept changes and return to the Phone menu.
Minute reminder
You can access this function to set the reminder that tells you how long you are talking on the phone by minute.
From the main menu, select Settings > Phone > Minute reminder.
Use the ◀ and ▶ navigation keys or press the Right Softkey to toggle the reminder On/Off. Use the ▼ navigation key to move down to the next field to set a Timer for the reminder. Press Left Softkey to save and return to the Phone menu.
Auto key lock
You can lock your keypad keys by activating Auto key lock; that way, you may prevent your keypad from being accidentally pressed.
From the main menu, select Settings > Phone > Auto key lock to toggle on/off the feature by pressing Left Softkey. A tick in the check box indicates that the function has been activated. If your key pad is not used for 30 seconds, the phone automatically locks the key pad.
You can unlock the keys by pressing and holding # from the standby screen.
You can make an emergency call even if the keypads are locked.
ALS setup
If your SIM card supports Alternate Line Service (ALS), you can set which line to use for your phone:
- From the main menu, select Settings > Phone > ALS setup.
- Use the ▲ and ▼ navigation keys to highlight the desired line option.
- Press Left Softkey to turn on the radio button for the highlighted option and return to the Phone menu.
ALS setup function is SIM card and network related and may only be available from your service provider.
You can access the ALS setup screen by pressing and holding * from the standby screen.
Time/date
You can access this function to set the time/date displayed in your phone and hence enable other related functions. For example, the alarm function. Use the following procedure to set the time and date:
Set timezone
- From the main menu, select Settings > Phone > Time/date > Set timezone.
- Press ▲ and ▼ navigation keys to move along the world map to select the city/time zone closest to you. Press Left Softkey to confirm the time zone selection.
- The phone will prompt you as to whether Daylight saving is required. Press Left Softkey if it is required or press Right Softkey if it is not.
- Subsequently, your phone will prompt you whether to set the selected city as your local city, press Left Softkey to confirm or press Right Softkey to reject. The phone returns to the Time / date menu display.
Set date/time
From the main menu, select Settings > Phone > Time/date > Set date/time.
- Press Left Softkey to start editing the date using the text editor.
- Use the ▼ navigation key to highlight the Time field, press Left Softkey and edit the time.
- After editing, press the Left Softkey to save all changes made. The phone returns to the Time / date menu screen.
Set time format
From the main menu, select Settings > Phone > Time/date > Set time format.
- Use the ▲ and ▼ navigation keys to highlight 12 Hour/24 Hour format. Press Left Softkey to confirm the selection and turn on the radio button. The phone returns to the Time / date menu screen.
Set date format
From the main menu, select Settings > Phone > Time/date > Set date format.
- Use ▲ and ▼ navigation keys to highlight either DD/MM/YYYY, DD.MM.YYYY, MM/DD/YYYY, MM.DD.YYYY, YYYY/MM/DD or YYYY.MM.DD format.
- Press Left Softkey to confirm the selection and turn on the radio button. The phone returns to the Time/date menu screen.
FAK setting
FAK (Fast Access Key) is a shortcut to the major functions of the phone by simply pressing the key itself.
To set FAK, you can also press the unassigned number key from the standby screen, press Left Softkey twice and select the function to allocate for the number key.
- From the main menu, select Settings > Phone > FAK setting.
- Use the ▲ and ▼ navigation keys to highlight the Fast Access Key (2 to 9) that you want to set up. Press Left Softkey to select from the list of functions.
- Use the ▲ and ▼ navigation keys to highlight the function to be assigned to the FAK and press Left Softkey to confirm the selection (turns on the radio button) and return to the FAK setting display menu.
- To use FAK, press the number key and Left Softkey from the standby screen.
You can also use already set FAK by pressing and holding the number key from the standby screen.
Language
If the display is showing any language other than your own, use the following procedure:
- From the main menu, select Settings > Phone > Language.
- Use the ▲ and ▼ navigation keys to select the required language and press Left Softkey to confirm the selection and turn on the radio button. The phone returns to Phone menu screen.
When you have changed the display language, please wait until the new setting becomes effective.
If you select Automatic, the language specified in your SIM card or the default language is automatically selected.
Phone modes
You can set your phone to operate in any one of four modes in the Phone modes menu:
- Normal mode
- Meeting mode
- Pocket mode
- Car mode
If the selected mode is Car mode, the backlight will always be turned on. This will accelerate the battery consumption.
Phone mode selection
From the main menu, select Settings > Phone modes. Use the ▲ and ▼ navigation keys to highlight a phone mode in the list. Press the Left Softkey to display the Options menu. You can choose to either Activate the phone mode or to Change settings by pressing the Left Softkey when your selection is highlighted.
Alternatively, press ▲ navigation key to display the Phone modes menu from the standby screen.
Phone mode settings
When a phone mode is selected, some of your phones settings will be altered according to the selected phone mode. The phone functions that can be altered include:
• Ringer setting (On/Off)
- Ringer (for Any call/Phonebook call/Alarm/Message/Friends/Colleagues/Family/Biz partner/VIP)
- Ringer volume (for Any call/Phonebook call/Alarm/Message/Friends/Colleagues/Family/Biz partner/VIP)
• Key tone (On/Off)
- Info tones (On/Off for Warning tone/Cell broadcast/Message sent)
- Vibrator (On/Off)
• Earphone(Earphone&Speaker/Earphone)
- Illumination (Off/LCD only/Key & LCD)
• Auto answer (On/Off, only available for the Car mode)
Any changes made to the Ringer setting options in a phone mode are stored and used when that mode is selected again.
Use the ▲ and ▼ navigation keys to move the highlight bar to the previous or next item in a list.
To toggle an option On/Off: On (a tick is displayed in the check box beside the option) or Off (the check box beside the option is empty).
Changing phone mode settings
To change the settings of a particular phone mode, use the following procedure.
With the standby screen displayed, press ▲ navigation key or select Settings >Phone modes from the main menu.
Use the ▲ and ▼ navigation keys to highlight the phone mode you wish to change from the following:
- Normal mode;
- Meeting mode;
- Pocket mode;
- Car mode.
Press Left Softkey to display the Options menu. Use the ▲ and ▼ navigation keys to highlight either Activate to activate the phone mode or Change settings to change the phone mode's settings, then press Left Softkey. When you select Change settings, you can make the following changes:
Ringer setting
To change the ringer setting, highlightRinger setting and press Left Softkey to toggle Ringer setting between On (a tick appears in the check box) and Off (the tick disappears).
Ringer
To change the ring tone or melody, selectRinger to display the Ringer menu screen.
- Highlight the type of calls to change from the menu: Any call/Phonebook call/Alarm/Message/Friends/Colleagues/Family/Biz partner/VIP.
- Press Left Softkey to access the Sounds folder.
- Highlight the desired ringtone and press Left Softkey to select and return to the Ringer menu screen.
Ringer volume
To change the ring volume settings, select Ringer volumeto display the Ringer volume screen.
- Highlight the type of calls to change and press Left Softkey to select: Any call/Phonebook call/Alarm/Message/Friends/Colleagues/Family/Biz partner/VIP.
- The volume screen showing the level of ring volume is displayed. Use the ▲ navigation key to increase or ▼ navigation key to decrease the volume setting to the level required (the level bar moves in the direction corresponding to the key pressed).
- Press Left Softkey to save the current ring volume setting or Right Softkey to reject any ring volume changes.
- The phone returns to the Ringer volume screen.
Key tone
To change the settings, highlightKey tone and press Left Softkey to toggle between On (a tick appears in the check box) and Off (the tick disappears).
Info tones
To change the Info tones settings, selectInfo tones to display the Info tones screen.
- Use the ▲ and ▼ navigation keys to highlight the type of Info tones you wish to change: Warning tone / Cell broadcast / Message sent.
- Press Left Softkey to toggle between On (a tick appears in the check box) and Off (the tick disappears).
- Press Right Softkey to accept the changes and return to the previous Profiles menu.
Vibrator
To change the settings, highlightVibrator and press Left Softkey to toggle between On (a tick appears in the check box) and Off (the tick disappears).
Earphone
To change the settings, select Earphone and press Left Softkey to set either Earphone & Speaker or Earphone only.
Illumination
To change the illumination settings, select Illumination to display the Illumination screen with radio button selections: Off, illuminate LCD only or illuminate Key & LCD.
- Use the ▲ and ▼ navigation keys to highlight your desired setting and press Left Softkey to confirm and turn on the radio button.
With the illumination always on, the battery consumption will be accelerated.
Auto answer
Auto answer option is only available for Car mode. The Auto answer feature allows a received call to be connected automatically if you are using your phone as a car phone or with a hands-free kit. To change the Auto answer settings:
- HighlightAuto answer and press Left Softkey to toggle between On (a tick appears in the check box) and Off (the tick disappears).
Auto answer only works if your phone is working with a handsfree kit or a headset.
Power on greetings/animations
Two types of greeting/animation screens can be displayed when the phone is power-on:
- No greeting (standard powering on screen display animation).
- Text greeting (standard powering on screen with text greeting).
The type of greeting to display can be selected as follows:
- From the main menu, select Settings > Display.
- Highlight Greetings and press Left Softkey to set the power-on text greeting on. The text editor screen is displayed. Edit the text greeting.
- Press □ to save the greeting and return to Display menu. To cancel the change, press 🔒 key to return to Display menu screen.
- To switch the text greeting function off, highlight Greetings and press Left Softkey from the Display menu screen. The text editor screen is displayed. Long press Right Softkey to clear the text and press Left Softkey to save. A tick in the check box beside the option disappears. For more information on "Text entry", please refer to page 42.
Wallpaper
You can select an image file from Photos/Pictures folders to be displayed as a background to the standby screen.
To select the wallpaper and its style, use the following procedure:
- From the main menu, select Settings > Display > Wallpaper.
- Use the ▲ and ▼ navigation keys to highlight either Set wallpaper or Style. Press Left Softkey to enter each option.
- In the Set wallpaper display screen, select Photos/Pictures to display the folder for the selection of the desired wallpaper or select Off to set the background display off (a blank screen will be displayed at standby mode).
- With the Photos/Pictures folder displayed, highlight your desired wallpaper from the list. Press Left Softkey to confirm the selection. Press key to return to the standby screen. The selected wallpaper is displayed.
- In the Style display screen, select Fit to screen/Tile/Best fit/Center to confirm the selection of wallpaper display style. The radio button for the selected style is turned on.
Color style
You can select from the different colour styles available in your phone:
- From the main menu, select Settings > Display > Color style.
- Use the ▲ or ▼ navigation keys to highlight a colour style and press Left Softkey to confirm the selection.
- The LCD menu screen will be displayed in the selected color style.
Animation
You can select one of the two animations available in your phone:
- From the main menu, select Settings > Display > Animation.
- Use the ▲ or ▼ navigation keys to highlight either Animation 1 or Animation 2. Press Left Softkey to confirm the selection and turn on the radio button.
Brightness
To alter the brightness of your phone's display screen, use the following procedure:
- From the main menu, select Settings > Display > Brightness.
- Use the ▲ and ▼ navigation keys to highlight the desired brightness level for your phone: Low/Medium/High/Max.
- Press Left Softkey to confirm the selection and turn on the radio button.
Contrast
To alter the contrast of your phone's display screen, use the following procedure:
- From the main menu, select Settings > Display > Contrast.
- Use the ▶/▲ navigation key to increase the contrast level or the ◀/▼ navigation key to decrease the contrast level until the screen reaches a suitable contrast level.
- Press Left Softkey to save any contrast changes, or press Right Softkey to reject any contrast changes.
Calls
The Calls screen allows you to activate Call diversion, Call waiting, Auto redial, and Withhold ID.
From the main menu, select Settings > Calls.
Call diversion
You may preset your phone to divert incoming calls to a specified phone number for the following conditions:
- Divert for all calls (All incoming calls to your phone will be diverted to the number you have specified)
- Not reachable (Calls will be diverted if your phone is switched off or is out of range for signals to reach)
- No reply (An incoming call will be diverted if the phone is not answered after the time period determined by the network. The period can be set to a maximum of 30 seconds in 5-second intervals)
- Busy (Call divert will be activated if you are in the middle of a call. If call waiting is activated, a call waiting tone can be heard during the call)
- Receiving fax (Divert all fax calls to a number with a fax connection)
- Receiving data (Divert all data calls to a phone number with a PC connection)
The divert status and details that you have selected will be stored in the network and not in your phone. (e.g., the divert status will remain even when the SIM card is changed).
Setting up call divert and editing the number
- From the main menu, select Settings > Calls > Call diversion.
- Use the ▲ and ▼ navigation keys to highlight the desired condition to divert your incoming calls.
- Press Left Softkey to display the Options menu.
- Highlight Set and press Left Softkey to display the edit screen.
- Press Left Softkey to confirm the entered number. After a short pause, the network will confirm your setting.
- Enter or make necessary amendments to the phone number in which the calls will be diverted to, or press Left Softkey to choose a number from the phonebook.
There may be additional charge for this service depending on your network.
There may be unavailable settings depending on your network.
Check call divert status for a condition or to disable call divert
- From the main menu, select Settings > Calls > Call diversion.
- Use the ▲ and ▼ navigation keys to highlight the condition that you need to check.
-
Press Left Softkey to display the Options menu.
-
Highlight Check status and press Left Softkey for the network to transmit and display the status of the selected condition.
- To disable call divert for the selected condition, highlightClear from the Options menu and press Left Softkey to confirm.
There will be a short delay while the network sends the divert status of your phone.
Status check and cancellation of all call diverts
Status check allows you to check the current divert status for all the different conditions.
- From the main menu, select Settings > Calls > Call diversion > Status check. After a short pause, the network transmits and displays all the call divert status previously set.
Cancel all call diverts allows you to clear all call diverts that has been set previously. - From the main menu, select Settings > Calls > Call diversion > Cancel all. Press Left Softkey to confirm or Right Softkey to reject the cancellation.
Only the call types supported by the Network are displayed on the current status screen.
Call waiting
Call waiting allows you to answer an incoming call during another call. A call waiting tone can be heard during the call to alert the user of another incoming call.
Setting call waiting On/Off
- From the main menu, selectSettings > Calls > Call waiting.
- SelectActive to set call waiting on.
- Select Cancel to set the call waiting off.
The setting is saved and a confirmation message from the network will be displayed.
Checking status of call waiting
- From the main menu, select Settings > Calls > Call waiting.
- SelectCheck status from the menu. A message from the network will be displayed to indicate whether call waiting is activated or cleared.
The Call waiting function is SIM card dependent.
Auto redial
The Auto redial option allows your phone to redial an unsuccessful call up to 10 times. To set the auto redial on or off, use the following procedure:
- From the main menu, select Settings > Calls.
- Highlight Auto redial and press the Left Softkey to toggle automatic redial On/Off. A tick in the check box beside the option indicates the activation of Auto redial.
Withhold ID
The feature allows you to withhold your ID when making a call to others.
- From the main menu, select Settings > Calls > Withhold ID.
- Press Left Softkey to withhold for all calls and Right Softkey to cancel.
Security
The security settings protects your phone from improper and unauthorized use.
These confidential numbers should be kept in a safe place for future access, if required.
You may be required to enter one of the following security codes as shown below. When the phone prompts you for one of these codes, use the keypad to enter the appropriate number and press Left Softkey to confirm.
• PIN code (provided by your network to protect your SIM card if it is stolen)
• PIN2 code (provided by your network for charge information and FDN services protection)
- PUK/PUK2 code (respective personal unblocking code in case you forget the PIN/PUK code)
• Phone code (default setting is "0000")
If you forget any of these codes, ALWAYS contact your service provider as they are the ONLY source for your codes.
If the PIN2 code is entered incorrectly 3 times, you will need to contact your service provider for a PUK2 code.
The PIN codes and security codes are between 4 to 8 digits.
If the phone code is entered incorrectly 10 times (not necessarily in the same session), the Phone code will be locked. In order to unlock the code, you will need to contact your service provider.
Change PINs
The PIN will be requested most of the times when the phone is switched on. This feature can be deactivated, at the risk of unauthorized usage of your phone. Some service providers do not permit the deactivation of this control.
You can set up your phone to require your PIN code entered when the phone is switched on before the phone can be used and receive any incoming calls. If you entered your PIN code incorrectly for more than three times (not necessarily in the same session), you will have to contact your service provider for a PUK code to unblock your SIM card.
Your phone supports advanced features (e.g. FDN) that may require a PIN2 code to be entered before they can be accessed or modified.
To activate PIN
- From the main menu, select Settings > Security. Highlight PIN activate and press Left Softkey to toggle PIN activate Enable/Disable. You will have to key in a PIN code for activation. A tick in the check box beside the option indicates that PIN activate has been activated.
PIN/PIN2/Phone code change
- From the main menu, select Settings > Security > Code.
- Select either Change PIN/Change PIN2/Chg. phone code.
- Key in the current code. You will be prompted to enter the new code when the correct current code is entered. Enter the new code again and press Left Softkey to confirm the new code.
- A confirmation screen is displayed momentarily and the phone returns to Code display menu.
The PIN2 code is SIM card related and may only be available from your service provider.
Phone lock
The Phone lock menu allows you to lock your SIM card from unauthorized usage. If Phone lock is On, SIM data can be accessed only when the correct PIN code is entered. To enable/disable Phone lock, proceed as follows:
- From the main menu, select Settings > Security.
- Highlight Phone lock and press Left Softkey to toggle Phone lock On/Off. A tick in the check box beside the option indicates that Phone lock has been activated. You will have to key in a Phone code to activate Phone lock.
The default setting of the Phone code is "0000".
Bar calls
This feature allows you to restrict the following type of calls made or received on your phone. You will need a 4-digit password provided by your service provider to activate barring. You may have to register separately for each type of barring.
- All outgoing (All outgoing calls, except emergency numbers 112 and 999 will be barred)
- Outgoing international (International outgoing - Only calls within the home country can be made on the phone)
- Outgoing international except home (International outgoing without home country - International calls not permitted. However calls can still be made to your home country when you're abroad)
- All incoming (All incoming calls will be barred, including the forwarding of the calls to the voice mail)
- When roaming (You will not be able to receive calls when you are outside your home network. This means that no charges will be incurred for incoming calls)
Roaming allows you to use your phone in many parts of the world and to pay all charges through your home network service provider. Your network operator usually has agreements with named networks in other countries. The phone also allows you to set network preferences of your own. When dialing you will need to add the international access codes when required, so storing all numbers with the codes (such as 01 for the US) is helpful.
Call your service provider to activate international service options.
Before leaving your home country you should select preferences such as call block or call transfer.
You will be charged for calls forwarded to you while you are roaming.
To place restrictions on certain type of calls:
From the main menu, select Settings > Security> Bar calls. Use the ▲ and ▼ navigation keys to highlight the type of calls you want to restrict and press Left Softkey to display the Options menu.
- SelectSet to activate. You will be prompted to enter the bar password.
- SelectClear to disable ring for the selected type of calls. You will be prompted to enter the bar password.
- SelectCheck status for the network to transmit and display the ring status of the selected type of calls.
Change password
- To change the password for barring, select Settings > Security > Bar calls > Change password from the main menu. Enter the call barring
password. You will then be prompted to enter a new password twice. Press Left Softkey to confirm the password.
Status check
To check the status of calls barring for all the different types of calls, select Settings > Security > Bar calls > Status check from the main menu. After a short pause, the network transmits and displays all the ring status previously set.
Cancel all
To cancel all barrings previously set, select Settings > Security > Bar calls > Cancel all from the main menu. The password provided by your service provider will be needed for this function. Press Left Softkey to confirm or Right Softkey to reject the cancellation.
Fixed dialing
This function allows you to restrict the use of dialed number to FDN only. To change the settings for Fixed dialing:
- From the main menu, select Settings > Security.
- Highlight Fixed dialing and press Left Softkey to toggle Fixed dialing On/Off. You will have to key in the PIN2 code to display a message to activate/deactivate Fixed dialing. A tick in the check box beside the option indicates that Fixed dialing has been activated.
The FDN facility is network dependent.
Network
Network info
- From the main menu, select Settings > Network > Network info.
- Use the ▲ and ▼ navigation keys to highlight the network you want to connect to and press Left Softkey to select. The screen will return to standby mode after a confirmation message is displayed.
Choose network
- From the main menu, select Settings > Network > Choose network.
- Press Left Softkey to confirm. This will restart the network search that will be very useful if you are not on your home network or you need to register on a different network.
Set automatic or manual network selection
- From the main menu, select Settings > Network.
- Highlight Auto network and press Left Softkey to toggle the automatic network search On/Off. A tick in the check box beside the option indicates the activation of Auto network.
Before you manually select a network, ensure it is covered under the agreement you have with your service provider.
View/Edit/Delete network list
When Auto network is activated, the network will be selected according to the ranking order in your Pref. network. You can manually select a separate network from the list of the GSM networks available.
- From the main menu, select Settings > Network > Pref. network to display the Pref. network screen with Home Network information.
- Press Left Softkey to display the list of networks you have added to your list. To edit this list, press Left Softkey and select Insert or Add to end with Left Softkey to display the Net operator screen, listing the major net operators.
- Use ▲ and ▼ navigation keys to highlight the net operator you wish to add to your list and press Left Softkey to confirm adding it to your list. The phone returns to the Network menu screen.
- To delete a network from the list, selectSettings > Network > Pref. network. Press Left Softkey, highlight the network you wish to delete and press Left Softkey again to display the Options menu. Select Delete to confirm the deletion.
Before editing your pref. network, please contact and consult with your service provider.
Band
- From the main menu, select Settings > Network > Band.
- Use ▲ and ▼ navigation keys to highlight the required band and press Left Softkey to select and turn on the radio button. The phone returns to the Network screen. The available bands are 900MHz; 1800MHz; 1900MHz; 900/1800MHz; 900/1900MHz
Frequency bands must be adjusted to suit the location when roaming (Europe, U.S., etc.), for the phone to work properly.
Connectivity
- From the main menu, select Settings > Network > Connectivity. See "Connectivity profiles" on page 54 for details.
GPRS info
GPRS info displays details about the size and time of the data that has been transferred to your phone via GRPS frequency.
- From the main menu, select Settings > Network > GPRS info.
- From the GPRS info screen, press Left Softkey to reset the parameter or Right Softkey to go back to Network screen.
Transfer rate
- From the main menu, select Settings > Network > Transfer rate.
- Press Left Softkey to select from 115.2 Kb/s, 57.6 Kb/s, 38.4 Kb/s, and 19.2 Kb/s or press Right Softkey to return to Network screen.
T9 input
Please refer to "T9 language" on page 43 for details.
Reset settings
- To revert your phone to its default factory settings, select Settings > Reset settings from the main menu and press Left Softkey.
- Press Left Softkey again confirm resetting or press Right Softkey to abort resetting and return to Settings menu. You will be prompted to enter your phonecode.
Reverting to the default factory settings will NOT reset data in My data, Message, Phonebook, etc.
If you have set the security code on your phone, you will be prompted to enter the security code in order to restore to factory settings.
Text Entry
This section describes how you can enter text (letters, numbers and symbols). The same method of text entry can be used in all of the phone's editing display.
Mode change
In the text entry screen, pressing * key can change the text entry mode in the normal text input or when T9 ^ is activated. Pressing and holding the # key will toggle T9 ^ input On/Off. The sequence of the entry mode is as follows:
| Normal Text Input | T9 Input Activated |
| abc (All lower case) | T9 abc ( T9^® English) |
| Abc (Sentence case) | T9 Abc ( T9^® English) |
| ABC (All upper case) | T9 ABC ( T9^® English) |
| Numeric Input (123) | Numeric Input (123) |
Text edit screen options menu
Press Left Softkey in Edit mode when typing or editing text to display the Options menu. These options are available:
Inserting object
Highlight Insert object and press Left Softkey to display the following options:
- Highlight Std. sounds and press Left Softkey to select built-in sound clips to be inserted into your message. Use ▲ and ▼ navigation keys to select the desired sound clip to be inserted and press Left Softkey to confirm.
- Highlight Std. Animations and press Left Softkey to select the animation icons to be inserted into your message. Use ▲ and ▼ navigation keys to select the desired animation icon to be inserted and press Left Softkey to confirm.
- Highlight Own animations/Own pictures/Own sounds to select animations, tones, or pictures stored in the phone to be inserted into your message. Use ▲ and ▼ navigation keys to select the desired attachment and press Left Softkey to confirm.
Format
Highlight Format and press Left Softkey to display the following options:
- Highlight Text format and press Left Softkey to choose the following text formats for your message: Underline/Strike through/Italic/Bold or choose the desired Font (Mid font/Large font) for your text. Highlight your selection and press Left Softkey to confirm. A tick appears in the corresponding check box beside the option. Continue with your selection and press the Right Softkey to save the format settings and return to the previous Options menu.
- Highlight Text color and press Left Softkey. Use ▲ and ▼ navigation keys to edit the Text color and Background color of your text
message. In each highlighted field, use ◀ and ▶ navigation keys to choose the desired colour for your message. Press Left Softkey to save and return to the Edit screen
Text formatsItalic and Bold cannot be applied simultaneously to your messages.
Predefined text
You may add a predefined text into your message editing screen. SelectPredefined text and use ▲ and ▼ navigation keys to scroll through a list of texts and press Left Softkey to open the Options menu: either Select or View the text.
Insert number
You may attach a phone number to the message that you are editing and send it. SelectInsert number and use the ▲ and ▼ navigation keys to scroll through the phonebook and press Left Softkey to attach the number.
T9 language
T9 preferred
To select whether to activate T9 input, use the following procedure:
- From the main menu, select Settings > T9 input. Highlight T9 preferred and press Left Softkey to toggle T9 ^ preferred On/Off. A tick in the check box indicates that T9 input has been activated.
Alternatively, you can press and hold the # key in the text entry screen to toggle T9® input On/Off.
T9 English text input
Your phone supports T9 ^® Text Input and will try to deduce the correct word by individually comparing the entered letters with an extensive in-built dictionary, enabling fast and intuitive text input.
For each letter to be keyed in, you will only need to press the number key corresponding to the alphabet once. The screen will display the word you may require based on the in-built English dictionary of the mobile phone. An example of it shown as follows:
- With the text entry screen displayed, press * key to switch to desired T9® English input case(T9 abc/T9 Abc/T9 ABC) before entering the word/sentence.
- To enter the word "good", press 4, 6, 6 and 3 then press 0 to complete the word with a spacing after the word.
- To enter "Peter is good", press 7, 3, 8, 3 and 7 to display 'Peter', then press 0 to confirm.
- Press 4 and 7 to display 'is', then press 0 to confirm.
- Press 4, 6, 6 and 3 to display "good", then press 0 to confirm. The sentence is now completed.
Other key functions
- 0: To insert a space and/or complete the word.
- Left Softkey: To display other words with the same combination of letters (e.g. words like home, gone and etc. can be formed by pressing the number keys 4, 6, 6, 3 and Left Softkey).
• Right Softkey: To delete the letter to the left of the cursor
- / navigation key: To move the cursor around and each of the words keyed will be highlighted.
• * key: To toggle the different modes of text entry.
- # key: To activate the symbol list; Press and hold to toggle T9® input On/Off.
Normal text input
Normal text input (abc/Abc/ABC)
- With the text entry screen displayed, press * key until the entry mode is Normal text (abc/Abc/ABC) input.
- Long press # key to toggle T9® input Off.
- Use number keys to enter letters. For example, to enter e, press 3 twice; to enter f, press 3 three times.
Other key functions
- 0: To insert a space.
- Right Softkey: To delete the letter to the left of the cursor.
• ◀ / ▶ navigation key: To move the cursor around.
• * key: To toggle the different modes of text entry. -
key: Press to activate the symbol list; Press and hold to toggle T9® input On/Off.
Numeric input
With the text entry screen displayed, press * key until the entry mode is Numeric input (123).
Message
From the main menu, select Message. Using this function, you can send and receive text messages with attached sound, image files, etc.
Alternatively, you can press navigation key to access the Message menu directly from the standby screen.
The following folders in the Message menu have the following functions:
- Inbox: The received messages are saved. (To enter, selectInbox from Message menu screen.)
- Draft: The edited messages are saved.(To enter, select Draft from Message menu screen.)
- Outbox: The sent messages are saved and specified. (To enter, select Outbox from Message menu screen.)
When the storage memory is full, you cannot create a new message. Please delete unnecessary messages from time to time.
Message overview
Your phone supports the following messaging services:
- SMS (Short Messaging Service) allows you to send short messages (maximum of 160 characters). To send an SMS message, the destination phone number must be a mobile phone with an SMS service subscription. Long text messages (up to 1520 characters) can be transmitted and received via your phone. When long SMS messages are sent or received by the phone, they are automatically broken down into a series of short SMS messages. (Take note of the higher charges for these long messages sent). Animations, pictures and sounds can also be included inside the SMS.
- EMS (Enhanced Messaging Service) is similar to SMS and allows you to send to another EMS capable mobile phone. In your EMS message, you can include formatted text, small graphics, animations and musical sounds. If the destination phone is only capable of SMS, only the text part of the message will be received.
The Short Messaging Service and linking of SMS messages are network dependent.
- MMS (Multimedia Messaging Service) is a service that allows you to send messages with multimedia files attached. You can attach a sound file and an image file to an MMS message. When you receive an MMS message, you will be notified by a message from the MMS center. You can either automatically or manually receive the contents of an MMS message.
Message list screen options menu
Depending on the type of message you are viewing, the available options menu may change
The following options will be displayed when Left Softkey is pressed in the message list (Inbox/Draft/Outbox) screen:
• View: Display the complete message, containing detailed information of the message such as the date, time and sender's details. If the highlighted message is a notification message, viewing it will download the MMS contents. (MMS only)
- Reply via SMS: Display the SMS Edit screen to type a message to reply to the sender.(available forInbox only)
- Reply via MMS: Display the MMS New screen to compose a message to reply to the sender.(available forInbox only)
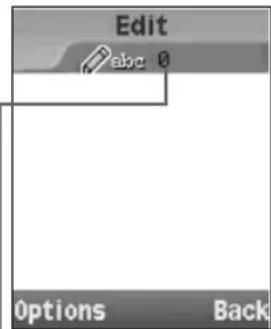
This number indicates the size of the message equivalent to the number of SMS messages (maximum of 10).
- Reply all: Display the MMS New screen to compose a message to reply to the sender and receivers in the To and Cc & Bcc list of the received MMS. (available for Inbox and for MMS only)
- Forward: Display the Edit screen for the forwarding of the displayed message. (available for Inbox only)
- Edit: Display the message in the Edit screen for editing. (available for Draft/Outbox only)
- Delete: Delete the highlighted message
- Delete all: Delete all the messages in the current folder.
To select an option, highlight the option and press Left Softkey.
Message display screen options menu
When a received message (Inbox/Draft/Outbox) is displayed, press Left Softkey to access the following options:
- Reply via SMS: Display the SMS Edit screen to type a message to reply to the sender.(available for Inbox only)
- Reply via MMS: Display the MMS New screen to compose a message to reply to the sender.(available for Inbox only)
- Reply all: Display the MMS Edit screen to compose a message to reply to the sender and receivers in To and Cc & Bcc list of the received MMS.(available in Inbox and for MMS only)
- Forward: Display the Edit screen for the forwarding of the displayed message.(available for Inbox only)
- Edit: Display the message in the Edit screen for editing.(available for Draft/Outbox only)
• Detail: Display the date, time and sender's information. - Delete: Delete the displayed message.
- Extract number: Extract the number to save in the phonebook if it is not already saved.(available for Inbox only)
- Extract URL: Access the hyperlink attached to the message.(available for Inbox only)
To select an option, highlight the option and press Left Softkey.
SMS edit screen options menu
When creating an SMS in the Edit screen, press Left Softkey to access the following options:
- Send: Send the edited SMS and subsequently save it in Outbox.
- Save: Save the edited SMS in Draft.
- Insert object: Insert pictures, sound or animations into the edited SMS.
- Format: Change the format of the fonts.
- Predefined text: Insert a pre-defined user message into the edited SMS.
- Insert number: Insert a phone number from the SIM Phonebook.
To select an option, highlight the option and press Left Softkey.
Text formats, Italic and Bold cannot be applied simultaneously to your messages.
MMS edit screen options menu
When creating an MMS in the Edit screen, press Left Softkey to access the following options:
- Send: Display the Send screen to set the addressee and subject.
- Store: Save the edited MMS in the Draft
- Delete object: Delete the inserted text/image/voice from the slide.
• View details: Display details of the Slide timing and Message size of the MMS.
• Page timing: Edit the timing ( Slide timer) for the MMS. - Delete page: Delete a selected slide from the MMS. (applicable only if there is more than 1 slide in the MMS)
- Preview page: Preview the selected page of the MMS in full-screen before sending.
- Preview msg: Preview the edited MMS in full-screen before sending.
To select an option, highlight the option and press Left Softkey.
MMS edit screen insert menu
When creating an MMS in the New screen, press Right Softkey to access the following functions:
- Insert picture: Insert pictures into the MMS from the Pictures folder.
- Insert text: Add text to the MMS.
- Edit text: Edit the inserted text.
- Insert photo: Insert photos into the MMS from the Photos folder.
- Insert sound: Attach a selected ringtone/melody to the MMS from the Sounds folder.
- Insert voice: Attach voice clips to the MMS from the Record voice folder.
- Insert page: Adds an additional slide to the MMS.
MMS send screen menu
When setting the addressee on the Send screen, press Left Softkey to access the following functions:
- Send: Send the edited MMS and subsequently save it in the Outbox.
- Phonebook: Display the phonebook to select an addressee from.
• E-mail: Display the phonebook entries with Email addresses registered to select an address from.
Receiving and reading a message
If you receive a message at the same time the alarm is due to ring, you will not see any popup notification that a new message is received; as alarm clock is a higher priority event. Likewise, no notification will occur when the message is received during a call or when there is an incoming call. The phone will emit a beep tone only if the call is put on hold.
When the memory allocated for the message function is full, your phone cannot receive new messages until you delete the old messages. To prevent the message memory from being used up, it is recommended to regularly delete unwanted messages.
When a new MMS is successfully downloaded, the LCD screen will display "Received MMS message complete".
When you received an incoming call while downloading an MMS, the download connection will not be interrupted as long as the
incoming call duration is not longer than the GPRS connection time-out.
To read a message
- Select Message from the main menu or press ◀ navigation key directly from the standby screen.
- Press Left Softkey to display the message list of the highlighted mailbox (Inbox/Outbox/Draft).
- Highlight the message to be read and press Left Softkey. Select View from the Options menu. The message contents will be displayed.
Please review message only after the whole series of SMS/MMS has been received by your phone. When the phone has not finished receiving the long message, there will be a popup notification that the message is incomplete and it cannot be viewed.
Creating and sending a message
The following describes the operations related to creating and sending a message.
To create and send SMS
- Select Message from the main menu or press ◀ navigation key directly from the standby screen.
- SelectCreate > SMS to start a new SMS.
- Input your message.
- When done, press Left Softkey to display the Options menu. Highlight Send and press Left Softkey. Input the recipient's number using the text editor.
- To send the SMS to a number in the phonebook, press Left Softkey and selectSend. The Send screen is displayed. Press Left Softkey and select Phonebook from the Options menu. The list of the phonebook entries will be displayed, highlight the phonebook entry you wish to send the SMS to, then press Left Softkey.
- To send, press Left Softkey to display the Options menu, then highlight Send and press Left Softkey again to send. After sending, the SMS will be saved in the Outbox.
The maximum number of characters is defined as the number of single byte characters (alphanumeric characters, etc.) allowed in a field/item. If a double byte character such as a special symbol is used, the number of characters allowed will vary accordingly.
You can send SMS messages to a group of not exceeding 10 recipients. The complete phonebook will be displayed.
For inputting multiple addresses, insert ';' (semicolon) between addresses.
To create and send MMS
- Select Message from the main menu or press ◀ navigation key directly from the standby screen.
- SelectCreate > MMS to start a new MMS.
- Press Right Softkey to display the Options menu to insert pictures, text, photo, sounds, voice or an additional page into the MMS. Use the ▲ and ▼ navigation keys to highlight your choice and press Left Softkey to select.
• After selection, the phone will return to the MMS editing screen with the inserted attachment. - To send the MMS after completing it, press Left Softkey and select Send from the Options menu. Input the recipient's number using the text editor.
• To send the MMS to a number in the phonebook, press Left Softkey and select Phonebook from the Options menu. The list of the phonebook
entries will be displayed, highlight the phonebook entry you wish to send the MMS to, then press Left Softkey.
- To send the MMS to an E-mail address in the phonebook, press Left Softkey and select E-mail from the Options menu. The list of the phonebook entries will be displayed, highlight the phonebook entry you wish to send the MMS to, then press Left Softkey.
- Enter the Subject, Cc, or Bcc.
- To send, press Left Softkey to display the Options menu, then highlight Send and press Left Softkey again to send. After sending, the MMS will be saved in the Outbox.
To reply SMS to a received message
- SelectMessage from the main menu or press ◀ navigation key directly from the standby screen.
- SelectInbox from the Message menu screen. Highlight the message to reply to, press Left Softkey for the Options menu. Highlight Reply via SMS and press Left Softkey.
- The Edit screen will be displayed with the text editor.
- Input the message and press Left Softkey for the Options menu. Highlight Send and press Left Softkey to send the SMS reply. The message is sent and saved in Outbox.
To reply MMS to a received message
- SelectMessage from the main menu or press ◀ navigation key directly from the standby screen.
- SelectInbox from the Message menu screen. Highlight the message to reply to and press Left Softkey for the Options menu. Highlight Reply via MMS and press Left Softkey.
- The Edit screen will be displayed with the sender's address and Re: original subject of the MMS message.
- Input the message and press Left Softkey for the Options menu. Highlight Send and press Left Softkey to send the MMS reply. If necessary, edit the Subject title.
- Press Left Softkey again for the Options menu. Highlight Send and press Left Softkey to send the MMS reply.
To forward a received message
- SelectMessage from the main menu or press ◀ navigation key directly from the standby screen.
- SelectInbox from the Message menu screen. Highlight the message to forward and press Left Softkey for the Options menu. Highlight Forward and press Left Softkey.
- If necessary, edit the Subject title (for MMS only). Press Left Softkey again for the Options menu. Highlight Send and press Left Softkey to forward the MMS or SMS.
Useful Tips For SMS, EMS, and MMS
The useful tips for writing and sending a message are shown below:
Saving an unfinished and unsent message:
- In the message Edit screen, press Left Softkey, select Save/Store to save the message in Draft.
Editing and sending a message saved in Draft:
- To display theDraft message list screen, highlight the saved message.
- Press Left Softkey, select Edit. After editing the message, press Left Softkey to display the Options menu. Select Send to send the message.
Predefined text
- From the main menu, selectMessage > Predefined text. The list of predefined text for you to add into your messages will be displayed.
- Highlight the desired message and press Left Softkey to either Select or View.
- Highlight Select and press Left Softkey to display the message editing display. After changes are made, press Left Softkey to either Send and save or just Save the message.
Once you edit the predefined texts, you cannot return them to the default setting even by the reset setting function.
Message settings
The following describes the setting items for SMS/EMS settings, MMS settings and Cell broadcast settings:
SMS/EMS settings
From the main menu, select Message > Settings > SMS setting.
Service centre
- Use the ▲ and ▼ navigation keys to highlight Service centre and press Left Softkey to edit the SMS Message Center number.
- Press Left Softkey to save any changes made to the number. This number is saved in the SIM card.
Message type
- Use the ▲ and ▼ navigation keys to highlight Message type and press the Left Softkey to display the Message type screen.
- Use the ▲ and ▼ navigation keys to highlight the different options and press Left Softkey to select: Standard text/Fax/X.400/Paging/E-mail/ERMES/Voice mail. The corresponding radio button beside the option will be turned on.
The Message type settings are network dependent.
Validity period
This function sets the duration that the SMS/EMS message will be stored in the SMS/EMS center while trying to deliver the message.
- Use the ▲ and ▼ navigation keys to highlight Validity period and press the Left Softkey.
- Highlight 1 hour/12 hours/1 day/1 week/Maximum. Press Left Softkey to select and turn on the radio button of the highlighted option. The phone returns to the SMS setting menu screen.
Status report
Select this option to request for a receipt when the SMS message is sent successfully.
- Use the ▲ and ▼ navigation keys to highlight Status report and press Left Softkey to toggle it On/Off. The tick in the check box indicates that Status report is activated.
The status report facility is network dependent.
Direct reply
- Use the ▲ and ▼ navigation keys to highlight Direct reply and press Left Softkey to toggle it On/Off. The tick in the check box indicates that Direct reply is activated.
SMS via GPRS
- Use the ▲ and ▼ navigation keys to highlight SMS via GPRS and press Left Softkey to toggle it On/Off. The tick in the check box indicates that this function is activated.
MMS setting - Send options
- SelectMessage from the main menu or press ◀ navigation key directly from the standby screen.
- Then select Settings > MMS setting > Send options.
Delivery report
This function sets whether to request a delivery report of the sent MMS message.
- Highlight Delivery report and press Left Softkey to toggle the Delivery report On/Off. A tick in the check box beside the option indicates the activation of the function.
Own address
This function sets whether to show your address or to hide it when sending out MMS.
- Select Own address from Send options menu screen.
- Highlight Hide/Show and press Left Softkey to confirm and turn on the radio button.
Lifetime
This function sets the period of time the MMS message is stored on the server while trying to deliver the message.
- SelectLifetime from Send options menu screen. Highlight 1 day/2 days/1 week/4 weeks/Maximum.
- Press Left Softkey to turn on the radio button of the highlighted option.
Priority
This function sets the priority level for the MMS you send out.
- SelectPriority from Send options menu screen. Highlight High/Normal/Low and press Left Softkey to confirm and turn on the radio button.
MMS setting - Receive options
You can set the options when receiving MMS from the different senders.
- SelectMessage from the main menu or press < navigation key directly from the standby screen. Then select Settings > MMS setting > Receive options.
- SelectNormal/Anon. sender/Advertisements to display the MMS receive options screen for the different category of MMS senders.
- Highlight Auto retrieve, Auto reject or Auto defer (applicable for normal MMS senders only) and press Left Softkey to confirm and turn on the radio button.
- When Auto retrieve is set: The contents of the MMS message are downloaded automatically from the MMS center.
- When Auto reject is set: No MMS will be received by the phone.
- When Auto defer is set: The notification message will be saved in Inbox. (applicable for Normal message sender only)
Memory status
The available memory and the used-up memory will be displayed.
- With the standby screen displayed, press ◀ navigation key or select Message from the main menu.
- Select Memory status to display the SMS memory status of the phone and the SIM, MMS memory status.
Cell broadcast
- From the main menu, selectMessage >Cell broadcast.
When cell broadcast service is activated, the phone operating time will be reduced.
Message list
- Select Message list to display the list of received cell broadcast messages.
Broadcast
- Highlight Broadcast and press Left Softkey to toggle the receiving of the cell broadcast messages On/Off. A tick in the check box indicates that the receiving of cell broadcast messages is activated.
Broadcast messages service is network dependent. Please contact your service provider for details.
Topic list
A number of topics can be added to this personal list. You can enter five entries using the channel number (ID) and if required, the name itself.
- To add a new topic, selectTopic list>User defined >
to display the Enter msg ID: screen. Enter the ID and press Left Softkey. Enter the name and press Left Softkey. - To add to a current topic, selectTopic list > Current >
to display a list of topics to choose from. - To delete a topic, highlight the topic, press Left Softkey and select Delete.
Auto display
Turns the automatic display function On/Off for cell broadcast messages to be displayed in standby mode.
- Use the ▲ and ▼ navigation keys to highlight Auto display and press Left Softkey to toggle it On/Off. The tick in the check box indicates that Auto display has been activated.
CB languages
The language in which you wish to receive cell broadcast messages can be specified.
- SelectCB languages to display the list of available languages. To add a new language, press Left Softkey and select Insert. Highlight the
desired language to add to the list and press Left Softkey to confirm selection. The phone returns to the Cell broadcast display menu.
WAP Service
You can obtain the latest information specifically adapted to the display options of your phone from the Internet via your phone with this function. To access WAP service, you would need to:
- Apply for WAP service. You can choose GPRS or CSD (the connection speed of GPRS is faster than CSD) as the data bearer for WAP access. For more details or subscription of WAP service, please contact your service provider.
- Set up WAP service settings in your phone.
Alternatively, press and hold Right Softkey directly from the standby screen. The browser will be activated as soon as the function is called up.
The phone does not support "Mailto" function.
The size of downloaded files should not exceed 48KB.
Ringtones/Melodies cannot be played in the WAP browser
End connection
To end the connection, press key to close the browser.
Supported downloads
Your phone supports the downloading of four different types of content:
- Ringtones/Melodies
- Pictures/Wallpaper
- Animation
- Java™ application
NEC WAP site
Your phone can now access the NEC WAP website at www.necmobile.com You can select and download the desired content from the wide variety available.
Further information
For more details, visit www.necmobile.com on your PC, or your phone.
WAP setup
Connectivity profiles
Your phone had been preset with a list of GPRS and CSD WAP proxy of the different service providers.
To display the list of available connections, you can use the following procedure:
From the main menu, select Settings > Network > Connectivity to display the connections of first five (5) network service providers.
The connection with a turned on radio button next to its name will be the connection used to make a WAP connection.
To choose another connection from the list of network service providers, use the ▲ and ▼ navigation keys to highlight another connectivity profile and press Left Softkey for the Options menu. Select Activate to confirm activation of the highlighted profile.
Profile setting
From the Connectivity menu, press Left Softkey to display the Options menu. Select View to display the Profile setting screen.
To edit the profile settings, press Left Softkey to display the Options menu, select Edit. Use ▲ and ▼ navigation keys to highlight the following options and press Left Softkey to edit the respective details:
Server address
Use ▲ and ▼ navigation keys to scroll between the WAP and MMS address fields and type in the new address using the text editor.
Press Left Softkey to save all changes made. To cancel the change, press ☐, the screen will return to the Profile setting screen.
IP address
Use ▲ and ▼ navigation keys to scroll between the WAP/MMS/JAVAfields and type in the new Gateway IP using the text editor.
Press Left Softkey to save all changes made.
Port number
Use ▲ and ▼ navigation keys to scroll between the WAP/MMS/JAVA fields and type in the new Port number using the text editor.
Press Left Softkey to save all changes made. To cancel the change, press ☐, the screen will return to the Profile setting screen.
Linger time
The linger time will cause the connection to be broken if the connection has not been used for a preset amount of time.
In the Linger time field, key in the new time. Press Left Softkey to save the change. To cancel the change, press ☐.
Connection mode
Select to use either GPRS or CSD for WAP/MMS/JAVA connection. Use ▲ and ▼ navigation keys to scroll between the WAP, MMS and JAVA fields. Use ◀ and ▶ navigation keys or Right Softkey to toggle the settings. For WAP and JAVA fields, you can select Auto/CSD Settings/GPRS Settings. For MMS field, you can select CSD settings/GPRS settings. Press Left Softkey to save changes made. To cancel the change, press
CSD (Circuit Switched Data) settings
Data transfer is made possible via the data connection to a default IP address of your network provider or service provider. This connection allows you to exchange data, such as Internet access, or download games, and use WAP services.
Use ▲ and ▼ navigation keys to select WAP/MMS/JAVA to change their settings. Press Left Softkey to select. Use the ◀ and ▶ navigation keys or Right Softkey to toggle between the options available or key in the new settings for the following fields:
-
Connect type (Analog or ISDN)
• Dial-up number (Enter the ISP number) -
User name (Enter your user name or login name)
- Password
Press Left Softkey to save all changes made. To cancel the change, press 📄, the screen will return to the previous screen.
GPRS (General Packet Radio Service) settings
GPRS is a method for faster data transmitting in the mobile network.
If the network has sufficient capacity, you will be able to get connected to the Internet almost permanently. The network operator will only charge the actual data transmission time. Some service providers are unable to support this service.
Use ▲ and ▼ navigation keys to select WAP/MMS/JAVA to change their settings. Press Left Softkey to select. Use the ◀ and ▶ navigation keys or Right Softkey to toggle between the options available or key in the new settings for the following fields:
• APN (Enter the service provider address)
• Authentication (To activate or deactivate)
- User name (Enter your user name or login name)
- Password
Press Left Softkey to save all changes made. To cancel the change, press ☐, the screen will return to the previous screen.
You can choose which type of connection you require: GPRS or CSD. Please contact your service provider before setting.
When connecting via CSD, connection will remain active during the linger time.
The preset profile settings cannot be edited. Only
Logging on to WAP site
There are two types of WAP connection:
- Connect to the default Homepage
- Connect to a specific URL
- Connect to a bookmarked URLs.
Connect to the default homepage
From the main menu, select Browser > Homepage to connect to the default homepage.
Alternatively, press and hold Right Softkey from the standby screen will connect to the default WAP homepage directly.
Connect to a specific URL or bookmarked URLs
From the main menu, select Browser > Favorites to display the list of bookmarked WAP pages.
Press Left Softkey to display the Options menu to Launch to connect to the bookmarked page.
You can edit or delete the bookmarks by selecting Edit or Delete from the Options menu.
The size of downloaded files should not exceed 48KB.
Ringtones/Melodies cannot be played in the WAP browser
The functions of the softkey will vary according to the type of WAP service page loaded.
End connection
To end the connection, press ☐ key to close the browser.
WAP push
From the main menu, select Browser >WAP push.
- Highlight Switch on and press Left Softkey to activate the receipt of messages from the service provider.
- Highlight Switch off and press Left Softkey to deactivate.
- Highlight Service center only and press Left Softkey to receive WAP push messages only from a previously defined service center. Key in the necessary details in the field and press Left Softkey to save. The radio button will be turned on.
GPRS info
From the main menu, select Settings > Network > GPRS info.
- The reflected information in the counter will be the total amount of data and time used for GPRS connection.
- Press Left Softkey to Reset the counter. Press Left Softkey again to confirm resetting or press Right Softkey to abort resetting. The phone returns to Network menu display screen.
Transfer rate
From the main menu, select Settings > Network > Transfer rate.
Use the ▲ and ▼ navigation keys to highlight the desired data transfer rate and press Left Softkey to select from the following rates:
• 115.2 Kb/s
- 57.6 Kb/s
• 38.4 Kb/s
• 19.2 Kb/s
Camera
The integrated digital camera in the phone allows you to take photos and send them out via the Multimedia Messaging Service (MMS). The photos will be stored in JPG format in the phone, and can be viewed by most picture viewing programs.
Taking a picture
To take and save a picture inside your phone, use the following procedure:
- From the main menu, select Camera. The camera finder screen will appear in the LCD and the actual composition of the picture will be shown.
Alternatively, you can get to the camera finder screen by pressing □ key. -
Press key to capture the picture.
-
To save the picture you just took, press Left Softkey/ □ key.
- To return to the camera finder screen without saving, press Right Softkey.
- After saving the picture, press Left Softkey to display the camera options menu.
The default file name for the picture is image+serial number, for instance image0001.
• To return to the camera finder screen, press Right Softkey.
- To switch off the camera function, press key to return to the standby screen.
Your phone's camera is constructed using extremely high precision technology, but there may be lines or dots on the screen that appear permanently dark or bright. Note also that the amount of noise in the image (white lines etc.) may increase noticeably when you take pictures in dimly-lit places.
Be careful not to apply force to the lens. This could damage the lens.
Be considerate of other people's privacy when you take a picture using the camera of your phone and send it to others.
Remember to turn off the camera after using to save power.
Zoom
When taking a picture in the camera finder screen, you can zoom in by pressing ▲ navigation key. To zoom out, press ▼ navigation key.
The zoom function cannot be activated when an image size of 640 x 480 is selected. For a selected image size of 320 x 240, you can zoom in only once, and for a selected image size of 160 x 120, you can zoom in twice.
Brightness
Press the ◀ or ▶ navigation keys to control the brightness level of the picture when taking a picture in the camera finder screen.
Camera (before taking a picture)
Images shot in your phone cannot be used in ways that infringe copyright laws without the consent of the copyright holder, unless intended only for personal use. Note that some restrictions apply to the photographing of stage performances, entertainments and exhibits, even when intended purely for personal use.
Users are also asked to note that the transfer of images protected under copyright laws is only permissible within the restrictions imposed by those copyright laws.
When in camera mode, the phone returns to standby mode after 2 minutes of idling.
You can display the quick keys by pressing # key on the camera finder screen.
Press Left Softkey from the camera finder screen to display the Options menu for the camera to set the following:
Self timer
- Highlight Self timer and press Left Softkey to toggle this function On/Off. The picture is taken after 10 seconds after □ is pressed during picture taking.
Twilight
- Highlight Twilight and press Left Softkey to toggle this function On/Off. The exposure time will be increased during photo taking due to the poor light conditions.
Close up
You can take a close up photo by activating this mode.
- Highlight Close up and press Left Softkey to toggle this function On/Off
Screen mode
You can switch the screen between normal mode or full mode.
- Highlight Screen mode and press Left Softkey to display the Options menu. Use the ▲ and ▼ navigation keys to highlight Normal mode or Full mode and press Left Softkey to confirm the selection.
Photo size
The image size can be set for external usage (e.g., on a PC) regardless of the image shown in the display screen (which will be at the default of VGA (640 x 480)).
- Highlight Photo size and press the Left Softkey to display the Options menu. Use the ▲ and ▼ navigation keys to highlight the image size that best suits your needs and press Left Softkey to confirm the selection.
- The available sizes are: VGA (640 x 480); QVGA (320 x 240) QQVGA (160 x120).
- A larger image size will take up more memory space.
Brightness
- Highlight Brightness and press Left Softkey to adjust the brightness for the photo shoot with the use of ▲ and ▼ navigation keys. Press Left
Softkey to confirm the setting.
Image quality
- Highlight Image quality and press the Left Softkey to display the Options menu. The quality of the photos can be set as Fine/Normal/Economy. Use the ▲ and ▼ navigation keys to highlight and select the quality by pressing Left Softkey.
- A 'Fine' quality photo implies that the photos taken will be of better quality. However, the total number of pictures that can be taken will be reduced.
Effect
- Highlight Effect and press Left Softkey to display the Options menu.
- Use the ▲ and ▼ navigation keys to highlight and select the different colour tint to take your photo: Normal/Monochrome/Sepia/Bluish. Change the colour tint setting by pressing Left Softkey. The radio button beside the option will be turned on.
Flicker control
When taking pictures under a fluorescent light, flickers may occur. To prevent flickers, use the following procedure:
- Highlight Flicker control and press Left Softkey to display the Options menu.
- Use the ▲ and ▼ navigation keys to select 50Hz/60Hz and press Left Softkey to confirm your selection. The radio button beside the option will be turned on.
Default setting
By selecting this menu you can return the Options menu to the default settings.
- Highlight Default setting and press Left Softkey to reset the camera Options menu.
Camera options menu (after saving a picture)
After saving the picture, press Left Softkey. The following options will be displayed:
View finder
- By selecting this menu, you can return to the camera finder screen.
Send as MMS
- By selecting this menu, you can attach the saved picture to an MMS.
Set as wallpaper
- By selecting this menu, you can set the saved picture as the wallpaper.
Go to my photos
- By selecting this menu, you can access the photos folder in My data.
My data
You can use this menu function to manage all the pictures and sounds saved in the phone. You can playback sound, ringtones or display pictures/wallpapers downloaded from the Internet, or photos captured with the built-in camera function.
From the main menu, select My data.
You can also get to My data display screen by pressing ▼ navigation key from the standby screen.
When your phone memory is full, you may not be able to rename the files.
Photos and pictures
The Photos and Pictures folders manage the photos and pictures in your phone respectively. You can choose to display and edit the images and animations that are either captured by the built-in camera or downloaded from the Internet. You can also attach the images and animations to the MMS you are sending out.
Display the photos/pictures list screen
From My data display screen, highlight either Photos or Pictures folder and press Left Softkey to view the list of photos or pictures in your phone.
Alternatively, you can access the Photos folder by selecting Go to my photos in the Options menu for the camera after taking and saving a picture.
Selecting and displaying an image
To view a certain photo/picture from the Photos/Pictures list display screen, use the ▲ and ▼ navigation keys to highlight an image file you want to display and press Left Softkey to display the Options menu. Highlight View and press Left Softkey to display the picture. Press Right Softkey to return to the Photos/Pictures display list screen.
While viewing, you can switch the previous/next picture by pressing the ▲ and ▼ navigation keys.
Photos/Pictures options menu
Use the ▲ and ▼ navigation keys to scroll through the list of photos and pictures and press Left Softkey to display the Options menu:
View
Highlight View and press Left Softkey to display the picture.
Send as MMS (not for preset wallpaper)
Highlight Send as MMS and press Left Softkey to display the MMS editing screen with the selected picture attached. Proceed with the MMS editing before sending it out.
Set as wallpaper
Highlight Set as wallpaper and press Left Softkey to set the selected picture as the wallpaper for the standby screen. The phone returns to the Photos/Pictures display list screen.
Rename (not for preset wallpaper)
You can use the Rename function to edit the names of the photos/pictures. HighlightRename and press Left Softkey. Key in the new name for the picture and press Left Softkey to save the changes made.
You can only input "0-9", "a-z", "A-Z" and "_" for filenames. Changing of text entry mode is not available in this menu.
Delete (not for preset wallpaper)
This option allows you to delete the highlighted photo/picture file. HighlightDelete and press Left Softkey to delete the file. When the confirmation message appears, press Left Softkey to confirm or press Right Softkey to cancel the deletion.
Delete all (not for preset wallpaper)
This option allows you to delete all the photo/picture files in the folder. Highlight Delete all and press Left Softkey to delete all the files. When the confirmation message appears, press Left Softkey to confirm or press Right Softkey to cancel the deletion.
Info
You can display the details of the selected image file using this function. The following details will be displayed:
- File name
- Resolution
- Bit depth
- File type
- File size
- Creation time
Sounds
The Sounds folder manages the ringtones and other melodies in your phone.
- From My data display screen, highlight Sounds folder and press Left Softkey to view the list of ringtones/melodies in your phone.
If voices or sounds are recorded in the folder when the user opens it, it sounds automatically.
Sounds options menu
The phone plays back the ringtone/melody that is highlighted from the list in the Sounds folder. Use the ▲ and ▼ navigation keys to highlight the desired ringtone/melody and press Left Softkey to display the Options menu:
Send as MMS (for downloaded ringtone/melody)
Highlight Send as MMS and press Left Softkey to send the selected ringtone/melody attached to an MMS.
Set as ringtone (for preset and downloaded ringtone/melody)
Highlight Set as ringtone and press Left Softkey to set the selected ringtone/melody as the default ringtone for the following type of calls:
- Any call
- Phonebook call
- Alarm
- Message
- Friends, Colleagues, Family, Biz partner, and VIP
Highlight the type of call you want to set the ringtone and press Left Softkey. The phone returns to the Sounds list screen.
Rename (for downloaded ringtone/melody)
You can use the Rename function to edit the file name for the selected ringtone/melody. Highlight Rename and press Left Softkey. Key in the new name for the ringtone/melody and press Left Softkey to save the changes made.
Delete (for downloaded ringtone/melody)
Highlight Delete and press Left Softkey to delete the selected ringtone/melody.
Delete all (for downloaded ringtone/melody)
Highlight Delete all and press Left Softkey to delete all the downloaded ringtone/melody.
Info (for preset and downloaded ringtone/melody)
You can display the details of the selected ringtone/melody using this function. The following details will be displayed:
- File name
- Creation time
- File type
- File size
Record voice
The Record voice function allows you to record a sound file and send it as MMS. Or you may record a sound file and play it later.
The Record voice folder manages the voice files recorded by your phone.
- From My data display screen, highlight Record voice folder and press Left Softkey to view the list of recorded voice in your phone.
Recording voice
From the main menu, select Accessory > Voice memo > Record. A message shows: Please start recording. You may press Right Softkey to Record or press Left Softkey to see the information. To stop/pause recording, you may press Left Softkey/Right Softkey. To resume recording after selecting pause function, press Right Softkey to continue recording. Once you stop the recording, you may choose to either save or play the recording. Press Left Softkey to save the recording but you need to edit the name for the file first. After the editing is done, press Left Softkey to save the file.
Record voice options menu
From Record voice display screen, use ▲ or ▼ navigation keys to scroll through the list of sound files and press Left Softkey to display the Options menu:
Send as MMS
Highlight Send as MMS and press Left Softkey to display MMS editing screen with the selected sound file. Proceed with the MMS editing before
sending it out.
Rename
Highlight Rename and press Left Softkey to change the name of the sound file.
Delete
Highlight Delete and press Left Softkey to delete the selected sound file.
Delete all
Highlight Delete All and press Left Softkey to delete all the sound files in the folder.
Info
Highlight Info and press Left Softkey to see the details of the sound file.
Memory status
This feature allows you to check the memory space in your phone.
- From My data display screen, highlight Memory status folder and press Left Softkey to view the details in your phone.
Phonebook
Lists
Your phone can store up to 8 different phonebooks:
- Complete (a list of all the numbers stored in the other phonebooks (Phone, SIM, FDN) except SDN numbers)
• Personal directories (ADN) in SIM - Personal directories (ADN) in your phone memory (Phone)
- Own number
• Service dialing numbers (SDN)
• Fixed dialing numbers (FDN) - Groups
• Voicemail
From the main menu, select Phonebook > Lists to display the phonebook entries.
Alternatively, press ▶ navigation key directly from the standby screen.
- To display the other phonebooks, press either ◀ or ▶ navigation keys till the desired phonebook is displayed.
The name of the type of phonebook list is displayed at the top of the list. The next time you press ▶ navigation key from the standby screen, the phonebook displayed will be the last one in use before you exit the phonebook and return to the standby screen.
The phone number in the phonebook record is displayed when the name is highlighted in the phonebook.
When viewing any of the directories described, you can switch to the other directories (if your SIM card supports them) by using the ◀ or ▶ navigation key.
Personal Directory (ADN)
The personal directory numbers are known as Abbreviated Dialing Numbers (ADN). Up to 255 numbers can be stored (along with only one name for each number) on your SIM (depending on your SIM card capacity). Up to 250 numbers can be stored along with a name, ring melody and a phonebook picture in your phone memory. The phone memory also allows you to store 4 phone numbers, 2 e-mail addresses, note, company, street, post code, country, city, and URL under one name. You can also group names in your phone memory to simplify searching. The numbers from either of these personal phonebooks can be viewed, altered and dialed when you need to do so.
The maximum number of 255 phone numbers that can be stored on a SIM card is shared between the ADN, FDN, and SDN directories.
Fixed Dialing Numbers (FDN)
Fixed dialing numbers is a function to limit the numbers that can be called using your phone. With the FDN feature turned ON, only the phone entries you stored in the FDN phonebook and emergency numbers can be called from your phone.
If the FDN function is set to ON, only numbers in the FDN directory can be called.
Although FDN is supported by your phone, it must be present on your SIM. Check with your service provider.
Service Dialing Numbers (SDN)
The numbers stored in the SDN phonebook are supplied, ready to use, and installed by your service provider. The SDN phonebook contains numbers and services that cannot be edited by you. You will not be able to see the number that is dialed as only the associated text title will be shown.
To call numbers in the SDN directory, press ◀ or ▶ navigation key until the SDN directory is displayed and then use either the scrolling or searching method to locate and call the number.
Although SDN is supported by your phone, it must be present on your SIM. Check with your service provider.
Creating a new phonebook record
From the main menu, select Phonebook > Lists to display the desired phonebook list.
Use the ◀ and ▶ navigation keys to display the following directories.
Complete
To create a new personal record, use the following procedures:
- Highlight
- Choose SIM or Phone depending on in which list you wish to create a new phonebook record.
- The following steps are the same as when creating a new record in the phonebook (SIM/Phone). See "SIM" or "Phone" for details.
You can check the record number of a phonebook (Phone) entry in Complete. The number is on the third line of highlighted phonebook (Phone) entry.
SIM
You can set up the following information in the phonebook (SIM):
- Name
- Home number
- Location
- Record No.
To create a new personal record, use the following procedures:
- Highlight
- Use the ▲ and ▼ navigation keys to highlight the fields to be added.
• Highlight Name field. Key in the name.
- Highlight Home number field. Key in the phone number.
- To select an area code, press Right Softkey to access the +List menu and select the desired location.
- Highlight Location field. Use the ◀ and ▶ navigation keys to select whether to save the record in the SIM or Protected SIM (in the FDN list).
- You will have to enter your PIN2 code before you can select Protected SIM as the location to store the record.
If you select the Protected SIM to save the record in, the record is stored in the FDN list.
- Highlight Record No. field. Use the ◀ and ▶ navigation keys to choose the Record No..
- Press the Left Softkey to save the changes made. You cannot save a record unless Phone number is set. The phone returns to the phonebook list.
Phone
You can set up the following information in the phonebook (Phone):
- Name.
- Home number
- Other phone numbers (Office number, Mobile number, Fax number).
- 2 e-mail addresses.
- Other personal information into the information fields (Note, Company, Street, Post code, Country, City).
• A URL. - Group (No group, Friends, Colleagues, Family, Biz partner, VIP).
• A picture ID for the caller.
• A specific ringtone/melody for the caller.
To create a new personal record, use the following procedure:
- Highlight
and press Left Softkey to display the screen. - Use the ▲ and ▼ navigation keys to highlight the fields to be added.
• Highlight Name field. Key in the name. - Highlight Home number/Office number/Mobile number/Fax number field and enter the phone number.
- To select an area code, press Right Softkey to access the +List menu and select the desired location.
- Highlight E-mail 1/E-mail 2 field. Key in the E-mail address. You can enter '@' or '.' by pressing 1 or # key and choosing an appropriate mark.
- Highlight Note/Company/Street Post code/Country/City/URL field. Key in the appropriate information.
- Highlight Group field. Use the ◀ and ▶ navigation keys to select a group name.
- To set a picture ID, highlightCaller picture field. Press Left Softkey to display the Options menu. Select Pictures/Photos, the selected folder is displayed. Then select the picture or photo you want to use for the picture ID.
- To set a ringtone/melody, highlightCaller ringtone field. Press Left Softkey to display the Options menu. Select Change, the Sounds folder is displayed. Then select the sound you want to use for the ringtone/melody.
- Press Left Softkey (when highlighting any fields other than Caller picture and Caller ringtone) to save the change.
Own number
Own number list allows you to enter your own phone numbers. To create a new entry, use the following procedure:
Alternatively, press 0 from the main menu directly.
- Use the ▲ and ▼ navigation keys to select one of the
slots and press Left Softkey to display the Options menu. - SelectEdit from the Options menu.
- Highlight Own number field, then enter the number.
- Highlight Name field, then key in the name.
- Press Left Softkey to save and return to Own number menu screen.
- To delete a saved entry, highlight the entry from Own number menu screen and press Left Softkey to display the Options menu. Select Delete and press Left Softkey to confirm the deletion.
The Own number service is SIM card dependent.
FDN
To create a new personal record, use the following procedures:
- Highlight
and press Left Softkey. You will be asked to enter your PIN2 code. - The following steps are the same as when creating a new record in the phonebook (SIM). See "SIM" on page 66 for details.
Groups
There are 6 groups available to allocate phone numbers to (including 'No group').
Add a phonebook record to a group
You can allocate specific members to be under a certain group. For example work, golf, and family, etc. When a member of the group calls, the assigned group image and melody will be activated.
- With the desired phone record to be added to the group displayed, go to Edit and use the ▲ and ▼ navigation keys to highlight the Group field. Use the ◀ and ▶ navigation keys or Right Softkey to toggle between the different groups (No group, Friends, Colleagues, Family, Biz partner, VIP) available.
- Press Left Softkey to save changes.
View group member
From the main menu, select Phonebook > Lists to display the phonebook entries.
- Press either ◀ or ▶ navigation key till the Groups list screen is displayed. Use the ▲ and ▼ navigation keys as appropriate to scroll through the Groups list.
- When the required group name is highlighted, press Left Softkey to display the Options menu.
- SelectView group to display the names of the entries in the selected group.
- Use the ▲ and ▼ navigation keys as appropriate to scroll through the names.
• To call the phone record number, press key.
Assign a ringtone/melody to a group
To assign a specific ringtone/melody stored in your phone to a group, use the following procedure:
- With the Groups list screen displayed, use the ▲ and ▼ navigation keys to highlight the desired group and press Left Softkey to display the
Options menu. Highlight Set ring tone and press Left Softkey to display the Sounds folder.
- Use the ▲ and ▼ navigation keys to scroll through the list of ringtones/melodies and press Left Softkey to confirm the selection of desired ringtone/melody for the group. The phone returns to the Groups list screen.
Change a group image
To change the group image, use the following procedure:
- With the Groups list screen displayed, use the ▲ and ▼ navigation keys to highlight the desired group and press Left Softkey to display the Options menu. Highlight Group image and press Left Softkey to display the default group image.
- Use ▲, ▼, ◀ and ▶ navigation keys to scroll to the different default group images and press Left Softkey to confirm the selection of the new allocated image. The phone returns to the Groups list screen.
Changing a group name
To change the group names, use the following procedure:
- With the Groups list screen displayed, use ▲ and ▼ navigation keys to highlight the desired group name and press Left Softkey to display the Options menu.
- Highlight Rename group and press Left Softkey to display the editing display screen. Make the necessary changes to the name and press Left Softkey to save and return to the Groups list screen.
Ungroup a phone number or remove all entries from the group
- To remove a member from the allocated group, change the Group field in a phonebook record to
and save the change. - To remove all members from a group, use the ▲ and ▼ navigation keys to highlight the desired group from the Groups list screen and press Left Softkey to display the Options menu.
- Highlight Remove entries and press Left Softkey twice to confirm the removing of all the members in the selected group.
Calling phone numbers from phonebook
The phone numbers in your personal phonebook can be located and then called using one of the following methods:
From the main menu, select Phonebook > Lists to display the phonebook directory.
- Use the ◀ or ▶ navigation keys to display the desired directory.
- Use the ▲ and ▼ navigation keys as appropriate to scroll through your phonebook directory or hold them down to scroll down continuously.
- To call a phone number of the highlighted phonebook record, press the key.
- When dialing the number in the phonebook (Phone), the Phone number screen will be displayed. Choose a phone number you wish to make a call to, then press the key to dial the number.
When the phone number saved in the phonebook contains 8 digits, the name of the caller might not display on the screen when there is an incoming call, or in the missed calls and received calls list. When the phone number saved in the phonebook contains 11 digits and an 8-digit phone number is dialed, the name of the called party might not be displayed under the dialed calls list.
Search a list
- To jump directly to names starting with a specific character, press the corresponding number key (e.g. press 5 once to jump to names beginning with J or twice to jump to names beginning with K).
• To jump to a name beginning with specific letters, press the corresponding number keys for the first few letters of the desired name.
The cursor is positioned on the right of the title bar in the phonebook list. This allows you to enter the characters to perform a search for the contact you wish to recall.
Editing phonebook entries
The edit function enables any phone number stored in the phone memory to be edited and have additional information/attributes added to the number.
From the main menu, select Phonebook > Lists to display the phonebook entries.
- Press either ◀ or ▶ navigation key until the desired phonebook is displayed: Complete, SIM, Phone, Own number, SDN, FDN, Groups, or Voice mail.
- When the desired phonebook record (name or number) is highlighted, press Left Softkey to display the Options menu, highlight Edit and press Left Softkey to display the Edit entry screen.
- To edit each entry, refer to "Creating a new phonebook record" on page 66 for details.
If you edit a record in the FDN list, you will be asked to enter your PIN2 code.
Alternatively, you can edit each entry from/view in the Options menu. Select View from the Options menu, the View entry screen for the highlighted phonebook record is displayed. Highlight the entry you wish to edit and press Left Softkey to start editing. When you finish editing, press Left Softkey (when highlighting any fields other than Caller picture and Caller ringtone) to save the change.
Deleting a single phonebook record
- When any phonebook record is highlighted, press Left Softkey, highlight Delete and press Left Softkey. The confirmation screen displays.
- Press Left Softkey to confirm the deletion or Right Softkey to cancel the action.
Deleting all phone records
To delete all phone records in your Phone/SIM memory, use the following procedure.
- When any phonebook record is highlighted, press Left Softkey, highlight Delete all and press Left Softkey to delete. The confirmation screen displays.
- Press Left Softkey to confirm the deletion of all phone records or Right Softkey to cancel the action.
Copying/Moving from phone to SIM / SIM to phone
- To copy a phonebook record in SIM to Phone or Phone to SIM, highlight the record in the SIM or Phone directory, press Left Softkey for the Options menu. Select Copy to phone(or Copy to SIM) and press Left Softkey to confirm.
- To copy all phonebook records in SIM to Phone or Phone to SIM, highlight any record in the SIM or Phone directory, press Left Softkey for the Options menu. Select Copy all to phone (or Copy all to SIM) and press Left Softkey to confirm.
• To move a phonebook record in SIM to Phone or Phone to SIM, highlight the record in the SIM or Phone directory, press Left Softkey for the
Options menu. Select Move to phone (or Move to SIM) and press Left Softkey to confirm.
When copying/moving a phonebook record in the phonebook (Phone) with more than one phone number in one record, the Phone number screen is displayed to choose which number you wish to copy/move.
Sending an SMS/MMS from the phonebook
You can send an SMS or MMS message to the phone number stored in the phonebook.
- Highlight the phonebook record you wish to send an SMS or MMS to.
- Press Left Softkey, highlight Send as SMS/Send as MMS and press Left Softkey
- To compose a message, see "To create and send SMS" on page 48 or "To create and send MMS" on page 48 for details.
Search by a record number
- When any phonebook record in the phonebook is displayed, press Left Softkey for the options menu.
- Highlight Go to location and press Left Softkey.
• Key in a record number of the phonebook record you are searching. Press Left Softkey to confirm.
Memory status
You can display the capacity of the phonebook.
- Press Left Softkey and select Memory status. The maximum number of personal records that can be stored and the current number of personal records in the SIM/FDN/Phone are displayed.
Sorting a list
- Highlight a phonebook record in the SIM/Phone, press Left Softkey to display the Options menu.
- SelectSort, then select Alphabetic/Location. The list will be sorted alphabetically or by the Record no..
Sorting may take time depending on the number of personal data entries, the number of characters contained in each record and the type of language.
Java ^TM
You can download Java from WAP sites and etc. and run these in your phone. The downloaded Java applications are saved under this function.
When you have downloaded a Java ^™ application program, please make sure to check that the downloaded program is displayed in the Java ^™ application screen.
When you display the Java™ applications list screen for the first time after downloading a program(s), it may take a while for your phone to verify the program(s). A message will be displayed during this process, and you may activate the program(s) after it is completed.
Do not remove the battery while the software is running as data to that point may not be saved.
Java™
From the main menu, select Java ^TM . The downloaded Java ^TM applications and folders will be displayed.
Highlight any application and press Left Softkey to start the following options:
Launch
- Highlight Launch and press Left Softkey to start the highlighted Java™ application.
New folder
- Highlight New Folder and press Left Softkey to create a new Java™ folder to organize the different Java™ applications.
Info
- Highlight Info and press Left Softkey to display the details of the Java™ application such as file name, file size, version, vendor, domain and website.
Rename
- Highlight Rename and press Left Softkey to change the name of the highlighted Java™ application.
When in Java ^™ editing (rename) mode, the phone will not return to the standby mode after 3 minutes of idling.
Security
- Highlight Security and press Left Softkey to view the security settings of the highlighted Java™ application.
Delete
- Highlight Delete and press Left Softkey to delete the selected file.
Memory status
- Highlight Memory Status and press Left Softkey to check the remaining memory space for Java ^TM .
About
- Highlight About and press Left Softkey to display Java™ vendor and its copyrights information.
Exit
- Highlight Exit and press Left Softkey to leave Java™ function and return to the main menu.
Folders options menu
After you highlight a folder, press Left Softkey to display the Options menu for the following:
If there is a folder or file inside the folder, you cannot delete the folder until it is emptied.
Open
- SelectOpen to display the list of Java™ applications in the selected folder.
New folder
- Highlight New Folder and press Left Softkey to create a new folder.
Rename
- Highlight Rename and press Left Softkey to change the name of the folder.
Delete
- Highlight Delete and press Left Softkey to delete the selected folder.
Up
- Highlight Up and press Left Softkey to return to the upper level folder.
Up is displayed only when there is an upper level folder.
Memory status
- Highlight Memory Status and press Left Softkey to check the remaining memory space for Java™.
About
- Highlight About and press Left Softkey to display Java™ vendor and its copyrights information.
Exit
- Highlight Exit and press Left Softkey to exit the Java™ function and return to the main menu.
Please note that you will have the option to create new folders inside a folder by pressing Right Softkey and select New.
Playing games
To activate a Java ^™ game application, use the following procedure:
- From the Java™ menu screen, use the ▲ and ▼ navigation keys to highlight the desired application/software and press Left Softkey to display the Options menu.
- Highlight Launch and press Left Softkey to activate the selected Java™ application/software.
You can also press Right Softkey to launch the highlighted Java ^™ application/software on the Java ^™ menu screen.
Remember to turn off the Java™ application/software after playing to save power.
Accessory
From the main menu, select Accessory to access the various functions provided by your phone as listed below:
- Camera (See "Camera" on page 58 for details.)
- Organizer (Scheduler, ToDo list, Notepad)
- Clock (Alarm clock, Auto off, Auto on, Countdown, Stopwatch)
• Calculator (Calculator, Currency conv.) - Composer
• Voice memo (Record, Play, Data rate)
Camera
For details on the camera function, please refer to "Camera" on page 58
Scheduler
From the main menu, select Accessory > Organizer > Scheduler. The default will be the monthly display. Press the Left Softkey and select Week to view the calendar in week display.
There is a 20 seconds delay before the phone emits an alert tone for the scheduled appointment time.
Make sure that the Scheduler function is not activated when entering premises where use of mobile phone is prohibited.
Agenda
You can use the Agenda function in the calendar menu to key in your appointments. Time and date must be preset first before the calendar can work correctly. When the appointment time reaches, a signal tone can be heard.
Even if the phone has been switched off, the phone automatically switches itself on at the specified time if the Agenda function is turned on.
To register a new event in the agenda function, use the following procedure:
- With the calendar displayed, press Left Softkey to display the Options menu, select Agenda.
- Select
to display the editing screen for the agenda. - Use the ◀ and ▶ navigation keys to select the desired Type of appointment that you are creating: Memo, Call, Meeting mode.
- Use ▼ navigation key to move down to the Description field. Key in the necessary details for this agenda.
- Use ▼ navigation key to move down to the Status field. Use the ◀ and ▶ navigation keys to change the status of the agenda, either to Activate or Deactivate it.
-
Use ▼ navigation key to move down to the Reoccurrence field. Use the ◀ and ▶ navigation keys to change the reoccurrence of the agenda: Once, Daily, Weekly, Month, Annual.
-
If you choose Weekly, you can toggle On/Off, the required day(s) of the week by highlighting and pressing Right Softkey.
- Edit the Start date, Start time, End date, and End time fields accordingly.
- Press Left Softkey to save agenda settings and return to the Agenda display screen.
If you miss an appointment alarm, you can check it by pressing Right Softkey from the standby screen when there is a note-shaped icon displayed in the Softkey area.
Options menu for existing agenda
An Options menu is displayed when an existing agenda is selected and Left Softkey is pressed. The options are described below:
• View
Display the details of the selected agenda.
- Activate/Deactivate
Use ▲ and ▼ navigation keys to change the status, either to Activate or Deactivate it.
• Edit
Display an edit screen for the highlighted agenda. Use the ◀ and ▶ navigation keys to toggle between the different choices in the different fields to edit the agenda settings and use the ▲ and ▼ navigation keys to move along the different fields. Press Left Softkey to save the changes made and return to the list of agendas.
- Add new
Display a new entry screen.
- Delete/Delete all
To delete an existing agenda, highlight the agenda press Left Softkey, select Delete. A confirmation screen is displayed. Press Left Softkey to confirm the deletion or Right Softkey to cancel the action. To delete all existing agendas, select Delete all.
- Capacity
Display the maximum number of agendas (max = 50) allowed and the remaining capacity for new agendas.
ToDo list
The ToDo list allows you to set up reminders and appointments for a particular time and day (up to 50 appointments can be stored).
Make sure that the ToDo list function is not activated when entering premises where use of mobile phone is prohibited.
To register an event in the ToDo list, use the following procedure:
- From the main menu, select Accessory> Organizer > ToDo list to display ToDo list display screen with previously entered reminders/appointments, if any.
- Highlight
and press Left Softkey to display the editing screen for the appointment. - Use the ◀ and ▶ navigation keys to select the desired type of appointment that you are creating: Memo, Call, Meeting mode.
-
Use the ▼ navigation key to move down to the Description field. Key in the necessary details for this appointment.
-
Use the ▼ navigation key to move down to the Status field. Use the ◀ and ▶ navigation keys to change the status of the appointment, either to Activate or Deactivate it.
- Use ▼ navigation key to move down to the Reoccurrence field. Use the ◀ and ▶ navigation keys to change the reoccurrence of the appointment: Once, Daily, Weekly, Month, Annual.
- If you choose Weekly, you can toggle On/Off, the required day(s) of the week by highlighting and pressing Right Softkey.
- Edit the Start date, Start time, End date, and End time fields accordingly.
- Press Left Softkey to save appointment settings and return to ToDo list display screen.
Options menus for existing reminders/appointments
An Options menu is displayed when an existing reminder/appointment is selected and Left Softkey is pressed. To access each option, highlight the option and press Left Softkey again. The options are described below:
• View
Display the details of the selected reminder/appointment.
- Activate/Deactivate
Use ▲ and ▼ navigation keys to change the status, either to Activate or Deactivate it.
- Edit
Display an edit screen for the highlighted reminder/appointment. Use the ◀ and ▶ navigation keys to toggle between the different choices in the different fields to edit the reminder/appointment settings and use the ▲ and ▼ navigation keys to move along the different fields. Press Left Softkey to save the changes made and return to the list of ToDo list.
- Add new
Display a new entry screen.
- Delete/Delete all
To delete an existing appointment, highlight the appointment, press Left Softkey, select Delete. A confirmation screen is displayed. Press Left Softkey to confirm the deletion or Right Softkey to cancel the action. To delete all existing appointments, select Delete all.
- Capacity
Display the maximum number of appointments (max = 50) allowed and the remaining capacity for new appointments.
Notepad
The notepad application allows you to write text files and save them in your phone as reference.
From the main menu, select Accessory > Organizer > Notepad. Use ▲ and ▼ navigation keys to highlight the existing notes or highlight
Notepad options menus
Highlight an existing note and press Left Softkey to display the Options menu for the Notepad. The options are described below:
• View: Display the note for reading.
- Edit: Display an editing screen for the highlighted text note.
- Add new: Display a new entry screen.
- Delete: Delete the highlighted text note.
- Delete all: Delete all the existing text notes.
- Send: Send the note via SMS to a recipient (you may select a phone number from the phonebook list or enter a recipient's number).
- Capacity: Display the memory left in your phone for saving other text notes. Up to a maximum of 10 notes can be saved.
Notepad edit options menu
While on Edit screen, press Left Softkey. The options are described below:
- Save: Save the note and return to the Notepad screen.
- Insert new line: Change the line at the cursor position.
- Clear text: Delete the text
- Send: Send the note as an SMS.
Alarm clock
The alarm will start ringing at the time you set (even after the phone is switched off).
When the alarm sounds, other events will just display on the screen until the alarm stops.
Make sure that the Alarm clock function is not activated when entering premises where use of mobile phone is prohibited.
- From the main menu, selectAccessory > Clock > Alarm clock.
- Use ▲ and ▼ navigation keys to highlight one of the 4 time fields and press Left Softkey to display the Options menu.
- Select Edit to display the editing screen. Key in the time you want to activate the alarm clock in the Time field.
- Use ▼ navigation key to move to the next field to select the day(s) of the week to activate the alarm. Use ◀ and ▶ navigation keys to move to select the day(s) of the week. Press Right Softkey to display a tick in the respective check box.
- Use ▼ navigation key to move to the Status field. Use ◀ and ▶ navigation keys or press Right Softkey to toggle between activating or deactivating the alarm. You can also activate/deactivate the entry from the Options menu in the Alarm clock display screen.
- If necessary, use ▼ navigation key to move to the Description field and key in the reason for the alarm.
- Press Left Softkey to save this alarm setting and return to the Alarm clock display screen.
- You can delete the entry by selectingDelete/Delete all in the Options menu.
- Each icon in the Alarm clock display screen indicates if the settings is activated/deactivated. The alarm clock icon will appear on the standby screen when activated.
- When the alarm sounds, press Left Softkey to turn off the alarm clock or press Right Softkey to pause the alarm clock, which keeps ringing every other 5 minutes. This resembles the snooze function. During the snooze period, you may press Left Softkey to stop the alarm clock or go to Accessory > Clock > Alarm clock to deactivate the alarm.
Even if the phone has been switched off, the phone automatically switches itself on at the specified time if the alarm is turned on.
Once you set the time, the alarm will ring every day(s) of the week you have set until you deactivate the settings.
If you miss an alarm, you can check it by pressing Right Softkey from the standby screen when there is a clock-shaped icon displayed in the Softkey area.
Auto off
When this function is activated, the phone will be automatically switched off at the preset time everyday.
- From the main menu, select Accessory > Clock. Highlight Auto off and press Left Softkey.
- Press Right Softkey or use ◀ and ▶ navigation keys to toggle the function On/Off.
- Use ▼ navigation key to move down to the Time field (when the function is toggled on) to set the auto off time.
- Press Left Softkey to save the settings and return to the Clock menu screen. A tick in the check box indicates that the function is activated.
Auto on
When this function is activated, the phone will be automatically switched on at the pre-set time everyday.
Make sure that the Auto on function is not activated when entering premises where use of mobile phone is prohibited.
- From the main menu, select Accessory > Clock. Highlight Auto on and press Left Softkey.
- Press Right Softkey or use ◀ and ▶ navigation keys to toggle the function On/Off.
- Use ▼ navigation key to move down to the Time field (when the function is toggled on) to set the auto on time.
- Press Left Softkey to save the settings and return to the Clock menu screen. A tick in the check box indicates that the function is activated.
Countdown
After a preset time elapsed, the function will indicate last 3 seconds of the countdown timer by a beep tone. At the end of the countdown time, a special beep can be heard.
- From the main menu, select Accessory > Clock > Countdown.
- Press Left Softkey to set a desired duration for the countdown. Edit the countdown timer and press Right Softkey to save the setting. Press Right Softkey to start the countdown.
- To pause the countdown, press Right Softkey. Press Right Softkey again to continue with the countdown.
- To reset the countdown timers after pausing, press Left Softkey.
Stopwatch
From the main menu, select Accessory > Clock > Stopwatch. A maximum of two timings can be registered with the stopwatch.
- Press Left Softkey to start the timing. To register the first timing, press Left Softkey. To register the next timing, press Left Softkey again.
- To register only one timing with the stopwatch, press Left Softkey to start timing and Right Softkey to stop.
- To reset all time counters, press Left Softkey.
Calculator
You can perform addition, subtraction, multiplication and division of numbers with the calculator function. You can enter up to 8 digits. The calculator can display a result of up to 9 digits, with a maximum of 6 decimal places.
If a calculation results in a number exceeding the maximum, "Over range" appears in the calculation field.
Calculator key
The following keys are assigned with different functions under the calculator:
• ▲ navigation key: Addition (+)
• navigation key: Subtraction (-)
• ▼ navigation key: Multiplication (x)
• navigation key: Division (÷)
• Left Softkey: Equals to (=)
- Right Softkey: Clear
• : Back to the standby screen
- # key: Decimal point (.)
• * key: Negative (-)
Activating calculator
To start the calculator function, use the following procedure:
- From the main menu, selectAccessory > Calculator > Calculator.
Terminating calculator
Press key to return to the standby screen.
Calculating
To calculate using the calculator, for example 52 + 37 , use the following procedure:
- Input 52 on Calculator.
- Press the ▲ navigation key.
- Input 37.
- Press Left Softkey.
• The answer 89 appears in the calculation field.
Deleting a digit
To delete a digit, press Right Softkey.
Deleting all digits
• To delete all digits input, press and hold Right Softkey.
Currency converter
From the main menu, select Accessory > Calculator > Currency conv. You are able to calculate the exchange rates between two currencies using this function:
Rate setting
From the Currency conv.display screen, select Rate setting. Enter the exchange rate for the domestic currency and foreign currency. Press # to enter a decimal point. Press Left Softkey to calculate the conversion. Save the settings by pressing Left Softkey.
Rate compute
From the Currency conv. display screen, select Rate compute. Use ▲ and ▼ navigation keys to move along the fields. Enter the sum to be converted at either domestic currency or foreign currency field. Press Left Softkey to Convert. The results will be displayed at the other field.
Composer
From the main menu, select Accessory >Composer to display the list of preset melodies. Press Left Softkey on the selected preset melody to display the Options menu. Highlight Composer and press Left Softkey to display Composed melody screen. You will have the options to compose one main track and three sub tracks in each preset melody.
You can compose your own melodies (maximum of five) using the following keys in each track:
• Number keys 1 to 7: Represent notes C, D, E, F, G, A, B in this order.
• ▲ and ▼ navigation keys: To move the keyed melody one note up or down.
• * key: Increase/Decrease length of notes/rests.
• Number key 9: Adds a dot.
• Number key 0: Represents rest note.
- # key: Raises/lowers the note by a semitone.
• After composing, press Left Softkey to select one of these available options: Play/Tempo /Instrument/Save.
- Press key to exit the composed melody and press Left Softkey to select Composer again to edit other tracks.
Voice memo
The Voice memo function allows you to record sound/voice using your phone's microphone. You can also send the Voice memo as an MMS
attachment.
From the main menu, select Accessory > Voice memo.
Record
- Select Record. A message shows: Please start recording.
- Press Right Softkey to start recording. To pause, press Right Softkey.
- Press Left Softkey to stop the recording.
- To play and listen to the recording, press Right Softkey.
- To save the recording, press Left Softkey, edit the title if necessary, and press Left Softkey.
Play
- SelectsPlay to display the list of the recorded voice files.
- Use ▲ and ▼ navigation keys to select the files from the list.
For details, see "Record voice options menu" on page 63.
Data rate
- Select Data rate to display Data rate display screen.
- Highlight a desired value (the smaller the value, the longer the recording time allowed) for the data rate and press Left Softkey to confirm and turn on the radio button.
Index
A
Accepting a Call 22
Accessory 75
ADN 65
Agenda 75
Alarm clock 78
Alternate Line Service (ALS) ..30
Any key answer ......29
Auto answer 34
Auto key lock 30
Auto network 40
Auto off 79
Auto on 79
Auto redial 37
B
Band 41
Bar calls 39
Brightness 35
Browser 54
C
Calculator 80
Call diversion ....36
Call list
Dialed calls 27
Missed calls 27
Received calls 27
Call options ......27
Call waiting 37
Calls 36
Camera
Brightness 58
Default settings 60
Effect 60
Flicker control 60
Image quality 60
Photo size 59
Self timer 59
Twilight 59
Zoom 58
Cell broadcast 52
Auto display 52
CB languages 52
Topic list 52
Change PINs 38
Changing the battery 20
Charge settings 28
Auto display 28
Currency 28
Display credit 28
Max cost 28
Charging the battery 20
Color style 35
Composer 81
Connection mode 55
Connectivity profiles .... 54
Countdown 79
CSD settings 55
Currency converter 81
D
Date format 31
Delivery report 51
Draft 45
E
Earphone 34
Emergency services ....6
F
Factory settings 41
FAK (Fast Access Key) ...... 31
Fast Dial 24, 25
FDN 40,65
G
GPRS setting 56
Group
Add a phone contact .....68
Assign a ring tone 68
Changing a group name ... 69
Group image 69
View group member .....68
Groups 68
H
Holding a call 23
I
Illumination ....34
Inbox 45
Info Tone 33
Inserting a SIM Card .....17
IP address 55
J
Java™ 72
K
Key tone 33
Keylock/Auto key lock ......26
L
Language 31
LCD Contrast ....35
M
Message 45
Minute reminder 29
Missed calls 27
MMS
Lifetime 51
Priority 51
My data 61
N
Network info 40
Notepad 77
Numeric input ....44
O
Outbox 45
P
Password 16
Personalizing Settings ...... 29
Phone lock 39
Phone mode
Car 32
Meeting 32
Normal 32
Pocket 32
Phonebook 65
Copying records 70
Deleting a record ..... 70
Deleting all records ..... 70
Moving records 70
Photos 61
Pictures 61
PIN code 38
Port number 55
PUK code 38
R
Received calls 27
Receiving Calls 22
Rejecting a call 22
Removing a SIM Card ...... 18
Ringer setting ....33
Ringer volume 33
Roaming 39
S
Scheduler 75
Scratchpad number
Noting & calling ......24
Storing 24
Screen Saver 26
SDN 66
Security settings ....38
Sending an SMS/MMS from the
phonebook 71
Server address ....55
SMS via GPRS ....51
Sounds 62
Stopwatch 79
T
T9® English text input .....43
T9® Preferred 43
Taking a picture ....58
Text Entry 42
Time format 31
Time/charge 28
Timezone 30
ToDo list 76
Topic list 52
V
Vibrator 34
Voice mail 25
Voice volume 29
Volume control 25
W
Wallpaper 34
WAP push 57
WAP service 54
1_10905
- Important Information 5
- Safety And Precautions 6
- Before You Start 9
- Getting Started 16
- Basic Calls and Phone Use 21
- Call Options 27
- Personalizing Settings 29
- Text Entry 42
- Message 45
- WAP Service 54
- Camera 58
- My data 61
- Phonebook 65
- Java™ 72
- Accessory 75
- Index 83
- Important Information
- Read this information before using your phone
- Conditions of Use
- FCC RF Exposure Information
- Body-worn Operation
- Declaration of Conformity
- Safety And Precautions
- Emergency services
- General care
- Aircraft safety
- Hospital safety
- General safety
- Road safety
- Vehicles equipped with an air bag
- Third party equipment
- Service
- Non-ionizing radiations
- Efficient use
- Radio frequency energy
- Exposure to Radio Frequency Energy
- Licenses
- Before You Start
- Cellphone system structure
- User guide legend
- Parts and functions
- Display information
- LCD graphic display area
- Status icon area
- Help and softkey area
- Key functions
- Main menu
- Main menu screens, menus, check boxes/radio buttons
- - Main menu screens
- - Options menus
- - Check box/ Radio button
- Options menu operation example
- Keypad shortcuts
- Main phone features
- Displayed icons for LCD
- Getting Started
- Service activation
- Voice mail messaging and text messaging
- Phone password
- SIM card
- Inserting a SIM card
- Removing a SIM card
- Preparing the battery
- Charging the battery for the first time
- Checking the battery
- Low battery indication
- Charging the battery
- Changing the battery
- Powering on the phone
- Switching the phone on
- Switching the phone off
- Basic Calls and Phone Use
- Making an emergency call
- Dialing calls
- Accessing the dialed calls list
- Accessing the other dialed lists
- Ending a call
- Using handsfree
- Receiving calls
- Accepting a call
- Rejecting a call
- Placing a call on hold
- Making a second call
- Receiving a second call (subscription dependent)
- Making multi-party calls (subscription dependent)
- Unsuccessful calls/Auto redial
- International dialling service
- Entering international dialling codes
- Scratchpad number
- Noting & calling a scratchpad number
- Storing a scratchpad number
- Call features
- Fast dial
- Voice mail
- To set the voice mail number
- To retrieve a voice mail
- To divert a received call to the voice mail centre
- Volume control
- Keylock/Auto key lock
- Screen Saver
- Call Options
- Dialed calls
- Call lists
- Time/charge
- Time/charge service is SIM card dependent.
- Charge settings
- The charge settings service is SIM card and network dependent.
- Personalizing Settings
- Voice volume
- Answer options
- Any key answer
- Ring silencer
- Minute reminder
- Auto key lock
- ALS setup
- Time/date
- Set timezone
- Set date/time
- Set time format
- Set date format
- FAK setting
- Language
- Phone modes
- Phone mode selection
- Phone mode settings
- Changing phone mode settings
- Ringer setting
- Ringer
- Ringer volume
- Key tone
- Info tones
- Vibrator
- Earphone
- Illumination
- Auto answer
- Power on greetings/animations
- Wallpaper
- Color style
- Animation
- Brightness
- Contrast
- Calls
- Call diversion
- Setting up call divert and editing the number
- Check call divert status for a condition or to disable call divert
- Status check and cancellation of all call diverts
- Call waiting
- Setting call waiting On/Off
- Checking status of call waiting
- Auto redial
- Withhold ID
- Security
- Change PINs
- To activate PIN
- PIN/PIN2/Phone code change
- Phone lock
- Bar calls
- To place restrictions on certain type of calls:
- Change password
- Status check
- Cancel all
- Fixed dialing
- Network
- Network info
- Choose network
- Set automatic or manual network selection
- View/Edit/Delete network list
- Band
- Connectivity
- GPRS info
- Transfer rate
- T9 input
- Reset settings
- Text Entry
- Mode change
- Text edit screen options menu
- Inserting object
- Format
- Predefined text
- Insert number
- T9 language
- T9 preferred
- T9 English text input
- Other key functions
- Normal text input
- Normal text input (abc/Abc/ABC)
- key: Press to activate the symbol list; Press and hold to toggle T9® input On/Off.
- Numeric input
- Message
- Message overview
- Message list screen options menu
- Message display screen options menu
- SMS edit screen options menu
- MMS edit screen insert menu
- MMS send screen menu
- Receiving and reading a message
- To read a message
- Creating and sending a message
- To create and send SMS
- To create and send MMS
- To reply SMS to a received message
- To reply MMS to a received message
- To forward a received message
- Useful Tips For SMS, EMS, and MMS
- Saving an unfinished and unsent message:
- Editing and sending a message saved in Draft:
- Message settings
- SMS/EMS settings
- Service centre
- Message type
- Validity period
- Status report
- Direct reply
- SMS via GPRS
- MMS setting - Send options
- Delivery report
- Own address
- Lifetime
- Priority
- MMS setting - Receive options
- Memory status
- Cell broadcast
- Message list
- Broadcast
- Topic list
- Auto display
- CB languages
- WAP Service
- End connection
- Supported downloads
- NEC WAP site
- Further information
- WAP setup
- Connectivity profiles
- Profile setting
- Server address
- IP address
- Port number
- Linger time
- Connection mode
- CSD (Circuit Switched Data) settings
- GPRS (General Packet Radio Service) settings
- Logging on to WAP site
- Connect to the default homepage
- Connect to a specific URL or bookmarked URLs
- WAP push
- Camera
- Taking a picture
- Zoom
- Camera (before taking a picture)
- Self timer
- Twilight
- Close up
- Screen mode
- Photo size
- Image quality
- Effect
- Flicker control
- Default setting
- Camera options menu (after saving a picture)
- View finder
- Send as MMS
- Set as wallpaper
- Go to my photos
- My data
- Photos and pictures
- Display the photos/pictures list screen
- Selecting and displaying an image
- Photos/Pictures options menu
- Delete (not for preset wallpaper)
- Delete all (not for preset wallpaper)
- Info
- Sounds
- Sounds options menu
- Send as MMS (for downloaded ringtone/melody)
- Set as ringtone (for preset and downloaded ringtone/melody)
- Rename (for downloaded ringtone/melody)
- Delete (for downloaded ringtone/melody)
- Delete all (for downloaded ringtone/melody)
- Info (for preset and downloaded ringtone/melody)
- Record voice
- Recording voice
- Record voice options menu
- Rename
- Delete
- Delete all
- Phonebook
- Lists
- Personal Directory (ADN)
- Fixed Dialing Numbers (FDN)
- Service Dialing Numbers (SDN)
- Creating a new phonebook record
- Complete
- SIM
- Phone
- Own number
- FDN
- Groups
- Add a phonebook record to a group
- View group member
- Assign a ringtone/melody to a group
- Change a group image
- Changing a group name
- Ungroup a phone number or remove all entries from the group
- Calling phone numbers from phonebook
- Editing phonebook entries
- Deleting a single phonebook record
- Deleting all phone records
- Copying/Moving from phone to SIM / SIM to phone
- Sending an SMS/MMS from the phonebook
- Search by a record number
- Sorting a list
- Java TM
- Java™
- Launch
- New folder
- About
- Exit
- Folders options menu
- Open
- Up
- Playing games
- Accessory
- Scheduler
- Agenda
- Options menu for existing agenda
- ToDo list
- To register an event in the ToDo list, use the following procedure:
- Options menus for existing reminders/appointments
- Notepad
- Notepad options menus
- Notepad edit options menu
- Alarm clock
- Auto off
- Auto on
- Countdown
- Stopwatch
- Calculator
- Calculator key
- Activating calculator
- Terminating calculator
- Calculating
- Deleting a digit
- Deleting all digits
- Currency converter
- Rate setting
- Rate compute
- Composer
- Voice memo
- attachment.
- Record
- Play
- Data rate
- Index
- A
- B
- C
- D
- E
- F
- G
- H
- I
- J
- K
- L
- M
- N
- O
- P
- R
- S
- T
- V
- W
Brand : NEC
Model : e121
Category : Mobile Phone