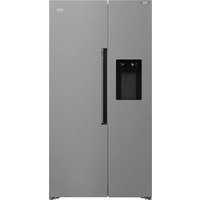
USER MANUAL ASP34B32VPS BEKO
ASP34B32VPS
Please read these instructions first before using your appliance
Thank you for choosing a Beko appliance.
Please take some time to read this user manual before using your appliance, to ensure you know how to safely operate the controls and functions.
Carefully follow all unpacking and installation instructions to ensure the appliance is correctly connected and fitted prior to use.
Please write your product model and serial number on the last page of this user manual, and store in a safe location close to the appliance for easy future reference.
This user manual may also be applicable for several other models. Differences between models will be listed.
If you have any questions or concerns, please call our contact centre or find help and information online at www.beko.co.uk
Symbols and their descriptions
This instruction manual contains the following symbols:

Important information or useful usage tips.

Warning against dangerous conditions for life and property.
Warning against electric voltage.
| i INFORMATION |
| ENERG
SUPPLIER'S NAME
MODEL IDENTIFIER
(*)
A
A | .The model information as stored in the product data base can be reached by entering following website and searching for your model identifier (*) found on energy label.
https://eprel.ec.europa.eu/ |
1 Safety Instructions 3
⚠️1.1 Purpose of usage. 3 ⚠️1.2 Safety of children, vulnerable persons and pets. 3 ⚠️1.3 Electrical safety ..... 4 ⚠️1.4 Handling Safety 4 ⚠️ 1.5 Installation Safety. ..... 4 ⚠️1.6 Operational safety .....5 ⚠️1.7 Maintenance and cleaning safety ..... 6 ⚠️1.8HomeWhiz 6 ⚠️ 1.9 Lighting. 6
2 Environmental instructions 7
2.1 Compliance with the WEEE Directive and Disposing of the Waste Product: .....7 2.2 Compliance with RoHS Directive ..... 7 2.3 Package information....7
3 Your Refrigerator 8
4 Installation 9
4.1 The right place for installation ..... 9 4.2 Attaching the plastic wedges ..... 9 4.3 Adjustment of the feet. 10 4.4 Electrical connection....11 4.5 Water connection 11 4.6 Connecting water hose to the product ..... 12 4.7 Connecting to water mains ..... 12 4.8. For products using water carboy ..... 13 4.9 Water filter 13 4.10 Fixing external filter on the wall (Optional) . 14 4.11.Internal filter....15
5 Preparation 17
5.1 What to do for energy saving ..... 17 5.2 First operation 17
6 Operating the Product 18
6.1 Turning off the product 18
6 Operation of the Product 19
6.2 Indicator panel ..... 19 6.3 Deodoriser Module 22
(FreshGuard) 22 6.4 Humidity controlled crisper (EverFresh+) . . . 23 6.5 Blue Light/HarvestFresh 23 6.6 Using the water fountain 24 6.7 Filling the water tank of the water fountain 24 6.8 Cleaning the water tank ..... 24 6.9 Dairy (cold storage) bin 26 6.10 Crisper 26 6.11 Ionizer....26 6.12 Odour filter 26 6.13 Icematic and ice storage box.....26 6.14 Taking ice / water 27 6.15 Drip tray 27 6.16 Ice-maker 28 6.17 Freezing fresh food....30 6.18 Recommendations for storing frozen foods 30 6.19 Deep freezer details 30 6.20 Placing the food ..... 31 6.21 Door open alert 31 6.22 Illumination lamp 31
7 Maintenance and cleaning 32
7.1 Stainless Steel External Surfaces.....32 7.2 Cleaning of the Products with Glass Doors. . 33 7.3 Preventing Odours....33 7.4 Protecting Plastic Surfaces ..... 33
7 Maintenance and cleaning 33
8 Troubleshooting 34
1 Safety Instructions
- This section includes the safety instructions necessary to prevent the risk of personal injury or material damage.
- Our company shall not be held responsible for damages that may occur if these instructions are not observed.
⚠️ Installation and repair operations shall always be performed by Authorized Service. ⚠️ Always use genuine spare parts and accessories. ⚠️ Original spare parts will be provided for 10 years, following the product purchasing date. ⚠ Do not repair or replace any part of the product unless specified expressly in the user manual. ⚠️ Do not perform any modifications on the product. ⚠️1.1 Purpose of usage
- This product is not intended for commercial use and it shall not be used out of its intended purpose.
This product is intended for operating interiors, such as households or similar.
For example;
- In the staff kitchens of the stores, offices and other working environments,
- In farm houses,
- In the units of hotels, motels or other resting facilities that are used by the customers,
- In hostels, or similar environments,
- In catering services and similar non-retail applications.
This product shall not be used in open or enclosed external environments such as vessels, balconies or terraces. Exposing the product to rain, snow, sunlight and wind may cause risk of fire.
⚠️1.2 Safety of children, vulnerable persons and pets
- This product may be used by children aged 8 years and older and persons with reduced physical, sensory or mental capabilities or lack of experience and knowledge if they have been given supervision or instruction concerning use of the appliance in a safe way and understand the hazards involved.
- Children between 3 and 8 years are allowed to put and take out food to/from the cooler product.
- Electrical products are dangerous for children and pets. Children and pets must not play with, climb on, or enter the product.
- Cleaning and user maintenance should not be performed by children unless there is someone overseeing them.
- Keep the packaging materials away from children. Risk of injury and suffocation.
- Before disposing of old products that shall not be used any more:
- Unplug the power cord from the mains socket.
- Cut the power cord and remove it from the appliance together with the plug.
- Do not remove the racks and drawers from the product to prevent children from getting inside the appliance.
- Remove the doors.
- Store the product so that it shall not be tipped over.
- Do not allow children to play with the scrapped product.
- Do not dispose of the product by throwing it into fire. Risk of explosion.
- If there is a lock available in the product's door, keep the key out of children's reach.
Safety instructions

1.3 Electrical safety
- The product shall not be plugged into the outlet during installation, maintenance, cleaning, repair, and transportation operations.
- If the power cord is damaged, it shall be replaced by authorized service only to avoid any risk that may occur.
- Do not tuck the power cord under the product or to the rear of the product. Do not put heavy items on the power cord. The power cord should not be bent, crushed, and come into contact with any heat source.
- Do not use an extension cord, multi-plug or adaptor to operate your product.
- Portable multi sockets or portable power supplies may overheat and cause fire. Thus, do not have a multi-plug behind or in the vicinity of the product.
- The plug shall be easily accessible. If this is not possible, a mechanism that meets the electrical legislation and that disconnects all terminals from the mains (fuse, switch, main switch, etc.) shall be available on the electrical installation.
- Do not touch the plug with wet hands.
- When unplugging the appliance, don't hold the power cord, but the plug.

1.4 Handling Safety
- This product is heavy, do not handle it by yourself.
- Do not hold the product from its door while handling the product.
- Be careful not to damage the cooling system and the pipes while handling the product. Do not operate the product if the pipes are damaged, and contact an authorized service.

1.5 Installation Safety
Contact the Authorized Service for the installation of the product. To prepare the product for installation, see the information in the user guide and make sure the electric and water utilities are as required. If the installation is not suitable, call a qualified electrician and plumber to have them make the necessary arrangements. Otherwise, electric shock, fire, issues with the product, or injuries may occur.
- Check for any damage on the product before installing it. Do not have the product installed if it is damaged.
- Place the product on a level and hard surface and balance it with the adjustable legs. Otherwise, the refrigerator may tip over and cause injuries.
- The product shall be installed in a dry and ventilated environment. Do not keep carpets, rugs, or similar floor covers under the product. This may cause risk of fire as a result of inadequate ventilation!
- Do not block or cover ventilation holes. Otherwise, power consumption may be increased and damage to your product may occur.
- Do not connect the product to supply systems such as solar power supplies. Otherwise, damage to your product may occur as a result of abrupt voltage fluctuations!
- The more refrigerant a refrigerator contains, the bigger its installation room shall be. In very small rooms, a flammable gas-air mixture may occur in case of a gas leak in the cooling system. At least 1 m³ of volume is required for each 8 grams of refrigerant. The amount of refrigerant available in your product is specified on the type label.
- The installation place of the product shall not be exposed to direct sunlight and it shall not be in the vicinity of a heat source such as stoves, radiators, etc. If you cannot prevent installation of the product in the vicinity of a heat source, you shall use a suitable insulation plate and the minimum distance to the heat source shall be as specified below.
- At least 30 cm away from heat sources such as stoves, heating units, and heaters, etc.
- And at least 5 cm away from electric ovens.
- Your product has protection class I. Plug the product into a grounded socket that conforms with the voltage, current, and frequency values specified on the type label. The socket outlet shall be equipped with a fuse with a rating of 10 A – 16 A. Our company shall not be responsible for damages incurred as a result of operating the product without ensuring ground and electrical connections are made as per local or national regulations.
Safety instructions
tions made as per local or national regulations.
- The product's power cable must be unplugged during installation. Otherwise, risk of electric shock and injury may occur!
- Do not plug the product into loose, broken, dirty, greasy sockets, sockets that have come out of their seats, or sockets with a risk of water contact.
- Place the power cord and hoses (if available) of the product so that they do not cause a risk of tripping.
- Penetration of humidity into live parts or the power cord may cause a short circuit. Therefore, do not use the product in humid environments or in areas where water may splash (e.g., garage, laundry room, etc.). If the refrigerator gets wet, unplug it and contact an authorized service.
- Do not connect your refrigerator to power-saving devices. These systems are harmful to the product.

1.6 Operational safety
- Do not use chemical solvents on the product. These materials contain an explosion risk.
- In case of a product failure, unplug it and do not operate it until it is repaired by authorized service. There is a risk of electric shock!
- Do not place a source of flame (e.g., candles, cigarettes, etc.) on or near the product.
- Do not climb on the product. Risk of falling and injury!
- Do not damage the pipes of the cooling system with sharp or piercing tools. The refrigerant that sprays out in case of puncturing the gas pipes, pipe extensions, or upper surface coatings may cause skin irritation and eye injuries.
- Do not place or operate electrical appliances inside the refrigerator/freezer unless advised by the manufacturer.
- Do not jam any parts of your hands or body into the moving parts inside the product. Be careful to prevent jamming your fingers between the refrigerator and its door. Be careful when opening or closing the door if there are children around.
- Do not put ice cream, ice cubes, or frozen food into your mouth as soon as you take them out of the freezer. Risk of frostbite!
- Do not touch the inner walls, metal parts of the freezer, or food kept inside the refrigerator with wet hands. Risk of frostbite!
- Do not place soda cans or cans and bottles that contain fluids that may freeze in the freezer compartment. Cans or bottles may explode. Risk of injury and material damage!
- Do not use or place materials sensitive to temperature, such as flammable sprays, flammable objects, dry ice, or other chemical agents, in the vicinity of the refrigerator. Risk of fire and explosion!
- Do not store explosive materials such as aerosol cans with flammable materials inside the product.
- Do not place cans containing fluids over the product. Splashing of water on an electrical part may cause the risk of an electric shock or a fire.
- This product is not intended for storage and cooling of medicines, blood plasma, laboratory preparations, or similar materials and products that are subject to the Medical Products Directive.
- If the product is used against its intended purpose, it may cause damage to or deterioration of the products kept inside.
- If your refrigerator is equipped with blue light, do not look at this light with optical devices. Do not stare directly at UV LED light for a long time. Ultraviolet rays may cause eye strain.
- Do not fill the product with more food than its capacity. Injuries or damages may occur if the contents of the refrigerator fall when the door is opened. Similar problems may occur when an object is placed over the product.
- Ensure that you have removed any ice or water that may have fallen to the floor to prevent injuries.
- Change the locations of the racks/bottle racks on the door of your refrigerator while the racks are empty only. Danger of physical injury!
- Do not place objects that may fall/tipped over on the product. These objects may fall while opening or closing the door and cause injuries and/or material damages.
Safety instructions
- Do not hit or exert excessive pressure on glass surfaces. Broken glass may cause injuries and/or material damages.
- The cooling system in your product contains R600a refrigerant. The refrigerant type used in the product is specified in the type label. This gas is flammable. Therefore, be careful not to damage the cooling system and the pipes while operating the product. In case of damage to the pipes;
- Do not touch the product or the power cord.
- Keep the product away from potential sources of fire that may cause the product to catch fire.
- Ventilate the area where the product is placed. Do not use a fan.
- Contact authorized service.
- If the product is damaged and you observe a gas leak, please stay away from the gas. Gas may cause frostbite if it contacts your skin.
For products with a Water Dispenser/Ice Machine
- Use only potable water. Do not fill the water tank with any liquids - such as fruit juice, milk, carbonated beverages, or alcoholic drinks - that are not suitable for use in the water dispenser. There is a risk for health and safety!
- Do not allow children to play with the water dispenser or ice machine (Icematic) in order to prevent accidents or injuries.
- Do not insert your fingers or other objects into the water dispenser hole, water channel, or ice machine container. There is a risk of injury or material damage!
⚠️ 1.7 Maintenance and cleaning safety
- Do not pull by the door handle if you shall move the product for cleaning purposes. The handle may cause injuries if it is pulled too hard.
- Do not clean the product by spraying or pouring water on the product and inside the product. Risk of electric shock and fire.
- Do not use sharp or abrasive tools to clean the product. Do not use materials such as household cleaning agents, detergents, gas, gasoline, alcohol, wax, etc.
- Use cleaning and maintenance agents that are not harmful for food only inside the product.
- Do not use steam or steamed cleaning materials for cleaning the product and thawing the ice inside it. Steam contacts the live areas in your refrigerator and causes short circuit or electric shock!
- Take care to keep water away from the electronic circuits or lighting of the product.
- Use a clean, dry cloth to wipe the dust or foreign material on the tips of the plugs. Do not use a wet or damp piece of cloth to clean the plug. Otherwise, risk of fire or electric shock may occur.
1.8 HomeWhiz
(May not be applicable for all models)
- Follow the safety warnings even if you are away from the product while operating the product via HomeWhiz app. Also, pay attention to the warnings in the app.
1.9 Lighting
(May not be applicable for all models)
- Contact an authorized service when you shall replace the LED / bulb using for lighting.
2 Environmental instructions
2.1 Compliance with the WEEE Directive and Disposing of the Waste Product:
This product complies with EU WEEE Directive (2012/19/EU). This product bears a classification symbol for waste electrical and electronic equipment (WEEE).

This symbol indicates that this product shall not be disposed with other household wastes at the end of its service life. Used device must be returned to official collection point for recycling of electrical and electronic devices. To find these collection systems please contact to your local authorities or retailer where the product was purchased. Each household performs important role in recovering and recycling of old appliance. Appropriate disposal of used appliance helps prevent potential negative consequences for the environment and human health.
2.2 Compliance with RoHS Directive
The product you have purchased complies with EU RoHS Directive (2011/65/EU). It does not contain harmful and prohibited materials specified in the Directive.

Packaging materials of the product are manufactured from recyclable materials in accordance with our National Environment Regulations. Do not dispose of the packaging materials together with domestic or other wastes. Take them to the packaging material collection points designated by the local authorities.
3 Your Refrigerator
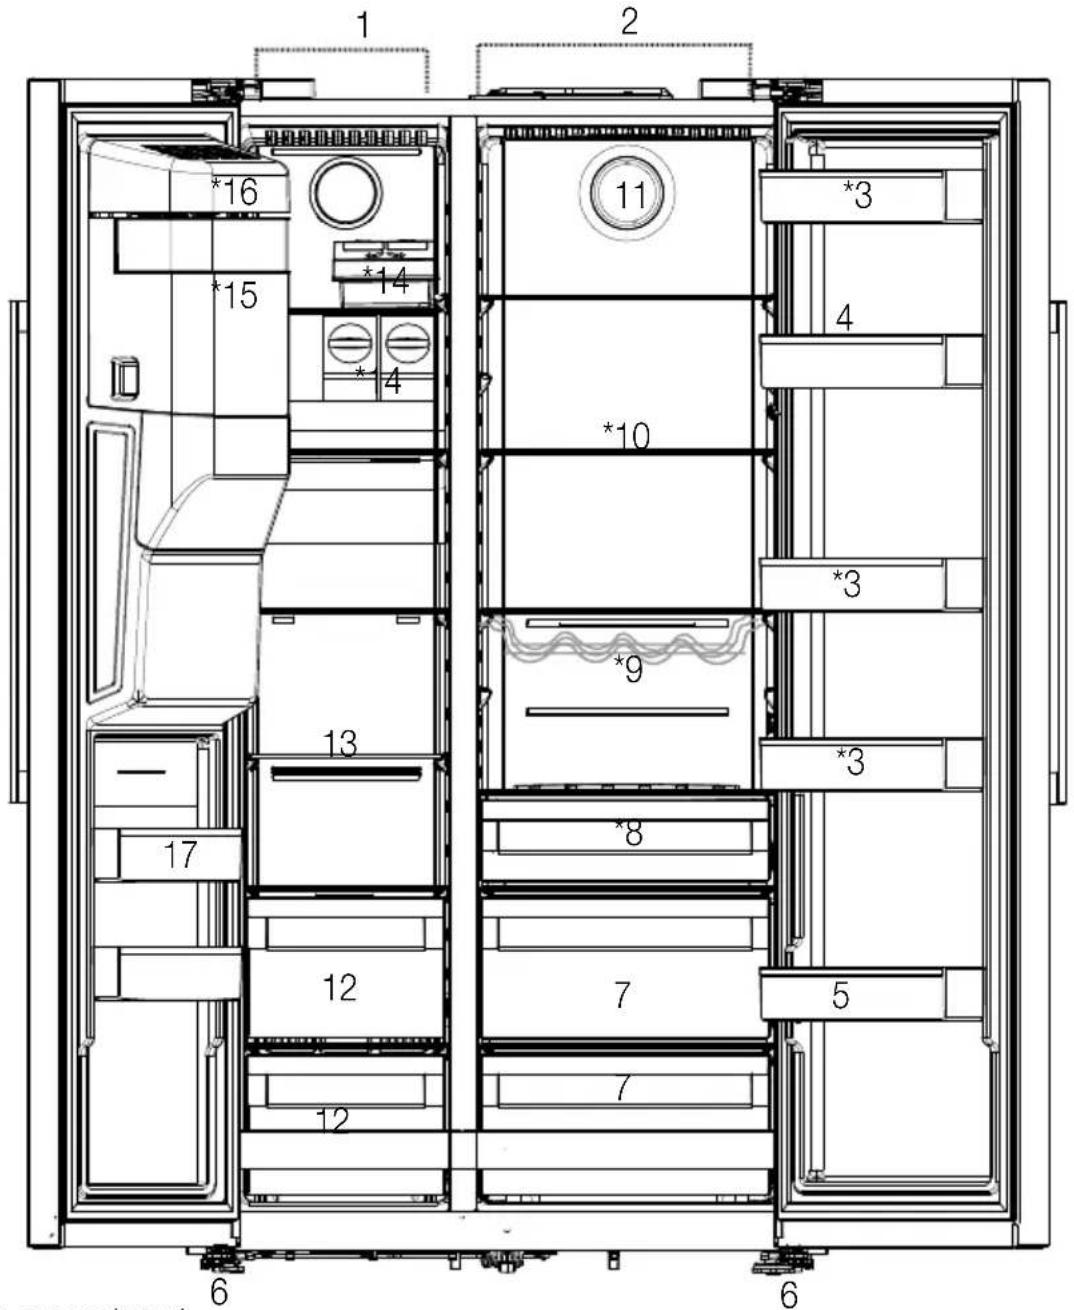
1- Freezer compartment 2- Cooler compartment 3- Cooler compartment door shelves 4- Egg Holder 5- Bottle shelf 6- Adjustable stands 7- Crispers 8- The dairy (cold storage) bin
9- Bottle shelf 10- Glass shelves 11- Fan 12- Frozen food storing compartments 13- Freezer compartment glass shelf 14- Icematic 15- Ice storage box 16- Ice-maker decorative lid 17- Freezer compartment door shelves
May not be available in all models

*Optional: Figures in this user guide are schematic and may not exactly match your product. If your product does not comprise the relevant parts, the information pertains to other models.
4 Installation
4.1 The right place for installation
Read the "Safety Instructions" section first!
Your product requires adequate air circulation to function efficiently. If the product will be placed in an alcove, remember to leave at least 5 cm clearance between the product and the ceiling, rear wall and the side walls.
If the product will be placed in an alcove, remember to leave at least 5 cm clearance between the product and the ceiling, rear wall and the side walls. Check if the rear wall clearance protection component is present at its location (if provided with the product). If the component is not available, or if it is lost or fallen, position the product so that at least 5 cm clearance shall be left between the rear surface of the product and the wall of the room. The clearance at the rear is important for efficient operation of the product.
WARNING: Do not use extension or multi sockets in power connection.

WARNING: The manufacturer assumes no responsibility for any damage caused by the work carried out by unauthorized persons.
WARNING: The product's power cable must be unplugged during installation. Failure to do so may result in death or serious injuries!

WARNING: If the door span is too narrow for the product to pass, remove the door and turn the product sideways; if this does not work, contact the authorized service.
- Place the product on a flat surface to avoid vibration.
- Place the product at least 30 cm away from heaters, stoves, and similar sources of heat, and at least 5 cm away from electric ovens.
- Do not expose the product to direct sunlight or keep it in damp environments.
- The product requires adequate air circulation to function efficiently. If the product is placed in an alcove, leave at least 5 cm of space between the product and the ceiling and walls.
4.2 Attaching the plastic wedges
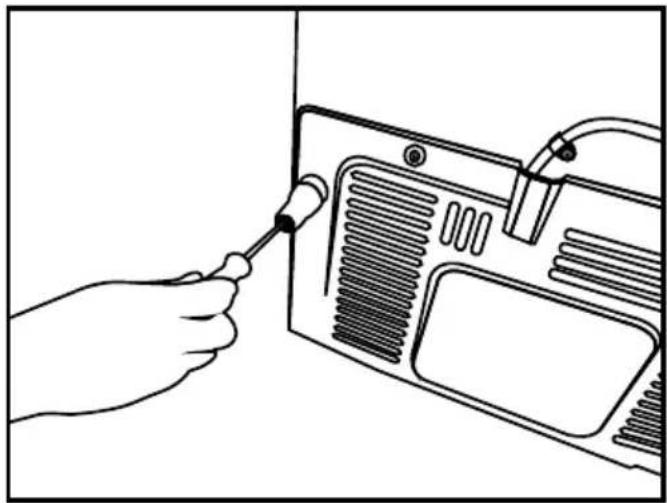
Use the plastic wedges provided with the product to ensure sufficient space for air circulation between the product and the wall.
- To attach the wedges, remove the screws on the product and use the screws provided with the wedges.

- Attach 2 plastic wedges on the ventilation cover as shown in the figure.
Installation
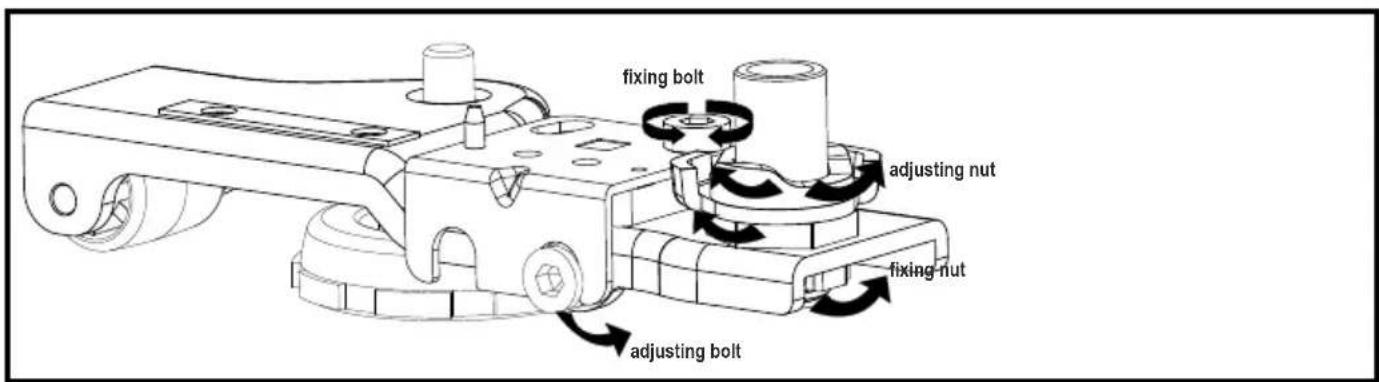
To adjust the doors vertically:
- Loosen the fixing nut at the bottom.
- Screw the adjusting nut (CW/CCW) according to the position of the door.
- Tighten the fixing nut for the final position.
To adjust the doors horizontally:
- Loosen the fixing screw at the bottom.
- Loosen the fixing bolt on the top.
- Screw the adjusting bolt (CW/CCW) on the side according to the position of the door.
- Tighten the fixing bolt on the top for the final position. Tighten the fixing screw at the bottom.
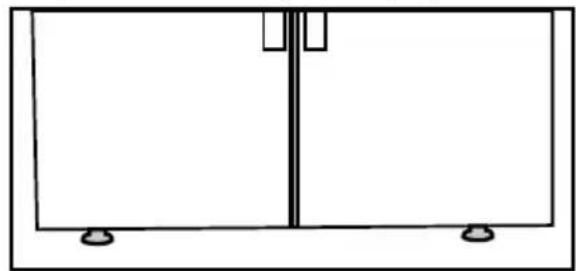
4.3 Adjustment of the feet
If the product is not in a balanced position, adjust the front adjustable stands by rotating them right or left.

Installation
4.4 Electrical connection
| WARNING: Do not use extension or multi sockets in power connection. |
| WARNING: Damaged power cable must be replaced by Authorized Service. |
Our firm will not assume responsibility for any damages due to usage without earthing and power connection in compliance with national regulations.
The power cable plug must be easily accessible after installation.
| Hot surface warning!The side walls of your product are equipped with cooler pipes to enhance the cooling system. High pressure fluid may flow through these surfaces, and cause hot surfaces on the side walls.This is normal and it does not require servicing. Be careful when you contact these areas. |
4.5 Water connection (Optional)
WARNING: Unplug the product and the water pump (if available) during connection.
The product's water mains, filter, and carboy connections must be rendered by authorized service. The product can be connected to a carboy or directly to the water mains, depending on the model. To establish the connection, the water hose must first be connected to the product.
Check to see the following parts are supplied with your product's model:
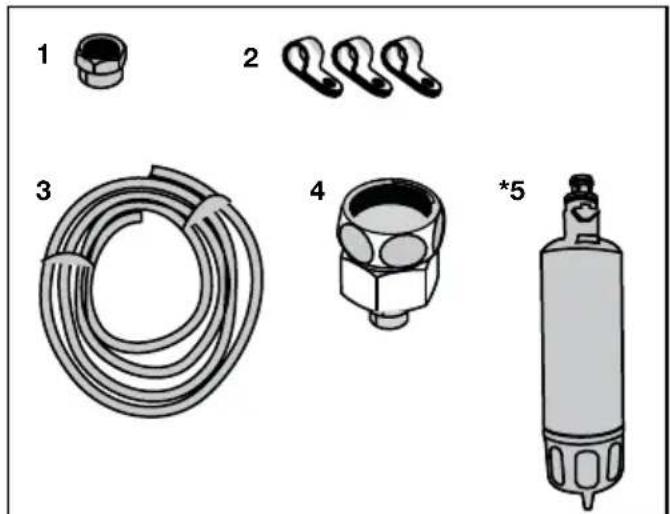
- Connector (1 piece): Used to attach the water hose to the rear of the product.
- Hose clip (3 pieces): Used to fix the water hose on the wall.
- Water hose (1 piece, 5 meters long, 1/4 inch diameter): Used for the water connection.
- Faucet adapter (1 piece): Comprises a porous filter, used for connection to the cold water mains.
- Water filter (1 piece, optional): Used to connect the mains water to the product. Water filter is not required if carboy connection is available.
Installation
4.6 Connecting water hose to the product
To connect the water hose to the product, follow the instructions below.
- Remove the connector on the hose nozzle adaptor in the back of the product and run the hose through the connector.
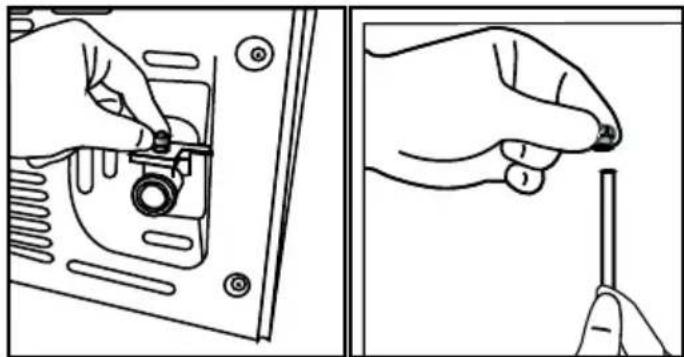
- Push the water hose down tightly and connect to the hose nozzle adaptor.
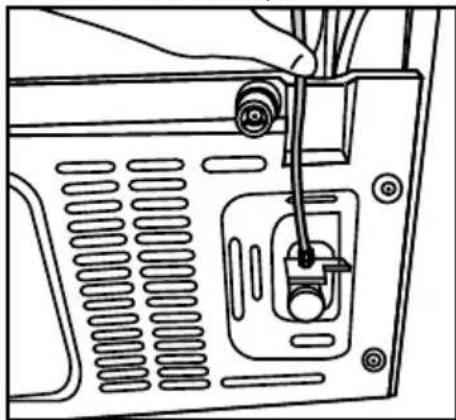
- Tighten the connector manually to fix on the hose nozzle adaptor. You may also tighten the connector using a pipe wrench or pliers.
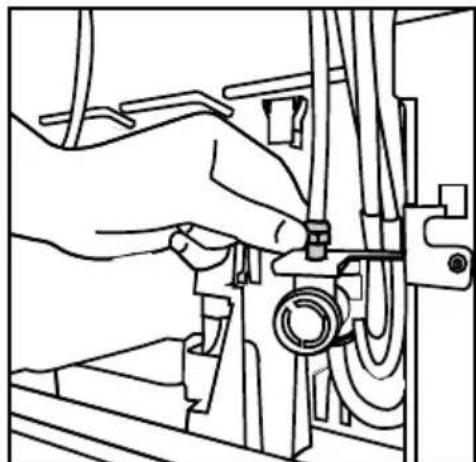
- Connect the other end of the hose to the water mains (See Section 4.7) or, to use carboy, to the water pump (See Section 4.8).
4.7 Connecting to water mains (Optional)
To use the product by connecting to the cold water mains, a standard 1/2" valve connector must be installed to the cold water mains in your home. If the connector is not available or if you are unsure, consult a qualified plumber.
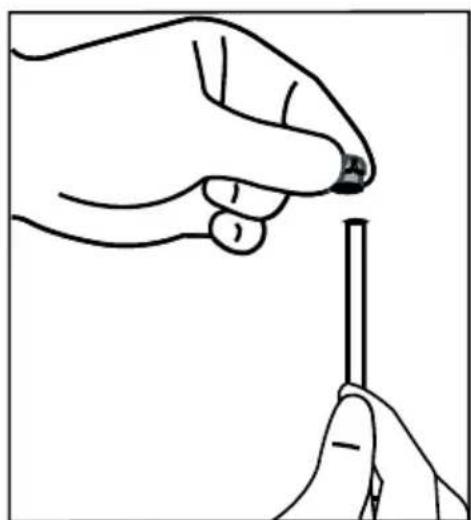
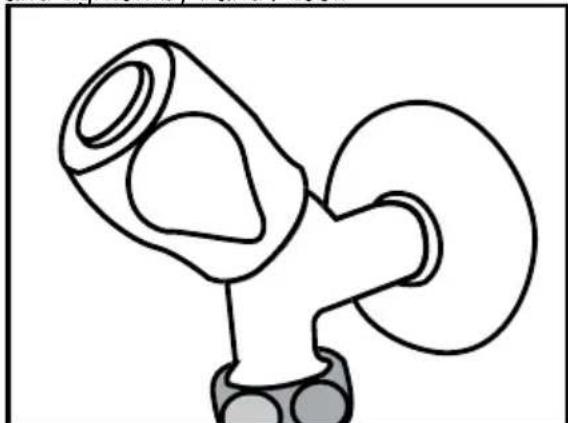
- Detach the connector (1) from the faucet adaptor (2).
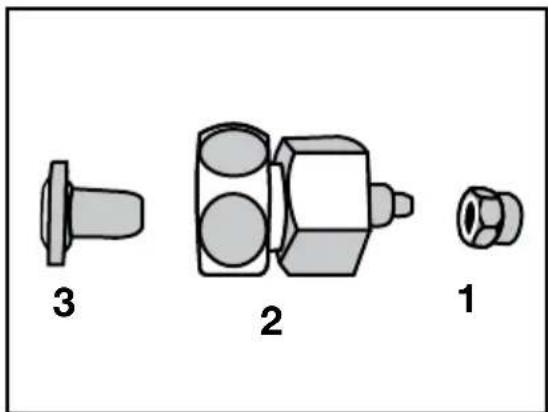
- Connect the faucet adaptor to the water mains valve.
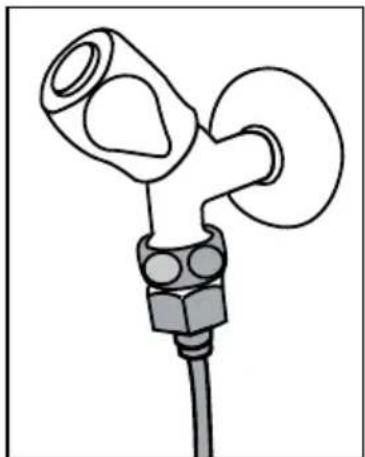
- Attach the connector around the water hose.
Installation
- Attach the connector into the faucet adaptor and tighten by hand or with a tool.
- To avoid damaging, shifting, or accidentally disconnecting the hose, use the provided clips to secure the water hose appropriately.
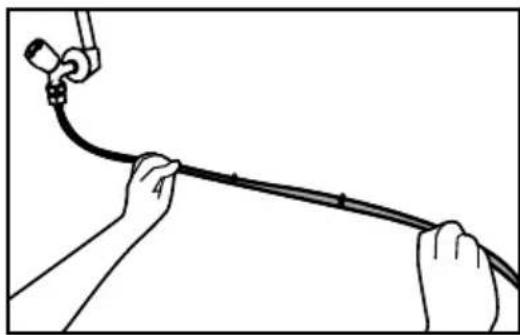
WARNING: After turning on the faucet, ensure there is no water leak at either end of the water hose. In case of leakage, turn off the valve and tighten all connections using a pipe wrench or pliers.
4.8. For products using a water carboy (Optional)
To use a carboy for the product's water connection, the water pump recommended by the authorized service must be used.
- Connect one end of the water hose provided with the pump to the product (see 4.6) and follow the instructions below.
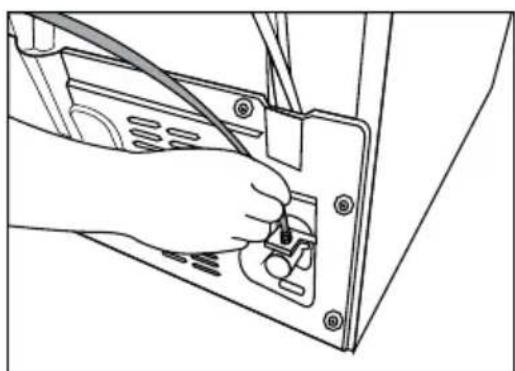
- Connect the other end of the water hose to the water pump by pushing the hose into the pump's hose inlet.

- Place and secure the pump hose inside the carboy.

- Once the connection is established, plug in and start the water pump.
 | Please wait 2-3 minutes after starting the pump to achieve the desired efficiency. |
 | See also the pump's user guide for water connection. |
 | When using carboy, water filter is not required. |
4.9 Water filter
(Optional)
The product may have an internal or external filter, depending on the model. To attach the water filter, follow the instructions below.
Installation
4.10 Fixing external filter on the wall (Optional)
WARNING: Do not fix the filter on the product.
Check to see the following parts are supplied with your product's model:
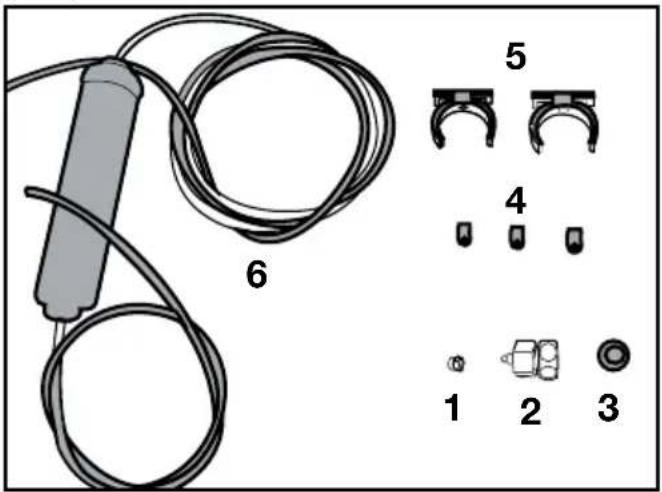
- Connector (1 piece): Used to attach the water hose to the rear of the product.
- Faucet adapter (1 piece): Used for connection to the cold water mains.
- Porous filter (1 piece)
- Hose clip (3 pieces): Used to fix the water hose on the wall.
- Filter connecting apparatus (2 pieces): Used to fix the filter on the wall.
- Water filter (1 piece): Used to connect the product to the water mains. Water filter is not necessary when using carboy connection.
- Connect the faucet adaptor to the water mains valve.
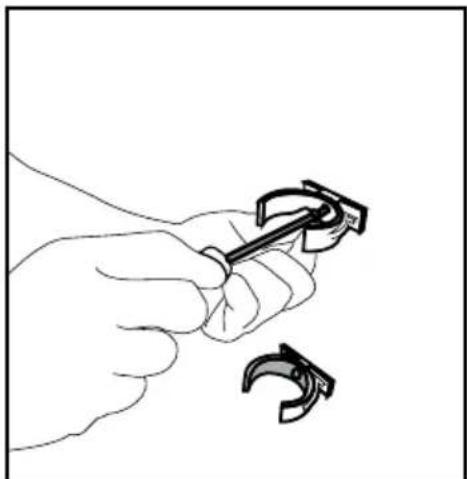
- Determine the location to fix the external filter. Fix the filter's connecting apparatus (5) on the wall.
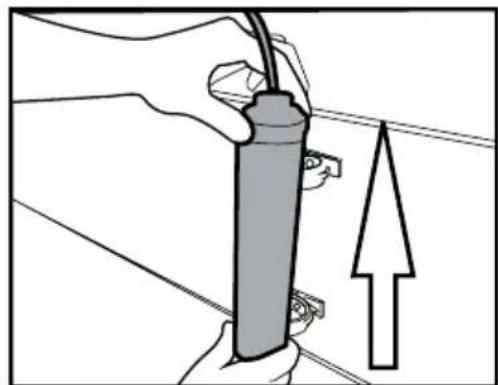
- Attach the filter in upright position on the filter connecting apparatus, as indicated on the label. (6)
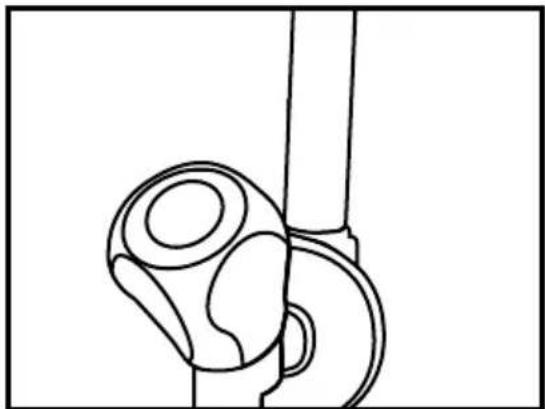
- Attach the water hose extending from the top of the filter to the product's water connection adaptor, (see 4.6.)
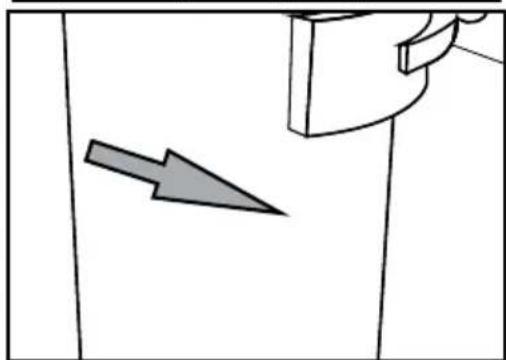
After the connection is established, it should look like the figure below.
Installation
4.11. Internal filter
The internal filter provided with the product is not installed upon delivery; please follow the instructions below to install the filter.
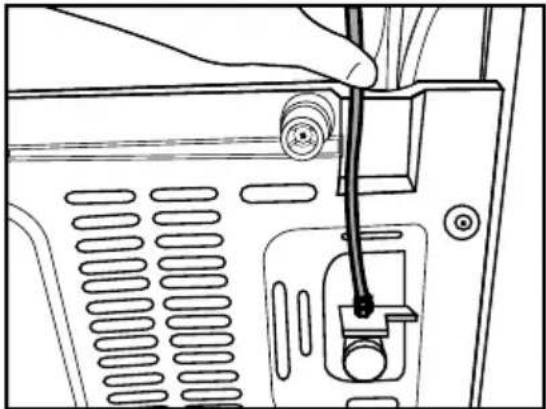
Water line: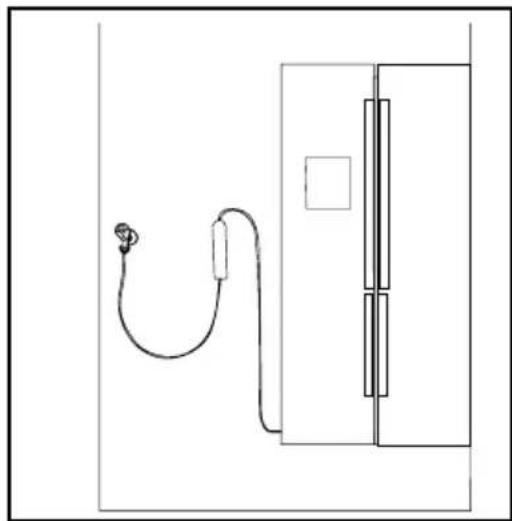
Carboy line: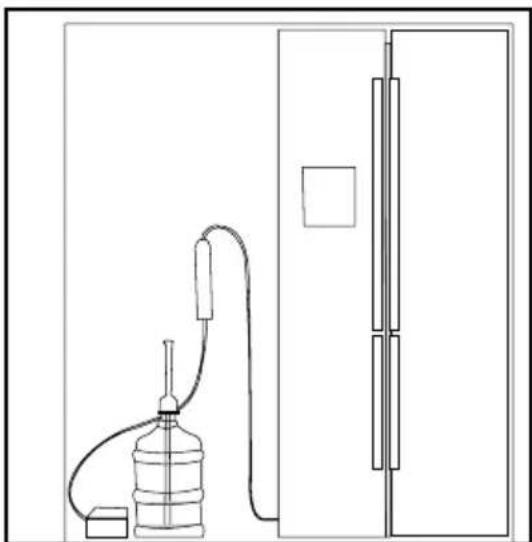

Do not use the first 10 glasses of water after connecting the filter.
- "Ice Off" indicator must be active while installing the filter. Switch the ON-OFF indicator using the "Ice" button on the screen.

- Remove the vegetable bin (a) to access the water filter.

Installation
Remove the water filter by-pass cover by pulling.

A few drops of water may flow out after removing the cover; this is normal.
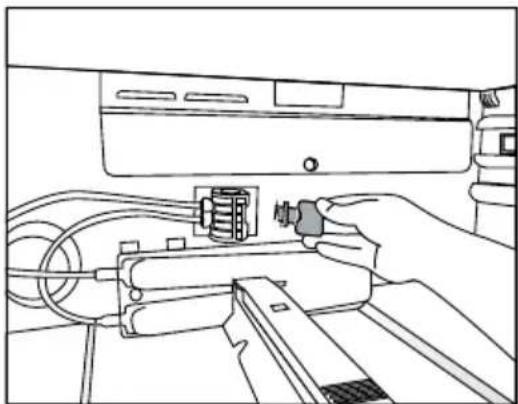
- Place the water filter cover into the mechanism and push to lock in place.
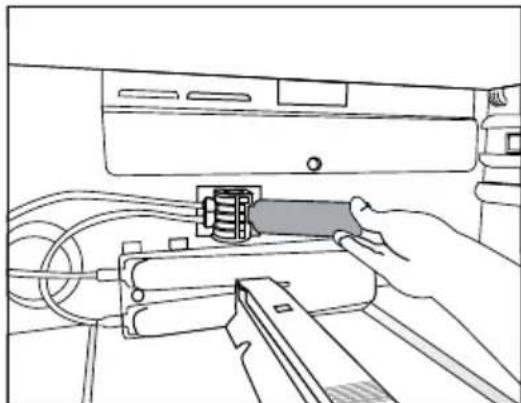
- Push the "Ice" button on the screen again to cancel the "Ice Off" mode.
The water filter will clear certain foreign particles in the water. It will not clear the microorganisms in the water.
5 Preparation

Read the "Safety Instructions" section first!
5.1 What to do for energy saving

Connecting the product to electronic energy-saving systems is harmful, as it may damage the product.
- For a freestanding appliance; 'this refrigerating appliance is not intended to be used as a built-in appliance';
- Do not keep the refrigerator doors open for long periods.
- Do not place hot food or beverages into the refrigerator.
- Do not overfill the refrigerator; blocking the internal air flow will reduce cooling capacity.
- Depending on the product's features; defrosting frozen foods in the cooler compartment will ensure energy saving and preserve food quality.
- Food shall be stored using the drawers in the cooler compartment in order to ensure energy saving and protect food in better conditions.
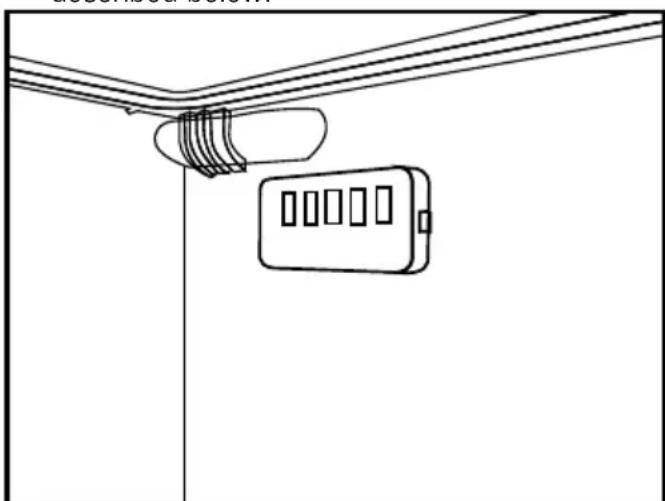
- Make sure the foods are not in contact with the cooler compartment temperature sensor described below.
- Since hot and humid air will not directly penetrate into your product when the doors are not opened, your product will optimize itself in conditions sufficient to protect your food. In this energy saving function, functions and components such as compressor, fan, heater, defrost, lighting, display and so on will operate according to the needs to consume minimum
energy while maintaining the freshness of your foodstuff.
- In case of multiple options are present glass shelves must be placed so that the air outlets at the backwall are not blocked, preferably air outlets are remaining below the glass shelf. This combination may help impoving air distribution and energy efficiency.

5.2 First operation
Before using your refrigerator, make sure the necessary preparations are made in line with the instructions in "Safety and environment instructions" and "Installation" sections.
- Keep the product running without placing any food inside for 12 hours and do not open the door, unless absolutely necessary.

A sound will be heard when the compressor is engaged. It is normal to hear sound even when the compressor is inactive, due to the compressed liquids and gasses in the cooling system.

It is normal for the front edges of the refrigerator to be warm. These areas are designed to warm up in order to prevent condensation.

For some models, indicator panel turns off automatically 1 minute after the door closes. It will be reactivated when the door is open or any button is pressed.
6 Operating the Product

Read the "Safety Instructions" section first!
- Do not use any mechanical tools or any other tools than the recommendations of the manufacturer to speed up the thawing operation.
- Do not use parts of your refrigerator such as the door or drawers as a support or a step. This may cause the product to trip over or its components to be damaged.
- The product shall be used for storing food only.
- Turn off the water valve if you will be away from home (e.g. on vacation) and you will not be using the Ice Maker or the water dispenser for a long period of time. Otherwise, water leaks may occur.
6.1 Turning off the product
- If you shall not be using the product for a long period:
- unplug it,
- remove the food to prevent odours,
- wait until the ice is thawed,
- clean the inside and wait until it is dried.
- leave the doors open to prevent damage to internal body plastics.
6 Operation of the Product
Read the "Safety Instructions" section first!
6.2 Indicator panel
Indicator panels may vary depending on the model of your product.
Audial and visual functions of the indicator panel will assist in using the refrigerator.

- Freezer compartment temperature setting
- Economy mode
- Energy saving function (display off)
- Power failure/High temperature / error warning indicator
- Cooler compartment temperature setting
- Rapid cooling
- Vacation function
- Keypad lock / filter replacing alert cancellation
- Water, fragmented ice, ice cubes selection
- Ice making on/off
- Display on/off/Alarm off
- Autoeco
- Rapid freezing
*May not be available in all models

*Optional: Figures in this user guide are schematic and may not exactly match your product. If your product does not comprise the relevant parts, the information pertains to other models.
Using the product
- Freezer compartment temperature setting
Pressing the button ( ™ ) will enable the freezer compartment temperature to be set at -18,-19,-20,-21,-22,-23,-24,-18...
2. Economy mode
Indicates the refrigerator is running on energy-saving mode. This indicator will be active when the freezer compartment temperature is set at -18 or the energy-saving cooling is engaged by eco-extra function. (ECO)
3. Energy saving function (display off)
If the product doors are kept closed for a long time energy saving function is automatically activated and energy saving symbol is illuminated. When energy saving function is activated, all symbols on the display other than energy saving symbol will turn off. When the Energy Saving function is activated, if any button is pressed or the door is opened, energy saving function will be cancelled and the symbols on display will return to normal. Energy saving function is activated during delivery from factory and cannot be cancelled.
4. Power failure/High temperature / error warning indicator
This indicator (⚠️) will light up in case of temperature faults or fault alerts. This indicator illuminates during power failure, high temperature failures and error warnings. During sustained power failures, the highest temperature that the freezer compartment reaches will flash on the digital display. After checking the food located in the freezer compartment press the alarm off button to clear the warning.
5. Cooler compartment temperature setting
After pressing the button (☐), the cooler compartment temperature can be set to 8,7,6,5,4,3,2.. respectively.
6. Rapid cooling
For rapid cooling, press the button; this will activate the rapid cooling indicator (✿). Press this button again to deactivate this function. Use this function when placing fresh foods into the cooler compartment or to rapidly cool the food items. When this function is activated, the refrigerator will be engaged for 1 hour.
7. Vacation function
When the Vacation function (*) is active, the cooler compartment temperature indicator displays the inscription "-" and no cooling process will be active in the cooling compartment. This function is not suitable to keep food in the cooler compartment. Other compartments will remain cooled with the respective temperature set for each compartment.
Press the vacation function button again to cancel this function. (1)
8. Keypad lock / Keypad lock / filter replacing alert cancellation
Press keypad lock button ( ) to activate the keypad lock. You may also use this function to prevent changing the refrigerator's temperature settings. The refrigerator's filter must be replaced every 6 months. If you follow the instructions in section 6.2, the refrigerator will automatically calculate the remaining period and the filter replacement alert indicator ( ) will light up when the filter expires.
Press and hold the button (*) for 3 seconds to turn off the filter alert light.
9. Water, fragmented ice, ice cubes selection
Navigate the water (☐), ice cube (☐) and fragmented ice (☐) selections using button number 8. The active indicator will remain lit.
10. Ice making on/off
Press the button ( ) to cancel ( ) or activate ( ) once-making.
11.1 Display on/off
When you press the Display off button and when the (— off) function is lit, all the other icons of the display will go off and the display will enter the energy saving mode. When you press the Display off button again and when the (— on) function is lit, all the other icons of the display will be lit and the display will exit the energy saving mode.
Using the product
11.2 Alarm off warning
In case of power failure/high temperature alarm, after checking the food located in the freezer compartment press the alarm off button to clear the warning.
12. Autoeco
Press the auto eco button (3") for 3 seconds to activate this function. If the door remains closed for a long time when this function is activated, the cooler section will switch to economic mode. Press the button again to deactivate this function.
The indicator will light up after 6 hours when the auto eco function is active. (e)
13. Rapid freezing
For rapid freezing, press the button; this will activate the rapid freezing indicator (✿).
When the rapid freezing function is turned on, the rapid freeze indicator will light up and the freezer compartment temperature indicator will display the value -27. Press the Rapid freeze button (✗)
again to cancel this function. The Rapid freeze indicator will turn off and return to normal setting.
The rapid freezing function will be automatically cancelled after 24 hours, unless cancelled by the user. To freeze a large amount of fresh food, press the rapid freeze button 24 hours before placing the food in the freezer compartment.
6.3 Deodoriser Module
(FreshGuard)
*May not be available in all models
The deodoriser module quickly eliminates the bad smells in your refrigerator before they permeate the surfaces. Thanks to this module, which is placed on the ceiling of the fresh food compartment, the bad odours dissolve while the air is actively being passed on the odour filter, then the air that has been cleaned by the filter is re-emitted to the fresh food compartment. This way, the unwanted odours that may emerge during the storage of foods in the refrigerator are eliminated before they permeate the surfaces. This is achieved thanks to the fan, LED and the odour filter integrated into the module.
When you want to use the deodorizer module, please activate it from the indicator button.
6.4 Humidity controlled crisper (EverFresh+)
*May not be available in all models
Thanks to the humidity controlled crisper, vegetables and fruits may be stored for a longer period at an environment with ideal humidity conditions. With the humidity setting system with 3 options in front of your crisper, you may control the humidity inside the compartment as per the food you store. We recommend you to store your food by selecting vegetable option when you store vegetables only, fruit option when you store fruit only and mixed option when you store mixed food. We recommend that the vegetables and fruits shall not be stored in bags to improve the storage period of the food and to better benefit from the humidity control system. Leaving them in plastic bags causes vegetables to rot in a short time. We recommend that cucumbers and broccoli, in particular, are not stored in closed bags. In situations where contact with other vegetables is not preferred, use packaging materials such as paper that has a certain level of porosity in terms of hygiene.
When placing the vegetables, place heavy and hard vegetables at the bottom and light and soft ones on the top, taking into account the specific weights of vegetables.
Do not put fruits that have a high ethylene gas production such as pear, apricot, peach and particularly apple in the same crisper with other vegetables and fruits. The ethylene gas coming out of these fruits might cause other vegetables and fruits to mature faster and rot in a shorter period of time.
6.5 Blue Light/HarvestFresh
*May not be available in all models
For Blue light,
Vegetables and fruit stored in crispers illuminated with blue light continue to perform photosynthesis and retain their levels of C vitamin thanks to the effect of the wavelength of the blue light.
For HarvestFresh,
Vegetables and fruit stored in crispers illuminated with HarvestFresh technology retain their vitamin levels (vitamins A and C) for a longer period thanks to the cycles of blue, green, red lights and dark that simulate the cycle of the day.
When the door of your refrigerator is opened during the dark period of the HarvestFresh technology, your refrigerator shall sense this automatically and illuminate the crisper with one of the blue, green or red lights respectively for your convenience. The dark period shall be continued when you close the door of your refrigerator so that it shall represent the night period of the day cycle.
Using the product
6.6 Using the water fountain *May not be available in all models
| The first few glasses of water taken from the fountain will normally be warm. |
| If the water fountain is not used for a long time, dispose of the first few glasses of water to get clean water. |
- Push the arm of the water fountain with your glass. It would be easier to push the arm with your hand if you are using a soft plastic glass.
- Release the arm after filling your glass with water as you desire.
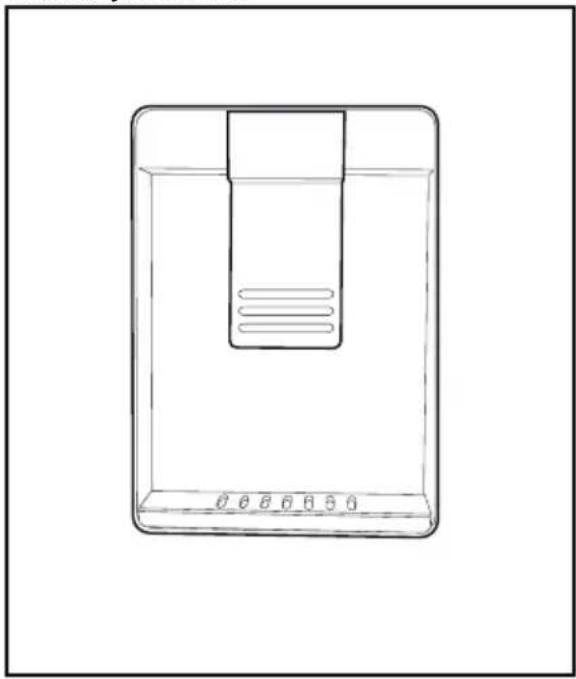
| i | The amount of water flow from the fountain depends on the pressure you apply on the arm. Release the pressure on the arm slightly as the water level in your glass/container is increased to prevent overflow. Water shall drip if you press the arm slightly; this is normal and it is not a malfunction. |
6.7 Filling the water tank of the water fountain
Open the lid of the water tank as shown in the figure. Fill in pure and clean drinking water. Close the lid.
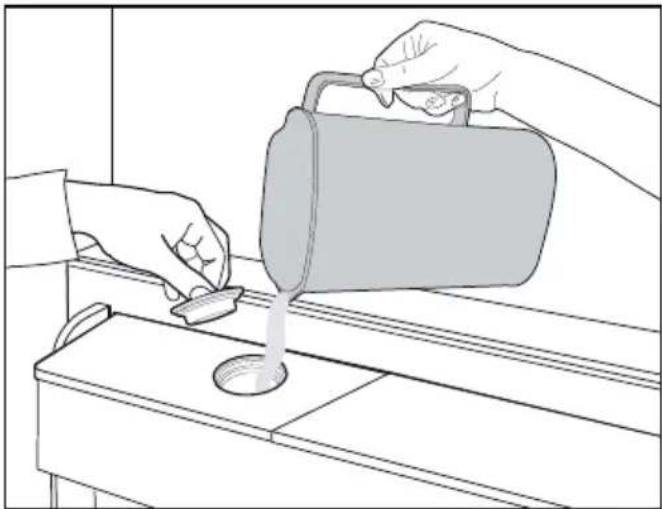
6.8 Cleaning the water tank
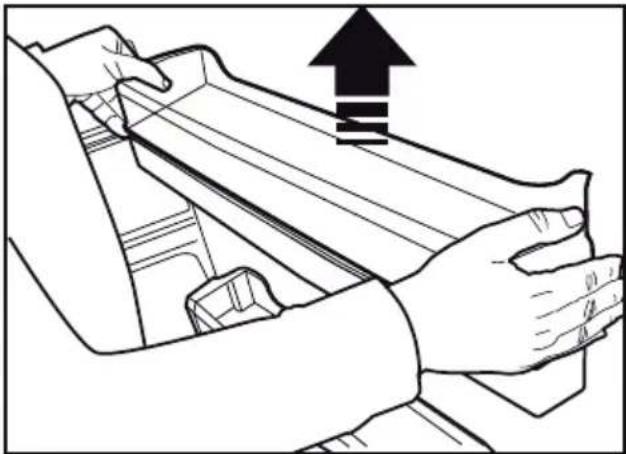
Remove the water filling reservoir inside the door shelf.
Detach by holding both sides of the door shelf.
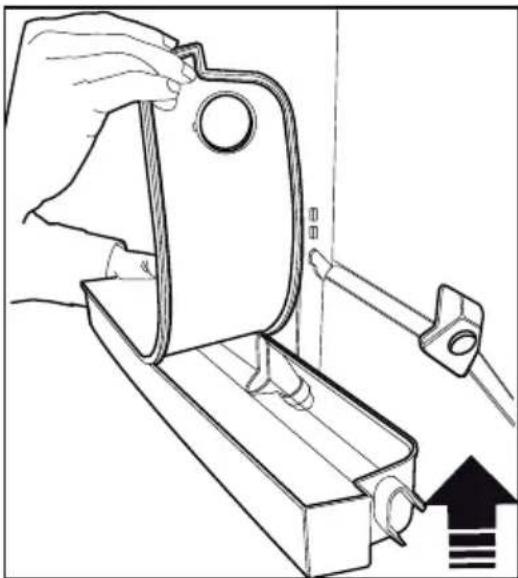
Hold both sides of the water tank and remove at a 45° angle.
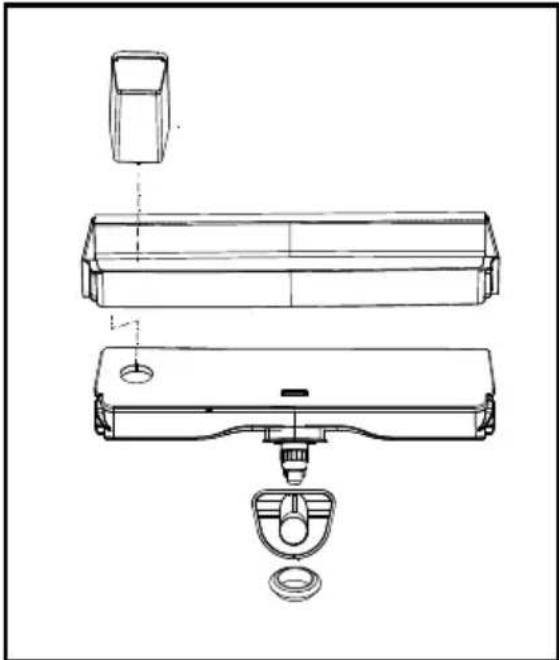
Remove and clean the water tank lid.
Using the product

Do not fill the water tank with fruit juice, fizzy beverages, alcoholic beverages or any other liquids incompatible for use in the water fountain. Using such liquids will cause malfunction and irreparable damage in the water fountain. Using the fountain in this way is not within the scope of warranty. Such certain chemicals and additives in the beverages / liquids may cause material damage to the water tank.
The water tank and water fountain components cannot be washed with dishwashers.
Components of the water tank and water dispenser should not be washed in dishwasher.
Using the product
6.9 Dairy (cold storage) bin
*May not be available in all models
The dairy (cold storage) bin provides lower temperature within the refrigerator compartment. Use this bin to store delicatessen (salami, sausages, dairy products and etc.) that requires lower storage temperature or meat, chicken or fish products for immediate consumption. Do not store fruits and vegetables inside this bin.
6.10 Crisper
The refrigerator's vegetable bin is designed to keep crispers fresh by preserving humidity. For this purpose, the overall cold air circulation is intensified in the crisper bin. Keep fruits and vegetables in this compartment. Keep the green-leaved crispers and fruits separately to prolong their life.
6.11 Ionizer
*May not be available in all models
The ionizer system in the cooler compartment's air duct serves to ionize the air. The negative ion emissions will eliminate bacteria and other molecules causing odour in the air.
6.12 Odour filter
*May not be available in all models
The odour filter in the cooler compartment's air duct will prevent undesirable odour formation.
6.13 Icematic and ice storage box
*May not be available in all models
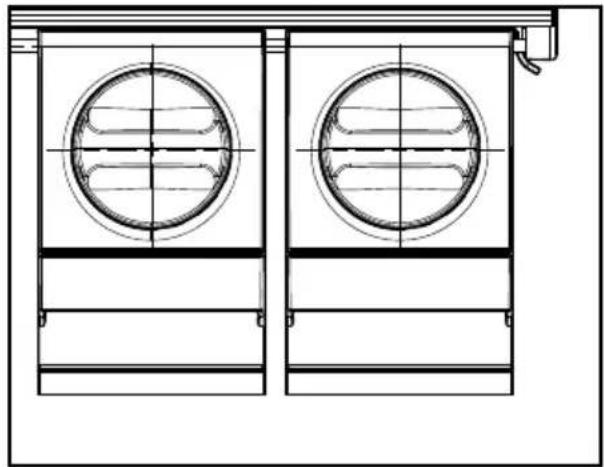
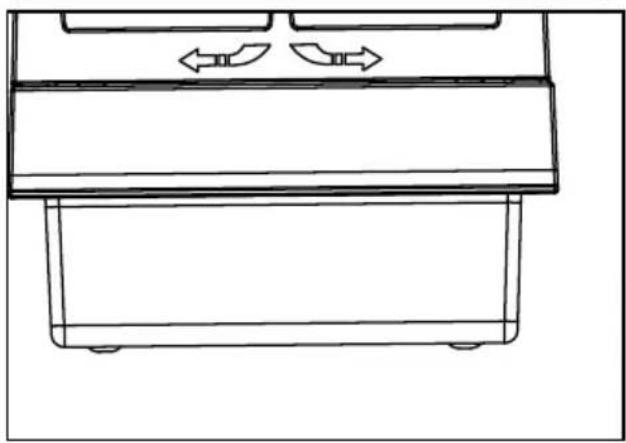
Fill the icematic with water and put it in place. The ice will be ready after approximately two hours. Do not remove the icematic to take the ice.
Turn the buttons on the right-hand side of the ice chambers by 90°; the ice will fall into the ice storage box below. You may then remove the ice storage box and serve the ice.

The ice storage box is intended for storing ice only. Do not fill it with water. Doing so will cause it to break.

In products with an automatic ice machine, you might hear a sound when pouring the ice. This sound is normal and is not a sign of failure.
Using the product
6.14 Taking ice / water
(Optional)
To take water / ice cube ( / fragmented ice ), use the display to select the respective option. Take water/ice by pushing the trigger on the water fountain forward. When switching between ice cube ( / fragmented ice ) options, the previous ice type may be discharged a few more times.
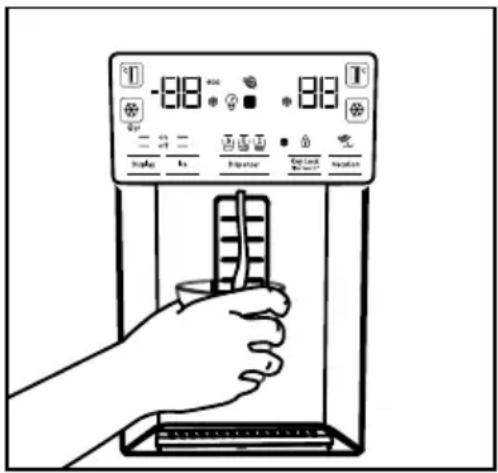
- You must wait approximately 12 hours before taking ice from the ice / water fountain for the first time. The fountain may not discharge ice if there is insufficient ice in the ice box.
- The 30 pieces of ice cubes (3-4 litres) taken after first operating should not be used.
- In case of power blackout or temporary malfunction, the ice may partly melt and re-freeze. This will cause the ice pieces to merge with each other. In case of extended power blackouts or malfunction, the ice may melt and leak out. If you experience this problem, remove the ice in the ice box and clean the box.
WARNING: The product's water system should be connected to cold water line only. Do not connect to hot water line.
- The product may not discharge water during first operation. This is caused by the air in the system. The air in the system must be discharged. To do this, push the water fountain trigger for 1-2 minutes until the fountain discharges water. The initial water flow may be irregular. The water will flow normally once the air in the system is discharged.
- The water may be cloudy during first use of the filter; do not consume the first 10 glasses of water.
- You must wait approximately 12 hours to get cold water after first installation.
- The product's water system is designed for clean water only. Do not use any other beverages.
- It is recommended to disconnect the water supply if the product will not be used for long periods during vacation etc.
- If the water fountain is not used for a long time, the first 1-2 glasses of water received may be warm.
6.15 Drip tray
(optional)
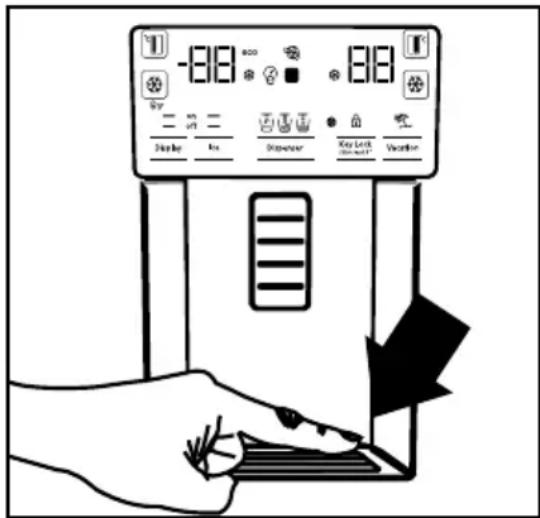
The water dripping from the water fountain accumulates on the drip tray; no water drainage is available. Pull the drip tray out or push on the edges to remove the tray. You may then discharge the water inside the drip tray.
Using the product
6.16 Ice-maker
(Optional)
Ice maker is located on the upper section of the freezer cover.
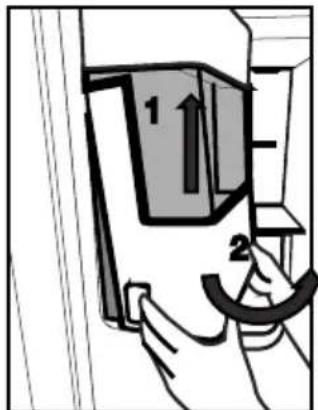
Hold the handles on the sides of the ice stock reservoir and move up to remove.
Remove the ice-maker decorative lid by moving up.
OPERATION
To remove the ice reservoir
Hold the ice stock reservoir from the handles, then move up and pull the ice stock reservoir.
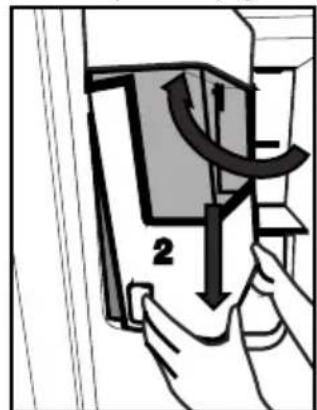
To reinstall the ice reservoir
Hold the ice stock reservoir from the handles, move up with an angle to fit the sides of the reservoir to their slot and make sure that the ice selector pin is mounted properly. (Figure 2)
Push downwards firmly, until there is no space left between the reservoir and the door plastic. (Figure 2)
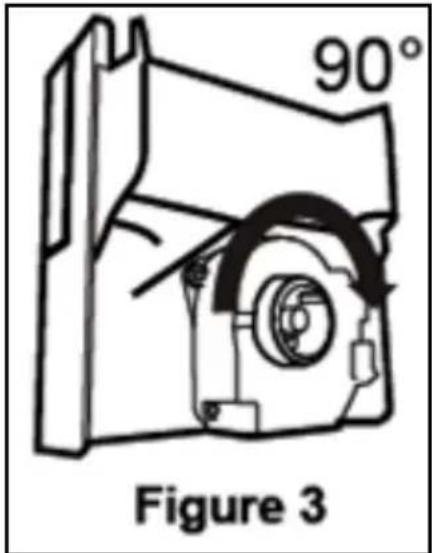
If you have difficulty in refitting the reservoir, turn the rotary gear 90° and reinstall it as shown in the figure3.
Any sound you hear when the ice drops into the reservoir is a part of normal operation.
When the ice dispenser does not work properly
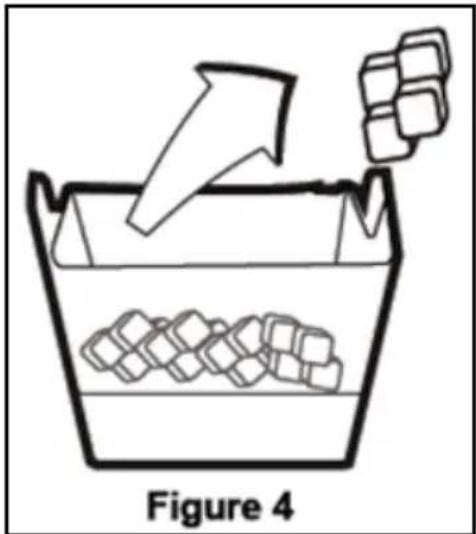
If you do not remove ice cubes for a long time, they will cause formation of ice chunks. In this case, please remove the ice stock reservoir in accordance with the instructions given above, separate the ice chunks, discard the inseparable ice and put the ice cubes back into the ice stock reservoir. (Figure 4)
Using the product
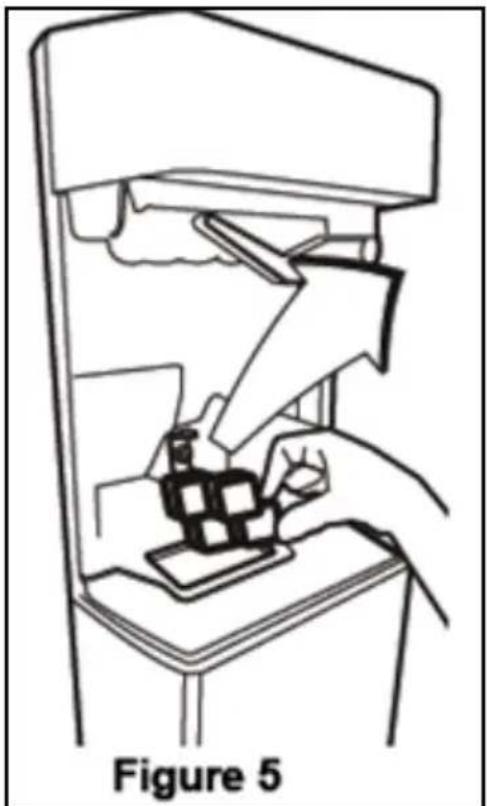
When ice does not come out, check for any ice stuck in the canal and remove it. Regularly check the ice canal to clear the obstacles as shown in the figure 5.
When using your refrigerator for the first time or when not using it for an extended period of time ice cubes may be small due to air in the pipe after connection, any air will be purged during normal use.
Discard the ice produced for approximately one day since the water pipe may contain contaminants.
Caution!
Do not insert your hand or any other object into the ice chute and blade, as this may damage the parts or injure your hand.
Do not let children hang on the ice dispenser or the ice maker, as this may cause injury.
To prevent dropping the ice storage bin, use both hands when removing it.
If you close the door hard, it may cause water to spill over the ice storage bin.
Do not disassemble the ice storage bin unless necessary.
If there is a lockout (ice does not come from the refrigerator) while taking crushed ice, try taking cubed ice.
Then it will be suitable for taking crushed ice again.
While taking crushed ice, cubed ice may come out first. There is a possibility of cubed ice coming out while taking crushed ice.
The freezer door in front of the ice machine can create a light frost and film layer.
This is normal; it is recommended to clean it without waiting for a long time.
Water accumulates over time in the lower area of the water dispenser. It is recommended to clean the water in this area periodically.
The sound made when ice falls from the ice storage bin is normal and does not indicate a problem with the product.
The blade mechanism inside the ice bin is sharp and can cut your hand.
If the ice dispenser does not provide ice, the ice may be stuck together. Remove the tank and clean it again.
The ice type cannot be changed on the display while the ice trigger is pressed to obtain ice. Release the trigger, change the ice type on the display, and then obtain ice again.
Using the product
6.17 Freezing fresh food
- To preserve food quality, the food items placed in the freezer compartment must be frozen as quickly as possible. Use the rapid freezing function for this.
- To freeze a large amount of fresh food, press the rapid freeze button 24 hours before placing the food in the freezer compartment.
- Freezing food items while they are fresh will extend their storage time in the freezer compartment.
- Pack the food items in air-tight packs and seal them tightly.
- Make sure the food items are packed before putting them in the freezer. Use freezer holders, tinfoil, damp-proof paper, plastic bags, or similar packaging materials instead of traditional packaging paper.
- Mark each food pack by writing the date on the package before freezing. This will allow you to determine the freshness of each pack every time the freezer is opened. Keep the earlier food items in the front to ensure they are used first.
- Frozen food items must be used immediately after defrosting and should not be frozen again.
- Do not freeze large quantities of food at once.
| Freezer Compartment Setting | Cooler Compartment Setting | Descriptions |
| -18°C 4°C This is the default, recommended setting. |
| -20,-22 or -24°C | 4°C | These settings are recommended for ambient temperatures exceeding 30°C. |
| Rapid Freeze 4°C | Press Rapid Freeze function 24 hours before placing the food, the product will reset to previous settings when the process is completed. |
| -18°C or colder | 2°C | Use these settings if you believe the cooler compartment is not cold enough due to ambient temperature or frequently opening the door. |
6.18 Recommendations for storing frozen foods
The compartment must be set to at least -18°C.
- Place the food items in the freezer as quickly as possible to avoid defrosting.
- Before freezing, check the "Expiry Date" on the package to make sure it is not expired.
- Make sure the food's packaging is not damaged.
6.19 Deep freezer details
As per the IEC 62552 standards, the freezer must have the capacity to freeze 4.5 kg of food items at -18°C or lower temperatures in 24 hours for each 100 litres of freezer compartment volume. Food items can only be preserved for extended periods at or below a temperature of -18°C. You can keep the foods fresh for months (in a deep freezer at or below temperatures of -18°C).
The food items to be frozen must not contact the already-frozen food inside to avoid partial defrosting.
Using the product
Boil the vegetables and filter the water to extend the frozen storage time. Place the food in air-tight packages after filtering and place in the freezer. Bananas, tomatoes, lettuce, celery, boiled eggs, potatoes and similar food items should not be frozen. Freezing these food items will simply reduce the nutritional value and food quality, as well as possibly spoiling, which is harmful to health.
6.20 Placing the food
| Freezer compartment shelves | Various frozen goods including meat, fish, ice cream, vegetables etc. |
| Cooler compartment shelves | Food items inside pots, capped plate and capped cases, eggs (in capped case) |
| Cooler compartment door shelves | Small and packed food or beverages |
| Vegetable bin | Fruits and vegetables |
| Fresh food compartment | Delicatessen (breakfast food, meat products to be consumed in short notice) |
6.21 Door open alert
*May not be available in all models
An audible alert will be heard if the product's door remains open for 1.5 minutes. The audible alert will stop when the door is closed or any button on the display (if available) is pressed.
6.22 Illumination lamp
Interior light uses a LED type lamp. Contact the authorized service for any problems with this lamp. Lamp(s) used in this appliance cannot be used for house lighting. The intended use of this lamp is to help the user place food into the refrigerator/freezer safely and comfortably.
7 Maintenance and cleaning

WARNING: Read the "Safety Instructions" section first!.
WARNING: Unplug the refrigerator before cleaning it.
- Do not use sharp or abrasive tools to clean the product. Do not use materials such as household cleaning agents, soap, detergents, gas, gasoline, alcohol, wax, etc.
- The dust shall be removed from the ventilation grill on the rear of the product at least once a year (without opening the cover). Cleaning shall be performed with a dry cloth.
For Products With Water Fountain / Ice Maker
- If the water in the water tank has waited for 2-3 weeks, it shall be replaced.
- The water tank and the components of the water fountain shall not be washed in dishwashers.
- Melt a teaspoonful of carbonate in the water. Moisten a piece of cloth in the water and wring out. Wipe the device with this cloth and dry off thoroughly. Take care to keep water away from the lamp's cover and other electrical parts.
- Clean the door with a damp cloth. Remove all contents to remove the door and body racks. Remove the door racks by lifting them upwards. Clean and dry the shelves, then attach back in place by sliding from above.
- Do not use chlorinated water or cleaning products on the exterior surface and chrome-coated parts of the product. Chlorine will cause rust on such metallic surfaces.
- Do not use sharp and abrasive tools, soap, house cleaning materials, detergents, gas, gasoline, varnish and similar substances to prevent deformation of the plastic part and removal of prints on the part. Use warm water and a soft cloth for cleaning, and then dry it.
- On the products without a No-Frost feature, water droplets and icing up to a thickness of a finger may occur on the rear wall of the freezer compartment. Do not clean, and never apply oils or similar materials.
- Use a mildly dampened micro-fiber cloth to clean the external surface of the product. Sponges and other types of cleaning cloths may cause scratches.
- To clean all removable components during the cleaning of the interior surface of the product, wash these components with a mild solution consisting of soap, water and carbonate. Wash and dry thoroughly. Prevent contact of water with illumination components and the control panel.

CAUTION:
Do not use vinegar, rubbing alcohol or other alcohol based cleaning agents on any interior surface.
7.1 Stainless Steel External Surfaces
Use a non-abrasive stainless steel cleaning agent and apply it with a soft lint-free cloth. To polish, gently wipe the surface with a micro-fiber cloth dampened with water and use dry polishing chamois. Always follow the veins of the stainless steel.
7 Maintenance and cleaning
7.2 Cleaning of the Products with Glass Doors
Remove the protective foil on the glasses.
There is a coating on the surface of the glasses. This coating minimizes formation of stains and provides easy cleaning of the stains and dirt that have been formed. Glass that is not protected by coating may be exposed to permanent bonding of organic or inorganic, air and water-based contaminants such as limestone, mineral salts, unburned hydrocarbons, metal oxides and silicones, which cause staining and physical damage easily in a short period of time. Keeping the glasses clean becomes very difficult, if not impossible, despite the fact they are cleaned regularly. As a result, the transparency and appearance of the glass deteriorates. Hard and abrasive cleaning methods and agents further increase these defects and accelerate the process of deterioration.
For routine cleaning processes, *non-alkaline and non-corrosive water based cleaning products shall be used.
In order to have a longer service life of this coating, alkaline and corrosive substances shall not be used during cleaning.
A tempering process is applied to increase the resistance of these glasses against impacts and breakage.
As an additional safety precaution, a safety film has been applied to the rear surface of these glasses to prevent harm to the environment in case it breaks.
7.3 Preventing Odours
The product is manufactured free of any odorous materials. However, keeping food in inappropriate sections and improper cleaning of internal surfaces may lead to odours.
To avoid this, clean the inside with carbonated water every 15 days.
- Keep foods in sealed containers. Microorganisms may spread from unsealed food items and cause malodour.
- Do not keep expired or spoiled foods in the refrigerator.

Tea is one of the most effective odour removers. Place the pulp of brewed tea in an open container inside the product and remove it after 12 hours at the latest. If you keep the tea pulp inside the product for longer than 12 hours, it will collect the organisms that cause odour, so it can become a source of odour itself.
7.4 Protecting Plastic Surfaces
Oil spilled on plastic surfaces may damage the surface and must be cleaned immediately with warm water.
8 Troubleshooting
Check this list before contacting the service. Doing so will save you time and money. This list includes frequent complaints that are not related to faulty workmanship or materials. Certain features mentioned herein may not apply to your product.
The refrigerator is not working.
- The power plug is not fully settled. >>> Plug it in to settle completely into the socket.
- The fuse connected to the socket powering the product or the main fuse is blown. >>> Check the fuse.
Condensation on the side wall of the cooler compartment (MULTI ZONE, COOL, CONTROL and FLEXI ZONE).
- The door is opened too frequently. >>> Take care not to open the product's door too frequently.
- The environment is too humid. >>> Do not install the product in humid environments.
- Foods containing liquids are kept in unsealed holders. >>> Keep the foods containing liquids in sealed holders.
- The product's door is left open. >>> Do not keep the product's door open for long periods. • The thermostat is set to a very cool
- temperature. >>> Set the thermostat to an appropriate temperature.
Compressor is not working.
- In case of sudden power failure or pulling the power plug off and putting back on, the gas pressure in the product's cooling system is not balanced, which triggers the compressor thermic safeguard. The product will restart after approximately 6 minutes. If the product does not restart after this period, contact the service.
- Defrosting is active. >>> This is normal for a fully-automatic defrosting product. The defrosting is carried out periodically.
- The product is not plugged in. >>> Make sure the power cord is plugged in.
- The temperature setting is incorrect. >>> Select the appropriate temperature setting.
- The power is out. >>> The product will continue to operate normally once the power is restored.
The refrigerator's operating noise is increasing while in use.
- The product's operating performance may vary depending on the ambient temperature variations. This is normal and not a malfunction.
The refrigerator runs too often or for too long.
Troubleshooting
- The new product may be larger than the previous one. Larger products will run for longer periods.
- The room temperature may be high. >>> The product will normally run for long periods in higher room temperature.
- The product may have been recently plugged in or a new food item is placed inside. >>> The product will take longer to reach the set temperature when recently plugged in or a new food item is placed inside. This is normal.
- Large quantities of hot food may have been recently placed into the product. >>> Do not place hot food into the product.
- The doors were opened frequently or kept open for long periods. >>> The warm air moving inside will cause the product to run longer. Do not open the doors too frequently.
- The freezer or cooler door may be ajar. >>> Check that the doors are fully closed.
- The product may be set to temperature too low. >>> Set the temperature to a higher degree and wait for the product to reach the adjusted temperature.
- The cooler or freezer door washer may be dirty, worn out, broken or not properly settled. >>> Clean or replace the gasket. Damaged / torn door washer will cause the product to run for longer periods to preserve the current temperature.
The freezer temperature is very low, but the cooler temperature is adequate.
- The freezer compartment temperature is set to a very low degree. >>> Set the freezer compartment temperature to a higher degree and check again.
The cooler temperature is very low, but the freezer temperature is adequate.
- The cooler compartment temperature is set to a very low degree. >>> Set the freezer compartment temperature to a higher degree and check again.
The food items kept in cooler compartment drawers are frozen.
- The cooler compartment temperature is set to a very low degree. >>> Set the freezer compartment temperature to a higher degree and check again.
The temperature in the cooler or the freezer is too high.
- The cooler compartment temperature is set to a very high degree. >>> Temperature setting of the cooler compartment has an effect on the temperature in the freezer compartment. Wait until the temperature of relevant parts reach the sufficient level by changing the temperature of cooler or freezer compartments.
- The doors were opened frequently or kept open for long periods. >>> Do not open the doors too frequently.
- The door may be ajar. >>> Fully close the door.
- The product may have been recently plugged in or a new food item is placed inside. >>> This is normal. The product will take longer to reach the set temperature when recently plugged in or a new food item is placed inside.
- Large quantities of hot food may have been recently placed into the product. >>> Do not place hot food into the product.
Shaking or noise.
- The ground is not level or durable. >>> If the product is shaking when moved slowly, adjust the stands to balance the product. Also make sure the ground is sufficiently durable to bear the product.
- Any items placed on the product may cause noise. >>> Remove any items placed on the product.
The product is making noise of liquid flowing, spraying etc.
- The product's operating principles involve liquid and gas flows. >>> This is normal and not a malfunction.
Troubleshooting
There is sound of wind blowing coming from the product.
- The product uses a fan for the cooling process. This is normal and not a malfunction.
There is condensation on the product's internal walls.
- Hot or humid weather will increase icing and condensation. This is normal and not a malfunction.
- The doors were opened frequently or kept open for long periods. >>> Do not open the doors too frequently; if open, close the door.
- The door may be ajar. >>> Fully close the door.
There is condensation on the product's exterior or between the doors.
- The ambient weather may be humid, this is quite normal in humid weather. >>> The condensation will dissipate when the humidity is reduced.
The interior smells bad.
- The product is not cleaned regularly. >>> Clean the interior regularly using sponge, warm water and carbonated water.
- Certain holders and packaging materials may cause odour. >>> Use holders and packaging materials without free of odour.
- The foods were placed in unsealed holders. >>> Keep the foods in sealed holders. Micro-organisms may spread out of unsealed food items and cause malodour.
- Remove any expired or spoilt foods from the product.
The door is not closing.
- Food packages may be blocking the door. Relocate any items blocking the doors.
- The product is not standing in full upright position on the ground. >>> Adjust the stands to balance the product.
- The ground is not level or durable. >>> Make sure the ground is level and sufficiently durable to bear the product.
The crisper is jammed.
- The food items may be in contact with the upper section of the drawer. >>> Reorganize the food items in the drawer.
In case of a Hot Surface on the Product,
- High temperature may be observed between two doors, on the side panels and on the rear grill area while your product is operated. This is normal and it does not require servicing!
Fan continues to operate when the door is opened.
- Fan may continue to operate when the freezer door is open.
WARNING: If the problem persists after following the instructions in this section, contact your vendor or an Authorized Service. Do not try to repair the product.
BEKO UK AND IRELAND STANDARD MANUFACTURER GUARANTEE TERMS AND CONDITIONS
Your new Beko product is guaranteed against faulty materials, defective components or manufacturing defects.
The standard guarantee starts from the date of original purchase of the product, and lasts for a period of twelve (12) months unless Beko plc (the “Manufacturer”) agrees to extend the guarantee for the product in writing.
If you have purchased an American style Fridge freezer, the standard guarantee starts from the date of original purchase of the product, and lasts for a period of twenty four (24) months unless Beko plc (the "Manufacturer") agrees to extend the guarantee for the product in writing.
If you have any questions about the guarantee on your product (including how long it is valid), please contact your retailer or our contact centre on
0333 207 971(UK and Northern Ireland) or 01 862 3411 (Republic of Ireland)
This guarantee does not in any way diminish or affect your statutory rights in connection with the product. This guarantee is in addition to your statutory rights as a consumer. If you have any questions about these rights, please contact the retailer from which you purchased the product. In certain circumstances, it is possible that your statutory rights may offer additional or higher levels of protection than those offered under the terms of this guarantee.
What is covered by this guarantee?
- Repairs to the product required as a result of faulty materials, defective components or manufacturing defects. • Functional replacement parts to repair a product. • The costs of a Beko Approved Engineer to carry out the repair.
What is not covered?
• Transit and delivery damage. • Cabinet or appearance parts, including but not limited to control knobs, flaps and handles. - Accessories and/or consumable items including but not limited to ice trays, scrapers, cutlery baskets, filters and light bulbs. • Repairs necessary as a direct or indirect result of:
- Accidental damage, misuse or abuse of a product.
- An attempted repair of a product by anyone other than a Beko Approved Engineer (the "Engineer").
- Installation or use of a product where such installation or use fails to meet the requirements contained in this guarantee or the User Instructions Booklet.
- Repairs to a product operated at any time on commercial or non-residential household premises (unless we have previously agreed to the installation environment).
This guarantee is limited to the cost of repairing the product. To the extent permitted by law, the Manufacturer does not accept and will not be held liable for any financial loss incurred in connection with the failure of any product to operate in accordance with the expected standards. Such financial loss includes but is not limited to loss arising from:
• Time taken off work. • Damaged food, clothing or other items. • Meals taken at restaurants or from takeaways. • General compensation for inconvenience.
Important Notes
- Your product is designed and built for domestic household use only.
- The guarantee will automatically be void if the product is installed or is used in commercial or non-residential domestic household premises, unless we have previously agreed to the installation environment.
- The product must be correctly installed, located and operated in accordance with the instructions contained in the User Instructions Booklet provided with your product.
- Professional installation by a qualified Electrical Domestic Appliance Installer is recommended for all Washing Machines, Dishwashers and Electric Cookers (as incorrect installation may result in you having to pay for the cost of repairing the product).
- Gas Cookers must be professionally installed by a Gas Safe (or Gas Networks Ireland for Republic of Ireland) registered gas installer.
- This guarantee is given in respect of products purchased and used within the United Kingdom and the Republic of Ireland.
- This guarantee is effective from the initial date of purchase of a new product from an authorised retailer and will be void if the product is resold.
- This guarantee does not apply to graded sales (where the product is purchased as a “second”).
- Possession of a copy of these terms and conditions does not necessarily mean that a product has the benefit of this guarantee. If you have any questions, please call our Call Centre on the number set out above.
- The Manufacturer reserves the right to terminate the guarantee if its staff or representatives are subjected to physical or verbal abuse in the course of carrying out their duties.
- Optional extras, where available (i.e. extendable feet) are supplied on a chargeable basis only.
Does Beko offer replacements?
This is a repair-only guarantee. On occasion, the Manufacturer may at its sole discretion, replace your product with a new product instead of carrying out a repair. Where a replacement is offered, this would normally be an identical model but when this is not possible, a model of similar specification will be provided. The Manufacturer will cover the costs and arrange for the delivery of the new product and for the return of the old product. Any costs related to disconnecting the faulty product and installing the replacement product will not be borne by the Manufacturer unless previously agreed to in writing. The original guarantee will continue to apply to the replacement product; the new product will not come with a new guarantee.
When will the repair take place?
Our Engineers work Monday to Friday 9.00am to 5.00pm. Appointments outside these hours may be possible at the sole discretion of the Manufacturer but cannot be guaranteed. Whilst our Engineers will endeavour to minimize inconvenience and to meet requests for specific timed appointments, this cannot be guaranteed. We will not be liable for delays or if it is unable to carry out a repair because a convenient appointment cannot be arranged.
Will there be any charge for the repairs?
It is your responsibility to provide evidence to the Engineer that your product is covered by this guarantee with a proof of purchase. The Manufacturer reserves the right to charge for the reasonable cost of any service call if:
• You cannot provide evidence that your product is covered by this guarantee. - Where a service call has been made and the engineer finds that there is no fault with your product. - That your product has not been installed or operated in accordance with the User Instructions Booklet. - That the fault was caused by something other than faulty materials, defective components or manufacturing defects. • For missed appointments.
Payment of these costs are due immediately upon the Engineer providing you with an invoice. The Manufacturer reserves the right to terminate the guarantee if you fail to pay the costs for the service call in a timely manner.
If you are a resident of the United Kingdom, this guarantee will be governed by English law and subject to the English Courts, save where you live in another part of the United Kingdom, in which case the law and courts of that location will apply.
If you are resident in the Republic of Ireland, this guarantee will be governed by Irish law and the Irish courts will have jurisdiction.
This guarantee is provided by Beko plc. Beko House, 1 Greenhill Crescent, Watford, Hertfordshire. WD18 8QU.
Beko plc is registered in England and Wales with company registration number 02415578
BEKO UK AND IRELAND BUILT-IN APPLIANCES GUARANTEE TERMS AND CONDITIONS
If you have purchased a built-in or integrated appliance, and registered it within 90 days of purchase by completing the online registration form, then the standard 12 month guarantee will be extended to 24 months, under the same terms and conditions as detailed in our Standard Guarantee Terms and Conditions.
Beko Free standing appliances come with a 12 month parts and labour guarantee as standard,
Beko Built-in appliances come with a 12 month parts and labour guarantee as standard. This is extended to 24 months, free of charge, upon registration of the appliance. When you register your appliance for additional guarantee, you will automatically activate the ProSmart Motor 10 year guarantee. You do not need to register twice. (beko.co.uk/guarantee-terms).
To make a claim against your Beko ProSmart Inverter Motor Guarantee (the “Guarantee”), all customer and product details must be registered with Beko plc using the procedure outlined below.
- This extra 9 years (for free standing appliances) or 8 years (for built-in or integrated appliances) guarantee is only effective after the expiration of the standard manufacturer's guarantee.
- It is only valid for the ProSmart Inverter motors of selected washing machines, washer-dryers, tumble dryers and dishwashers. It does not cover any labour charge or any other components of the product. In addition, it is only valid for one replacement of the ProSmart motor during the extra 9-year (for free standing appliances) or 8 year (for built-in appliances) guarantee period.
- To activate your guarantee, you MUST register your appliance within 90 days of the original purchase date, by visiting beko.co.uk/register.
- Customers will receive a unique reference code as proof of guarantee validation by email or post, which must be quoted at the time of a claim being made.
- Any repair/replacement of the ProSmart Inverter motor must only be carried out by an authorised Beko Service Agent (the "Service Agent").
- Labour for the repair/replacement of the ProSmart Inverter motor is not included in this guarantee and is chargeable directly by the Service Agent.
- Any additional components fitted to the product at any time will not be covered by this guarantee and will be chargeable directly by the Service Agent.
- The guarantee is not transferable and cannot be exchanged for cash.
- There are no alternative or additional offers to this Guarantee.
- The guarantee is exclusive of the manufacturer's standard guarantee
- The Terms and Conditions shown above are in addition to the standard terms and conditions of your product guarantee. Please read and refer to such Terms and Conditions when making any claim.
- We may use the information you provide for marketing purposes and to analyse your purchasing preferences. We may keep your information for a reasonable period for these purposes in accordance with the applicable Data Protection Laws and General Data Protection Regulations (GDPR). You can opt into this service during the registration process. Further details are available at http://www.beko.co.uk/cookie-and-privacy.
- These Terms and Conditions are governed by the laws of England and Wales; manufacturer: Beko plc, Beko House, 1 Greenhill Crescent, Watford WD18 8QU. Company Registration Number: 02415578.
HOW TO OBTAIN SERVICE FOR YOUR APPLIANCE
Please keep your purchase receipt or other proof of purchase details in a safe place; you will need to have this documentation available should the product require attention under guarantee.
Please take a few moments to complete the details below, as you will need this information when you call us, or to use our online services. When you call us you may be required to input your serial number into your telephone keypad. For help please visit beko.co.uk/support/model-finder
- The product model number is printed on the Operating Instruction Booklet / User guide
- The product model and serial number is printed on the Rating Label affixed to the appliance.
- The Retailer (Purchased from) and Date of purchase will be printed on your purchase receipt or other proof of purchase paperwork
Recording of these details alone will not count as proof of purchase. A valid proof of purchase is required for requesting service under guarantee.
| Model number Serial number Purchased from Date of purchase |
| | | |
Before requesting service please check the troubleshooting guide in the Operating Instructions booklet, as a charge may be levied where no fault is found, and even though your product may still be under guarantee.
After arranging service the area around the product must be easily accessible to the Engineer, without the need for cabinets or furniture to be removed or moved.
It is your responsibility to ensure our Engineers have a clean and safe environment to carry out any repairs.
Please have your Model number and Serial number available when you call us, as you may be required to input your serial number into your telephone keypad during your call.
UK Mainland & Northern Ireland:
0333 207 9710
Landline or mobile calls to 0333 numbers cost no more than calls to geographic numbers 01 or 02, and are charged at the basic rate. Calls from landlines and mobiles are included in free call packages but please check with your telephone service provider for exact call charges.
Republic of Ireland:
01 862 3411
Service once the manufacturers guarantee has expired
If you have purchased an extended guarantee please refer to the instructions contained within the extended guarantee agreement document, otherwise please call us using the appropriate number above, where service can be obtained at a charge.
Should you experience any difficulty in obtaining service please call us on 0333 207 9710 or 01862 3411
Send us a secure message through our online contact us form. Please visit our website, click Contact Us and choose a product support topic from the list of options. Complete the required details and click send message.
Product registrations
For UK registrations please visit beko.co.uk/register and for the Republic of Ireland visit beko.ie/register.
DISCLAIMER / WARNING
Some (simple) failures can be adequately handled by the end-user without any safety issue or unsafe use arising, provided that they are carried out within the limits and in accordance with the following instructions (see the “Self-Repair” section).
Therefore, unless otherwise authorized in the “Self-Repair” section below, repairs shall be addressed to registered professional repairers in order to avoid safety issues. A registered professional repairer is a professional repairer that has been granted access to the instructions and spare parts list of this product by the manufacturer according to the methods described in legislative acts pursuant to Directive 2009/125/EC.
However, only the service agent (i.e. authorized professional repairers) that you can reach through the phone number given in the user manual/warranty card or through your authorized dealer may provide service under the guarantee terms. Therefore, please be advised that repairs by professional repairers (who are not authorized by Beko) shall void the guarantee.
Self-Repair
Self-repair can be done by the end-user with regard to the following spare parts: door handles, door hinges, trays, baskets and door gaskets (an updated list is also available in support.beko.com as of 1st March 2021).
Moreover, to ensure product safety and to prevent risk of serious injury, the mentioned self-repair shall be done following the instructions in the user manual for self-repair or which are available in support.beko.com. For your safety, unplug the product before attempting any self-repair.
Repair and repair attempts by end-users for parts not included in such list and/or not following the instructions in the user manuals for self-repair or which are available in support.beko.com, might give raise to safety issues not attributable to Beko, and will void the warranty of the product.
Therefore, it is highly recommended that end-users refrain from the attempt to carry out repairs falling outside the mentioned list of spare parts, contacting in such cases authorized professional repairers or registered professional repairers. On the contrary, such attempts by end-users may cause safety issues and damage the product and subsequently cause fire, flood, electrocution and serious personal injury to occur.
By way of example, but not limited to, the following repairs must be addressed to authorized professional repairers or registered professional repairers: compressor, cooling circuit, main board, inverter board, display board, etc.
The manufacturer/seller cannot be held liable in any case where end-users do not comply with the above.
The spare part availability of the refrigerator that you purchased is 10 years. During this period, original spare parts will be available to operate the refrigerator properly
The minimum duration of the guarantee for the refrigerator you purchased is 24 months.