
RadiForce GX550-P - Screen EIZO - Free user manual and instructions
Find the device manual for free RadiForce GX550-P EIZO in PDF.


| Product Type | Monochrome LCD Monitor |
| Screen Size | 21.3 inches (54.1 cm) |
| Resolution | 5M pixels (Portrait 2048 x 2560) |
| Pixel Pitch | 0.165 mm |
| Display Tones | 1,024 grayscale tones out of 16,369 (Sub Pixel Drive Off) |
| Viewing Angles (H/V, typical) | 178° / 178° |
| Recommended Brightness | 600 cd/m² |
| Response Time (typical) | 25 ms (black-white-black) |
| Video Input Terminals | DVI-D (Dual Link) x 1, DisplayPort x 1 |
| Video Output Terminal | DisplayPort x 1 (daisy-chain) |
| USB Ports | Upstream x 1, Downstream x 2 (USB 2.0) |
| Power Supply | 100-240 VAC ±10%, 50/60 Hz, 1.0-0.45 A |
| Maximum Power Consumption | 95 W or less |
| Power Save Mode | 1.0 W or less |
| Physical Dimensions (W x H x D) | 367 mm x 505-595 mm x 264 mm (with stand, tilt 30°) |
| Dimensions without Stand | 367 mm x 452 mm x 78 mm |
| Net Weight | Approx. 8.1 kg (with stand), 5.3 kg (without stand) |
| Height Adjustment Range | 90 mm |
| Tilt / Swivel / Rotation | Up 30°, down 5° / 70° / 90° (counterclockwise for portrait) |
| Operating Temperature / Humidity | 0 °C to 35 °C / 20% to 80% R.H. (no condensation) |
| Backlight | LED (long service life) |
| Built-in Sensors | Ambient light sensor, presence sensor, integrated front sensor |
| Included Accessories | Power cord, USB cable UU300, DisplayPort cable PP300, EIZO LCD Utility Disk (CD-ROM), Instructions for Use |
| Compliance | Medical device (Class I), FCC Class B, CE, WEEE |
| Intended Use | Review, analysis and diagnosis of digital medical images, including breast tomosynthesis |
Frequently Asked Questions - RadiForce GX550-P EIZO
User questions about RadiForce GX550-P EIZO
0 question about this device. Answer the ones you know or ask your own.
Ask a new question about this device
Download the instructions for your Screen in PDF format for free! Find your manual RadiForce GX550-P - EIZO and take your electronic device back in hand. On this page are published all the documents necessary for the use of your device. RadiForce GX550-P by EIZO.
USER MANUAL RadiForce GX550-P EIZO
Monochrome LCD Monitor
Instructions for Use
Important: Please read this "Instructions for Use", and Installation Manual (separate volume) carefully to familiarize yourself with safe and effective usage. Please retain this manual for future reference.
- For monitor adjustment and settings, refer to the Installation Manual.
- The latest “Instructions for Use” is available for download from our web site: http://www.eizoglobal.com
Gebrauchsanweisung
Instructions for Use
RadiForce®
GX550
Monochrome LCD Monitor
SAFETY SYMBOLS
This manual and this product use the safety symbols below. They denote critical information. Please read them carefully.
 | WARNINGFailure to abide by the information in a WARNING may result in serious injury and can be life threatening. |  CAUTIONFailure to abide by the information in a CAUTION may result in moderate injury and/or property or product damage. CAUTIONFailure to abide by the information in a CAUTION may result in moderate injury and/or property or product damage. |
 | Indicates a warning or caution. For example, [WW5] indicates an “electrical shock” hazard. | |
 | Indicates a prohibited action. For example,  ns “Do not disassemble”. ns “Do not disassemble”. | |
 | Indicates a mandatory action. For example,  ans “Ground the unit”. ans “Ground the unit”. | |
This product has been adjusted specifically for use in the region to which it was originally shipped. If operated outside this region, the product may not perform as stated in the specifications.
No part of this manual may be reproduced, stored in a retrieval system, or transmitted, in any form or by any means, electronic, mechanical, or otherwise, without the prior written permission of EIZO Corporation. EIZO Corporation is under no obligation to hold any submitted material or information confidential unless prior arrangements are made pursuant to EIZO Corporation's receipt of said information. Although every effort has been made to ensure that this manual provides up-to-date information, please note that EIZO monitor specifications are subject to change without notice.
PRECAUTIONS
IMPORTANT
- This product has been adjusted specifically for use in the region to which it was originally shipped. If the product is used outside the region, it may not operate as specified in the specifications.
- To personal safety and proper maintenance, please read carefully this section and the caution statements on the monitor.
Location of the Caution Statements

| Symbol This symbol indicates | |
 | Main Power Switch: Press to turn the monitor's main power off. |
| Main Power Switch: Press to turn the monitor's main power on. | |
 | Power button: Press to turn the monitor's power on or off. |
| Alternating current | |
 | Alerting electrical hazard |
| CAUTION: Refer to “SAFETY SYMBOLS” (page 2). | |
 | WEEE marking: Product must be disposed of separately; materials may be recycled. |
| CE marking: EU conformity mark in accordance with the provisions of Council Directive 93/42/EEC and 2011/65/EU. | |
 | Manufacturer |
| Date of manufacture | |

If the unit begins to emit smoke, smells like something is burning, or makes strange noises, disconnect all power connections immediately and contact your EIZO representative for advice.
Attempting to use a malfunctioning unit may result in fire, electric shock, or equipment damage.
Do not open the cabinet or modify the unit.
Opening the cabinet or modifying the unit may result in fire, electric shock, or burn.

Refer all servicing to qualified service personnel.
Do not attempt to service this product yourself as opening or removing covers may result in fire, electric shock, or equipment damage.
Keep small objects or liquids away from the unit.
Small objects accidentally falling through the ventilation slots into the cabinet or spillage into the cabinet may result in fire, electric shock, or equipment damage. If an object or liquid falls/spills into the cabinet, unplug the unit immediately. Have the unit checked by a qualified service engineer before using it again.

Place the unit at a sturdy and stable place.
A unit placed on an inadequate surface may fall and result in injury or equipment damage. If the unit falls, disconnect the power immediately and ask your local EIZO representative for advice. Do not continue using a damaged unit. Using a damaged unit may result in fire or electric shock.
Use the unit in an appropriate location.
Otherwise, fire, electric shock, or equipment damage may result.
- Do not place outdoors.
- Do not place in any form of transportation (ships, aircraft, trains, automobiles, etc.).
- Do not place in dusty or humid environments.
- Do not place in locations where water may be splashed on the screen (bathrooms, kitchens, etc.)
- Do not place in locations where steam comes in direct contact with the screen.
- Do not place near heat generating devices or humidifiers.
- Do not place in locations where the product is subject to direct sunlight.
- Do not place in environments with inflammable gas.
- Do not place in environments with corrosive gases (such as sulfur dioxide, hydrogen sulfide, nitrogen dioxide, chlorine, ammonia, and ozone)
- Do not place in environments with dust, components that accelerate corrosion in the atmosphere (such as sodium chloride and sulfur), conductive metals, and so on

To avoid danger of suffocation, keep the plastic packing bags away from babies and children.
Use the enclosed power cord and connect to the standard power outlet in your country.
Be sure to use within the rated voltage of the power cord. Otherwise, fire or electric shock may result.
Power supply: 100-240Vac 50/60Hz
To disconnect the power cord, grasp the plug firmly and pull.
Tugging on the cord may damage and result in fire or electric shock.

OK


The equipment must be connected to a grounded main outlet.
Failure to do so may result in fire or electric shock.

Use the correct voltage.
- The unit is designed for use with a specific voltage only. Connection to another voltage than specified in this "Instructions for Use" may cause fire, electric shock, or equipment damage.
Power supply: 100-240Vac 50/60Hz - Do not overload your power circuit, as this may result in fire or electric shock.
Handle the power cord with care.
- Do not place the cord underneath the unit or other heavy objects.
- Do not pull on or tie the cord.
If the power cord becomes damaged, stop using it. Using of a damaged cord may result in fire or electric shock.

For electrical safety, do not connect or disconnect the power cord in the presence of patients.
Never touch the plug and power cord if it begins to thunder.
Touching them may result in electric shock.

When attaching an arm stand, please refer to the user's manual of the arm stand and install the unit securely.
Otherwise, the unit may become detached, resulting in injury and/or equipment damage. Before installation, make sure that desks, walls, or any other installation surface has adequate mechanical strength. If the unit falls, please ask your local EIZO representative for advice. Do not continue using a damaged unit. Using a damaged unit may result in fire or electric shock. When reattaching the tilt stand, please use the same screws and tighten them securely.
Do not touch a damaged LCD panel directly with bare hands.
Liquid crystal is poisonous. If any part of your skin comes in direct contact with the panel, wash thoroughly. If liquid crystal enters your eyes or mouth, immediately flush with large amounts of water and seek medical attention.

Fluorescent backlight lamps contain mercury (the products that have LED backlight lamps contain no mercury), dispose according to local, state or federal laws.
Exposure to elemental mercury can result in effects on the nervous system, including tremors, memory loss, and headaches.

Handle with care when carrying the unit.
Disconnect the power cord and cables when moving the unit. Moving the unit with the power cord or cables attached is dangerous and may result in injury.
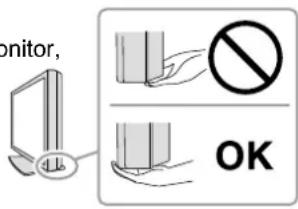
Carry or place the unit according to the correct specified methods.
- When carrying, grasp and firmly hold the unit as shown in the illustration below.
• Monitors of size 30 inches and above are heavy. When unpacking and/or carrying the monitor,
ensure at least two people are utilized.
Dropping the unit may result in injury or equipment damage.

OK


Do not block the ventilation slots on the cabinet.
- Do not place any objects on the ventilation slots.
- Do not install the unit in a place with poor ventilation or inadequate space.
- Do not use the unit laid down or upside down.
Blocking the ventilation slots prevents proper airflow and may result in fire, electric shock, or equipment damage.

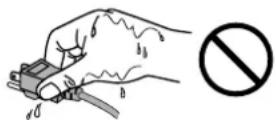
Do not touch the plug with wet hands.
Doing so may result in electrical shock.
Use an easily accessible power outlet.
This is to facilitate disconnecting the power in case of a problem.
Periodically clean the area around the power plug and the ventilation slot of the monitor.
Dust, water, or oil on the plug may result in fire.
Unplug the unit before cleaning it.
Cleaning the unit while it is plugged into a power outlet may result in electric shock.
If you plan to leave the unit unused for an extended period of time, disconnect the power cord from the wall socket after turning off the power switch for the safety and the power conservation.
This product is suitable for placing near patients, but not for direct contact with patients.
Notice for this monitor
Intended use
This product is intended to be used in displaying and viewing digital images, including standard and multi-frame digital mammography, for review, analysis and diagnosis by trained medical practitioners. It is specially designed for breast tomosynthesis applications.
Caution: Federal law (USA) restricts this device to sale by or on the order of a physician.
Attention
- This product may not be covered by warranty for uses other than those described in this manual.
- The specifications noted in this manual are only applicable when the following are used:
- Power cords provided with the product
- Signal cables specified by us
- Only use optional products manufactured or specified by us with this product.
Installation Requirements
- Carefully read the "PRECAUTIONS" (page 3) and always follow the instructions.
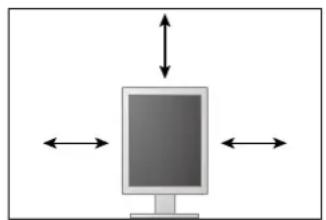
- When installing the monitor in a rack, ensure that there is adequate space around the sides, back and top of the monitor.
natural_image
Diagram of a computer monitor with bidirectional arrows indicating data or communication (no text or symbols)
- Position the monitor so that there is no light to interfere with the screen.
- If you place this product on a lacquer-coated desk, the color may adhere to the bottom of the stand due to the composition of the rubber. Check the desk surface before use.
Maintenance
- The display quality of monitors is affected by the quality level of input signals and the degradation of the product. It is recommended that daily checkups and periodical constancy test be performed to comply with medical standards/guidelines according to your application. Use of the RadiCS monitor quality control software enables you to perform high-level total quality control that meets medical standards/guidelines.
- It takes about 15 minutes for the performance of electrical parts to stabilize. Please wait 15 minutes or more after the monitor power has been turned on or the monitor has recovered from the power saving mode, and then adjust the monitor.
- It takes about a few minutes for the image quality to reach acceptable level. Please wait a few minutes or more after the monitor power has been turned on or the monitor has recovered from the power saving mode, and then view images for diagnosis.
- Monitors should be set to a lower brightness to reduce changes in luminosity caused by long-term use and maintain a stable display. Periodically perform constancy tests. Calibrate if necessary. For details, refer to the User Manuals for the RadiCS/RadiCS LE monitor quality control software.
- To maintain the measurement accuracy of the integrated front sensor, perform periodical correlation using RadiCS/RadiCS LE.
- Parts (such as the LCD panel) may deteriorate over the long term. Periodically check that they are operating normally.
- When the screen image is changed after displaying the same image for extended periods of time, an afterimage may appear. Use the screen saver or power save function to avoid displaying the
same image for extended periods of time.
- If the monitor displays continuously over a long period of time, dark smudges or burn-in may appear. To maximize the life of the monitor, we recommend the monitor be turned off periodically.
- The backlight of the LCD panel has a fixed lifetime. When the screen becomes dark or begins to flicker, please contact your local EIZO representative.
- The screen may have defective pixels or a small number of light dots on the screen. This is due to the characteristics of the panel itself, and is not a malfunction of the product.
- Do not press on the panel or edge of the frame strongly, as this may result in display malfunctions, such as interference patterns, etc. If pressure is continually applied to the panel, it may deteriorate or damage your panel. (If the pressure marks remain on the panel, leave the monitor with a black or white screen. The symptom may disappear.)
- Do not scratch or press on the panel with any sharp objects, as this may result in damage to the panel. Do not attempt to brush with tissues as this may scratch the panel.
- When the monitor is cold and brought into a room or the room temperature goes up quickly, dew condensation may occur on the interior and exterior surfaces of the monitor. In that case, do not turn the monitor on. Instead wait until the dew condensation disappears, otherwise it may cause some damage to the monitor.
Cleaning
Periodic cleaning is recommended to keep the monitor looking new and to prolong its operation lifetime.
Attention
- Do not use chemicals on a frequent basis. Chemicals such as alcohol and antiseptic solution may cause gloss variation, tarnishing, and fading of the cabinet or panel, and also quality deterioration of the image.
- Never use any thinner, benzene, wax, and abrasive cleaner, which may damage the cabinet or panel.
- Do not let chemicals come into direct contact with the monitor.
Note
- The optional ScreenCleaner is recommended for cleaning the cabinet and panel surface.
Gently wipe off any dirt on the cabinet or panel surface with a soft cloth soaked in a small amount of water or one of the chemicals listed below.
Chemicals that may be used for cleaning
| Material name Product name | |
| Ethanol Ethanol | |
| Isopropyl alcohol Isopropyl alcohol | |
| Chlorhexidine Hibitane | |
| Benzalkonium chloride Welpas | |
| Alkyldiaminoethylglycine Tego 51 | |
| Glutaral Sterihyde | |
| Glutaral Cidex Plus28 |
To use the monitor comfortably
- Staring at the monitor for a long time tires your eyes. Take a 10-minute rest every hour.
- Look at the screen from a proper distance and from a proper angle.
CONTENTS
PRECAUTIONS 3
IMPORTANT 3
Notice for this monitor 7
CONTENTS....9
Chapter 1 Introduction....10
1-1. Features ....10
1-2. Package Contents....11
1-3. EIZO LCD Utility Disk....11
Disk contents and software overview .....11
Using RadiCS LE 11
1-4. Controls and Functions .....12
1-5. Compatible Resolutions ....13
Chapter 2 Connection....14
2-1. Connecting Cables ...... 14
2-2. Making Use of USB (Universal Serial Bus) ...16
Required system environment ....16
Connection procedure (Setup of USB function)....17
Chapter 3 Setting Up....18
3-1. Adjusting the Screen Height and Angle....18
3-2. Attaching Arm....19
Chapter 4 Troubleshooting....20
Chapter 5 Specifications ...... 21
5-1. Specifications List....21
5-2. Main Default Settings 22
5-3. Dimensions.... 23
5-4. Accessories....23
Chapter 6 Glossary 24
Appendix 25
Trademark 25
License / Copyright 26
Medical Standard 26
FCC Declaration of Conformity 27
EMC Information 28
Recycling Information/Informationen zum Thema Recycling/Informations sur le recyclage/Информация относно рециклиране ..... i
Chapter 1 Introduction
Thank you for purchasing our product.
1-1. Features
- 21.3 inches
• Supports a resolution of 5M pixels (Portrait: 2048 × 2560 dots (H × V)) - Uses high-contrast panel (1500 : 1). Enables the display of sharp images.
- Applicable to DisplayPort (applicable to 8 bit or 10 bit, not applicable to audio signals)
- The daisy-chain function is included enabling multiple monitors to be connected with the DisplayPort cable.
A graphic board supporting DisplayPort1.2 is required. For details, refer to the EIZO website. http://www.eizoglobal.com - The CAL Switch function allows the user to select the display mode optimum to the displayed image.
Refer to the Installation Manual (on the CD-ROM). - Selectable DICOM (page 24) Part 14 complied screen.
- The quality control software “RadiCS LE” used to calibrate the monitor and to manage the history is included.
See "1-3. EIZO LCD Utility Disk" (page 11).
• Power saving function
This product is equipped with power saving function.
- 0 W power consumption when the main power is off
Equipped with main power switch.
When not using the monitor, you can turn off the main power supply so that the power is cut completely.
- Presence Sensor
The sensor on the front side of the monitor detects the movement of a person. When a person moves away from the monitor, the monitor shifts to the power saving mode automatically and does not display the images on the screen. Therefore, the function reduces the power consumption.
Refer to the Installation Manual (on the CD-ROM).
- Low-profile and lightweight design
- Long service life LED backlight LCD panel
• Built-in ambient light sensor
Depending on the environment, the sensor sometimes indicates different values from those measured by a stand-alone illuminance meter.
The usage of this sensor requires the quality control software "RadiCS/RadiCS LE" and the measurement is always triggered by the user's operation in the corresponding menu. For further details about the measured value and how to execute the measurement, refer to the RadiCS/RadiCS LE User's Manual (on the CD-ROM).
1-2. Package Contents
Check that all the following items are included in the packaging box. If any items are missing or damaged, contact your local EIZO representative.
Note
- Please keep the packaging box and materials for future movement or transport of the monitor.
- Monitor
- USB cable : UU300
- Power cord
• Digital signal cable : PP300 DisplayPort - DisplayPort
• EIZO LCD Utility Disk (CD-ROM)
- Instructions for Use (this manual)
An "EIZO LCD Utility Disk" (CD-ROM) is supplied with this product. The following table shows the disk contents and the overview of the software programs.
Disk contents and software overview
The disk includes quality control software and User's Manual. Refer to Readme.txt file on the disk for software startup procedures or file access procedures.
Contents Overview
Readme.txt file
RadiCS LE (for Windows) Quality control software for calibrating the monitor and managing the calibration history.
Installation Manual of this monitor (PDF file)
"Instructions for Use" of this monitor (PDF file)
Using RadiCS LE
For the installation and use of RadiCS LE, refer to the User's Manual on the disk.
When using this software, you will need to connect a PC to the monitor with the supplied USB cable (see "2-2. Making Use of USB (Universal Serial Bus)" (page 16)).
Note
- Using DDC communication allows you to use RadiCS LE without having to use the USB cable. For information on how to configure DDC communication, refer to the Installation Manual (on the CD-ROM).
1-4. Controls and Functions

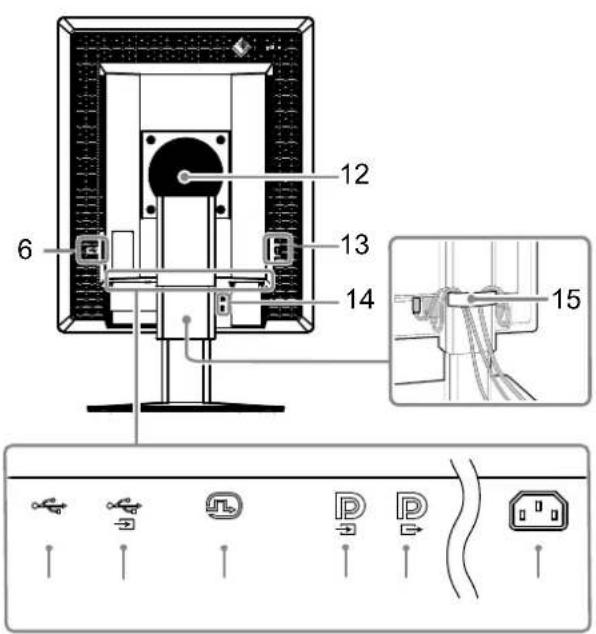
| 1. Integrated Front Sensor (Mobile) | Detects the movement of a person in front of the monitor. |
| 2. Ambient Light Sensor | Measures the environmental illumination. |
| 3. Presence Sensor | Detects the movement of a person in front of the monitor. |
| 4. Operation switches | Displays the menu. Follow the guide to perform the desired operations. |
| 5. switch | Turns the power on or off Indicates the monitor's operation status.Green: Operating, Orange: Power saving mode, Off: Main power/power off |
| 6. USB downstream port | Connects a peripheral USB device. |
| 7. USB upstream port | Connects the USB cable to use the software that needs USB connection, or to use USB Hub function. |
| 8. DVI-D connector | Connect it to the PC. |
| 9. DisplayPort input connector | Connect it to the PC. To set up a daisy-chain connection, connect the cable to the output connector of an upstream monitor. |
| 10. DisplayPort output connector | To set up a daisy-chain connection, connect the cable to the input connector of a downstream monitor. |
| 11. Power connector | Connects the power cord. |
| 12. Stand | Used to adjust the height and angle of the monitor screen. |
| 13. Main power switch | Turns the main power on or off.○: Off | : On |
| 14. Security lock slot | Complies with Kensington's MicroSaver security system. |
| 15. Cable holder | Covers the monitor cables. |
*1 For instructions for use, refer to the Installation Manual (on the CD-ROM).
1-5. Compatible Resolutions
The monitor supports the following resolutions.
√: Supported
| Resolution | vertical scan frequency | DVI DisplayPort SDG | *1 | |||
| Portrait | Landscape | Portrait | Landscape | Portrait | ||
| 720×400 70 | Hz | |||||
| 640×480 60 | Hz | |||||
| 800×600 60 | Hz | |||||
| 1024×768 60 | Hz | |||||
| 1280×1024 | 60 Hz | |||||
| 1600×1200 | 60 Hz | |||||
| 2560×2048 | 50 Hz | - | 2 | - | 3 | - |
| 2048×2560 | 50 Hz | 2 | - | 3 | - | - |
| 2560×2048 | 48 Hz | - | - | - | 4 | - |
| 2048×2560 | 48 Hz | - | - | 4 | - | - |
| 2560×2048 | 25 Hz | - | √ | - | - | - |
| 2048×2560 | 25 Hz | √ | - | - | - | √ |
*1 In order to display, a compatible graphics board is required.
*2 A dual link signal only.
*3 Only when the "DisplayPort version" is "1.1".
*4 Only when the "DisplayPort version" is "1.2".
Chapter 2 Connection
2-1. Connecting Cables
Attention
- Check that the monitor and the PC are powered off.
- When replacing the current monitor with this monitor, refer to "1-5. Compatible Resolutions" (page 13) to change the PC settings for resolution and vertical scan frequency to those that are available for this monitor, before connecting the PC.
1. Turn the monitor screen 90° in clockwise direction.
The landscape position is the default monitor orientation.
Attention
- Before turning the monitor screen, raise it to the highest position.
2. Connect signal cables.
Check the shapes of the connectors, and connect the cables. After connecting the DVI cable, tighten the fasteners to secure the connector.
Connecting to a single PC
Attention
- The DisplayPort connectors of the monitor consist of input and output. When connecting a monitor to a PC, connect the cable to input connector.

flowchart
graph TD
    A["DisplayPort"] -->|Signal cable: DD300DL| B["DVI"]
    B -->|Signal cable: PP300| C["Device 1"]
    C -->|Signal cable: DD300DL| D["Device 2"]
    D -->|Signal cable: PP300| E["Device 3"]
    E -->|Signal cable: DD300DL| F["Device 4"]
    F -->|Signal cable: PP300| G["Device 5"]
    G -->|Signal cable: DD300DL| H["Device 6"]
    H -->|Signal cable: PP300| I["Device 7"]
    I -->|Signal cable: DD300DL| J["Device 8"]
    J -->|Signal cable: PP300| K["Device 9"]
    K -->|Signal cable: DD300DL| L["Device 10"]
    L -->|Signal cable: PP300| M["Device 11"]
    M -->|Signal cable: PP300| N["Device 12"]
    N -->|Signal cable: PP300| O["Device 13"]
    O -->|Signal cable: PP300| P["Device 14"]
    P -->|Signal cable: PP300| Q["Device 15"]
    Q -->|Signal cable: PP300| R["Device 16"]
    R -->|Signal cable: PP300| S["Device 17"]
    S -->|Signal cable: PP300| T["Device 18"]
    T -->|Signal cable: PP300| U["Device 19"]
    U -->|Signal cable: PP300| V["Device 20"]
    V -->|Signal cable: PP300| W["Device 21"]
    W -->|Signal cable: PP300| X["Device 22"]
    X -->|Signal cable: PP300| Y["Device 23"]
    Y -->|Signal cable: PP300| Z["Device 24"]
    Z -->|Signal cable: PP300| AA["Device 25"]
    AA -->|Signal cable: PP300| AB["Device 26"]
    AB -->|Signal cable: PP300| AC["Device 27"]
    AC -->|Signal cable: PP300| AD["Device 28"]
    AD -->|Signal cable: PP300| AE["Device 29"]
    AE -->|Signal cable: PP300| AF["Device 30"]
    AF -->|Signal cable: PP300| AG["Device 31"]
    AG -->|Signal cable: PP300| AH["Device 32"]
    AH -->|Signal cable: PP300| AI["Device 33"]
    AI -->|Signal cable: PP300| AJ["Device 34"]
    AJ -->|Signal cable: PP300| AK["Device 35"]
    AK -->|Signal cable: PP300| AL["Device 36"]
    AL -->|Signal cable: PP300| AM["Device 37"]
    AM -->|Signal cable: PP300| AN["Device 38"]
    AN -->|Signal cable: PP300| AO["Device 39"]
    AO -->|Signal cable: PP300| AP["Device 40"]
    AP -->|Signal cable: PP300| AQ["Device 41"]
    AQ -->|Signal cable: PP300| AR["Device 42"]
    AR -->|Signal cable: PP300| AS["Device 43"]
    AS -->|Signal cable: PP300| AT["Device 44"]
    AT -->|Signal cable: PP300| AU["Device 45"]
    AU -->|Signal cable: PP300| AV["Device 46"]
    AV -->|Signal cable: PP300| AW["Device 47"]
    AW -->|Signal cable: PP300| AX["Device 48"]
    AX -->|Signal cable: PP300| AY["Device 49"]
    AY -->|Signal cable: PP300| AZ["Device 50"]
    AZ -->|Signal cable: PP300| BA["Device 51"]
    BA -->|Signal cable: PP300| BB["Device 52"]
    BB -->|Signal cable: PP300| BC["Device 53"]
    BC -->|Signal cable: PP300| BD["Device 54"]
    BD -->|Signal cable: PP300| BE["Device 55"]
    BE -->|Signal cable: PP300| BF["Device 56"]
    BF -->|Signal cable: PP300| BG["Device 57"]
    BG -->|Signal cable: PP300| BH["Device 58"]
    BH -->|Signal cable: PP300| BI["Device 59"]
    BI -->|Signal cable: PP300| BJ["Device 60"]
Connecting to multiple PCs
For information on how to switch the input signals, refer to the Setup manual (on the CD-ROM).
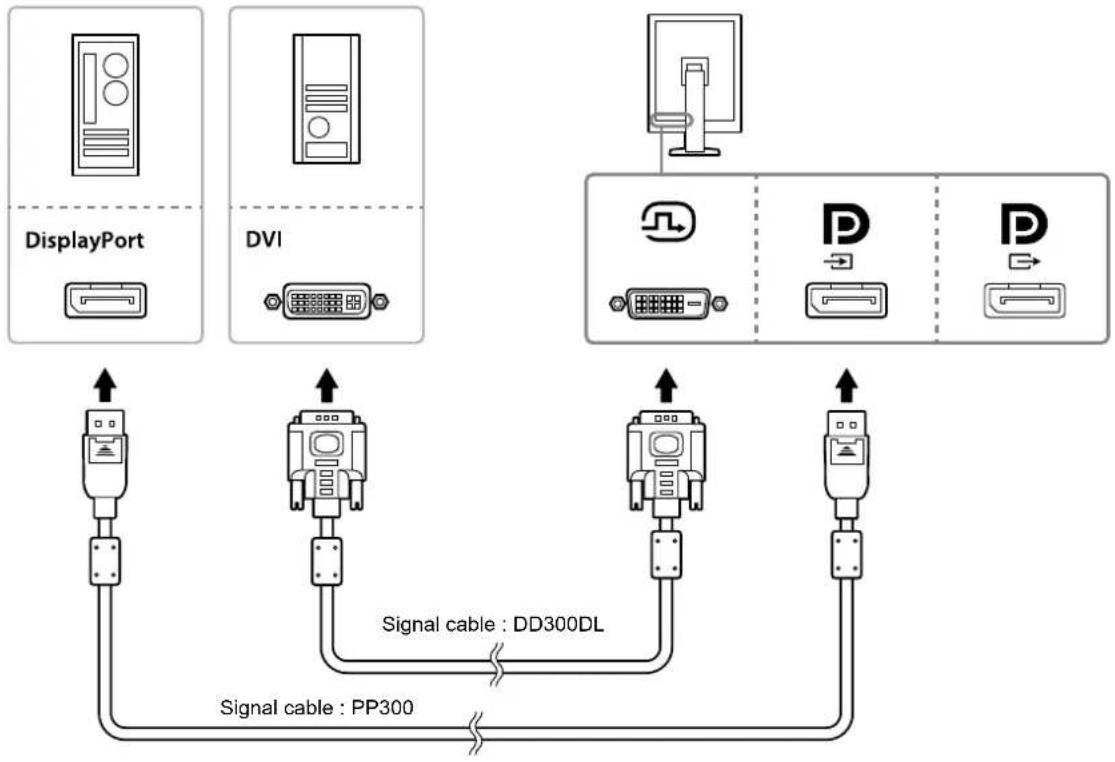
flowchart
graph TD
    A["DisplayPort"] --> B["DVI"]
    C["Signal cable: DD300DL"] --> B
    D["Signal cable: PP300"] --> B
    B --> E["Device 1"]
    B --> F["Device 2"]
    B --> G["Device 3"]
    style A fill:#f9f,stroke:#333
    style C fill:#f9f,stroke:#333
    style D fill:#f9f,stroke:#333
    style E fill:#ccf,stroke:#333
    style F fill:#ccf,stroke:#333
    style G fill:#ccf,stroke:#333
Daisy-chaining multiple monitors
Attention
- Visit the EIZO website for information about monitors and graphic boards that can be used for the daisy-chain connection: http://www.eizoglobal.com
- Remove the D cap before connecting the signal cable.

flowchart
graph TD
    A["DisplayPort"] --> B["PD"]
    B --> C["PP300 Signal cable"]
    C --> D["Signal cable: PP300"]
    D --> E["PP300 Signal cable"]
    E --> F["Signal cable: PP300"]
    F --> G["Signal cable: PP300"]
    G --> H["Signal cable: PP300"]
3. Plug the power cord into a power outlet and the power connector on the monitor.
4. Connect the USB cable when using RadiCS LE.
For information about the connection to the USB upstream port, refer to “2-2. Making Use of USB (Universal Serial Bus)” (page 16).
Connecting to the Monitor Connecting to a Computer

Note
- Using DDC communication allows you to use RadiCS LE without having to use the USB cable. For information on how to configure DDC communication, refer to the Installation Manual (on the CD-ROM).
5. Touch ⏻ to turn on the power to the monitor.
The monitor's power indicator lights up green.
6. Turn on the PC.
The screen image appears.
If an image does not appear, refer to "Chapter 4 Troubleshooting" (page 20) for additional advice.
Attention
- For the maximum power saving, it is recommended that the Power button be turned off. When not using the monitor, you can turn off the main power supply or disconnect the power plug so that the power is cut completely.
Note
- In order to maximize the monitor life and to minimize luminance deterioration as well as power consumption, proceed the following: - Use the power saving function of the computer. - Turn off the monitor and PC after using them.
2-2. Making Use of USB (Universal Serial Bus)
This monitor has a hub compatible with USB. Connected to a PC compatible with USB or another USB hub, this monitor functions as a USB hub allowing connection to peripheral USB devices.
Required system environment
- A PC equipped with a USB port or another USB hub connected to a USB compatible PC
- Windows 10 / Windows 8.1 / Windows 8 / Windows 7 / Windows Vista / Windows XP, or Mac OS X 10.2 or later
- USB cable
Attention
- This monitor may not work depending on PC, OS or peripheral devices to be used. For USB compatibility of peripheral devices, contact their manufacturers.
- Devices connected to the USB downstream port still work when the monitor is in power saving mode or when the power is switched off using only the power button of the monitor. Therefore, power consumption of the monitor varies with connected devices even in the power saving mode.
- When the main power switch is Off, device connected to the USB port will not operate.
Connection procedure (Setup of USB function)
Procedure
- Connect the monitor first to a PC using the signal cable, and run the PC.
-
Connect the supplied USB cable between the USB downstream port of a USB compatible PC (or another USB hub) and the monitor's USB upstream port.
The USB hub function is set up automatically upon connection of the USB cable. -
Connect the peripheral USB device to the USB downstream port of the monitor.

Chapter 3 Setting Up
3-1. Adjusting the Screen Height and Angle
Hold left and right edge of the monitor with both hands, and adjust the screen height, tilt and swivel of the screen to the best condition for working.

natural_image
Illustration of two hands holding a tablet with directional arrows indicating rotation (no text or symbols)Attention
• After carrying out the adjustment, make sure that the cables are connected correctly, and put them through the cable holder.
3-2. Attaching Arm
An optional arm (or an optional stand) can be attached by removing the stand section. For supported optional arms (or optional stands), refer to the EIZO website: http://www.eizoglobal.com
Attention
- When attaching an arm or stand, follow the instructions of their User's Manual.
- When using another manufacturer's arm or stand, confirm the following in advance and select one conforming to the VESA standard.
- Clearance between the screw holes: 100mm × 100 mm
- VESA mount of the arm or stand, external dimensions: 122 mm x 122 mm or less
- Strong enough to support weight of the monitor unit (except the stand) and attachments such as cables.
- When using another manufacturer's arm or stand, use the following screws to secure it.
- Screws fixing the stand to the monitor
- When using an arm or stand, attach it to meet the following tilt angles of the monitor.
- Up 45°, down 45° (when the portrait orientation is used, and when rotated 90° counterclockwise for landscape display)
- Connect the cables after attaching an arm or stand.
- Do not move the removed stand up and down. Doing so may result in injury or device damage.
• The monitor and arm or stand are heavy. Dropping them may result in injury or equipment damage. - Periodically check the tightness of the screws. If not sufficiently tight, the monitor may detach from the arm, which may result in injury or equipment damage.
Procedure
-
Lay the LCD monitor on a soft cloth spread over on a stable surface with the panel surface facing down.
-
Remove the stand.
Prepare a screwdriver. Loosen the screws (four) securing the unit and the stand with the screwdriver.
- Attach the arm or stand to the monitor.
Use the screws that you removed in step 2 to attach the arm (or stand) to the monitor.

natural_image
Technical line drawing of a mechanical assembly with mounting holes and a central component (no text or symbols)Chapter 4 Troubleshooting
If a problem still remains after applying the suggested remedies, contact your local EIZO representative.
| Problem Possible cause and remedy | |
| 1. No picture• Power indicator does not light. | Check whether the power cord is connected properly.Turn the main power switch on.Touch ⏻Turn off the main power, and then turn it on again. |
| Power indicator is lighting green. | Increase “Brightness” in the Adjustment menu. For details, refer to the Installation Manual (on the CD-ROM).Turn off the main power, and then turn it on again. |
| Power indicator is lighting orange. • Switch the | Input signal. For details, refer to the Installation Manual (on the CD-ROM).Move the mouse or press any key on the keyboard.Check whether the PC is turned on.When Presence Sensor is set to “On”, the monitor may have shifted to the power saving mode. Come near to the monitor.Check if the signal cable is connected toDfor inputting the DisplayPort signal.Dis used for output when a daisy-chain connection is set up.Turn off the main power, and then turn it on again. |
| Power indicator is flashing orange and green. | Connect via the signal cable specified by EIZO. Turn off the main power, and then turn it on again.When connected to DisplayPort, switch the version of DisplayPort to 1.1. For details, refer to the Installation Manual (on the CD-ROM). |
| 2. The message below appears. | This message appears when the signal is not input correctly even when the monitor functions properly. |
This message appears when no signal is input.Example: | The message shown left may appear, because some PCs do not output the signal soon after power-on.Check whether the PC is turned on.Check whether the signal cable is connected properly.Switch the input signal. For details, refer to the Installation Manual (on the CD-ROM).When connected to DisplayPort, switch the version of DisplayPort to 1.1.Check if the signal cable is connected toDfor inputting the DisplayPort signal.Dis used for output when a daisy-chain connection is set up.Turn off the main power, and then turn it on again. |
The message shows that the input signal is out of the specified frequency range.Example: | Check whether the PC is configured to meet the resolution and vertical scan frequency requirements of the monitor (see “1-5. Compatible Resolutions” (page 13)).Reboot the PC.Select an appropriate setting using the graphics board’s utility. Refer to the manual of the graphics board for details. |
Chapter 5 Specifications
5-1. Specifications List
| LCD Panel Type IP$ | ||
| Backlight LED | ||
| Size 54.1 cm (21.3 inch) | ||
| Resolution 5M pixels (Portrait orientation: 2048 dots × 2560 lines (H × V)) | ||
| Display Size (H × V) 337.9 mm × 422.4 mm (Portrait orientation) | ||
| Pixel Pitch 0.16 5 mm | ||
| Display Tones Simultaneous display of 1,024 tones out of 16,369 tones("Sub Pixel Drive": When "Off" is set)Simultaneous display of 1,024 tones out of 4,093 tones("Sub Pixel Drive": When "On" is set) | ||
| Viewing Angles (H / V, typical) | 178° / 178° | |
| Recommended Brightness | 600 cd/m2 | |
| Response Time (typical) | 25 ms (black -> white -> black) | |
| Video Signals | Input Terminals | DVI-D (Dual Link) × 1, DisplayPort × 1 |
| Output Terminal | DisplayPort x 1 | |
| Digital Scanning Frequency (H / V) | 31 kHz - 135 kHz / 59 Hz - 61 Hz (VGA TEXT: 69 Hz - 71 Hz, QSXGA: 24 Hz - 51 Hz (DVI), QSXGA: 23 Hz - 51 Hz (DisplayPort))Frame synchronous mode : 23.5 Hz - 25.5 Hz, 47.0 Hz - 51.0 Hz | |
| Dot clock | 25 MHz - 290 MHz | |
| USB | Port | Upstream port × 1, Downstream port × 2 |
| Standard USB Specification | Revision 2.0 | |
| Power | Input | 100 - 240 VAC +/-10%, 50/60 Hz, 1.0 A - 0.45 A |
| Maximum Power Consumption | 95 W or less | |
| Power Save Mode | 1.0W or less (When DVI input is used, no USB device is connected, "Auto Input Detection": "Off", "Power Save": "High", "DDC": "Off", "DC5V Output": "Off", "DP Power Save": "On", "DisplayPort version": "1.1", no external load is connected) | |
| Standby Mode | 1.0W or less (When no USB device is connected, "DP Power Save": "On", "DC5V Output": "Off", "DisplayPort version": "1.1", "DDC": "Off", no external load is connected) | |
| Physical Specifications | Dimensions | 367 mm × 505 mm - 595 mm × 264 mm (W × H × D) (Tilt: 30°) |
| Dimensions (Without Stand) | 367 mm × 452 mm × 78 mm (W × H × D) | |
| Net Weight | Approx. 8.1 kg | |
| Net Weight (Without Stand) | Approx. 5.3kg | |
| Height Adjustment Range | 90mm (Tilt: 0°) | |
| Tilt | Up 30°, down 5° | |
| Swivel | 70° | |
| Rotation | 90° (counterclockwise for portrait display) | |
| Operating Environmental Requirements | Temperature: 0°C to 35°C (32°F to 95°F) | |
| Humidity 20% to 80% R.H. (no condensation) | ||
| Air pressure 540 hPa to 1060 hPa | ||
| Transportation/ Storage Environmental Requirements | Temperature -20°C to 60°C (32°F to 95°F) | |
| Humidity 10% to 90% R.H. (no condensation) | ||
| Air pressure 200 hPa to 1060 hPa | ||
5-2. Main Default Settings
CAL Switch Mode: The factory default display setting is DICOM mode.
| Mode Brightness Gamma value | ||
| 1-DICOM 600 cd/m | 2 | DICOM |
| 2- CAL1 500 cd/m | 2 | DICOM |
| 3-CAL2 400 cd/m | 2 | DICOM |
Others
| Auto Input Detection Off | |
| Power Save | High |
| Indicator | 4 |
| Presence Sensor | Off |
| Languages | English |
| On-Screen Logo*1 | Off |
| Image Rotation*1 | Portrait |
| DDC*1 | Auto |
| DC5V Output*1 | Off |
| DP Power Save*1 | Off |
| Grayscale Warning*1 | On |
| Sharpness Recovery *1 | On |
| Sub Pixel Drive*1,*2 | Off |
| Preferred Refresh Rate*1 | Low |
| DisplayPort version*1 | 1.1 |
*1 These menus cannot be initialized with "Monitor Reset". (Refer to the Installation Manual (on the CD-ROM)).
*2 Leave the default setting "Off" as it is.
Attention
- If "Sub Pixel Drive" is set to "On", the screen is not displayed properly.
For information on how to reconfigure, refer to the Installation Manual (on the CD-ROM).
5-3. Dimensions
Unit: mm

5-4. Accessories
| Calibration Kit EIZO “RadiCS UX1” Ver. 4.4.2 or laterEIZO “RadiCS Version Up Kit” Ver. 4.4.2 or later |
| Network QC Management Software EIZO “RadiNET Pro” Ver. 4.4.2 or laterEIZO “RadiNET Pro Lite” Ver. 4.4.2 or later |
| Cleaning Kit EIZO “ScreenCleaner” |
| LCD protection panel EIZO "RP-917" |
For the latest information about the accessories and information about the latest compatible graphics board, refer to our web site. http://www.eizoglobal.com
Chapter 6 Glossary
Daisy-chain connection
A method of connecting two or more monitors to a PC in a daisy-chain.
DDC (Display Data Channel)
VESA provides the standardization for the interactive communication of the setting information, etc. between a PC and the monitor.
DICOM (Digital Imaging and Communication in Medicine)
The DICOM standard was developed by the American College of Radiology and the National Electrical Manufacturer's Association of the USA.
The DICOM compatible device connection enables to transfer the medical image and information.
The DICOM, Part 14 document defines the digital, grayscale medical image display.
DisplayPort
This is the interface standard for image signals standardized in accordance with VESA. It was developed with the aim of replacing the conventional DVI and analog interfaces, and it can transmit high resolution signals and sound signals, which DVI does not support. The standard size and mini size connectors have been standardized.
DVI (Digital Visual Interface)
DVI is a digital interface standard. DVI allows direct transmission of the PC's digital data without loss.
This adopts the TMDS transmission system and DVI connectors. There are two types of DVI connectors. One is a DVI-D connector for digital signal input only. The other is a DVI-I connector for both digital and analog signal inputs.
DVI DMPM (DVI Digital Monitor Power Management)
DVI DMPM is a digital interface power saving function. The “Monitor ON (operating mode)” and “Active Off (power saving mode)” are indispensable for DVI DMPM as the monitor’s power mode.
Resolution
The LCD panel consists of numerous pixels of specified size, which are illuminated to form images. This monitor consists of horizontal 2048 pixels and 2560 vertical pixels. At a resolution of 2048×2560 (Portrait orientation), all pixels are illuminated as a full screen (1:1).
Appendix
Trademark
The terms HDMI and HDMI High-Definition Multimedia Interface, and the HDMI Logo are trademarks or registered trademarks of HDMI Licensing, LLC in the United States and other countries.
The DisplayPort Compliance Logo and VESA are registered trademarks of the Video Electronics Standards Association.
Acrobat, Adobe, Adobe AIR, and Photoshop are registered trademarks of Adobe Systems Incorporated in the United States and other countries.
AMD Athlon, AMD Opteron, and FreeSync are trademarks of Advanced Micro Devices, Inc.
Apple, ColorSync, eMac, iBook, iMac, iPad, Mac, MacBook, Macintosh, Mac OS, PowerBook, and QuickTime are registered trademarks of Apple Inc.
ColorMunki, Eye-One, and X-Rite are registered trademarks or trademarks of X-Rite Incorporated in the United States and/or other countries.
ColorVision and ColorVision Spyder2 are registered trademarks of DataColor Holding AG in the United States.
Spyder3, Spyder4 and Spyder5 are trademarks of DataColor Holding AG.
ENERGY STAR is a registered trademark of the United States Environmental Protection Agency in the United States and other countries.
GRACoL and IDEAlliance are registered trademarks of International Digital Enterprise Alliance.
Linux is a registered trademark of Linus Torvalds.
NEC is a registered trademark of NEC Corporation.
PC-9801 and PC-9821 are trademarks of NEC Corporation.
NextWindow is a trademark of NextWindow Ltd.
Intel, Intel Core, Pentium, and Thunderbolt are trademarks of Intel Corporation in the U.S. and/or other countries.
PowerPC is a registered trademark of International Business Machines Corporation.
PlayStation is a registered trademark of Sony Computer Entertainment Inc.
PSP and PS3 are trademarks of Sony Computer Entertainment Inc.
RealPlayer is a registered trademark of RealNetworks, Inc.
Red Hat is a registered trademark of Red Hat, Inc.
TouchWare is a trademark of 3M Touch Systems, Inc.
Windows, Windows Media, Windows Vista, SQL Server, Xbox 360, and Internet Explorer are registered trademarks of Microsoft Corporation in the United States and other countries.
YouTube and Chrome are registered trademarks of Google Inc.
Firefox is a registered trademark of the Mozilla Foundation.
Kensington and MicroSaver are registered trademarks of ACCO Brands Corporation.
EIZO, the EIZO Logo, ColorEdge, DuraVision, FlexScan, FORIS, RadiCS, RadiForce, RadiNET, Raptor, and ScreenManager are registered trademarks of EIZO Corporation in Japan and other countries.
ColorNavigator, EcoView NET, EIZO EasyPIX, EIZO Monitor Configurator, EIZO ScreenSlicer, G-Ignition, i • Sound, Re/Vue, Screen Administrator and UniColor Pro are trademarks of EIZO Corporation.
All other company and product names are trademarks or registered trademarks of their respective owners.
License / Copyright
A round gothic bold bit map font designed by Ricoh is used for the characters displayed on this product.
Medical Standard
- It shall be assured that the final system is in compliance to IEC60601-1-1 requirement.
- Power supplied equipment can emit electromagnetic waves, that could influence, limit or result in malfunction of the monitor. Install the equipment in a controlled environment, where such effects are avoided.
Classification of Equipment
- Type of protection against electric shock : Class I
- EMC class: EN60601-1-2:2007 Group 1 Class B
- Classification of medical device (MDD 93/42/EEC): Class I
- Mode of operation : Continuous
- IP Class : IPX0
For U.S.A., Canada, etc. (rated 100-120 Vac) Only
FCC Declaration of Conformity
We, the Responsible Party EIZO Inc.
5710 Warland Drive, Cypress, CA 90630
Phone: (562) 431-5011
declare that the product Trade name: EIZO
Model: RadiForce GX550
is in conformity with Part 15 of the FCC Rules. Operation of this product is subject to the following two conditions: (1) this device may not cause harmful interference, and (2) this device must accept any interference received, including interference that may cause undesired operation.
This equipment has been tested and found to comply with the limits for a Class B digital device, pursuant to Part 15 of the FCC Rules. These limits are designed to provide reasonable protection against harmful interference in a residential installation. This equipment generates, uses, and can radiate radio frequency energy and, if not installed and used in accordance with the instructions, may cause harmful interference to radio communications. However, there is no guarantee that interference will not occur in a particular installation. If this equipment does cause harmful interference to radio or television reception, which can be determined by turning the equipment off and on, the user is encouraged to try to correct the interference by one or more of the following measures.
* Reorient or relocate the receiving antenna.
* Increase the separation between the equipment and receiver.
* Connect the equipment into an outlet on a circuit different from that to which the receiver is connected.
* Consult the dealer or an experienced radio/TV technician for help.
Changes or modifications not expressly approved by the party responsible for compliance could void the user's authority to operate the equipment.
Note
Use the attached specified cable below or EIZO signal cable with this monitor so as to keep interference within the limits of a Class B digital device.
- AC Cord
- Shielded Signal Cable (enclosed)
Canadian Notice
This Class B digital apparatus complies with Canadian ICES-003.
Essential performance of RadiForce series is to display images and operate functions normally.

CAUTION
The RadiForce series requires special precautions regarding EMC and need to be installed, put into service and used according to the following information.
Do not use any cables other than the cables that provided or specified by us.
Using other cables may cause the increase of emission or decrease of immunity.
Cable Length: Max. 3m
Do not put any portable and mobile RF communications equipment close to the RadiForce series.
Doing so may affect the RadiForce series.
The RadiForce series should not be used adjacent to or stacked with other equipment. If adjacent or stacked use is necessary, the equipment or system should be observed to verify normal operation in the configuration in which it will be used.
Anyone who connects additional equipment to the signal input part or signal output parts, configuring a medical system, is responsible that the system complies with the requirements of IEC/EN60601-1-2.
| Guidance and manufacturer's declaration - electromagnetic emissions | ||
| The RadiForce series is intended for use in the electromagnetic environment specified below.The customer or the user of the RadiForce series should assure that it is used in such an environment. | ||
| Emission test Co | Compliance Elec | Electromagnetic environment - guidance |
| RF emissionsCIS PR11/EN55011 | Group 1 The Rad | diForce series uses RF energy only for its internal function.Therefore, its RF emission are very low and are not likely to cause any interference in nearby electronic equipment. |
| RF emissionsCIS PR11/EN55011 | Class B The Rad | diForce series is suitable for use in all establishments, including domestic establishments and those directly connected to the public low-voltage power supply network that supplies buildings used for domestic purposes. |
| Harmonic emissionsIEC/EN61000-3-2 | Class D | |
| Voltage fluctuations / flicker emissionsIEC/EN61000-3-3 | Complies | |
| Guidance and manufacturer's declaration - electromagnetic immunity | |||
| The RadiForce series is intended for use in the electromagnetic environment specified below.The customer or the user of the RadiForce series should assure that it is used in such an environment. | |||
| Immunity test IEC/EN60601 test level | Compliance level | Electromagnetic environment - guidance | |
| Electrostatic discharge (ESD)IEC/EN61000-4-2 | ±6kV contact±8kV air | ±6kV contact±8kV air | Floors should be wood, concrete or ceramic tile.If floors are covered with synthetic material, the relative humidity should be at least 30%. |
| Electrical fast transient / burstIEC/EN61000-4-4 | ±2kVfor power supply lines±1kVfor input/output lines | ±2kVfor power supply lines±1kVfor input/output lines | Mains power quality should be that of a typical commercial or hospital environment. |
| SurgeIEC/EN61000-4-5 | ±1kV line(s) to line(s)±2kV line(s) to earth | ±1kV line(s) to line(s)±2kV line(s) to earth | Mains power quality should be that of a typical commercial or hospital environment. |
| Voltage dips, short interruptions and voltage variations on power supply input linesIEC/EN61000-4-11 | <5% UT (>95% dip in UT ) for 0.5 cycle40% UT (60% dip in UT )for 5 cycles70% UT (30% dip in UT )for 25 cycles<5% UT (>95% dip in UT ) for 5sec | <5% UT (>95% dip in UT ) for 0.5 cycle40% UT (60% dip in UT ) for 5 cycles70% UT (30% dip in UT ) for 25 cycles<5% UT (>95% dip in UT ) for 5sec | Mains power quality should be that of a typical commercial or hospital environment. If the user of the RadiForce series requires continued operation during power mains interruptions, it is recommended that the RadiForce series be powered from an uninterruptible power supply or a battery. |
| Power frequency(50/60Hz)magnetic fieldIEC/EN61000-4-8 | 3A/m 3A/m Power frequency magnetic fields should be at levels characteristic of a typical location in a typical commercial or hospital environment. | ||
| NOTE UT is the a.c. mains voltage prior to application of the test level. | |||
| Conducted RFIEC/EN61000-4-6 | 3Vrms150kHz to 80MHz | 3Vrms | Portable and mobile RF communications equipment should be used no closer to any part of the RadiForce series, including cables, than the recommended separation distance calculated from the equation applicable to the frequency of the transmitter.Recommended Separation distanced = 1.2 √Pd = 1.2 √P, 80MHz to 800MHzd = 2.3 √P, 800MHz to 2.5GHzWhere “P” is the maximum output power rating of the transmitter in watts (W) according to the transmitter manufacturer and “d” is the recommended separation distance in meters (m).Field strengths from fixed RF transmitters, as determined by an electromagnetic site surveya, should be less than the compliance level in each frequency rangeb.Interference may occur in the vicinity of equipment marked with the following symbol. |
| Radiated RFIEC/EN61000-4-3 | 3V/m80MHz to 2.5GHz | 3V/m | |
| NOTE 1 At 80 MHz and 800 MHz, the higher frequency range applies. | |||
| NOTE 2 These guidelines may not apply in all situations. Electromagnetic propagation is affected by absorption and reflection from structures, objects and people. | |||
| a Field strengths from fixed transmitters, such as base stations for radio (cellular/cordless) telephones and land mobile radios, amateur radio, AM and FM radio broadcast and TV broadcast cannot be predicted theoretically with accuracy. To assess the electromagnetic environment due to fixed RF transmitters, an electromagnetic site survey should be considered. If the measured field strength in the location in which the RadiForce series is used exceeds the applicable RF compliance level above, the RadiForce series should be observed to verify normal operation. If abnormal performance is observed, additional measures may be necessary, such as reorienting or relocating the RadiForce series.b Over the frequency range 150 kHz to 80 MHz, field strengths should be less than 3 V/m. | |||
| Recommended separation distances between portable and mobile RF communications equipmentand the RadiForce Series | |||
| The RadiForce series is intended for use in an electromagnetic environment in which radiated RF disturbancesare controlled. The customer or the user of the RadiForce series can help prevent electromagnetic interference bymaintaining a minimum distance between portable and mobile RF communications equipment (transmitters) and theRadiForce series as recommended below, according to the maximum output power of the communications equipment. | |||
| Rated maximum outputpower of transmitterW | Separation distance according to frequency of transmitterm | ||
| 150kHz to 80MHzd = 1.2 √P | 80MHz to 800MHzd = 1.2 √P | 800MHz to 2.5GHzd = 2.3 √P | |
| 0.01 0.12 0.12 0.23 | |||
| 0.1 0.38 0.38 0.73 | |||
| 1 1.2 1.2 2.3 | |||
| 10 3.8 3.8 7.3 | |||
| 100 12 12 23 | |||
| For transmitters rated at a maximum output power not listed above, the recommended separation distance “d” in meters (m) can be estimated using the equation applicable to the frequency of the transmitter, where “P” is themaximum output power rating of the transmitter in watts (W) according to the transmitter manufacturer.NOTE 1 At 80 MHz and 800 MHz, the separation distance for the higher frequency range applies.NOTE 2 These guidelines may not apply in all situations. Electromagnetic propagation is affected by absorptionand reflection from structures, objects and people. | |||
Recycling Information/Informationen zum Thema Recycling/Informations sur le recyclage/Информация относно рециклиране
Recycling Information
This product, when disposed of, is supposed to be collected and recycled according to your country's legislation to reduce environmental burden. When you dispose of this product, please contact a distributor or an affiliate in your country.
The contact addressees are listed on the EIZO website below.
http://www.eizoglobal.com
For recycling information for customers in Switzerland, please refer to the following website.
http://www.swico.ch

- Instructions for Use
- Gebrauchsanweisung
- RadiForce®
- GX550
- SAFETY SYMBOLS
- PRECAUTIONS
- IMPORTANT
- Do not open the cabinet or modify the unit.
- Refer all servicing to qualified service personnel.
- Keep small objects or liquids away from the unit.
- Place the unit at a sturdy and stable place.
- Use the unit in an appropriate location.
- To avoid danger of suffocation, keep the plastic packing bags away from babies and children.
- Use the enclosed power cord and connect to the standard power outlet in your country.
- To disconnect the power cord, grasp the plug firmly and pull.
- The equipment must be connected to a grounded main outlet.
- Use the correct voltage.
- Handle the power cord with care.
- For electrical safety, do not connect or disconnect the power cord in the presence of patients.
- Never touch the plug and power cord if it begins to thunder.
- When attaching an arm stand, please refer to the user's manual of the arm stand and install the unit securely.
- Do not touch a damaged LCD panel directly with bare hands.
- Fluorescent backlight lamps contain mercury (the products that have LED backlight lamps contain no mercury), dispose according to local, state or federal laws.
- Handle with care when carrying the unit.
- Carry or place the unit according to the correct specified methods.
- Do not block the ventilation slots on the cabinet.
- Do not touch the plug with wet hands.
- Use an easily accessible power outlet.
- Periodically clean the area around the power plug and the ventilation slot of the monitor.
- Unplug the unit before cleaning it.
- Notice for this monitor
- Intended use
- Attention
- Installation Requirements
- Maintenance
- Cleaning
- Note
- To use the monitor comfortably
- CONTENTS
- PRECAUTIONS 3
- Notice for this monitor 7
- CONTENTS....9
- Chapter 1 Introduction....10
- Chapter 2 Connection....14
- Chapter 3 Setting Up....18
- Chapter 4 Troubleshooting....20
- Chapter 5 Specifications ...... 21
- Chapter 6 Glossary 24
- Appendix 25
- Chapter 1 Introduction
- 1-1. Features
- 1-2. Package Contents
- Disk contents and software overview
- Contents Overview
- Using RadiCS LE
- 1-4. Controls and Functions
- 1-5. Compatible Resolutions
- Chapter 2 Connection
- 2-1. Connecting Cables
- Turn the monitor screen 90° in clockwise direction.
- Connect signal cables.
- Connecting to a single PC
- Connecting to multiple PCs
- Daisy-chaining multiple monitors
- Plug the power cord into a power outlet and the power connector on the monitor.
- Connect the USB cable when using RadiCS LE.
- Touch ⏻ to turn on the power to the monitor.
- Turn on the PC.
- 2-2. Making Use of USB (Universal Serial Bus)
- Required system environment
- Connection procedure (Setup of USB function)
- Procedure
- Chapter 3 Setting Up
- 3-1. Adjusting the Screen Height and Angle
- 3-2. Attaching Arm
- Chapter 4 Troubleshooting
- Chapter 5 Specifications
- 5-1. Specifications List
- 5-2. Main Default Settings
- 5-3. Dimensions
- 5-4. Accessories
- Chapter 6 Glossary
- Daisy-chain connection
- DDC (Display Data Channel)
- DICOM (Digital Imaging and Communication in Medicine)
- DisplayPort
- DVI (Digital Visual Interface)
- DVI DMPM (DVI Digital Monitor Power Management)
- Resolution
- Appendix
- Trademark
- License / Copyright
- Medical Standard
- Classification of Equipment
- FCC Declaration of Conformity
- Canadian Notice
- CAUTION
- Recycling Information/Informationen zum Thema Recycling/Informations sur le recyclage/Информация относно рециклиране
- Recycling Information
Brand : EIZO
Model : RadiForce GX550-P
Category : Screen