
BI6062IXUK - Kitchen Appliances HISENSE - Free user manual and instructions
Find the device manual for free BI6062IXUK HISENSE in PDF.


| Product Type | Built-in Electric Oven |
| Brand | Hisense |
| Model | BI6062IXUK |
| Installation | Built-in |
| Color | Stainless Steel |
| Dimensions (W x H x D) | 595 x 595 x 550 mm |
| Oven Capacity | 65 Liters |
| Net Weight | 30 kg |
| Energy Source | Electric |
| Power Consumption | 3.0 kW |
| Voltage / Frequency | 220-240 V / 50 Hz |
| Oven Functions | Convection, Grill, Defrost, Bottom Heat, Top Heat, Fan-assisted |
| Temperature Range | 50°C - 250°C |
| Control Type | Touch + Rotary Knobs |
| Display | LED Digital Display |
| Cleaning | Easy-clean Enamel Interior |
| Safety Features | Child Lock, Automatic Shut-off, Cool Touch Door |
| Door Type | Double Glazed, Cool Touch |
| Interior Light | Yes |
| Spare Parts Availability | Available through Hisense Service Centers |
| Repairability Index | 8.0 / 10 |
| Warranty | 2 Years |
Frequently Asked Questions - BI6062IXUK HISENSE
User questions about BI6062IXUK HISENSE
0 question about this device. Answer the ones you know or ask your own.
Ask a new question about this device
Download the instructions for your Kitchen Appliances in PDF format for free! Find your manual BI6062IXUK - HISENSE and take your electronic device back in hand. On this page are published all the documents necessary for the use of your device. BI6062IXUK by HISENSE.
USER MANUAL BI6062IXUK HISENSE
natural_image
Simple diagram of a kitchen appliance with two circular handles, placed on a grid background (no text or symbols)Wethankyouforyourtrustandthepurchaseofourappliance.
This detailed instruction manual is supplied to make the use of this product easier. The instructions should allow you to learn about your new appliance as quickly as possible.
Makesureyouhavereceivedanundamagedappliance.Ifyoudofindtransportdamage, pleasecontactthesellerfromwhichyoupurchasedtheappliance,ortheregional warehousefromwhichitwassupplied.Thetelephonumbercanbefoundonthe invoiceoronthedeliverynote.
Instructions for installation and connection aresupplied on a separate sheet.
The following symbols are used throughout the manual and they have the following meanings:

INFORMATION!
Information, advice, tip, or recommendation

WARNING!
Warning-general danger

It is important that you carefully read the instructions.
Contents
Safety precautions 4
Other important safety warnings 6
Built-in oven 7
Appliance description 7
Appliance equipment 8
Using the appliance 11
Before first use 11
Switching on for the first time 11
Choosing the settings 12
Starting the cooking process 17
End of cooking and switching off the oven 17
General tips and advice for baking 18
Cooking tables 19
Cooking with a temperature probe 23
24Recomm
Cleaning and maintenance 25
26Usingthe
27Removin
28Removing
Replacing the bulb 29
Troubleshooting table 30
Special warnings and fault reporting 30
DISPOSAL 31
Safetyprecautions

natural_image
Warning symbol: black exclamation mark inside a triangle (no text or numbers)Carefullyreadtheinstructionsandsavethemforfuture reference
Appliancemustbeconnectedtofixedwiringwhichhas incorporatedmeansofdisconnection.Fixedwiringmustbe madeinaccordancewiththewiringrules.
Meansfordisconnectionmustbeincorporatedinthefixed wiringinaccordancewiththewiringrules.
Theappliancemustnotbeinstalledbehindadecorativedoor inordertoavoidoverheating.
If the supply cord is damaged, it must bere placed by the manufacturer, its service agent or similarly qualified persons in order to avoid a hazard (only for appliance supplied with connection cord).
During usethe appliance becomeshot. Careshouldbetaken to avoid touching the heating elements inside the oven.
This appliance can be used by children aged 8 years and above, and by persons with reduced physical, sensory or mental capabilities or lack of experience and knowledge, if they have been given supervision or instruction concerning the use of the appliance in asafeway, and if they understand the hazards involved. Children shall not play with the appliance. Cleaning and user maintenance shall not be done by children without supervision.
WARNING: Accessible parts may become hot during use. Young children should be kept away.
WARNING:Theapplianceandsomeofitsaccessibleparts maybecomeveryhotduringuse.Careshouldbetakentoavoid touchingheatingelements.Childrenlessthan8yearsofage shallbekeptawayunlesscontinuouslysupervised.
The appliance is not intended to be controlled by external timers or separate remote control system.
Onlyusethetemperatureproberecommendedforuseinthis oven.
Donotuseharshabrasivecleanersorsharpmetalscrapersto cleantheovendoorglass/theglassofhingedlidsofthehob (asappropriate),sincetheycanscratchthesurface,whichmay resultinshatteringoftheglass.
Donotusesteamcleanersorhigh-pressurecleanerstoclean theapplianceasthismayresultinanelectricshock.
WARNING: Before replacing the light bulb, makes sure the appliance has been disconnected from themains power, in ordertoprevent the hazard of an electric shock.
Neverpourwaterdirectlyonthebottomoftheovencavity. Temperaturedifferencescouldresultindamagetotheenamel coating.
Otherimportantsafetywarnings
The appliance is intended for household use. Donot use it for any other purpose, such as room heating or drying of pets or other animals, paper, fabrics, herb setc., asthism may lead to injury or fire hazard.
Appliancemustbeconnectedtofixedwiringwhichhasincorporatedmeansofdisconnection.Fixed wiringmustbemadeinaccordancewiththewiringrules.
Donotlifttheappliancebyholdingitbythedoorhandle.
Ovendoorhingesmaybedamagedwhenunderexcessiveload.Donotstandorsitontheopenoven door, anddonotleanagainstit. Also, donotplaceanyheavyobjectsontotheovendoor.
If the power cord so of other appliances placed near this appliance get entangled in the ov endoor, they can be damaged, which inturn can result in a short circuit. Therefore, makes sure the power cord so of other appliances are always at as a fast distance.
Ovendoorbecomesveryhotduringoperation.Athirdglassisinstalledforextraprotection,reducing thetemperatureoftheoutsidesurface(onlywithsomemodels).
Makesuretheventsarenevercoveredorobstructedinanyotherway.
Donotlinetheovencavitywithaluminiumfoil, and donotplaceanybakingtraysorothercookware ontheovenbottom. This would obstruct and reduce aircirculation in the oven, slowdown the baking process, and destroy the enamel coating.
Werecommendyouavoidopeningtheovendoorduringbaking,asthisincreasespowerconsumption andincreasescondensateaccumulation.
Attheendofthebakingprocess, and during baking, be careful when opening the ovendoor, asthere is dangerofscalding.
Topreventlimescaleaccumulation,leavetheovendooropenafterbakingorusingtheoven,toallow theovencavitytocooldowntoroomtemperature.
Cleantheovenwhenithascompletelycooleddown.
Eventualmismatchesincolourshadesbetweendifferentappliancesorcomponentswithinasingle designlinemayoccurduetovariousfactors,suchasdifferentanglesunderwhichtheappliancesare observed,differentcolouredbackgrounds,materials,androomillumination.
Neverpourwaterontotheovencavitybottom. Temperaturedifferencescouldresultindamagetothe enamelcoating.

WARNING!
Carefullyreadtheinstructionsforusebeforeconnectingtheappliance.Repairorany warrantyclaimresultingfromincorrectconnectionoruseoftheapplianceshallnotbe coveredbythewarranty.
Built-inoven
Appliancedescription

INFORMATION!
Appliancefunctionsandequipmentdependonthemodel.
Basicequipmentofyourapplianceincludeswireguides,shallowbakingsheet,andagrid.

5Guides-cookinglevels1Controlunit
6Ratingplate2Doorswitch
7Ovendoor3Lighting
8Doorhandle4Temperatureprobesocket
Ratingplate-productinformation
Aratingplatewithbasicinformationabouttheapplianceisattachedtotheedgeoftheoven.Precise informationonappliancetypeandmodelcanalsobefoundonthewarrantysheet.

5Model1Serialnumber
6Technicalinformation2Code/ID
7Complianceindications/symbols3Type
4Brand
Controlunit
(dependingonthemodel)

- Cookingsystemselectorknob
- Gratinkey(gratin)
- Valuedecreasekey
- Timerfunctionandsettingskey
- Valueincreasekey
6.Start/stopkeytostartorpauseaprogram - Temperature settings knob
8.Displayunit

INFORMATION!
Forbetterkeyresponse,touchthekeyswithalargerareaofyourfingertip.Eachtimeyoupress akey,thiswillbeacknowledgedbyashortacousticsignal.
Push-pullknobs
Slightlypushtheknobuntilitpopsout;then,rotateit.

WARNING!
Aftereachuse, rotatetheknobbacktothe "off" position and push it back in. The push-pull knob can only be pushed back when the switch is in the off position.
Applianceequipment
Controllights
Ovenlight:turnsonwhenacookingsystemmisselected.
Guides
- Theguidesallowcookingorbakingon5racklevels.
- The height levels of guides into which the racks can be inserted, shall be counted from bottom up.
•Guidelevels4and5areintendedforgrilling/broiling. - Wheninsertingequipment, it should be correctly rotated.
- Alwayspushtheequipmentallthewayintotheappliance.
Wireguides

natural_image
Technical line drawing of a front panel assembly with internal components and mounting brackets (no text or symbols)Incaseofwireguides,alwaysinsertthewire (grid)rackandthebakingsheetsintotheslot between the upper and lower part of each guide level.
Fixedpull-outguides
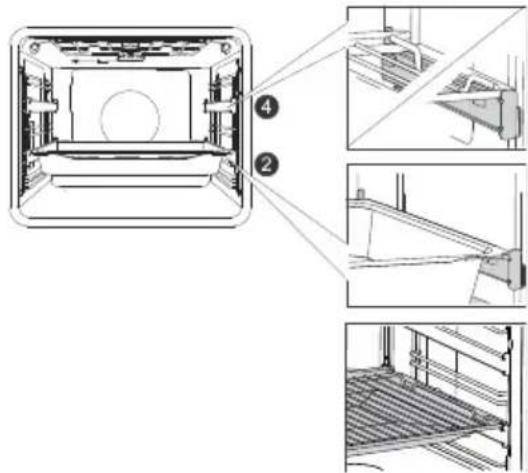
Pull-outguidesmaybefittedforthe2ndand 4thlevel.
INcaseoffixedpull-outguides, placetherack orbakingsheetontotheguide. Youcanplace thewirerackdirectlyontoabakingsheet (shallowordeepall-purposebakingsheet) and placebothontothesameguide; inthiscase, thebakingsheetactsasadriptray.
Click-onpull-outguides
(dependingonthemodel)

natural_image
Technical line drawing of a mechanical assembly with internal components and a star symbol indicating a specific part (no text or labels present)Click-onpull-outguidescanbeattachedany spacebetweentwowireguidelevels.
Placetheguidessymmetricallyontothewire guidesontheleftandrightsideoftheoven cavity.First,hooktheupperclipoftheguide ontothewireofthewireguide.Then,pressthe lowerclipintotherightpositionuntilyouhear aclick.
NOTE: Theguidescanbeattachedtoany heightbetweentwolevelsofwireguides.

INFORMATION!
Theclick-onpull-outguidescannotbemountedontoguideswithfixeddouble-levelpartial extension. Theycan, however, bemountedontosingle-levelpartiallyextendibleguides, tolevels 3–4 and 4–5.
Makesurethepull-outguideiscorrectlyrotatedandthatitextendsoutwards,i.e.outfromthe oven.
Ovendoorswitch
(dependingonthemodel)
If theovendoorisopened during oven operation, the switch turn soff the heater and fan in the oven cavity. Whent hedor is closed, the switch turnsthe appliance operation back on.
Coolingfan
The appliance is fitted with a cooling fan that cold the housing, the door, and the appliance control unit. After the oven is switched off, the cooling fan continues to operate for a short while in order to cooldown the oven.
Ovenequipmentandaccessories

The WIRERACK is used for grilling/broiling or support forapan, baking tray or baking dish with the foody you are baking.

INFORMATION!
Thereisasafetylatchonthegrid. Therefore, thegridhastobeliftedslightly atthefrontwhenpullingitoutfromthe oven.

SHALLOWBAKINGSHEET is used for flat and small pastry. It can also be used as adriptay.

WARNING!
Theshallowbakingsheetmaydeform asitheatsupintheoven.Onceitcools down,itreturnstotheinitialshape. Suchdeformationdoesnotaffectits function.

natural_image
Simple line drawing of a rectangular container or basin (no text or symbols)TheALL-AROUNDDEEPBAKINGTRAYis usedforroastingvegetablesandbakingmoist pastry.Itcanalsobeusedasadriptray.

INFORMATION!
Neverinserttheall-purpose(oruniversal) deepbakingtrayintothefirstguideduring baking.

TemperaturePROBE(BAKESENSOR).

WARNING!
The appliance and some of the accessible part tend to heat up during cooking.
Usingtheappliance
Beforefirstuse
- Removeovenaccessoriesandanypackaging(cardboard,polystyrenefoam)fromtheoven.
- Wipetheovenaccessoriesandinteriorwithadampcloth.Donotuseabrasiveoraggressive clothsorcleaners.
- Heatanemptyovenforapproximatelyonehourwiththetopandbottomheatersystemata temperatureof250°C.Thecharacteristic"newovenscent"willbereleased;therefore,ventilate theroomthoroughlyduringthisprocess.
Switchingonforthefirsttime
Afterconnectingyourapplianceorafteranextendedpoweroutage,12:00willflashonthedisplay.
First, choose and confirm the basic settings.

INFORMATION!
Tochangethem,touchthekeysor.Confirmthedesiredsettingbypassingtheor ▷|□ key.Thenextsettingcanbeadjustedonceyouhavesetandconfirmedtheprecedingone.

1.CLOCKSETTING
Settheclock/timeofday.First,setandconfirmtheminutes;thenset and confirm the hours. If you press and hold the value adjustment key, therate at which these value is being changed will increase.

INFORMATION!
Tosetoradjusttheclocklateron,seechapterExtrafunctions.

2.DISPLAYDIMMER
Mediumlightintensityisthedefaultsetting.Thesignbrhandthecurrently setvalueforthedisplaylightintensitywillappearonthedisplayunit. Usethevaluesettingkeystoincreaseordecreaselightintensity.

3.ACOUSTIC SIGNALVOLUME
Mediumvolumeisthedefaultsetting.ThesignVolandthecurrentlyset valuefortheacousticsignalvolumewillappearonthedisplayunit.Use thevaluesettingkeystoincreaseordecreasetheacousticsignalvolume.
Afteryouconfirmtheselectedsettings, theclockwillappearonthedisplayunit.
Choosingthesettings CHOOSINGTHECOOKINGSYSTEM

RotatetheKNOB(leftandright)toselecttheCOOKINGSYSTEM(see programtable).

INFORMATION!
Settingscanalsobechangedduringoperation.

INFORMATION!
Appliancefunctionsandequipmentdependonthemodel.
| UseSymbol | |
 | RAPIDPREHEATINGToreachthesettemperatureintheshortestpossibletime.Whentheovenheats uptothedesiredtemperature,theheatingprocessiscompleted.Thisisfollowed upbythesystemsettingyouwishtousetocookyourfood.Thisfunctionisnot suitableforcookingfood. |
 | TOPANDBOTTOMHEATERWITHFANForevenbakingoffoodonasinglerack,andformakingsoufflés. |
 | TOPANDBOTTOMHEATERUsethissystemforconventionalbakingonasinglerack,makingsoufflés,and bakingatlowtemperatures(slowcooking). |
 | LARGEGRILLWITHFANForroastingpoultryandlargercutsofmeatunderabroiler. |
 | PIZZASYSTEMThissystemisoptimalforbakingpizzaandpastrywithhigherwatercontent.Use ittobakeonasinglerack,whenyouwantthefoodtobedonefasterandtobe crunchy. |
 | LARGEGRILLUsethissystemtogrillargeamountsofflat-shapedfoodliketoast,open sandwiches,grillsausages,fish,skewersetc.,aswellasforcookingaugratinand forbrowningthecrust.Theheatersmountedonthetopoftheovencavityevenly heattheentiresurface.Maximumallowedtemperatureis240°C. |
 | SLOWBAKING ^1) Forgentle,slowandevencookingofmeat,fishandpastryona singlerack.Thiscookingmethodwillleavethemeatwithahigherwatercontent, makingitjuicierandmoretender,whilepastrywillbeevenlybrowned/baked.This systemisusedinthetemperaturerangebetween140°Cand220°C. |
 | BAKINGFROZENFOODThismethodallowsbakingfrozenfoodinashorterperiodoftimewithout pre-heating.Optimumforpre-bakedfrozenproducts(bakeryproducts,croissants, lasagne,Frenchfries,chickennuggets),meatandvegetables. |
 | DEFROSTINGThissystemissuitableforgentledefrostingoffrozenfood. |
Tablecontinuedfromlastpage
| UseSymbol | |
 | STEAMCLEANThisprogrammakesiteasiertoremoveanystainsfrominsidetheoven. |
1) ItisusedfordeterminingtheenergyefficiencyclasspursuanttotheEN60350-1standard.
Inthismode, you can specify the duration of oven operation (cooking time).
Touchthekey Symbolwillappearonthedisplayunit.Touch theortosetthedesiredoperatingtime.Touchthekeyto confirmthesettings.
Holdthekeytostartovenoperation
▷|o

Settingthedelayedstart

INFORMATION!
Delayedstartcannotbesetforthegrillandgrillwithfansystems.
Usethisfunctionwhenyouwishtostartcookingthefoodintheoven afteracertainperiodoftime.Placethefoodintotheoven,thensetthe systemandtemperature.Then,settheprogramdurationandthetime whenyouwishyourfooddone.
Example:
Currenttime:noon
Cookingtime:2hours
Endofcooking:6pm
Touchthekey Thecookingdurationsymbolwillappearonthe displayunit.Touchtheortosetprogram(cooking)duration (inourcase,thisis2:00).Confirmthesettingbypassingthekey. Double-taptheagaintosetthetimewhenyouwishyourfooddone (inourcase,thisis18:00,or6p.m.).Desiredcookingendtimewillappear onthedisplayunit(18:00).Touchthekeytoconfirmthesettings.
Holdthekeytostartovenoperation.
Whilewaitingtostartoperation,theovenisinapartialstandbymode. Thedisplayisdimmed,andthefansystemandovenlightingareonthe entiretime.Theovenwillswitchonwiththeselectedsettings automatically(inourcaseat16:00,or4p.m.).Theovenwillswitchoff atthesetime(inourcase,thisis18:00,or6p.m.).

INFORMATION!
Cookingendtimeandtheclockwillalternateonthedisplayunit.
Afterthesetimeexpires, theovenwillautomaticallystopoperating. SignsEndand00:00 will alternateonthedisplayunit. Anacousticsignal will beemitted, which you may turn off by touching any key. Afterone minute, the acousticsignal will beswitched off automatically.

WARNING!
Thisfunctionisnotsuitableforfoodrequiringapreheatedoven.
Perishablefoodshouldnotbekeptintheovenforalongtime. Beforeusingthismode, checkwhethertheclockonthe applianceisaccuratelyset.

Minutemindersetting
Theminutemindercanbeusedindependentlyofovenoperation.The longestpossiblesettingis24hours.Duringthelastminute,theminiteminderisdisplayedinseconds.Touchthetwice(double-tapit)until thesymbolappearsonthedisplayunit.Touchtheortosetheminuteminder.

INFORMATION!
Ifadelayedstartisset,youcansettheminuteminderby triple-tappingthekey.

INFORMATION!
Youcanterminatetheselectedtimerfunctionbytouchingtheandkeysimultaneously.

INFORMATION!
Themostrecentlyusedtimerfunctionvalueswillbestoredandofferedaspresetvaluesthenext timeyouusethetimer.Thesesettingsmayalsobedeactivated(seechapterSelectingextra functions,Adaptivefunction).
CHOOSINGTHEGENERAL SETTINGS
TurntheCOOKINGSYSTEMSELECTORKNOBtoposition"0".
To activate a function, press the Ⓤ key and hold it for 3 seconds. SEtt will appear on the display unitforafewseconds.Then,theextrafunctionsmenuwillappear.


INFORMATION!
Usetheandkeystonavigatethemenu.Confirmthesettingbypassingthekey.
Toexittheextrafunctionsmenu,touchthekey.

▷|o

1. Clockdisplayed
Usetheandkeystosettheclock.CLocwillappearonthedisplay unit. Afteryouconfirm, youcantogglebetween12-hourand24-hour display. Confirm, thesettheclock/timeofday. First, setandconfirmthe minutes; thensetandconfirmthehours.
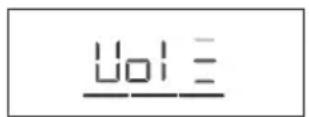
2. Acousticsignalvolume
Choosebetweenthreebeepvolumelevels.ChoosetheVolsetting. Touchtheorkeytoselectthedesiredlevel,andconfirm.

3. Displayillumination
Choosebetweenthreelevelsofdisplaylightintensity.Choosethebrh setting.Touchtheorkeytoselectthedesiredlevel,andconfirm. Usethevaluesettingkeystoincreaseordecreaselightintensity.

4. Displayunit-nightmode
Thisfunctionwillautomaticallydimthedisplay(switchfromhightolow displayilluminationlevel)duringnighttime(8:00p.m.to6:00a.m.)Choose thenGhtsetting.Touchtheorkeytoselectthedesired night-timedisplayillumination,andconfirm.

5.Standby
Thisfunctionautomaticallyswitchestheclockdisplayonoroff.Select thehidEsetting.Touchtheorkeytoselectrononoroff,andconfirm.

6. Adaptive function
Thisfunctionallowsadjustingthesetcookingtime. Thefunctionis activatedasafactorydefault, butitcanalsobedeactivated.
Whenthefunctionisactivated,themostrecentcookingprogramduration settingsaredisplayed.Valuesfromthemostrecentcookingsessionwill beused.
AdPtwillappearonthedisplayunit. Todeactivatethefunction, touch theorkeytoselectoff. Followthesameprocedureore-activate thefunction. Selectononthedisplayunit.

7. Factorysettings
Thisfunctionallowsresettingtheappliancetofactorysettings.FActwill appearonthedisplayunit.TouchtheorkeytoselectESto choosethefactorysettings,andconfirmbypassingandholding thekey.Holdthekeyuntilallitdashesdisappear.

WARNING!
Afterapoweroutageoraftertheapplianceisswitchedoff,additionalfunctionsettings willremainstoredfornomorethanafewminutes.Then,allsettings,exceptfortheacoustic signalvolumeanddisplaydimmerwillberesettofactorydefaults.
Startingthecookingprocess

Thedashabovethekeyispartiallylit.Startthesetprogrambylong pressingthiskey.
Untiltheovenreachesthetemperatureforthefirsttime,thedash abovethekeywillflash.Duringprogramoperation,thekeywillbe brighter(itisfullylit).

INFORMATION!
If notimerfunctionisselected, cooking timewillappearonthedisplayunit. Ashortacoustic signalisemitted when the ovenreachestheselected temperature.

Extragratin
The function can only be started after 10 minutes of ofoven operation (the dashabovethegratinkey will be partly/dimly lit). When the function is confirmed, cooking time 10 minutes (10:00) will appear on the display unit. Touch the key to set the grat induration.
The function can also be deactivated by long-pressing the gratin key.
The function is used in the last stage of baking or after the baking process when you add sauce (wetrub) or dry rub onto the food, or when you wish to additionally brown the crust. A golden-brown crust will form the dish during the gratin process, which protect the food from drying out, while also imparting amore pleasant appearance and better flavour.
Endofcookingandswitchingofftheoven
Longpressthekeytopausethecookingprocess.Endappearsondisplayunitanacoustic signalisemitted.
TurntheCOOKINGSYSTEMSELECTORKNOBtoposition "0".

INFORMATION!
After the cooking process, all timersettings are also stopped and deleted, except fortheminute minder. Time of day (clock) will be displayed.
Aftertheuseoftheoven,somewatermaybeleftinthecondensatechannel(underneaththe door).Wipethechannelwithaspongeoracloth.
Generaltipsandadviceforbaking
- Remove all unnecessary equipment from theovenduringbaking
- Use equipment made of heat-resistant non-reflectivematerials (supplied bakingsheets, trays, and dishes, enamel-coated cookware, tempered glass cookware). Bright-coloured materials (stainless steel/oraluminium) materials reflectheat. As a result, thermal processing of food in them is less effective.
- Always insert the baking sheets and trays to the end of the guides. When baking on the wire rack, placethebakingdishesortraysinthemiddleoftherack.
- Foroptimumfoodpreparation, were recommendobservingtheguidelinessspecifiedinthecooking table.Choosethelowerspecifiedtemperatureandtheshortestspecifiedcookingtime.Whenthis timeexpires,checktheresultsandthenadjustthesettingsasnecessary.
- Unlessitisabsolutelynecessary, donotopentheovendoorduringbaking.
- Donotplacethebakingtraysdirectlyontotheovencavitybottom.
- Do not use the all-purpose deep baking tray on the 1st guide level while the appliance is operating.
- Donotcovertheovencavitybottomorthewirerackwithaluminiumfoil.
- Withlongercookingprograms,youcanswitchchofftheovenapproximately10minutesbeforethe endofcookingtimetomakeuseoftheaccumulatedheat.
•Alwaysplacethebakingdishesontothewirerack.
- When baking on several levels at the same time, insert the all-purpose deep baking tray into the lowerlevel.
- When cooking according to recipes from older cookbooks, use the bottom and top theaters system (asin conventionallovens) and set the temperature 10^ Clower than specified in the recipe.
- If you are using parchment paper, make sure it is resistant to high-temperatures. Always trim it accordingly. Parchmentpaperpreventsthefoodfromstickingtothebakingsheetandmakesit easiertoremovethefoodfromthebakingsheet.
- When cooking larger cut of meat or pastry with higher water content, alot of steam will be generated inside the oven, which in turn may condense on the oven. This is an normal phenomenon which will not affect the operation of the appliance. After the cooking process, wipe the door and the doorglass dry.
- When baking directly on the wire rack, insert the all-purpose deep tray one level lower to serve asadriptray.
- Preheating: Only preheat the oven if required by the recipe of in the tables in these instructions foruse. If you are preheating the oven, donot insert the food into the oven until the oven is fully heated. Temperature has as substantial aleffect on the final result. Preheating is recommended for delicate cut sof meat (sirloin), and for yeast-leavened and spongedough that require a shorter baking time. Heating an empty oven consumes alotof energy. Therefore, if possible, we recommend cooking several dishes in succession, or making several dishess simultaneously. Dishesthat require a fully pre-heated oven are indicated with one asterisk in the table*, while dishes for which a 5-minute preheat will suffice are indicated with two asterisks**. In this case, donot usetherapid preheat mode.
- Slow Bake: Allows slow and controlled cooking at a low temperature. The meat juices are distributed evenly, and themeatremainsjuicy and tender. The Slow Bakeslow cooking method is suitable for delicate boneless meat cuts. Before slow cooking, searthemeatthoroughly from all sidesina frying pan.
Cookingtables
| Dish | ||||
| PASTRYANDBAKERYPRODUCTS | ||||
| Pastry/cakesinmoulds | ||||
| Spongecake | 30-401603 | |||
| piewithfilling | 60-701802 | |||
| marblecake | 50-60170-1802 | |||
| cakewithleaveneddough,Gugelhupf(Bundtcake,poundcake) | 45-55170-1802 | |||
| openpie,tart | 35-45180-1903 | |||
| brownies | 30-35180-1902 | |||
| pastryonbakingtraysandsheets | ||||
| strudel | 60-70180-2002 | |||
| strudel,frozen | 34-45190-2102 | |||
| spongeroll | 13-18180-190*3 | |||
| Buchteln | 30-40180-1902 | |||
| biscuits,cookies | ||||
| cupcakes | 25-35160*3 | |||
| yeast-leavenedsmallpastry | 17-22180*2 | |||
| puffpastry | 15-20200*2 | |||
| cookies/biscuits | ||||
| pipedcookies | 30-40150*3 | |||
| cookies/biscuits | 15-20160-170*3 | |||
| meringue | 120-15080-100*3 | |||
| macarons | 15-20130-140*3 | |||
| bread | ||||
| risingandproofing | 30-4540-452 | |||
| breadonabakingsheet | 40-55190-2002 | |||
| breadinatin | 30-45190-2001 | |||
Tablecontinuedfromlastpage
| Dish | ||||
| flatbread(focaccia) | 15-252702 | |||
| freshbreadrolls(Semmel/morningrolls) | 10-15200-2103 | |||
| toastedbread | 4-62405 | |||
| opensandwiches | 3-52405 | |||
| pizzaandotherdishes | ||||
| pizza | 5-10300*1 | |||
| frozenpizza | 10-20200-2202 | |||
| savourypie,quiche | 50-60180-2002 | |||
| burek | 40-50180-1902 | |||
| MEAT | ||||
| beefandveal | ||||
| beefroast(loin,rump),1.5kg | 130-160160-1702 | |||
| boiledbeef,1.5kg | 90-120200-2102 | |||
| sirloin,mediumdone,1kg | 40-60170-190*2 | |||
| beefroast,slowcooked | 250-300120-140*2 | |||
| beefsteaks,welldone,thickness4cm | 25-30220-2304 | |||
| burgers,thickness3cm | 25-35220-2304 | |||
| vealroast,1.5kg | 120-150160-1702 | |||
| pork | ||||
| porkroast,rump,1.5kg | 100-130170-1803 | |||
| porkroast,shoulder,1.5kg | 120-150180-1903 | |||
| porkloin,400g | 80-10080-100*2 | |||
| porkroast,slowcooked | 200-230100-120*2 | |||
| porkribs,slowcooked | 210-240120-140*2 | |||
| porkchops,thickness3cm | 20-25220-2304 | |||
| poultry | ||||
| poultry,1.2-2.0kg | 60-80200-2202 | |||
| poultrywithstuffing,1.5kg | 80-100170-1802 | |||
Tablecontinuedfromlastpage
| Dish | (CZ28) |  | [WSTD] | (###) (###) |
| poultry,breast | ### | 45-60170-1802 | ||
| chickenthighs,wings | ### | 25-40210-2203 | ||
| poultry,breast,slowcooked | ### | 60-90100-120*3 | ||
| meatdishes | ||||
| meatloaf,1kg | ### | 60-70170-1802 | ||
| grillsausages,bratwurst | ### | 8-15230**4 | ||
| FISHANDSEAFOOD | ||||
| wholefish,350g | ### | 12-20230-2404 | ||
| fishfillet,thickness1cm | ### | 8-12220-2304 | ||
| fishsteak,thickness2cm | ### | 10-15220-2304 | ||
| scallops | ### | 5-10230*4 | ||
| shrimps | ### | 3-10230*4 | ||
| VEGETABLES | ||||
| bakedpotatoes,wedges |  | 30-40210-220*3 | ||
| bakedpotatoes,halved | ### | 40-50200-210*3 | ||
| stuffedpotato(jacketpotato) | ### | 30-40190-2003 | ||
| Frenchfries,home-made |  | 20-30210-220*4 | ||
| mixedvegetables,wedges | ### | 30-40190-2003 | ||
| stuffedvegetables | ### | 30-40190-2003 | ||
| CONVENTIONALPRODUCTS-FROZEN | ||||
| Frenchfries | ### | 20-30210-2203 | ||
| Chickenmedallions | ### | 12-20210-220*4 | ||
| Fishfingers | ### | 15-25210-2202 | ||
| lasagne,400g | ### | 30-40200-2202 | ||
| dicedvegetables | ### | 20-30190-2102 | ||
| croissants | ### | 18-23170-1803 | ||
| BAKEDPUDDINGS,SOUFFLÉSANDDISHESAUGRATIN | ||||
| potatomoussaka | ### | 35-45180-1902 | ||
Tablecontinuedfromlastpage
| Dish | ||||
| lasagne | 35-45190-2002 | |||
| sweetbakedpudding | 40-60160-180*2 | |||
| sweetsoufflé | 35-45160-1802 | |||
| dishesaugratin | 30-45170-1903 | |||
| stuffedtortillas,enchiladas | 20-35180-2002 | |||
| grillingcheese | 6-9240**4 | |||
| OTHER | ||||
| preservation | 301802 | |||
| sterilization | 301253 | |||
| cookinginabain-marie(doubleboiler) | /150-170*2 | |||
| reheating | /60-953 | |||
| platewarming | 15752 | |||
Cookingwithatemperatureprobe (BAKESENSOR)
(dependingonthemodel)
Thetemperatureprobeallowsforaccuratemonitoringofthecoretemperatureofthefoodduring cooking.

WARNING!
Thetemperatureprobeshouldnotbeindirectvicinityoftheheatingelements.

1 Stickthemetalendoftheprobeintothe thickestpartofthefood.
2 Plugtheprobeplugintothesocketlocated intheupper-rightcorneratthefrontoftheoven cavity(seefigure).SEnSwillappearonthe displayunit.
NOTE: When you insert the probe into the socket, the preset functions on the oven are deleted.
3 Choosethedesiredsystemandcooking temperature(inthetemperaturerangeofupto 230°C).Probeoperationsymbolandthepreset temperaturewillappearonthedisplayunit.To changethetemperature,usetheor key.Selectthedesiredfinalcoretemperature ofthefood(inthetemperaturerangebetween 30and99°C).
NOTE: When using the probe, setting the cooking time is not possible.
4 Confirm the setting bypassing the ▶|□ key.
5 When the set core temperature is reached, the oven will stop operating. End will appear on the display unit. An acoustic signal will be heard which you may turn off by touching any key. After on minute, the acoustic signal will be switched off automatically.

INFORMATION!
During the cooking process, set and current food core temperature alternate on the display unit. You may change the cooking temperature or that target food core temperature during the cooking process.
Correctuseoftheprobe,bytypeoffood:
- poultry:sticktheprobeinthethickestpartofthebreast;
•redmeat:sticktheprobeintoaleanpartthatisnotmarbledwithfat; - smallerchunkswithbone:stickthemintoanareaalongthebone;
- fish:sticktheprobebehindthehead,towardsthespine.

WARNING!
Afteruse, carefullyremovetheprobefromthefood, unplugfromthesocketintheoven cavity, andcleanit.

INFORMATION!
If you donot usethe probe, remove it from the oven.
Recommendeddonenesslevelsfordifferenttypesofmeat
| Typeoffood | blue (raw) | medium rare | medium | medium well | welldone |
| BEEF | |||||
| 68-7359-6553-584 | |||||
| 63-6658-6254-574 | |||||
| 63-6658-6254-574 | |||||
| 71-7466-6860-635 | |||||
| VEAL | |||||
| 63-6658-6254-574 | |||||
| 63-6658-6254-574 | |||||
| PORK | |||||
| 75-8565-70///roasl | |||||
| /60-69///pork,loi | |||||
| 80-85///meatloaf | |||||
| LAMB | |||||
| 77-8072-7666-716 | |||||
| MUTTON | |||||
| 77-8072-7666-716 | |||||
| GOATMEAT | |||||
| 77-8072-7666-716 | |||||
| POULTRY | |||||
| 82-90///poultry,wt | |||||
| 62-65///poultry,br | |||||
| FISHANDSEAFOOD | |||||
| /62-65///trout | |||||
| /55-60///tuna | |||||
| /52-55///salmon | |||||
Cleaningandmaintenance

WARNING!
Beforecleaning, unplugtheappliance from the power mains and wait for the appliance to cooldown.
Childrenshouldnotcleantheapplianceorperformmaintenancetaskswithoutproper supervision.
Foreasiercleaning, ovencavity and baking tray and sheet are coated with special enamelforasmooth and resistant surface.
Regularlycleantheapplianceandusewarmwaterandhanddishwashingliquidtoremovelarger impuritiesandlimescale.Useacleansoftclothorspongecloth.
Appliance exterior: use hot soapsuds and a soft cloth to remove impurities, then wipe the surfaces dry.
Appliance interior: for stubborn dirt and grime, use conventional oven cleaners. When using such cleaners, thoroughlywipetheappliancewithawetclothtoremoveallcleanerresidue.
Accessoriesandguides:cleanwithhotsoapsudsandadampcloth.Forstubborndirtandgrime, werecommendpriorsoakinganduseofabrush.
If the cleaning results are not satisfactory, repeat the cleaning process.

INFORMATION!
Neveruseaggressiveorabrasivecleanersandaccessories(abrasivespongesanddetergents, stainandrustremovers, scrapersforglassceramicplates).
Ovenequipmentisdishwasher-safe.
Foodresidue(fat,sugar,protein)canigniteduringtheuseoftheappliance.Therefore,remove largerchunksofdirtfromtheoveninteriorandaccessoriesbeforeeachuse.
UsingtheSteamCleanprogramtocleantheoven
Thisprogrammakesiteasiertoremoveanystainsfrominsidetheoven.
The functionisthemosteeffectiveifusedregularly,aftereachuse.
Before running the cleaning program, remove all large visible chunk of dirt and food residues from the ovencavity.

1 Inserttheshallowbakingsheetintothefirst guidelevelandpour0.4litresofhotwaterinto it.
2 TurntheCOOKINGSYSTEMSELECTOR KNOBtoSteamClean.SettheTEMPERATURE KNOBto80°C.
3 Lettheprogramoperateforhalfanhour.
4 When the program is completed, carefully removethebakingsheet, using ovenmitts (there can still besomewater on the baking sheet). Wipedownthestains with damp cloth and soapsuds. Thoroughly wipethe appliance with awet cloth to remove all cleaner residue.

INFORMATION!
If the cleaning process is not successful (incase of particularly stubborndirt), repeat it.

WARNING!
UsetheSteamCleansystemwhentheovenhasfullycooleddown.
Removingwireandfixedpull-out(extendible)guides
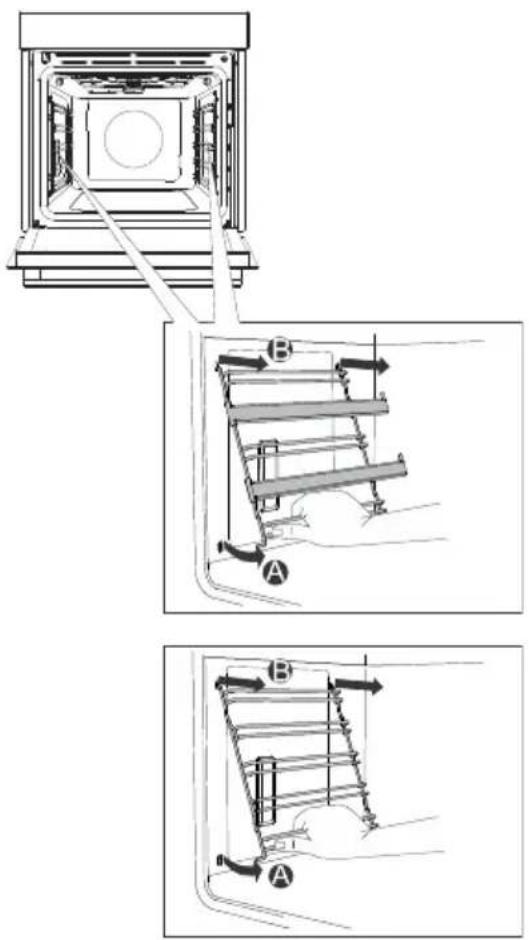
A Holdtheguidesbythebottomsideand pullthemtowardsthecenteroftheovencavity.
BRemovethemfromtheopeningsatthetop.
INFORMATION!
Whenremovingtheguides, takecarenot todamagetheenamelcoating.
Removing andreplacing theovendoorandglasspanes

flowchart
graph TD
    A["Step 1: Floor with horizontal panel and vertical connectors"] --> B["Step 2: Internal component assembly"]
    B --> C["Step 3: Panel assembly with directional arrows indicating motion"]
    C --> D["Step 4: Panel assembly with directional arrows indicating motion"]
    D --> E["Step 5: Final assembly with directional arrows indicating motion"]
1 First,fullyopenthedoor(asfarasitwillgo).
2 Ovendoorisattachedtothehingeswith specialsupportsthatalsoincludesafetylevers. Rotatethesafetyleverstowardsthedoorby 90°.Slowlyclosethedoortoa45°angle (relativetothepositionofthefullycloseddoor); then, liftthedoorandpullitout.
Ovendoorglasspanecanbecleanedfrom theinside,butithastoberemovedfromthe appliancedoorfirst.First,proceedasdescribed underitem2,butdonotremoveit.
3Removetheairguide.Holditontheleft-andright-handsideofthedoorwithyour hands.Removeitbyslightlypullingittowards you.
4 Holdthedoorglassattheupperedge and removeit. Tothesameforthesecondandthird glasspane(dependingonthemodel).
5Toreplacetheglasspanes, observethe reverseorder.

INFORMATION!
Toreplacethedoor, followthereverseorder. If the doordoes not open or close properly, make sure thenotches on the hinges are aligned with the hinge beds.

WARNING!
Theovendoorhingecanclosewithconsiderableforce.Therefore,alwaysrotateboth safetyleverstothesupportwhenfittingorremovingtheappliancedoor.
Softdoorclosingandopening
Ovendoorisfittedwithasystemthatdampensthedoorclosingforce,startingatthe75-degreeangle. Itallowssimple,quiet,andgentleopeningandclosingofthedoor.Agentlepush(toa15°angle relativetothecloseddoorposition)isenoughforthedoortocloseautomaticallyandsoftly.

WARNING!
If the force applied to closeted doorist or strong, the effect of the system is reduced for the system will be bypassed for safety.
Replacingthebulb
Thebulbisaconsumableandthereforenotcoveredbywarranty.Beforereplacingthebulb,remove allaccessoriesfromtheoven.
Halogenlamp:G9,230V,25W

1 Unscrewandremovethecover(in anti-clockwisedirection).Removethehalogen bulb.
2 Useaflatplastictooltoremovethecover. Removethehalogenbulb.
INFORMATION!
Takecarenottodamagetheenamel coating. Useprotectiontoavoidburningyourself.

WARNING!
Onlyreplacethelightbulbwhentheapplianceisdisconnectedfrompowersupply.
Troubleshootingtable
Specialwarningsandfaultreporting
Duringthewarrantyperiod,onlyaservicecenterauthorizedbythemanufacturermaycarryout anyrepairs.
Beforemakinganyrepairs, makesuretheapplianceisdisconnectedfromthepowermainseitherby removingthefuseorbydisconnectingthepowerplugfromthewalloutlet.
Anyunauthorizedrepairsoftheappliancemayresultinelectricshockandshortcircuithazard;therefore, donotperformthem.Leavesuchworktoanexpertoraservicetechnician.
In caseofminorproblemswithapplianceoperation, check this manual to see if you can fix the problem yourself.
If the appliance is not operating properly or at all duetoin appropriate operation or handling, a visit from as servicetechnicians shall not be free of charge, even during the warranty period.
Savetheinstructionsforfuturereferenceandpassthemontoanysubsequentownersorusersofthe appliance.
Followingissomeadviceonrectifyingsomecommonproblems.
| CauseProblem/error | |
| Callaservicetechnician.Themainfuseinyourhometripsoften. | |
| Theovenlightingdoesnotwork. | Theprocessofchangingthelightbulbintheovenis describedinthechapterReplacingthebulb. |
| Controlunitisnotresponding,the screenisfrozen. | Disconnectttheappliancefromthepowermainsforafew minutes(undothefuseorswitchoffthemainswitch); then,reconnecttheapplianceandswitchiton. |
| ErrorCodeErrXisdisplayed.Incaseofadouble-digiterrorcode, ErXXwillbedisplayed. | Thereisanerrorintheelectronicmoduleoperation.Disconnectttheappliancefromthepowermainsforafew minutes.Iftheerrorisstillindicated,callaservicetechnician. |
If the problem persist despite observing the above advice, call an authorized servicetechnician. Repair or any warranty claim resulting from incorrect connection or use of the appliances shall not be covered by the warranty. In this case, the user will cover the cost of repair.
DISPOSAL

Ourproductpackagingismadeofenvironmentallyfriendlymaterialsthat canberecycled, disposedof, ordestroyedwithoutanyhazardtothe environment. To thisend, packagingmaterials are labelled appropriately.
Thesymbolontheproductoritspackagingindicatesthattheproduct shouldnotbetratedasnormalhouseholdwaste.Taketheproductto anauthorizedcollectioncentreforwasteelectricandelectronic equipmentprocessing.
Correctdisposaloftheproductwillhelppreventanynegativeeffects ontheenvironmentandhealthofpeople,whichcouldoccurincaseof incorrectproductremoval.Fordetailedinformationonremovaland processingoftheproduct,pleasecontacttherelevantmunicipalbody inchargeofwastemanagement,yourwastedisposalservice,orthe storewhereyouboughttheproduct.
Wereservetherighttoanychansanderrorsintheinstructionsforuse.
Hisense
life reimagined


- INFORMATION!
- WARNING!
- Contents
- Safetyprecautions
- Carefullyreadtheinstructionsandsavethemforfuture reference
- Otherimportantsafetywarnings
- Built-inoven
- Appliancedescription
- Ratingplate-productinformation
- Controlunit
- Push-pullknobs
- Applianceequipment
- Controllights
- Guides
- Wireguides
- Fixedpull-outguides
- Click-onpull-outguides
- Ovendoorswitch
- Coolingfan
- Usingtheappliance
- Beforefirstuse
- Switchingonforthefirsttime
- 1.CLOCKSETTING
- 2.DISPLAYDIMMER
- 3.ACOUSTIC SIGNALVOLUME
- Choosingthesettings CHOOSINGTHECOOKINGSYSTEM
- Settingthedelayedstart
- Minutemindersetting
- CHOOSINGTHEGENERAL SETTINGS
- Clockdisplayed
- Acousticsignalvolume
- Displayillumination
- Displayunit-nightmode
- 5.Standby
- Adaptive function
- Factorysettings
- Startingthecookingprocess
- Extragratin
- Endofcookingandswitchingofftheoven
- Generaltipsandadviceforbaking
- Cookingwithatemperatureprobe (BAKESENSOR)
- Correctuseoftheprobe,bytypeoffood:
- Cleaningandmaintenance
- UsingtheSteamCleanprogramtocleantheoven
- Removingwireandfixedpull-out(extendible)guides
- Removing andreplacing theovendoorandglasspanes
- Softdoorclosingandopening
- Replacingthebulb
- Troubleshootingtable
- Specialwarningsandfaultreporting
- DISPOSAL
- Hisense
Brand : HISENSE
Model : BI6062IXUK
Category : Kitchen Appliances