
BI6061CXUK - Kitchen Appliances HISENSE - Free user manual and instructions
Find the device manual for free BI6061CXUK HISENSE in PDF.


| Brand | Hisense |
| Model | BI6061CXUK |
| Product Type | Built-in Electric Oven |
| Installation Type | Built-in under counter or in column |
| Dimensions (H × W × D) | 595 mm × 595 mm × 545 mm |
| Oven Capacity | 71 litres |
| Energy Efficiency Class | A+ (on a scale of A+++ to D) |
| Power Supply | 220-240 V ~ 50/60 Hz |
| Total Connected Load | 3.65 kW |
| Main Functions | Convection, Grill, Pizza, Defrost, Conventional, Fan-Forced |
| Temperature Range | 50°C – 250°C |
| Control Type | Retractable knobs + touch display |
| Display | LED digital screen with clock and timer |
| Cleaning Method | HydroEasy cleaning (steam-assisted) |
| Safety Features | Child lock, cool door, automatic shut-off, residual heat indicator |
| Door Type | Drop-down door with triple glazing |
| Number of Glass Panels | 3 |
| Interior Light | Halogen lamp, door-activated switch |
| Racks Included | 1 telescopic shelf, 1 standard shelf, 1 baking tray |
| Weight (net) | 31.5 kg |
| Color | Stainless steel / Black glass |
| Warranty | 2 years (parts and labor) |
Frequently Asked Questions - BI6061CXUK HISENSE
User questions about BI6061CXUK HISENSE
0 question about this device. Answer the ones you know or ask your own.
Ask a new question about this device
Download the instructions for your Kitchen Appliances in PDF format for free! Find your manual BI6061CXUK - HISENSE and take your electronic device back in hand. On this page are published all the documents necessary for the use of your device. BI6061CXUK by HISENSE.
USER MANUAL BI6061CXUK HISENSE
DETAILED INSTRUCTIONS
FOR USE OF GLASS CERAMIC BUILT-IN COOKING HOB
Hisense
We thank you for your trust and the purchase of our appliance.
This detailed instruction manual is supplied to make the use of this product easier. The instructions should allow you to learn about your new appliance as quickly as possible.
Make sure you have received an undamaged appliance. If you do find transport damage, please contact the seller from which you purchased the appliance, or the regional warehouse from which it was supplied. The telephone number can be found on the invoice or on the delivery note.
| 4 | IMPORTANT SAFETY INSTRUCTIONS | INTRODUCTION |
| 6 | Before connecting the appliance: | |
| 7 | GLASS CERAMIC BUILT-IN COOKING HOB | |
| 8 | Technical specifications | |
| 9 | BEFORE USING THE APPLIANCE FOR THE FIRST TIME | PREPARING THE APPLIANCE FOR THE FIRST USE |
| 10 | COOKING HOB | COOKING HOB OPERATION |
| 10 | Glass ceramic cooking surface | |
| 11 | Tips regarding your cookware | |
| 11 | Energy saving tips | |
| 12 | OPERATING THE COOKING HOB | |
| 12 | Control unit (depending on the model) | |
| 13 | Switching on the hob | |
| 13 | Switching on the cooking zones | |
| 14 | Automatic rapid heating | |
| 14 | Automatic rapid heating table | |
| 16 | Extended cooking zone (depending on the model) | |
| 16 | Power zone | |
| 17 | Child lock | |
| 18 | Timer functions | |
| 19 | Pausing the cooking process with stop & go | |
| 19 | Memory function | |
| 20 | Switching off a cooking zone | |
| 20 | Residual heat indicator | |
| 20 | Maximum cooking time | |
| 21 | Switching off the entire cooking hob | |
| 21 | Automatic switch off | |
| 21 | Setting the acoustic signal and lock parameters | |
| 23 | MAINTENANCE & CLEANING | MAINTENANCE & CLEANING |
| 25 | TROUBLESHOOTING TABLE | TROUBLE-SHOOTING |
| 26 | INSTALLING A BUILT-IN HOB | INSTALLATION AND CONNECTION |
| 34 | CONNECTING THE COOKING HOB TO THE POWER MAINS | |
| 36 | DISPOSAL | MISCELLANEOUS |
CAREFULLY READ THE INSTRUCTIONS AND SAVE THEM FOR FUTURE REFERENCE.
This appliance can be used by children aged from 8 years and above and persons with reduced physical, sensory or mental capabilities or lack of experience and knowledge if they have been given supervision or instruction concerning use of the appliance in a safe way and understand the hazards involved. Children shall not play with the appliance. Cleaning and user maintenance shall not be made by children without supervision.
This appliance is not intended for use by persons (including children) with reduced physical, sensory or mental capabilities, or lack of experience and knowledge, unless they have been given supervision or instruction concerning use of the appliance by a person responsible for their safety.
Children should be supervised to ensure that they do not play with the appliance.
WARNING: The appliance and its accessible parts become hot during use. Care should be taken to avoid touching heating elements. Children less than 8 years of age shall be kept away unless continuously supervised.
WARNING: Ensure that the appliance is switched off before replacing the lamp to avoid the possibility of electric shock.
WARNING: Accessible parts will become hot when in use. To avoid burns and scalds children should be kept away.
WARNING: Ensure that the appliance is switched off before replacing the lamp to avoid the possibility of electric shock.
Do not use steam cleaners or high pressure cleaners to clean the appliance as this may result in an electric shock.
The appliance is not intended to be controlled with external timers or special control systems.
Means for disconnection must be incorporated in the fixed wiring in accordance with the wiring rules.
If the supply cord is damaged, it must be replaced by the manufacturer, its service agent or similarly qualified persons in order to avoid a hazard (only for appliances supplied with connection cord).
WARNING: If the surface is cracked, switch off the appliance to avoid the possibility of electric shock.
Do not stare at the hob elements, as they have incorporated halogen lamps.
WARNING: Unattended cooking on a hob with fat or oil can be dangerous and may result in fire. NEVER try to extinguish a fire with water, but switch off the appliance and then cover flame e.g. with a lid or a fire blanket.
WARNING: Danger of fire: do not store items on the cooking surfaces.
Danger of fire: Do not store items on the cooking surfaces.
CAUTION: The cooking process has to be supervised. A short term cooking process has to be supervised continuously.
WARNING: Unattended cooking on a hob with fat or oil can be dangerous and may result in a fire.
WARNING: Use only hob guards designed by the manufacturer of the cooking appliance or indicated by the manufacturer of the appliance in the instructions for use as suitable or hob guards incorporated in the appliance. The use of inappropriate guards can cause accidents.
The appliance is intended for household use. Do not use it for any other purpose, such as room heating, drying of pets or other animals, paper, fabrics, herbs etc. As this may lead to injury or fire hazard.
The appliance may only be connected to the power mains by an authorised service technician or expert. Tampering with the appliance or non-professional repair thereof may result in risk of severe injury or damage to the product.
Eventual mismatches in colour shades between different appliances or components within a single design line may occur due to various factors, such as different angles under which the appliances are observed, different coloured backgrounds, materials, and room illumination.
BEFORE CONNECTING THE APPLIANCE:

Carefully read the instructions for use before connecting the appliance. Repair or any warranty claim resulting from incorrect connection or use of the appliance shall not be covered by the warranty.
GLASS CERAMIC BUILT-IN COOKING HOB
(DESCRIPTION OF EQUIPMENT AND FUNCTIONS - DEPENDING ON THE MODEL)
Since the appliances for which these instructions were drawn up may have different equipment, some functions or equipment may be described in the manual that may not be present in your appliances.


1 Cooking zone rear left
2 Cooking zone rear right
3 Cooking zone front left
4 Cooking zone front right
5 Cooking hob control unit
TECHNICAL SPECIFICATIONS
(DEPENDING ON THE MODEL)

A Serial number
B Code/ID
C Type
D Brand
E Model
F Technical data
G Compliance symbols
The rating plate with basic information on the appliance is located on the bottom side of the cooking hob.
BEFORE USING THE APPLIANCE FOR THE FIRST TIME
If your hob has a glass ceramic surface, clean it with a damp cloth and some washing-up liquid. Do not use aggressive cleaners, such as abrasive cleaners that could cause scratches, abrasive dishwashing sponges, or stain removers.
During initial use, characteristic "new appliance smell" may appear; it will gradually disappear.
GLASS CERAMIC COOKING SURFACE
- The heating zone will quickly reach the set power or temperature, while the area around the hot cooking zones will remain cook.
- The hob is resistant to temperature changes.
- The hob is also impact-resistant. Even if the cookware is placed onto the hob roughly, the hob will not be damaged.
- Using the glass ceramic hob as a storage area may result in scratches or other damage to it. Do not use aluminium or plastic cookware on hot cooking zones. Do not place any plastic objects or aluminium foil on the glass ceramic hob.
- Do not use the glass ceramic hob if it is cracked or broken. If a sharp object falls on the hob, the hob may break. The consequences of such occurrence may be visible immediately or only after a while. If any visible crack appears in the hob, immediately cut off the power supply to the appliance.
TIPS REGARDING YOUR COOKWARE

- Use quality cookware with fl at and stable bottom.
- Pan bottom and cooking zone diameters should be the same.
- Tempered glass cookware with special ground bottom may be used on the cooking zones if its diameter fi ts that of the cooking zones. Cookware with larger diameter may crack due to thermal tension.
-
Make sure the pot or pan is in the middle of the cooking zone.
-
When using a pressure cooker, keep an eye on it until the right pressure is reached. First, set the cooking zone to maximum power; then, following the pressure cooker manufacturer's instructions, use the relevant sensor to decrease the cooking power at the right time.
- Make sure there is enough liquid in the pressure cooker or any other pot or pan. Due to overheating, using an empty pot on the cooking zone may result in damage to both the pot and the cooking zone.
- When using special cookware, observe the manufacturer's instructions.
ENERGY SAVING TIPS
- Diameter of the pot and pan bottoms should match the diameter of the cooking zone. If the pot or pan is too small, a part of the heat will be lost, and the cooking zone may be damaged.
- If the cooking process allows, use a lid.
- Cookware should be suitably sized given the amount of food. When you cook a small amount of food in a large pot or pan, more energy is lost.
- If a dish takes a long time to cook, use a pressure cooker.
- Vegetables, potatoes etc. may be cooked in a smaller amount of water. The food will cook just as well, as long as the pot is tightly closed with a lid. After bringing the water to a boil, reduce the heat to a level that just suffi ces to maintain a slow simmer.
Settings sensor keys:
A Hob on/off and lock key
A1 Appliance on indicator light
C Stop & Go (pause) key
C1 Stop & Go (pause) indicator light
D Minute minder of power off timer key
E Extended cooking zone indicator light
F Power level/residual heat displays
G Power increase key (+)
G Power decrease key (-)
J Left extended heating zone on/off key
J1 Right extended heating zone on/off key
K Timer-operated cooking zone indicator light
L Timer display
M Timer settings decrease key
N Timer settings increase key
SWITCHING ON THE HOB

Touch the on/off key (A) and hold it for 1 second to switch on the hob. "O" will appear on all power level indicators. A brief acoustic signal will be emitted and an indicator light will light up above the "on" key.

If no cooking zone is switched on in 10 seconds, the cooking hob will power off.
SWITCHING ON THE COOKING ZONES
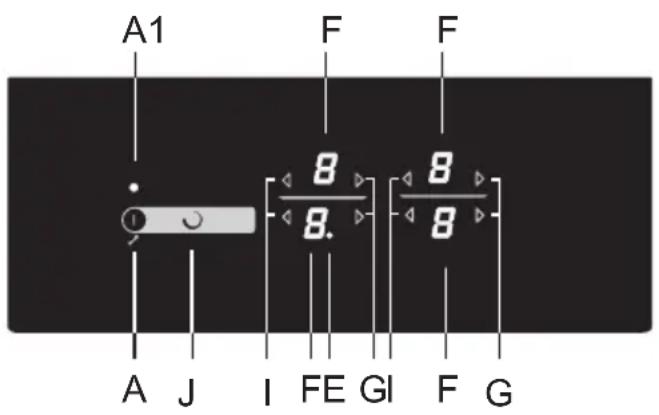
After the hob is switched on (in the next 10 seconds), switch on the desired cooking zone.
Use the "+" and "-" keys to select the desired setting for the activated cooking zone. If you first touch the "+" key, the power level will be set to "9".
If you first touch the "-" key, the power level will be set to "4".
Change of cooking zone settings
Power level can be changed at any time by touching the relevant "+" or "-" key.
To increase or decrease the power level faster, touch and hold the "+" or "-" key.
Stay-warm/reheating function
The stay-warm/reheating zone is intended for keeping warm the food that is already cooked. To activate the function, select the setting U, between 0 and 1.
AUTOMATIC RAPID HEATING
All cooking zones are fitted with a special mechanism that sets the cooking power to maximum at the start of the cooking process, regardless of the actual power setting. After a while, the cooking zone power switches back to the initially set level (1 to 8).
The auto rapid heating function is suitable for dishes that have to be heated up at maximum power first, and then cooked for a longer period of time.
The auto rapid heating function is not suitable for braising, frying or sautéing, food that requires frequent turning, basting, or mixing, or food that has to boil for a longer period of time in a pressure cooker.

The cooking zone should be off ("0" should appear on the display unit). Press the relevant "+" key and hold it for 3 seconds until you hear a short beep. "A" and "9" will flash alternately on the display.
Decrease the power to the level you wish to cook with after the automatic rapid heating. "A" and selected power level will alternate on the power level display. When the automatic rapid heating time expires, the cooking zone automatically switches to the selected level which will then be continuously displayed.
AUTOMATIC RAPID HEATING TABLE
| Power level 1 | 2 | 3 | 4 | 5 | 6 | 7 | 8 | |
| Automatic rapid heating time (min) | 1:00 | 2:00 | 4:50 | 6:30 | 8:30 | 2:30 | 3:30 | 4:30 |
If cooking power is decreased while the automatic rapid heating is activated, then automatic rapid heating for this cooking zone will be switched off.
The auto rapid heating function can be deactivated by selecting the relevant cooking zone and decreasing the power level to "0". Then, set the new power level.
| Type of food/ cooking method | amount power | level cooking time | (minutes) |
| Soup/reheating 0,5 - 1 litre A 7 - 8 4 - 7 | |||
| Milk/reheating 0,2 - 0,4 litre A 1 - 2 4 - 7 | |||
| Rice/cooking | 125g - 250g approx. 300ml - 600ml of water | A 2 - 3 20 - 25 | |
| Boiled potatoes/ whole, unpeeled | 750g - 1,5kg | A 5 - 625 - 38 | |
| Fresh vegetables, chopped/cooking | 0,5 - 1 kg approx. 400ml - 600ml of water | A 4 - 5 18 - 25 |
- The table lists examples of some dishes that will particularly benefit from the automatic rapid heating function.
- The indicated values are approximate and may depend on other parameters of cooking (e.g. type and quality of cookware, amount of water added etc.).
- Smaller amounts apply to smaller cooking zones; larger amounts apply to large cooking zones.
EXTENDED COOKING ZONE (depending on the model)
An additional heater ring can be activated for some cooking zones (depending on the model).
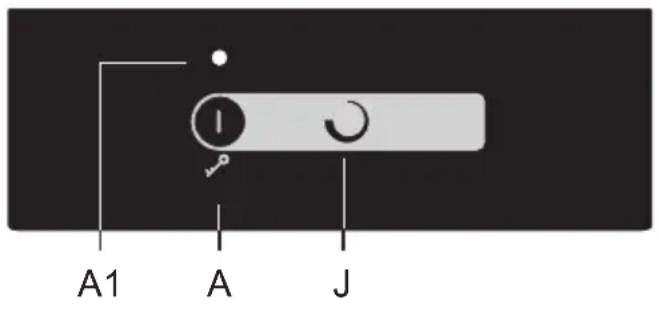
Activating the cooking zone extension / additional heater ring
- An additional ring can be activated to extend an already selected cooking zone for which the power level has been set.
To activate the extension, press the (J/J1) key. Signal light (I) next to the display will light up. - The power level is selected for both rings.
- If a cooking zone has a third ring, activate it by pressing the (J/J1) key again, so that two signal lights (I) are lit next to the power level display.
Deactivating the cooking zone extension / additional heater ring
- To switch off the extension ring (or rings), press the (J/J1) key next to the selected cooking zone.
POWER ZONE
In some models, a Rapid Boil can be activated on the front left cooking zone indicated with "P" or "»". This allows faster heating of both the cookware and the food.
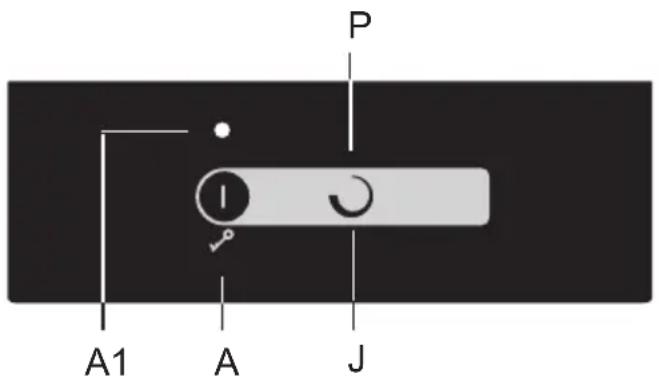
Activating the Rapid Boil
- Select the front left cooking zone.
- Press the (J) key for an additional heater ring or for Rapid Boil. Letter »P« will appear on the power display unit and extra heating power will soon be engaged on the cooking zone which will glow intensely.
Deactivating the Rapid Boil
Rapid Boil can be deactivated in two ways:
- Press the (J) key. Rapid Boil will be deactivated and operating power will return to the level set before the Rapid Boil activation.
- Power can be decreased to desired level by pressing the (-) key.

The cooking zone with activated Rapid Boil draws a lot of heating power. Therefore, adjacent upper (rear) cooking zone cannot be simultaneously set to maximum power; other, its power will be limited to 7 for the duration of the Rapid Boil. If the Rapid Boil activated on the front left cooking zone at a time when the rear cooking zone is set power level 8 or 9, or when automatic rapid heating is engaged, the power level for rear left cooking zone will be automatically set to 7 and the automatic rapid heating action will be deactivated.

Each cooking zone has built-in overheating protection. If there is no cookware on cooking zone or if the heat transfer to the food is not sufficient, then heating will be automatically deactivated for a few seconds. This is particularly important on the cooking e with the Rapid Boil option as it operates at much higher power and there is a greater bability of overheating.
CHILD LOCK
Child lock may be activated on the hob to prevent the appliance from being switched on easily and quickly.

Locking the cooking hob controls
The hob must be switched off.
Touch the on/off key and hold it for 3 seconds. "O" on the cooking zone power indicators will turn to sign "L". The cooking hob is now locked. After a few seconds, the cooking hob will switch off automatically.
Unlocking the cooking hob controls
To unlock the cooking hob, proceed in the same way as for locking it. The hob must be switched off.
Touch the on/off key and hold it for 3 seconds. "L" on the cooking zone power indicators will turn to "O". The cooking hob is now unlocked and ready for use.

If the child lock function is activated in the user settings mode (see chapter "User Settings Mode", then the hob will be automatically locked every time it is switched off.
TIMER FUNCTIONS
Cooking time can be set from 1 to 99 minutes. This function allows two operating modes:

A MINUTE MINDER
Press the timer/minute minder key (D) to activate the timer. "00" will appear on the timer display (L). Touch the "+" (N) and "-" (M) keys to set the time in the range from 1 to 99 minutes.
- After the set time expires, alarm will be activated; however, the cooking zone will not be switched off.
- Switch off the alarm by touching any key; alternatively, it will switch off automatically after a certain period of time.
- The minute minder function will remain activated even when the cooking hob is switched off using the (A) key.
B OFF TIMER FOR THE SELECTED COOKING ZONE
This function allows setting the cooking time for the selected cooking zone on which a power level has already been set. When the time expires, the cooking zone is switched off automatically.
Press the timer/minute minder key (D) to activate the timer. "00" will appear on the timer display (L). Touch the (D) sensor key again. The point (K) for the relevant cooking zone will start to flash.
- Touch the »+« and »-« keys to set the time in the range from 1 to 99 minutes.
- When the desired value is set, the countdown begins. The point (K) indicating which cooking zone the timer function is set for will continue to flash.
- After the set time has expired, acoustic signal will be activated and the cooking zone will be switched off. »00« will flash on the clock display. Switch of the alarm by touching any key; alternatively, it will switch off automatically after a certain period of time.

Cooking time can be set separately for each cooking zone. If several timer functions are activated, the remaining times of respective cooking zones will alternate on the display unit in intervals lasting a few seconds. A flashing indicator light will indicate the relevant cooking zone.
Changing the cooking time
- Remaining cooking time can be changed at any time during cooking.
- Touch the power-off timer key (D) to select the timer display for the desired cooking zone. The relevant indicator light (K) will flash.
- Touch the »+« (N) and »-« (M) keys to set the new cooking time.
Displaying the remaining cooking time
If several timer settings are activated, remaining cooking time can be displayed by touching the (D) key.
Timer reset
- Select the desired timer display by pressing the (D) key (see section Changing the set cooking time). The set timer will be displayed and the indicator light for the relevant cooking zone will light up.
- Touch the »-« (M) key to set the value to »00«, or press the »+« (N) and »-« (M) key simultaneously to immediately reset the value to »00«.
PAUSING THE COOKING PROCESS WITH
STOP & GO
The STOP & GO function allows you to pause (or suspend) the cooking process, but keep all your settings.
To pause the cooking process, touch the STOP & GO key (C). An indicator light (C1) will light up above the key. Settings on the displays will start to flash. All settings are frozen, and the cooking zone are not heated (the heaters are switched off).
All keys except on/off and STOP & GO are inactive. To deactivate the STOP & GO function, touch the STOP & GO key again. Indicator light (C1) will switch off.
If the STOP & GO function is not switched off, the entire hob will automatically switch off after 10 minutes.
MEMORY FUNCTION
The memory function allows restoring the most recently selected settings in 5 seconds after the hob is switched off. This is convenient when, for example, you accidentally press the on/off key and switch off the entire hob, or if the cooking hob is switched off automatically due to some spilt liquid.
After switching off with the on/off key, you have 5 seconds to switch the control panel back on, and further 5 seconds to press the STOP & GO key to restore your settings.
During these 5 seconds, the indicator light above the settings restore key will flash.
All settings active before the hob was switched off will be restored.
SWITCHING OFF A COOKING ZONE
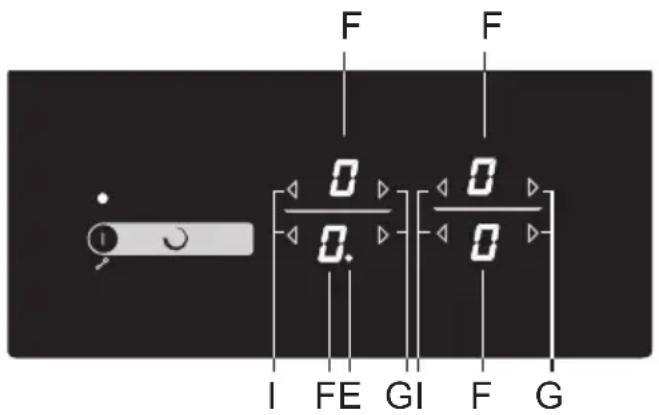
To switch off a cooking zone, use the relevant "-" key to set the value to "O". To quickly switch off the cooking zone, touch the relevant "-" and "+" keys simultaneously. You will hear a short beep, and "O" will be displayed on the display unit.
If the power of all cooking zones is set to "O", the cooking zone will switch off automatically after a few seconds.
RESIDUAL HEAT INDICATOR
As soon as a hot cooking zone or the entire cooking hob is switched off, the following will be displayed:
- "H" cooking zone is hot;
How long this will be displayed depends on the power level and on how long a cooking zone was activated. When the "H" sign disappears, the cooking zone may still be hot in some cases (power failure, a hot pan left on the cooking zone etc.). Be careful as there is danger of burns! In case of a power failure while the cooking zones are still hot, the "H" sign will flash on the display. This indicates that the cooking zone may or may not be hot, depending on the duration of the power failure.

The appliance was tested at the factory and the cooking zones were heated up.
Therefore, "H" may flash on the display for a while when the appliance is connected for the first time at your home.

When the "H" sign disappears, the cooking zone may still be hot. Risk of burns!
For safety, the cooking time for each cooking zone is restricted to a maximum duration.
Maximum cooking time depends on the most recently set power level.
If the power level is not changed, the cooking zone will be switched off automatically after the maximum cooking duration is reached.
| Power level u | 1 | 2 | 3 | 4 | 5 | 6 | 7 | 8 | 9 | P | |
| Maximum operating time (hours) | 8 8 | 8 6 | 6 4 | 4 2 | 1,5 | 1,5 | 1 |
SWITCHING OFF THE ENTIRE COOKING HOB

Touch the ON/OFF key (A) to switch off the entire hob. The hob will beep and all indicators will be switched off, except for the indicators for the cooking zones that are still hot, for which the residual heat indicator "H" will remain lit.
AUTOMATIC SWITCH OFF
If the keys are activated for too long during cooking (e.g. due to spilt liquid or an object placed over the sensor keys), all cooking zones will be switched off after 10 seconds. The symbol will flash on the display.
The object should be removed, or the spilt liquid should be cleaned, from the sensor keys within 2 minutes; otherwise, the cooking hob will switch off automatically.
The most recent settings can be restored with the memory function using the STOP & GO key.
SETTING THE ACOUSTIC SIGNAL AND LOCK PARAMETERS
You can adjust the volume of the acoustic signal, duration of acoustic alarm, and automatic lock settings.
The parameter settings menu can be activated within two minutes after the appliance is connected to the power mains, by touching and holding the pause (STOP & GO) key for around 3 seconds while the appliance is switched off.
The first parameter "Uo" will appear on the timer display, indicating the volume (loudness) of acoustic signals. Press the timer key (M,N) to select the type of parameter.

Uo - acoustic signal and alarm volume (loudness)
So - alarm duration
Lo - Automatic lock

The currently set value will appear on the right cooking zone power level displays. The value can be adjusted by pressing the "-" or "+" keys for the front right cooking zone. All parameters can be confirmed and stored by pressing and holding the pause (STOP & GO) key for 2 seconds. Then, a short beep will be heard. If you do not wish to store the new parameter settings, close the user settings mode by pressing the on/off key.
Acoustic signal and alarm volume (loudness) "Uo"
The following values can be set:
00 on the display = off (does not apply to alarm and error acoustic signal)
01 on the display = minimum volume
02 on the display = medium volume
03 on the display = maximum volume (default)
A short acoustic signal will be sounded upon every change, with the newly set volume.
Acoustic alarm duration "So"
The following values can be set:
05 on the display = 5 seconds
1,0 on the display = 1 minute
2,0 on the display = 2 minutes (default)
Child safety lock "Lo"
If the automatic lock function is activated in the user settings mode, the cooking hob will be automatically locked every time it is switched off.
00 on the display = off (default)
01 on the display = on

Be sure to unplug the appliance from the power supply and wait for the appliance to cool down.
Children should not clean the appliance or perform maintenance tasks without proper supervision.
After each use, wait for the glass ceramic surface to cool down and clean it. Otherwise, all remaining impurities will burn onto the hot surface the next time you use the hob.
For regular maintenance of the glass ceramic hob, use special care products that create a protective film on the surface to prevent the dirt from sticking onto it.

natural_image
Abstract pattern of curved white lines on a dark background, no text or symbols presentBefore each use of the glass ceramic surface, wipe off the dust or any other impurities that could scratch the surface, from both the hob and the pan bottom.

Steel wool, coarse cleaning sponges, and abrasive powders may scratch the surface. The surface may also be damaged by aggressive spray cleaners and unsuitable liquid cleaners.

natural_image
Abstract pattern with concentric circular lines on a dark textured background (no text or symbols)Signage may be worn when using aggressive or abrasive cleaners or cookware with coarse or damaged bottom.
Use a damp soft cloth to remove minor impurities. Then, wipe the surface dry.
natural_image
Abstract circular pattern with white concentric rings on a dark background, no text or symbols presentRemove water stains with a mild solution of vinegar. However, do not use this solution to wipe the frame (only with some models) as it may lose its sheen. Do not use aggressive spray cleaners or descaling agents.
Use special glass ceramic cleaners for stubborn dirt. Observe the manufacturer's instructions. Be sure to thoroughly remove any cleaner residues after the cleaning process as they may damage the glass ceramic surface when the cooking zones heat up.

natural_image
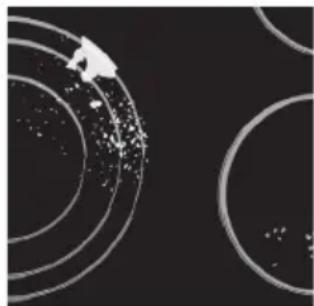
Illustration of a white tool with a handle against a dark background with faint circular patterns (no text or symbols)Remove stubborn and burnt residues with a scraper. Be careful when handling the scraper to prevent injury.

Only use the scraper when dirt cannot be removed with a wet with or special cleaners for glass ceramic surfaces.
natural_image
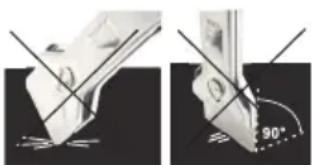
Two-step diagram showing a tool tip interacting with a surface, with a 90-degree angle标注 (no text or symbols present)Hold the scraper at the correct angle ( 45^ to 60^ ). Gently press the scraper against the glass and slide it over the signage to remove the dirt. Make sure the plastic handle of the scraper (in some models) does not come into contact with a hot cooking zone.

natural_image
Close-up of concentric circular rings with a small white object on the outer ring (no text or symbols visible)
Do not press the scraper perpendicularly against the glass I do not scratch the hob surface with its tip or blade.
Immediately remove any sugar or sugar-laden food from the glass ceramic hob using a scraper, even if the hob is still hot, as sugar may permanently damage the glass ceramic surface.

Any changes to the sheen of the graphic design elements or discolouration should not be deemed as damage to the appliance, but rather a result of normal use of the cooking hob. Such discolouration is most commonly a result of food residues burnt onto the surface, or it may be caused by some cookware materials (such as aluminium or copper). Such discolouration is very difficult to remove entirely.
Note: Discolouration and similar flaws only affect the appearance of the hob and do not directly affect its function. Removing such flaws shall not be covered by the warranty.
Tip
If the power level is set to "O" for all cooking zones, the cooking hob will be switched off after 10 seconds.
If any key is activated (pressed) for more than 10 seconds, the cooking hob will be switched off, an acoustic signal will be sounded, and a flashing sign will appear on the display.
If several keys are covered with an object or liquid is spilt over them, the hob will automatically switch off after a while.
Make sure the surface around the sensor keys is dry and clean.
If the keys do not respond or unusual signs appear on the displays, disconnect the cooking hob from the power mains for a few minutes (undo the fuse or trip the main switch); then, reconnect the hob to the power mains and switch on the main switch key.
The cooking hob is fitted with overheating protection. If the control unit starts to overheat, the cooking power level will be automatically decreased; eventually the cooking hob may be switched off and in this case, FH will appear on the display unit. When the control panel cools down, you can resume cooking.
The cooking hob is resistant to interferences in the power supply network. In case of stronger interference, the keys may respond somewhat more slowly. In this case, press on the keys slightly harder. Such occurrences are normally brief and do not affect the appliance operation in the long run.
If the problems persist despite observing the advice above, call an authorised service technician. Repair or any warranty claim resulting from incorrect connection or use of the appliance shall not be covered by the warranty. In this case, the user will cover the cost of repair.

Before the repair, disconnect the appliance from the power mains (by removing the fuse or by removing the plug from the wall outlet).


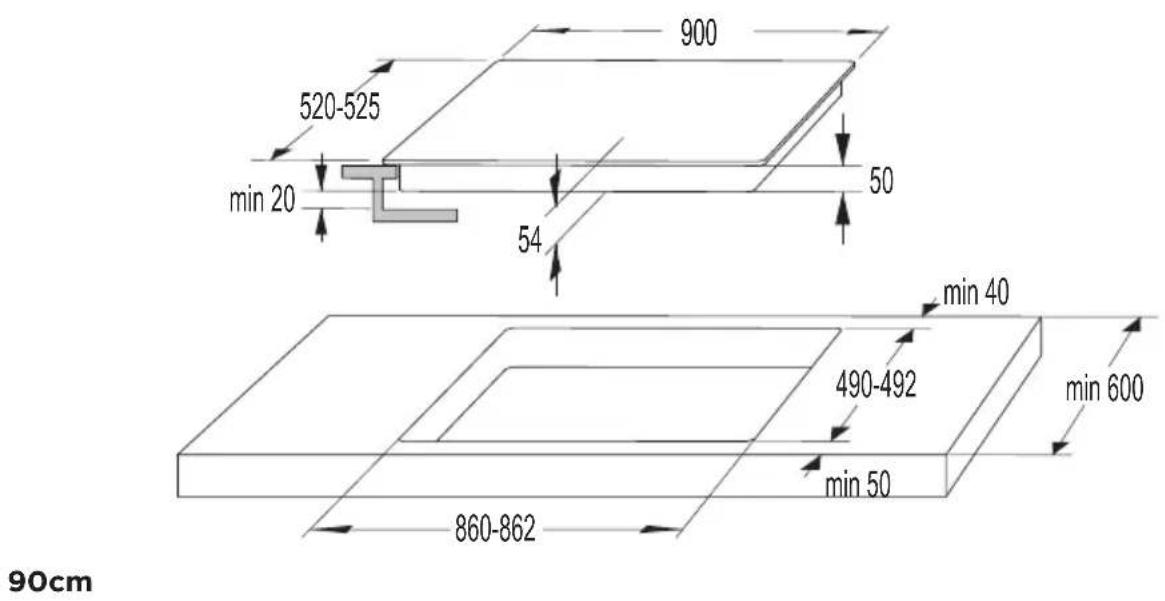
- A horizontal partition panel should be installed underneath the cooking hob along its entire length. There should be at least 20 mm of clearance between the lower end of the appliance and the partition panel.
Adequate ventilation should be allowed from the rear side.
- After installation of the built-in cooking hob, the front two fixing elements have to be accessible from the bottom side.
- Use of solid wood corner trims on worktops behind the cooking zone is only allowed if the clearance between the trim and the cooking hob is no smaller than indicated on the installation plans.
- Installing an oven under a cooking hob is possible for oven types EVP4, EVP2, EVP3 etc. which are fitted with a cooling fan.


DIMENSIONS OF THE OPENING IN THE WORKTOP
(depending on the model)

80cm
Some appliances come with the gasket already fitted!
Before installing the appliance into a kitchen worktop, attach the foam gasket supplied with the appliance to the bottom side of the glass ceramic hob.
- Remove the protective film from the gasket.
- Attach the gasket to the bottom side of the glass (2-3 mm away from the edge). The gasket has to be applied along the entire edge of the glass. The gasket may not overlap in the corners.
- When fi tting the gasket, make sure it is not damaged by or in contact with any sharp objects.

natural_image
Diagram showing a rectangular object with a magnified inset of a hand holding a small object, labeled '2 - 3 mm' (no text or symbols on the object itself)
Do not install the appliance without this gasket!

- The worktop has to be completely level.
- Protect the cut out surfaces.
- Use the four supplied screws (4x) to attach the fixing elements (4x) to the hole and cut-out in the front and back wall of the cooking hob.
- Insert the cooking hob into the cut-out and press it strongly towards the worktop from above.
- Do not use screws longer than 6.5 mm to tighten the fixing clamp.
FLUSH-MOUNT INSTALLATION INTO THE WORKTOP
Appliances without faceted edges or decorative frames are suitable for flush mounting.
1. Installing the appliance
The appliance may only be installed into a temperature- and water-resistant countertop, such as a countertop made of (natural) stone (marble, granite), or solid wood (the edges along the cut-out have to be sealed). When installing into a countertop made of ceramics, wood, or glass, a wooden sub-frame should be used. The frame is not supplied with the appliance.
The appliance may only be installed into a countertop made of other materials after you have consulted the countertop manufacturer and obtained his express approval. Internal dimension of the basic unit should be at least equal to the internal cutout for the appliance. This will allow simple removal of the appliance from the countertop. Attach sealing tape along the perimeter of the bottom of the glass panel.

natural_image
Illustration of hands connecting a cable to a tablet device (no text or symbols visible)First, feed the power cord through the cutout. Place the appliance over the centre of the cutout.
Connect the appliance to the power mains (see instructions for connecting the appliance). Before sealing the appliance, test its operation.
Seal the slot between the appliance and the countertop using a silicone sealant. The silicone sealant used to seal the appliance has to be temperature-resistant (to at least 160°C). Smooth out the silicone sealant using a suitable tool.
Observe the instructions for use of the selected silicone sealant. Do not switch on the appliance until the silicone sealant has dried completely.
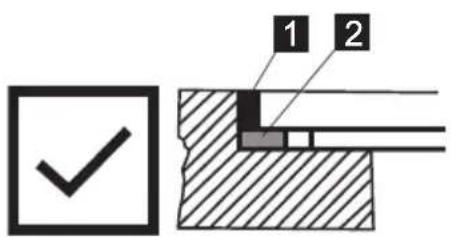
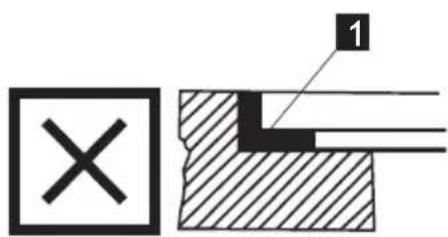
- Silicone sealant, 2. Sealing tape

Pay particular attention to built-in dimensions with (natural) stone countertops. When choosing the silicone sealant, observe the countertop material and consult the countertop manufacturer. Use of inappropriate silicone sealants can result in permanent discolouration of some parts.
2. Removing the built-in appliance:
Disconnect the appliance from the power mains.
Use a suitable tool to remove the silicone gasket from the perimeter. Remove the appliance by pushing it upwards from the bottom side.

Do not attempt to remove the appliance from the upper side of the counter!
Stone countertop

1 - Countertop
2 - Appliance
3 - Slot
Given the margin of error (tolerance) for the glass ceramic plate of the appliance, and the cutout in the countertop, the slot is adjustable (min. 2 mm).
Ceramic, wooden, or glass countertop

1 - Countertop
2 - Appliance
3 - Slot
4 - Wooden frame, thickness 16 mm.
Given the margin of error (tolerance) for the glass ceramic plate of the appliance, and the cutout in the countertop, the slot is adjustable (min. 2 mm). Install the wooden frame 5.5 mm below the upper edge of the countertop (see figure).
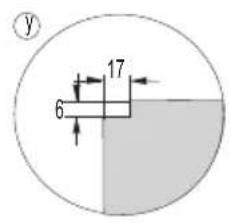
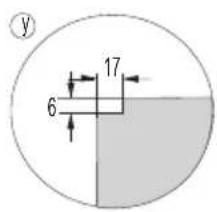
Observe the radii of glass edges (R10, R2) when making the cutout.

FLUSH-MOUNT INSTALLATION INTO THE WORKTOP - FLUSH MOUNT
(depending on the model)
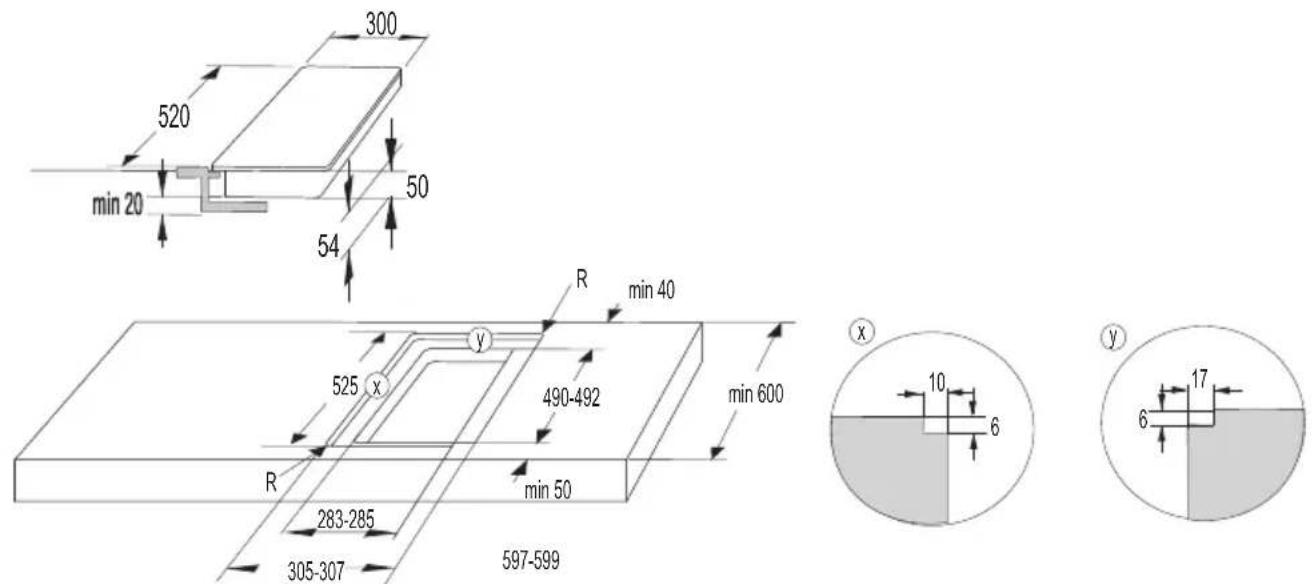
30cm


60cm
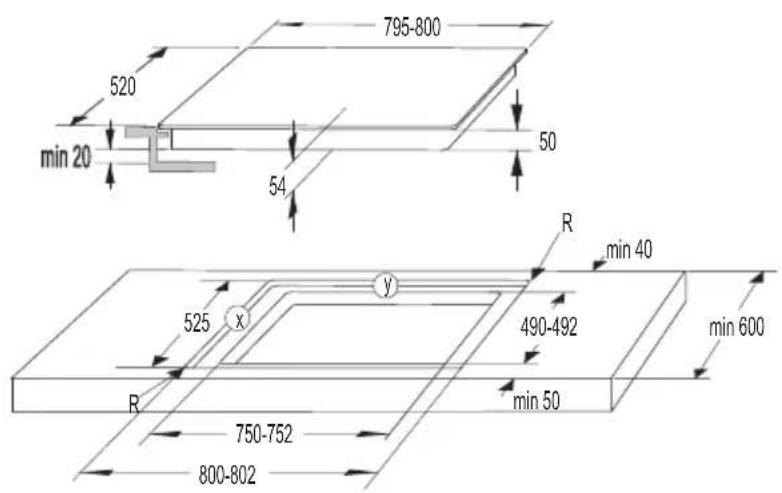

80cm


90cm
CONNECTING THE COOKING HOB TO THE POWER MAINS
- Power mains protection must conform to the relevant regulations.
- Before connecting the appliance, make sure the voltage indicated on the rating plate conforms to the voltage in your power mains.
- There should be a switching device in the electrical installation that can disconnect all poles of the appliance form the power mains, with a minimum clearance of 3 mm between the contacts when open. Suitable devices include fuses, protective switches etc.
- The connection should be adjusted to the current and fuses.
- After installation, the parts carrying electrical current and insulated parts shall be protected against contact.

The appliance may only be connected by an authorised expert. False connection can destroy parts of the appliance. In such case, there is no right to warranty. Disconnect the appliance from the power mains before any repair or maintenance operation.
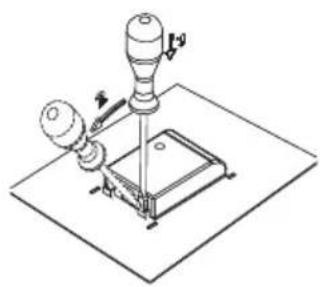
CONNECTION DIAGRAM:
natural_image
Technical line drawing of a mechanical device with a lever and base, no visible text or symbols


Jumpers (connecting bridges) are placed in the dedicated slot on the clamp.
POWER CORD
The following may be used for connection:
- PVC insulated connection cables type H05 VV-F or H05V2V2-F with yellow-and-green protective conductor, or other equivalent or superior cables.
Normal connection
• 2 phases, 1 neutral conductor (2 1N, 380-415 V\~/50 Hz):
Voltage between phases and neutral conductor is 220-240 V\~. Voltage between the two phases is 380-415 V\~. Install a jumper between the terminals 4-5. The group should include at least two 16-ampere fuses. Diameter of the power cord core should be at least 1.5 ~mm^2 .
• 2 phases, 2 neutral conductors (2 2N, 220-240V\~/50Hz):
▷ Voltage between phases and neutral conductors is 220-240 V\~.
The group (installation) should include at least two 16-ampere fuses. Diameter of the power cord core should be at least 1.5 mm ^2 .
Special connection:
- Single-phase connection (11N, 220-240 V-/50 Hz):
Voltage between phase and neutral conductor is 220-240 V-. Install jumpers between the terminals 1-2 and 4-5. The group (installation) should be fitted with a fuse of at least 32 A. Power cord core diameter should be at least 4mm^2 .
Run the power cord through a cord strain relief (clamp) which protects the cable from being pulled out. Make sure the cable on the rear side of the appliance is not in contact with the cooking hob rear wall, as this part can heat up during use.
After connecting the appliance, switch on all heaters for approximately 3 minutes to check their operation.
False connection can destroy parts of the appliance. In such case, there is no right to warranty.
Before connecting the appliance, make sure the voltage specified on the rating plate conforms to the voltage of the power mains. An expert should check the actual voltage in your home (220-240 V relative to N), using a suitable meter!
Appliances with a width of 30 centimetres (two cooking zones) only allow single-phase connection. The diameter of the power cord should be at least 1.5 mm!

Packaging is made of environmentally friendly materials that can be recycled, disposed of, or destroyed without any hazard to the environment. To this end, packaging materials are labelled appropriately.
The symbol on the product or its packaging indicates that the product should not be treated as normal household waste. The product should be taken to an authorised collection centre for waste electric and electronic equipment processing.
Correct disposal of the product will help prevent any negative effects on the environment and health of people which could occur in case of incorrect product removal. For detailed information on removal and processing of the product, please contact the relevant municipal body in charge of waste management, your waste disposal service, or the store where you bought the product.
We reserve the right to any changes and errors in the instructions for use.


- DETAILED INSTRUCTIONS
- CAREFULLY READ THE INSTRUCTIONS AND SAVE THEM FOR FUTURE REFERENCE.
- BEFORE CONNECTING THE APPLIANCE:
- GLASS CERAMIC BUILT-IN COOKING HOB
- (DESCRIPTION OF EQUIPMENT AND FUNCTIONS - DEPENDING ON THE MODEL)
- TECHNICAL SPECIFICATIONS
- (DEPENDING ON THE MODEL)
- BEFORE USING THE APPLIANCE FOR THE FIRST TIME
- GLASS CERAMIC COOKING SURFACE
- TIPS REGARDING YOUR COOKWARE
- ENERGY SAVING TIPS
- Settings sensor keys:
- SWITCHING ON THE HOB
- SWITCHING ON THE COOKING ZONES
- Change of cooking zone settings
- Stay-warm/reheating function
- AUTOMATIC RAPID HEATING
- AUTOMATIC RAPID HEATING TABLE
- EXTENDED COOKING ZONE (depending on the model)
- Activating the cooking zone extension / additional heater ring
- Deactivating the cooking zone extension / additional heater ring
- POWER ZONE
- Activating the Rapid Boil
- Deactivating the Rapid Boil
- CHILD LOCK
- Locking the cooking hob controls
- Unlocking the cooking hob controls
- TIMER FUNCTIONS
- A MINUTE MINDER
- B OFF TIMER FOR THE SELECTED COOKING ZONE
- Changing the cooking time
- Displaying the remaining cooking time
- Timer reset
- PAUSING THE COOKING PROCESS WITH
- STOP & GO
- MEMORY FUNCTION
- SWITCHING OFF A COOKING ZONE
- RESIDUAL HEAT INDICATOR
- SWITCHING OFF THE ENTIRE COOKING HOB
- AUTOMATIC SWITCH OFF
- SETTING THE ACOUSTIC SIGNAL AND LOCK PARAMETERS
- Acoustic signal and alarm volume (loudness) "Uo"
- Acoustic alarm duration "So"
- Child safety lock "Lo"
- Only use the scraper when dirt cannot be removed with a wet with or special cleaners for glass ceramic surfaces.
- Do not press the scraper perpendicularly against the glass I do not scratch the hob surface with its tip or blade.
- Tip
- DIMENSIONS OF THE OPENING IN THE WORKTOP
- FLUSH-MOUNT INSTALLATION INTO THE WORKTOP
- Installing the appliance
- Removing the built-in appliance:
- CONNECTING THE COOKING HOB TO THE POWER MAINS
- CONNECTION DIAGRAM:
- POWER CORD
- Normal connection
- Special connection:
Brand : HISENSE
Model : BI6061CXUK
Category : Kitchen Appliances