
EMP-710 - Video projector EPSON - Free user manual and instructions
Find the device manual for free EMP-710 EPSON in PDF.


| Product Type | Video projector |
| Brand | Epson |
| Model | EMP-710 |
| Display Technology | 3LCD |
| Native Resolution | XGA (1024 x 768) |
| Brightness | 2000 ANSI lumens |
| Contrast Ratio | 500:1 |
| Lamp Life | 2000 hours (normal mode), 3000 hours (eco mode) |
| Projection Lens | Manual zoom and focus |
| Keystone Correction | Vertical ±30 degrees |
| Inputs | VGA, S-Video, Composite, Audio (RCA) |
| Output | Monitor out (VGA), Audio out |
| Weight | 3.5 kg |
| Dimensions (W x D x H) | 325 x 260 x 95 mm |
| Power Consumption | 250 W (max), 5 W (standby) |
| Noise Level | 35 dB (normal mode), 30 dB (eco mode) |
| Remote Control | Included |
| Maintenance | Clean air filter regularly; replace lamp as needed |
| Safety Features | Overheat protection, auto power-off, Kensington lock slot |
| Spare Parts | Replacement lamp (ELPLP??), air filter |
Frequently Asked Questions - EMP-710 EPSON
User questions about EMP-710 EPSON
0 question about this device. Answer the ones you know or ask your own.
Ask a new question about this device
Download the instructions for your Video projector in PDF format for free! Find your manual EMP-710 - EPSON and take your electronic device back in hand. On this page are published all the documents necessary for the use of your device. EMP-710 by EPSON.
USER MANUAL EMP-710 EPSON
natural_image
Black-and-white night sky with bright sun and clouds, no text or symbols visibleEPSON®
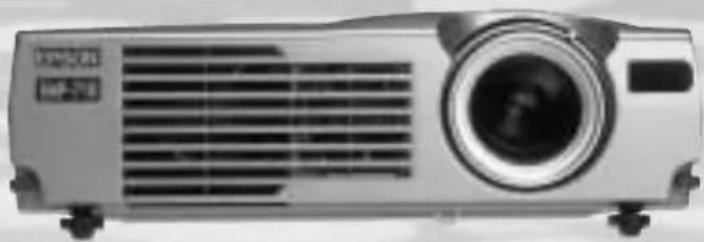
natural_image
Front view of a projector with ventilation grilles and a circular lens (no visible text or symbols)MULTI MEDIA PROJECTOR
EMP-710/700/500 ^TM
Owner's Manual
Important Information
Please read the following important information about your projector.
Important Safety Information
Warning: Never look into the projector lens when the lamp is switched on as the bright light can damage your eyes. Never let children look into the lens when it is on.
Warning: Never open any covers on the projector except the lamp and filter covers. Dangerous electrical voltages inside the projector can cause severe injury. Except as specifically directed in this Owner's Manual, do not attempt to service this product yourself. Refer all servicing to qualified service personnel.
Warning: Keep the plastic bags for the projector, accessories and optional parts out of the reach of children. Children covering their heads with bags may result in death by suffocation. Be particularly careful around small children.
Caution: When you replace the lamp, never touch the new bulb with your bare hands. The invisible residue left by the oil on your hands may be shorten the bulb life. Use a cloth or gloves to handle the new bulb.
QUICK START
flowchart
graph TD
    A["Power"] --> B["Source"]
    B --> C["Enter"]
    D["Help"] --> E["Keystone + Select"]
    style A fill:#fff,stroke:#000
    style B fill:#fff,stroke:#000
    style C fill:#fff,stroke:#000
    style D fill:#fff,stroke:#000
    style E fill:#fff,stroke:#000
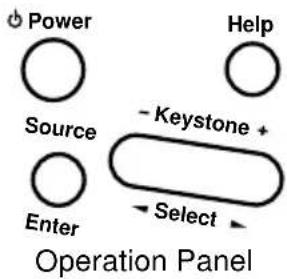
Button Function
Power Turns the projector on or off.
Help Displays the Help menu.
Source Switches the image source in order of computer → S-video → composite video. If there is no S-video input, the switch toggles between computer and composite video.
Enter Selects a menu option when the Help menu is displayed.
Keystone +/- Adjusts a trapezoid distorted image to normal.
Select Scrolls up and down, or right and left when the Help menu is displayed.
QUICK START
natural_image
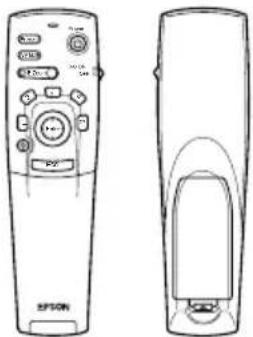
Line drawing of two remote control devices, one with a scroll and button, the other with a handle and spout (no text or symbols)Remote control
Button Function
Freeze Keeps the current computer or video image on the screen.
A/V Mute Turns off the audio and video output of the projector. To turn on the audio and video output, press either the A/V mute button or Esc button again.
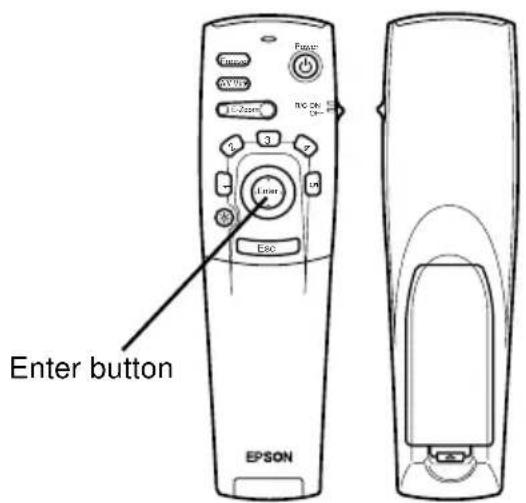
E-Zoom Pressing the right side of the button enlarges the image, pressing the left side of the button reduces the image. To display a portion of the enlarged image which is outside of the display area, press the Enter button to scroll the image.
Power Turns the projector on or off.
Effect buttons Use to display special effects that have been assigned in the Effect menu.
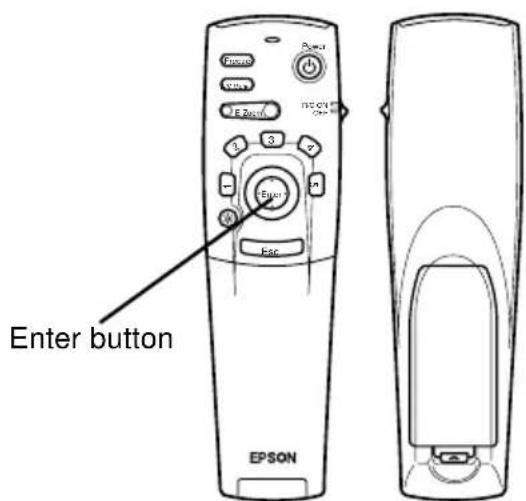
Enter Use the enter button to navigate the menus or use the remote as a mouse pointer when the projector is connected to the computer with the computer cable and the mouse cable. You can also select a menu option by pressing the center of this button (Enter). If you press the Enter when a menu or help is displayed, you access the next menu or screen. When the image source is a computer, the Enter button acts as the mouse left click.
Illumination Lights up all buttons on the remote control for 10 seconds. button
Esc Terminates the current function. If you press the Esc button when a menu or help is displayed, you go back to the previous screen or menu. When the image source is a computer, the Esc button acts as the mouse right click.
Menu Displays or hides the menu.
Help Displays the Help menu.
Comp Switches to the computer image from Computer.
S-Video Switches to the video image from S-Video.
Video Switches to the image from Video.
Auto Optimizes the computer image.
Resize Switches between the Window display and Resizing display.
P in P Displays a subscreen on the main display. To display the subscreen, press the PinP button once. To hide the subscreen, press it again.
To set the subscreen being displayed, press in the following order :
[Menu] → [Setting] → [P in P].
The default settings are as follows;
Subscreen size:1/9 division
Main screen input source:Computer
Subscreen input source:Video
To change the subscreen position, press the Enter button. The subscreen will move to the selected direction.
Volume +/- Adjusts the volume.
EPSON®
natural_image
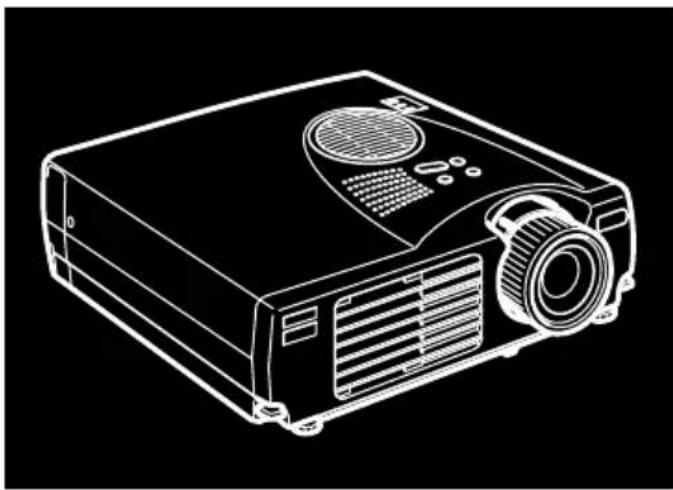
Line drawing of a projector with front panel and screen (no text or symbols)EMP-710/700/500™
DATA/VIDEO PROJECTOR
Owner's Manual
All rights reserved. No part of this publication may be reproduced, stored in a retrieval system, or transmitted in any form or by any means, electronic, mechanical, photocopying, recording, or otherwise, without the prior written permission of SEIKO EPSON CORPORATION. No patent liability is assumed with respect to the use of the information contained herein. Neither is any liability assumed for damages resulting from the use of the information contained herein.
Neither SEIKO EPSON CORPORATION nor its affiliates shall be liable to the purchaser of this product or third parties for damages, losses, costs, or expenses incurred by purchaser or third parties as a result of: accident, misuse, or abuse of this product or unauthorized modifications, repairs, or alterations to this product, or (excluding the U.S.) failure to strictly comply with SEIKO EPSON CORPORATION's operating and maintenance instructions.
SEIKO EPSON CORPORATION shall not be liable against any damages or problems arising from the use of any options or any consumable products other than those designated as Original EPSON Products or EPSON Approved Products by SEIKO EPSON CORPORATION.
EPSON is a registered trademark and PowerLite is a trademark of SEIKO EPSON CORPORATION.
General Notice: The following trademarks and registered trademarks are the property of their respective owners and are used in this publication for identification purposes only.
• EPSON/ Seiko Epson Corp.
• Macintosh, PowerBook/ Apple Computer Corp.
• IBM/ International Business Machines, Inc.
- Windows/ Microsoft Corp.
Other product names used herein are also for identification purposes only and may be trademarks of their respective owners. EPSON disclaims any and all rights in those marks.
natural_image
Line drawing of a projector with front panel and screen (no text or symbols)Contents
Contents iii
Introduction vii
Getting the Most Out of Your Projector ......ix
Optional Accessories....ix
About This Manual....x
Safety Instructions ......xi
Where to Get Help...... xiii
World Wide Web site.....xiii
Transporting your projector....xiv
1 Installation 1
Unpacking the Projector....2
Additional Components.... 3
Setting Up the Projector....4
Connecting to a Computer....6
Connecting to a PC Desktop Computer 7
Connecting to a PC Laptop Computer 10
Connecting to a Desktop Macintosh.... 13
Connecting to a PowerBook.... 17
Connecting to a Video Source 22
Connecting to an External Speaker or
PA System 25
2 Using the Projector 27
Turning the Equipment On and Off ....29
Turning the Projector On and Off.... 29
Focusing and Positioning the Screen Image ....31
Resize Button.... 33
Controlling the Projector....34
Using the Remote Control 35
Using the Operation Panel 38
Projector Status Indicators....39
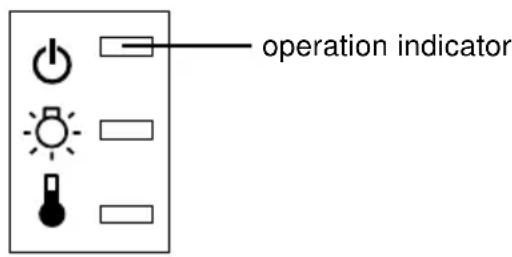
Operation Indicator.... 39
Lamp Indicator.... 40
Temperature Indicator.... 40
3 Using the Projector Menus 41
Accessing the Main Menu....42
Changing a Menu Setting....43
Menu Options....45
Video Menu (Image source = Computer) 45
Video Menu (Image source = Video)...... 47
Audio Menu.... 48
Effect Menu 49
Setting Menu 49
User's Logo Menu 50
Reset All Menu.... 52
Advanced Menu 53
About Menu.... 54
4 Maintenance 55
Cleaning the Lens....56
Cleaning the Projector Case....56
Cleaning the Air Filter 57
Replacing the Lamp....58
5 Troubleshooting 61
Problems with the Projector....62
Problems with the Image or Sound....64
Technical Specifications 67
Supported Monitor Displays 69
Computer In connector pin assignments....71
Glossary 73
Index 75
World-Wide Warranty Terms 77
natural_image
Line drawing of a projector with a circular vent and screen (no text or symbols)Introduction
Your compact, lightweight EPSON EMP-710/ 700/ 500 projector lets you project full-color images and video onto a large screen for presentations. You can connect it simultaneously to two image sources: one PC or Apple® Macintosh® computer image source, plus one video source such as a video tape deck, camcorder, or digital camera. You can also connect audio for each image source.
Images are displayed in full color (16,670,000 colors) at a XGA resolution of 1024 x 768 pixels (EMP-710/ 700) or SVGA resolution of 800 x 600 pixels (EMP-500). Your projector produces bright images that can be easily seen in rooms light enough to take notes.
A totally new AVTSS™ (Automatic Video Tracking and Synchronization Sensing, patent pending) provides automatic set-up of image from a computer.
You control your projector through a hand-held remote control unit, with menus being provided for image source switching and image adjustment. The remote control can also act as a wireless mouse to control mouse operations on your computer screen during presentations.
Your projector features the newest resizing technology DAR (Digital Active Resizing) which supports VGA\~UXGA (EMP-710/700) and VGA\~SXGA (EMP-500) computer output. No matter what type of computer output is used, the result is a full-size video image of outstanding clarity.
The video source can be NTSC, PAL or SECAM in composite video or S-Video format. See Chapter 6 for details on supported computers and video formats.
Getting the Most Out of Your Projector
Your projector comes with a full set of features that enable you to control the settings for the image display, video and audio. To get the most out of your projector, read this section for a quick summary of the important features.
Optional Accessories
To enhance your use of the projector, EPSON provides the following optional accessories:
- Spare Lamp (EMP-710) ELPLP10S
- Spare Lamp (EMP-700/ 500) ELPLP10B
• Image Presentation Camera ELPDC01EX
• Mac Adapter Set ELPAP01 - Portable Screen ELPSC06
• VGA-Computer Cable (1.8m) ELPKC02
• VGA-Computer Cable (3.0m) ELPKC09
You can purchase these accessories from your dealer.
About This Manual
Chapter 1, “Installation”, gives step-by-step instructions on how to set up the projector and connect it to your computer, video source, or other external speaker or PA system. Read the installation procedures that apply to your configuration.
Chapter 2, “Using the Projector”, describes how to switch the projector on/off and control simple projector settings using the remote control or the operation panel.
Chapter 3, “Using the Menus”, describes how to use the menus to adjust the color and image settings, change the display of the projected image, and modify audio settings.
Chapter 4, “Maintenance”, describes how to clean your projector and perform limited maintenance.
Chapter 5, “Troubleshooting”, describes how to interpret your projector’s indicator lights and gives helpful information for avoiding errors, optimizing image quality and solving problems.
Chapter 6, “Technical Specifications,” lists the technical specifications for your projector.
A Glossary and Index are provided at the end of the manual.
Safety Instructions
Follow these safety instructions when setting up and using the projector:
- Do not place the projector on an unstable cart, stand, or table.
- Do not use the projector near water or sources of heat.
- Use attachments only as recommended.
- Use the type of power source indicated on the projector. If you are not sure of the power available, consult your dealer or local electricity company.
- Place the projector near a wall outlet where the plug can be easily unplugged.
- Insert the projector's three-pin grounding-type plug into a properly grounded outlet. If you have a two-prong outlet, contact an electrician to replace it. Do not handle the plug with wet hands.
- Take the following precautions when handling the plug. Failure to comply with these precautions could result in sparks or fire.
- Do not insert the plug into an outlet with dust present.
- Insert the plug firmly into the outlet.
- Do not overload wall outlets, extension cords or integral convenience receptacles. This can cause fire or electric shock.
- Do not place the projector where the cord can be stepped on. It may result in fraying or damage to the plug.
-
Unplug the projector from the wall outlet before cleaning. Use a damp cloth for cleaning. Do not use liquid or aerosol cleaners.
-
Do not block the slots and openings in the projector case. They provide ventilation and prevent the projector from overheating. Do not place the projector on a sofa, rug or other soft surface, or in a closed-in cabinet unless proper ventilation is provided.
- Never push objects of any kind through cabinet slots. Never spill liquid of any kind into the projector.
- Except as specifically explained in this User's Guide, do not attempt to service this product yourself. Refer all servicing to qualified service personnel. Opening or removing covers may expose you to dangerous voltages and other hazards.
- Unplug the projector during thunder storms or when it will not be used for extended periods.
- Do not place the projector and remote control on top of heat-producing equipment or in a heated place, such as a car.
-
Unplug the projector from the wall outlet and refer servicing to qualified service personnel under the following conditions:
-
When the power cord or plug is damaged or frayed
- If liquid has been spilled into the projector, or it has been exposed to rain or water
- If it does not operate normally when you follow the operating instructions, or if it exhibits a distinct change in performance, indicating a need for service
-
If it has been dropped or the housing has been damaged
-
When you use the projector in other countries except from where you purchased it, use the correct power cable suitable for that country.
Where to Get Help
If you are having trouble setting up or running your projector, first see Chapter 5, “Troubleshooting”. If you cannot resolve the problem, contact the appropriate representative listed in the section entitled “World -Wide Warranty Terms” at the end of this manual.
Before you call, please have the following information ready:
- Product name
• Product serial number - Computer configuration
• Description of the problem
World Wide Web site
If you connect to the Internet and have a Web browser, you can access to EPSON's World Wide Web site at http://www.epson.com. EPSON's home page provides you What's New, EPSON Products, EPSON Connection, Corporate Info and EPSON Contacts. Link to the EPSON Connection for the latest drivers and FAQ's (Frequently Asked Questions) and the EPSON Chart area. To get in touch with EPSON around the world, EPSON Contacts includes Contact Information for local EPSON subsidiaries.
Transporting your projector
The projector contains many glass parts and precision parts. If you need to transport it, please follow these packing guidelines to prevent damaging the projector:
- When shipping the projector for repairs, use the original packaging material.
If you don't have the original packaging, use equivalent materials, placing plenty of cushioning around the projector.
- When transporting the projector for business use, first put the projector in a hard carrying case, then pack it in a firm box, using cushioning around the case.
Note: EPSON shall not be liable for any damages incurred during transportation.
natural_image
Line drawing of a projector with a label '1' (no text or symbols on the device itself)Installation
This chapter describes how to unpack and set up your projector, and connect it to other equipment. The projector must be connected to a computer or a video source such as a video tape deck, camcorder, digital camera or laser disc player before it can project any images.
You may also want to set up the projector for one or more of the following:
- Connect the mouse cable to use the remote control as a wireless mouse.
- Provide audio for one or both image sources. The audio source can be the computer, video source, or another device such as a stereo.
- Connect to an external speaker or PA system to amplify the audio.
Unpacking the Projector
When you unpack the projector, make sure you have all these components:
- Projector
- Remote control
- 2 AA batteries
- Power cord
- Computer cable
• Audio/ Video cable (A/ V cable) - PS/ 2 mouse cable
- USB mouse cable
• Mac mouse cable (ADB mouse cable) - Owner's manual
- Softcase
Depending on the configuration of your equipment, you may not need all these components.
Save all packaging materials in case you need to ship the projector in the future. It should be transported in its original packaging or the equivalent.
Additional Components
Depending on how you plan to use the projector, you may need these additional components:
- To receive an S-Video signal, you need an S-Video cable. (One is usually provided with your video device.) A separate cable is required for each video source.
- To connect the projector to a Macintosh PowerBook, you need a video-out cable.
(One is provided by/ or can be purchased from Apple for all new PowerBooks that have video-out capability.) If your PowerBook does not include one, see your Macintosh dealer. - To connect the mouse cable to your computer, you may require a special connector, cable, or other components. You can obtain these items from your computer dealer. If your computer doesn't have a mouse connector, you cannot use the mouse cable.
Note: You can connect a Kensington MicroSaver® anti-theft device in the hole on the projector's right side. Contact your computer dealer.
Setting Up the Projector
- Place the projector on a sturdy, level surface within five feet of the computer or video source.
Caution: Do not hold the projector by the lens. This can damage the lens.
- Place the projector at a correct distance from the screen.
The distance between the projector and the screen determines the actual image size. Use the general guidelines below to determine the correct distance.
| Screen size Horizontal distance from projector to screen |
| 300 inches (610x460cm) 450.7 inches (11.5m) ~ 546.3 inches (13.8m) |
| 200 inches (410x300cm) 299.5 inches (7.7m) ~ 363.3 inches (9.2m) |
| 150 inches (305x228cm) 223.9 inches (5.7m) ~ 271.7 inches (6.9m) |
| 100 inches (200x150cm) 148.3 inches (3.8m) ~ 180.2 inches (4.5m) |
| 80 inches (160x120cm) 118.1 inches (3.0m) ~ 143.6 inches (3.6m) |
| 60 inches (120x90cm) 87.8 inches (2.3m) ~ 107.0 inches (2.7m) |
| 40 inches (81x61cm) 57.6 inches (1.5m) ~ 70.4 inches (1.7m) |
| 30 inches (61x46cm) 42.5 inches (1.1m) ~ 52.1 inches (1.3m) |
| 26 inches (53x40cm) — ~ 44.7 inches (1.1m) |
-
Turn the projector so that the lens is at right angles to the screen. If the projector is not angled correctly, the screen image will be crooked.
-
Connect one end of the power cable to the projector's power connector. Connect the other end to an earthed electrical socket.
The projector should be in sleep mode, indicated by an orange power indicator.
- Warning: Never look into the lens when the projector is on. There is a risk that the projector might come on suddenly even though it is not in use. The light from the lamp can damage your eyes. It is especially important that children should not be allowed to look into the lens.
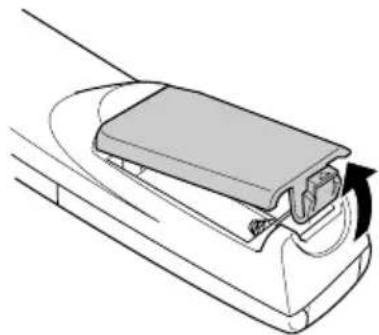
- To insert the batteries in the remote control device, slide off the battery compartment cover.
natural_image
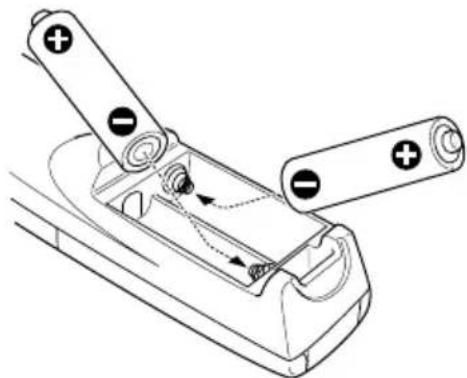
Diagram of a mechanical component with a rotating arrow indicating motion (no text or symbols)- Insert the two AA batteries included with the projector. Make sure the polarity of the batteries is correct.
natural_image
Diagram of a battery holder mechanism with two batteries and a switch, showing internal components and wiring (no text or labels)- Replace the battery compartment cover.
When replacing batteries, take the following precautions:
- Do not recharge the used batteries or expose to fire or water.
- Replace batteries as soon as they run out. If the batteries leak, wipe away battery fluid with a soft cloth. If fluid gets on your hands, wash them immediately.
- Remove the batteries if you will not be using the projector for a long period of time.
Connecting to a Computer
You can connect the projector to a computer capable of VGA, SVGA, XGA, SXGA and UXGA output. (EMP-500 supports VGA, SVGA, XGA, and SXGA resolutions. EMP-710/ 700 support VGA, SVGA, XGA, SXGA and UXGA resolutions.)
To connect the computer and mouse cables (to use the wireless remote as a mousepointer), see the section in this chapter that applies to your computer.
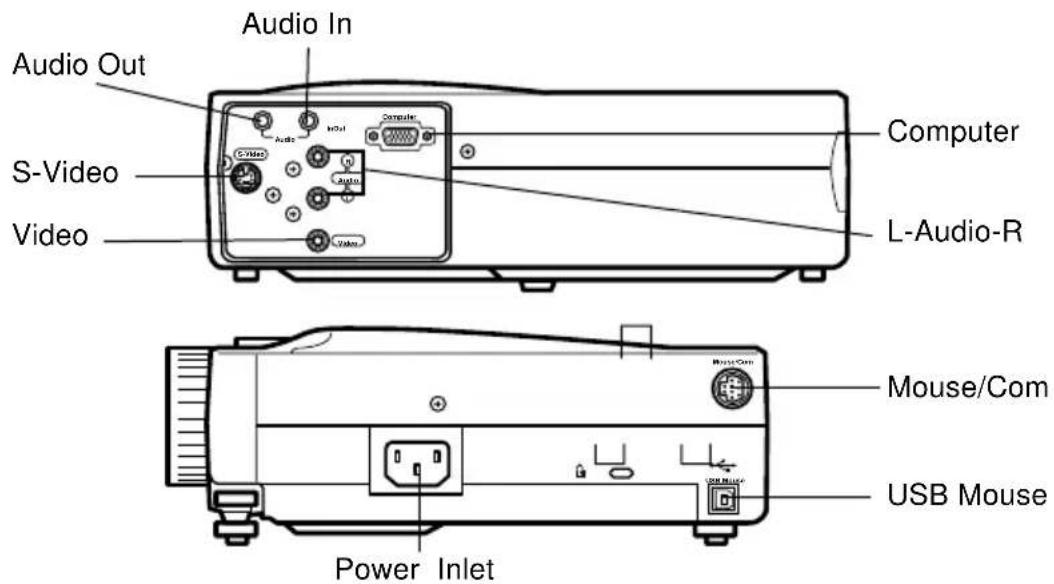
The illustration below identifies all the interface ports on the back of the projector; you may want to refer to this as you connect your computer or other equipment to the projector.
Connecting to a PC Desktop Computer
To connect the projector to your PC desktop computer, you need to:
- Connect the computer cable
- Connect the audio cable (if you'll be projecting with audio)
Follow the steps in each section for the cables you need to connect. Before beginning, turn off the projector and computer if they are on.

Note: Computer configurations vary. See your computer manual for the location of the ports needed to connect your projector.
Connecting the Computer
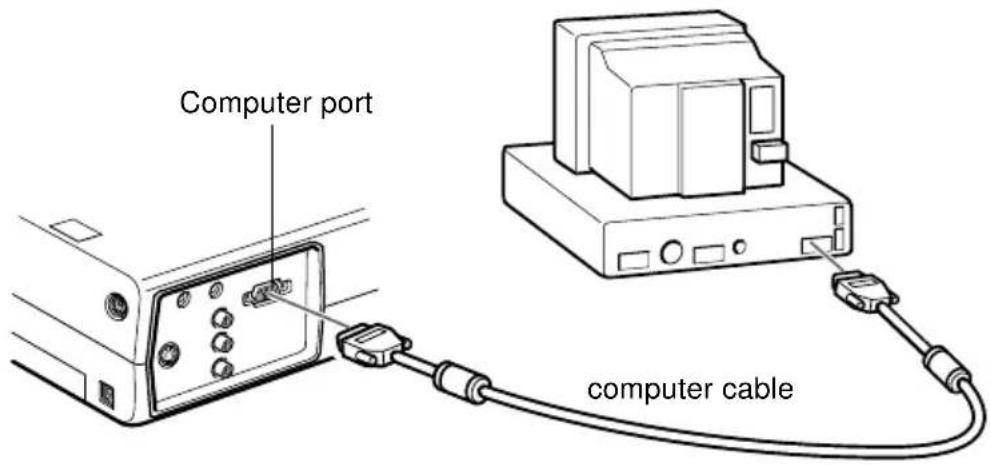
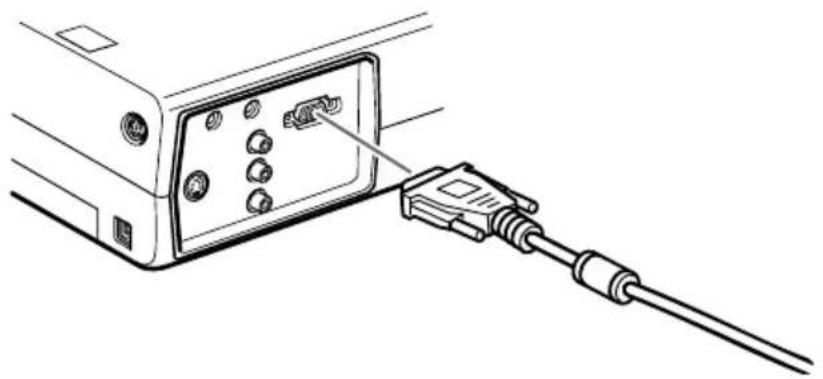
Refer to this illustration while following the steps below.
-
If you will be viewing the video on your computer monitor as well as the projector screen, disconnect the monitor cable from the video port on the back of your computer.
-
Connect one end of the computer cable to the projector's Computer port.
natural_image
Line drawing of a device showing an attached cable with a connector inserted into the port (no text or symbols present)-
Connect the other end of the computer cable to the computer's video port.
-
Tighten the screws on all connectors.
Connecting the Mouse Cables
If you want to use the remote control as a mouse, you need to connect the PS/ 2 mouse cable or USB mouse cable.
Refer to this illustration while following the steps below.
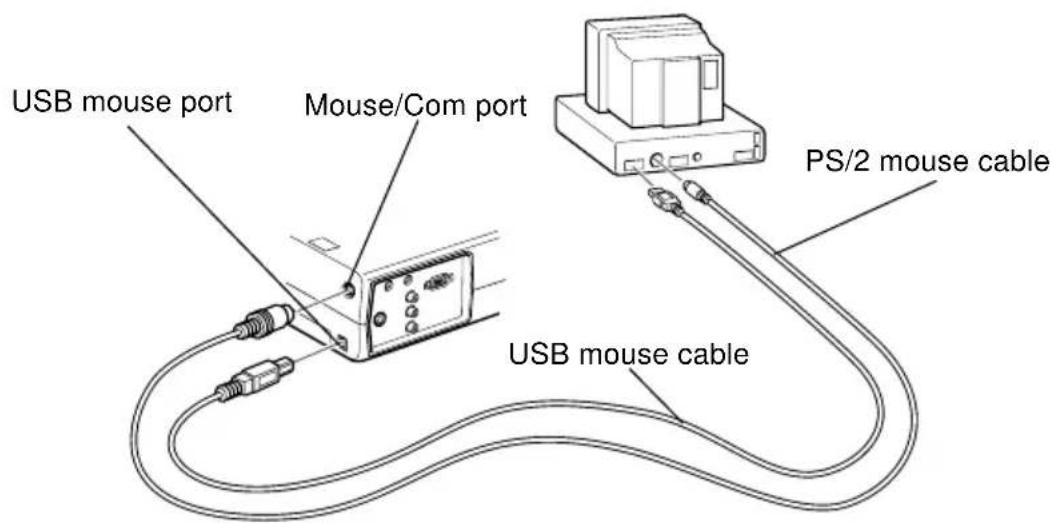
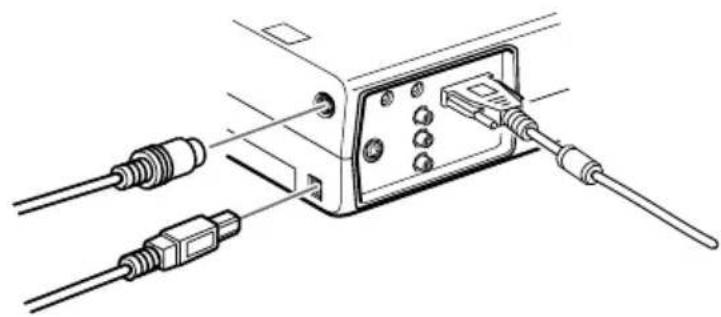
- Connect the 9-pin end of the PS/2 mouse cable or, the USB mouse cable to the Mouse/Com or USB mouse port on the projector.
natural_image
Technical line drawing of a device with two cables connected to a panel (no text or symbols)- Disconnect your mouse from the mouse port on the back of your computer and replace it with the other end of the PS/ 2 mouse cable or USB mouse cable. (Your computer's mouse will be disabled while you are using the remote control as a mouse.)
Connecting the Audio Cable
- If you will be using audio, connect one end of the audio cable to the Audio In jack on the projector.
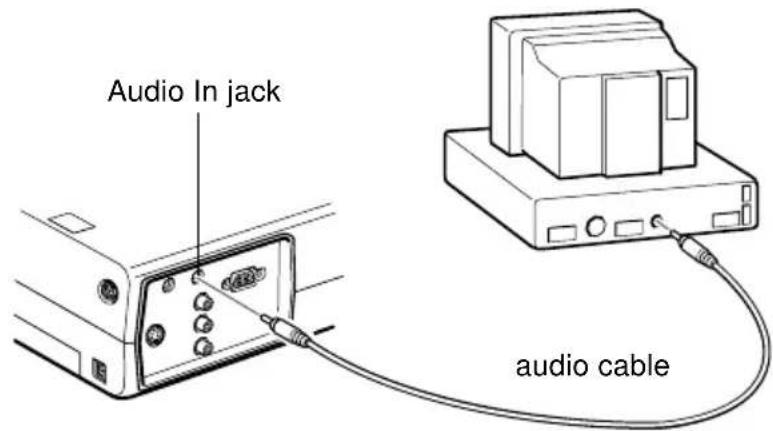
- Connect the other end of the audio cable to the speaker or audio out port on the computer's sound card.
Connecting to a PC Laptop Computer
To connect the projector to your PC laptop computer, you need to:
- Connect the computer cable
- Connect the mouse cable (if you want to use the remote control as a mouse)
- Connect the audio cable (if you'll be projecting with audio)
Follow the steps in each section for the cables you need to connect. Before beginning, turn off the projector and computer if they are on.

Note: Laptop configurations vary. See your computer manual for the location of the ports needed to connect your projector.
Connecting the Computer Cable
First connect the projector's computer cable to your laptop.
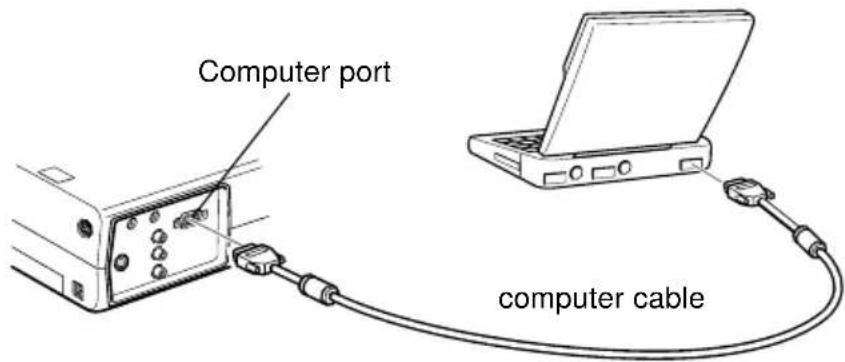
- Connect one end of the computer cable to the projector's Computer port.
- Connect the other end of the computer cable to the laptop's video (monitor) port.
- Tighten the screws on all connectors.
Connecting the Mouse Cables
If you want to use the remote control as a mouse, you need to connect the PS/ 2 mouse cable or USB mouse cable.
Refer to this illustration while following the steps below.
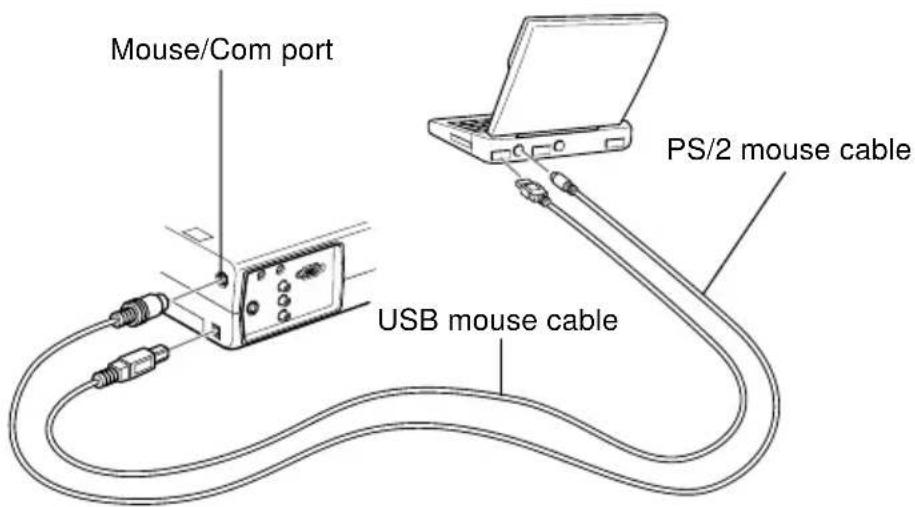
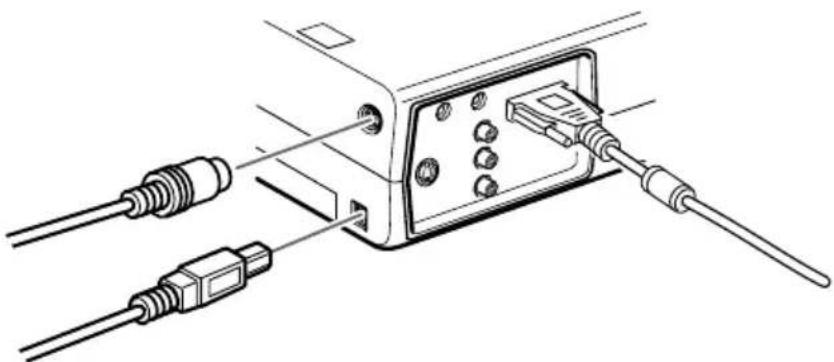
- Connect the 9-pin end of the PS/2 mouse cable or USB mouse cable to the Mouse/Com or USB Mouse port on the projector.
natural_image
Diagram of cable connections to an electronic device panel (no text or symbols)-
Connect the 6-pin (mini-DIN) end of the PS/ 2 mouse cable or USB mouse cable to the external mouse port or USB port on your laptop.
-
Configure your laptop to work with an external mouse.

Note: You may have to set the display to appear on both the laptop's screen and the projector. Some laptops let you change this setting with the keyboard's function keys or by using a setup utility provided by the computer manufacturer. Check your laptop's manual or online help for instructions.
Connecting the Audio Cable
- If you will be using audio, connect one end of the audio cable to the Audio In jack on the projector.
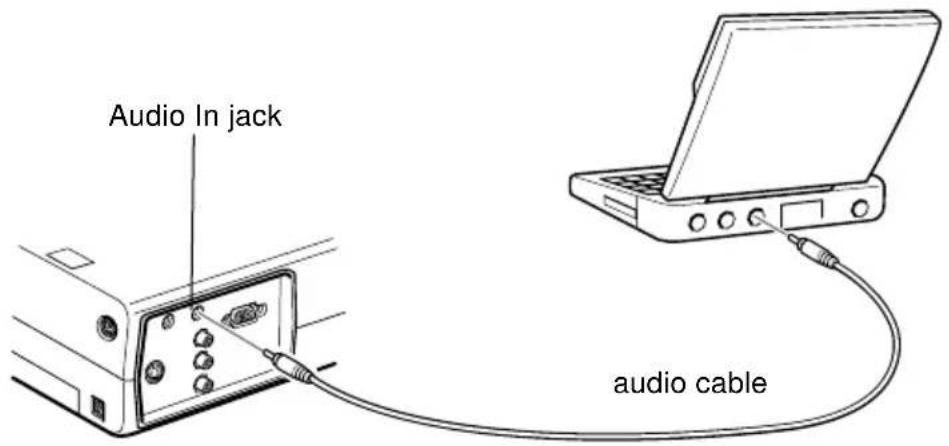
- Connect the other end of the audio cable to your laptop.
Connecting to a Desktop Macintosh
To connect the projector to your desktop Macintosh, you need to:
- Connect the computer cable
- Connect the mouse cable (if you want to use the remote control as a mouse)
- Connect the audio cable (if you'll be projecting with audio)
Follow the steps in each section for the cables you need to connect. Before beginning, turn off the projector and computer if they are on.

Note: Macintosh configurations vary. See your computer manual for the location of the ports needed to connect your projector.
Connecting the Computer Cable
First connect the computer cable. Refer to this illustration as you follow the steps below.
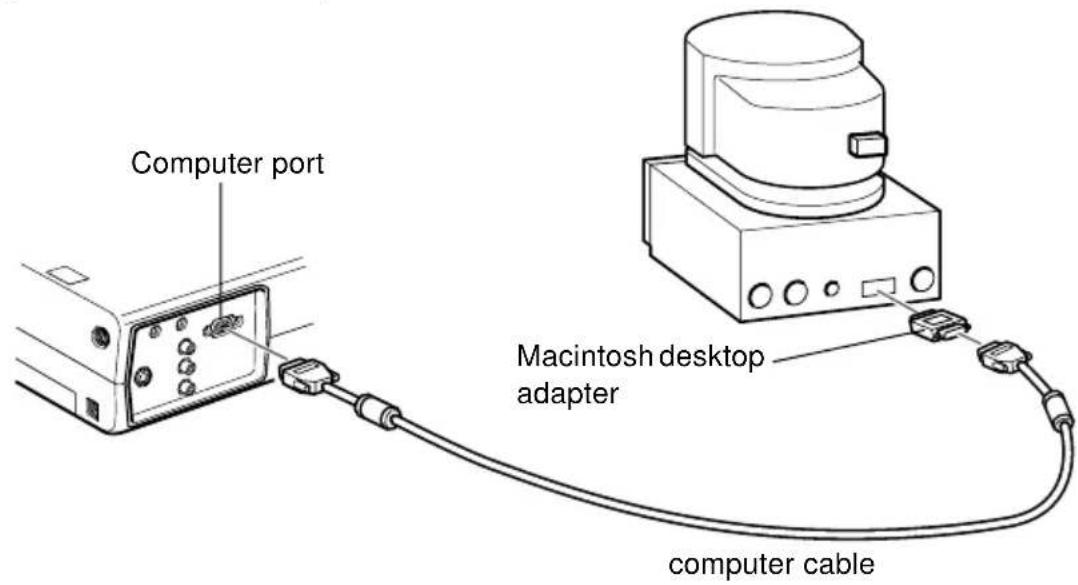
- Connect one end of the computer cable to the projector's Computer port.
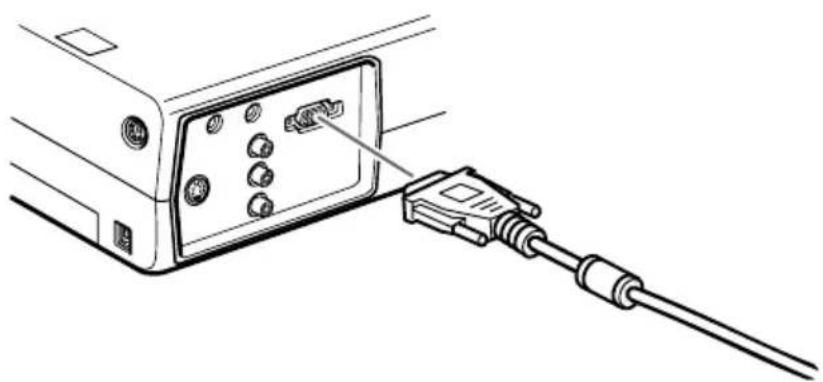
natural_image
Line drawing of a cable connector inserted into a device panel (no text or symbols)- Remove the small cover on the Macintosh desktop adapter and set its DIP switches in accordance with the resolution you want to use (such as 16-inch mode). See your Macintosh documentation for instructions.
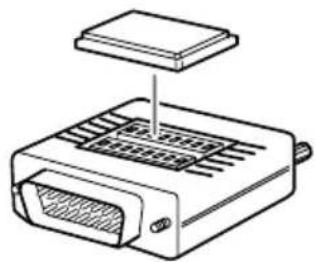
natural_image
Technical line drawing of a device with a lid and internal grid structure (no text or symbols)- Connect the small terminal of the Macintosh desktop adapter to the other end of the computer cable.
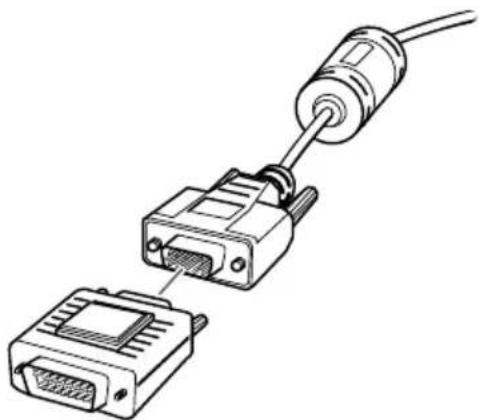
natural_image
Diagram of three connected electronic components: a cable, a port, and a connector (no text or symbols present)- Connect the computer cable (with the Macintosh desktop adapter attached) to the video-out port on your Macintosh.
Connecting the Mouse Cables
If you want to use the remote control as a mouse, you need to connect the Mac mouse cable or USB mouse cable.
Refer to this illustration while following the steps below.
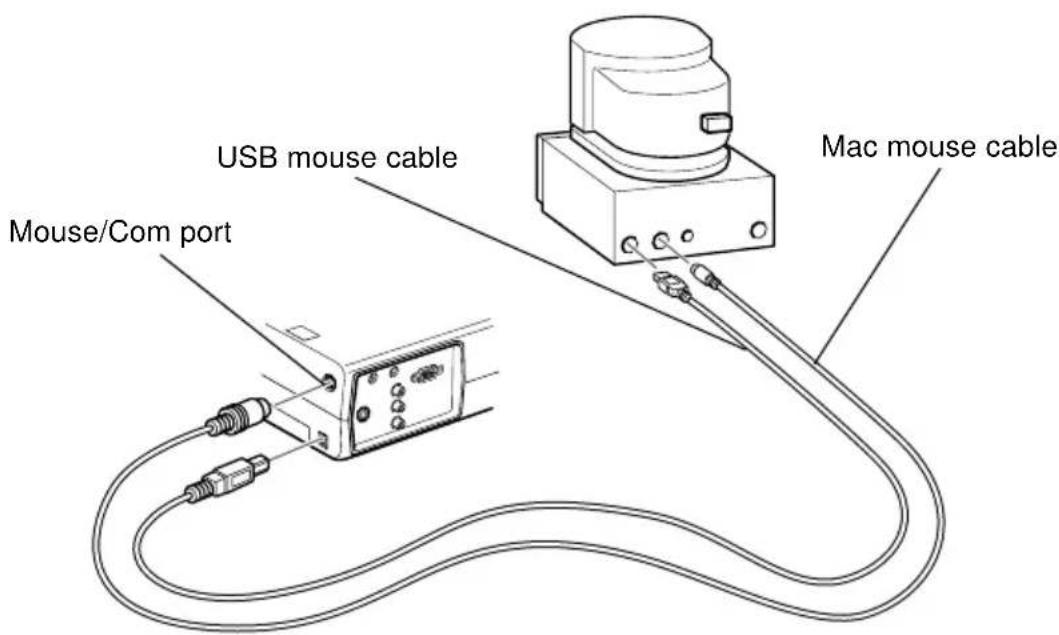
- Connect one end of the projector's Mac mouse cable or USB mouse cable to the Mouse/ Com or USB Mouse port on the projector
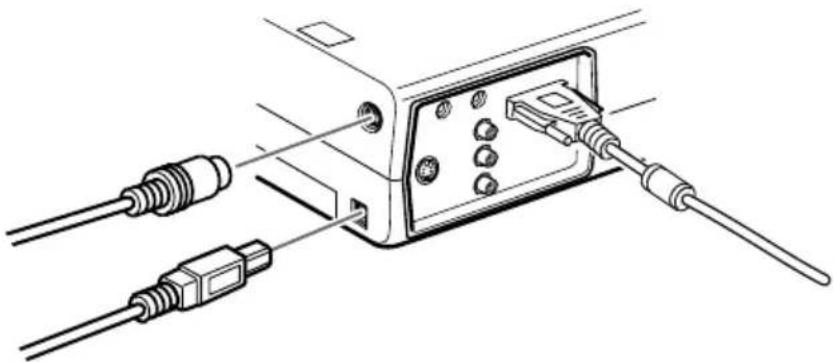
natural_image
Diagram of cable connections to an electronic device panel (no text or symbols)- Disconnect your Macintosh's mouse cable. Connect the other end of the projector's Mac mouse cable or USB mouse cable to the mouse port on your Macintosh.
Connecting the Audio Cable
- If you will be using audio, connect one end of the audio cable to the Audio In jack on the projector.
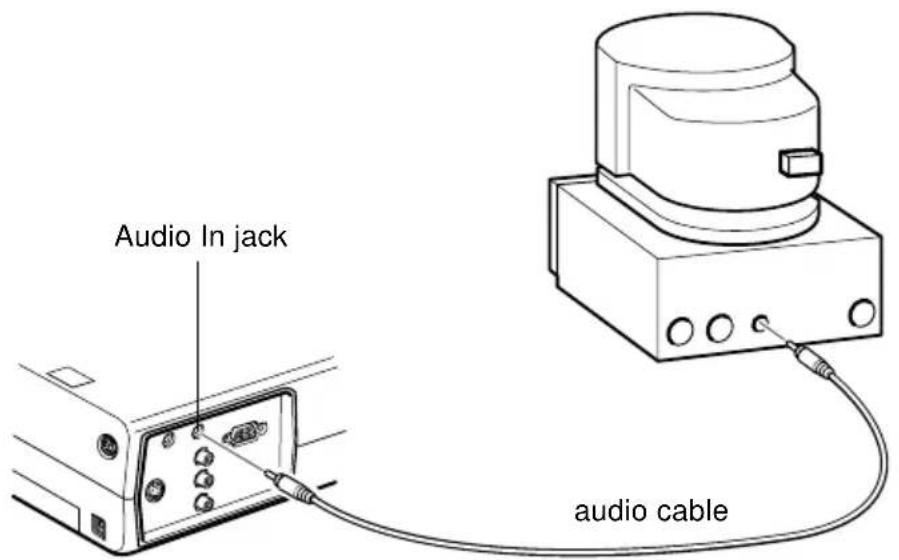
- Connect the other end of the audio cable to the Audio Out port on your computer.
Connecting to a PowerBook
Your PowerBook must have video-out capability in order to connect to the projector.
To connect the projector to your PowerBook, you need to:
- Connect the computer cable
- Connect the mouse cable (if you want to use the remote control as a mouse)
- Connect the audio cable (if you'll be projecting with audio)
Follow the steps in each section for the cables you need to connect. Before beginning, turn off the projector and computer if they are on.
Note: PowerBook configurations vary, so the location of your computer's ports may not match the illustrations. See your PowerBook manual for the port locations if necessary.
Connecting the Computer Cable
First connect the computer cable. Refer to this illustration as you follow the steps below.
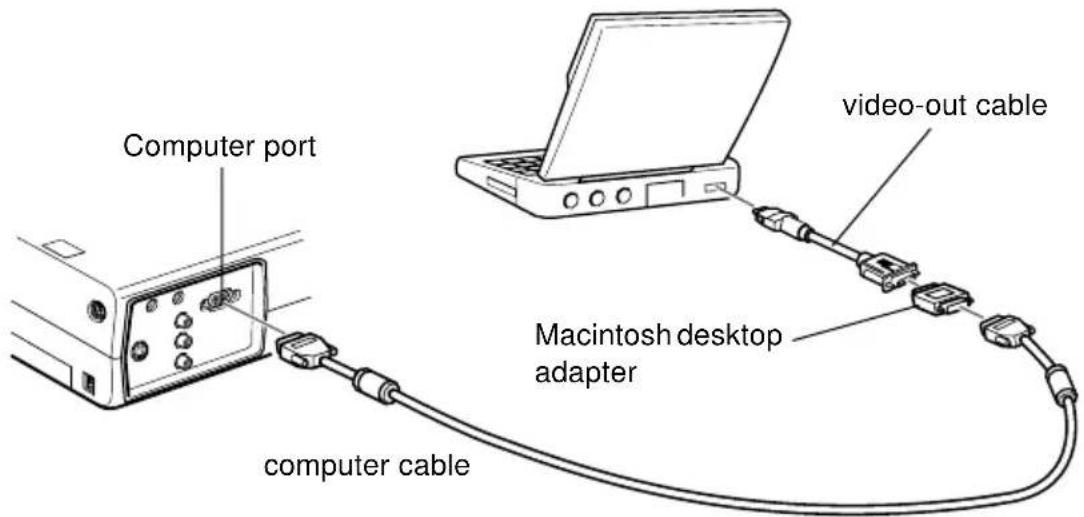

Note: Some new PowerBooks may allow you to connect the computer cable directly to the computer without using a video-out cable. See your PowerBook manual for additional information on connecting a computer cable.
- Connect one end of the computer cable to the projector's Computer port.
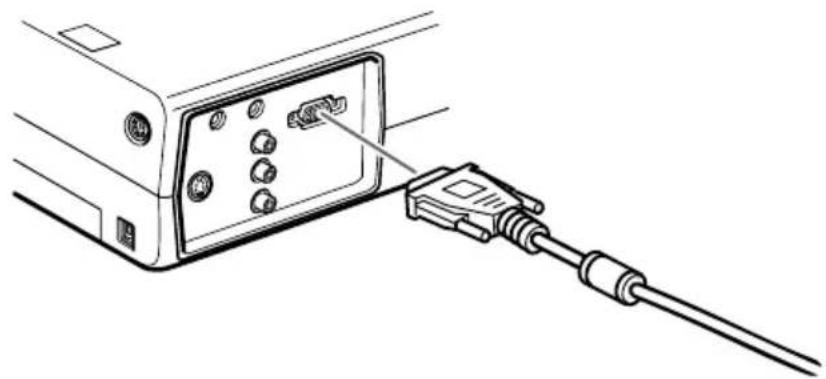
natural_image
Line drawing of a cable being inserted into an electronic device panel (no text or symbols)- Remove the small cover on the Macintosh desktop adapter and set its DIP switches in accordance with the resolution you want to use (such as 16-inch mode). See your Macintosh documentation for instructions.
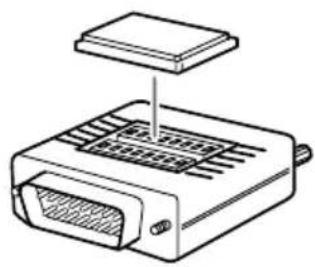
natural_image
Diagram of a device with a lid and internal grid structure (no text or symbols)- Connect the small terminal of the Macintosh desktop adapter to the other end of the computer cable.
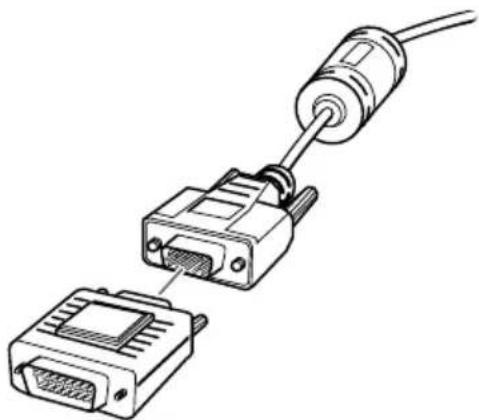
natural_image
Diagram of three connected electronic components: a cable, a port, and a connector (no text or symbols present)- Connect the computer cable (with the optional Macintosh desktop adapter) to the video-out port on the PowerBook.
If a video-out cable was provided with your PowerBook, connect the smaller end of the video-out cable to the video-out port on the back of the PowerBook. Connect the other end to the Macintosh desktop adapter on the end of the computer cable.
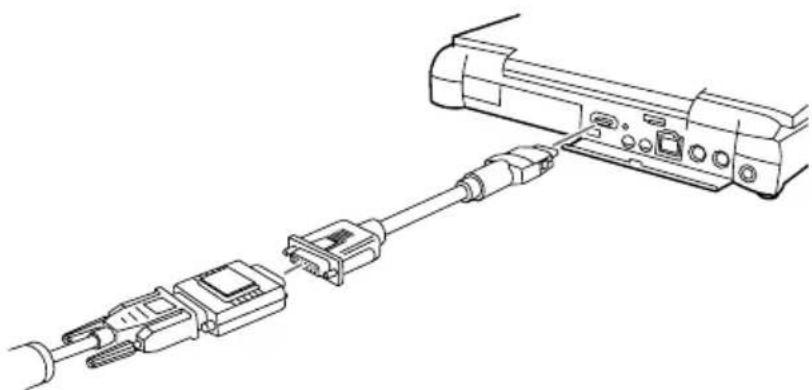
natural_image
Line drawing of a cable connector assembly showing two connected connectors (no text or symbols)Connecting the Mouse Cables
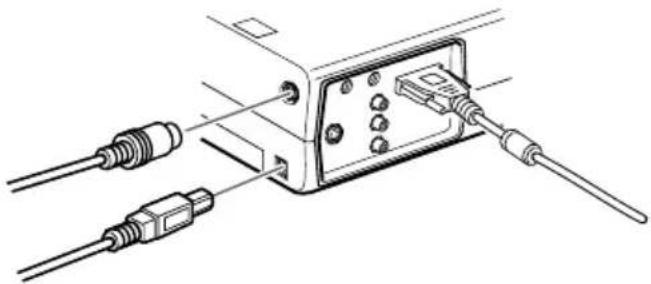
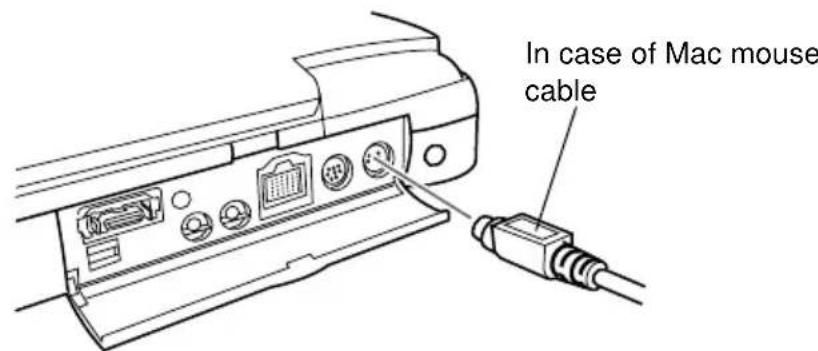
If you want to use the remote control as a mouse, you need to connect the Mac mouse cable or USB mouse cable.
Refer to this illustration while following the steps below.
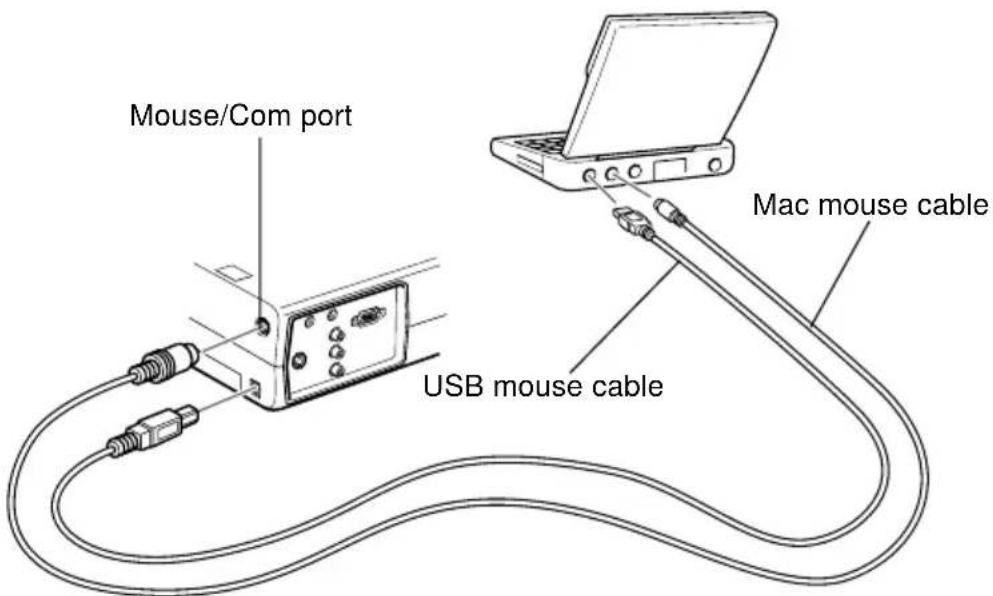
- Connect one end of the projector's Mac mouse cable or USB mouse cable to the Mouse/ Com or USB Mouse port on the projector.
natural_image
Technical line drawing of a device with two cables connected to an internal component (no text or symbols visible)- Connect the other end of the Mac mouse cable or USB mouse cable to the mouse port on the back of the PowerBook.
Connecting the Audio Cable
- If you will be using audio, connect one end of the audio cable to the Audio In jack on the projector.
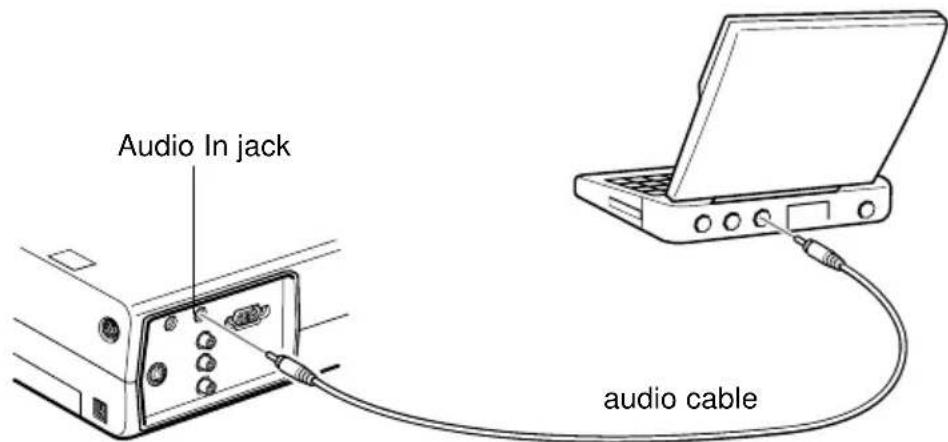
- Connect the other end of the audio cable to the audio-out port on your PowerBook.
Note: After you turn on the projector and computer, you'll need to choose Mirroring in the Display Control Panel if you set up your configuration to display on the LCD screen as well as the projector screen.
Connecting to a Video Source
You can connect a VCR, a camcorder, a laser disc player, DVD player, or any other compatible video image source to your projector.
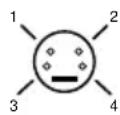
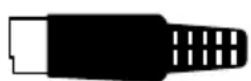
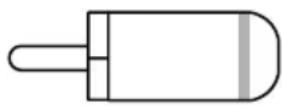
The projector can receive composite video or S-Video. Your equipment has composite video if your video source has a one-pin RCA video jack. Your equipment has S-Video if your video source has a four-pin (mini-DIN) video jack.
Note: The projector is not compatible with a cable TV-style F connector.
You can connect the projector to an S-Video source and a composite video source at the same time.
The projector supports NTSC, PAL, and SECAM video formats, and automatically detects and identifies the video format. However, you can specify that a single broadcast format be detected. (See Chapter 3.) Note that the projector will then be able to detect only one type of video signal.
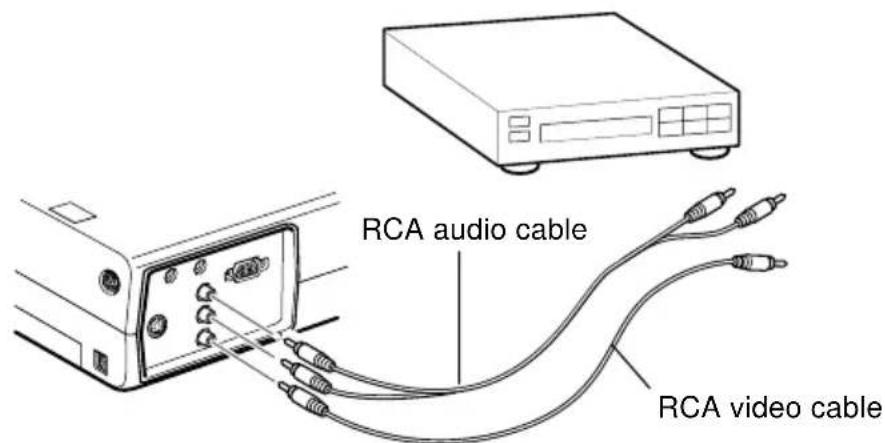
The type of cable you use to connect the video source to the projector depends on whether you have composite video or S-Video. For composite video, use the RCA audio and RCA video cable supplied with the projector. For S-Video, use the S-Video cable supplied with your video device or obtain one from your computer or video equipment dealer.
S-Video
4-pin, mini-DIN
composite
RCA
To connect a video source to the projector:
-
Turn off the projector and video source if they are on.
-
If your video source uses a small, round, one-prong composite (RCA) video connector, you'll need the RCA video cable that comes with the projector. If your video source uses a large, round, four-prong S-Video connector, you will need to purchase the appropriate cable or use the cable that came with your video source.
-
For Composite Video, connect the yellow RCA plug on one end of the RCA video cable to the projector's Video jack. Connect the other yellow RCA plug to the video-out jack of your video source.
-
Connect the RCA audio cable to the Audio jacks of the projector: insert the white plug into the L jack and the red plug into the R jack. Connect the plug at the other end of the RCA audio cable to the audio output jacks of the video source.
-
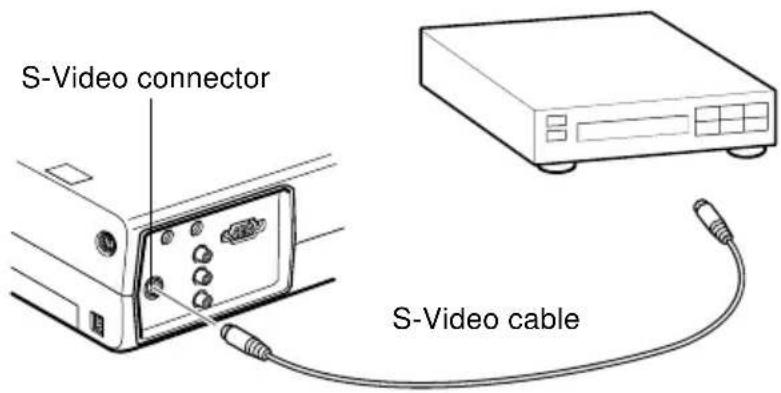
For S-Video, insert one end of an S-Video cable into the projector's S-Video connector. Insert the other end into the S-video out jack of your video source.
-
Connect the RCA audio cable to the Audio jacks of the projector: insert the white plug into the L jack and the red plug into the R jack. Connect the plug at the other end of the RCA audio cable to the audio output jack of the video source.
Connecting to an External Speaker or PA System
Although the projector's internal speakers are enough for most small- or medium-size rooms, you can connect the projector to an external speaker or public address (PA) system for large rooms or to gain maximum benefit.
To connect the projector to an external sound system, you need to obtain an RCA-to-3.5 mm stereo audio cable. You can get one from your computer dealer.
- Turn off the projector and speaker or PA system if they are on.
- Connect the cable's 3.5 mm stereo miniplug to the projector's Audio Out jack.
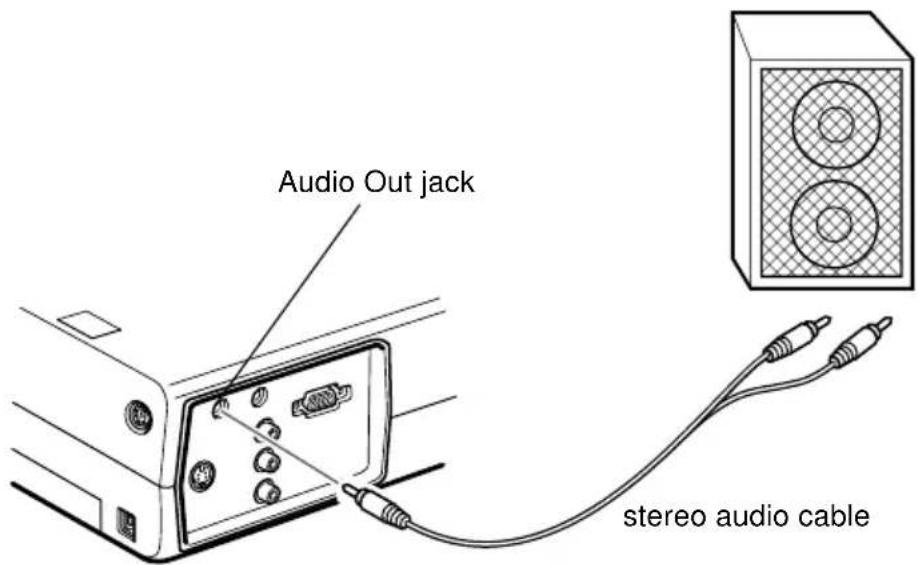
- Connect the RCA plugs to the external amplified speaker or PA system. Insert the cable's red plug into the Audio R jack, and the white plug into the Audio L jack.
Note: The internal speakers are disabled when an external audio system is used.
natural_image
Line drawing of a projector with a circular lens and ventilation slots, labeled with the number 2 (no text or symbols on the device itself)Using the Projector
This chapter provides the following information about using your projector:
- Turning the equipment on and off
- Focusing and positioning the screen image
- Controlling the projector with the remote control and the operation panel
- Monitoring the projector's operating status
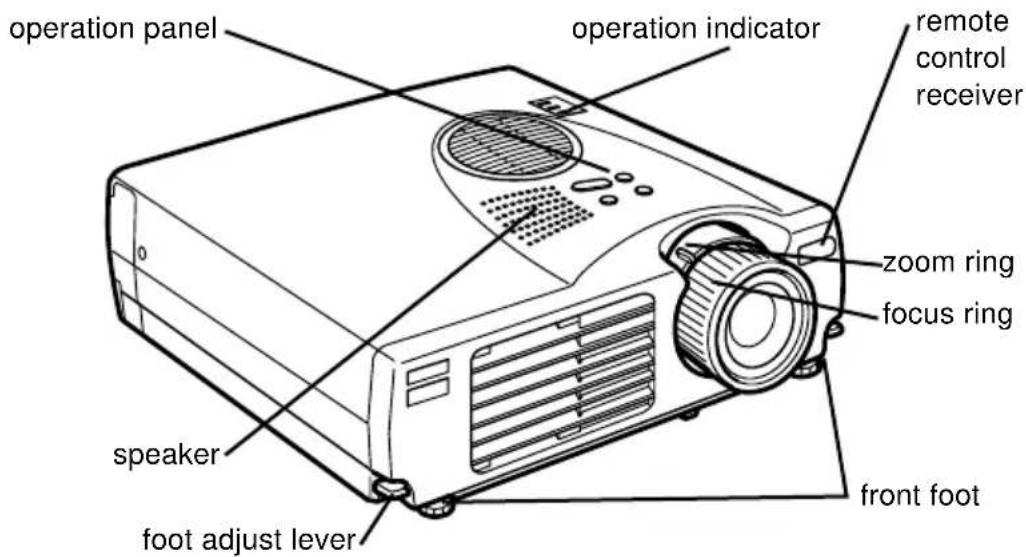
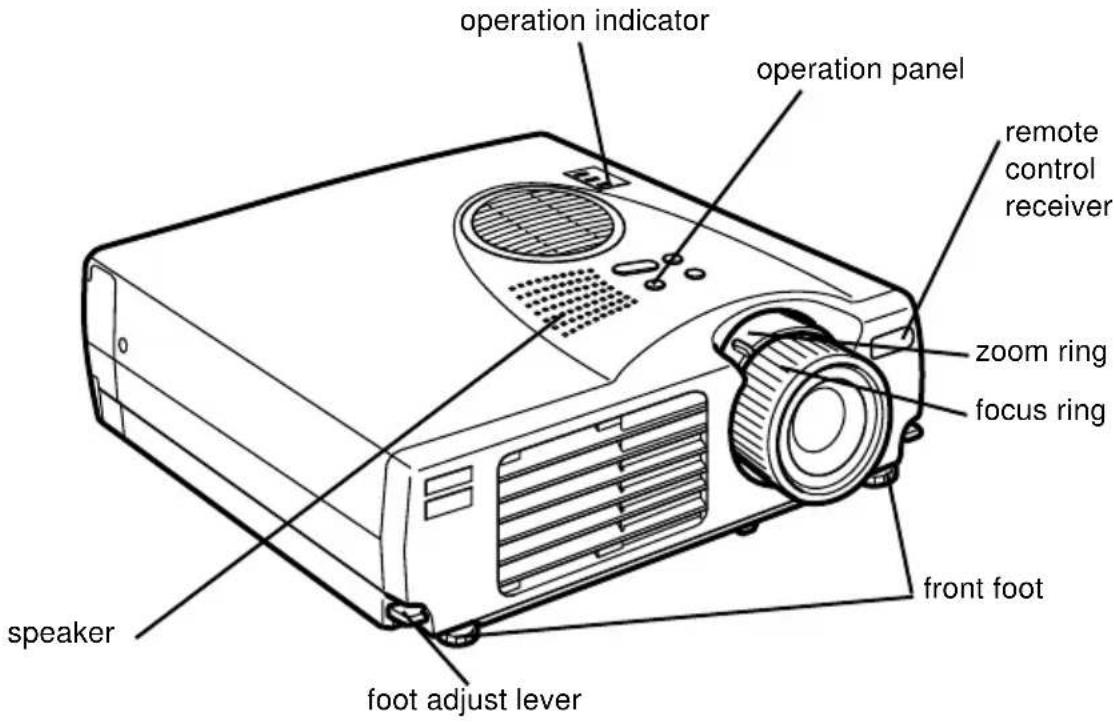
The illustration below identifies the parts of your projector.
Turning the Equipment On and Off
Turn on the projector and its attached equipment in the following order.
- Video source
- Audio source (if different from computer or video source)
- Projector
- External speaker or PA system (if necessary)
- Computer
When you turn off the equipment, do so in the reverse order.
Turning the Projector On and Off
- Remove the projector lens cap.
- When you plug in the projector power cord, the power indicator flashes orange for few seconds. Then the light remains orange.
- Press the Power button on the remote control or operation panel. The power indicator flashes green as the projector warms up. When the projector is fully warmed up, this light remains green.
If computer or video equipment is attached, the computer or video signal is projected.
- Warning: Never look into the lens when the lamp is on. This can damage your eyes. It is especially important that children are not allowed to look into the lens.
Caution: When turning the projector on or off with the remote control, be sure to turn the remote control on first with the power switch.
After you press the power button to turn off the projector, a confirmation message appears. If you want to turn off the projector, press the power button again. If you don't want to turn off the projector, press any button. The fan will remain on and the operation indicator will flash orange for about one minute as the projector cools down.
When the projector has cooled down, the operation indicator stops flashing and remains orange.
Note: If you press the Power button to turn the projector back on while the operation indicator is orange, there may be a delay before a projected image appears.
Focusing and Positioning the Screen Image
When an image appears on the screen, check that it is in focus and correctly positioned on the screen.
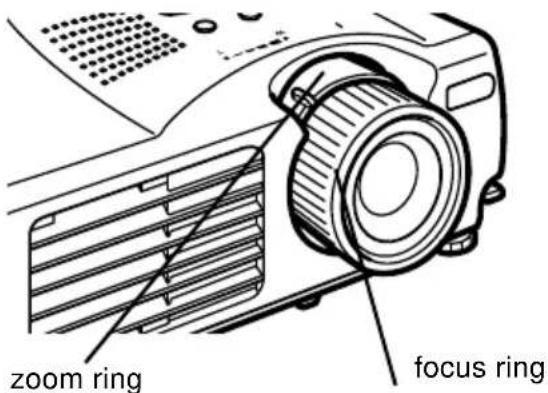
- To focus the image, rotate the focus ring (the outer ring on the lens).
- To adjust the size of the image, rotate the inner zoom ring. Rotate the zoom ring between W (wide) and T (tele) marks.
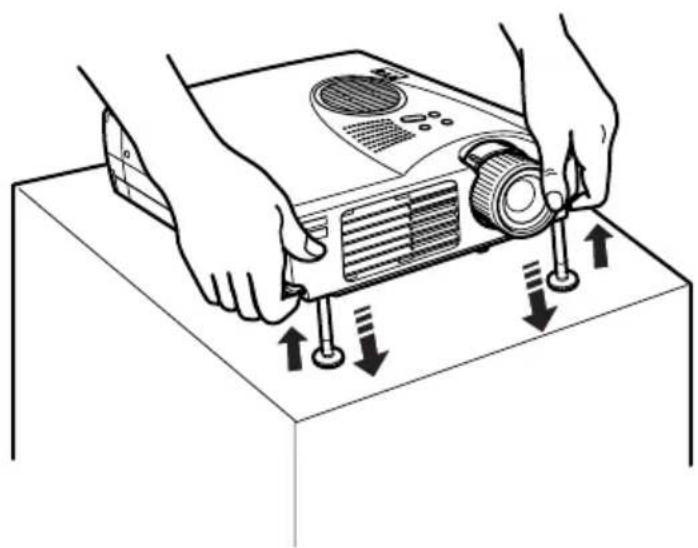
If you need to raise or lower the image on the screen, extend or retract the two feet at the bottom of the projector as follows:
natural_image
Illustration of hands operating a projector with directional arrows indicating motion (no text or symbols)- Stand behind the projector and support the front of it while you lift the foot adjust levers above the feet. This unlocks the feet so they can move up and down freely. Do not let the projector drop.
Caution: Do not hold the projector by its lens. This can damage the lens.
-
While lifting the foot adjust levers, raise or lower the projector until the screen image is positioned correctly.
-
Release the lever to lock the feet in their new position.
-
To fine-tune the height of the projector, turn the feet clockwise to raise the height or anti-clockwise to lower it.
Resize Button
The Resize button allows you to select the projection method for certain types of image input signals from a computer.
With images up to XGA size (1024×768) or SVGA size (800×600), you can choose from two projection methods. You can either display the image in the center of the projection area(Window display) or display the image full size(Resize display).
You can also choose from two projection methods with images greater than XGA or SVGA size: either project a portion of the image or project the entire image in a compressed format. The projector automatically reduces the image size to the projector's maximum resolution. The Resize button cannot be used with images at XGA or SVGA resolution.
When the image source is Video, the resize button lets you choose an aspect ratio either resize display or 16:9.
Controlling the Projector
You can use the operation panel on top of the projector or the remote control to perform the following actions:
- Turn the power on or off
• Auto set-up of the computer image - Switch between input images (Computer, video-computer)
- Access the projector menus to adjust the image, audio, video, and display settings
- Resize the projected image
- Freeze the display
• Temporarily display a blank screen - Adjust or mute audio/ video output
- Use custom functions
- Move the mouse pointer
Using the Remote Control
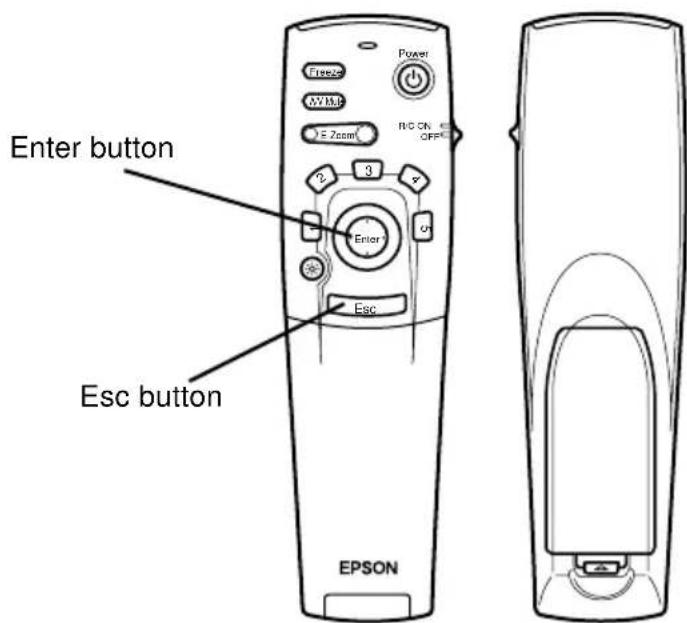
Remote control
To use the remote control, point it towards the remote control receivers located at the front of the projector.
To be able to use the remote control as a cordless mouse, connect the mouse cable to the projector and your computer.
You can use the remote control up to 10 metres (30 feet) from the projector.
Note: The projector may not respond to remote control commands in these conditions: ambient light is too bright; a certain type of fluorescent light is present; a strong light source (such as direct sunlight) shines into the infrared receiver; or other equipment emitting infrared energy is present (such as a radiant room heater). Correct these conditions to use the remote control or control the projector from a computer.
This table summarizes the functions on the remote control.
| Button Function | |
| Freeze Keeps the current computer or video image on the screen. | |
| A/V Mute Turns off the audio and video output of the projector.To turn on the audio and video output, press either the A/V mute button or Esc button again. | |
| E-Zoom Pressing the right side of the button enlarges the image, pressing the left side of the button reduces the image.To display a portion of the enlarged image which is outside of the display area, press the Enter button to scroll the image. | |
| Power Turns the projector on or off. | |
| Effect buttons Use to display special effects that have been assigned in the Effect menu. | |
| Enter Use the enter button to navigate the menus or use the remote as a mouse pointer when the projector is connected to the computer with the computer cable and the mouse cable.You can also select a menu option by pressing the center of this button (Enter).If you press the Enter when a menu or help is displayed, you access the next menu or screen. When the image source is a computer, the Enter button acts as the mouse left click. | |
| Illumination button | Lights up all buttons on the remote control for 10 seconds. |
| Esc Terminates the current function.If you press the Esc button when a menu or help is displayed, you go back to the previous screen or menu.When the image source is a computer, the Esc button acts as the mouse right click. | |
| Menu Displays or hides the menu. | |
| Help Displays the Help menu. | |
Button Function
Comp Switches to the computer image from Computer.
S-Video Switches to the video image from S-Video.
Video Switches to the image from Video.
Auto Optimizes the computer image.
Resize Switches between the Window display and Resizing display.
P in P Displays a subscreen on the main display. To display the subscreen, press the PinP button once. To hide the subscreen, press it again. To set the subscreen being displayed, press in the following order : [Menu] → [Setting] → [P in P]. The default settings are as follows; Subscreen size:1/9 division Main screen input source:Computer Subscreen input source:Video To change the subscreen position, press the Enter button. The subscreen will move to the selected direction.
Volume +/- Adjusts the volume.
Using the Operation Panel
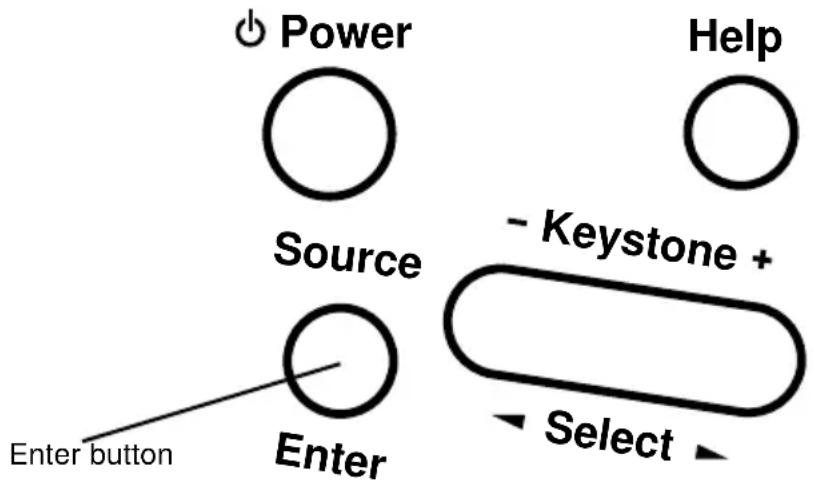
flowchart
graph TD
    A["Power"] --> B["Source"]
    B --> C["Enter"]
    D["Help"] --> E["- Keystone +"]
    E --> F["Select"]
    G["Enter button"] --> B
Operation Panel
You can use the operation panel to control the projector instead of the remote control. However, you can program and access the custom features only using the remote control.
The following table summarizes the functions on the operation panel.
Button Function
Power Turns the projector on or off.
Help Displays the Help menu.
Source Switches the image source in order of computer → S-video → composite video. If there is no S-video input, the switch toggles between computer and composite video.
Enter Selects a menu option when the Help menu is displayed.
Keystone +/- Adjusts a trapezoid distorted image to normal.
Select Scrolls up and down, or right and left when the Help menu is displayed.
Projector Status Indicators
The power and lamp indicators at the top of the projector tell you its operating status.
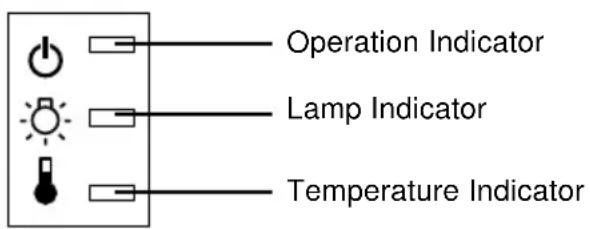
Caution: A red indicator warns you if a serious problem occurs. See Chapter 5, “Troubleshooting,” for what to do if a warning light comes on.
Operation Indicator
Displays machine condition.
Color Status Meaning
Orange Lit Sleep mode. (The projector is plugged in, but not projecting.)
Green Flashing The projector is warming up.
Green Lit Power and projection lamp are on.
Orange Flashing Projection lamp is off, and the projector is cooling down for one minute. Cooling time depends on the air temperature. During the cooling, any other operations cannot be executed.
Red Lit There is an internal projector problem and the power to the projector has been cut off.
- Off The projector is not on.
Lamp Indicator
Displays lamp condition.
This indicator is off when the projector is in a normal condition.
Color Status Meaning
- Off Lamp is functioning normally.
Red Lit The lamp needs to be replaced.
Orange Flashing Projection lamp has reached the time to replace and will no longer project images. Replace the projection lamp with a new one.
Red Flashing There is a problem with the projection lamp, lamp power supply, lamp fuse, or a circuit malfunctioned in the projector.
Temperature Indicator
Displays the internal temperature condition.
This indicator is off when the projector is in a normal condition.
Color Status Meaning
- Off The projector is functioning normally.
Orange Flashing The projector is too hot.
Red Lit The projector has turned off automatically because of over heating.
Red Flashing There is a problem with the cooling fan or temperature sensor.
natural_image
Line drawing of a projector with a circular lens and ventilation slots, labeled with the number 3 (no text or symbols on the device itself)3
Using the Projector Menus
The eight projector menus let you to control your projector.
- The Video menu controls the look and quality of the projected image, whether the image source is a computer or video.
- The Audio menu controls audio features, such as the volume level, tone setting.
- The Effect menu lets you define functions for the Effects buttons on the remote control.
- The Setting menu lets you select various projector options.
- The User's Logo menu lets you select special features such as background color or a custom logo.
- The Advanced menu enables you to set various projector options.
- The About menu provides information about H/V(Horizontal/ Vertical) frequency, and lamp hours etc.
- The Reset All menu returns all settings to their factory defaults.
Accessing the Main Menu
To display the Main menu, press the Menu button on the remote control. The Main menu appears:
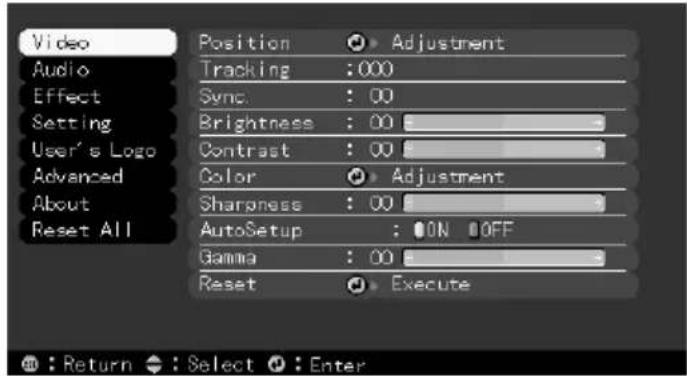
Press the Menu button again to hide the menu.
Changing a Menu Setting
To change a menu setting:
-
Press the Menu button on the remote control to display the Main menu.
-
Press the top or bottom of the Enter button to scroll through the menu choices.
- Press the Enter button to display a submenu.
As you select a menu, a sub menu of options appears to the right.
![Video Audio Effect Setting User's Logo Advanced About Reset All Position Brightness : 00 Contrast : 00 Color : 00 Tint : 00 Sharpness : 00 Gamma : 00 Mode Reset Adjustment Select[NTSC4.43] Execute](/content/2026/05/974613/images/5fa2e4747e0bf61cb549c38e14209c293435c63fe9ae49c33c9e294fa4d4c78c.jpg)
Note: The options available in some submenus vary, depending on whether the current image source is the computer or a video source.
- Press the top or bottom of the Enter button to scroll through the menu choices.
- Press the right or left sides of the Enter button to change a setting on one of the submenus.
- When you are finished changing settings, press the Menu button again to hide the menu, or press the Esc to go back to the Main menu. Your changes are saved automatically.
Menu Options
Video Menu (Image source = Computer)
The Video menu lets you make adjustments to the projected image. The following options are available when the image source is Computer.
Note: The computer must be connected and operating, and the image source on the projector must be set to Computer for you to access these menu options.
Menu item Description
| Position Select this item by pressing the Enter button to enter the screen position adjustment mode. Then use the Enter button to move the screen position in the corresponding direction.When you finish making adjustment, press the Esc button to return to the Video submenu. |
| Tracking Matches the projector's internal clock to various computer graphic signals. Adjust this setting to remove vertical lines from the image. |
| Sync. Synchronizes with the tracking signal sent from the computer. Adjust this setting to correct fuzziness or screen flicker. |
| Brightness Lightens or darkens the overall image. Increase brightness to lighten an image, or decrease it to darken the image. |
| Contrast Adjusts the difference between light and dark areas.Increase the contrast to make light areas lighter and dark areas darker. Decrease it to minimize the difference between light and dark areas. |
Menu item Description
| Color Adjusts the color balance (Red:Green:Blue) of the input source.Select this item by pressing the Enter button. The projector will enter color adjustment mode. Use the Enter button to select a color.Next, use the Enter button to adjust the selected color.Increase the color setting for more intense color, or decrease the setting for less intense color. |
| Sharpness Adjusts the screen sharpness.Increase the sharpness for a sharper image, or decrease it for a less sharp image. |
| Auto Setup Set to On to have the computer automatically optimize the image for projection. |
| Gamma Adjusts the projected imagery for natural coloration. |
| Reset Returns all menu items to their initial factory defaults.Select this item and then press the Enter button to display the confirmation screen.Next, select Yes and then press the Enter button to reset the menu.If you change your mind, select No and then press the Enter button to clear the confirmation screen without changing any settings. |
Video Menu (Image source = Video)
The Video menu lets you make adjustments to the projected image. The following options are available when the image source is Video.
Note: The projector's image source must be set to Video, and the video source (such as a VCR or camcorder) must be connected and operating for you to access these menu options (for example, the projector must actually be projecting an image from a video tape, if you're using a VCR).
Menu item Description
Position Select this item by pressing the Enter button to enter the screen position adjustment mode. Then use the Enter button to move the screen position in the corresponding direction. When you finish making adjustment, press the Esc button to return to the Video submenu.
Brightness Lightens or darkens the overall image. Increase brightness to lighten an image, or decrease it to darken the image.
Contrast Adjusts the difference between light and dark areas. Increase the contrast to make light areas lighter and dark areas darker. Decrease it to minimize the difference between light and dark areas.
Color Adjusts color density. Increase the setting for darker and more opaque colors. Decrease it for lighter and less opaque colors.
Tint Adjusts the red-green color balance of the screen. Increase tint to add more green, (NTSC only) or decrease it to add more red. This setting only works with NTSC video signals.
Sharpness Adjusts the screen sharpness. Increase the sharpness to make screen images more sharp, or decrease it to make the images less sharp.
Gamma Adjusts the projected imagery for natural coloration.
Menu item Description
Mode Specifies the image signal mode. User can select from Auto, NTSC, NTSC4.43, PAL, M-PAL, N-PAL, PAL 60, SECAM.
Reset Returns all menu items to their initial factory defaults. Select this item and then press the Enter button to display the confirmation screen. Next, select Yes and then press the Enter button to reset the menu. If you change your mind, select No and then press the Enter button to clear the confirmation screen without changing any settings.
Audio Menu
The Audio menu lets you make adjustments related to audio.
Menu item Description
Volume Adjusts the volume level for the speakers and audio-out terminal.
Tone Adjusts the sound quality.
Reset Returns all menu items to their initial factory defaults. Select this item and then press the Enter button to display the confirmation screen. Next, select Yes and then press the Enter button to reset the menu. If you change your mind, select No and then press the Enter button to clear the confirmation screen without changing any settings.
Effect Menu
Use the Effect menu to modify what happens when you use the Effects buttons on the remote control and to change the cursor speed.
Menu item Description
Cursor/Stamp Selects the stamp icon you want to use as the cursor graphic and a zoom rate.
Box Selects the box color and shape.
Marker Selects the marker color and width.
Freehand Selects the color and width.
Cursor Speed Selects the cursor speed to Low, Middle, or High.
Reset Returns all menu items to their initial factory defaults.
Select this item and then press the Enter button to display the confirmation screen.
Next, select Yes and then press the Enter button to reset the menu.
If you change your mind, select No and then press the Enter button to clear the confirmation screen without changing any settings.
Setting Menu
The Setting menu lets you adjust or set the various projector options.
Menu item Description
Keystone Adjusts the trapezoid distorted image to normal.
P-in-P Selects the image source (composite or S-Video) for the subscreen.
Menu item Description
| No-Signal Msg Specifies whether a black screen, a blue screen, or a user logo displays when the screen is blanked. |
| Prompt Temporarily displays a message on the projector screen to identify which source (computer or video) is providing the image. |
| A/V Mute Turns off/on the audio/video output of the projector, clears all special effects, and displays a black, blue, or user logo screen. |
| Power Mgmt Sys You can select to turn off or keep the lamp power on when there is no input source. |
| Reset Returns all menu items to their initial factory defaults.Select this item and then press the Enter button to display the confirmation screen.Next, select Yes and then press the Enter button to reset the menu.If you change your mind, select No and then press the Enter button to clear the confirmation screen without changing any settings. |
User's Logo Menu
The User's Logo menu lets you display a custom logo on the screen.
Creating a user logo requires two steps:
- Storing a user logo
- Assigning the logo to the A/ V Mute button
Storing a User Logo
Follow these steps to capture and store a logo.
- Display the image(with the projector) you wish to use as a logo.
- Press the Menu button to open the Menu window.
- Select the User's Logo menu option by pressing the pointer button. Then press the Enter button to display the User's Logo Setting window.
- The message, "Do you use the present image as a user logo?" appears on the screen. Choose Yes or No by pressing left or right of the Enter button. Then press Enter button.
- When you choose "Yes" in the step 4, a selection box will appear over the image. To select the portion of the image you wish to use as the logo, use the Enter button. Once you have selected the desired area, press the Enter button.
- The message "Do you use this image?" appears on the screen. Select Yes and press the Enter button. If you want to change the position, select No.
- Next, the Zoom rate setting window appears on the screen. Select a rate using the arrow buttons, then press the Enter button.
- The message “Do you save this user logo?” appears on the screen. Select Yes and press the Enter button. If you don’t want to save the logo, select No.
Note: Saving the logo may take a moment. Do not use the projector or other sources (computer, video, speaker, etc.) while the logo is being saved.
- When the message "Saving the user logo is completed" appears on the screen, press the Menu or Enter button to display the Main Menu.
Assigning the Logo to the A/V Mute Button
Follow these steps to assign the logo to the A/ V Mute button:
- Press the Menu button to open the Menu window.
- Select the Setting menu and press the Enter button.
- Select the Blank option (A/ V Mute), then highlight User Logo.
- Press the Menu button twice.
Now you can press the A/ V Mute button on the remote control to display the user logo.
Reset All Menu
Selecting the Reset All menu option resets the settings in all menus to their factory defaults. It does not change or delete any user logo you may have stored.
You will be prompted to confirm the reset action. Select Yes or No, then press the Enter button to reset all the settings.
Advanced Menu
The Advanced menu enables you to set various projector options.
Menu item Description
| Language Selects the menu language from Japanese, English, German, French, Italian, Spanish, Portuguese, Chinese and Korean. |
| Startup Screen Displays the user logo during the warm-up after the projector is turned on. |
| Color Temp. Adjusts the whiteness and blackness of the screen.Increasing the values emphasizes the whiteness and blackness.Decreasing the values weakens the whiteness and blackness. |
| Rear Proj. Mirrors the projected image so it looks correct when you're projecting from behind onto a translucent screen. Selecting ON turns mirroring on, while OFF turns it off (for a normal image). |
| Ceiling Flips the projected image so it looks correct when you're hanging the projector upside-down from the ceiling. Selecting ON turns this feature on, while OFF turns it off (for a normal image). |
| Reset Returns all menu items to their initial factory defaults.Select this item and then press the Enter button to display the confirmation screen.Next, select Yes and then press the Enter button to reset the menu. If you change your mind, select No and then press the Enter button to clear the confirmation screen without changing any settings. |
About Menu
The About menu displays the following information about your projector.
Image source = Computer or Component Video
Menu item Description
Lamp Displays the number of hours the current lamp has been used. The lamp light turns red when the projector lamp needs to be replaced. When this happens, replace the projector lamp with a new one as soon as possible.
Frequency Displays the horizontal and vertical frequency of the computer.
SYNC Polarity Displays the sync polarity of the computer.
SYNC Mode Displays the sync mode of the computer.
Resolution Displays the output resolution of the computer video output.
Refresh Rate Displays the refresh rate of the computer video output.
Image source = Video
Menu item Description
Lamp Displays the number of hours the current lamp has been used. The lamp light turns red when the projector lamp needs to be replaced. When this happens, replace the projector lamp with a new one as soon as possible.
Video Signal Displays the input image signal mode.
natural_image
Line drawing of a projector with a label '4' below it (no other text or symbols)Maintenance
Your projector needs little maintenance. You should keep the lens clean because any dirt or smears appear on the screen. You also need to periodically clean the air filter. A clogged air filter can block ventilation needed to cool the projector and keep it from overheating.
The only parts you should replace are the lamp and air filter. If any other part needs replacing, contact your dealer or a qualified service person.
- Warning: Before you clean any part of the projector, turn off the projector and unplug the power cord. Never open any cover on the projector, except the lamp and filter covers. Dangerous electrical voltages in the projector can injure you severely. Do not try to service this product yourself, except as specifically explained in this User's Guide. Refer all other servicing to qualified service personnel.
Cleaning the Lens
Clean the lens whenever you notice dirt or dust on the surface. Lightly wipe the lens surface with a soft, dry, lint-free cloth.
To remove dirt or smears on the lens, moisten a soft cloth with an alcohol-based cleaner and gently wipe the lens surface.
Cleaning the Projector Case
To clean the projector case, first unplug the power cable. To remove dirt or dust, wipe the case with a soft, dry, lint-free cloth. To remove stubborn dirt or stains, moisten a soft cloth with water and a neutral detergent. Then wipe the case.
Do not use alcohol, benzene, thinners or other chemical detergents. These can cause the case to warp.
Cleaning the Air Filter
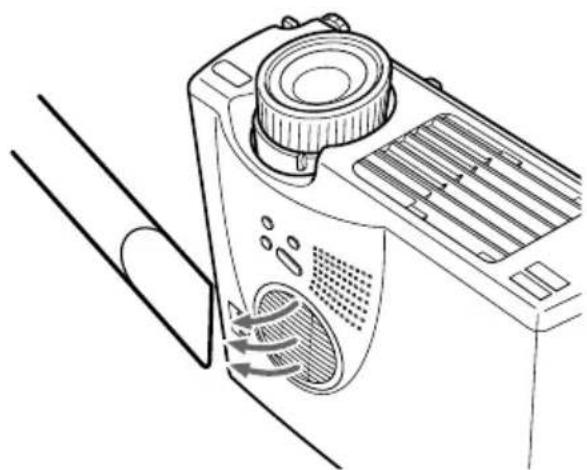
Clean the air filter at the top of the projector after every 100 hours of use. If it is not cleaned periodically, it can become clogged with dust, preventing proper ventilation. This can cause overheating and damage the projector. To clean the air filter, follow these steps:
- Turn off the projector and unplug the power cable.
- Stand the projector with the lens at the top.
Note: Standing the projector with the lens at the top keeps dust from getting inside the projector housing.
natural_image
Line drawing of a mechanical device with airflow indicators (no text or symbols)- Use a small vacuum cleaner designed for computers and other office equipment to clean the filter.
If the dirt is difficult to remove or if the filter is torn, replace it. Contact your dealer or call EPSON Service Center.
Replacing the Lamp
Replace the lamp when:
- The projected image gets darker or starts to deteriorate.
- The projection lamp indicator is flashing orange.
- The message “LAMP REPLACE” appears on the screen when the projector lamp comes on.
Note: To keep the initial brightness and image quality, replace the lamp as soon as possible when the message appears on the screen. The replacement message is set to being displayed at about 2000 hours of use. Contact your local EPSON dealer for a spare lamp. Request part number ELPLP10B (EMP-700/500) or ELPLP10S (EMP-710).
- Warning: Let the lamp cool before replacing it. Also, do not touch the glass portion of the lamp assembly. Touching the glass portion of the lamp will result in premature lamp failure.
-
Turn off the power and allow the unit to cool down, then remove the power cord. The amount of time needed to cool down will depend on the ambient temperature.
-
Remove the lamp cover after the unit is cool. It will normally take about an hour to completely cool down. Loosen a lamp cover-mounting screw with the screwdriver provided with the spare lamp, then remove.
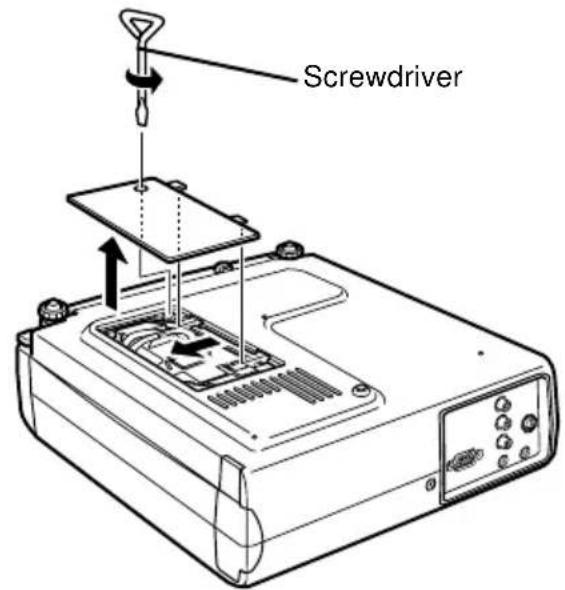
- Loosen two mounting screws for the lamp with the same screwdriver, and pull out the lamp using the handle.
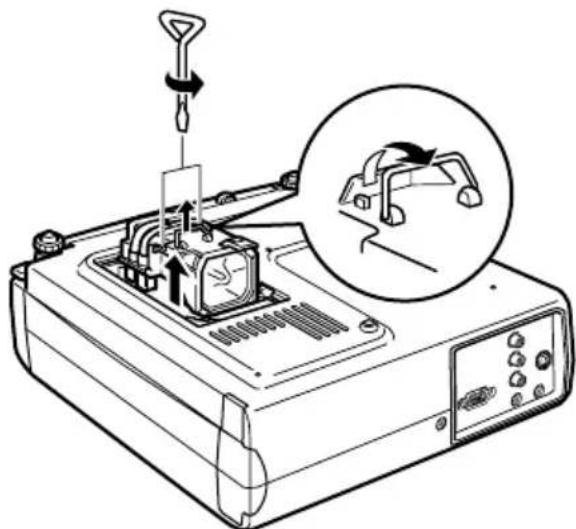
natural_image
Diagram of a mechanical device with a tool inserted, showing a close-up of a component being processed (no text or symbols present)-
Mount new lamp. Check that the lamp orientation is correct, and then press it into place securely. Tighten the mounting screws for the lamp with the screwdriver.
-
Remount the lamp cover. Tighten the lamp cover screw with the screwdriver.
natural_image
Line drawing of a projector with a label '5' on the left (no other text or symbols)Troubleshooting
This chapter describes the problems indicated by the warning lights and provides information on how to solve problems with the projector. It is divided into the following sections:
- Problems with the projector. See this section if the projector is not working and to find out what the warning lights are indicating.
- Problems with the screen image. See this section if you cannot project an image or if the screen image is poor.
If you have a problem, refer to the appropriate section and follow all suggestions that apply to your problem. If none of the suggested solutions solves the problem, call your dealer or EPSON Service Centre.
Problems with the Projector
If you have problems with the projector, first turn it off and unplug it. Then plug the power cord back in and turn on the projector. If this does not solve the problem, check the warning lights at the top of the projector. These lights alert you to problems with projector operation.
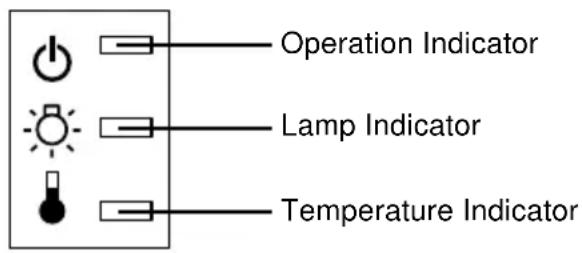
See the following pages for information on what to do when you see these warning lights or encounter other specific problems with the projector.
☐ The operation indicator is flashing orange and you cannot turn on the projector.
The lamp is cooling down. Wait until the light turns off and then turn on the projector.
☐ The operation indicator does not come on.
Turn off the projector, check that the power cable is connected securely both at the power outlet and the projector, and press the Power button again.
□ Projected images get darker or start to deteriorate, or the lamp indicator is red.
Replace the projector lamp as described on page 58.
☐ The temperature indicator is red.
The projector is overheating, which turns the lamp off automatically. Let the projector cool for a few minutes, then turn it back on. Make sure nothing is blocking the ventilation vents.
The air filter may be clogged. Clean it as described on page 57 in Chapter 4 and then let the projector cool for a while.
If the projector continues to overheat after you clean the air filter, the problem may be caused by damage to the cooling fan or internal circuits. Contact a qualified service person.
Warning: Do not attempt to service this product yourself except as specifically explained in this User's Guide.
Problems with the Image or Sound
□ An image does not appear on the screen.
Check that the power light is on and the lens cover is off. Also make sure the cables are installed correctly, as described in Chapter 1.
The correct image source may not be selected. Press the Source button on the remote control or the Source button on the appropriate input operation panel to choose another image source.
☐ Only part of the computer image is displayed.
If the computer's output resolution setting is higher than 1024 × 768 (EMP-710/ 700) or 800 × 600 (EMP-500), the projector resizes the image. If the computer output is not compatible with this resizing, choose a different display setting on the computer. For supported display settings, see “Supported Monitor Displays” on page 69, 70.
You also may need to modify existing presentation files if you created them for a different resolution. See your software manual for specific information.
☐ The message NO SIGNAL is displayed.
An image source not connected to the projector is selected, the signal is not being output from the computer, or the signal is not reaching the projector. Make sure the connectors are securely attached to both the projector and the image source. Then check that the image source is selected correctly. When NO SIGNAL is displayed, you cannot access the Video (computer/video) menu.
☐ A blank screen is displayed.
The computer signal cannot be interpreted by the projector. Verify the display format (see page 69, 70). When you see a blank screen, you cannot access the projector menus.
☐ The image or parts of the image are blurred or not in focus.
Adjust the Brightness and Contrast settings on the Video menu. If you're viewing a computer image, also try adjusting the Tracking and Sync buttons on the projector's operation panel.
There may be dirt or smears on the lens. Clean the lens as described in Chapter 4, “Maintenance.”
☐ The colors of the image are not right.
The color balance may be incorrect. If you're displaying a computer image, adjust the red, green, and blue settings in the Video menu. If you're displaying video, adjust the Color and Tint (NTSC only) settings on the Video menu.
□ There is no sound.
First check that the volume setting is not turned all the way down and that the RCA audio cable is securely attached to both the projector and the audio source. Also, make sure that the Mute button is off.
The wrong source is selected. Press either the Computer or Video button on the remote control or Source button on the operation panel to select the proper source.
natural_image
Line drawing of a projector with a circular lens and ventilation slots, labeled with the number 6 (no text or symbols on the device itself)Technical Specifications
General
Type of display Poly-silicon TFT
Size of liquid crystal panels 0.9 inches (22.9 mm)
Resolution
1024 (horizontal) x 768 (vertical) pixels (EMP-710/700)
800 (horizontal) x 600 (vertical) pixels (EMP-500)
Projection distance 26-300 inch (1.1-13.8 meters)
Remote control range 32.8 feet (10 meters)
Internal speaker system 1W Monaural
Optical aspect ratio 4 : 3 (horizontal : vertical)
Zoom ratio 1:1.2
Projector Lamp
Type UHE Lamp (Ultra High Efficiency Lamp)
Power 120 W
Part number ELPLP10S (EMP-710)
ELPLP10B (EMP-700/500)
Mechanical
| Height 7.4 inches (87 mm) | Maximum dimension |
| Width 19.8 inches (267 mm) | Maximum dimension |
| Depth 12 inches (213 mm) | Maximum dimension |
| Weight 5.8 lb (2.6 kg) |
Electrical
| Voltage 100 - 120 V | AC and 200 - 240 V_AC ± 10% |
| Rated frequency 50/60 Hz | |
| Power supply 100 - 120 V | AC, 1.9 A, 50/60 Hz200 - 240 V_AC , 1.0 A, 50/60 Hz |
Environmental
| Temperature | Operation: 41 - 95° F (5 - 35° C), non-condensing |
| Storage: 14 - 140° F (-10 - 60° C), non-condensing | |
| Humidity Operation: 20 - 80% RH, non-condensing | |
Supported Monitor Displays
The projector displays images at a resolution of 1024 x 768 (EMP-710/ 700) or 800 x 600 (EMP-500) pixels. To display a higher resolution image, the projector compresses it to 1024 x 768 (EMP-710/ 700) or 800 x 600 (EMP-500). The following table lists the display formats supported by the projector:
A: Resize B: Native
| Mode ACTIVE FREQUENCY MODEL | |||||||
| H V | H(KHz) | V(Hz) Pixel | (MHz) EMP-710/ | 700 | EMP-500 | ||
| VGACGA 640 | 400 31 | .46 70 | 25.175 A/B | A/B | |||
| VGAEGA 640 | 350 31 | .46 70 | 25.175 A/B | A/B | |||
| NEC400 | 640 4 | 00 24.8 | 3 56.65 | 21.053 A/B | A/B | ||
| VGA60 | 640 | 480 | 31.469 | 59.94 | 25.175 | A/B | A/B |
| VGA72 | 640 | 480 | 37.861 | 72.809 | 31.5 | A/B | A/B |
| VGA75 | 640 | 480 | 37.5 | 75 | 31.5 | A/B | A/B |
| VGA85 | 640 4 | 80 | 48.269 85.00 | 8 36 | A/B A/B | ||
| SVGA56 | 800 | 600 | 35.156 | 56.25 | 36 | A/B | B |
| SVGA60 | 800 | 600 | 37.879 | 60.317 | 40 | A/B | B |
| SVGA72 | 800 | 600 | 48.077 | 72.188 | 50 | A/B | B |
| SVGA75 | 800 | 600 | 46.875 | 75 | 49.5 | A/B | B |
| SVGA85 | 800 | 600 | 53.674 | 85.061 | 56.25 | A/B | B |
| XGA43i | 1024 | 768 | 35.522 | 86.958 | 44.9 | B | A |
| XGA60 | 1024 | 768 | 48.363 | 60.004 | 65 | B | A |
| XGA70 | 1024 | 768 | 56.476 | 70.069 | 75 | B | A |
| XGA75 | 1024 | 768 | 60.023 | 75.029 | 78.75 | B | A |
| XGA85 | 1024 | 768 | 68.677 | 84.997 | 94.5 | B | A |
| SXGA1_70 | 1152 | 864 | 63.851 | 70.012 | 94.5 | A | A |
| SXGA1_75 | 1152 | 864 | 67.5 | 75 | 108 | A | A |
| SXGA1_85 | 1152 | 864 | 77.094 | 84.999 | 121.5 | A | A |
| SXGA2-60 | 1280 | 960 | 60 | 60 | 108 | A | A |
| SXGA2-75 | 1280 | 960 | 75 | 75 | 126 | A | A |
A: Resize B: Native
| Mode | ACTIVE | FREQUENCY | MODEL | ||||
| H | V | H(KHz) | V(Hz) | Pixel(MHz) | EMP-710/700 | EMP-500 | |
| SXGA2-85 1280 960 | 85.938 | 85.002 148.5 | A A | ||||
| SXGA3_43i 1280 1024 | 46.433 | 86.871 78.75 | A A | ||||
| SXGA3_60 1280 1024 | 63.981 | 60.02 108 | A A | ||||
| SXGA3_75 1280 1024 | 79.976 | 75.025 135 | A A | ||||
| SXGA3_85 1280 1024 | 91.146 | 85.024 157.5 | A A | ||||
| UXGA48i 1600 1200 | 62.5 | 96.08 135 | A | - | |||
| UXGA60 1600 1200 | 75 | 60 | 162 | - | |||
| MACLC13 | 640 | 480 | 34.975 | 66.62 | 31.33 | A/B | A/B |
| MAC II 13 | 640 | 480 | 35 | 66.67 | 30.24 | A/B | A/B |
| MAC16 | 832 | 624 | 49.725 | 74.55 | 57.28 | A/B | A |
| MAC19-60 1024 768 | 48.193 | 59.28 64 | B A | ||||
| MAC19 | 1024 | 768 60.241 | 74.93 80 | B A | |||
| MAC21 | 1152 | 870 68.682 | 75.062 | 100 A A | |||
| NTSC | 1024 | 480 15.734 | 60 | - | A A | ||
| PAL 1024 | 576 15.625 | 50 | - | A A | |||
| SECAM | 1024 | 576 | 15.625 | 50 | - | A | A |
Note: The frequencies of some computers may not allow the image to be display correctly.
Computer In connector pin assignments
The Computer In connectors are female video RGB, 15-pin micro-D-style connector. The pin assignments are:
| Input pin Signal | |
| 1 | Red analogue input |
| 2 | Green analogue input |
| 3 | Blue analogue input |
| 4 | GND |
| 5 | GND |
| 6 | Red GND |
| 7 | Green GND |
| 8 | Blue GND |
| 9 | Reserved |
| 10 | Sync GND |
| 11 | GND |
| 12 | SDA |
| 13 | Horizontal sync/composite sync input |
| 14 | Vertical sync input |
| 15 | SCL |
DECLARATION of CONFORMITY/DICHIARAZIONE di CONFORMITÀ/KONFORMITÄUNG/DECLARACIÓN de CONFORMIDAD/DECLARATION de CONFORMITE
according to ISO/IEC Guide 22 and EN 45014/secondo la Guida ISO/IEC 22 e EN 450014/entsprechend ISO/CEI Anleitung 22 und EN 45014/De acuerdo con ISO/IEC Guide 22 y EN 45014/selon les normes ISO/IEC Guide 22 et EN45014
Conforms to the following directives and Norms/Conforme alle seguenti direttive e Norme/Erfüllt die folgenden Direktiven und Normen/De acuerdo con las directrices y normas siguientes/ Conforme aux directives et normes suivantes
Directive 89/336/EEC
: EN 55022 Class B
: EN 50082-1
Directive 73/23/EEC
: EN 60950
natural_image
Line drawing of a projector with a circular lens and ventilation slots (no text or symbols)Glossary
Brightness. The balance of light and dark shades in an image.
Composite video. A type of video signal that encodes colours, luminance and synchronization information so it can be carried in one signal.
Contrast. A measure of the luminance differences between the highlights and shadows of an image. In a high-contrast image, light areas are very bright and dark areas are very dark.
NTSC. A 525-line video broadcast format developed by the National Television Standards Committee. NTSC is widely used in North America, Mexico and Japan.
PAL (Phase Alternation by Line). A 625-line video broadcast format used in Western Europe, India, China, Australia, New Zealand and parts of Africa.
Resolution. A measure of the amount of detail contained in an image. Resolution can be measured in dots per inch or in pixels. Image sharpness and clarity improve as resolution increases.
RGB. Red Green Blue
S-Video. A type of video signal which transmits luminance and colour separately.
Serial. A type of communication interface that transmits data over a single wire.
natural_image
Line drawing of a projector with a circular lens and ventilation slots (no text or symbols)Index
A
Audio cable 9
Audio In jack 9
Audio Menu 48
Audio Out jack 25
B
Brightness 73
C
Cleaning the Air Filter 57
Color 47
Contrast 73
cooling 62
D
DAR viii
E
Effect Menu 49
External Speaker 1, 25
F
Format 69
G
Glossary 73
I
Image 64
Installation x
M
Mac mouse cable 2, 15
Macintosh desktop adapter 13, 17
Maintenance x
Mouse/ Com port 8, 11, 15
N
NTSC 73
O
operation indicator 28
operation panel 28
Optional Accessories ix
P
PA System 1,25
PAL 73
pin assignments 71
Power cord 2
Projector ix
PS/ 2 mouse cable 2, 8
R
RCA audio cable 23
RCA video cable 23
Resolution 64, 73
RGB 73
s
SECAM 73
Serial 74
Setting Menu 49
Sound 64
stereo audio cable 25
S-Video 73
S-Video cable 24
S-Video connector 24
T
Technical Specifications x, 67
Tone 48
Troubleshooting x, 61
U
USB mouse cable 2
User's Logo Menu 50
V
Video Source 22
video-out cable 17
Volume 48
W
wireless mouse 1
World Wide Web xiii
World-Wide Warranty Terms
The EPSON Multi-Media Projector you purchased includes Epson's World-Wide Warranty, which allows you to obtain repair service for your product outside the country where you purchased it in over 45 countries in the world. Please note that the terms stated in the warranty card which accompanied your product, and not these world-wide terms, will apply to service sought in the country or countries covered by the card.
This warranty service is limited to the following countries.
AUSTRIA, BELGIUM, BULGARIA, CROATIA, CYPRUS, CZECH, DENMARK, FINLAND, FRANCE, GERMANY, GREECE, HUNGARY, IRELAND, ITALY, LUXEMBURG, MACEDONIA, NETHERLANDS, NORWAY, PORTUGAL, POLAND, ROMANIA, SLOVAKIA, SLOVENIA, SPAIN, SWEDEN, SWITZERLAND, TURKEY, UNITED KINGDOM and YUGOSLAVIA
ARGENTINA, BRAZIL, CHILE, COLOMBIA, PERU and VENEZUELA
AUSTRALIA, HONG KONG, JAPAN, KOREA, MALAYSIA, SINGAPORE and TAIWAN
This warranty service is subject to the following terms and conditions.
1) To obtain warranty service, you must present proof of the date you purchased your product, by showing the servicer either your purchase receipt or your warranty card (if the purchase date is shown on the card).
2) This warranty service will be implemented based on the warranty term and conditions that have been established by EPSON (or its authorized servicer) in the country where service is sought. However, Epson guarantees at least these service terms:
- The period of warranty is 12 months from the day of purchase.
- The warranty will cover at least the cost of parts and labor.
- Epson cannot guarantee that the servicer will be able to provide you with a replacement product while your product is being repaired.
3) This warranty service will not apply in to the following cases:
a. Failures or defects in consumables such as Lamps or optional equipment
b. In case the product was damaged due to inappropriate use or failure to properly use in accordance with details of this manual, or transportation
c. In case the product was repaired or modified by any party other than EPSON or an Epson-authorized servicer
d.Problems caused by optional equipment or consumables, other than original EPSON product or product of the same quality
Notice: The power supply cable packed with your projector is subject to the power supply condition of the country where you purchased. When using your projector in foreign countries, make sure to purchase the original EPSON power supply cable produced for each country.
SERVICE CONTACTS FOR THE EPSON WORLD WIDE WARRANTY ON PROJECTORS
This contact list is current as of 21st June, 1999.
For the latest contact information, please refer to the Web home page noted for the relevant country, or, if none is listed, refer to Epson's main Web page at www.epson.com.
AUSTRIA :
EPSON Support Center
Austria
Tech. Help Desk: 0810 200129
Web Address:
http://www.epson.at
BELGIUM :
EPSON Support Center
BeNeLux
Tech. Help Desk: 070 222083
Web Address:
http://www.epson.be
BULGARIA :
PROSOFT
- Al Jendov Str.
BG-1113 Sofia
Tel: 00359.2.730.231
Fax: 00359.2.9711049
E-mail: Prosoft@internet-BG.BG
CROATIA :
Recro d.d.
Trg. Sportova 11
HR-10000 Zagreb
Tel: 00385.1.6350.777
Fax: 00385.1.6350.716
E-mail: recro@recro.hr
Web Address:
http://www.recro.hr
CYPRUS :
CTC- INFOCOM
6a. Ionos Str., Engomi
P. O. Box 1744
2406 Nicosia, Cyprus
Tel: 00357.2.458477
Fax: 00357.2.668490
CZECH :
EPRINT s.r.o.
Stresovicka 49
CZ-16200 Praha 6
Tel: 00420.2.20180610
Fax: 00420.2.20180611
E-mail: eprint@mbox.vol.cz
DENMARK :
Tech. Help Desk: 80881127
FINLAND :
Tech. Help Desk: 0800.523010
(note. Some geographical
areas excluded)
FRANCE :
EPSON France,
Pouliadis Ass. Corp.
Aristotelous St. 3
GR-19674 Athens
Tel: 0030.1.9242072
Fax: 0030.1.9441066
HUNGARY :
R.A. Trade Kft.
Petöfi Sandor u. 64
H-2040 Budaör
Tel: 0036.23.415.317
Fax: 0036.23.417.310
IRELAND :
Tech. Help Desk: 01.6799016
ITALY :
EPSON Italia s.p.a.
Tech. Help Desk: 02.29400341
Web Address:
http://www.epson.it
LUXEMBURG :
EPSON Support Center
BeNeLux
Tech. Help Desk:
0032 70 222083
Web Address:
http://www.epson.be
MACEDONIA :
Rema Kompjuteri d.o.o.
St. Naroden Front 19a
lok 16
91000 Skopje/ Macedonia
Tel: 00389.91.118159
Fax: 00389.91.118159
NETHERLANDS :
EPSON Support Center
BeNeLux
Tech. Help Desk: 043 3515753
Web Address:
http://www.epson.nl
NORWAY :
Tech. Help Desk: 800.11828
PORTUGAL :
EPSON Portugal, S.A.
Tel: 0048.22.638.9782
Fax: 0048.22.638.9786
E-mail: office@for-ever.com.pl
ROMANIA :
MB Distribution S.R. L.
162, Barbu Vacarescu Blvd.
Sector 2
RO- 71422 Bucharest
Tel: 0040.1.2300314
Fax: 0040.1.2300313
E-mail: office@mbd-epson.ro
SLOVAKIA :
Print Trade spol. s.r.o.
Cajkovskeho 8
SK-98401 Lucenec
Tel: 00421.863.4331517
Fax: 00421.863.4325656
E-mail: Prntrd@lc.psg.SK
Web Address:
http://www.printtrade.sk
SLOVENIA :
Repro Ljubljana d.o.o.
Smartinska 106
SLO-1001 Ljubljana
Tel: 00386.61.1853411
Fax: 00386.61.1400126
SPAIN :
EPSON IBERICA, S.A.
Avda. Roma 18-26,
08290
Tech. Help Desk: 902.404142
E-mail: soporte@epson.es
Web Address:
http://www.epson.es
SWEDEN :
Tech. Help Desk: 08 445 1258
UNITED KINGDOM :
EPSON (UK) Ltd.
Campus 100, Maylands Avenue
Hemel Hempstead,
Herts, HP2 7TJ
Tech. Help Desk: 0990 133640
Web Address:
http://www.epson.uk
SWITZERLAND :
EXCOM Service AG
Moosacher Str. 6
CH-8820 Wädenswil
Tel: 01.7822111
Fax: 01.7822349
Web Address:
http://www.excom.ch
YUGOSLAVIA :
BS Procesor d.o.o.
Hadzi Nikole Zivkovica 2
11000 Beograd
Tel: 00381.11.639610
Fax: 00381.11.639610
TURKEY :
Romar Pazarlama
Sanayi ve TIC. A.S.
Rihtim Cad. No. 201
Tahir Han
TR-Karaköy-Istanbul
Tel: 0090.212.2520809
Fax: 0090.212.2580804
CANADA :
Epson Canada, Ltd.
100 Mural Street, Suite 300
Richmond Hill, Ontario
CANADA L4B IJ3
Tel: 905-709-3839
Web Address:
http://www.epson.com
COSTA RICA :
Epson Costa Rica, S.A.
Embajada Americana,
200 Sur y 300 Oeste
San Jose, Costa Rica
Tel: (50 6) 296-6222
Web Address:
http://www.epsoncr.com
MEXICO :
Epson Mexico, S.A. de C.V.
AV. Sonora #150
Mexico, 06100, DF
Tel: (52 5) 328-4008
Web Address:
http://www.epson.com.mx
U. S. A.:
Epson America, Inc.
3840 Kilroy Airport Way
Long Beach, CA90806
Tel: (562) 276-4394
Web Address:
http://www.epson.com
ARGENTINA :
Epson Argentina S.A.
Avenida Belgrano 964/970
(1192), Buenos Aires
Tel: (54 11) 4346-0300
Web Address:
Epson Venezuela S.A.
70 Gibbs Street Chatswood
NSW 2067 AUSTRALIA
Tel: 1300 361 054
Web Address:
http://www.epson.com.au
HONGKONG :
EPSON Technical Support
Centre
(Information Centre)
Rooms 4706-4710,
China Resources Building,
26 Harbour Road, Wan Chai,
HONG KONG
Tech. Hot Line: (852) 2585 4399
Fax: (852) 2827 4383
Web Address:
http://www.epson.com.hk
JAPAN :
SEIKO EPSON
CORPORATION
SHIMAUCHI PLANT
VD Customer Support Group:
4897 Shimauchi, Matsumoto-shi,
Nagano-ken, 390-8640 JAPAN
Tel: 0263-48-5438
Fax: 0263-48-5680
KOREA :
EPSON KOREA CO., LTD
17F HANSOL Bldg., 736-1,
Yaoksam-dong Kangnam-gu,
Seoul, 135-080, KOREA
Tel: 2-553-3515
Fax: 2-5584271
http://www.epson.co.kr
MALAYSIA :
EPSON TRADING
(MALAYSIA) SDN. BHD.
No. 21 Jalan U 1/19, Seksyen U1,
Hicom-grenmarie Industrial
Park, 40150 Shan Alam,
Selangor Darul Ehsan
Tel: 03-5191366
Fax: 03-5191386
SINGAPORE :
EPSON SINGAPORE
PTE. LTD.
401 Commonwealth Drive
10F, No.287, Nanking East Road,
Section 3, Taipei, Taiwan, China.
Tel: 02-2717-7360 ext. 327
Fax: 02-2713-2155
http://www.epson.com.tw
THAILAND :
Epson (Thailand) Co., Ltd.
24th Floor, Empire Tower,
195 South Sathorn Road, Yannawa,
Sathorn, Bangkok 10120, Thailand.
Tel: 6700680 Ext. 309, 316, 317
Fax: 6700688
http://www.epson.co.th
Epson Technical Center
21st Floor, Payathai Tower,
128/227 Payathai Road, Rachataewee,
Bangkok 10400, Thailand.
Tel: 6120291-3
Fax: 2165005
http://www.epson-tech.in.th
DECLARATION of CONFORMITY
According to 47CFR, Part 2 and 15
Declare under sole responsibility that the product identified herein, complies with 47CFR Part 2 and 15 of the FCC rules as a Class B digital device. Each product marketed, is identical to the representative unit tested and found to be compliant with the standards. Records maintained continue to reflect the equipment being produced can be expected to be within the variation accepted, due to quantity production and testing on a statistical basis as required by 47CFR §2.909 Operation is subject to the following two conditions: (1) this device may not cause harmful interference, and (2) this device must accept any interference received, including interference that may cause undesired operation.
Representative : EPSON AMERICA, INC.
Address : 3840 Kilroy Airport Way
MS : 3-13
Long Beach, CA90806-2469
Telephone : (562) 290-5254
Manufacturer : SEIKO EPSON CORPORATION
Address : 3-5, Owa 3-Chome, Suwa-shi, Nagano-ken 392-8502 Japan
Trade Name : EPSON
Type of Product : LCD Projector
Type of Device : Class B personal computers and peripherals
Model : ELP-710/700/500
We hereby declare that the equipment specified above conforms to the above Standards.
FCC Compliance Statement For United States Users
This equipment has been tested and found to comply with the limits for a Class B digital device, pursuant to Part 15 of the FCC Rules. These limits are designed to provide reasonable protection against harmful interference in a residential installation. This equipment generates, uses, and can radiate radio frequency energy and, if not installed and used in accordance with the instructions, may cause harmful interference to radio or television reception. However, there is no guarantee that interference will not occur in a particular installation. If this equipment does cause interference to radio and television reception, which can be determined by turning the equipment off and on, the user is encouraged to try to correct the interference by one or more of the following measures.
- Reorient or relocate the receiving antenna.
- increase the separation between the equipment and receiver.
- Connect the equipment into an outlet on a circuit different from that to which the receiver is connected.
- Consult the dealer or an experienced radio/TV technician for help.
WARNING
The connection of a non-shielded equipment interface cable to this equipment will invalidate the FCC Certification or Declaration of this device and may cause interference levels which exceed the limits established by the FCC for this equipment. It is the responsibility of the user to obtain and use a shielded equipment interface cable with this device. If this equipment has more than one interface connector, do not leave cables connected to unused interfaces. Changes or modifications not expressly approved by the manufacturer could void the user's authority to operate the equipment.
For Canadian Users
FCC Compliance Statement For United States Users
This equipment has been tested and found to comply with the limits for a Class B digital device, pursuant to Part 15 of the FCC Rules. These limits are designed to provide reasonable protection against harmful interference in a residential installation. This equipment generates, uses, and can radiate radio frequency energy and, if not installed and used in accordance with the instructions, may cause harmful interference to radio or television reception. However, there is no guarantee that interference will not occur in a particular installation. If this equipment does cause interference to radio and television reception, which can be determined by turning the equipment off and on, the user is encouraged to try to correct the interference by one or more of the following measures.
- Reorient or relocate the receiving antenna.
- increase the separation between the equipment and receiver.
- Connect the equipment into an outlet on a circuit different from that to which the receiver is connected.
- Consult the dealer or an experienced radio/TV technician for help.
WARNING
The connection of a non-shielded equipment interface cable to this equipment will invalidate the FCC Certification or Declaration of this device and may cause interference levels which exceed the limits established by the FCC for this equipment. It is the responsibility of the user to obtain and use a shielded equipment interface cable with this device. If this equipment has more than one interface connector, do not leave cables connected to unused interfaces. Changes or modifications not expressly approved by the manufacturer could void the user's authority to operate the equipment.
For Canadian Users
natural_image
Black and white sky with scattered clouds against a dark background (no text or symbols)EPSON®
E
Printed in Japan 75420207
- MULTI MEDIA PROJECTOR
- Important Information
- Important Safety Information
- QUICK START
- Button Function
- EPSON®
- EMP-710/700/500™
- Contents
- Contents iii
- Introduction vii
- Installation 1
- Using the Projector 27
- Using the Projector Menus 41
- Maintenance 55
- Troubleshooting 61
- Technical Specifications 67
- Glossary 73
- Index 75
- World-Wide Warranty Terms 77
- Introduction
- Getting the Most Out of Your Projector
- Optional Accessories
- About This Manual
- Safety Instructions
- Where to Get Help
- World Wide Web site
- Transporting your projector
- Installation
- Unpacking the Projector
- Additional Components
- Setting Up the Projector
- Connecting to a Computer
- Connecting to a PC Desktop Computer
- Connecting the Computer
- Connecting the Mouse Cables
- Connecting the Audio Cable
- Connecting to a PC Laptop Computer
- Connecting the Computer Cable
- Connecting to a Desktop Macintosh
- Connecting to a PowerBook
- Connecting to a Video Source
- Connecting to an External Speaker or PA System
- Using the Projector
- Turning the Equipment On and Off
- Turning the Projector On and Off
- Focusing and Positioning the Screen Image
- Resize Button
- Controlling the Projector
- Using the Remote Control
- Using the Operation Panel
- Projector Status Indicators
- Operation Indicator
- Color Status Meaning
- Lamp Indicator
- Temperature Indicator
- 3
- Using the Projector Menus
- Accessing the Main Menu
- Changing a Menu Setting
- Menu Options
- Video Menu (Image source = Computer)
- Menu item Description
- Video Menu (Image source = Video)
- Audio Menu
- Effect Menu
- Setting Menu
- User's Logo Menu
- Storing a User Logo
- Assigning the Logo to the A/V Mute Button
- Reset All Menu
- Advanced Menu
- About Menu
- Maintenance
- Cleaning the Lens
- Cleaning the Projector Case
- Cleaning the Air Filter
- Replacing the Lamp
- Troubleshooting
- Problems with the Projector
- ☐ The temperature indicator is red.
- Problems with the Image or Sound
- Technical Specifications
- General
- Projector Lamp
- Supported Monitor Displays
- Computer In connector pin assignments
- DECLARATION of CONFORMITY/DICHIARAZIONE di CONFORMITÀ/KONFORMITÄUNG/DECLARACIÓN de CONFORMIDAD/DECLARATION de CONFORMITE
- Directive 89/336/EEC
- Directive 73/23/EEC
- Glossary
- Index
- A
- B
- C
- D
- E
- F
- G
- I
- M
- N
- O
- P
- R
- s
- T
- U
- V
- W
- World-Wide Warranty Terms
- SERVICE CONTACTS FOR THE EPSON WORLD WIDE WARRANTY ON PROJECTORS
- ARGENTINA :
- DECLARATION of CONFORMITY
- FCC Compliance Statement For United States Users
- WARNING
- For Canadian Users
Brand : EPSON
Model : EMP-710
Category : Video projector