
Mi4004 - Alarm Clock MEMOREX - Free user manual and instructions
Find the device manual for free Mi4004 MEMOREX in PDF.


| Product Type | Alarm Clock Radio |
| Brand | Memorex |
| Model | Mi4004 |
| Dimensions (approx.) | 5.1 x 2.4 x 3.5 inches |
| Weight (approx.) | 0.5 lbs |
| Power Supply | AC 120V ~ 60Hz or 2 x AAA batteries (backup) |
| Radio Bands | FM / AM |
| Alarm Type | Buzzer or radio |
| Snooze Function | Yes, 9 minutes |
| Display | LED digital clock with adjustable brightness |
| Controls | Rotary knobs and push buttons |
| Wake-up Options | Radio or alarm beep |
| Sleep Timer | Yes, up to 90 minutes |
| Battery Backup | Maintains time/alarm during power outage |
| Care Instructions | Clean with soft dry cloth; avoid liquids |
| Safety Warnings | Keep away from water and heat sources |
| Spare Parts | Not available; unit is non-serviceable |
| User Manual | Available for download in PDF |
Frequently Asked Questions - Mi4004 MEMOREX
User questions about Mi4004 MEMOREX
0 question about this device. Answer the ones you know or ask your own.
Ask a new question about this device
Download the instructions for your Alarm Clock in PDF format for free! Find your manual Mi4004 - MEMOREX and take your electronic device back in hand. On this page are published all the documents necessary for the use of your device. Mi4004 by MEMOREX.
USER MANUAL Mi4004 MEMOREX
iWake Clock Radio with Dual Alarm

natural_image
Illustration of a digital alarm clock with a 12:00 time display and a remote control (no text or symbols on the device itself)Before operating this product, please read these instructions completely.
SAFETY PRECAUTIONS

natural_image
Black triangular warning sign with white lightning bolt symbol (no text)CAUTION
RISK OF ELECTRIC SHOCK DO NOT OPEN

natural_image
Black triangular warning symbol with exclamation mark (no text or numbers)CAUTION: TO REDUCE THE RISK OF ELECTRIC SHOCK, DO NOT REMOVE COVER (OR BACK). NO USER-SERVICEABLE PARTS INSIDE. REFER SERVICING TO QUALIFIED SERVICE PERSONNEL.

DANGEROUS VOLTAGE:
The lightning flash with arrowhead symbol within an equilateral triangle is intended to alert the user to the presence of uninsulated dangerous voltage within the product's enclosure that may be of sufficient magnitude to constitute a risk of electric shock to persons.

ATTENTION:
The exclamation point within an equilateral triangle is intended to alert the user to the presence of important operating and maintenance (servicing) instructions in the literature accompanying the appliance.
FCC WARNING:
This equipment may generate or use radio frequency energy. Changes or modifications to this equipment may cause harmful interference unless the modifications are expressly approved in the instruction manual. The user could lose the authority to operate this equipment if an unauthorized change or modification is made.
ATTENTION:
POUR ÉVITER LES CHOC ÉLECTRIQUES, INTRODUIRE LA LAME LA PLUS LARGE DE LA FICHE DANS LA BORNE CORRESPONDANTE DE LA PRISES ET POUSSER JUSQU'AU FOND.

Symbol is a trademark of SRS Labs, Inc.
WOW technology is incorporated under license from SRS Labs, Inc.
SAFETY PRECAUTIONS
INFORMATION:
This equipment complies with Class B digital device regulations. This equipment generates, uses and can radiate radio frequency energy and, if not installed and used in accordance with the instructions, may cause harmful interference to radio communications. However, there is no guarantee that interference will not occur in a particular installation. If this equipment does cause harmful interference to radio or television reception, which can be determined by turning the equipment off and on, the user is encouraged to try to correct the interference by one or more of the following measures:
- Reorient or relocate the receiving antenna.
- Increase the separation between the equipment and receiver.
- Connect the equipment into an outlet on a circuit different from that to which the receiver is connected.
- Consult the dealer or an experienced radio/TV technician for help.
WARNING: TO PREVENT FIRE OR SHOCK HAZARD, DO NOT EXPOSE THIS UNIT TO RAIN OR MOISTURE.
SURGE PROTECTORS:
It is recommended to use a surge protector for AC connection. Lightning and power surges ARE NOT covered under warranty for this product.
This Class B digital apparatus complies with Canadian ICES-003.
- TUNE Up/Down/Skip ▶ / ▶ Buttons
- iPod ® Dock with Connector & Interchangeable Universal Docks
- VOLUME Up/Down Buttons
- Power Button
- iPod ^ /LINE IN Button
- AM/FM Button
- Left Speaker
-
Display
-
TIME SET Button
- HR (Hour) Button
- MN (Minute) Button
- AL1 SET Button
- AL2 SET Button
- ALARM 2 Button
- ALARM 1 Button
- SNOOZE/SLEEP Button
- Right Speaker
- Remote Sensor
LOCATION OF CONTROLS (CONTINUED)
REAR

- DIMMER Switch
- DC 13.5V IN Jack
- LINE IN Jack
- FM Wire Antenna
- DST (Daylight Savings Time) Switch
- Headphones Jack
- Battery Compartment (Bottom of Unit)
LOCATION OF CONTROLS (CONTINUED)
REMOTE

- Battery Compartment (Side of Unit)
- TUNE Down/Skip Button
- VOLUME Down Button
-
MODE Button
-
VOLUME Up Button
- Power/PLAY/PAUSE (▶II) Button
- TUNE Up/Skip ▶▶ Button
- Belt Clip
NOTES:
- The remote buttons function in the same way as the buttons on the main unit.
- To switch between modes (AM/FM, LINE IN or iPod®, use the MODE button.
• To turn on the unit, press the Power/PLAY/PAUSE (▶II) button. To turn the unit off, press and hold the Power/PLAY/PAUSE (▶III) button until the unit turns off, then release the button. - For the Belt Clip, simply clip it to a non-slip location such as your belt, purse or backpack.
POWER SOURCE
AC CONNECTION
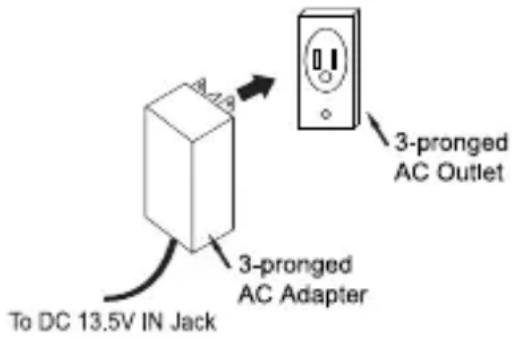
Insert the small end of the AC adapter into the DC 13.5V IN jack (located on the rear of the unit). Connect the other end to a wall outlet having 120V AC, 60 Hz. AC Adapter, DC 13.5V ☑
NOTES:
- The AC adapter supplied with the unit is polarized to help minimize the possibility of electric shock. If the AC plug does not fit into a nonpolarized AC outlet, do not file or cut the wide blade. It is the user's responsibility to have an electrician replace the obsolete outlet.
- Remove both the DC plug and the AC-IN plug to disconnect the AC adapter when not in use.
- Only use the supplied AC Adapter which has the following specs: DC 13.5V ⊙⊖⊕
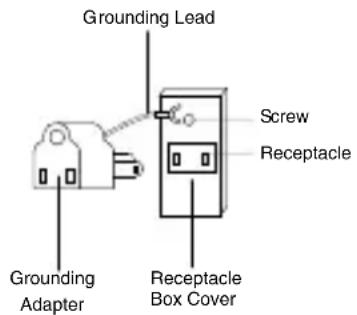
When Using a 3-pronged Plug
When using a grounding adapter, make sure the receptacle box is fully grounded.
BACKLIGHT
When the AC adapter is connected to the unit, the LCD backlight will always be on.
BATTERY INSTALLATION
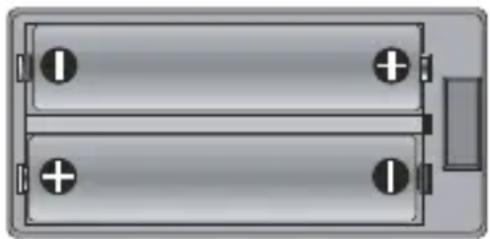
Two (2) “AAA” size batteries can also be used to power and/or to provide a backup for the clock and alarm time for this unit as follows:
- Open the battery door by pushing in on the tab, then removing the door.
-
Insert two (2) "AAA" batteries as shown. Alkaline batteries are recommended for the longest playing time.
-
Place the battery door back on the compartment.
natural_image
Diagram of a battery pack with two plates and four terminals (no text or symbols)NOTES:
- The batteries are used to back-up the clock and alarm times when the AC adapter is disconnected or there is a power failure.
- The battery indicator will appear or blink in the display when there are no batteries or the batteries are low and need replacing.
IMPORTANT! See BATTERY PRECAUTIONS on the next page.
POWER SOURCE (CONTINUED)
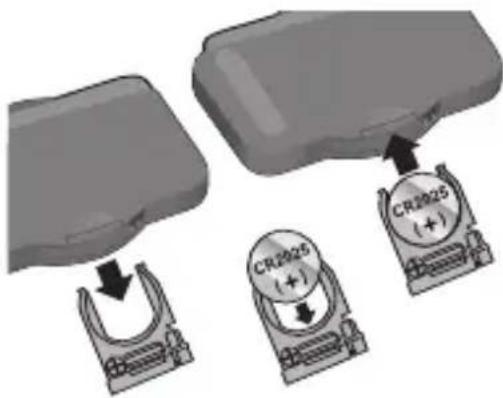
REMOTE BATTERY INSTALLATION
-
Remove the Battery Compartment by pressing in on the tab and then sliding the compartment out.
-
Install a CR2025 battery, paying attention to the polarity diagram in the Battery Compartment (positive side up).
-
Replace the Battery Compartment.
BATTERY PRECAUTIONS
Follow these precautions when using batteries in this device:
- Use only the size and type of batteries specified.
- Be sure to follow the correct polarity when installing the batteries as indicated in the Battery Compartment. A reversed battery may cause damage to the device.
- If the device is not to be used for a long period of time, remove the batteries to prevent damage or injury from possible battery leakage.
- Do not try to recharge a battery not intended to be recharged; it can overheat and rupture. (Follow battery manufacturer's directions.)
INSERTING AN IPOD®
1
natural_image
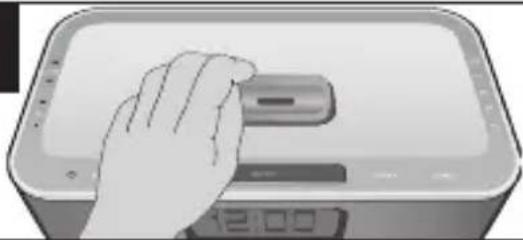
Hand pressing a button on a digital device (no text or symbols visible)Locate the correct iPod® Universal Dock to use as shown on pages 16-17. Insert the dock into the cavity (as shown), making sure the tabs are facing front, and slip the tabs into place.
2

Press the rear side of the holder until it is positioned inside the cavity.
NOTE: To remove the holder, insert your finger (or other object) into the gap in the holder, then gently pull the holder out to remove it.
3

natural_image
Illustration of a portable electronic device with a mounted screen and base (no text or symbols visible)If using the dock: Insert the iPod® onto the holder. Gently push down so the connector on the iPod® slides onto the connector on the Mi4004. If the Mi4004 is turned off, once you connect the iPod®, it will start charging the battery until it is full. If the Mi4004 is turned on and in AM/FM/LINE IN mode, once the iPod® is connected, the Mi4004 will change to iPod® mode automatically. Then, if you disconnect the iPod®, the Mi4004 will revert back to the AM/FM/LINE IN mode. When the iPod® is connected to the Mi4004, it will be in the Pause mode.
4
natural_image
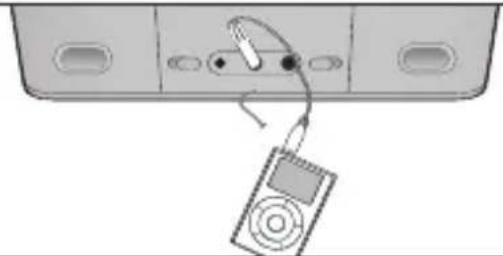
Diagram showing a device being connected to a screen, with no visible text or symbolsIf using the LINE IN jack: Insert an audio cable (not included) into the LINE OUT jack on your player and the other end into the LINE IN jack on the rear of the Mi4004. Press the Power button to turn this unit on, then press the iPod®/LINE IN button to select the LINE IN mode. The external player's output sound will be heard through the Mi4004's speakers. If the Mi4004 is already on, when you connect the external unit to it, the Mi4004 will change to LINE IN mode automatically. If you disconnect the external unit from the LINE IN jack, the Mi4004 will revert back to the AM/FM/iPod® mode.
NOTES:
- CHARGING: When the iPod ^ is inserted into the dock, whether the Mi4004 is on or off, the iPod's ^ battery will charge until it is full.
- CHANGING THE MODE: If units are connected to the dock AND the LINE IN jack, you can press the iPod®/LINE IN or AM/FM button repeatedly to select between iPod (dock)/LINE IN/AM/FM mode as desired. (You will not be able to select between iPod/LINE IN mode, if there is no device or iPod® connected to the LINE IN jack or the iPod® dock.) To turn off the unit, press the Power button.
OPERATION
USING AN IPOD® WITH THIS UNIT

natural_image
Illustration of a portable electronic device with a CD and a scroll, no text or symbols presentWith an iPod ^® connected (see previous page), turn the Mi4004 on by pressing the Power button (if it is not on already); “iPod” will appear in the display.
NOTE: If the Mi4004 is in a mode other than iPod ^® , press the iPod ^® /LINE IN button to select iPod ^® mode.

natural_image
Illustration of a portable electronic device with a digital display and an arrow pointing to it (no text or symbols)Operate the iPod® as per its owner's manual and the sound will be heard through the Mi4004's speakers.
Adjust the volume as desired by pressing the Volume Up/Down buttons.

natural_image
Illustration of an outdoor electronic device with a CD and antenna, no text or symbols presentFor private listening, plug in headphones into the Headphones jack on the rear of the Mi4004. The speakers will be disconnected when headphones are plugged in. When done, press the Power button and also turn off the iPod®.
NOTES:
- When the iPod ® is inserted into the dock, you can press the TUNE Up/Down/Skip ▶/▲ buttons to skip to the beginning of the current track/previous or next track.
- The default volume setting level is 6. After you have adjusted the volume setting, if you turn the unit off and then on again, the volume level will be set back to the default level of 6.
OPERATION (CONTINUED)
USING THE RADIO
natural_image
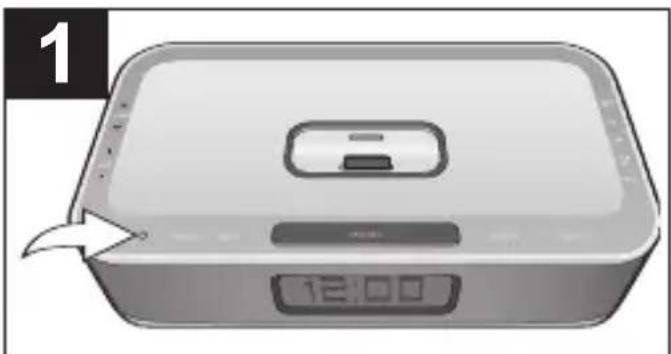
Illustration of a digital kitchen appliance with a clock and indicator lights (no text or symbols on the device itself)Turn the Mi4004 on by pressing the Power button; "AM" or "FM" will appear in the display.

natural_image
Illustration of a rectangular electronic device with a digital display and control panel, no visible text or symbols.Press the AM/FM button repeatedly to select the desired band (AM or FM).

natural_image
Top-down view of a smartphone with a button and arrow indicator (no text or symbols)Repeatedly press the TUNE Up/Down/Skip ▶ / ◀ buttons to manually advance the frequency in the display up or down until the desired frequency appears.
For auto tuning, press and hold the TUNE Up/Down/Skip ▶/◀ buttons until the frequency in the display starts to scan and then release; the tuner will search and then stop on the next strong station it finds. Repeat this step until the desired frequency appears in the display.
NOTE: When a station is tuned, after five seconds, the radio frequency will disappear and the actual time will reappear in the display. If you press the TUNE Up/Down/Skip ▶/◀ buttons, the radio frequency will appear in the display again.
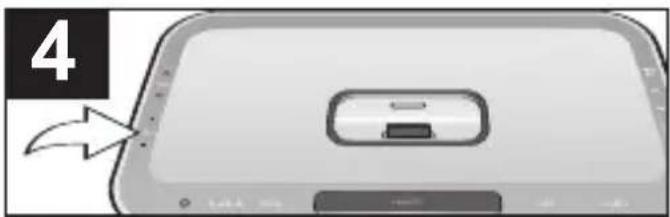
Adjust the volume as desired by pressing the Volume Up/Down buttons.
For private listening, plug in headphones into the Headphones jack on the rear of the Mi4004. The speakers will be disconnected when headphones are plugged in.
Antennas
FM: Unravel and extend the FM wire antenna for best reception.
AM: Turn the unit for better AM reception. Also, move the AC adapter 1.5ft. away from the main unit to prevent interference to the AM signal.
OPERATION (CONTINUED)
TO SET OR RESET THE ACTUAL TIME

natural_image
Digital alarm clock with digital display showing 12:00, no visible text or symbols on the device itselfWith the power off, press the TIME SET button; the time will blink.
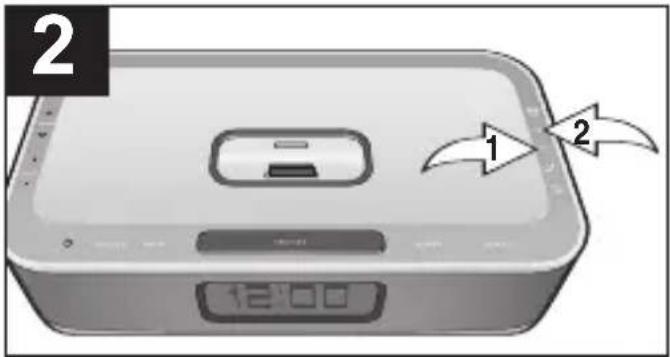
Within 5 seconds, press the MN (Minute) button ① to set the present minute and the HR (Hour) button ② to set the present hour. Make sure to set the correct AM/PM setting.

natural_image
Digital alarm clock with digital display showing 12:00, no visible text or symbols on the device itselfPress the TIME SET button (or wait approx. 5 seconds) and the time will be set.
DST (DAYLIGHT SAVINGS TIME)

natural_image
Diagram of a computer monitor rear panel with ports and an arrow indicating a location (no text or symbols present)For your convenience, there is a DST (Daylight Savings Time) switch located on the rear of the unit. Slide the switch to +1 to add an hour to the actual time or slide the switch to -1 to subtract an hour from the actual time.
OPERATION (CONTINUED)
TO SET OR RESET THE ALARM TIME
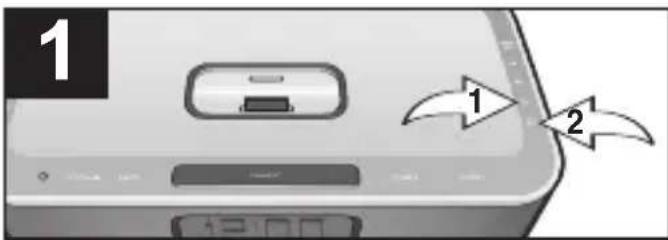
With the power off, press either the AL1 SET button ① (to set Alarm 1) or AL2 SET button ② (to set Alarm 2); the Alarm time will blink in the display.

Within 5 seconds, press the MN (Minute) button ① to set the alarm minute and the HR (Hour) button ② to set the alarm hour. Make sure to set the correct AM/PM setting. Press the AL1 SET button ③ or AL2 SET button ④ again (or wait approx. 5 seconds); the alarm time will stop blinking.

Repeatedly press the ALARM 1 ① or ALARM 2 ② button to select alarm off, alarm on for buzzer, radio or iPod®.
NOTE: Make sure the corresponding indicator (BUZZ/RADIO/iPod) appears in the display.

If set to Radio, within 5 seconds, set the band (AM or FM) using the AM/FM button ① and the frequency using the Tune/Skip/Search ▶ or ◀ button ②. When the alarm time is reached, the unit will turn on the band (AM or FM) and the frequency that you selected.
NOTE: When you have selected the radio band and frequency, after 5 seconds, the radio frequency will be set and the actual time will appear in the display again.
CONTINUED ON THE NEXT PAGE
OPERATION (CONTINUED)
5

natural_image
Illustration of a portable electronic device with a mounted screen and indicator lights (no text or symbols visible)If set to iPod ^® , insert the iPod ^® as shown on page 8. Then, using the controls on the iPod ^® , select the track that you would like to wake to and put the iPod ^® into Pause mode. DO NOT turn the iPod ^® off; let it go to sleep by itself. When the alarm time is reached, the unit will start playback on the track that you selected and the tracks following it in the playlist. The Mi4004 will playback for 20 minutes then turn off automatically or, if the remaining playlist has less than 20 minutes of playback time remaining, the Mi4004 will just playback the remaining time of the playlist and then stop.
NOTES:
- It is not necessary to set the volume level for the alarm. When the alarm time is reached, the alarm volume level will be set to the minimum (Level 1) and it will increase one step every five seconds continuously until Volume Level 12 is reached.
- When the actual time matches the selected preset alarm time(s), if set to Radio or Buzzer, the unit will automatically turn on for 20 minutes and then shut off. If set to iPod®, the unit will start playback on the track that you selected and the tracks following it in the playlist. The unit will playback for 20 minutes then turn off automatically or, if the remaining playlist has less than 20 minutes of playback time remaining, the unit will just playback the remaining time of the playlist and then stop.
• TO SHUT OFF THE ALARM, see TO SHUT THE ALARM OFF section on the next page. - While the alarm is sounding, if the other alarm reaches the alarm time, the first alarm will stop sounding and the second alarm will start sounding.
- Make sure you have disconnected the headphones from the Headphones jack (rear of the unit) and disconnected the audio cable from the LINE IN jack (rear of the unit); otherwise, there will be no sound when the actual time matches the preset alarm time.
OPERATION (CONTINUED)
TO SHUT THE ALARM OFF

If the alarm was set to BUZZ, press the ALARM 1 ① or ALARM 2 ② button (which corresponds to the alarm that was set) and the alarm will turn off and NOT be set for the next day. To set the alarm for the next day, press the ALARM 1 ① or ALARM 2 ② button repeatedly to select between alarm on for buzzer, radio or iPod® again.

If the alarm was set to Radio or iPod®, press the Power button ① to turn off the alarm and the alarm will be set for the next day. To not set the alarm for the next day, press the ALARM 1 ② or ALARM 2 ③ button (which corresponds to the alarm that was set) repeatedly until "ALARM 1" or "ALARM 2" disappear from the display.
NOTE: While the alarm is on, if you press any button on the unit (except the SNOOZE/SLEEP button or the Power button), the unit will change from Alarm mode to normal Power On mode, so you can adjust any setting (i.e., volume level, radio frequency, etc.) as desired.
SNOOZE
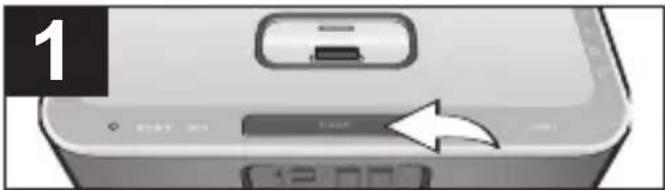
While the alarm is sounding, press the SNOOZE/SLEEP button; the SNOOZE indicator will appear in the display. Also, "10" will appear in the display for five seconds and then revert back to the actual time. The alarm will turn back on automatically ten minutes later.
natural_image
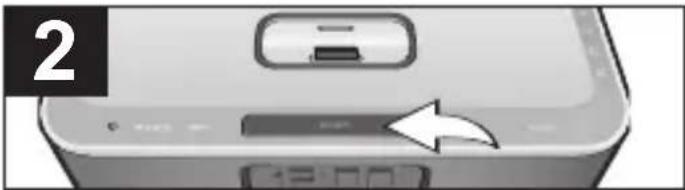
Close-up of a white electronic device with a digital display and control panel, no visible text or symbolsTo set the SNOOZE time to a time other than 10 minutes, when "10" appears in the display, press the SNOOZE/SLEEP button again. Each press of the SNOOZE/SLEEP button will increase the SNOOZE time by five minutes (up to "60" for 60 minutes). Once you stop pressing the button, the display will show the SNOOZE time for five seconds and then revert back to the actual time. The alarm will turn back on according to the SNOOZE time set.
NOTE:
- To cancel the SNOOZE function (the alarm will not turn back on), press the ALARM 1 or ALARM 2 button (which corresponds to the alarm that was set)—the SNOOZE indicator will disappear from the display—and repeatedly press to select between alarm off (alarm will not be set for the next day) or alarm on for buzzer, radio or iPod® (alarm will be set for next day).
OPERATION (CONTINUED)
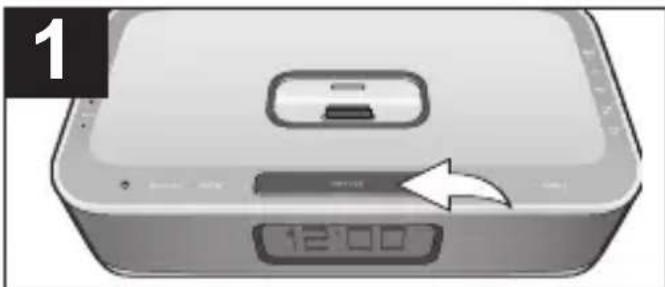
SLEEP DIMMER SWITCH
natural_image
Digital alarm clock with digital display showing 12:00, no visible text or symbols on the device itselfWith the unit in the LINE IN, iPod® or Radio mode, press the SNOOZE/SLEEP button; the SLEEP indicator and "10" will appear in the display for five seconds which indicates the unit will turn off after 10 minutes. Repeatedly press the SNOOZE/SLEEP button to select the SLEEP time, up to 60 minutes (i.e., "20"-turns off automatically after 20 minutes, "30"-turns off automatically after 30 minutes, etc.). After five seconds, the SLEEP time will disappear from the display. To view the remaining SLEEP time, press the SNOOZE/SLEEP button once. Repeatedly press the SNOOZE/SLEEP button to increase the SLEEP time; each press will increase the SLEEP time by 10 minutes.
NOTE: To cancel the SLEEP function, repeatedly press the SNOOZE/SLEEP button until the "SLEEP" indicator disappears from the display.
natural_image
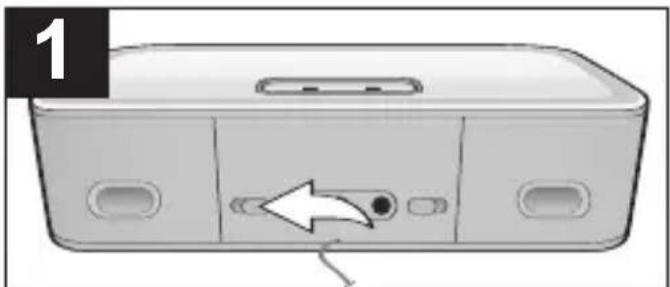
Diagram of a device rear panel with a directional arrow indicating movement or force (no text or symbols)Slide the DIMMER switch to adjust the dimmer of the display. If the display is too dim, slide the DIMMER switch towards "H" for a brighter display. Slide the DIMMER switch towards "L" for a less bright display.
OPERATION (CONTINUED)
IPOD® UNIVERSAL DOCKS
Locate your iPod® in the chart on the next two pages and select the respective Universal Dock (the Universal Dock No. is engraved at the front of the Universal Docks as shown on the next page) to match with your iPod®. Insert the corresponding Universal Dock and your iPod® into the unit as described on page 8.
| iPod^® | Type Memory Univ. Dock No. | ||
 | Fourth Generation iPod® | 10 to 15GB | No. 4 |
| 30GB | No. 5 | ||
 | iPod^® Photo | 30GB | No. 6 |
| 40 to 60GB | No. 7 | ||
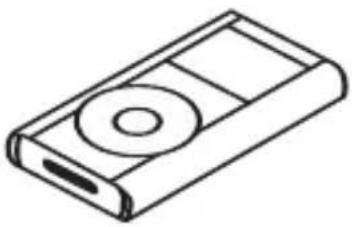 | iPod^® mini | 4 to 6GB | No. 3 |
OPERATION (CONTINUED)
| iPod® | Type Memory Univ. Dock No. | ||
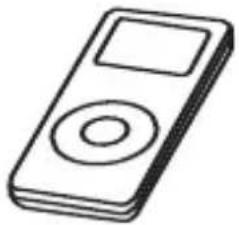 | iPod® nano | 2 to 4GB | Please use the Universal Dock included with your iPod®. |
 | Fifth Generation iPod® (w/Video) | 30GB | |
| 60GB | |||
NOTE:
- The 5 holders provided with this unit are Universal Docks.
IMPORTANT! The Universal Dock No. is engraved at the front of the docks. Please refer to the illustration below for the location of the Universal Dock No.

natural_image
Simple line drawing of a mechanical component with a lightning bolt and label '5' (no text or symbols beyond basic lines)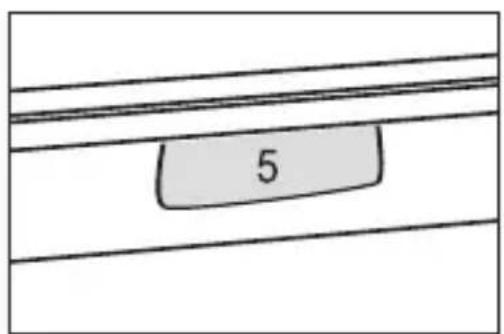
TROUBLESHOOTING GUIDE
If you experience a problem with this unit, check the chart below before calling for service.
| SYMPTOM CAUSE SOLUTION | ||
| No sound. Volume is Increase volume.set to minimum. | ||
| AM or FM, no sound. Power is not on. Press the Power button,then the AM/FM button to select AM/FM. | ||
| AM/FM, poor sound. Station is not tuned Retune the AM or FM properly. broadcast station. | ||
| iPod® mode, no sound. Incorrectly connected. Check the connection. | ||
| Time reset to “12:00”. Batteries connected Check the batteries.improperly, not connected or dead. | ||
| Clock not set. | Set the clock. | |
| Alarm does not turn on. | Alarm is not activated or set properly. | Set and activate alarm as described on page 12. |
| Clock is not set. | Set the clock. | |
SPECIFICATIONS
GENERAL:
Power Source ......DC 13.5V Adapter (Center Positive)
Battery Backup......2 x 1.5V “AAA” size batteries
Speaker....2 x 4 ohms
Output Power 2 x 5W
RADIO SECTION:
Frequency Range (FM) 87.5–108 MHz
Frequency Range (AM) 520–1710 KHz
Specifications are subject to change without notice.
FOR ADDITIONAL SET-UP OR OPERATING ASSISTANCE, PLEASE VISIT OUR WEBSITE AT:
WWW.MEMOREXELECTRONICS.COM
OR CONTACT CUSTOMER SERVICE AT (954) 660-7100.
PLEASE KEEP ALL PACKAGING MATERIAL FOR AT LEAST 90 DAYS IN CASE YOU NEED TO RETURN THIS PRODUCT TO YOUR PLACE OF PURCHASE OR MEMOREX.
FOR PARTS AND ACCESSORIES, CONTACT FOX INTERNATIONAL AT 1-800-321-6993.
Memcorp, Inc.
Weston, FL
Printed in Hong Kong
Visit our website at www.memorexelectronics.com
Mi4004 Suffix/Sujijo A
natural_image
Black triangular warning symbol with a white lightning bolt inside, indicating electrical hazard (no text)CUIDADO
RIESGO DE DESCARGA ELÉCTRICA. NO ABRIR

natural_image
Black triangular warning symbol with exclamation mark (no text or numbers)natural_image
Diagram of a dual-chamber battery pack with two leads and one terminal block (no text or symbols)FUENTES DE ENERGÍA (CONTINÚA)
natural_image
Hand pressing a button on a digital device (no text or symbols visible)natural_image
Illustration of a portable electronic device with a mounted screen and base (no text or symbols visible)natural_image
Diagram showing a device with a scroll and cable connecting to a panel (no text or symbols visible)natural_image
Illustration of a CD or DVD player with an open lid and control panel, no text or symbols presentnatural_image
Illustration of a portable electronic device with a digital display and control panel, showing no text or symbols.natural_image
Illustration of an electronic device with a CD and a scroll, no text or symbols presentnatural_image
Illustration of a digital kitchen appliance with a clock and indicator lights (no text or symbols on the device itself)natural_image
Illustration of a rectangular electronic device with a digital display and control panel, no visible text or symbols.natural_image
Top-down view of a smartphone showing the front panel with a button and arrow indicator (no text or symbols)natural_image
Digital kitchen appliance with digital clock and control buttons, no visible text or symbols on the device itselfnatural_image
Digital kitchen appliance with digital display and control buttons, no visible text or symbols on the device itselfnatural_image
Diagram of a computer monitor rear panel with ports and an arrow indicating a cable or connector (no text or symbols present)natural_image
Illustration of a portable electronic device with a mounted screen and indicator lights (no text or symbols visible)natural_image
Close-up of a white electronic device with a digital display and control panel, no visible text or symbolsnatural_image
Digital alarm clock with digital display showing 12:00, no visible text or symbols on the device itselfnatural_image
Diagram of a device rear panel with a directional arrow indicating movement or force (no text or symbols)natural_image
Simple line drawing of a hand holding a tool with a lightning bolt and label '5' (no text or symbols beyond basic lines)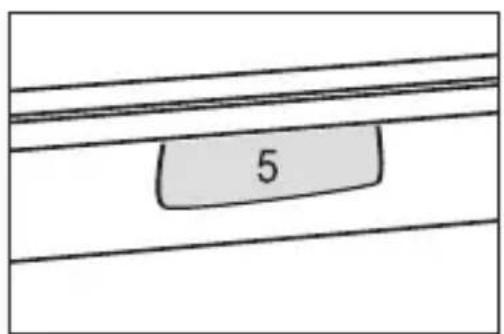
GUÍA DE DIAGNÓSTICO
- SAFETY PRECAUTIONS
- CAUTION
- DANGEROUS VOLTAGE:
- ATTENTION:
- FCC WARNING:
- INFORMATION:
- WARNING: TO PREVENT FIRE OR SHOCK HAZARD, DO NOT EXPOSE THIS UNIT TO RAIN OR MOISTURE.
- SURGE PROTECTORS:
- LOCATION OF CONTROLS (CONTINUED)
- REAR
- REMOTE
- NOTES:
- POWER SOURCE
- AC CONNECTION
- BACKLIGHT
- BATTERY INSTALLATION
- POWER SOURCE (CONTINUED)
- REMOTE BATTERY INSTALLATION
- BATTERY PRECAUTIONS
- INSERTING AN IPOD®
- 1
- 2
- 3
- 4
- OPERATION
- USING AN IPOD® WITH THIS UNIT
- OPERATION (CONTINUED)
- USING THE RADIO
- Antennas
- TO SET OR RESET THE ACTUAL TIME
- DST (DAYLIGHT SAVINGS TIME)
- TO SET OR RESET THE ALARM TIME
- CONTINUED ON THE NEXT PAGE
- 5
- TO SHUT THE ALARM OFF
- SNOOZE
- NOTE:
- SLEEP DIMMER SWITCH
- IPOD® UNIVERSAL DOCKS
- TROUBLESHOOTING GUIDE
- SPECIFICATIONS
- GENERAL:
- RADIO SECTION:
- Mi4004 Suffix/Sujijo A
- CUIDADO
- FUENTES DE ENERGÍA (CONTINÚA)
- GUÍA DE DIAGNÓSTICO
Brand : MEMOREX
Model : Mi4004
Category : Alarm Clock