
PJ551 - Video projector VIEWSONIC - Free user manual and instructions
Find the device manual for free PJ551 VIEWSONIC in PDF.


| Product Type | Video Projector |
| Brand | ViewSonic |
| Model | PJ551 |
| Display Technology | Single 0.55" DLP |
| Native Resolution | XGA (1024 x 768) |
| Contrast Ratio | 2000:1 |
| Lamp | 180W |
| Lens | Manual Zoom (1.1x) |
| Screen Size | 30" – 250" |
| Input Ports | D-Sub 15-pin, S-Video, Composite Video, USB |
| Video Compatibility | NTSC, PAL, SECAM, HDTV (480i/p, 576i/p, 720p, 1080i) |
| Scanning Frequency | Horizontal: 31-79 kHz, Vertical: 50-85 Hz |
| Noise Level | 36 dB (Normal), 34 dB (ECO) |
| Power Consumption | 230W |
| Power Supply | AC 100-240V, 50-60 Hz |
| Dimensions (W x D x H) | 277 x 223 x 110 mm |
| Weight | 2.5 kg (5.5 lb) |
| Keystone Correction | Advanced electronic keystone correction (-40 to +40) |
| OSD Languages | English, Deutsch, 简体中文, 日本語, Italiano, Français, Español, Português, Русский, 繁體中文, 한국어 |
| Remote Control | IR remote with CR2025 battery |
| Package Contents | Projector, Lens Cap, AC Power Cord, VGA Cable, Remote Control, User Manual, Quick Start Guide |
| Safety Features | Password protection, blank screen, start-up screen |
| Maintenance | Clean lens with lens paper; replace lamp after 45 min cooldown |
Frequently Asked Questions - PJ551 VIEWSONIC
User questions about PJ551 VIEWSONIC
0 question about this device. Answer the ones you know or ask your own.
Ask a new question about this device
Download the instructions for your Video projector in PDF format for free! Find your manual PJ551 - VIEWSONIC and take your electronic device back in hand. On this page are published all the documents necessary for the use of your device. PJ551 by VIEWSONIC.
USER MANUAL PJ551 VIEWSONIC
IMPORTANT: Please read this User Guide to obtain important information on installing and using your product in a safe manner, as well as registering your product for future service. Warranty information contained in this User Guide will describe your limited coverage from ViewSonic Corporation, which is also found on our web site at http://www.viewsonic.com in English, or in specific languages using the Regional selection box in the upper right corner of our website.

ViewSonic®
- User Guide
- Guide de l'utilisateur
- Bedienungsanleitung
- Guía del usuario
- Guida dell'utente
- Guia do usuário
- Användarhandbok
- Käyttöopas
- Руководство пользователя
- 使用手册 (繁體)
- 使用手册(简体)
-사용자 안내서
Model No.: VS11973
Compliance Information
FCC Statement
This device complies with part 15 of FCC Rules. Operation is subject to the following two conditions: (1) this device may not cause harmful interference, and (2) this device must accept any interference received, including interference that may cause undesired operation.
This equipment has been tested and found to comply with the limits for a Class B digital device, pursuant to part 15 of the FCC Rules. These limits are designed to provide reasonable protection against harmful interference in a residential installation. This equipment generates, uses, and can radiate radio frequency energy, and if not installed and used in accordance with the instructions, may cause harmful interference to radio communications. However, there is no guarantee that interference will not occur in a particular installation. If this equipment does cause harmful interference to radio or television reception, which can be determined by turning the equipment off and on, the user is encouraged to try to correct the interference by one or more of the following measures:
- Reorient or relocate the receiving antenna.
- Increase the separation between the equipment and receiver.
- Connect the equipment into an outlet on a circuit different from that to which the receiver is connected.
- Consult the dealer or an experienced radio/TV technician for help.
Warning: You are cautioned that changes or modifications not expressly approved by the party responsible for compliance could void your authority to operate the equipment.
For Canada
CE Conformity for European Countries
CE The device complies with the requirements of the EEC directive 89/336/EEC, 2004/108/EEC as amended by 92/31/EEC and 93/68/EEC Art.5 with regard to “Electromagnetic compatibility”, and 73/23/EEC as amended by 93/68/EEC Art.13 with regard to “Safety.”
Following information is only for EU-member states:
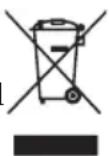
The mark shown to the right is in compliance with the Waste Electrical and Electronic Equipment Directive 2002/96/EC (WEEE).
The mark indicates the requirement NOT to dispose the equipment as unsorted municipal waste, but use the return and collection systems according to local law.
Important Safety Instructions
- Read these instructions.
- Keep these instructions.
- Heed all warnings.
- Follow all instructions.
- Do not use this unit near water.
- Clean with a soft, dry cloth. If still not clean, see “Cleaning the Display” in this guide for further instructions.
- Do not block any ventilation openings. Install the unit in accordance with the manufacturer's instructions.
- Do not install near any heat sources such as radiators, heat registers, stoves, or other devices (including amplifiers) that produce heat.
- Do not defeat the safety purpose of the polarized or grounding-type plug. A polarized plug has two blades with one wider than the other. A grounding type plug has two blades and a third grounding prong. The wide blade and the third prong are provided for your safety. If the provided plug does not fit into your outlet, consult an electrician for replacement of the obsolete outlet.
- Protect the power cord from being walked on or pinched particularly at plugs. Convenience receptacles and the point where they exit from the unit. Be sure that the power outlet is located near the unit so that it is easily accessible.
- Only use attachments/accessories specified by the manufacturer.
- Use only with the cart, stand, tripod, bracket, or table specified by the manufacturer, or sold with the unit. When a cart is used, use caution when moving the cart/unit combination to avoid injury from tipping over.
- Unplug this unit when unused for long periods of time.
- Refer all servicing to qualified service personnel. Servicing is required when the unit has been damaged in any way, such as: if the power-supply cord or plug is damaged, if liquid is spilled onto or objects fall into the unit, if the unit is exposed to rain or moisture, or if the unit does not operate normally or has been dropped.
Declaration of RoHS Compliance
This product has been designed and manufactured in compliance with Directive 2002/95/EC of the European Parliament and the Council on restriction of the use of certain hazardous substances in electrical and electronic equipment (RoHS Directive) and is deemed to comply with the maximum concentration values issued by the European Technical Adaptation Committee (TAC) as shown below:
| Substance | Proposed Maximum Concentration | Actual Concentration |
| Lead (Pb) 0.1% < 0.1% | ||
| Mercury (Hg) 0.1% < 0.1% | ||
| Cadmium (Cd) 0.01% < 0.01% | ||
| Hexavalent Chromium ( Cr^6+ ) 0.1% < 0.1% | ||
| Polybrominated biphenyls (PBB) 0.1% < 0.1% | ||
| Polybrominated diphenyl ethers (PBDE) 0.1% < 0.1% |
Certain components of products as stated above are exempted under the Annex of the RoHS Directives as noted below:
Examples of exempted components are:
- Mercury in compact fluorescent lamps not exceeding 5 mg per lamp and in other lamps not specifically mentioned in the Annex of RoHS Directive.
- Lead in glass of cathode ray tubes, electronic components, fluorescent tubes, and electronic ceramic parts (e.g. piezoelectronic devices).
- Lead in high temperature type solders (i.e. lead-based alloys containing 85% by weight or more lead).
- Lead as an allotting element in steel containing up to 0.35% lead by weight, aluminium containing up to 0.4% lead by weight and as a cooper alloy containing up to 4% lead by weight.
Copyright Information
Copyright ^© ViewSonic ^© Corporation, 2007. All rights reserved.
Macintosh and Power Macintosh are registered trademarks of Apple Computer, Inc.
Microsoft, Windows, Windows NT, and the Windows logo are registered trademarks of Microsoft Corporation in the United States and other countries.
ViewSonic, the three birds logo, OnView, ViewMatch, and ViewMeter are registered trademarks of ViewSonic Corporation.
VESA is a registered trademark of the Video Electronics Standards Association. DPMS and DDC are trademarks of VESA.
PS/2, VGA and XGA are registered trademarks of International Business Machines Corporation.
Disclaimer: ViewSonic Corporation shall not be liable for technical or editorial errors or omissions contained herein; nor for incidental or consequential damages resulting from furnishing this material, or the performance or use of this product.
In the interest of continuing product improvement, ViewSonic Corporation reserves the right to change product specifications without notice. Information in this document may change without notice.
No part of this document may be copied, reproduced, or transmitted by any means, for any purpose without prior written permission from ViewSonic Corporation.
Product Registration
To meet your future needs, and to receive any additional product information as it becomes available, please register your product on the Internet at: www.viewsonic.com. The ViewSonic® Wizard CD-ROM also provides an opportunity for you to print the registration form, which you may mail or fax to ViewSonic.
For Your Records
Product Name: PJ551D
ViewSonic DLP Projector
Model Number: VS11973
Document Number: PJ551D/-2_UG_ENG Rev. 1A 11-30-07
Serial Number:
Purchase Date:

The lamp in this product contains mercury.
Please dispose of in accordance with local, state or federal laws.
Contents
Introduction ...... 1
Projector Features....1
Package Contents....2
Projector Overview....3
Using the Product ....5
Control Panel 5
Connection Ports....6
Remote Control....7
Replacing the Battery....8
Remote Control Operation 9
Installation ....10
Connecting the Projector....10
Powering On/Off the Projector ....11
Adjusting the Projector....12
Menu Operation....14
Maintenance ....18
Cleaning the Lens 18
Cleaning the Projector Housing 18
Replacing the Lamp 19
Specifications....21
Appendix....22
LED Indicator Messages....22
Compatibility Modes....23
Troubleshooting 24
Other Information.... 25
Customer Support....25
Limited Warranty 26
Mexico Limited Warranty....28
Introduction
Projector Features
The projector integrates high-performance optical engine projection and a user-friendly design to deliver high reliability and ease of use.
■ The projector offers the following features:
■ Single chip 0.55" Texas Instruments DLP ^® technology
XGA (1024 x 768 pixels)
■ Auto image re-sizing (Auto-Sync.) to 1024 x 768 full screen with scaling compression compatibility for VGA, SVGA, XGA and SXGA*
■ Compatibility with Macintosh ^® computers
■ Compatibility with NTSC, PAL, SECAM and HDTV
■ D-Sub 15-pin terminal for analog video connectivity
■ User-friendly, multi-language on-screen display
■ Advanced electronic keystone correction

* means compressed.
Notes on the AC Power Cord
AC Power Cord must meet the requirement of countries where you use this projector. Please confirm your AC plug type with the graphics below and ensure that the proper AC Power Cord is used. If the supplied AC Power Cord does not match your AC outlet, please contact your sales dealer. This projector is equipped with a grounding type AC line plug. Please ensure that your outlet fits the plug. Do not defeat the safety purpose of this grounding type plug. We highly recommend using a video source device also equipped with a grounding type AC line plug to prevent signal interference due to voltage fluctuations.
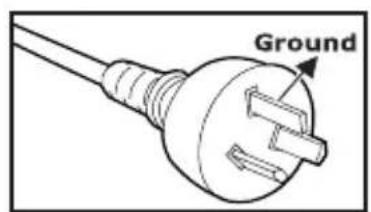
For Australia and Mainland China
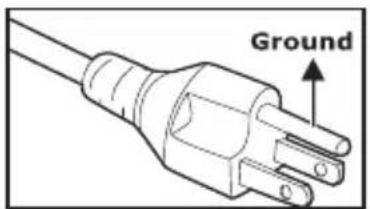
For the U.S.A. and Canada
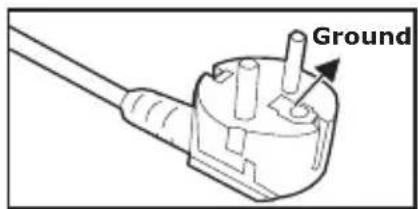
For Continental Europe
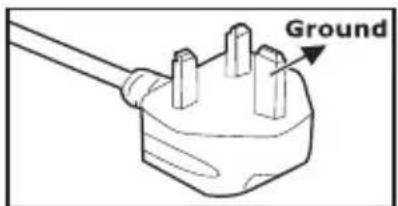
For the U.K.
Package Contents
When you unpack the projector, make sure you have all these components:
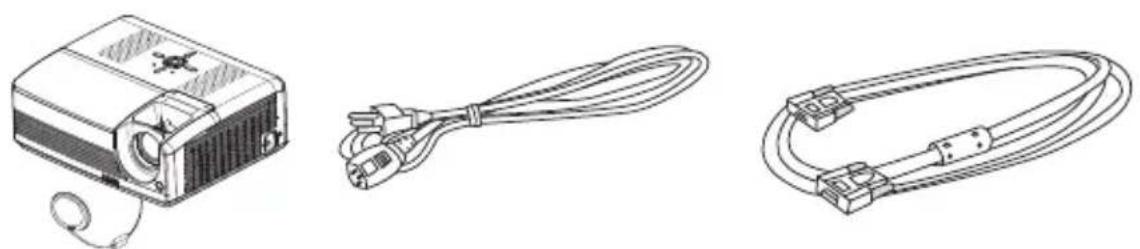
Projector with Lens Cap AC Power Cord VGA Cable (D-SUB to D-SUB)
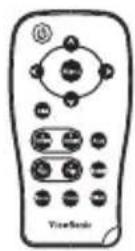

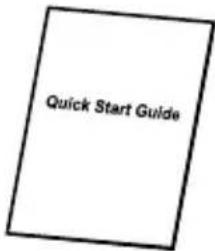
Remote Control (IR) User's Manual Quick Start Guide

■ Save the original shipping carton and packing material; they will come in handy if you ever to ship your unit. For maximum protection, repack your unit as it was originally packed at the factory.
■ Accessories and components may vary by retailer and region.
Projector Overview
Front View
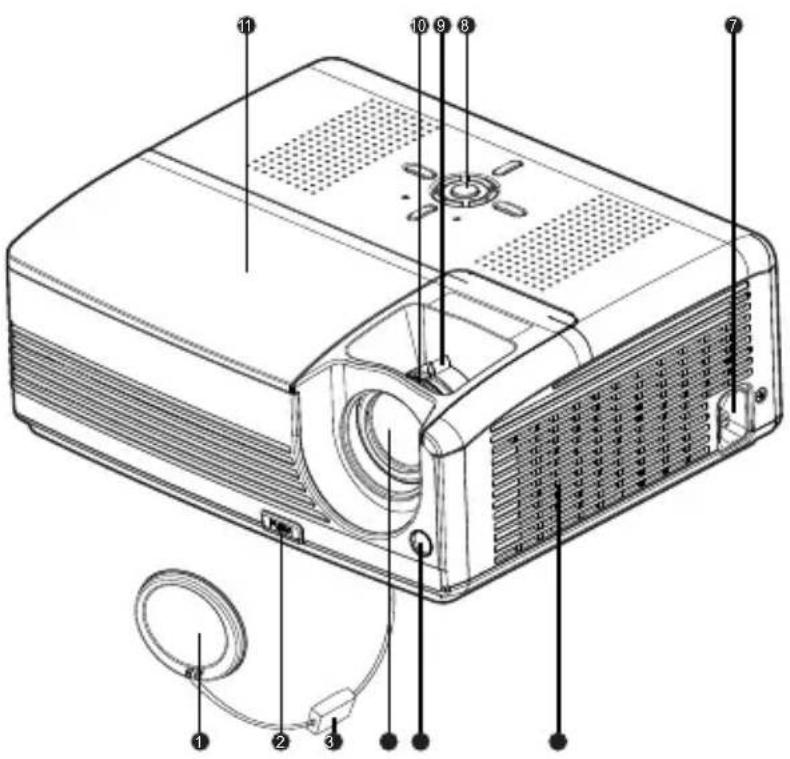
① Lens cap AC power socket ⑦
② Elevator button Control panel ⑧
③ Lens cap strap Zoom ring ⑨
4 Projection lens Focus ring 10
5 Front IR remote control sensor Lamp cover
6 Ventilation holes
Rear View
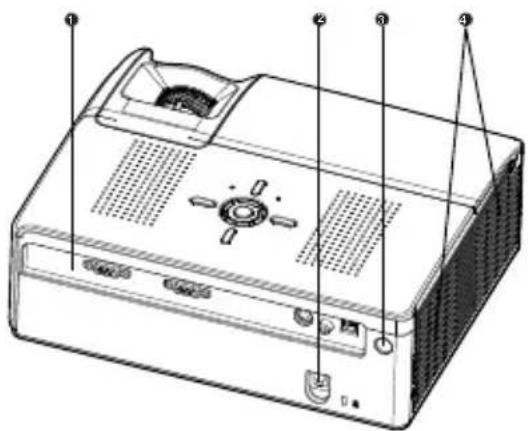
natural_image
Technical line drawing of a computer monitor base with labeled ports and connectors (no text or symbols present)1 Connection ports
② Kensington lock
③ Rear IR remote control sensor
4 Ventilation holes
Bottom View
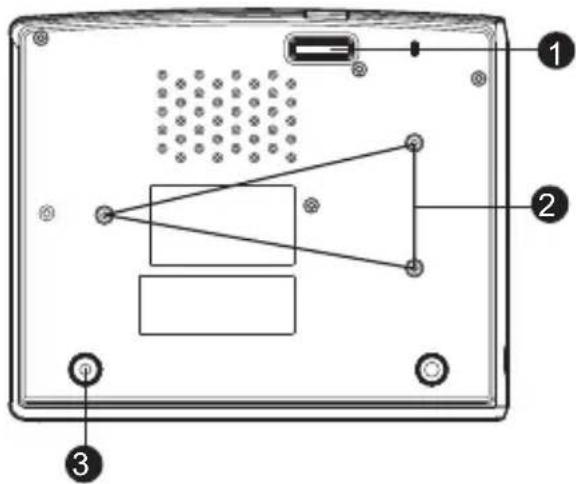
1 Elevator foot
② Ceiling mount
③ Tilt-adjustment foot

This projector can be used with a ceiling mount for support. The ceiling mount is not included in the package.
Using the Product
Control Panel
LED
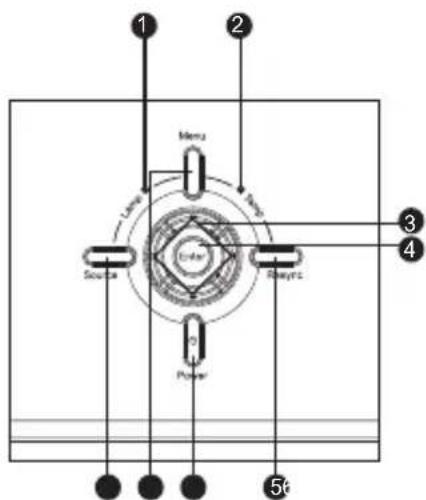
1 Lamp (Lamp LED indicator)
Refer to "LED Indicator Messages".
② Temp (Temperature LED indicator) Refer to "LED Indicator Messages".
Button Function
③ Four directional buttons
Use four directional buttons to select items or make adjustments to your selection.
④ Enter
Enter to sub-menu and confirm the menu selection. Activate in Color Setting, Lamp Counter Reset and Factory Default menu operations.
⑤ Resync
Resynchronize the projector to the input signal from a computer.
⑥ Power
Turn the projector on or off.
⑦ Menu
Display or exit the on-screen display menus.
8 Source
Manually select an input source.
Connection Ports

1 Computer Out(PJ551D-2)
Connect to a computer display, etc.
2 Computer In
Connect image input signal (analog RGB or component) to this jack.
③ S-Video
Connect S-Video output from video equipment to this jack.
4 Video
Connect composite video output from video equipment to this jack.
5 SERVICE
This connector is for firmware update.
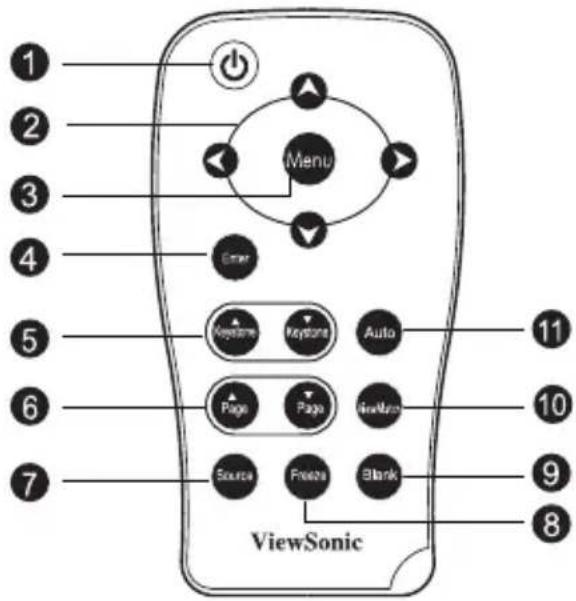
Remote Control
1 Power
Turn the projector on or off.
② Four directional buttons
Use four directional buttons to select items or make adjustments to your selection.
③ Menu
Display or exit the on-screen display menus.
④ Enter Confirm the selection.
⑤ Keystone ▲ / ▼
Adjust image distortion caused by tilting the projector.
⑥ Page ▲ / Page ▼ (Computer mode only)
This button has same function as Page Up / Page Down button in a PC keyboard. This function is only available when the projector is connected to a computer via a USB cable.
7 Source
Manually selects an input source.
8 Freeze
Press "Freeze" to pause the screen image. Press again to cancel the Freeze function.
⑨ Blank
Cut off the screen temporarily. Press again to cancel the Blank function.
10 ViewMatch
Switch the white intensity between 3 and 10.
1 Auto
Automatically adjust frequency and phase. This function is available for computer mode only.
For the first time use:
Remove the transparent insulation tape by pulling it before use.
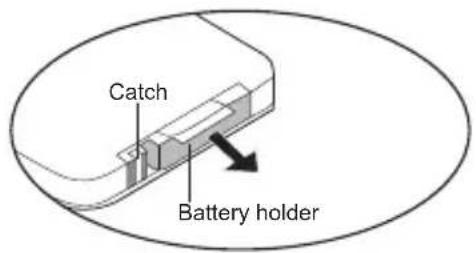
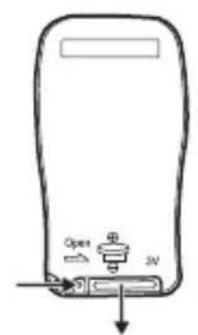
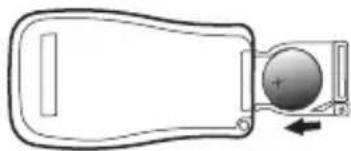
For battery change:
-
Push the catch to the right and remove the battery holder.
-
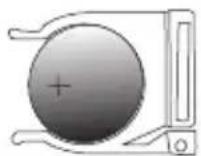
Remove the old Lithium coin cell and install new one (CR2025). Ensure that the side with the mark “+” is up.
-
Push the battery holder back into the remote control until you feel a click.
natural_image
Simple line drawing of a mechanical component with a circular element and directional arrow (no text or symbols)
- Keep the battery out of the reach of children. There is a danger of death by accidentally swallowing the battery.
Do not recharge the used battery or expose the battery to fire or water.
Do not dispose of the used battery along with household waste. Dispose of used batteries according to local regulations.
Danger of explosion may happen if batteries are incorrectly replaced. Replace only with the same type recommended by the manufacturer.
Remote Control Operation
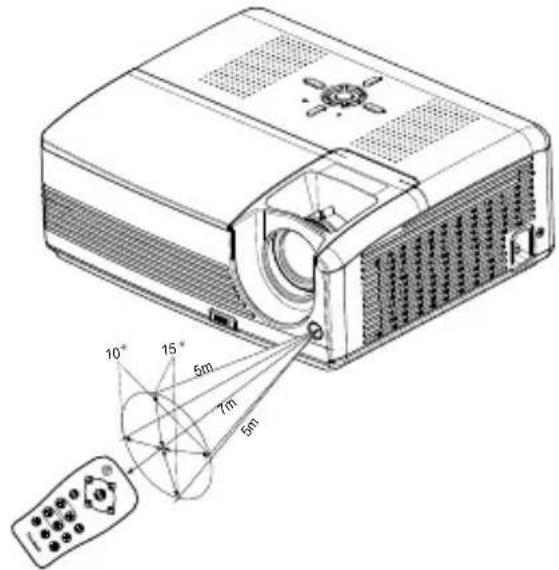
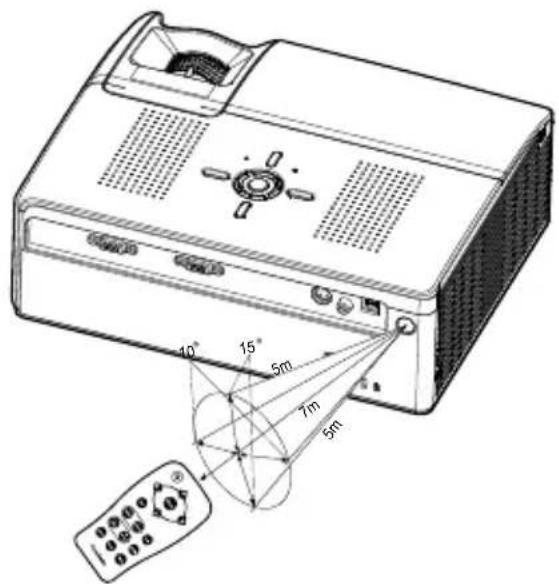
Point the remote control at the infrared remote sensor and press a button.
■ Operating the projector from the front
■ Operating the projector from the rear

The remote control may not operate when there is sunlight or other strong light such as a fluorescent lamp shining on the remote sensor.
Operate the remote control from a position where the remote sensor is visible.
Do not drop the remote control or jolt it.
- Keep the remote control out of locations with excessively high temperature or humidity.
Do not get water on the remote control or place wet objects on it.
Do not disassemble the remote control.
Installation
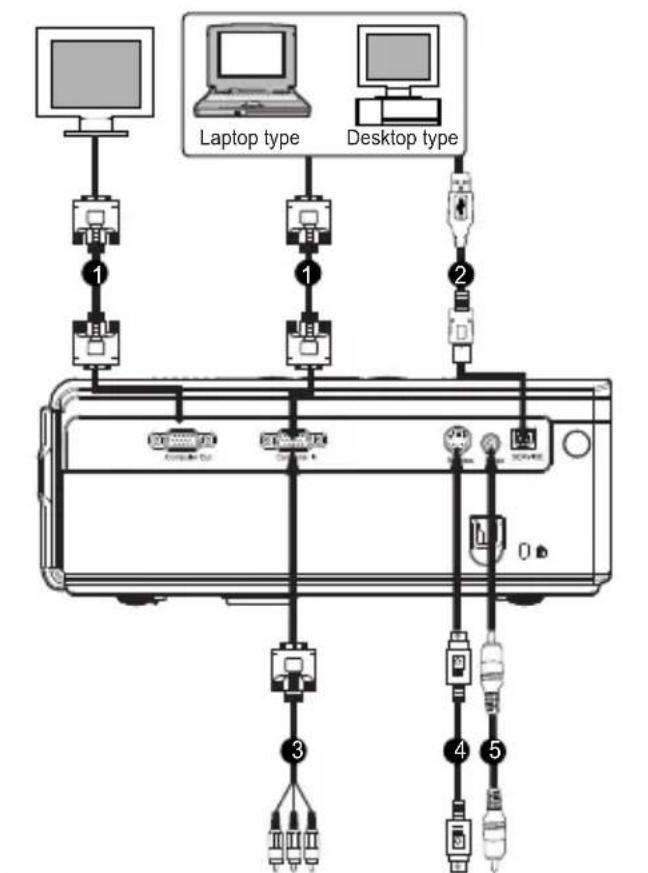
Connecting the Projector
① VGA Cable (D-Sub to D-Sub) S-Video Cable
② USB Cable Composite Video Cable ⑤
③ VGA (D-Sub) to HDTV (RCA) Cable
flowchart
graph TD
    A["Computer"] -->|1| B["Laptop type"]
    C["Desktop type"] -->|2| D["Device"]
    B --> E["Device 1"]
    B --> F["Device 2"]
    B --> G["Device 3"]
    B --> H["Device 4"]
    B --> I["Device 5"]
Video Source (example)
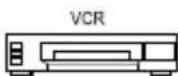
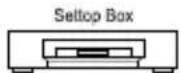
Component video output equipment (such as DVD player or high-definition TV source)


When connecting cable, power cords of both a projector and external equipment should be disconnected from AC outlet.
The figure above is a sample connection. This does not mean that all of these devices can or must be connected simultaneously.
The cables that come with the projector may differ from the above illustration. The included cables are based on actual shipment delivery.
Powering On/Off the Projector
Powering On the Projector:
-
Remove the projector lens cap.
-
Complete the AC power cord and peripheral signal cable(s) connections.
-
Press button to turn on the projector.
The projector takes a minute or so to warm up.
- Turn on your source (computer, notebook, DVD, etc.). The projector automatically detects your source.
If you are connecting multiple sources to the projector simultaneously, press the Source button.
Warning:
■ Remove the lens cap first before powering on.
■ Never look into the lens when the lamp is on. This can damage your eyes. It is especially important that children are not allowed to look into the lens.
Powering Off the Projector:
-
Press button to turn off the projector lamp. You will see a message "Power off? Press Power again" appear on the screen.
-
Press button again to confirm.
■ The cooling fans continue to operate for cooling cycle.
■ When the Lamp LED begins flashing, the projector has entered stand-by mode.
If you want to turn the projector back on, you must wait until the projector has completed the cooling cycle and has entered stand-by mode. Once in standby mode, simply press button to restart the projector.
3. Disconnect the AC power cord from the electrical outlet and the projector.
4. Do not turn on the projector immediately following a power off procedure.
Adjusting the Projector Adjusting the Projector Height
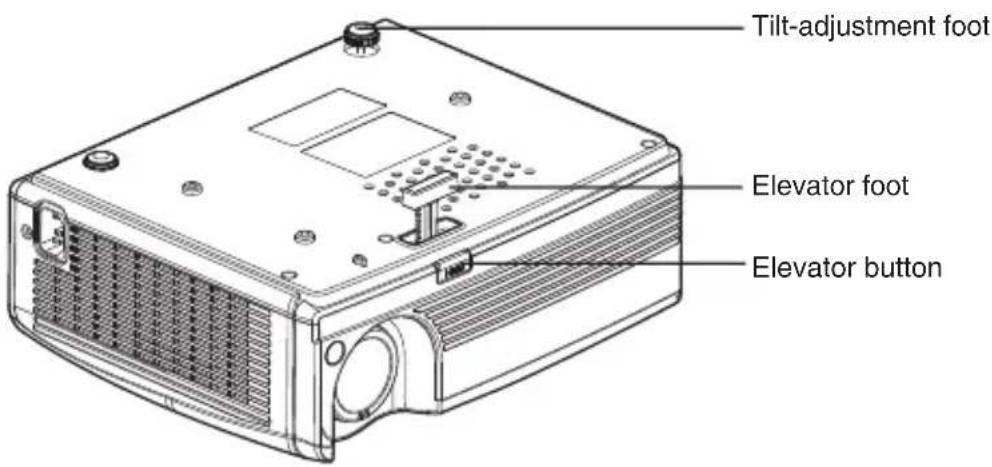
The projector is equipped with an elevator foot to adjust the image height.
To raise or lower the image:
-
To raise or lower the image, press the elevator button and raise or lower the front of the projector. Release the button to lock the adjustment.
-
To level the image on the screen, turn the tilt-adjustment foot to fine-tune the height.

To avoid damaging the projector, make sure that the elevator foot and tilt-adjustment foot are fully retracted before placing the projector in its carrying case.
Adjusting the Projector Zoom and Focus
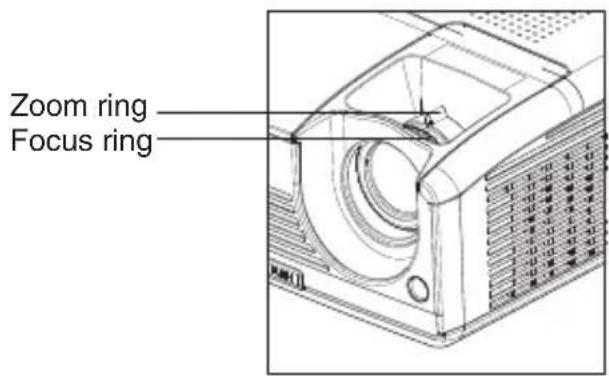
- Focus the image by rotating the focus ring. A still image is recommended for focusing.
- Adjust the image by sliding the zoom ring.
Adjusting Projection Image Size
Refer to the graphic and table below to determine the screen size and projection distance.
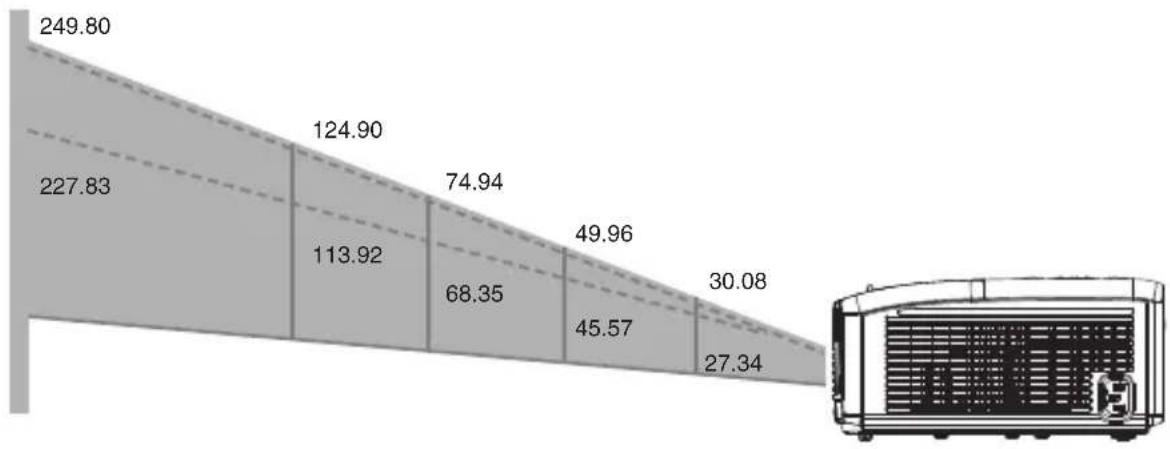
area
| Value | Label | |---|---| | 249.80 | | | 227.83 | | | 124.90 | | | 74.94 | | | 49.96 | | | 30.08 | | | 27.34 | |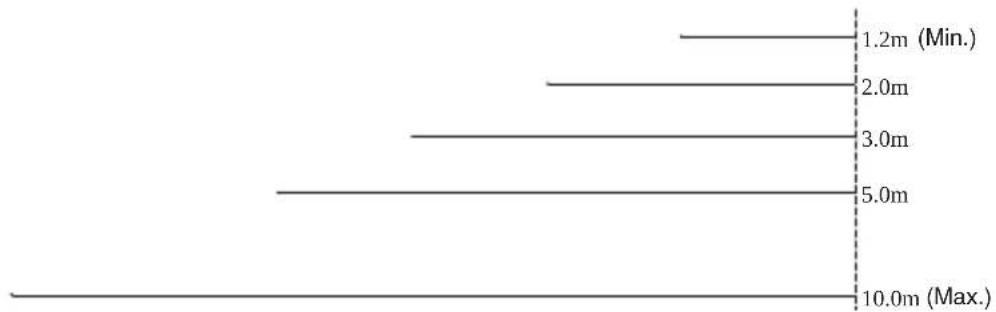
bar
| Category | Value (Min.) | |---|---| | 1.2m | 1.2 | | 2.0m | 2.0 | | 3.0m | 3.0 | | 5.0m | 5.0 | | 10.0m | 10.0 | (Max.))| Projection Distance (meters) | Screen Size (for 4:3 aspect ratio diagonal length) | |
| Wide (inches) Tele (inches) | ||
| 1.2 30.08 27.34 | ||
| 2 49.96 45.57 | ||
| 3 74.94 68.35 | ||
| 5 124.90 113.92 | ||
| 10 249.80 227.83 | ||

■ Position the projector in a horizontal position; other positions can cause heat build-up and damage to the projector.
■ Make sure the heat ventilation holes are not blocked.
Do not use the projector in a smoky environment. Smoke residue may cause build-up on critical parts (i.e. DMD, lens assembly, etc.)
Menu Operation
The projector has multilingual on-screen display menus that allow you to make image adjustments and change a variety of settings.
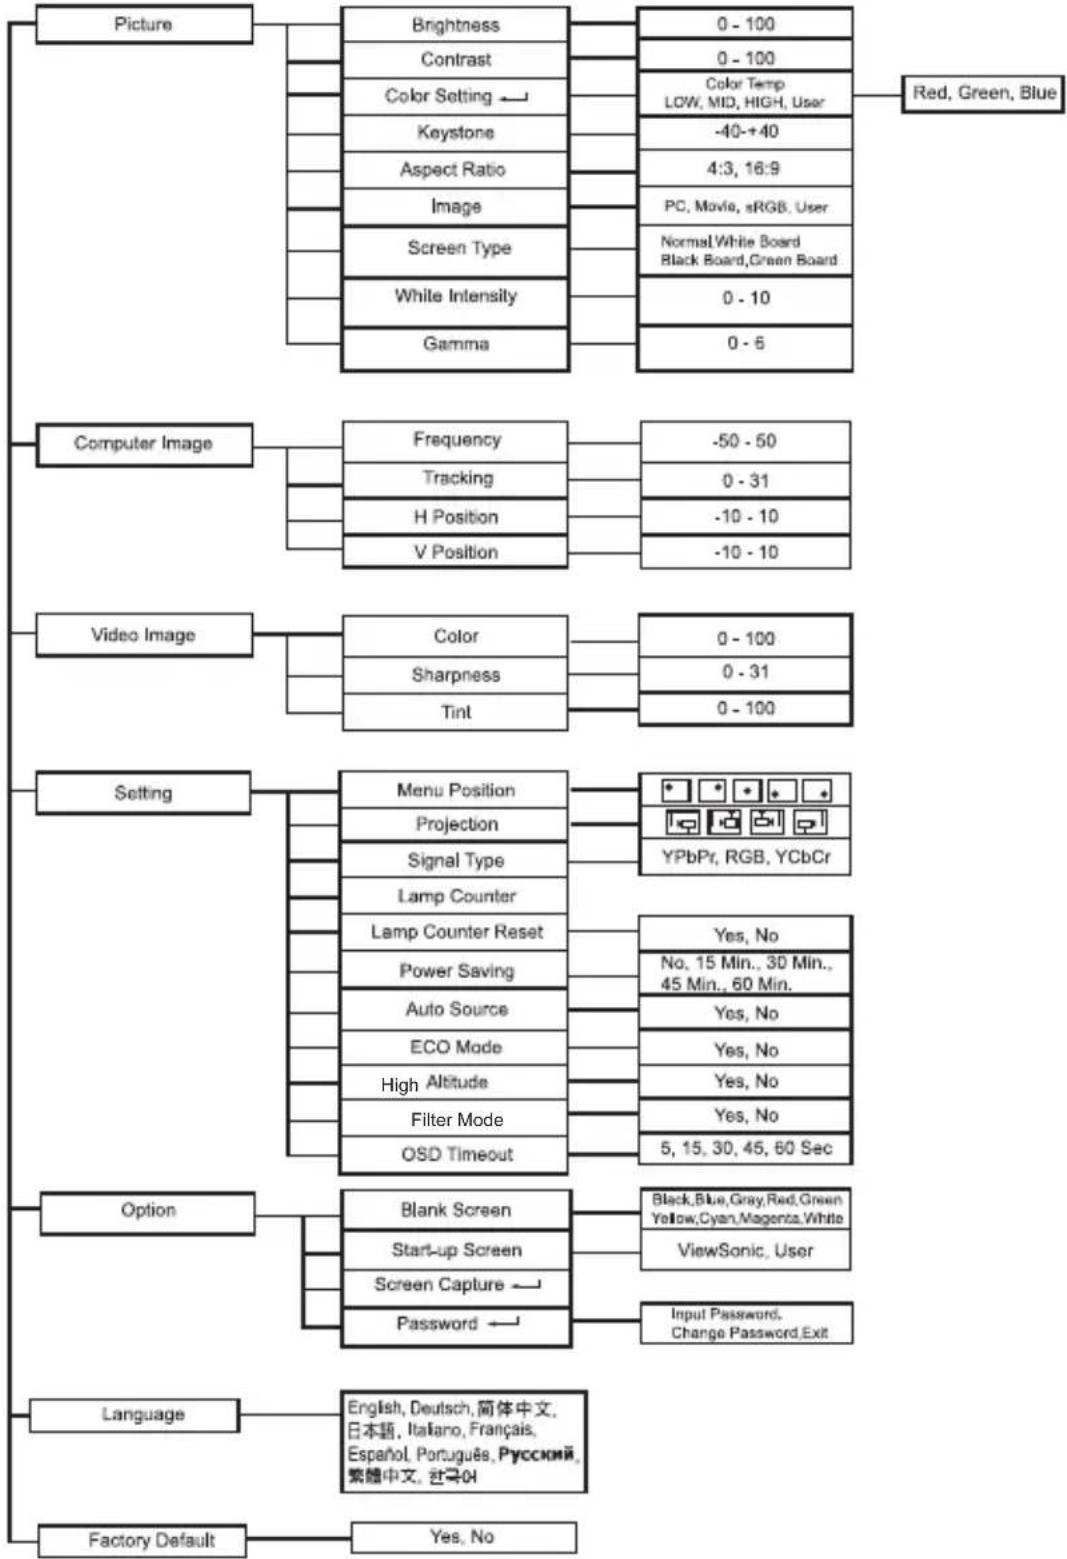
flowchart
graph TD
    A["Picture"] --> B["Brightness"]
    A --> C["Contrast"]
    A --> D["Color Setting"]
    A --> E["Keystone"]
    A --> F["Aspect Ratio"]
    A --> G["Image"]
    A --> H["Screen Type"]
    A --> I["White Intensity"]
    A --> J["Gamma"]
    K["Computer Image"] --> L["Frequency"]
    K --> M["Tracking"]
    K --> N["H Position"]
    K --> O["V Position"]
    P["Video Image"] --> Q["Color"]
    P --> R["Sharpness"]
    P --> S["Tint"]
    T["Setting"] --> U["Menu Position"]
    T --> V["Projection"]
    T --> W["Signal Type"]
    T --> X["Lamp Counter"]
    T --> Y["Lamp Counter Reset"]
    T --> Z["Power Saving"]
    T --> AA["Auto Source"]
    T --> AB["ECO Mode"]
    T --> AC["High Altitude"]
    T --> AD["Filter Mode"]
    T --> AE["OSD Timeout"]
    AF["Option"] --> AG["Blank Screen"]
    AF --> AH["Start-up Screen"]
    AF --> AI["Screen Capture"]
    AF --> AJ["Password"]
    AK["Language"] --> AL["English, Deutsch, 简体中文, 日本語, Italiano, Français, Español, Português, Русский, 繁體中文, 한국어"]
    AM["Factory Default"] --> AN["Yes, No"]

    B --> B1["0 - 100"]
    C --> C1["0 - 100"]
    D --> D1["Color Temp LOW, MID, HIGH, User"]
    E --> E1["-40->40"]
    F --> F1["4:3, 16:9"]
    G --> G1["PC, Movie, sRGB, User"]
    H --> H1["Normal/White Board Black Board, Green Board"]
    I --> I1["0 - 10"]
    J --> J1["0 - 6"]

    L --> L1["-50 - 50"]
    M --> M1["0 - 31"]
    N --> N1["-10 - 10"]
    O --> O1["-10 - 10"]

    U --> U1["0 - 100"]
    V --> V1["0 - 31"]
    W --> W1["0 - 100"]

    X["YPbPr, RGB, YCbCr"] --> Y["Yes, No"]
    Y --> Y1["No, 15 Min., 30 Min., 45 Min., 60 Min."]
    Z["Yes, No"] --> Z1["Yes, No"]
    AA["Yes, No"] --> AA1["Yes, No"]
    AB["Yes, No"] --> AB1["Yes, No"]
    AC["5, 15, 30, 45, 60 Sec"] --> AD
How to operate
- Press the Menu button to open the OSD menu.
- When OSD is displayed, use ▲ / ▼ to select any feature in the main menu.
- After selecting the desired main menu feature, press ▶ to enter sub-menu for feature setting.
- Adjust the settings with ◀/▶.
- Press the Menu button, the screen will return to the main menu.
- To exit OSD, Press the Menu button again. The OSD menu will close and the projector will automatically save the new settings.
Picture (Computer / Video Mode)
Brightness
Brighten or darken the image.
Contrast
Set the difference between light and dark areas.
Color Setting
Adjust the color temperature. At higher temperature the screen looks colder; at lower temperature, the screen looks warmer. If you select "User", "Red", "Green" and "Blue" cab be adjusted.
Keystone
Correct the keystone distortion.
Aspect Ratio
Select how the picture fits on the screen:
■ 4:3 : The input source will be scaled to fit the projection screen.
■ 16:9 : The input source will be scaled to fit the width of the screen.
Image
There are many factory presets optimized for various types of images.
■ PC : For computer or notebook.
■ Movie : For home theater.
■ sRGB : For PC standard color.
■ User : Memorize user's settings.
Screen Type
Select the projection screen type.
White Intensity
Increase the brightness of white areas.
Gamma
Effect the represent of dark scenery. With greater gamma value, dark scenery will look brighter.
Computer Image (Computer Mode)
Frequency
Adjust the timing of the projector relative to the computer.
Tracking
Adjust the phase of the projector relative to the computer.
H Position (Horizontal Position)
Adjust the image left or right within the projection area.
V Position (Vertical Position)
Adjust the image up or down within the projection area.
Video Image (Video Mode)
Color
Adjust the intensity of colors.
Sharpness
Sharpen or soften the image.
Tint
Shift colors toward red or green.
Setting (Computer / Video Mode)
Menu Position
Choose the menu location on the display screen.
Projection
Adjust the picture to match the orientation of the projector: upright or upside-down, in front of or behind the screen. Invert or reverse the image accordingly.
Signal Type
Specify the source to the Computer In terminal that you wish to project.
■ YPbPr : For component 480p,576p,720p,1080i signals
RGB : For VGA signal
■ YCbCr : For component 480i,576i signals
Lamp Counter
Display the lamp's elapsed operating time (in hours).
Lamp Counter Reset
Reset the lamp counter to 0 hours.
Power Saving
If no operation is performed for a specific period of time, the power to the projector is automatically turned off.
Auto Source
Automatically scan the input source.
ECO Mode
Use this function to dim the projector lamp light output which will lower power consumption and increase lamp life.
High Altitude
Turning on High Altitude mode operates the fans at full speed continuously to allow for proper high altitude cooling of the projector.
Filter Mode
When an optional air filter is attached, be sure to turn on the "Filter Mode"; otherwise, the machine can overheat and shutdown automatically.
OSD Timeout
Duration OSD menu stays active (at idle state by second).
Option (Computer / Video Mode)
Blank Screen
Blank the screen temporarily, and select the screen color when this function is active.
Start-up Screen
Select start-up screen when the projector is powered on or when no signal is input. "User" is the screen that you captured.
Screen Capture
Capture the current projection screen as a start-up screen.
Password
Set or change the password. When the password function is added, image projection requires an entry of the preset password at power-on.
DCR (Dynamic Contrast Ratio)
Enable DCR will further enhance contrast ratio by darkening the black scenes. Disable DCR will resume to normal contrast performance.
*DCR will impact lamp life and system noise performance.
Language (Computer / Video Mode)
Select the language used by the on-screen menu.
Factory Default (Computer / Video Mode)
Restore all menu settings to factory default settings.
Maintenance
The projector needs proper maintenance. You should keep the lens clean as dust, dirt or spots will project on the screen and diminish image quality. If any other parts need replacing, contact your dealer or qualified service personnel. When cleaning any part of the projector, always switch off and unplug the projector first.
Warning:
Never open any of the covers on the projector. Dangerous electrical voltages inside the projector can cause severe injury. Do not attempt to service this product yourself. Refer all servicing to qualified service personnel.
Cleaning the Lens
Gently wipe the lens with lens cleaning paper. Do not touch the lens with your hands.
Cleaning the Projector Housing
Gently wipe with a soft cloth. If dirt and stains are not easily removed, use a soft cloth damped with water, or water and neutral detergent, and wipe dry with a soft, dry cloth.

■ Turn off the projector and remove the AC power cord from the power outlet before beginning maintenance work.
■ Make sure the lens is cool before cleaning.
Do not use detergents or chemicals other than those noted above. Do not use benzene or thinners.
■ Do not use chemical sprays.
■ Use a soft cloth or lens paper only.
Replacing the Lamp
As the projector operates over time, the brightness of the projector lamp gradually decreases and the lamp becomes more susceptible to breakage. We recommend replacing the lamp if a warning message is displayed. Do not attempt to replace the lamp yourself. Contact the qualified service personnel for replacement.

The lamp becomes high temperature after turning off the projector with the power button. If you touch the lamp, you may scald your finger. When you replace the lamp, wait for at least 45 minutes for the lamp to cool down.
Do not touch the lamp glass at any time. The lamp may explode due to improper handling, including the touching of the lamp glass.
Lamp lifetime may differ from lamp to lamp and according to the environment of use. There is no guarantee of the same lifetime for each lamp. Some lamps may fail or terminate their lifetime in a shorter period of time than other similar lamps.
A lamp may explode as a result of vibration, shock or degradation as a result of hours of use as its lifetime draws to an end. Risk of explosion may differ according to the environment or conditions in which the projector and lamp are being used.
■ Wear protective gloves and eyeglasses when fixing or detaching the lamp.
■ Faster on-off-cycles will damage the lamp and reduce lamp life. Wait at least for 5 minutes to turn off the projector after powering on.
Do not operate the lamp in proximity to paper, cloth, or other combustible material nor cover it with such materials. Otherwise it could cause a fire.
Do not operate the lamp in an atmosphere containing an inflammable substance, such as thinner. Otherwise it could cause a fire or explosion.
Thoroughly ventilate the area or the room when operating the lamp in an oxygen atmosphere (in the air). If ozone is inhaled, it could cause headaches, nausea, dizziness, etc.
The inorganic mercury is involved in the lamp. If the lamp bursts, the mercury inside the lamp will go out of the projector. Leave the area immediately if the lamp shatters while being operated and ventilate the area for at least 30 minutes in order to avoid the inhalation of mercury fumes. Otherwise it could be harmful to user's health.
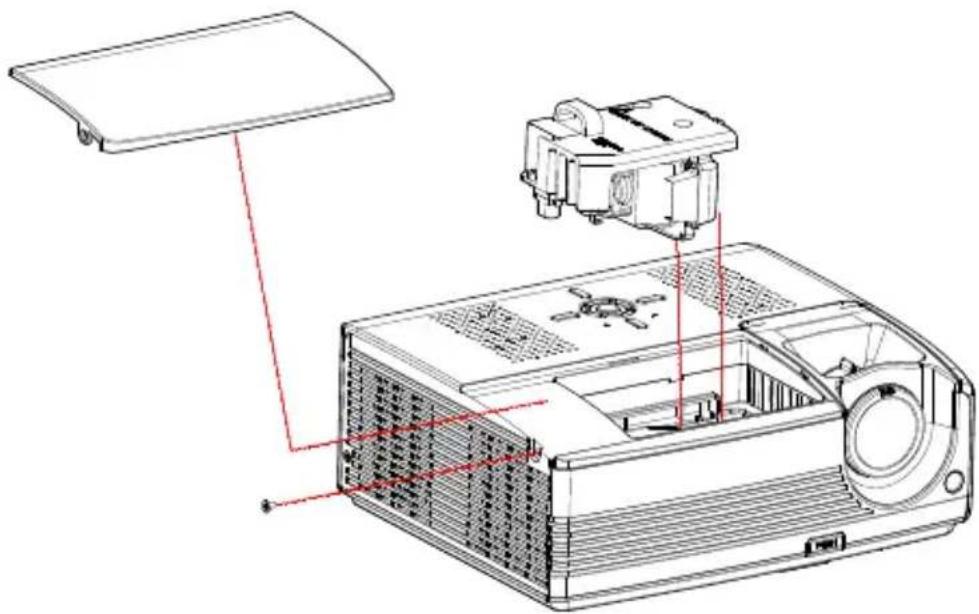
-
Turn off the projector.
-
If the projector is installed in a ceiling mount, remove it from the mount.
-
Unplug the power cord.
-
Loosen the screw in the side of the lamp cover and remove the cover.
-
Remove the screws from the lamp module, raise the handle, and lift out the module.
-
Insert the new lamp module into the projector and tighten the screws.
-
Replace the lamp cover and tighten the screw.
-
Turn on the projector. If the lamp does not turn on after the warm-up period, try reinstalling the lamp.
-
Reset the lamp hour. Refer to the "Setting" menu.

■ Dispose of the used lamp according to local regulations.
■ Ensure that screws are tightened properly. Screws not tightened fully may result in injury or accidents.
■ Since the lamp is made of glass, do not drop the unit and do not scratch the glass.
Do not reuse the old lamp. This could cause the lamp to explode.
Be sure to turn off the projector and unplug the AC power cord before replacing the lamp.
Do not use the projector with the lamp cover removed.
Specifications
| Display Type Single 0.55" | DLP panel |
| Resolution (Pixels) XGA (1024 × 768) | |
| Lens Manual Zoom (1.1x) | |
| Contrast Ratio 2000:1 | |
| Screen Size 30" – 250" | |
| Lamp 180W | |
| Input / Output Source D-Sub 15 pin, S-video, composite video, USB | |
| Video Compatibility NTSC | 3.58, NTSC4.43PAL-60, M, NSECAM, HDTV (480i/p, 576i/p, 720p, 1080i) |
| Scanning Frequency Horizontal Freq. | 31 - 79 KHz |
| Vertical Freq. | 50 - 85 Hz |
| Noise Level Normal: 36dB; ECO: 34dB | |
| Environment Operating: | Temperature: 0°C to 40°CHumidity: 30%-85%Storage:Temperature: -20°C to 60°CHumidity: 30%-85% |
| Power Requirement AC 100 - 240 V, 50 - 60 Hz | |
| Power Consumption 230 W | |
| Dimension | 277 x 223 x 110 mm |
| Weight | 2.5 kg (5.5lb) |
Note: Design and Specifications are subject to change without prior notice.
Appendix
LED Indicator Messages
| LED Type Color Status Meaning | |||
| LAMP LEDTEMP LED | GreenOff | Flash- | The projector is in standby mode. |
| LAMP LEDTEMP LED | GreenGreen | SolidFlash | The projector system has some problems with its fan, so the projector cannot start up. |
| LAMP LEDTEMP LED | GreenGreen | SolidSolid | The lamp is in good condition and is projecting at maximum brightness. |
| LAMP LEDTEMP LED | AmberGreen | SolidSolid | The lamp has reached its end of life and must be changed soon. The lamp will continue to operate until it fails. Change the lamp. If the lamp is off, then the ballast will become malfunction. |
| LAMP LEDTEMP LED | AmberAmber | SolidSolid | The projector is shutting and the fan motor is cooling the lamp for shutdown. Do not unplug the power cord or turn the power off before the Lamp LED changes to flashing. The fan motor will turn off when the lamp has cooled. |
| LAMP LEDTEMP LED | GreenRed | SolidFlash | Temperature is too high. The lamp will turn off. The fan motor is cooling the lamp. |
| LAMP LEDTEMP LED | AmberOff | Solid- | The lamp ignition failed. If temperature is too high, the fans will cool the lamp. |
Compatibility Modes
Computer:
| Compatibility | Resolution | H-Sync [KHz] | V-Sync [Hz] |
| VGA 640 x 480 31.5 59.9 | |||
| 37.9 72.8 | |||
| 37.5 75.0 | |||
| 43.3 85.0 | |||
| SVGA 800 x 600 35.2 56.3 | |||
| 37.9 60.3 | |||
| 48.1 72.2 | |||
| 46.9 75.0 | |||
| 53.7 85.1 | |||
| XGA 1024 x 768 48.4 60.0 | |||
| 56.5 70.1 | |||
| 60.0 75.0 | |||
| 68.7 85.0 | |||
| SXGA 1152 x 864 64.0 70.0 | |||
| 67.5 75.0 | |||
| 1280 x 960 60.0 60.0 | |||
| 75.0 75.0 | |||
| 1280 x 1024 64.0 60.0 | |||
| WXGA 1280 x 768 47.8 60.0 | |||
| 60.3 74.9 | |||
| 68.6 84.8 | |||
| 1280 x 800 49.7 59.8 | |||
| 62.8 74.9 |
Video:
| Signal | Horizontal Frequency (kHz) | Vertical Frequency (Hz) |
| 480i | 15.8 kHz | 60 Hz |
| 480p | 31.5 kHz | 60 Hz |
| 576i | 15.6 kHz | 50 Hz |
| 576p | 31.3 kHz | 50 Hz |
| 720p | 45.0 kHz | 60 Hz |
| 720p | 37.5 kHz | 50 Hz |
| 1080i | 33.8 kHz | 60 Hz |
| 1080i | 28.1 kHz | 50 Hz |
Troubleshooting
Refer to the symptoms and measures listed below before sending the projector forrepairs. If the problem persists, contact your local reseller or service center. Please refer to "Indicator Messages" as well.
Start-up problems
If no lights turn on:
- Be sure that the power cord is securely connected to the projector and the other end is plugged into an outlet with power.
■ Press the power button again.
■ Unplug the power cord and wait for a short while, then plug it in and press the power button again.
Image problems
If the searching source is displayed:
■ Press the Source button one or more times to select another active input source.
■ Be sure the external source is turned on and connected.
For a computer connection, ensure your notebook computer's external video port is turned on. Refer to the computer manual.
If the image is out of focus:
■ Be sure the lens cover is open.
■ While displaying the on-screen menu, adjust the focus ring. (The image size should not change; if it does, you are adjusting the zoom, not the focus.)
- Check the projection lens to see if it needs cleaning.
If the image is flickering or unstable for a computer connection:
■ Press the Resync button on the control panel or the Auto button on the remote control.
■ Press the Menu button, go to Computer Image and adjust Frequency or Tracking.
Remote control problems
If the remote control does not operate:
■ Be sure nothing is blocking the remote control receiver on the front or back of the projector. Use the remote control within the effective range.
Aim the remote control at the screen or at the front or back of the projector.
■ Move the remote control so it is more directly in front of or behind the projector and not as far to the side.
Customer Support
For technical support or product service, see the table below or contact your reseller.
Note : You will need the product serial number.
| Country/Region Web Site | T=TelephoneF=Fax | ||
| Australia/New Zealand www.viewsonic.com.au | AUS-1800 880 818NZ=0800 008 822 | service@au.viewsonic.com | |
| Canada www.viewsonic.com | T-1-866-463-4775F=1-909-468-5814 | service.ca@viewsonic.com | |
| Europe/Middle East/Baltic countries/North Africa | www.viewsoniceurope.com Contact your reseller | ||
| Hong Kong www.hk.viewsonic.com | T=852 3102 2900 service@hk.viewsonic.com | ||
| India www.in.viewsonic.com T=1800 11 9999 service@in.viewsonic.com | |||
| Korea www.kr.viewsonic.com T=080 265 9080 service@kr.viewsonic.com | |||
| Latin America (Argentina) www.viewsonic.com/la/ | T=0800-666-0098F=1-909-444-5655 | soporte@viewsonic.com | |
| Latin America (Brazil) www.viewsonic.com/la/ | T=0800-891-1829F=1-909-444-5655 | soporte@viewsonic.com | |
| Latin America (Chile) | www.viewsonic.com/la/ | T=800-440303F=1-909-444-5655 | soporte@viewsonic.com |
| Latin America (Columbia) | www.viewsonic.com/la/ | T=01800-9-156588F=1-909-444-5655 | soporte@viewsonic.com |
| Latin America (Mexico) | www.viewsonic.com/la/ | T=001-866-823-2004F=1-909-444-5655 | soporte@viewsonic.com |
| Renta y Datos, 29 SUR 721, COL. LA PAZ, 72160 PUEBLA, PUE. Tel: 01.222.891.55.77 CON 10 LINEASElectroser, Av Reforma No. 403Gx39 y 41, 97000 Merida, Yucatan. Tel: 01.999.925.19.16Other places please refer to http://www.viewsonic.com/la/soporte/index.htm#Mexico | |||
| Latin America (Peru) | www.viewsonic.com/la/ | T=0800-53311F=1-909-444-5655 | soporte@viewsonic.com |
| Macau | www.hk.viewsonic.com T=853 700 303 | service@hk.viewsonic.com | |
| Puerto Rico & Virgin Islands | www.viewsonic.com | T=1-800-688-6688 (English)T=1-866-379-1304 (Spanish)F=1-909-468-1202 | service.us@viewsonic.comsoporte@viewsonic.com |
| Singapore/Malaysia/Thailand | www.ap.viewsonic.com | T=65 6461 6044 | service@sg.viewsonic.com |
| South Africa | www.viewsoniceurope.com www.viewsoniceurope.com/uk/Support/Calldesk.htm | ||
| United Kingdom | www.viewsoniceurope.com/uk/ | www.viewsoniceurope.com/uk/Support/Calldesk.htm | |
| United States | www.viewsonic.com | T=1-800-688-6688F=1-909-468-1202 | service.us@viewsonic.com |
Limited Warranty
VIEWSONIC® PROJECTOR
What the warranty covers:
ViewSonic warrants its products to be free from defects in material and workmanship, under normal use, during the warranty period. If a product proves to be defective in material or workmanship during the warranty period, ViewSonic will, at its sole option, repair or replace the product with a like product. Replacement product or parts may include remanufactured or refurbished parts or components.
How long the warranty is effective:
North and South America: 3 years for all parts excluding the lamp, 3 years for labor, 1 year for the original lamp from the date of the first consumer purchase.
Europe: 3 years for all parts excluding the lamp, 3 years for labor, 1 year for the original lamp from the date of the first consumer purchase.
Other regions or countries: Please check with your local dealer or local ViewSonic office for the warranty information.
Lamp warranty subject to terms and conditions, verification and approval. Applies to manufacturer's installed lamp only.
All accessory lamps purchased separately are warranted for 90 days.
Who the warranty protects:
This warranty is valid only for the first consumer purchaser.
What the warranty does not cover:
- Any product on which the serial number has been defaced, modified or removed.
- Damage, deterioration or malfunction resulting from:
a. Accident, misuse, neglect, fire, water, lightning, or other acts of nature, unauthorized product modification, or failure to follow instructions supplied with the product.
b. Repair or attempted repair by anyone not authorized by ViewSonic.
c. Any damage of the product due to shipment.
d. Removal or installation of the product.
e. Causes external to the product, such as electric power fluctuations or failure.
f. Use of supplies or parts not meeting ViewSonic's specifications.
g. Normal wear and tear.
h. Any other cause which does not relate to a product defect.
- Any product exhibiting a condition commonly known as “image burn-in” which results when a static image is displayed on the product for an extended period of time.
- Removal, installation, and set-up service charges.
How to get service:
- For information about receiving service under warranty, contact ViewSonic Customer Support (please refer to “Customer Support” page). You will need to provide your product’s serial number.
- To obtain warranted service, you will be required to provide (a) the original dated sales slip, (b) your name, (c) your address, (d) a description of the problem, and (e) the serial number of the product.
- Take or ship the product freight prepaid in the original container to an authorized ViewSonic service center or ViewSonic.
- For additional information or the name of the nearest ViewSonic service center, contact ViewSonic.
Limitation of implied warranties:
There are no warranties, express or implied, which extend beyond the description contained herein including the implied warranty of merchantability and fitness for a particular purpose.
Exclusion of damages:
ViewSonic's liability is limited to the cost of repair or replacement of the product. ViewSonic shall not be liable for:
- Damage to other property caused by any defects in the product, damages based upon inconvenience, loss of use of the product, loss of time, loss of profits, loss of business opportunity, loss of goodwill, interference with business relationships, or other commercial loss, even if advised of the possibility of such damages.
- Any other damages, whether incidental, consequential or otherwise.
- Any claim against the customer by any other party.
Effect of state law:
This warranty gives you specific legal rights, and you may also have other rights which vary from state to state. Some states do not allow limitations on implied warranties and/or do not allow the exclusion of incidental or consequential damages, so the above limitations and exclusions may not apply to you.
Sales outside the U.S.A. and Canada:
For warranty information and service on ViewSonic products sold outside of the U.S.A. and Canada, contact ViewSonic or your local ViewSonic dealer.
The warranty period for this product in mainland China (Hong Kong, Macao and Taiwan Excluded) is subject to the terms and conditions of the Maintenance Guarantee Card.
For users in Europe and Russia, full details of warranty provided can be found in www.viewsoniceurope.com under Support/Warranty Information.
Mexico Limited Warranty VIEWSONIC® PROJECTOR
What the warranty covers:
ViewSonic warrants its products to be free from defects in material and workmanship, under normal use, during the warranty period. If a product proves to be defective in material or workmanship during the warranty period, ViewSonic will, at its sole option, repair or replace the product with a like product. Replacement product or parts may include remanufactured or refurbished parts or components & accessories.
How long the warranty is effective:
3 years for all parts excluding the lamp, 3 years for labor, 1 year for the original lamp from the date of the first consumer purchase.
Lamp warranty subject to terms and conditions, verification and approval. Applies to manufacturer's installed lamp only. All accessory lamps purchased separately are warranted for 90 days.
Who the warranty protects:
This warranty is valid only for the first consumer purchaser.
What the warranty does not cover:
-
Any product on which the serial number has been defaced, modified or removed.
-
Damage, deterioration or malfunction resulting from:
a. Accident, misuse, neglect, fire, water, lightning, or other acts of nature, unauthorized product modification, unauthorized attempted repair, or failure to follow instructions supplied with the product.
b. Any damage of the product due to shipment.
c. Causes external to the product, such as electrical power fluctuations or failure.
d. Use of supplies or parts not meeting ViewSonic's specifications.
e. Normal wear and tear.
f. Any other cause which does not relate to a product defect.
-
Any product exhibiting a condition commonly known as “image burn-in” which results when a static image is displayed on the product for an extended period of time.
-
Removal, installation, insurance, and set-up service charges.
How to get service:
For information about receiving service under warranty, contact ViewSonic Customer Support (Please refer to the attached Customer Support page). You will need to provide your product's serial number, so please record the product information in the space provided below on your purchase for your future use. Please retain your receipt of proof of purchase to support your warranty claim.
For Your Records
Product Name: ____ Model Number: ____
Document Number: Serial Number:
Purchase Date: ____ Extended Warranty Purchase? ____(Y/N)
If so, what date does warranty expire?
-
To obtain warranty service, you will be required to provide (a) the original dated sales slip, (b) your name, (c) your address, (d) a description of the problem, and (e) the serial number of the product.
-
Take or ship the product in the original container packaging to an authorized ViewSonic service center.
-
Round trip transportation costs for in-warranty products will be paid by ViewSonic.
Limitation of implied warranties:
There are no warranties, express or implied, which extend beyond the description contained herein including the implied warranty of merchantability and fitness for a particular purpose.
Exclusion of damages:
ViewSonic's liability is limited to the cost of repair or replacement of the product. ViewSonic shall not be liable for:
-
Damage to other property caused by any defects in the product, damages based upon inconvenience, loss of use of the product, loss of time, loss of profits, loss of business opportunity, loss of goodwill, interference with business relationships, or other commercial loss, even if advised of the possibility of such damages.
-
Any other damages, whether incidental, consequential or otherwise.
-
Any claim against the customer by any other party.
-
Repair or attempted repair by anyone not authorized by ViewSonic.
| Contact Information for Sales & Authorized Service (Centro Autorizado de Servicio) within Mexico: | |
| Name, address, of manufacturer and importers:México, Av. de la Palma #8 Piso 2 Despacho 203, Corporativo Interpalmas,Col. San Fernando Huixquilucan, Estado de MéxicoTel: (55) 3605-1099http://www.viewsonic.com/la/soporte/index.htm | |
| NÚMERO GRATIS DE ASISTENCIA TÉCNICA PARA TODO MÉXICO: 001.866.823.2004 | |
| Hermosillo:Distribuciones y Servicios Computacionales SA de CV.Calle Juarez 284 local 2Col. Bugambilias C.P: 83140Tel: 01-66-22-14-9005E-Mail: disc2@hmo.megared.net.mx | Villahermosa:Compumantenimietnos Garantizados, S.A. de C.V.AV. GREGORIO MENDEZ #1504COL, FLORIDA C.P. 86040Tel: 01 (993) 3 52 00 47 / 3522074 / 3 52 20 09E-Mail: compumantenimientos@prodigy.net.mx |
| Puebla, Pue. (Matriz):RENTA Y DATOS, S.A. DE C.V. Domicilio:29 SUR 721 COL. LA PAZ72160 PUEBLA, PUE.Tel: 01(52).222.891.55.77 CON 10 LINEASE-Mail: datos@puebla.megared.net.mx | Veracruz, Ver.:CONEXION Y DESARROLLO, S.A DE C.V. Av.Americas # 419ENTRE PINZÓN Y ALVARADOFracc. Reforma C.P. 91919Tel: 01-22-91-00-31-67E-Mail: gacosta@qplus.com.mx |
| ChihuahuaSoluciones Globales en ComputaciónC. Magisterio # 3321 Col. MagisterialChihuahua, Chih.Tel: 4136954E-Mail: Cefeo@soluglobales.com | CuernavacaCompusupport de Cuernavaca SA de CVFrancisco Leyva # 178 Col. Miguel HidalgoC.P. 62040, Cuernavaca MorelosTel: 01 777 3180579 / 01 777 3124014E-Mail: aquevedo@compusupportcva.com |
| Distrito Federal:QPLUS, S.A. de C.V.Av. Coyoacán 931Col. Del Valle 03100, México, D.F.Tel: 01(52)55-50-00-27-35E-Mail : gacosta@qplus.com.mx | Guadalajara, Jal.:SERVICRECE, S.A. de C.V.Av. Niños Héroes # 2281Col. Arcos Sur, Sector Juárez44170, Guadalajara, JaliscoTel: 01(52)33-36-15-15-43E-Mail: mmiranda@servicrece.com |
| Guerrero AcapulcoGS Computación (Grupo Sesicomp)Progreso #6-A, Colo Centro39300 Acapulco, GuerreroTel: 744-48-32627 | Monterrey:Global Product ServicesMar Caribe # 1987, Esquina con Golfo PésicoFracc. Bernardo Reyes, CP 64280Monterrey N.L. MéxicoTel: 8129-5103E-Mail: aydecm@gps1.com.mx |
| MERIDA:ELECTROSERAv Reforma No. 403Gx39 y 41Mérida, Yucatán, México CP97000Tel: (52) 999-925-1916E-Mail: rrrb@sureste.com | Oaxaca, Oax.:CENTRO DE DISTRIBUCION YSERVICIO, S.A. de C.V.Murguía # 708 P.A., Col. Centro, 68000, OaxacaTel: 01(52)95-15-15-22-22Fax: 01(52)95-15-13-67-00E-Mail: gpotai2001@hotmail.com |
| Tijuana:STDAv Ferrocarril Sonora #3780 L-CCol 20 de NoviembreTijuana, Mexico | FOR USA SUPPORT:ViewSonic Corporation381 Brea Canyon Road, Walnut, CA. 91789 USATel: 800-688-6688 (English); 866-323-8056 (Spanish);Fax: 1-800-685-7276E-Mail: http://www.viewsonic.com |
- Compliance Information
- FCC Statement
- For Canada
- CE Conformity for European Countries
- Following information is only for EU-member states:
- Important Safety Instructions
- Declaration of RoHS Compliance
- Copyright Information
- Product Registration
- For Your Records
- Contents
- Introduction ...... 1
- Using the Product ....5
- Installation ....10
- Menu Operation....14
- Maintenance ....18
- Specifications....21
- Appendix....22
- Other Information.... 25
- Introduction
- Projector Features
- Notes on the AC Power Cord
- Package Contents
- Projector Overview
- Rear View
- Bottom View
- Using the Product
- Control Panel
- Button Function
- Connection Ports
- Remote Control
- For the first time use:
- For battery change:
- Remote Control Operation
- Installation
- Connecting the Projector
- Powering On/Off the Projector
- Powering On the Projector:
- Powering Off the Projector:
- Adjusting the Projector Adjusting the Projector Height
- Adjusting the Projector Zoom and Focus
- Adjusting Projection Image Size
- Menu Operation
- How to operate
- Picture (Computer / Video Mode)
- Brightness
- Contrast
- Color Setting
- Keystone
- Aspect Ratio
- Image
- Screen Type
- White Intensity
- Gamma
- Computer Image (Computer Mode)
- Frequency
- Tracking
- H Position (Horizontal Position)
- V Position (Vertical Position)
- Video Image (Video Mode)
- Color
- Sharpness
- Tint
- Setting (Computer / Video Mode)
- Menu Position
- Projection
- Signal Type
- Lamp Counter
- Lamp Counter Reset
- Power Saving
- Auto Source
- ECO Mode
- High Altitude
- Filter Mode
- OSD Timeout
- Option (Computer / Video Mode)
- Blank Screen
- Start-up Screen
- Screen Capture
- Password
- DCR (Dynamic Contrast Ratio)
- Language (Computer / Video Mode)
- Factory Default (Computer / Video Mode)
- Maintenance
- Cleaning the Lens
- Cleaning the Projector Housing
- Replacing the Lamp
- Appendix
- LED Indicator Messages
- Compatibility Modes
- Troubleshooting
- Start-up problems
- Image problems
- Remote control problems
- Customer Support
- Limited Warranty
- VIEWSONIC® PROJECTOR
- What the warranty covers:
- How long the warranty is effective:
- Who the warranty protects:
- What the warranty does not cover:
- How to get service:
- Limitation of implied warranties:
- Exclusion of damages:
- Effect of state law:
- Sales outside the U.S.A. and Canada:
- Mexico Limited Warranty VIEWSONIC® PROJECTOR
Brand : VIEWSONIC
Model : PJ551
Category : Video projector