
Shake Creations MS400D - Cupcake Machine BREVILLE - Free user manual and instructions
Find the device manual for free Shake Creations MS400D BREVILLE in PDF.


| Product Type | Cupcake Machine |
| Brand | Breville |
| Model | Shake Creations MS400D |
| Dimensions (approx) | 30 x 20 x 25 cm |
| Weight (approx) | 2.5 kg |
| Power Consumption | 500 W |
| Voltage | 120 V / 60 Hz |
| Capacity | 12 cupcakes per batch |
| Baking Time | Adjustable timer, 10-20 minutes |
| Non-Stick Coating | Yes, on baking cups |
| Auto Shut-Off | Yes, after baking cycle |
| Indicator Lights | Power and ready lights |
| Handle | Cool-touch handle |
| Included Accessories | Measuring scoop, recipe book |
| Cleaning | Wipe with damp cloth; non-stick surface easy to clean |
| Spare Parts Availability | Available from Breville customer service |
| Warranty | 1 year limited |
Frequently Asked Questions - Shake Creations MS400D BREVILLE
User questions about Shake Creations MS400D BREVILLE
0 question about this device. Answer the ones you know or ask your own.
Ask a new question about this device
Download the instructions for your Cupcake Machine in PDF format for free! Find your manual Shake Creations MS400D - BREVILLE and take your electronic device back in hand. On this page are published all the documents necessary for the use of your device. Shake Creations MS400D by BREVILLE.
USER MANUAL Shake Creations MS400D BREVILLE
Breville Customer Service Centre
Australian Customers
Mail: PO Box 22 Botany NSW 2019 AUSTRALIA
Phone: 1300 139 798
Fax: (02) 9384 9601
Email: Customer Service: askus@breville.com.au
New Zealand Customers
Mail: Private Bag 94411 Botany Manukau 2163 Auckland NEW ZEALAND
Phone: 0800 273 845
Fax: 0800 288 513
Email: Customer Service: askus@breville.com.au
www.breville.com.au
Breville is a registered trademark of Breville Pty. Ltd. A.B.N. 98 000 092 928. Copyright Breville Pty. Ltd. 2010.
Due to continued product improvement, the products illustrated/photographed in this booklet may vary slightly from the actual product.
Model BSG220/BSG520/BSG540 Issue - B10
Breville
the Toast & Melt
Instruction Booklet
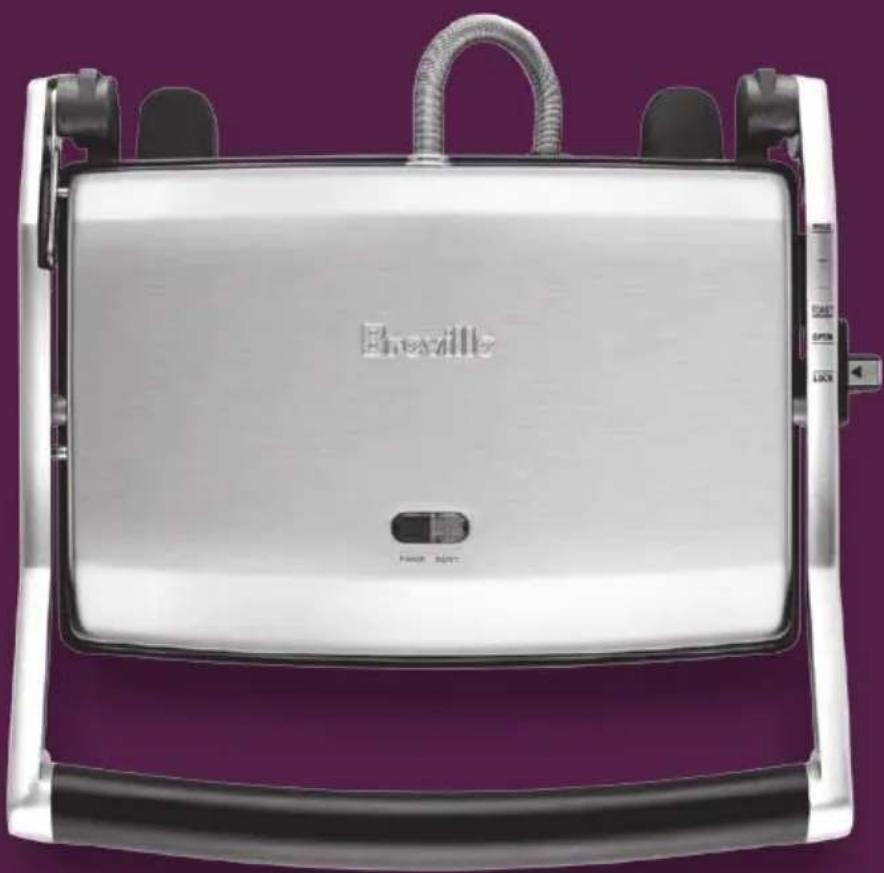
natural_image
Exterior view of a stainless steel electric heater (no visible text or symbols on body)CONGRATULATIONS
on the purchase of your new
Breville Toast & Melt
CONTENTS
4 Breville recommends safety first
6 Know your
Breville Toast & Melt
8 Operating your
Breville Toast & Melt
9 Toasted sandwiches
10 Open sandwich melts
12 Hints for best results
14 Care, cleaning & storage
16 Recipes
- Savoury (p17)
- Sweet (p25)
At Breville we are very safety conscious. We design and manufacture consumer products with the safety of you, our valued customer, foremost in mind. In addition we ask that you exercise a degree of care when using any electrical appliance and adhere to the following precautions.
IMPORTANT SAFEGUARDS
READ ALL INSTRUCTIONS BEFORE USE AND SAvE FOR FUTURE REFERENCE
- Carefully read all instructions before operation and save for future reference.
- Remove any packaging material and promotional stickers before using the sandwich press for the first time.
• To eliminate a choking hazard for young children, remove and safely discard the protective cover fitted to the power plug of this appliance.
- Do not place the sandwich press near the edge of a bench or table during operation. Ensure that the surface is level, clean and free of water.
- Keep the sandwich press clear of walls, curtains and other heat or steam sensitive materials.
- Do not place the sandwich press on or near a hot gas or electric burner, or where it could touch a heated oven. Use the sandwich press well away from walls.
- Provide adequate space above and on all sides for air circulation around the sandwich press.
- Do not place the sandwich press on any surface that may be affected by heat. The use of a heat resistant matt is recommended on these surfaces.
- Do not use on a sink drain board.
• Always use the sandwich press on a dry, level surface.
- Do not touch hot surfaces. Use the handles to lift and open the top plate. Take care when using the Adjustable Grilling Height Control.
- Do not leave the sandwich press unattended when in use.
- Do not place anything on top of the sandwich press when the lid is closed, when in use and when stored.
• Always switch the sandwich press off at the power outlet, then unplug the power cord and to allow to cool, if appliance is not in use, before cleaning, before attempting to move the appliance, disassembling, assembling and when storing the appliance.
- Do not use harsh abrasives, caustic cleaners or oven cleaners when cleaning the sandwich press.
- Keep the exterior housing and the non-stick cooking plates clean. Follow the cleaning instructions provided in this book. Refer to Care, Cleaning and Storage (Page 11).
- This appliance is not intended to be operated by means of an external timer or separate remote control system.
IMPORTANT SAFEGUARDS FOR ALL ELECTRICAL APPLIANCES
• Fully unwind the power cord before use.
- Do not let the power cord hang over the edge of a bench or table, touch hot surfaces or become knotted.
• To protect against electric shock do not immerse the power cord, power plug or appliance in water or any other liquid.
- The appliance is not intended for use by persons (including children) with reduced physical, sensory or mental capabilities, or lack of experience and knowledge, unless they have been given supervision or instruction concerning use of the appliance by a person responsible for their safety.
• Children should be supervised to ensure that they do not play with the appliance.
- It is recommended to regularly inspect the appliance. To avoid a hazard do not use the appliance if power cord, power plug or appliance becomes damaged in any way. Return the entire appliance to the nearest authorised Breville Service Centre for examination and/or repair.
- Any maintenance other than cleaning should be performed at an authorised Breville Service Centre.
- This appliance is for household use only. Do not use this appliance for anything other than its intended use. Do not use in moving vehicles or boats. Do not use outdoors. Misuse may cause injury.
- The installation of a residual current device (safety switch) is recommended to provide additional safety protection when using electrical appliances. It is advisable that a safety switch with a rated residual operating current not exceeding 30mA be installed in the electrical circuit supplying the appliance. See your electrician for professional advice.
IMPORTANT
Fully unwind the power cord from the cord storage facility before use.
SAvE THESE INSTRUCTIONS
KNOW
your Breville Toast & Melt
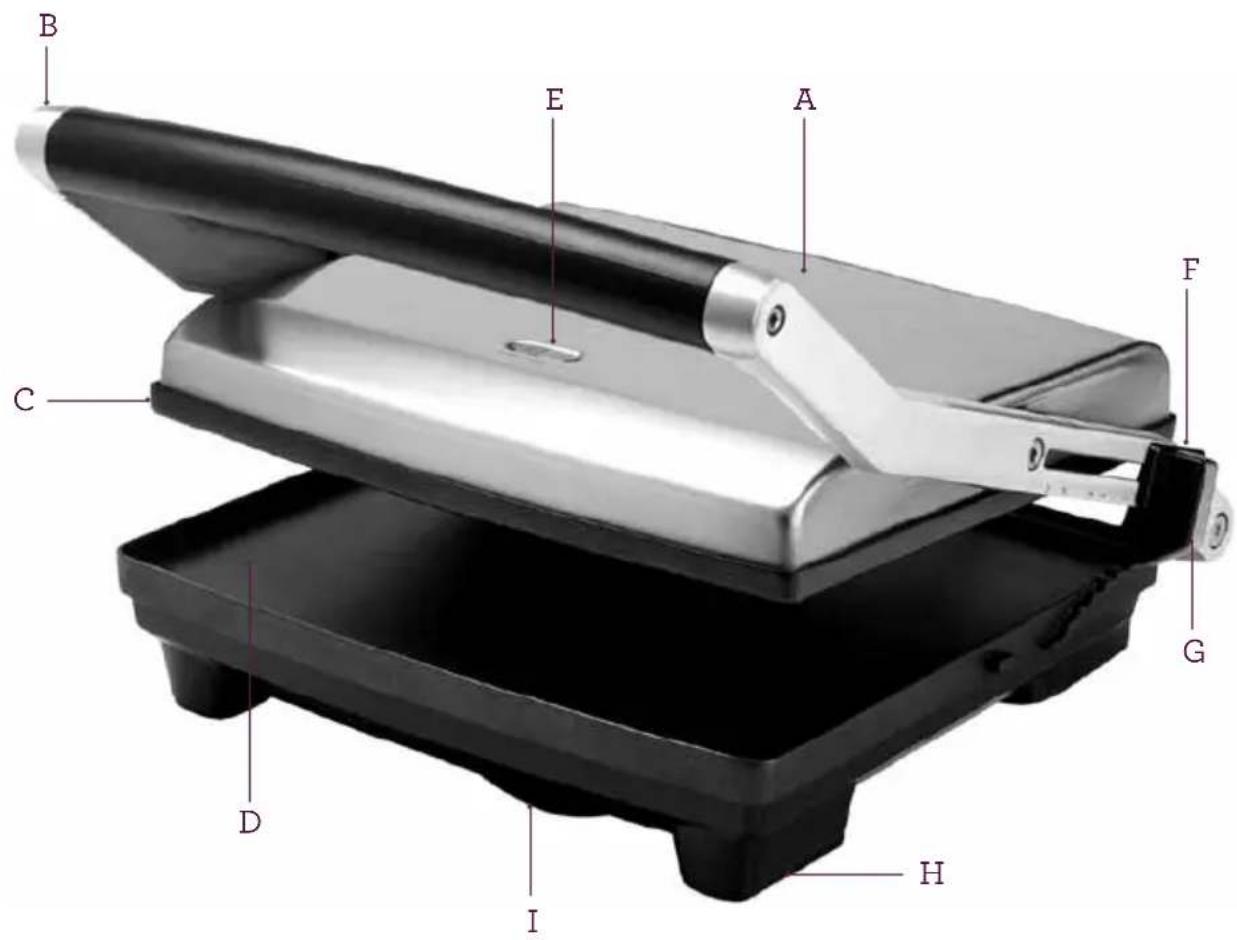
A. 2200W of power (BSG540)
2000W of power (BSG520 & BSG220)
for fast heat up and quick toasting.
B. Heavy duty die-cast arms for durability and strength.
C. Floating top plate automatically adjusts to thick or thin sandwiches.
D. Flat non-stick cooking plates for extra crispy toasted results.
E. 'Power' and 'Ready' lights indicate when the sandwich press is heating or ready to use.
F. Adjustable height control clip with 4 settings for making open sandwich melts, toasted sandwiches and everything in between.
G. Safety locking storage clip
to lock plates closed for upright storage.
H. Non-slip feet
I. Convenient cord wrap in base
OPERATING
your Breville Toast & Melt
OPERATING yOUR BREvILLE TOAST & MELT
BEFORE FIRST USE
Remove any promotional materials and packaging materials before use. Check that the cooking plates are clean and free of dust. If necessary, wipe over with a damp cloth.
When using the sandwich press for the first time you may notice a fine smoke haze. This is caused by the heating of some of the components. There is no need for concern.
TOASTEd SANdWICHES
- Insert the power plug into a 230V or 240V power outlet and then turn the power ON. The red 'POWER' light will illuminate.
- Allow the sandwich press to pre-heat with the top cooking plate in the closed position until the green 'READY' light illuminates.
- During this time, prepare the sandwich. When the sandwich press has preheated, place the sandwich onto the bottom cooking plate. Always place sandwiches towards the rear of the bottom cooking plate.
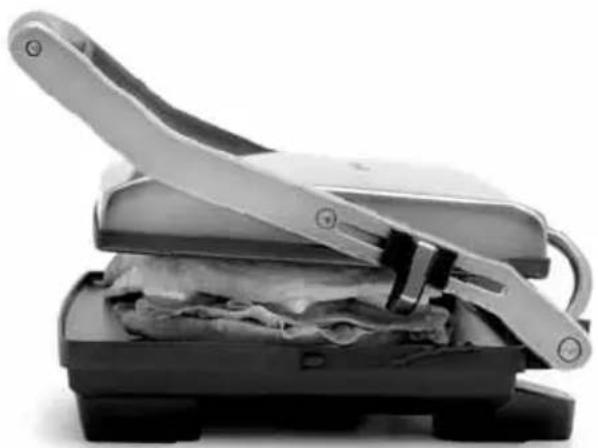
- Close the top cooking plate. The top cooking plate has a floating hinge that is designed to evenly press down on the sandwich (see Fig 1).
natural_image
Black-and-white photo of a sandwich with a knife inserted into the side (no text or symbols visible)Fig. 1
- Toasting should take approximately 5-8 minutes. Exact toasting time will be a matter of taste. It will also depend on the type of bread and type of filling used.
- When the sandwich is cooked, use the handle to open the sandwich press and raise the top cooking plate. Remove sandwich with the help of a plastic or wooden spatula. Never use metal tongs or a knife as these can cause damage to the non-stick coating.
NOTE
Always allow the sandwich press to pre-heat until the green 'READY' light illuminates.
NOTE
The safety locking storage clip should not be used to clamp down the top cooking plate when the sandwiches are in the sandwich press. The weight of the top cooking plate will gradually press down the sandwich during the cooking process.
NOTE
When using the sandwich press for the first time you may notice a fine smoke haze. This is caused by the heating of some of the components. There is no need for concern.

CAUTION
HOT SURFACE - The temperature of accessible surfaces may be high when the appliance is operating.
Fully unwind the cord from the cord storage facility before use.
OPERATING YOUR BREVILLE TOAST & MELT
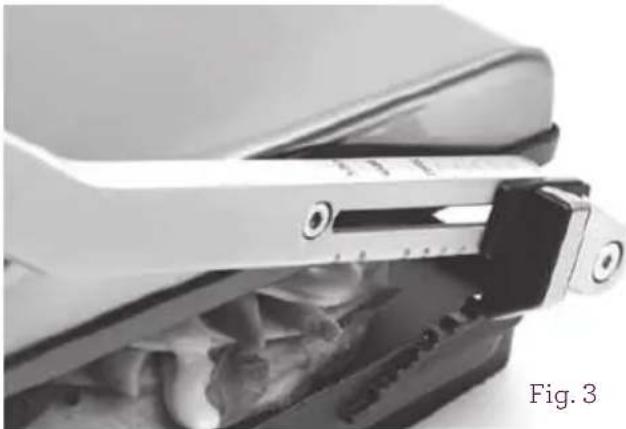
Your sandwich press features an Adjustable Height Control feature which allows you to fix the top plate to a range of positions above the bottom plate. This allows your sandwich press to be used as an open toaster ideal for toasting open sandwich melts. It can also be used for toasting sandwiches where you don't need to apply the weight of the top plate.
OPEN SANDWICH MELTS
- Allow the sandwich press to pre-heat until the green 'READY' light illuminates.
- Place sandwich to be melted on bottom plate.
- Move the Adjustable Height Control clip on the right hand side of the sandwich press to the desired height (see Fig 2).
- Slowly lower the top plate until it rests on the Adjustable Height Control clip.
- The top plate will radiate the desired heat to melt ingredients such as cheese.
- Toasting melts should take approximately 3-4 minutes. However exact toasting time will be a matter of taste. It will also depend on the height of the top plate.
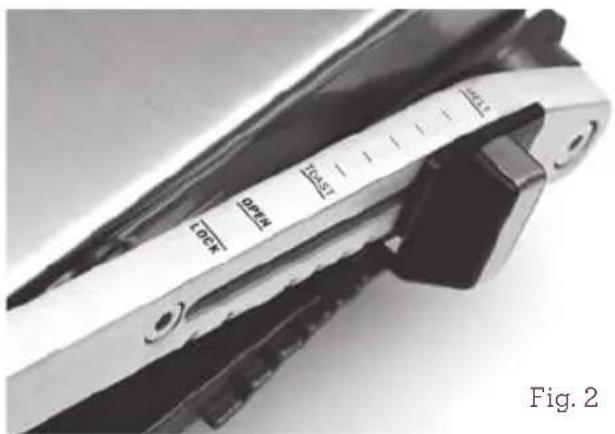

Adjustable Height Control
Toasts or melts any bread thickness in minutes.
natural_image
Close-up of a mechanical device with internal components and a label 'Fig. 3' (no readable text or symbols on the device itself)NOTE
The Adjustable Height Control can be moved to accommodate thick or thin melts by sliding the clip forwards or backwards along the arm.
HINTS FOR BEST RESULTS
from your Breville Toast & Melt
BREAD
Most types of bread can be used; white, wholemeal, kibbled wheat, wholegrain, raisin loaf and so on. The sandwich press is ideal for toasting foccacia, Turkish bread, baguettes as well as bread rolls. Raisin bread, brioche or other sweet breads which contain a high sugar content will tend to brown quicker.
FILLINGS
Try to use canned or pre-cooked fruit as fresh fruit may give off excessive juices when heated. Be careful when biting into sandwiches containing fillings such as cheese and tomato or jam as they retain heat and can burn if eaten too quickly.
TOASTING BREAD
The unique flat plate design makes the sandwich press ideal for toasting plain breads, and Turkish bread, without any fillings or spreads. Try toasting Turkish Bread with jams for a great alternative to standard breads at breakfast.
FAT FREE SNACKS
Due to the non-stick flat plate design, it is not necessary to use any butter or margarine on the outside of your toasted snacks.
CARE, CLEANING & STORAGE
for your Breville Toast & Melt
CARE, CLEANING & STORAGE
Before cleaning, switch the power off at the power outlet and then remove the power plug. Allow your sandwich press to cool before cleaning. The appliance is easier to clean when slightly warm.
Always clean your sandwich press after each use to prevent a build up of baked-on foods.
Wipe cooking plates with a soft cloth. If cooked on food is not removed by this method reheat the unit for 1-2 minutes, then brush with a little oil or melted butter. Allow to stand for five minutes then wipe with a damp cloth.
NOTE
The cooking plates are coated with a non-stick surface, do not use abrasives.
NOTE
Do not use spray-on non-stick coatings as this will affect the performance of the non-stick surface on the cooking plates.
STORAGE
To store your sandwich press:
- Switch off at power outlet and unplug power cord from the wall.
- Allow the sandwich press to fully cool.
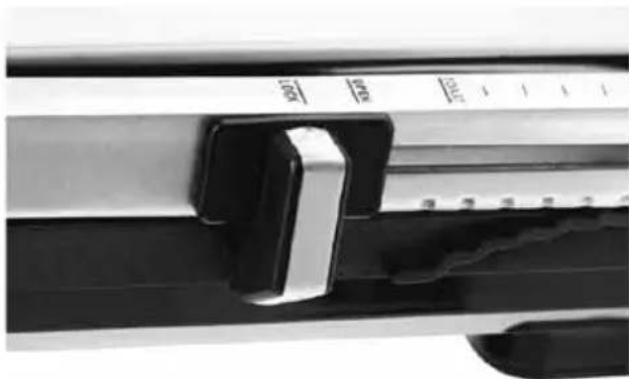
- Slide the Adjustable Height Control towards the front handle to the 'LOCK' position so that the top and bottom cooking plates are locked together (see Fig 4).
natural_image
Close-up of a mechanical component with a black clip and metallic handle, no visible text or symbolsFig. 4
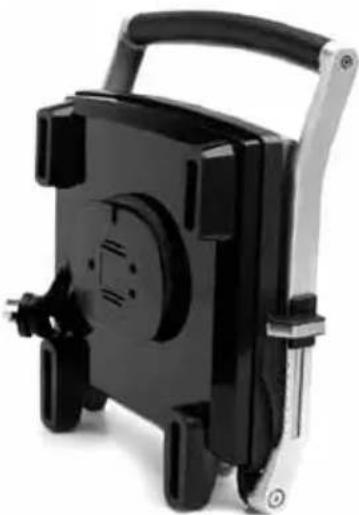
- Wrap the power cord in the cord storage area below the appliance (see Fig 5).
- Store on a flat, dry, level surface.
natural_image
Black and silver portable device with handle and wheels (no visible text or symbols)Fig.5
NOTE
The storage clip should not be used to clamp down the top plate when sandwiches are in the sandwich press.

WARNING
Do not immerse any part of the sandwich press in water or any other liquid.
RECIPES
OMELETTE FOCACCIA WITH ROASTEd CAPSICUM & MUSHROOM
Serves 2
INGREdIENTS
3 bacon rashers, thinly sliced
1 Tablespoon extra virgin olive oil
100g button mushrooms, sliced
^1/_3 cup shallots, thinly sliced
Freshly ground black pepper
3 x 60g eggs, lightly beaten
1 Tablespoon freshly chopped herbs
^1/_4 cup thinly sliced roasted capsicum
1 large focaccia, halved
125g sliced Swiss cheese
Salad greens, optional
METHOD
-
Pre-heat sandwich press until the green 'READY' light illuminates.
-
Meanwhile, fry bacon in a non-stick frypan until crisp. Remove from pan and set aside. Sauté mushrooms and shallots in frypan until any liquid has evaporated. Remove from heat.
-
Beat eggs lightly adding pepper and herbs. Pour mixture over mushrooms in pan. Return to medium heat and cook until eggs are set but soft in the centre, approximately 3-5 minutes.
-
Remove omelette from frypan and roughly chop.
-
Cut focaccia in half to form a sandwich. Fill focaccias with omelette, capsicum, cheese and bacon.
-
Cook focaccia until golden, crisp and heated through, approximately 8 minutes
-
Serve with salad greens.
CHAR GRILLED CHICKEN LAvOSH WITH MANGO & PINENUT MAyONNAISE
Serves 2-3
INGREdIENTS
1 / 4 cup mayonnaise
^1/2 Tablespoon chilli salsa
1 teaspoons grated lime rind
12 Tablespoon lime juice
125g canned mango pieces, drained
1 12 Tablespoon toasted pinenuts
1 char-grilled chicken breast, sliced thinly
2 sheets lavosh bread
1 avocado, sliced
Salad greens, optional
METHOD
-
Pre-heat sandwich press until the green 'READY' light illuminates.
-
Combine mayonnaise, salsa, rind, juice, mango, pinenuts and chicken.
-
Spread chicken mixture over each lavosh. Top with avocado and roll tightly.
-
Cook lavosh rolls until golden, crisp and heated through, approximately 8 minutes.
-
Serve sliced on an angle with salad greens.
TUNA, BRIE & ARTICHOKE ROLLS
Serves 2
INGREdIENTS
2 large crusty round rolls
100g black olive paste
200g can tuna, drained
6 marinated baby artichokes
125g Brie cheese, thinly sliced
METHOD
- Pre-heat sandwich press until the green 'READY' light illuminates.
- Cut rolls in half and spread with olive paste. Fill with tuna, artichokes and cheese.
- Cook until golden, crisp and heated through, approximately 8 minutes.
MEXICAN TORTILLAS WITH CHORIZO & SOUR CREAM
Serves 2-3
INGREdIENTS
125g Mexican salsa
^1/_4 cup red kidney beans
1 Tablespoon freshly snipped garlic chives
100g finely chopped chorizo sausage
8 tortilla rounds (unfried variety)
100g tzatziki dip
100g avocado dip
125g mozzarella cheese, grated
Sour cream, for serving
Salad greens, optional
METHOD
- Pre-heat sandwich press until the green 'READY' light illuminates.
- Combine salsa, beans, chives and sausage. Spoon mixture over 4 tortillas. Top with alternating layers of tzatziki, avocado and cheese, then remaining 4 tortillas to make 4 sandwiches. Be careful not overfill.
- Cook tortillas until golden, crisp and heated through, approximately 8 minutes.
- Serve with sour cream and salad greens.
ROAST BEEF PITA WITH EGGPLANT & MUSTARD
Serves 2-3
INGREdIENTS
2 round Pita bread
70g cream cheese
3 teaspoons seeded mustard
^1/_2 Tablespoon lemon juice
^1/_3 cup grated canned beetroot, drained
100g shaved rare roast beef
70g marinated roasted eggplant
METHOD
-
Pre-heat sandwich press until the green 'READY' light illuminates.
-
Combine cream cheese, mustard and lemon juice. Spread each Pita bread with cream cheese mixture. Top with beetroot, roast beef and eggplant. Roll tightly.
-
Cook Pita bread until golden, crisp and heated through, approximately 10 minutes. Serve sliced.
SPICy LAMB PITA WITH MINT & TOMATO
Serves 2-3
INGREdIENTS
1 Tablespoon oil
125g ground lamb mince
2 Tablespoons finely chopped onion
12 cup diced tomato
1 Tablespoon freshly chopped mint
^1/_4 teaspoon ground coriander
Pinch ground ginger
12 teaspoon ground cumin
^1/_4 teaspoon turmeric
Salt and freshly ground black pepper, to taste
3 pita breads
3 slices Swiss cheese
Tzatziki dip, for serving
METHOD
-
Pre-heat sandwich press until the green 'READY' light illuminates.
-
Heat oil in a non-stick frypan, sauté lamb mince, onions, tomato, mint, spices and seasonings until browned and cooked. Drain.
-
Split pitas open to form pockets. Fill with lamb mixture and insert a cheese slice into each pocket.
-
Cook pitas until golden, crisp and heated through, approximately 10 minutes.
-
Serve with tzatziki dip.
WARM CAESAR TURKISH
Serves 2
INGREdIENTS
3 bacon rashers, thinly sliced
2 round Turkish breads
1 char grilled chicken breast fillet, thinly sliced
1 hard boiled egg, peeled and sliced
^1/_3 cup prepared garlic croutons
30g baby spinach leaves
60g freshly grated Parmesan cheese
Caesar salad dressing, for serving
METHOD
- Pre-heat sandwich press until the green 'READY' light illuminates.
- Meanwhile heat a non-stick frypan and fry bacon until crispy. Cut Turkish bread in half to form a sandwich. Fill with bacon, chicken, eggs, croutons, spinach and cheese.
- Cook Turkish bread until golden, crisp and cooked through, approximately 6 minutes.
- Serve drizzled with Caesar salad dressing.
MEdITERRANEAN LAyEREd COB ROLLS
Serves 2-3
INGREdIENTS
2 twist or cob bread rolls
2 Tablespoons pesto
100g marinated roasted eggplant
125g marinated roasted red capsicum
60g char-grilled sliced sweet potato
100g marinated semi-dried tomatoes, drained
60g mushrooms, sliced
100g sliced Swiss cheese
METHOD
- Pre-heat sandwich press until the green 'READY' light illuminates.
- Cut bread rolls in half and spread with pesto. Fill with eggplant, capsicum, sweet potato, dried tomato, mushrooms and cheese.
- Cook bread rolls until golden, crisp and heated through, approximately 8 minutes.
ANTIPASTO RyE WITH HOMMUS
Serves 2-3
INGREdIENTS
4 slices rye bread
^1/_2 Tablespoon extra virgin olive oil
1 Tablespoon sun-dried tomato paste
60g hommus
4 stuffed vine leaves
200g artichoke hearts, drained and sliced
4 slices Swiss cheese
METHOD
-
Pre-heat sandwich press until the green 'READY' light illuminates.
-
Combine oil tomato paste. Spread rye bread with tomato mixture then hommus. Fill with vine leaves, artichokes and cheese to make 2 sandwiches.
-
Cook until golden, crisp and heated through, approximately 8 minutes.
-
Serve cut in half.
GORGONZOLA PANINI WITH SPINACH
Serves 2
INGREdIENTS
30g herb and garlic butter
4 slices crusty country-style bread
50g English spinach leaves
60g Gorgonzola cheese, crumbled
60g marinated roasted capsicum
METHOD
-
Pre-heat sandwich press until the green 'READY' light illuminates.
-
Spread herb and garlic butter over bread slices and fill with spinach, cheese and capsicum.
-
Cook until golden, crisp and heated through approximately 6 minutes.
-
Serve cut in half.
GOAT'S CHEESE & ROASTEd PEPPER FOCACCIA
Serves 2
INGREdIENTS
1 large round foccacia
90g softened goat's cheese
^1/2 Tablespoon roughly chopped Italian parsley
^1/2 Tablespoon roughly chopped basil
1 clove garlic, thinly sliced
1 Tablespoon drained capers
1 Tablespoon lemon juice
^1/2 Tablespoon sweet Thai chilli sauce
60g marinated roasted zucchini
50g semi dried tomatoes
METHOD
- Pre-heat sandwich press until the green 'READY' light illuminates.
- Cut focaccia in half to form a sandwich. Combine goat's cheese, parsley, basil, garlic, capers, lemon juice and chilli sauce. Spread focaccia with goat's cheese mixture. Fill with zucchini and tomatoes.
- Cook focaccias until golden, crisp and heated through, approximately 8 minutes.
PROSCIUTTO BAGUETTE WITH BOCCONCINI
Serves 2
INGREdIENTS
2 small-medium baguette rolls
80g Italian prosciutto, thinly sliced
75g bocconcini cheese, thinly sliced
4 basil leaves
Freshly ground black pepper
1 Tablespoon extra virgin olive oil
METHOD
- Pre-heat sandwich press until the green 'READY' light illuminates.
- Cut baguette in half. Fill with layers of prosciutto, cheese and basil. Season to taste and drizzle with oil.
- Cook baguettes until golden, crisp and heated through, approximately 6-8 minutes.
- Serve cut in half.
CHAR-GRILLED CHICKEN AND SALSA vERdE CIABATTA
Serves 2
INGREdIENTS
1 char- grilled chicken breast fillet, sliced
1 clove garlic, thinly sliced
^1/3 cup chopped parsley
1 Tablespoon finely chopped sage
^1/4 cup stuffed pimento green olives, chopped
1 Tablespoon drained capers
1 Tablespoon extra virgin olive oil
^1/2 teaspoon freshly grated lime rind
^1/_2 Tablespoon lemon juice
4 large slices Ciabatta bread
4 large slices Swiss cheese
METHOD
- Pre-heat sandwich press until the green 'READY' light illuminates.
- Combine chicken, garlic, parsley, sage, olives, capers, oil, rind and juice. Fill bread with chicken mixture and sliced cheese to make 2 sandwiches.
- Cook until golden, crisp and heated through, approximately 8-10 minutes.
PRAWN AND WATERCRESS WHOLEGRAIN TOASTIE
Serves 2
INGREdIENTS
4 slices wholegrain bread
70g cream cheese, softened
60g herb & garlic butter
75g watercress
400g medium cooked king prawns, peeled and de-veined
METHOD
- Pre-heat sandwich press until the green 'READY' light illuminates.
- Spread bread with combined cream cheese and garlic butter. Fill with watercress and prawns to make 2 sandwiches.
- Cook until golden, crisp and heated through, approximately 8 minutes.
CRISPy SWORdFISH FOCACCIA WITH SPINACH & MAyO
Serves 2
INGREdIENTS
250g fresh swordfish fillets thinly sliced
1^1/2 Tablespoons extra virgin olive oil
2 Tablespoons freshly chopped herbs (basil, garlic chives, thyme, dill)
^1/2 teaspoon paprika
Salt and freshly ground black pepper, to taste
1 large focaccia
2 Tablespoons mayonnaise
4 tomato slices
^1/2 Tablespoon drained capers
6 baby English spinach leaves
METHOD
-
Pre-heat sandwich press until the green 'READY' light illuminates.
-
Brush fish fillets with half the olive oil. Coat fillets with combined herbs, paprika and seasonings.
-
Heat remaining oil in a frypan. Fry fish until golden. Remove and drain.
-
Cut focaccia in half to form a sandwich and spread mayonnaise. Fill with fish, tomato, capers and spinach.
-
Cook focaccias until golden, crisp, and heated through, approximately 5 minutes.
NOTE
Large focaccia may need to be cut in half to fit into BSG220 and BSG520 2 Slice Sandwich Press's.
ITALIAN FONTINA TOASTIE
Serves 2
INGREdIENTS
4 slices white bread
100g Italian fontina cheese, sliced
100g marinated roasted red capsicums
100g sliced marinated mushrooms
Freshly ground black pepper, to taste
METHOD
-
Pre-heat sandwich press until the green 'READY' light illuminates.
-
Fill bread with layers of cheese, capsicum and mushrooms season with pepper make into 2 sandwiches.
-
Cook until golden, crisp and heated through, approximately 6-8 minutes.
NOTE
Fontina cheese may be substituted with Parmesan or Romano cheese.
CHOCOLATE CREAM CHEESE TOASTIE
Serves 2
INGREdIENTS
80g cream cheese, softened
4 slices textured Country style bread
250g bittersweet chocolate, coarsely grated
Vanilla ice-cream, for serving
METHOD
- Pre-heat sandwich press until the green 'READY' light illuminates.
- Spread cream cheese over bread slices and sprinkle with grated chocolate. Sandwich together.
- Cook until golden, crisp and heated through, approximately 6 minutes.
- Serve with ice-cream.
CRISPy BRIOCHE WITH BERRIES AND ICE-CREAM
Serves 2
INGREdIENTS
^1/2 punnet strawberries, hulled
^1/2 punnet blueberries
^1/2 punnet raspberries
1 / 4 cup port
1 loaf brioche
Vanilla ice-cream, for serving
Icing sugar, for serving
METHOD
- Pre-heat sandwich press until the green 'READY' light illuminates.
- Puree berries and port until smooth. Set aside. Cut 4 slices from brioche and cook until toasted, approximately 5 minutes.
- Arrange toasted brioche on 2 large, white plates. Top with ice-cream and drizzle with berry sauce.
- Serve immediately, dust with icing sugar.
BERRy & MASCARPONE TOASTIE
Serves 2
INGREdIENTS
100g Mascarpone cheese
4 slices Country style bread
^1/2 punnet strawberries, hulled and sliced
^1/_2 punnet raspberries
1 Tablespoon honey
METHOD
-
Pre-heat sandwich press until the green 'READY' light illuminates.
-
Spread cheese over bread slices. Fill with berries and drizzle with honey to make 2 sandwiches.
-
Cook until golden, crisp and heated through, approximately 8 minutes.
SWEET NECTARINE & CINNAMON TOASTIE
Serves 2
INGREdIENTS
40g unsalted butter, softened
4 slices soy and linseed grain bread
2 nectarines, peeled and sliced
1 teaspoon ground cinnamon
2 Tablespoons caster sugar
METHOD
-
Pre-heat sandwich press until the green 'READY' light illuminates.
-
Spread butter over bread slices. Fill with sliced nectarine and sprinkle with combined cinnamon and sugar to make 2 sandwiches.
-
Cook until golden, crisp and heated through, approximately 8 minutes.
FIG & RICOTTA FOCACCIA WITH FRESH MINT
Serves 2
INGREdIENTS
2 small plain rounds of focaccia
80g fresh ricotta cheese
3 fresh figs, thinly sliced
6 small fresh mint leaves
1 Tablespoon caster sugar
METHOD
- Pre-heat sandwich press until the green 'READY' light illuminates.
- Cut focaccias in half to form a sandwich. Spread with ricotta cheese. Fill with figs, mint leaves and sprinkling of caster sugar.
- Cook until golden, crisp and heated through, approximately 8 minutes.
- Breville Customer Service Centre
- Breville
- CONGRATULATIONS
- CONTENTS
- IMPORTANT SAFEGUARDS
- READ ALL INSTRUCTIONS BEFORE USE AND SAvE FOR FUTURE REFERENCE
- IMPORTANT SAFEGUARDS FOR ALL ELECTRICAL APPLIANCES
- IMPORTANT
- SAvE THESE INSTRUCTIONS
- KNOW
- OPERATING
- OPERATING yOUR BREvILLE TOAST & MELT
- BEFORE FIRST USE
- TOASTEd SANdWICHES
- NOTE
- CAUTION
- OPEN SANDWICH MELTS
- Adjustable Height Control
- HINTS FOR BEST RESULTS
- BREAD
- FILLINGS
- TOASTING BREAD
- FAT FREE SNACKS
- CARE, CLEANING & STORAGE
- STORAGE
- WARNING
- RECIPES
- OMELETTE FOCACCIA WITH ROASTEd CAPSICUM & MUSHROOM
- INGREdIENTS
- METHOD
- CHAR GRILLED CHICKEN LAvOSH WITH MANGO & PINENUT MAyONNAISE
- TUNA, BRIE & ARTICHOKE ROLLS
- MEXICAN TORTILLAS WITH CHORIZO & SOUR CREAM
- ROAST BEEF PITA WITH EGGPLANT & MUSTARD
- SPICy LAMB PITA WITH MINT & TOMATO
- WARM CAESAR TURKISH
- MEdITERRANEAN LAyEREd COB ROLLS
- ANTIPASTO RyE WITH HOMMUS
- GORGONZOLA PANINI WITH SPINACH
- GOAT'S CHEESE & ROASTEd PEPPER FOCACCIA
- PROSCIUTTO BAGUETTE WITH BOCCONCINI
- CHAR-GRILLED CHICKEN AND SALSA vERdE CIABATTA
- PRAWN AND WATERCRESS WHOLEGRAIN TOASTIE
- CRISPy SWORdFISH FOCACCIA WITH SPINACH & MAyO
- ITALIAN FONTINA TOASTIE
- CHOCOLATE CREAM CHEESE TOASTIE
- CRISPy BRIOCHE WITH BERRIES AND ICE-CREAM
- BERRy & MASCARPONE TOASTIE
- SWEET NECTARINE & CINNAMON TOASTIE
- FIG & RICOTTA FOCACCIA WITH FRESH MINT
Brand : BREVILLE
Model : Shake Creations MS400D
Category : Cupcake Machine