
DC C25 - Camera BENQ - Free user manual and instructions
Find the device manual for free DC C25 BENQ in PDF.


| Product Type | Digital Camera |
| Brand | BenQ |
| Model | DC C25 |
| Sensor Resolution | 2.0 megapixels |
| Optical Zoom | 3x |
| Digital Zoom | 4x |
| LCD Screen | 1.5-inch TFT LCD |
| Storage | SD/MMC card slot, internal memory 8MB |
| Image Format | JPEG |
| Video Recording | AVI with audio |
| Connectivity | USB 1.1, AV out |
| Power Source | 2x AA batteries (alkaline or Ni-MH rechargeable) |
| Dimensions (WxHxD) | 88 x 60 x 35 mm |
| Weight | Approx. 120 g (without batteries) |
| Main Functions | Auto mode, scene modes, self-timer, flash |
| Maintenance | Clean lens with soft cloth; keep dry and avoid dust |
| Safety | Do not disassemble; avoid water and extreme temperatures |
| Spare Parts | Batteries, charger, USB cable, wrist strap |
| General Information | Compact and easy-to-use digital camera for everyday photography |
Frequently Asked Questions - DC C25 BENQ
User questions about DC C25 BENQ
0 question about this device. Answer the ones you know or ask your own.
Ask a new question about this device
Download the instructions for your Camera in PDF format for free! Find your manual DC C25 - BENQ and take your electronic device back in hand. On this page are published all the documents necessary for the use of your device. DC C25 by BENQ.
USER MANUAL DC C25 BENQ
Copyright © 2004 by BenQ Corporation. All rights reserved. No part of this publication may be reproduced, transmitted, transcribed, stored in a retrieval system or translated into any language or computer language, in any form or by any means, electronic, mechanical, magnetic, optical, chemical, manual or otherwise, without prior written permission from BenQ Corporation.
Brands and product names are trademarks or registered trademarks of their respective owners.
Disclaimer
BenQ makes no warranty of any kind with regard to this material, including, but not limited to, the implied warranties of merchantability and fitness for a particular purpose. BenQ assumes no responsibility for any error that may appear in this document. BenQ makes no commitment to update nor to keep current the information contained in this document.
Taking care of your camera
- Do not use your camera outside of the following environmental ranges:
• temperature: 0°C to 40°C; relative humidity: 45% \~ 85%
- Do not use or store your camera in the environments listed below:
- Direct sunlight
• High humidity and dusty locations
- Next to an air conditioner, electric heater or other heat source
• In a closed car that is directly under the sun
- Avoid vibration
- If your camera gets wet, wipe it with a dry cloth as soon as possible.
- Seawater may cause severe damage.
- Do not use organic solvents such as alcohol to clean your camera.
- Use a lens brush or soft cloth to clean the lens.
- Do not touch the lens with your fingers.
- To prevent electrical shock, do not attempt to disassemble or repair your camera by yourself.
• Water may cause a fire or electric shock. Store your camera in a dry place.
- Do not use your camera outdoors when it is raining or snowing.
- Do not use your camera in water.
- If any foreign substance or water gets in the camera, turn the power off immediately and disconnect the transformer. Send the camera to a maintenance center for repairs.
- Transfer data to a computer as soon as possible to avoid losing data.
TABLE OF CONTENTS
Introduction
Features 2
Unpacking 2
Components ....3
Getting Started
Attaching the Hand Strap 4
Turning the Camera Off and On ....4
Recharging the Battery 4
Using an SD Flash Memory Card ....4
Using the DC C25/C35
Understanding the LCD Display Icons 5
Taking Photos 7
Recording Movie Clips 12
Playback Mode ....13
Setup Mode 16
Making Connections
Installing the Driver 19
Installing Software 19
Downloading Files to a Computer 20
Viewing Photos and Movie Clips on a Television ......20
Using the DC C25/C35 as a PC/Web Cam ......21
Using QLink ......21
Disconnecting the Camera 22
Appendix
Warning/Error Messages and Codes 23
System Requirements 24
Service Information & Technical Support 24
INTRODUCTION
Features
The BenQ DC C25/C35 Digital Camera is a powerful but easy to use digital still image, video recorder that links seamlessly with your computer. Major features include:
- Long-lasting built-in lithium-ion rechargeable battery
- USB or power adapter charge the camera directly
- Unlimited movie recording (duration depends on memory)
- Up to 3 mega pixels resolution with 4x digital zoom
- QLink software simplifies downloading and managing files
• Three games for great fun anywhere, anytime
Unpacking
Contact your dealer immediately if any of the items below are damaged or missing:
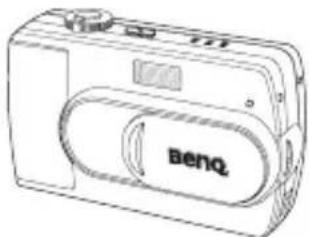
natural_image
Line drawing of a Beno digital camera with no visible text or symbols on the device bodyDC C25/C35 Digital Camera
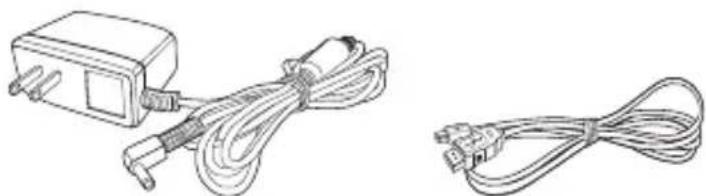
natural_image
Line drawings of two types of electrical connectors: a power adapter and a USB cable (no text or symbols)AC power adapter USB cable
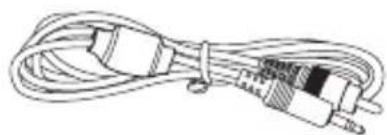
natural_image
Line drawing of a multi-pin cable with connectors and connectors (no text or symbols)Video cable Hand strap
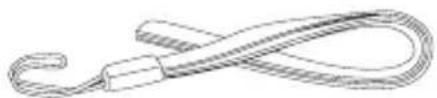
natural_image
Simple line drawing of a rope tied with a block (no text or symbols)
DC C25/C35 Software CD-ROM
Components
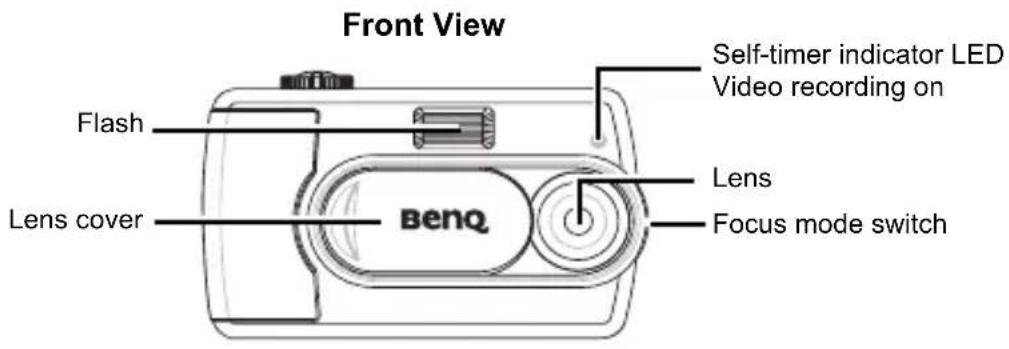
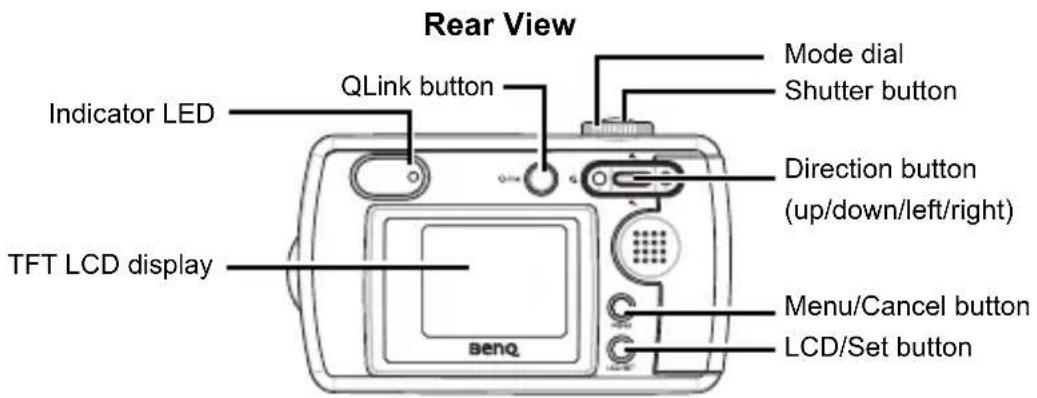
Side View Bottom View
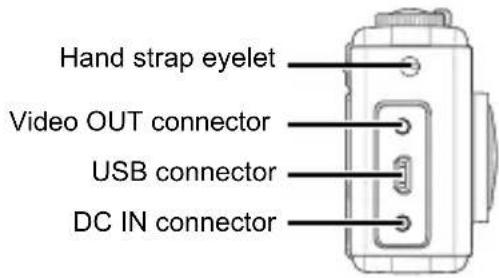
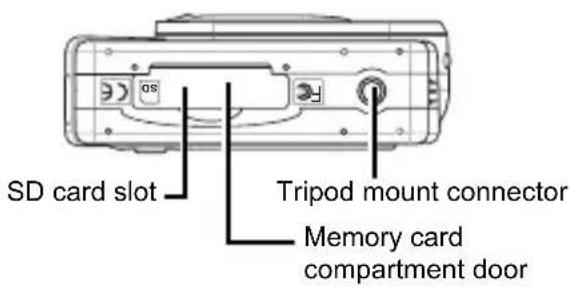
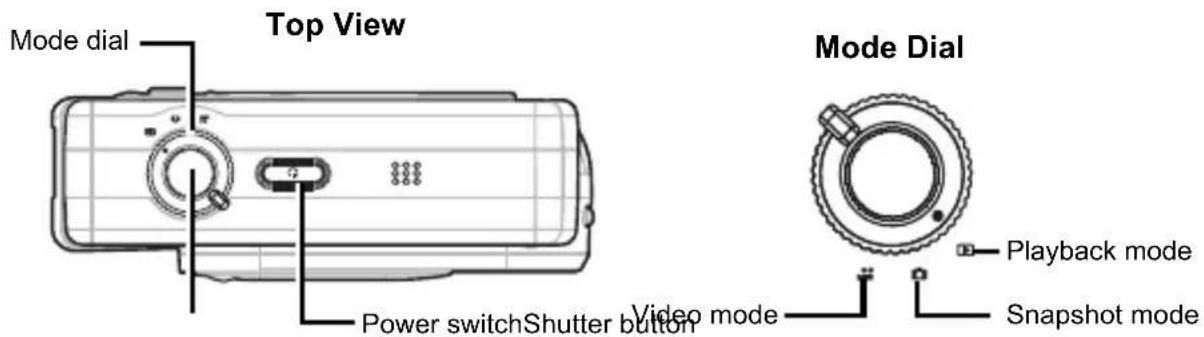
GETTING STARTED
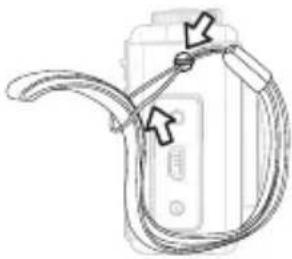
Attaching the Hand Strap
-
Run the small looped end of the hand strap through the hand strap eyelet.
-
Bring the other end of the strap through the loop and pull.
Turning the Camera Off and On
You can turn the camera off and on in two ways:
natural_image
Line drawing of a medical device with attached tubing and connectors (no text or symbols)- Open and close the lens cover to turn the power on and off (snapshot and movie mode only)
- Press and hold the power switch to turn the power on and off
Recharging the Battery
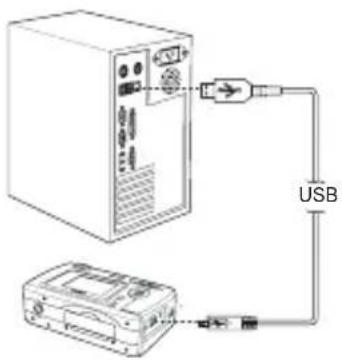
The DC C25/C35 is equipped with a built-in rechargeable battery that can be recharged by connecting the included AC power adapter or by connecting the camera to a computer with the included USB cable. Recharging takes about two hours.
The indicator LED glows orange when the battery is charging. When the battery is charged, the indicator LED turns off.
Warning: Use the adapter that came with your DC C25/C35. Do not use other adapters.
Note: A minimum of 5 minutes charging time is required to regain minimal power of the digital camera.
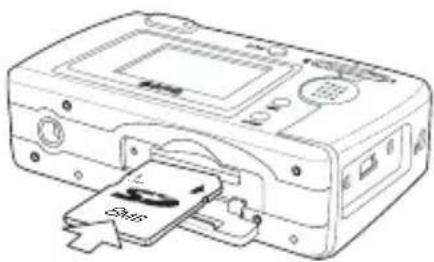
Using an SD Flash Memory Card
Inserting an SD Card
- Turn the camera off.
- Open the memory card compartment cover.
- Insert the SD card into the slot until you hear a click.
- Close the compartment cover.
Removing an SD Card
natural_image
Line drawing of a vintage desktop computer with an attached SaaS device (no text or symbols visible)- Turn the camera off.
- Open the memory card compartment cover.
- Press down on the edge of the SD card. The card will spring up.
- Gently grasp the card and pull it out. Close the compartment cover.
Note: If you are using an SD card in the DC C25/C35 for the first time, you must format it. See page 17 to learn how to format the card.
USING THE DC C25/C35
The DC C25/C35 digital camera has four basic operating modes: Snapshot mode, Video mode, Playback mode and Setup mode. All of the camera's functions can be accessed through these modes.
The DC C25/C35 is designed to be fast and easy to use while at the same time giving you full access to a wide range of settings. This chapter shows you how to use and adjust these settings.
Before proceeding, familiarize yourself with the buttons below. You will use these extensively in the following sections of the manual.
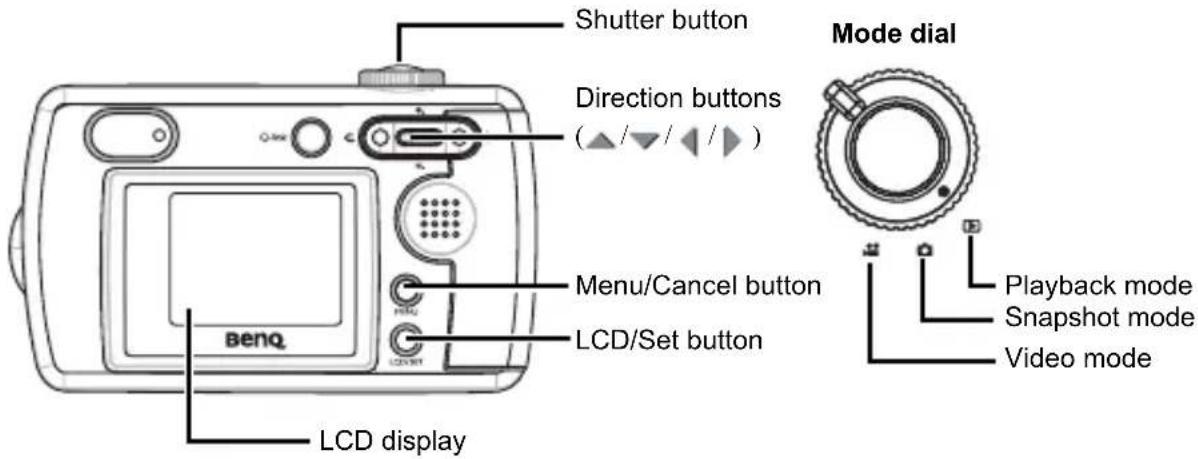
Understanding the LCD Display Icons
When the camera is in Snapshot mode, icons appear on the LCD display to indicate camera settings. Depending on your camera's settings, the illustration below may be different from your own camera.
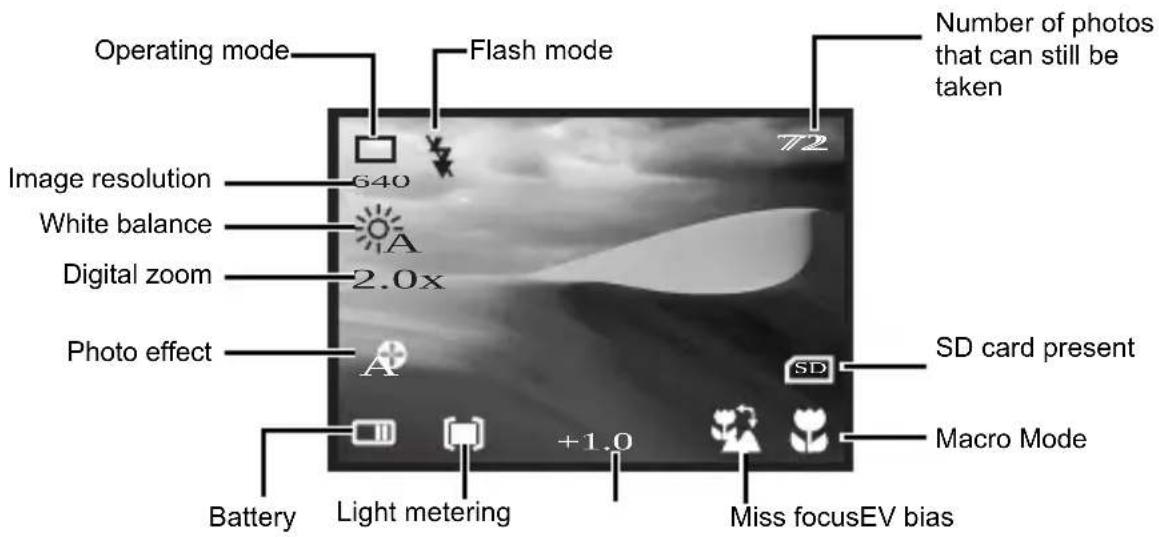
LCD Display Icon Index
First Level Second Level

Record mode Single shot mode

Self-timer mode

Burst mode (C25 only)

Image resolution 2048x1536

1600x1200

1280×960

640×480

Image quality Fine

Normal


Photo effect Auto

Portrait

Scene

Black and white

White Balance Auto

Daylight

Cloudy

Tungsten light

Fluorescent light

EV bias -2.0 to +2.0


Light metering Cent
er average

Point

Frame average

Date imprint On

Off

Taking Photos
- Open the lens cover. The power turns on automatically.
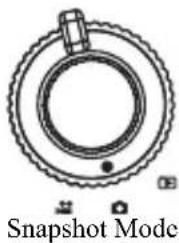
- Set the Mode dial to Snapshot mode to take still images, Video mode to shoot video.
- Switch the Focus Range switch to either Macro (for subjects between 0.3m to 0.4m from the lens) or Normal (for subjects beyond 1.0m).
- Frame the shot in the LCD, hold the camera still, and press the Shutter button.
- The Indicator LED starts blinking immediately after the Shutter button is pressed.
- When the Indicator LED stops blinking you can take another shot or recording.
Note: If you forget to open the lens cover, a "Lens Cover Closed" icon appears on the LCD display. Open the cover to proceed.
natural_image
Diagram of a mechanical ring assembly with no visible text or symbols

Setting the Snapshot Mode
The DC C25/C35 supports three different snapshot modes.

Single Shot mode: records a single still image when the shutter button is pressed.

Self-Timer mode: records a single still image ten seconds after the shutter button is pressed.

Burst mode (C25 only): records three still images in quick succession (approx. one photo every 0.1 seconds at 1600x1200) immediately after the shutter button is pressed.
-
Set the Mode dial to Snapshot mode.
-
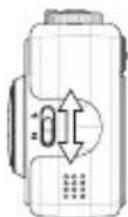
Set the Focus Range switch to either Macro 🎨 or Normal mode. Use Macro mode if the subject is between 0.3m and 0.4m from the camera lens. Use Normal mode if the subject is more than 1.0m from the lens.
Normal
Macro
Note: If macro is on, the macro 🎨 icon appears on the bottom right corner of the LCD display.
- The LCD Display button has three functions: to turn the display on with all icons visible, to turn the display on with only the function mode icon visible, and to turn the display off. Press the button until all icons appear on the display.
BenQ DC C25/C35 User's Manual
- Press the Menu MENU button. The Snapshot setup menu appears on the display.
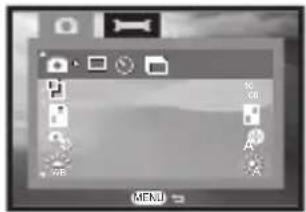
Snapshot menu screen
natural_image
Top-down schematic of a device with four directional arrows indicating orientation (no text or symbols)Arrow buttons
-
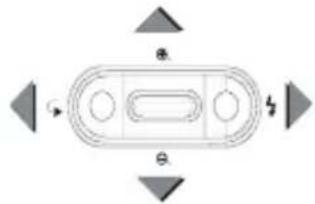
Select the Single Shot, Self-Timer or Burst mode by pressing the left and right arrow buttons.
-
Press the Menu Ⓜ button to exit the menu or press the down ▼ arrow button to move on to the next setting.

Setting the Image Resolution
The DC C25/C35 supports four different image resolutions that can be selected from the Snapshot setup menu show below.

2048 x 1536
- Set the Mode dial to 🔒 and press the Menu Ⓜ MENU button.

1600 x 1200
- Press and to select the image resolution menu.

1280 × 960
-
Press and to select the resolution setting.
-
Press the Menu button to exit the menu or use and to move on to the next setting.

640 × 480

Setting the Image Quality
You can choose between Fine and Normal image quality settings. Note that fewer photos are stored in memory if you use the Fine setting.

Fine
- Set the Mode dial to 📄 and press the Menu Ⓜ MENU button.

Normal
-
Press and to select the image quality menu.
-
Press and to select the quality setting.
-
Press the Menu mention to exit the menu or use and to move on to the next setting.

Setting the Photo Effect
The DC C25/C35 has four built-in photo effect modes.

Auto: When in automatic mode, the camera will adjust itself automatically to take the best possible picture under the given conditions.

Portrait: This preset is optimized for taking “head shots” of people. The lens focuses more on the center of the frame than on the peripheral areas.

Scene: This preset is optimized for taking landscape pictures. The lens focus is evenly distributed over the area in the frame.

Black and White: Use this photo effect if you want to take black and white (gray scale) pictures
-
Press and to select the image quality menu.
-
Press and to select the resolution setting.
-
Press the Menu ention to exit the menu or use and to move on to the next setting.

Adjusting the White Balance
There are five white balance settings to choose from:

Auto: The camera adjusts itself automatically. It is recommended that you use this setting except under unusual lighting conditions.
Daylight: Use this setting in bright outdoor settings or under strong lighting.
Cloudy: Use this setting when taking photos in overcast conditions.
Tungsten: This setting should be used in a tungsten light environment.
Fluorescent: This setting should be used in a fluorescent light environment.
-
Press and to select the image quality menu.
-
Press and to select the resolution setting.
-
Press the Menu mention to exit the menu or use and to move on to the next setting.

Setting the EV Bias (Exposure)
Set the EV bias to increase or decrease the camera lens' exposure value. This allows more or less light to pass through the lens. Adjusting this setting in particularly bright or dark environments can improve the quality of the photograph. A higher EV bias value results in a brighter photograph.
- Press and to select the EV
Bias menu.
-
Press or the Set button.
-
Press and to change the EV bias value (from -2.0 to +2.0).
-
Press the Menu button to confirm your selection

Setting Light Metering
The DC C25/C35 has three built-in light meter presets that you can use to optimize photo results in various lighting conditions.

Center Average: The camera adjusts itself based on the average light measurement over the center region of the viewfinder.

Point: The camera adjusts itself based on a point light measurement at the center of the viewfinder.

Average: The camera adjusts itself based on the average light measurement over the entire region of the viewfinder.
-
Press and to select the light metering menu.
-
Press and to select the meter setting.
-
Press the Menu 10/10/10 to exit the menu or use and to move on to the next setting.

Setting the Date Imprint
You can choose to have the current date imprinted over your photos. This function can be turned off.


Date Imprint OFFDate Imprint ON
-
Press and to select the date imprint menu.
-
Press and to select the date imprint setting.
-
Press the Menu button to exit the menu or use and to confirm move on to the next setting.
See page 17 for information on setting the camera's date.

Setting the Flash Mode
When the DC C25/C35 is in Auto mode (see page 9), you can change the flash setting when setting up the shot in the viewfinder by pressing ▶/✗. There are four flash settings:

Auto: The camera automatically fires the flash if necessary.

Red Eye: This setting is used to reduce the “red-eye” effect that occurs when light is reflected off of the eyes of people and animals.

On: The flash fires regardless of lighting conditions.

Off: The flash does not fire.

Zooming In and Out
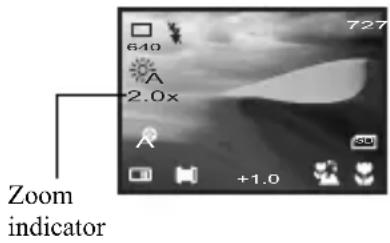
The DC C25/C35 is equipped with a digital zoom feature that you can use to take close-up shots of up to x4.0.
- Frame the shot in the LCD display.
- Press to zoom closer in steps of x0.2 from x1.0 to x4.0.
- Press to zoom out in steps of x0.2.
- Press the Shutter button to take the shot.

Reviewing and Deleting a Photo
After you take a photo you can view it in the LCD display and choose to delete it.
- Press . The image appears in the LCD display.
- Press the Menu button.
-
Press and to select "Yes" or "No".
-
Press the Set button to confirm your selection and return to the previous mode.

Recording Movie Clips
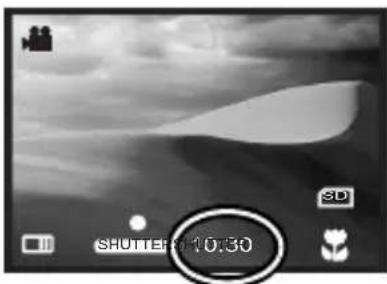
You can use the DC C25/C35 to record movie clips in AVI file format. Video duration is limited only by the amount of free memory remaining on the SD card. The remaining recording time appears on the LCD display in HH:MM:SS format.
natural_image
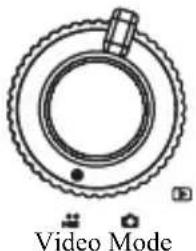
Diagram of a camera aperture with labeled mode (Video Mode) and no other text or symbols- Turn the Mode dial to Video mode.
- Press the Shutter button once to begin recording. An on screen timer displays the elapsed time.
- Set the Focus Range switch to either Macro
or Normal 🧑 mode. Use Macro mode if the subject is between 0.3m and 0.4m from the camera lens. Use Normal mode if the subject is more than 1.0m from the lens. If Macro is turned on, the 🔊 icon appears.

natural_image
Black-and-white photo of a desert landscape with a white sand dune and a circular overlay showing 'SHUTTER SHUTTER 10:30' (no readable text or symbols in the main image area)Remaining video recording time shown in minutes and seconds.
- Press the Shutter button again to stop recording. Recording will stop automatically when the camera's memory capacity has been reached.
See page 14 for information on playing back movie clips. See page 20 to learn how to download video files to your computer.
LCD Display Icon Index
First Level Second Level

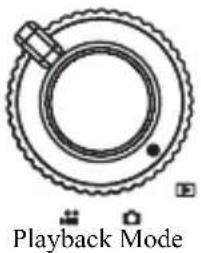
Playback Mode
You can view photographs and videos on the DC C25/C35 at any time using the built-in LCD display.
- Turn the Mode dial to Playback mode.
- Turn the camera power on.
- The latest. file stored in memory appears on the LCD display. Depending on the type of file, the screen will be similar to one of the following illustrations.
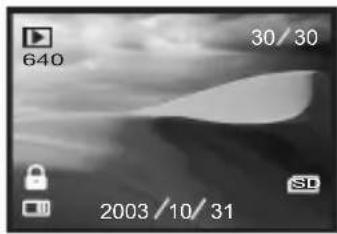
natural_image
Black and white photo of a cloud-shaped object with lock icons, no readable text or symbols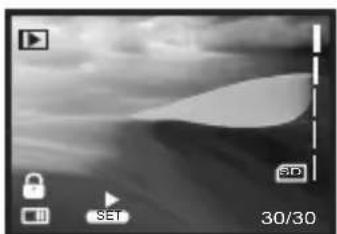
natural_image
Black and white photo of a cloudy sky with a curved abstract shape, no visible text or symbolsVideo Playback ScreenImage Playback Screen
- Press and to scroll through the files.

Playing Back Movie Clips
- Press the Set button to begin playing the video file.
- Press and to adjust the volume.
- Press the Menu button at any time to stop playback.

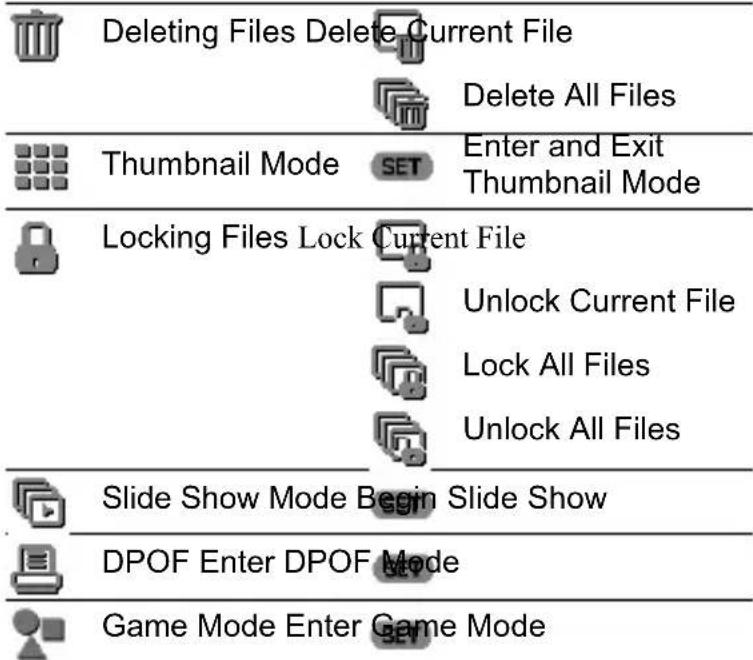
Deleting Files
When in Playback mode you can delete individual images, movie clips. You can also delete all of the files in memory.
- Turn the Mode dial to Playback mode, turn the camera power on and press the Menu button.
- The Delete icon is selected.
- Use ◀ and ▶ to select Delete Current ☐ or Delete All 📋.
- Press the Set button.
- Use ◀ and ▶ to select "Yes" or "No" and press the Set SET button to confirm your selection. Press the Menu MBu button to cancel the selection and return to the Playback menu.

Thumbnail Mode
Thumbnail mode allows you to view up to nine small images simultaneously on the LCD display.
- Turn the Mode dial to Playback mode, turn the camera power on and press the Menu button.
- Press to select the Thumbnail icon.
- Press the Set button to enter thumbnail view.
- Use ◀, ▶, ▲ and ▼ to scroll through the thumbnails.
- Press the Set button again to return to the playback menu.

Locking Files
There may be times when you want to make sure that certain photos, movie clips are not accidentally deleted. To prevent files from being deleted from memory, use the lock function.
- Turn the Mode dial to Playback Mode, turn the camera power on and press the Menu button.
- Press to select the Lock icon.
BenQ DC C25/C35 User's Manual
- Use and to select one of the following:

Lock Current File

Unlock Current File

Lock All Files

Unlock All Files
-
Press the Set button to make your selection.
-
Use and to select "Yes" or "No".
-
Press the Set SET MENU button to confirm your choice or press the Menu button to cancel and return to the Playback menu.

Slide Show Mode
Slide show mode displays each photo in memory on the LCD display for about two seconds. Movie clips are not played in slide show mode.
-
Turn the Mode dial to Playback Mode, turn the camera power on and press the Menu button.
-
Press to select the Slide Show icon.
-
Press the Set SET MENU button once to begin the slide show. Press the Menu button to end the slide show.

Printing Photos Directly from the Camera (DPOF)
The DC C25/C35's Digital Printer Order Format (DPOF) function lets you print photos directly to any printer that supports this protocol. Refer to your printer's manual for information.
-
Turn the Mode dial to Playback Mode, turn the camera power on and press the Menu button.
-
Press to select the DPOF icon.
-
Press the Set button once to enter the DPOF menu.
-
Use and to select one of the following;

Copies: Use ◀ and ▶ to select the number of copies you want to print.

Date Imprint: Use ◀ and ▶ to toggle between "On" and "Off".

Reset Current: Press the Set SET button to cancel the settings you made for the last photo you selected.

Reset All: Press the Set SET button to cancel the settings you made for all the photos you selected.
Note: To use DPOF, images must be stored on an SD card.

Game Mode
The DC C25/C35 includes three puzzle games that incorporate pictures that are stored in the camera's memory. You can access the games from the Playback menu. Each game has four difficulty levels.
Setup Mode
Setup mode allows you make adjustments to several of the camera's basic settings. The setup menu is indicated by the Setup icon and can be accessed in any of the camera modes.
- Turn the Mode dial to Playback or Snapshot mode, turn the camera power on and press the Menu MENU button.
- Press ▲ once, followed by ▶ . The Setup ┌ menu icon is highlighted in green.
- Press and to scroll through the Setup menu.
| First Level | Second Level | First Level | Second Level | ||||
 | Format Memory |  | Format Memory |  | Video Format |  | NTSC |
 | Reset File Name Numbering |  | Yes or No PAL |  | |||
 | Set Date and time |  | Set values | Power-saving Mode |  | On | |
 | LCD Display Brightness |  | Bright Off |  | |||
 | Normal |  | Restore Default Settings |  | Yes or No | ||
| Software Version | Display version | ||||||


Formatting Memory
Formatting an inserted SD card completely erases the memory's contents and prepares it for use. You must format an SD card if you are using it with the DC C25/C35 for the first time.
- Enter the setup menu and press ▼ to select the Copy/Format 📋 menu icon.
- To format the contents of memory, select the "Format Memory" icon and press the Set button.
- Use ◀ and ▶ to select "Yes" or "No" and press the Set SET button to confirm your selection. Press the Menu button to cancel and return to the Setup menu

Resetting File Names
All still images movie clips are given file names that follow the format "IMG_xxxx.yyy" where "xxxx" is a number from 0001 to 9999 and "yyy" is the file format (JPG, WAV or AVI). The file number is incremented automatically by the camera. Reset this number to "0001" (or the next available number) as follows
- Enter the setup menu and press ▼ to select the Reset Filename 📁 menu icon.
- Press the Set SET button and use ◀ and ▶ to select "Yes" or "No". Press the Set SET button to confirm your selection or press the Menu button to cancel and return to the Setup menu.

Setting the Date and Time
Because date and time are stored as metadata with each file recorded by the DC C25/C35, it is important to set this properly.
- Enter the setup menu and press ▼ to select the Set Date and Time 📄 menu icon.
- Press the Set button.
- Use ◀ and ▶ to navigate between year, month, date, hour and minute setting. Press and to adjust the values for each.
- Press the Set SET MENU button or the Menu button to confirm your changes and return to the Setup menu.

Adjusting LCD Display Brightness
By default, the DC C25/C35 LCD display brightness is set to "Bright". This setting is useful when using the camera outdoors or under bright lights. To maximize battery use, however, you can set the LCD display brightness to "Normal".
- Enter the setup menu as described above and press to select the LCD Brightness menu icon.
- Use ◀ and ▶ to choose between Bright ☐ and Normal ☐.
- Press the Menu button to confirm your selection.

Setting the Video Format
Although the DC C25/C35's video format is preset at the factory to suit the region of purchase, you can change the DC C25/C35's video format if necessary.
This setting is important when you connect the DC C25/C35 to a monitor or television.
Regional Video Formats:
- Enter the setup menu as described above and press
▼ to select the Video Format menu icon.
- Use ◀ and ▶ to choose between NTSC NT SC and PAL PAL.
- Press the Menu button to confirm your selection.

Turning Power Saving Mode On or Off
Power saving mode conserves battery life by turning the LCD display off after three minutes of inactivity and turning the camera power off after five minutes.
- Enter the setup menu as described above and press to select the Power Saving menu icon.
- Use ◀ and ▶ to choose between On 📄 on and Off 📄.
- Press the Menu button to confirm your selection.

Restoring Default Settings
You can restore the DC C25/C35's default factory settings at any time. Restoring default settings overrides any settings you have made in the past.
- Enter the setup menu and press ▼ to select the Reset Default 📁 menu icon.
- Press the Set to enter the confirmation menu. Select Yes or No and press the Menu button to confirm your selection.
MAKING CONNECTIONS
The DC C25/C35 makes it quick and easy to download photos and video clips to your computer for storage, editing and sharing with friends and family. You can also use the DC C25/C35 as a mass storage device to store and transfer files of any type between computers or as a PC/Web camera for videoconferencing and recording video directly to your computer's hard drive.
Installing the Driver
If your computer's operating system is Windows you must install the driver software that is included on the DC C25/C35 software installation CD-ROM before connecting the DC C25/C35 to your computer for the first time.
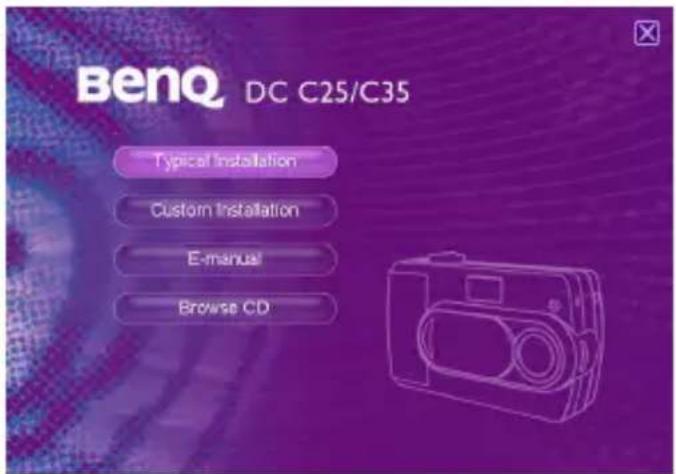
To install the driver, insert the CD-ROM into your computer's CD-ROM drive and wait for the software installation screen to appear. If this screen does not appear automatically, double click on the file named "setup.exe" that is located on the CD-ROM.
Follow the on-screen inductions to install the driver software.
Installing Software
The DC C25/C35 software installation CD-ROM includes several useful commercial software applications (Windows only) that you can use to edit and manage the multimedia files you create.
- Q Link
- Microsoft NetMeeting
- ArcSoft Photobase - multimedia organizer
- ArcSoft PhotoImpression - photo editing and design
- Microsoft DirectX - cross-platform media tool
- Adobe Acrobat Reader - PDF file viewer
To install the software, insert the CD-ROM into your computer's CD-ROM drive and wait for the software installation screen to appear. If this screen does not appear automatically, double click on the file named "setup.exe" that is located on the CD-ROM.
Follow the on-screen instructions to install the applications of your choice.
Downloading Files to a Computer
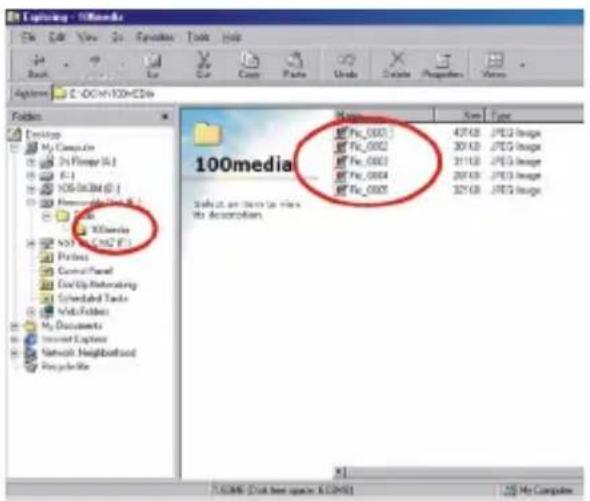
With Windows 98SE/2000/ME/XP use "My Computer" or the Windows Explorer to view and download files stored in the DC C25/C35.
- Turn on the computer.
- Connect the DC C25/C35 and the computer with the supplied USB cable.
- Turn the camera power on.
- A new disk named "Removable Disk" appears in the Explorer window.
- Files stored in the camera's memory are located in the directory "\Removable Disk\DCIM\100MEDIA".
- Drag and drop the files to your hard disk, or double-click a file to open it with your computer's default media application. The camera indicator LED flashes green and orange when files are being transferred to the computer.
Viewing Photos and Movie Clips on a Television
The DC C25/C35 can be connected to a video monitor or television with the included video cable.
- Connect the mini video connector to the video out port on the side of the DC C25/C35.
- Connect the RCA video out connector to your television's video in port.
- Turn on the television and the camera.
- Follow the Playback Mode instructions on page 13 to view photos and play-back movie clips.

Using the DC C25/C35 as a PC/Web Cam
You can use the DC C25/C35 as a PC/web cam with software such as Microsoft's Netmeeting (included on the CD-ROM).
- Turn on the computer.
- Connect the DC C25/C35 and the computer with the supplied USB cable.
- Turn the camera power on.
- Use ◀ and ▶ to choose between Mass Storage Device 📋 and PC/Web Cam
- Select "PC/Web Cam" and press the Set button.
- Refer to your software instructions for further details.

Using QLink
The QLink software that is included with your camera makes it quick and easy to download photos to your computer where you can view, edit, email and print them.
QLink task bar icon
First, install the QLink software that is located on your DC C25/C35 software installation CD-ROM. Just follow
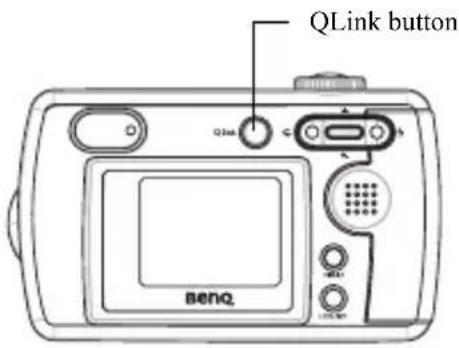
the on-screen instructions. The installer will create a folder within "Program Files" as well as a Startup item and a task bar icon. You can launch the program using any of these three methods, or by using the QLink button when the camera is connected to the computer with the USB cable.
QLink features a single window from which you can download and manage your photos. The left pane contains the Windows Explorer view to which you can drag and drop files from the preview pane in the center of the window.
Hold your mouse over any button to see a popup description of its function. The interface is intuitive, easy to learn, and provides shortcuts for many common tasks.
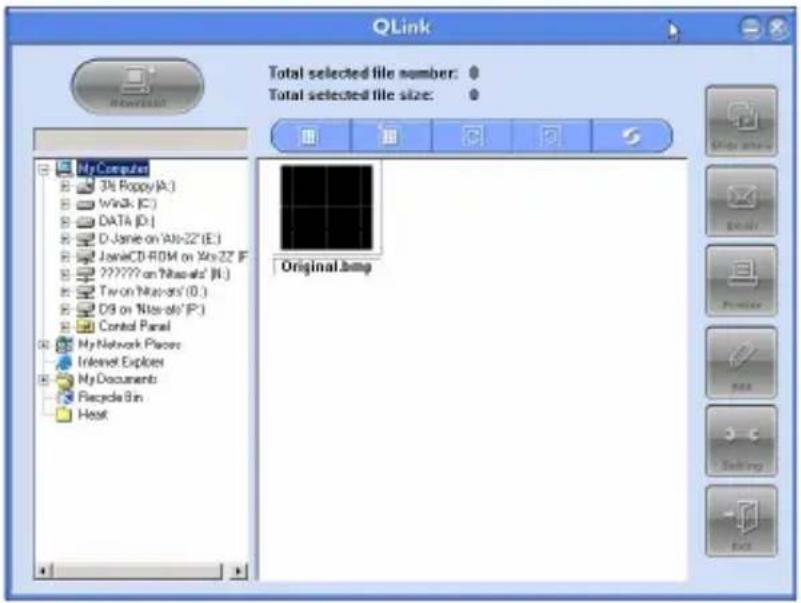
Slide Show: preview full-size photos.
Email: automatically launch your email program and attach the selected photo(s).
Printer: print the selected photo(s)
Edit: launch your default image editor.
Setting: change QLink default settings.
Exit: quit the QLink program.
Disconnecting the Camera
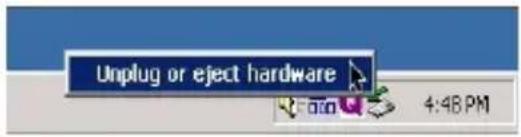
When you are finished, right-click the USB device task bar icon and click to disconnect your camera from the computer.
APPENDIX
Warning/Error Messages and Codes
| Message Cause | Solution | ||
Card Full There is insufficient  | card memory capacity to store an image. | Delete the stored image(s) in the memory card or insert a new memory card. See page 14 and page 4. | |
Card Lock The SD card  | ked. Switch the card lock to the | unlock position. | |
Card Error The SD card  | rupted. Purchase a new SD card. | ||
System Error  | There is a general system error. | Turn the camera off and on and try again. | |
Format Error  | Formatting has failed. | Turn the camera off and on and try again, or purchase a new SD card. | |
File Error  | The file is corrupted. | Delete this image (page 14) and take the picture again. | |
Image Locked The imag  | 't be deleted when it is locked. | Unlock the protected image. See page 14. | |
Lens Cover Closed  | The lens cover is closed. | Open the lens cover before taking pictures. | |
| Error Code Error Type | |
| 0000~0010 | System Error |
| 0100~0110 | Storage Error |
| 0200~0210 | File Error |
Note: If you cannot turn the digital camera off with power button, please press Shutter and Set button at the same time to force off.
System Requirements
• PC with processor better than MMX Pentium 233MHz
• Windows 98SE/2000/ME/XP
- Minimum 64MB RAM
• 100MB of available hard-disk space
- USB port
- CD-ROM drive
- 800x600 pixels,16-bit color display compatible monitor.
• (24-bit color display recommended)
Service Information & Technical Support
If you encountered problems using DC C25/C35 and the camera driver program, please send an e-mail (containing detailed descriptions of the problem you encountered, as well as the hardware and software environment of your system) to the following addresses:
USA support-sc@BenQ.com
Europe service@BenQ-eu.com
Taiwan service-tw@BenQ.com
China service_china@BenQ.com
Asia and Other Countries support@BenQ.com
Australia and New Zealand service-au@BenQ.com
For free driver updates, product information and news releases, please visit our web site at: http://www.BenQ.com.tw/global/
- Disclaimer
- Taking care of your camera
- TABLE OF CONTENTS
- Introduction
- Getting Started
- Using the DC C25/C35
- Making Connections
- Appendix
- Features
- Unpacking
- Components
- Attaching the Hand Strap
- Turning the Camera Off and On
- Recharging the Battery
- Using an SD Flash Memory Card
- Inserting an SD Card
- Removing an SD Card
- Understanding the LCD Display Icons
- LCD Display Icon Index
- First Level Second Level
- Taking Photos
- Setting the Snapshot Mode
- BenQ DC C25/C35 User's Manual
- Setting the Image Resolution
- Setting the Image Quality
- Setting the Photo Effect
- Adjusting the White Balance
- Setting the EV Bias (Exposure)
- Setting Light Metering
- Setting the Date Imprint
- Setting the Flash Mode
- Zooming In and Out
- Reviewing and Deleting a Photo
- Recording Movie Clips
- Playback Mode
- Playing Back Movie Clips
- Deleting Files
- Thumbnail Mode
- Locking Files
- Slide Show Mode
- Printing Photos Directly from the Camera (DPOF)
- Game Mode
- Setup Mode
- Formatting Memory
- Resetting File Names
- Setting the Date and Time
- Adjusting LCD Display Brightness
- Setting the Video Format
- Turning Power Saving Mode On or Off
- Restoring Default Settings
- Installing the Driver
- Installing Software
- Downloading Files to a Computer
- Viewing Photos and Movie Clips on a Television
- Using the DC C25/C35 as a PC/Web Cam
- Using QLink
- Disconnecting the Camera
- System Requirements
- Service Information & Technical Support
Brand : BENQ
Model : DC C25
Category : Camera