
RoboStar T30 - Vacuum Cleaner TESLA - Free user manual and instructions
Find the device manual for free RoboStar T30 TESLA in PDF.


| Product Type | Robot Vacuum Cleaner |
| Brand | Tesla |
| Model | RoboStar T30 |
| Dimensions (Diameter x Height) | Approx. 330 x 80 mm |
| Weight | Approx. 3.2 kg |
| Power Source | Rechargeable Li-ion battery, 14.4V |
| Battery Capacity | 2600 mAh |
| Charging Time | Approx. 4 hours |
| Runtime | Up to 120 minutes (quiet mode) |
| Suction Power | 2200 Pa |
| Dustbin Capacity | 0.5 L |
| Cleaning Modes | Auto, Spot, Edge, Schedule |
| Navigation | Gyro and infrared sensors, random/path planning |
| Control | Remote control and mobile app (Wi-Fi) |
| Smart Features | App scheduling, virtual walls, voice control (Alexa/Google) |
| Maintenance | Empty dustbin after each use; clean filter weekly |
| Filter Type | HEPA washable filter |
| Safety Features | Cliff sensors, anti-collision, auto-docking, low battery return |
| Included Accessories | Charging dock, remote control, adapter, extra filter, cleaning brush |
| Spare Parts Available | Filters, side brushes, main brush, battery |
Frequently Asked Questions - RoboStar T30 TESLA
User questions about RoboStar T30 TESLA
0 question about this device. Answer the ones you know or ask your own.
Ask a new question about this device
Download the instructions for your Vacuum Cleaner in PDF format for free! Find your manual RoboStar T30 - TESLA and take your electronic device back in hand. On this page are published all the documents necessary for the use of your device. RoboStar T30 by TESLA.
USER MANUAL RoboStar T30 TESLA
natural_image
Line drawing of a hand connecting an electrical outlet to a train, with cable wrapped around (no text or symbols)natural_image
Technical line drawing of a mechanical bracket with two circular components (no text or symbols)natural_image
Line drawing of a hand using a power outlet to install a cable into a train (no text or symbols present)natural_image
Simple line drawing of a hand holding a circular object with a handle, labeled 'A' at the bottom (no text or symbols on the object itself)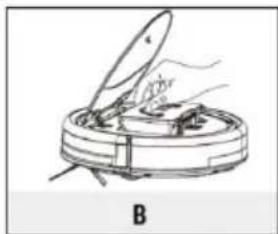
natural_image
Diagram of a hand inserting a component into a circular device, labeled B (no text or symbols on the diagram itself)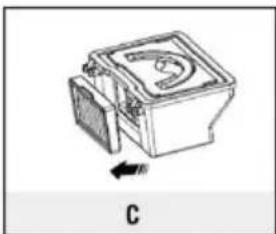
natural_image
Diagram of a square electrical meter with a dial and a base, showing an arrow indicating rotation (no text or symbols present)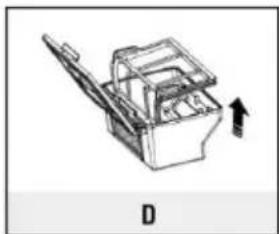
natural_image
Technical line drawing of a mechanical device with an arrow indicating direction (no text or symbols)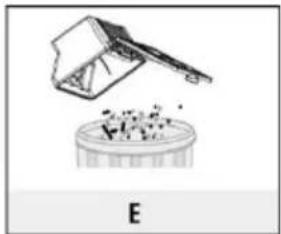
natural_image
Simple line drawing of a hammer crushing a trash bin labeled 'E' (no text or symbols on the diagram itself)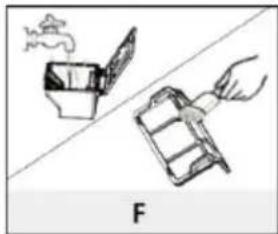
natural_image
Illustration of two hand-drawn containers with a bag, one open and one filled with liquid, separated by a diagonal line (no text or symbols)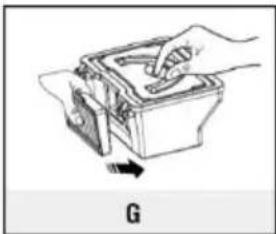
natural_image
Hand holding a tool inside a mechanical device with an arrow indicating direction (no text or symbols)natural_image
Technical line drawing of a mechanical housing component with two circular features (no text or symbols)Thank you for choosing the TESLA RoboStar T30.
Please, read the safety rules carefully and follow all common safety rules before using a robotic vacuum cleaner.
- read through the instructions for use thoroughly before using
- keep the user manual for future reference
- follow the rules stated in this manual to reduce the risk of damage to the robotic vacuum cleaner and possible injury
IMPORTANT SAFETY WARNINGS
This device is a complex electromechanical device, please, pay attention to the following guidelines:
- The device is intended for indoor use at room temperature only.
- Use the vacuum cleaner as often as possible for the maximum cleaning effect.
- Use only accessories provided by the authorised manufacturer. Using non-original accessories can cause damage the robotic vacuum cleaner, electric shock, or fire.
- Do not touch any of the parts plugged into the mains if you have wet hands.
- Do not leave the appliance in the presence of children without supervision of an adult.
- Do not allow children to use the robotic vacuum cleaner even under the supervision of an adult.
- Only use original accessories designed for this model.
- Do not sit on the robotic vacuum cleaner or place other objects on it.
- Do not use the appliance if the power cord is damaged.
- Do not open or repair the unit, there is a risk of electric shock and loss of warranty.
- Do not use the device if you have wet hands or feet.
- Keep away from flammable and volatile substances.
- Do not use the device near objects containing liquids, the device may for example turn the objects over causing water spillage.
- Do not wash the vacuum cleaner with water, avoid radiant heat on the plastic surface of the device.
- Do not use the device in a too hot, dusty or damp environment.
- Do not let the device vacuum fluids, burning cigarettes, splinters and sharp objects, matches and other combustible substances, flour, cement, plaster, larger pieces of paper, plastic bags, or other objects that can cause damage to the vacuum cleaner.
- Electrostatic charge may occur during the cleaning process, which may be dangerous to the user.
• Also inform your roommates about the use of the vacuum cleaner to avoid possible injury. - Do not use the robotic vacuum cleaner if its dust container is full.
- The manufacturer and distributor for the European Union is not responsible for damage caused by the operation of the device such as injuries, scalding, fire, damage to other objects etc.
PACKAGE CONTENT
Carefully check you have unpacked all accessories, we recommend keeping the original paper box, user manual and packaging materials for the warranty period.
DESCRIPTION
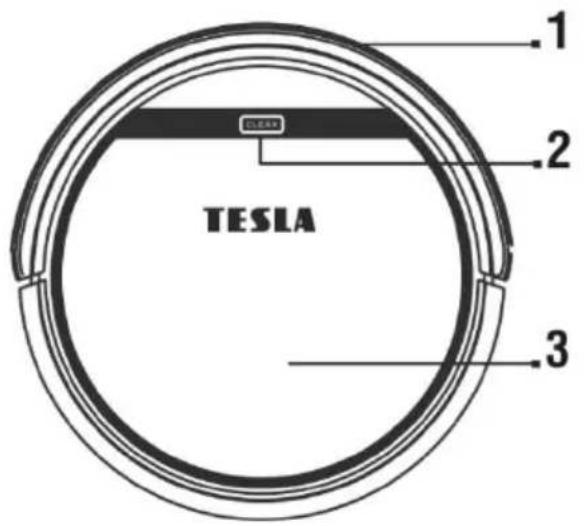
1 Front bumper
2 Start/Stop the operation
3 Open/Close the cover
4 Charging contact
5 Left side brush
6 Battery cover
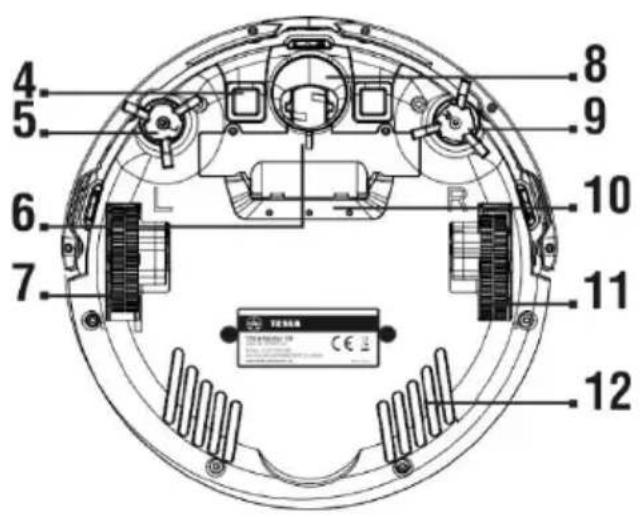
7 Left wheel
8 Front wheel
9 Right side brush
10 Intake opening
11 Right wheel
12 Bottom cover
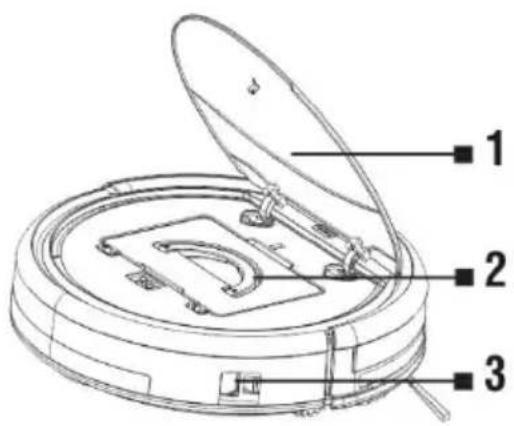
1 Top cover
2 Trash container
3 Main switch (ON/OFF button)
4 Primary filter
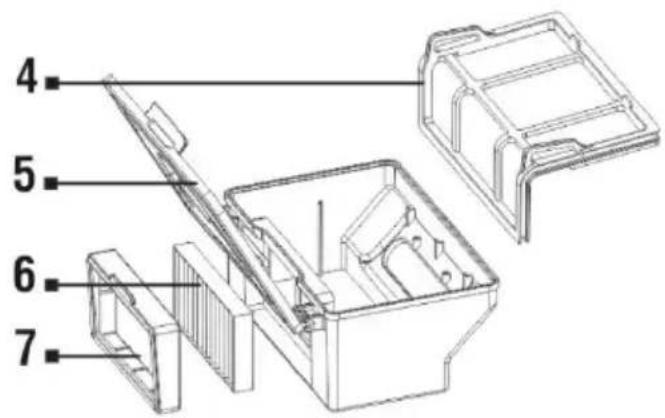
5 Trash container door
6 HEPA filter
7 HEPA filter frame
FIRST START - AUTOMATIC CLEANING
- This is the most common way of cleaning.
- Insert the batteries into the remote control, make sure the polarity is correct.
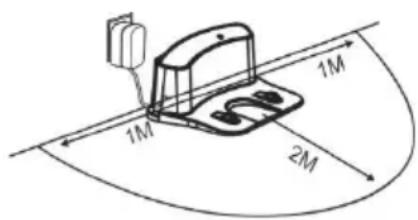
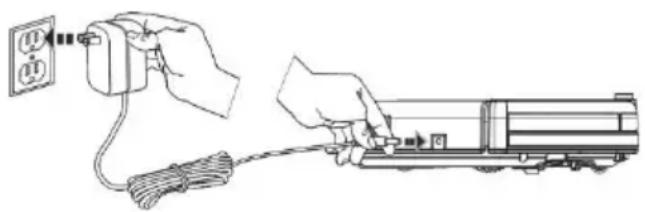
- Connect the charging station to an electrical outlet with a 230 V power adapter.
There must be no obstacles within 2 meters in front and 1 meter on the sides from the charging station.
The charging station must be placed on a flat surface, we also recommend to fix the station to the wall or floor with a double-sided adhesive tape.
Place the power cord so it does not get entangle in the cleaning brushes of the vacuum cleaner.
natural_image
Line drawing of a hand connecting an electrical outlet to a train, with cable wrapped around (no text or symbols)You can also plug the 230 V power adapter directly into the vacuum cleaner.
- Place the vacuum cleaner in the charging station.
- The vacuum cleaner battery will start charging automatically.
- When the battery is fully charged, LEDs on the top panel go off.
- Before putting the vacuum cleaner into operation, prepare the room so there are no objects on the floor that may prevent the vacuum cleaner to operate properly (bigger sheets of paper, cables, stickers, small items, inappropriately placed carpet, etc.).
- Remove the chairs and other larger items so the vacuum cleaner can easily reach inaccessible places.
- To put into operation, press the "CLEAN" button on the remote control or on the top of the device.
- The vacuum cleaner starts cleaning automatically until the battery is almost empty, then the vacuum cleaner automatically searches for the charging station and starts charging the battery.
- To pause/stop the vacuum cleaner operation, press the "CLEAN" button again.
- Press and hold the "CLEAN" button on the vacuum cleaner for 3 seconds to switch the device into the "Standby" mode.
- The vacuum cleaner also switches to the "Standby" mode automatically when it is idle for more than 10 minutes.
FIRST CLEANING
- Remove all obstacles that can prevent effective cleaning.
- Also remove objects that can damage the robotic vacuum cleaner.
- The carpet must be secured so the robot cannot get on it when mopping. If the mopping pad with the water container is installed on the vacuum cleaner, it may interrupt the cleaning process or cause unwanted soaking of the carpet.
- Direct sunlight may cause a reduced sensitivity of the infrared sensors of the vacuum cleaner, please avoid direct sunlight light.
- Black furniture may not be properly detected due to the physical nature of infrared sensors. This may cause a slight impact, which will be reduced by the front bumper.
TIME SETTING
- Press the "CLOCK" button on the remote control to enter the "Time Setting" mode, use the directional buttons to adjust the time (HH: MM).
- Press the "CLOCK" button again to confirm and save the set time.
- Successful time setting will be confirmed by a beep sound on the vacuum cleaner.
SCHEDULE CLEANING
- The vacuum cleaner will always start cleaning at the set time.
- Press the "PLAN" button on the remote control to enter the "Schedule Cleaning" mode.
- Use the directional buttons at the top half of the remote control display (HH: MM) to set the start for the schedule cleaning.
- Press the "PLAN" button again to confirm the set time of the "Schedule Cleaning".
- To erase the set time, turn the vacuum cleaner off (the main on/off switch).
- Successful schedule cleaning setting will be confirmed by a beep sound on the vacuum cleaner.
REMOTE CONTROL CHARGING STATION
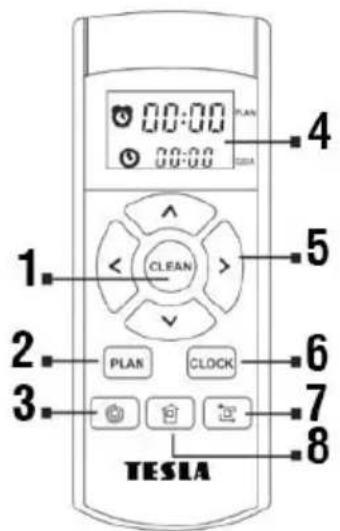
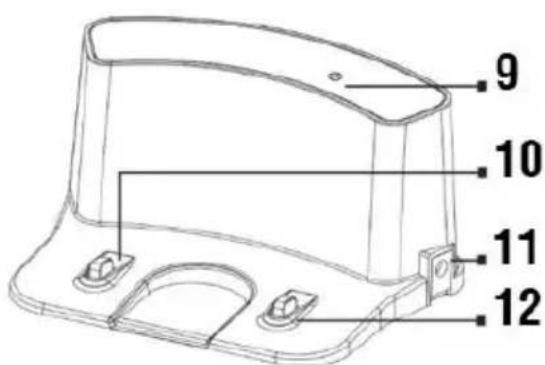
| 1 | Start/Stop the operation | 7 | Cleaning along the walls |
| 2 | Schedule cleaning setting | 8 | Return to the charging station |
| 3 | Spiral cleaning | 9 | Remote control sensor |
| 4 | Display | 10 | Charging contact |
| 5 | Directional buttons | 11 | 230 V input |
| 6 | Clock setting | 12 | Charging connector |
REMOTE CONTROL
1. The "CLEAN" (1) button
- Start/Stop the operation
- Run the selected mode
2. Directional buttons (5)
Button ▲ : to increase the time value for the schedule cleaning and time setting
Button ▲ : a directional button to move forward
Button ▼ : to decrease the time value for the schedule cleaning and time setting
Button ▼ : a directional button to move backward
Button ◀ : to switch from setting the minutes to setting the hours for a schedule cleaning and time setting
Button ◀ : a directional button to move to the left
Button ▶ : to switch from setting the hours to setting the minutes for a schedule cleaning and time setting
Button ▶ : a directional button to move to the right
3. The "PLAN" (2) button
- Enter the "Schedule Cleaning" mode, use the directional buttons at the top half of the remote control display (HH: MM) to set the start for the schedule cleaning.
- Press the button again to confirm the "Scheduled Cleaning".
4. The "CLOCK" (6) button
- Enter the "Time Setting" mode, use the directional buttons (HH: MM).
- Press the button again to confirm the set time.
5. The "HOME" (8) button
- Press to command the vacuum cleaner to search for the charging station and start charging.
6. The "SPIRAL" (3) button
- Press to command the vacuum cleaner to start cleaning in circles - targeted cleaning.
7. The "PERIMETER" (7) button
- Press to command the vacuum cleaner to start cleaning along the walls.
WET MOPPING
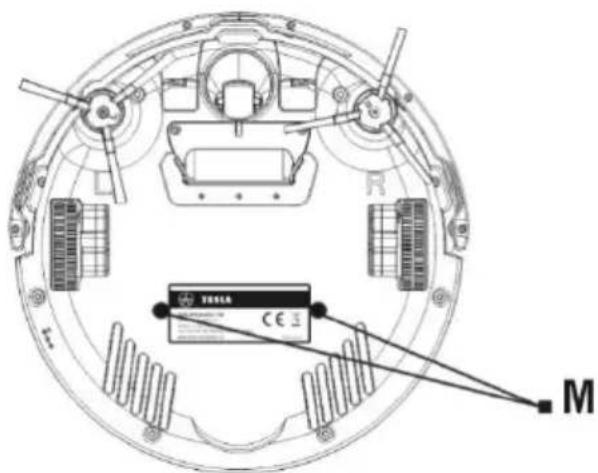
Attach the mopping pad with the mop on the vacuum cleaner, use the two installation holes "M" on the bottom of the vacuum cleaner.
Lightly moisten the XXL mop for faster and smoother wiping.
Remove the plastic cover and fill the plastic container with water without any cleaning agents (250 ml maximum).
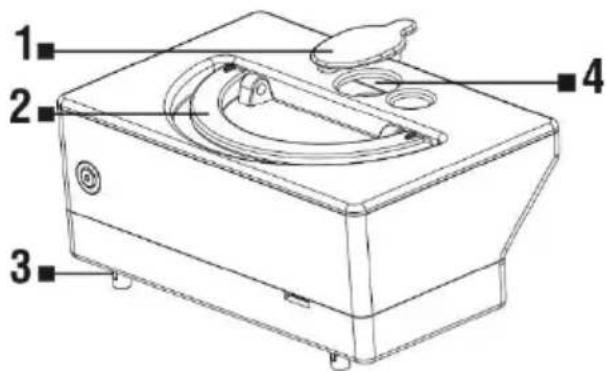
1 Water container opening cover
3 Opening for moistening the mop
2 Handle for removing the container from the vacuum cleaner
4 Water container opening
• Water should slowly drip from the left and right plastic parts.
- Press the top cover of the vacuum cleaner gently to open it, remove the dust container and insert the water container instead.
- The container should be properly inserted into its place in the vacuum cleaner.
- Close the top of the vacuum cleaner.
- Press the "CLEAN" button to start the wet mopping operation.
• In this mode, the device does not vacuum, only the side brushes operate.
- Water drips automatically, so do not let the vacuum cleaner stand motionlessly in one place with remaining water in the container to prevent water spillage on the floor.
- Do not use the microfiber cloth for mopping uneven surfaces or carpets.
- Remove the water container when the mopping is done.
- Do not charge the battery when the water container is inserted.
DRY MOPPING
- To remove fine dust and polish the floor.
- Attach the mopping pad with the mop on the vacuum cleaner, use the two installation holes "M" on the bottom of the vacuum cleaner.
- Do not use the microfiber cloth for mopping uneven surfaces or carpets.
DESCRIPTION OF THE STATUS LED DIODES
| Status | LED's |
| Charging | Sequential flashing |
| Battery fully charged | All lights are on |
| Selected mode | Slow flashing |
| Error | All lights are on |
| Low battery | The middle diode flashes |
| Return to the charging station mode | The middle diode flashes slowly |
| Cleaning mode | The middle diode shines |
| Perimeter cleaning mode | The middle diode shines, the diode below flashes |
| Spot cleaning mode | The middle diode shines, the diode above flashes |
DESCRIPTION OF AUDIO ERROR SIGNALS
| Short tone | Cause | Solution |
| 0 | The front wheel or the side brushes do not work. | Check the front wheel and the side brushes and clean them. |
| 0 0 | Error of the bottom or front sensor. | Clean the bottom sensors; lightly press the front bumper. Check there is no jammed object. |
| 0 0 0 | The vacuum cleaner got jammed. | Move the vacuum cleaner and continue cleaning. |
If the problem still occurs, check whether the battery is fully charged if it is, turn the vacuum cleaner off and on again with the main switch.
CHARGING
If you want charge up the vacuum cleaner, press the "HOME" (8) button on the remote control. The vacuum cleaner will search for the charging station and automatically start charging the battery. The blue LEDs on the vacuum cleaner flash while charging, the LEDs go off when the battery is fully charged.
If the battery status is low, the vacuum cleaner will automatically search for the charging station and start charging. Keep the charging station connected to the mains continuously otherwise the vacuum cleaner will not be able to find it.
BATTERY MAINTENANCE
- If you are going to carry the robotic vacuum cleaner or not use it for a long time, press the main switch to turn it off.
• We recommend using the charging station for charging. - The vacuum cleaner is equipped with a special protection that stops charging the battery when it is fully charged so the battery cannot be overcharged. This ensures a long service life of the battery and the vacuum cleaner is always ready to start cleaning.
CLEANING THE VACUUM CLEANER
Empty the dust container after every cleaning. If the dust container is full it has a bad effect on the suction power of the vacuum cleaner and the quality of the cleaning.
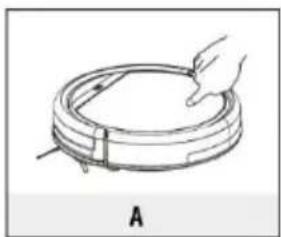
natural_image
Simple line drawing of a hand holding a circular object with a handle, labeled 'A' at the bottom (no text or symbols on the object itself)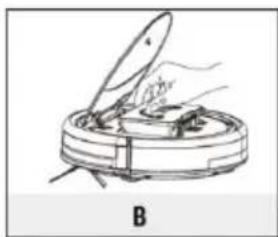
natural_image
Illustration of a hand holding a device over a circular device, labeled 'B' (no text or symbols on the device itself)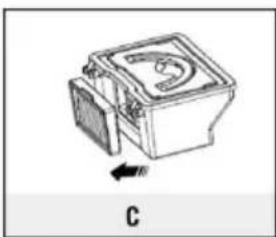
natural_image
Diagram of a mechanical component with a labeled arrow and letter C, no readable text or symbols present.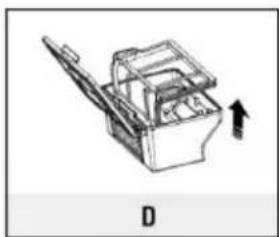
natural_image
Technical line drawing of a mechanical device with an arrow indicating direction (no text or symbols)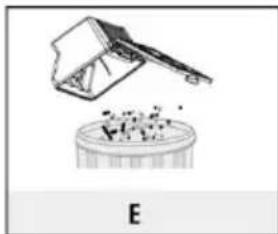
natural_image
Simple line drawing of a container with particles and an open lid, labeled 'E' at the bottom (no text or symbols on the diagram itself)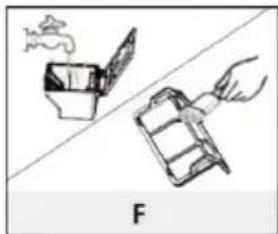
natural_image
Illustration of two hand-drawn containers with a bag and a fish, separated by a diagonal line (no text or symbols)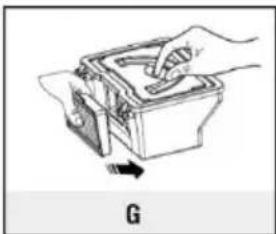
natural_image
Illustration of a hand using a tool to adjust or install a mechanical component, labeled 'G' at the bottom (no text or symbols on the diagram itself)Clean the HEPA filter every 14 days with a dust brush. We recommend replacing the HEPA filter every 6 months. If you rinse the dust container with water, let the container dry completely before reassembling the vacuum cleaner.
CLEANING THE SENSORS, CONTACTS AND BRUSHES
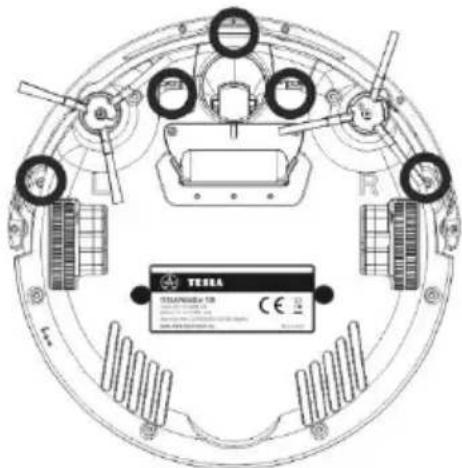
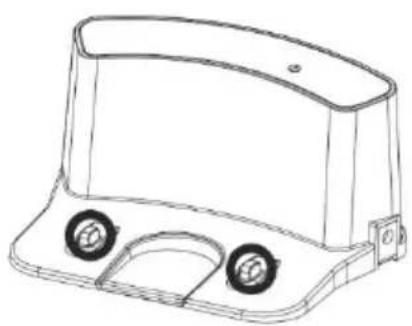
Clean the charging contacts on the vacuum cleaner and on the charging station once a month with a soft cloth. Clean the three sensors on the bottom of the vacuum cleaner in the same way, marked points in the wheel (see figure).
natural_image
Technical line drawing of a mechanical housing component with two circular components (no text or symbols)Check the two side cleaning brushes once a week and remove entangled hair and other dirt. Remove the dust from the air intake.
The warranty DOES NOT APPLY to:
• using the device for other purposes than it was designed to
- failure to observe the "Important Safety Instructions" stated in the user manual
• electrical or mechanical damage caused by improper use
- damage caused by natural elements such as water, fire, static electricity, power surges etcetera
• damage caused by an unauthorized repair
- unreadable serial number the battery capacity drops after 6 months of using (6-months battery life warranty)
DECLARATION OF CONFORMITY
We, INTER-SAT LTD, org. složka, declare that this device complies with the essential requirements and other relevant provisions of the standards and regulations relevant to the type of equipment.

This product complies with the requirements of the Europe Community.
When this crossed-out wheeled bin symbol is attached to a product it means that the product is covered by the European Directive 2002/96/EC. Please inform yourself about the local separate collection system for electrical and electronic products. Please act according to your local rules and do not dispose of your old products with your normal household waste. Correct disposal of your old product helps to prevent potential negative consequences for the environment and human health.
Design and specification may be changed without prior notice, print errors reserved.
www.tesla-electronics.eu

TESLA
- IMPORTANT SAFETY WARNINGS
- PACKAGE CONTENT
- FIRST START - AUTOMATIC CLEANING
- FIRST CLEANING
- TIME SETTING
- SCHEDULE CLEANING
- REMOTE CONTROL CHARGING STATION
- REMOTE CONTROL
- The "CLEAN" (1) button
- Directional buttons (5)
- The "PLAN" (2) button
- The "CLOCK" (6) button
- The "HOME" (8) button
- The "SPIRAL" (3) button
- The "PERIMETER" (7) button
- WET MOPPING
- DRY MOPPING
- CHARGING
- BATTERY MAINTENANCE
- CLEANING THE VACUUM CLEANER
- CLEANING THE SENSORS, CONTACTS AND BRUSHES
- The warranty DOES NOT APPLY to:
- DECLARATION OF CONFORMITY
- TESLA
Brand : TESLA
Model : RoboStar T30
Category : Vacuum Cleaner