
CVH 51 - Cooker Rommer - Free user manual and instructions
Find the device manual for free CVH 51 Rommer in PDF.


| Product type | Electric cooker |
| Brand | Rommer |
| Model | CVH 51 |
| Dimensions (H x W x D) | 85 x 50 x 50 cm |
| Approximate weight | 50 kg |
| Power supply | 220-240 V ~ 50/60 Hz or 400 V 3N |
| Number of cooking zones | 4 (ceramic glass) |
| Oven type | Multifunction electric |
| Oven functions | Static, bottom heat, grill, rapid grill, turbo, fan-assisted |
| Cleaning | Catalytic (walls) and manual |
| Oven door | Removable for cleaning |
| Interior light | Yes, replaceable bulb |
| Safety | Residual heat indicator, control lock, anti-tilt device |
| Foot adjustment | 4 adjustable feet (max 30 mm) |
| Supplied accessories | Grid, medium tray, drip pan |
| Energy class | Not specified (estimated A) |
| Repairability | Original parts available from after-sales service |
| Warranty | Standard (see conditions) |
Frequently Asked Questions - CVH 51 Rommer
User questions about CVH 51 Rommer
0 question about this device. Answer the ones you know or ask your own.
Ask a new question about this device
Download the instructions for your Cooker in PDF format for free! Find your manual CVH 51 - Rommer and take your electronic device back in hand. On this page are published all the documents necessary for the use of your device. CVH 51 by Rommer.
USER MANUAL CVH 51 Rommer
Partes del Horno :
natural_image
Line drawing of a four-circular kitchen appliance with a labeled component (12), no text or symbols present.
| MODEL | SIZE(cm) |
| CVB-4HL60W | 508508885 |
ES
LEA ESTE MANUAL DETENIDA Y COMPLETAMENTE ANTES DE UTILIZAR LA COCINA; GUÁRDELO PARA CONSULTARLO CUANDO SEA NECESARIO.
4.2 USO DE LOS HORNILLOS Y DE LA PLACA CERÁMICA
natural_image
Technical line drawing of a mechanical assembly with internal components and a directional arrow (no text or symbols)Partie de la liste:
natural_image
Simple line drawing of a mechanical or electrical component with no text, numbers, or symbolsthat are opened towards outside.
natural_image
Technical diagram showing a screw fastening mechanism with an arrow indicating rotational motion (no text or symbols)natural_image
Top-down diagram of a circular object with internal vertical divisions, surrounded by four small icons (no text or symbols)natural_image
Technical line drawing of an internal appliance or housing assembly with no visible text or symbols5. NETTOYAGE ET ENTRETIEN
5.1 Nettoyage
natural_image
Technical line drawing of a device casing with internal components and mounting brackets (no text or symbols)natural_image
Technical line drawing of a mechanical assembly with a rectangular frame and mounting bracket (no text or symbols)

natural_image
Line drawing of a door with a spring inside, enclosed in an oval frame (no text or symbols)5. CLEANING AND MAINTENANCE
We take offering quality products more than your expectation as a goal, offers you the products produced in modern facilities carefully and particularly tested for quality.
This manual is prepared in order to help you to use your appliance that is manufactured by the most recent technology, with confidence and maximum efficiency.
Before using your appliance, carefully read this guide that includes the basic information for right and safe installation, maintenance and use and contact to the nearest Authorized Service for mounting of your product.
Declaration of conformity
We declare that our products meet the applicable European Directives, Decisions and Regulations and the requirements listed in the standards referenced.
C€
CONTENTS :
- PRESENTATION AND SIZES OF PRODUCT
- SAFETY WARNINGS
- INSTALLATION AND PREPARATIONS FOR USE
- USE OF YOUR OVEN
- CLEANING AND MAINTENANCE
- SERVICE AND TRANSPORT
PART 1 : PRESENTATION AND SIZES OF PRODUCT

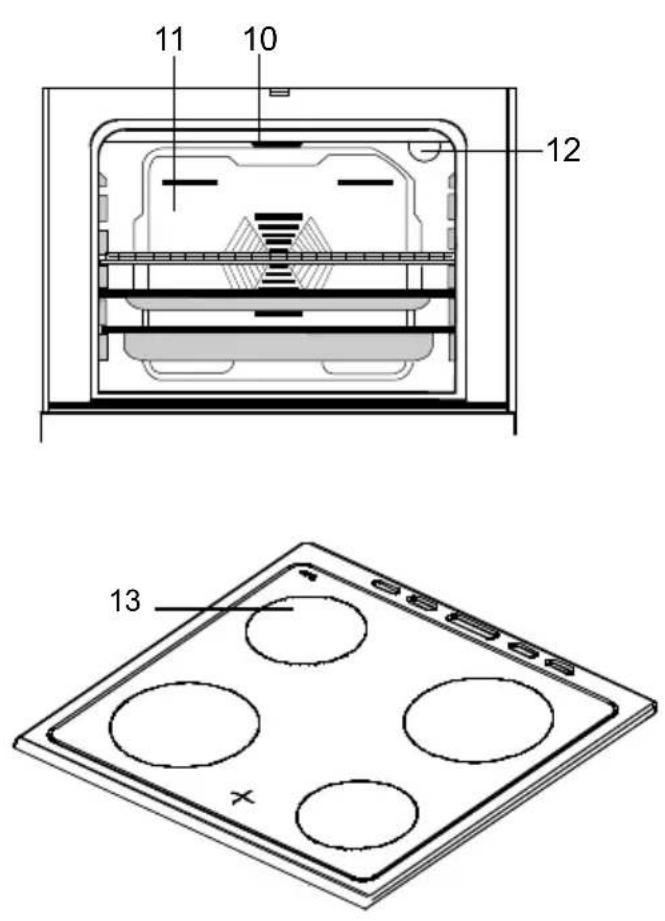
Part of List :
1- Cooktop Cover
2- Cooktop
3- Control Panel
4- Oven Door Handle
5- Drawer Cover
6- Supply Leg
7- Oven Door
8- Oven Tray
9- Wire Grid
10- Front Resistance
11- Fan Store
12- Oven Lamp
13- Highlite element
| MODEL | SIZE(cm) |
| YE 66 | 60*60*85/ 60*60*90 |
| YE 56 | 50*60*85/ 50*60*90 |
PART 2 : SAFETY WARNINGS
READ THESE INSTRUCTIONS CAREFULLY AND COMPLETELY BEFORE USING YOUR APPLIANCE, AND KEEP IT IN A CONVENIENT PLACE FOR REFERENCE WHEN NECESSARY.
THIS MANUAL IS PREPARED FOR MORE THAN ONE MODEL IN COMMON. YOUR APPLIANCE MAY NOT HAVE SOME OF THE FEATURES THAT ARE EXPLAINED IN THIS MANUAL. PAY ATTENTION TO THE EXPRESSIONS THAT HAVE FIGURES, WHILE YOU ARE READING THE OPERATING MANUAL.
General Safety Warnings
This appliance can be used by children aged from 8 years and above and persons with reduced physical, sensory or mental capabilities or lack of experience and knowledge if they have been given supervision or instruction concerning use of the appliance in a safe way and understand the hazards involved. Children shall not play with the appliance. Cleaning and user maintenance shall not be made by children without supervision.
WARNING: The appliance and its accessible parts become hot during use. Care should be taken to avoid touching heating elements. Children less than 8 years of age shall be kept away unless continuously supervised.
WARNING: Unattended cooking on a hob with fat or oil can be dangerous and may result in fire. NEVER try to extinguish a fire with water, but switch off the appliance and then cover flame e.g. with a lid or a fire blanket.
WARNING: Danger of fire: do not store items on the cooking surfaces.
WARNING: If the surface is cracked, switch off the appliance to avoid the possibility of electric shock.
For hobs incorporating a lid, any spillage should be removed from the lid before opening. And also the hob surface should be allowed to cool before closing the lid.
The appliance is not intended to be operated by means of an external timer or separate remote-control system.
WARNING: In order to prevent tipping of the appliance, the stabilizing brackets must be installed. (For detail information please read the anti-tilting kit set guide.)
During use, the appliance becomes hot. Care should be taken to avoid touching heating elements inside the oven.
During use, handles held for short periods in normal use can get hot.
Do not use harsh abrasive cleaners or sharp metal scrapers to clean the oven door glass and other surface since they can scratch the surface, which may result in shattering of the glass or damage to the surface.
Do not use steam cleaners for cleaning the appliance.
WARNING: Ensure that the appliance is switched off before replacing the lamp to avoid the possibility of electric shock.
CAUTION: Accessible parts may be hot when the cooking or grilling is in use. Young children should be kept away.
Your appliance is produced in accordance with all applicable local and international standards and regulations.
Maintenance and repair work must be made only by authorized service technicians. Installation and repair work that is carried out by unauthorized technicians may endanger you. It is dangerous to alter or modify the specifications of the appliance in any way.
Prior to installation, ensure that the local distribution conditions (nature of the gas and gas pressure or electricity voltage and frequency) and the adjustments of the appliance are compatible. The adjustment conditions for this appliance are stated on the label.
CAUTION: This appliance is designed only for cooking food and is intended for indoor domestic household use only and should not be used for any other purpose or in any other application, such as for non-domestic use or in a commercial environment or room heating.
All possible security measures have been taken to ensure your safety. Since the glass may break, you should be careful while cleaning to avoid scratching. Avoid hitting or knocking on the glass with accessories.
Ensure that the supply cord is not wedged during the installation. If the supply cord is damaged, it must be replaced by the manufacturer, its service agent or similarly qualified persons in order to prevent a hazard.
While the oven door is open, do not let children climb on the door or sit on it.
Installation Warnings
Do not operate the appliance before it is fully installed.
The appliance must be installed by an authorized technician and put into use. The producer is not responsible for any damage that might be caused by defective placement and installation by unauthorized people.
When you unpack the appliance, make sure that it is not damaged during transportation. In case of any defect; do not use the appliance and contact to the authorized maintenance service immediately. As the materials used for packaging (nylon, staplers, styrofoam...etc) may cause harmful effects to children, they should be collected and removed immediately.
Protect your appliance against atmospheric effects. Do not expose it to effects such as sun, rain, snow etc.
The surrounding materials of the appliance (cabinet) must be able to withstand a temperature of min 100^ C.
During usage
When you first run your oven a certain smell will emanate from the insulation materials and the heater elements. For this reason, before using your oven, run it empty at maximum temperature for 45 minutes. At the same time you need to properly ventilate the environment in which the product is installed.
During usage, the outer and inner surfaces of the oven get hot. While opening the oven door, step back to avoid the hot steam coming out of the oven. There may be a risk of burns.
Do not put flammable or combustible materials, in or near the appliance when it is operating.
Always use oven gloves to remove and replace food in the oven.
Do not leave the cooker while cooking with solid or liquid oils. They may catch fire on condition of extreme heating. Never pour water on to flames that are caused by oil. Cover the saucepan or frypan with its cover in order to choke the flame that has occurred in this case and turn the cooker off.
Always position pans over the centre of the cooking zone, and turn the handles to a safe position so they cannot be knocked or grabbed.
If you will not use the appliance for a long time, plug it off. Keep the main control switch off. Also when you do not use the appliance, keep the gas valve off.
Make sure the appliance control knobs are always in the "0" (stop) position when it is not used.
The trays incline when pulled out. Be careful not to let hot liquid spill over.
When the door or drawer of the oven is open, do not leave anything on it. You may unbalance your appliance or break the cover.
Do not put heavy things or flammable or ignitable goods (nylon, plastic bag, paper, cloth...etc) into the drawer. This includes cookware with plastic accessories (e.g. handles).
Do not hang towels, dishcloths or clothes from the appliance or its handles.
During cleaning and maintenance
Always turn the appliance off before operations such as cleaning or maintenance. You can do it after plugging the appliance off or turning the main switches off.
Do not remove the control knobs to clean the control panel.
TO MAINTAIN THE EFFICIENCY AND SAFETY OF YOUR APPLIANCE, WE RECOMMEND YOU ALWAYS TO USE THE ORIGINAL SPARE PARTS AND TO CALL ONLY OUR AUTHORIZED SERVICES IN CASE OF NEED.
PART 3. INSTALLATION AND PREPARATIONS FOR USE
Contact to Authorized Service for mounting of your oven.
3.1 INSTALLATION OF OVEN
There are some factors that must be paid attention to while installing your oven. Surely pay attention to our below suggestions in order to be able to prevent any problems and/or dangerous situations that may occur later.
It can be placed close to other furniture on condition that in the area where the oven is set up, the furniture's height must not exceed the height of the cooker panel.
Pay attention not to place it near the refrigerator, there must be no flammable or in flammable materials such as curtain, waterproof cloth etc. that will begin to burn quickly, while selecting place for oven.
It is required there must be at least 2 cm blank space between the back cover of oven and wall for air circulation.
The furniture close to oven must be manufactured resistant to heat more than 50 ^ of the room temperature.
If the kitchen furniture are higher than the pan which the oven's cookers are on, it must be at least 11 cm away from the oven's side.
The minimum heights from the oven's pan and wall cupboards and paddle boxes with fan over the oven, are shown as below. Thus, the paddle box must be at minimum 650 mm height from the cooker pan. If there is no paddle box, this height must not be less than 700 mm.
This appliance must only be installed directly on the floor and not on a base.
3.2 ELECTRIC CONNECTION AND SECURITY
During the electric connection, surely follow the instructions below.
The earthing cable must be connected to the terminal. You have to ensure the cable with insulation to be connected to the power source during the connection of cable. If there is not any appropriate earthed electric outlet in accordance with regulations in the place where the appliance will be installed, immediately contact to our authorized service.
The earthed electric outlet must be close to the appliance. Surely do not use the extension cord.
The supply cable must not touch to the hot surface of the product.
In case the supply cable is damaged, surely contact to Qualified Service. The cable must be changed by the authorized service.
The wrong electric connection may damage your appliance. Such damage is not in guarantee extent.
The appliance is adjusted as appropriate for 220-240 Volts and 380-415V 3N Volts of electricity. If the network electricity is different than this informed value, immediately contact to our authorized service.
The electric cable must not touch to the hot parts of appliance. The electric cable must not touch the back part of the appliance. Otherwise the electric cable of appliance may be damaged. And this situation may cause short circuit.
The producer firm declares that it has no responsibility against any kind of damages and losses that emanate from the following security norms.
Provide a means of disconnection from the supply having an air gap contact separation of at least 3mm in all active (phase) conductors. Such means of disconnection shall be incorporated in the fixed wiring according to the wiring rules.
The appliance is provided for fixed connection to the power supply. The connection of the appliance to an electrical source must be done by authorized technician. For fixed connection, use the H05VV, H05V2V2 or H05RR type supply cord.
For fixed connection, use 3x2,5mm2 or 3x4mm2 sized cable according to appliances power and terminal box label.
Some appliances can be equipped with special plug (Perilex or Norplug). If it is necessary, change it with the same specified spare part.
Use 16A/400V 5 pin for perilex plug and 25A/250V for Norplug.
These plugs can be used only in some countries.
3.3 GENERAL WARNINGS AND MEASURES
Your appliance is produced in accordance with the related security instructions connected with electrical appliance. The maintenance and repair works must be made just by the authorized service technician who is trained by the producer firm. The installation and repair works whitout following rules may endanger you.
Its outside surfaces heat while your appliance operates. The interior surfaces of oven, components that ensures the heat and steam that goes out are quite hot. Even if the appliance is turned off, these parts hold its heat for a specific time. Do not touch onto the hot surfaces. Keep children away.
Do not leave the cooker while cooking with solid or liquid oils. There may be flaming up on condition of extreme heating. Never pour water to the flames occurring from oil. Cover the saucepan or frypan with its cover in order to choke the flame that was occurred in this case and turn the cooker off.
The oven and heat adjustment switches must be adjusted and oven's clock must be programmed for cooking in your oven. Otherwise the oven does not operate.
Do not leave anything on it when the door or drawer of oven is open. You may unbalance your appliance or break the cover.
Do not put heavy things or flammable, burnable goods (nylon, plastic bag, paper, cloth etc.) into the lower drawer.
Plug it off when you do not use the appliance.
Protect your appliance against atmospheric effects. Do not leave it to effects such as sun, rain, snow, powder etc.

4. USE OF YOUR OVEN
4.1 GENERAL APPEARENCE AND TECHNICAL FEATURES OF
| CVH-51 | |
| LOWER HEATER | 1000 WATT |
| UPPER HEATER | 1000 WATT |
| GRILL | 1600 WATT |
4.2 PRESENTATION AND FEATURES OF THE CONTROL PANEL

4.3 USE OF HOB
The electrical cooker is commanded by 7 graded switches. "0" of the grades is off location. The use fields in response to other 6 grades are below.

pie
| Segment | Value | |---|---| | 0 | 0 | | 1 | 1 | | 2 | 2 | | 3 | 3 | | 4 | 4 | | 5 | 5 | | 6 | 6 |1..... ....Keeping hot location
2-3.....Heating locations at low heat
4-5-6..Cooking - roasting and boiling locations
During use of electrical cookers, it is required to pay attention to the used saucepans to have smooth bases. If appropriate sized and smooth based saucepans are used, you can get the most efficiency from your cooker. It is not suggested to use the little size saucepans on the big size cooker, because this will cause heat loss and so energy will be wasted.

Surely control that your cooker is off, the control switch is at "0" location after cooking. Also never touch it as the cooker will be hot for a specific time after it was turned off. Do not let children to come close to it.
Clean the electrical cooker with a wet cloth after using the electrical cooker. If there is excessively getting dirty situation, you can clean it with water with detergent rather well. Heat for a few minutes for the upper part to dry after cleaning. If you will not use its upper part for a while, ensure to occur a thin oil layer as oiling with machine oil.
4. 4. Use of Oven Function Switches
* The functions of your oven may be different due to the model of your product.
 | Oven Lamp |
| Only the oven light will be turned on and it remains on in all the cooking functions. | |
 | Static Cooking Function |
| The oven's thermostat and warning lights will be turned on, the lower and upper heating elements will start operating.The static cooking function emits heat, ensuring even cooking of the lower and upper food. This is ideal for making pastries, cakes, baked pasta, lasagne and pizza. Prehating the oven for 10 minutes is recommended and it is best to cook on only one shelf at a time in this function. | |
 | Lower Heating Function |
| The oven's thermostat and warning lights will be turned on, the lower heating element will start operating.The lower heating function is ideal for baking pizza, as the heat rises from the bottom of the oven and warms the food up. This function is appropriate for heating the food instead of cooking. | |
 | Upper Heating Function |
| The oven's thermostat and warning lights will be turned on, the upper heating element will start operating.In this type of cooking, the heat emanating from upper heating element cooks upper side of the food. The upper heating function is ideal for frying the upper side of already cooked food and heating the food. | |

Grilling Function
The oven's thermostat and warning lights will be turned on, the grill heating element will start operating.
The function is used for grilling and toasting foods, use the upper shelves of oven. Lightly brush the wire grid with oil to stop foods sticking and place foods in the center of the grid. Always place a tray beneath to catch any drips of oil or fat. It is recommended to pre-heat the oven about 10 minutes.
Warning: When grilling, the oven door must be closed and the oven temperature should be adjusted to 190^ C.

Faster Grilling Function
The oven's thermostat and warning lights will be turned on, the grill and upper heating elements will start operating.
The function is used for faster grilling and for covering a larger surface area, such as grilling meats, use the upper shelves of oven. Lightly brush the wire grid with oil to stop foods sticking and place foods in the center of the grid. Always place a tray beneath to catch any drips of oil or fat. It is recommended to pre-heat the oven about 10 minutes.
Warning: When grilling, the oven door must be closed and the oven temperature should be adjusted to 190^ C.
Energy Saving
- During use of electrical cookers, it is required to use saucepans having flat bases.
- Choose a cookware of proper size.
- Using a lid will reduce cooking times.
- Minimise the amount of liquid or fat to reduce cooking times.
- When liquid starts boling, reduce the temperature setting.
- Oven door should not be opened often during cooking period.
4.4.5 Accessories Used in Oven
You can use glass dishes, cake molds, special oven trays that are appropriate for use in oven, that you are able to assure in market, apart from the oven trays and grill wire chicken roasting skewer that are given together with your oven. Pay attention to the information related to the subject that were given by the manufacturer firm.
In case small size dishes are used, place the dish onto the grill wire, as it will completely be on the middle part of the wire. The following information must also be followed for the enameled dishes.
If the food that will be cooked does not cover the oven tray completely, if the food is taken from the deep freezer or the tray is being used for collection of food's juices that
flow during grilling, the form changes can be observed in tray because of the high heat that occur during cooking or roasting.
The tray will return to its old form only when the tray cooled after cooking. This is a normal physical event that occurs during heat transfer.
Do not leave this tray or dish in cold environment right away after cooking in glass tray
or dish. Do not put onto the cold and wet grounds. Place on a dry kitchen cloth or dish cross, ensure it to cools slowly. Otherwise the glass tray or dish may be broken.
If you will grill in your oven; we recommend you to use the grill that was given in tray together with product. ( If your product includes this material ) So, the oils that spatter and flow, will not dirty the inside of oven. If you will use the big wire grill; put a tray onto
one of the lower shelves for oils not to be collected. Also put some water into it for cleaning easiness.
Use 4th and 5th shelves while grilling and oil the grill for the ingredients that you will grill not to stick to the grill.

Use of rotisserie accessories
Pass the skewer through the chicken and lock the clamps, insert the tip of the skewer into the hole found at the rear panel of cavity and make sure that it completely leans on the frame and fits in motor shaft. To do this, first you have to turn the lid to the side, which is found in front of the skewer insertion hole, as shown in the figures. After that, fit the skewer onto the skewer grid (placed on the third rack) or skewer bracket (placed on the holes of tray). Remove the handle from screwer, if it is installed and close the oven door. The handle must be attached only for removing the food after grilling.
Make sure that the oven is not operating while performing these operations.
Oven Cavity
Rack positions

Oven Accessories
* The accessories of your oven may be different due to the model of your product.
Wire grid

natural_image
Pure 3D wireframe diagram of a rectangular grid structure with no text or symbolsWire grid is used to grill or to place different cookwares on it.
WARNING- Fit the grid correctly into any corresponding rack in the oven cavity and push it to the end.

natural_image
Technical line drawing of an internal mechanical or electrical component with no visible text or symbolsDeep Tray

natural_image
Isometric line drawing of a square frame structure (no text or symbols)Deep tray is used to cook stews.
To locate the tray correctly in the cavity, put it to any rack and push it up to the end.
5.1 CLEANING
Be sure that all control switches are off and your appliance cooled before cleaning your oven. Plug off the appliance.
Control whether they are appropriate and recommended by the manufacturer before using the cleaning materials on your oven. As they may damage the surfaces, do not use caustic creams, abrasive cleaning powders, thick wire wool or hard tools. In case the liquids that overflows around your oven burn, the enameled place may be damaged. Immediately clean the overflow liquids.
Cleaning of Inside of Your Oven
Surely plug off the oven before starting cleaning.
The inside of enameled oven is cleaned in the best way when the oven is warm.
Wipe the oven with a soft cloth that had been hemmed in soapy water after each use. Later wipe it with a wet cloth once more and then dry it. It may be required to use a liquid cleaning material from time to time and make a complete cleaning. Do not clean with dry and powder cleansers.
Cleaning of Your Oven's Cover
In order to be able to clean the cover of your oven from inside and outside, use a glass cleaner. Then rinse, dry it with a dry cloth. The cover can be pulled out for cleaning as shown in the following figure.
* Open the cover completely.
* Pass the metal pin through the holes as shown on picture
* Do this process for both hinges.
* Lift up the cover slightly, pull towards the outside smoothly. The cover will completely come out.
* Again place it into hinge holes while pinning the cover to its place.
Do not clean the oven's cover while the glass panels are hot. In case this measurement is not taken, the glass panel may brake down. Contact to Authorized Service when any problem occurred.
Cleaning Vitroceramic Cooker
Before starting cleaning wait for Vitroceramic cooker completely cool down. Be sure that cleaning material does not contain any particles which may cause to scratch glass. Use cream or liquid detergent. Vitroceramic surface must be cleaned with cold water and dried with soft cloth in a way that no cleaning material may be left. Use pallet provided with your product for cleaning food or residues. Sweet type food must be cleaned right after they are spilled before glass cools down. Steel cleaning material may damage Vitroceramic glass.
Dust on the surface must be cleaned with wet cloth. Color change on ceramic surfaces does not effect functional structure and durability of Vitroceramic.
Color change is caused by not cleaning the residues, erosion due to casseroles and using not appropriate cleaning materials and is not due to material change. Cleaning pallet must always be used before applying chemicals. With this pallet you can clean even the smallest dirt on the surface. Materials that are hard to clean like liquified plastic, oil and sweety materials can be cleaned with pallet easily. Your pallet is dangerous because it is equipped with razor therefore it must be kept away from children. Be careful not to scratch silicon adhesive placed on the edges of the glass while using pallet.
5.2 MAINTENENCE
Change of Oven Lamp
The change of oven lamp must be done by authorized technician. The rating the ampoule should be 230V, 25Watt, Type E14,T300 before changing the lamp,the oven should be plugged off and it should be cool.
PART 6 : SERVICE AND TRANSPORT
6,1 Requirements Before Contacting to Service
If the oven does not operate;
The oven may be plugged off, there has been a blow-out. On models fitted with a timer, time may not be regulated.
If the oven does not heat;
The heat may be not adjusted with oven's heater control switch.
If the interior lighting lamp does not light;
The electricity must be controlled.
It must be controlled whether the lamps are defective. If they are defective, you can change them as following the guide.
Cooking ( if lower-upper part does not cook equally ) ;
Control the shelf locations, cooking period and heat values according to the manual.
Except these, if you still have any problem with your product, please call to the "Authorized Service".
6,2 Information Related to Transport
If you need any transport;
Keep the original case of product and carry it with its original case when needed to be carried. Follow the transport signs on case.
Tape the cooker on upper parts, hats and heads and saucepan carriers to the cooking panels.
Place a paper between the upper cover and cooking panel, cover the upper cover, then tape it to the side surfaces of oven.
Tape cardboard or paper onto the front cover on interior glass of oven as it will be suitable to the trays, for the wire grill and trays in your oven not to damage to the oven's cover during transport.
Also tape the oven's covers to the side walls.
If it does not have the original case;
Take measure for the external surfaces (glass and painted surfaces) of oven against possible blows.

The symbol on the product or on its packaging indicates that this product may not be treated as household waste. Instead it shall be handed over to the applicable collection point for the recycling of electrical and electronic equipment. By ensuring this product is disposed of correctly, you will help prevent potential negative consequences for the environment and human health, which could otherwise be caused by inappropriate waste handling of this product. For more detailed information about recycling of this product, please contact your local city office, your household waste disposal service or the shop where you purchased the product.
ASISTENCIA TÉCNICA


- Partes del Horno :
- ES
- USO DE LOS HORNILLOS Y DE LA PLACA CERÁMICA
- Partie de la liste:
- NETTOYAGE ET ENTRETIEN
- Nettoyage
- CLEANING AND MAINTENANCE
- CONTENTS :
- Part of List :
- PART 2 : SAFETY WARNINGS
- General Safety Warnings
- CAUTION: Accessible parts may be hot when the cooking or grilling is in use. Young children should be kept away.
- During usage
- PART 3. INSTALLATION AND PREPARATIONS FOR USE
- INSTALLATION OF OVEN
- ELECTRIC CONNECTION AND SECURITY
- GENERAL WARNINGS AND MEASURES
- USE OF YOUR OVEN
- GENERAL APPEARENCE AND TECHNICAL FEATURES OF
- PRESENTATION AND FEATURES OF THE CONTROL PANEL
- USE OF HOB
- 4. Use of Oven Function Switches
- Grilling Function
- Faster Grilling Function
- Energy Saving
- Accessories Used in Oven
- Use of rotisserie accessories
- Oven Cavity
- Oven Accessories
- CLEANING
- Cleaning Vitroceramic Cooker
- MAINTENENCE
- PART 6 : SERVICE AND TRANSPORT
- 6,1 Requirements Before Contacting to Service
- 6,2 Information Related to Transport
- ASISTENCIA TÉCNICA
Brand : Rommer
Model : CVH 51
Category : Cooker