
A1/RHMD714RHMD714G - Stroller RUSSELL HOBBS - Free user manual and instructions
Find the device manual for free A1/RHMD714RHMD714G RUSSELL HOBBS in PDF.


| Product Type | Compact Digital Microwave |
| Brand | Russell Hobbs |
| Model | RHMD714 (G) |
| Rated Voltage | 220-240V / 50Hz |
| Rated Input Power (Microwave) | 1150W |
| Rated Output Power (Microwave) | 700W |
| Oven Capacity | 17 Liters |
| Turntable Diameter | 24.5 cm |
| External Dimensions (HxWxD) | 25.6 x 45.1 x 32.6 cm |
| Net Weight | Approx. 10.4 kg |
| Number of Power Levels | 5 (20%, 40%, 60%, 80%, 100%) + Defrost |
| Auto Cook Menus | 8 pre-sets (Popcorn, Reheat, Beverage, Pizza, Potato, Vegetable, Meat, Fish) |
| Defrost Programs | 3 (Meat, Poultry, Seafood) by weight |
| Express Function | Add 30 seconds per press (up to 1 min 30 sec) |
| Child Lock | Press and hold Pause/Cancel for 3 seconds |
| Clock | 24-hour format |
| Multi-Stage Cooking | Up to 2 stages with different power levels |
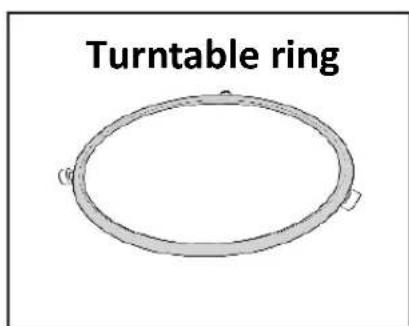
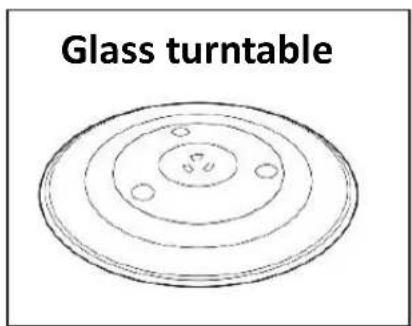
| Accessories Included | Turntable coupling, Turntable ring, Glass turntable |
| Cleaning | Wipe interior and exterior with damp cloth; clean waveguide cover |
| Spare Parts Availability | Contact customer service at 0345 209 7461 |
| Warranty | 12 months from original purchase |
Frequently Asked Questions - A1/RHMD714RHMD714G RUSSELL HOBBS
User questions about A1/RHMD714RHMD714G RUSSELL HOBBS
0 question about this device. Answer the ones you know or ask your own.
Ask a new question about this device
Download the instructions for your Stroller in PDF format for free! Find your manual A1/RHMD714RHMD714G - RUSSELL HOBBS and take your electronic device back in hand. On this page are published all the documents necessary for the use of your device. A1/RHMD714RHMD714G by RUSSELL HOBBS.
USER MANUAL A1/RHMD714RHMD714G RUSSELL HOBBS
Compact Digital Microwave
User Guide
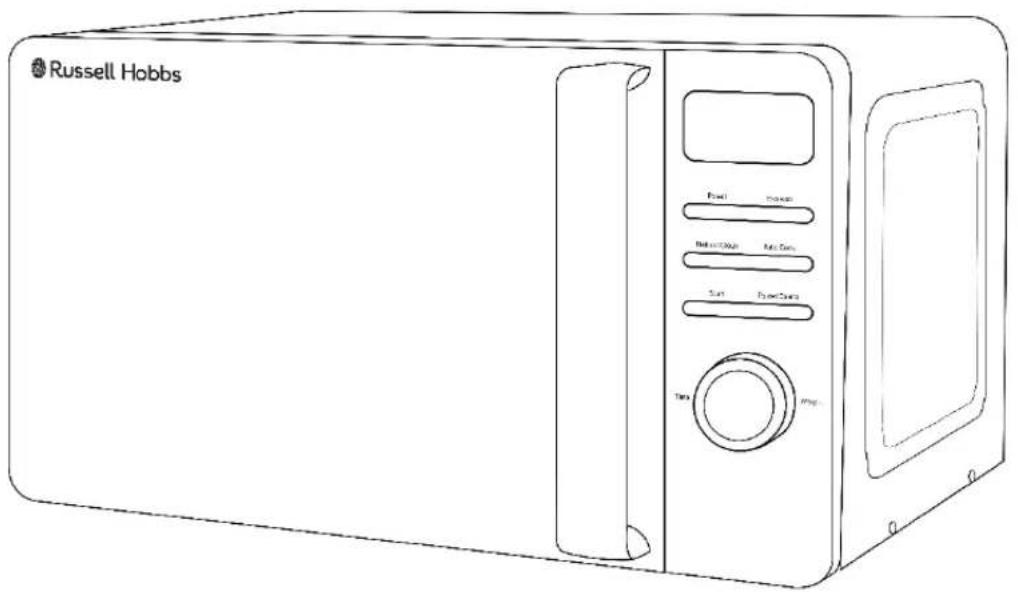
Model Number: RHMD714 (G)
For Customer Services & Spare Parts please call 0345 209 7461 Or visit us at http://mda.russellhobbs.com
PLEASE RETAIN FOR FUTURE REFERENCE
CONTENTS
| Page(s) | |
| Safety instructions | 3-9 |
| About your microwave | 10-11 |
| Product information | 12 |
| Unpacking the microwave | 13 |
| Product overview | 14 |
| Microwave oven installation | 15-16 |
| Turntable installation | 17-18 |
| Control panel | 19 |
| How to use the microwave | 20-25 |
| Utensil information | 26 |
| Cooking tips | 27 |
| Cleaning the microwave | 28 |
| Problem solving | 29-32 |
| Guarantee & customer services | 33 |
| Spare parts | 34 |
| Connection to the mains supply | 35-36 |
| Notes | 37-39 |
| Disposal information | 40 |
SAFETY INSTRUCTIONS
IMPORTANT SAFETY INSTRUCTIONS READ CAREFULLY AND KEEP FOR FUTURE REFERENCE
WARNING:
- If the door or door seals are damaged, the oven must not be operated until it has been repaired by a competent person.
- It is hazardous for anyone other than a competent person to carry out any service or repair operation that involves the removal of a cover which gives protection against exposure to microwave energy.
- Liquids and other foods must not be heated in sealed containers since they are liable to explode.
- The appliance and its accessible parts may become hot during use. Care should be taken to avoid touching heating elements.
- Do not leave the microwave oven unattended while you are using it.
- Do not use the microwave when it is empty. This could damage the oven.
- This appliance is intended to be used in the household and general domestic applications. It is not intended to be used in industrial or commercial applications.
SAFETY INSTRUCTIONS
READ CAREFULLY AND KEEP FOR FUTURE REFERENCE WARNING:
- This microwave is intended for heating food and beverages only. The drying of food or clothing and heating of warming pads, wheat bags, slippers, sponges, damp cloth and similar is extremely dangerous and may lead to risk of injury, ignition or fire.
- Do not use metal pans, dishes with metal handles or anything with a metal trim inside the microwave. Do not use paper covered wire twist-ties on plastic bags.
• Never put objects into the openings on the outer case. - This appliance can be used by children aged from 8 years and above and persons with reduced physical, sensory or mental capabilities or lack of experience and knowledge, only if they are being supervised or have been given instruction in the safe use of the appliance and understand the hazards involved. Children should not play with the appliance.
- Food containing a mixture of fat and water (for example, stock) should stand for 30 to 60 seconds in the oven after it has been turned off. This is to allow the mixture to settle and to prevent it from bubbling when a spoon is placed in it, or a stock cube is added.
SAFETY INSTRUCTIONS
READ CAREFULLY AND KEEP FOR FUTURE REFERENCE
WARNING:
- When heating or cooking food or liquid, remember that there are certain foods (such as, jam, Christmas pudding, and mincemeat) which heat up very quickly.
- Microwave heating of beverages can result in delayed eruptive boiling, therefore care must be taken when handling the container.
- The contents of feeding bottles and baby food jars shall be stirred or shaken and the temperature checked before consumption, in order to avoid burns. Do not heat baby bottles with the teat left on. Remove it if replacing the bottle back into the oven.
- Eggs in their shell and whole hard-boiled eggs should not be heated in microwave ovens since they may explode, even after microwave heating has ended.
- Do not cook any food surrounded by a membrane, such as egg yolks, potatoes, chicken livers, sausages, ready meals and so on without piercing them several times with a fork.
- Do not try to deep-fry foods in this microwave oven.
- Do not overcook food.
- When heating food in plastic or paper containers, keep an eye on the oven due to the possibility of ignition.
SAFETY INSTRUCTIONS
READ CAREFULLY AND KEEP FOR FUTURE REFERENCE WARNING:
- If materials inside the oven smoke or catch fire, keep the oven door closed to stifle the flames, turn the oven off at the wall switch, or shut the power off at the fuse or circuit-breaker panel. If smoke is emitted, switch off or unplug the appliance and keep the door closed in order to stifle any flames.
- Please remember that as food or liquids heat up, they will release steam or may be spitting. Never cover any container fully, always leave a gap for steam to escape.
- Do not use plastic containers when heating or cooking foods that contain a lot of fat or sugar.
- Always have the glass tray and turntable support in place when using the microwave oven.
- Do not cook food directly on the glass tray. Put food on a suitable plate or in a bowl before putting it in the oven.
- When using the grill rack and baking tray, be aware that these will become HOT during cooking as they aren't heatproof. Please use suitable oven gloves when removing these.
SAFETY INSTRUCTIONS
READ CAREFULLY AND KEEP FOR FUTURE REFERENCE WARNING:
- Do not use melamine dishes as they contain a material which will absorb microwave energy. This may cause the dishes to crack or burn, and will slow down the cooking speed.
- Use only cookware and utensils that are approved for use in a microwave oven.
- Do not use the microwave oven for heating utensils, plates or dishes.
- Do not cook using a container with a restricted opening, such as bottles, as they may explode.
• Before you clean your microwave oven, turn it off and unplug it. - Keep the inside of the oven clean. When food or liquids stick to the oven walls, wipe with a damp cloth. We recommend that you do not use harsh detergent or abrasives.
SAFETY INSTRUCTIONS
READ CAREFULLY AND KEEP FOR FUTURE REFERENCE WARNING:
- On the right hand wall of the cavity is the waveguide cover, microwaves are passed through this to enable your food to cook. It is important that this waveguide cover is kept clean at all times. To do this wipe with mild detergent and water, then dry.
- The oven should be cleaned regularly and any food deposits removed. Failure to maintain the oven in a clean condition could lead to deterioration of the surface that could adversely affect the life of the appliance and possibly result in a hazardous situation.
- You should clean the outside of the oven with a damp cloth. Do not allow water to seep into the ventilation openings.
- Do not use harsh abrasive cleaners or sharp metal scrapers to clean the oven door glass since they can scratch the surface, which may result in shattering of the glass.
- If steam builds up inside or around the outside of the oven door, wipe with a soft cloth. This may happen when the microwave oven is used in humid conditions.
SAFETY INSTRUCTIONS
READ CAREFULLY AND KEEP FOR FUTURE REFERENCE WARNING:
- Regularly remove the glass turntable to clean it, wash it in warm soapy water or a dishwasher. Regularly clean the turntable support and oven floor. Simply wipe the bottom surface of the oven with mild detergent and water, then dry. You can wash the turntable support in mild soapy water.
- Failure to maintain the oven in a clean condition, especially if liquid is left under the turntable, could lead to deterioration of the surface that will adversely affect the life of the appliance that may result in a hazardous condition.
ABOUT YOUR MICROWAVE
Thank you for purchasing your Russell Hobbs microwave oven.
The RHMD714 combines the convenience of a stylish and compact microwave with the added functionality of a digital oven with wooden accents. This means your oven will compliment any space in your kitchen, as well as facilitating a variety of cooking needs.
First, all you need to do is pick the perfect spot on your countertop, then, follow the simple steps for installation, and within minutes you're ready to start cooking.
To operate, simply use the sleek control panel with chrome accents to choose from a number of cooking functions. If you're in a hurry and just need a quick reheat, the Express function is the ideal programme for you. Pressing the 'Express' button will automatically add 30 seconds of full power to the display. Hit 'Start' and you're cooking.
If you want to choose your own cooking power and time this is also extremely easy – press the ‘Power’ button, turn the time dial and the ‘Start’ button will commence the process.
With the RHMD714 there're added features to enhance your cooking experience. As well as simple microwaving and defrosting, you can choose from 8 pre-set cooking menus that make your life easier. Cook anything from popcorn to pizza, potatoes and even fish.
Russell Hobbs understand that not all recipes are best cooked at one power. That's why the RHMD714 features a multi sequence function that can allow you to cook one dish at different power levels for desired times. What's more, you can set your food to cook whenever is convenient using the handy pre-set programme.
For added peace of mind, the RHMD714 enables a child lock to be set, meaning cooking cannot be started or interrupted.
Cleaning is straight forward, simply wipe the exterior, interior and waveguide cover with a damp soft cloth to maintain peak performance.
In the unlikely event that you experience any issues with your product, please make our friendly Customer Service team your first point of call.
ABOUT YOUR MICROWAVE
How do microwaves work?
Microwaves are high-frequency electromagnetic waves similar to radio waves. While radio waves may vary in length from one metre to many kilometres, microwaves are very short (less than 12.5 centimetres.)
Microwaves do not make any heat themselves but cause water molecules in food to vibrate.
This vibration produces heat that cooks the food. This is why your food will come out of the microwave piping hot, when your utensils inside the oven stay much cooler. The microwaves do not stay in the air or in the food when you open the microwave oven door.
The microwave oven will work using an ordinary household electrical socket. Inside the microwave oven is the magnetron, which turns the electrical energy into microwaves.
Microwaves cannot travel through metal, so the inside of the oven is lined with metal. The door is lined with a fine metal mesh which stops microwaves getting through. This means that when the microwave oven door is shut, there is no possibility that microwaves can be released.
PRODUCT INFORMATION
| Rated Voltage | 220-240V/50Hz |
| Rated Input Power (Microwave) | 1150W |
| Rated Output Power (Microwave) | 700W |
| Oven Capacity 17L | |
| Turntable Diameter | 24.5cm |
| External Dimensions (H x W x D) | 25.6 x 45.1 x 32.6cm |
| Net Weight; Approx | 10.4Kg |
| Number of Power Levels 5 + Defrost | |
| Accessories Included | Turntable couplingTurntable ringGlass turntable |
Produced for:
G2S Limited
Wigan
WN2 4AY
Before you use your microwave oven
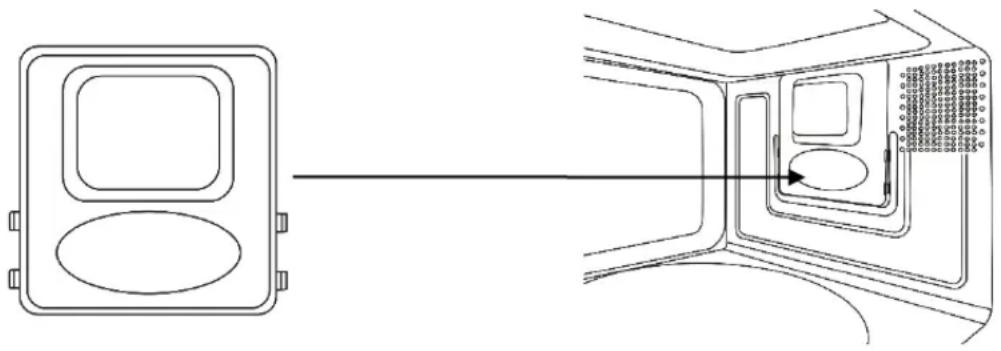
- Remove all the packaging. Do not remove the small piece of card from the right hand side of the cavity wall (Refer to the below image). This is called a waveguide cover and allows the microwaves to pass through to cook the food.
natural_image
Diagram showing a device with two components and an internal structure, no text or symbols presentPlease ensure you keep this cover clean at all times by wiping with a damp cloth. Do not remove/place in a dishwasher.
-
Check the oven after unpacking for any visual damage such as:
-
A misaligned door
- Damage to the door
- Dents or holes in the door window and screen
• Dents in the inside
If you can see any damage do not use the oven, please call our Customer Service team on 0345 209 7461.
This microwave oven weighs approximately 10.4Kg so you must put it on a horizontal surface that is strong enough to support this weight.
The oven must be placed away from high temperatures and steam. Do not put anything on the top of the microwave oven.
PRODUCT OVERVIEW
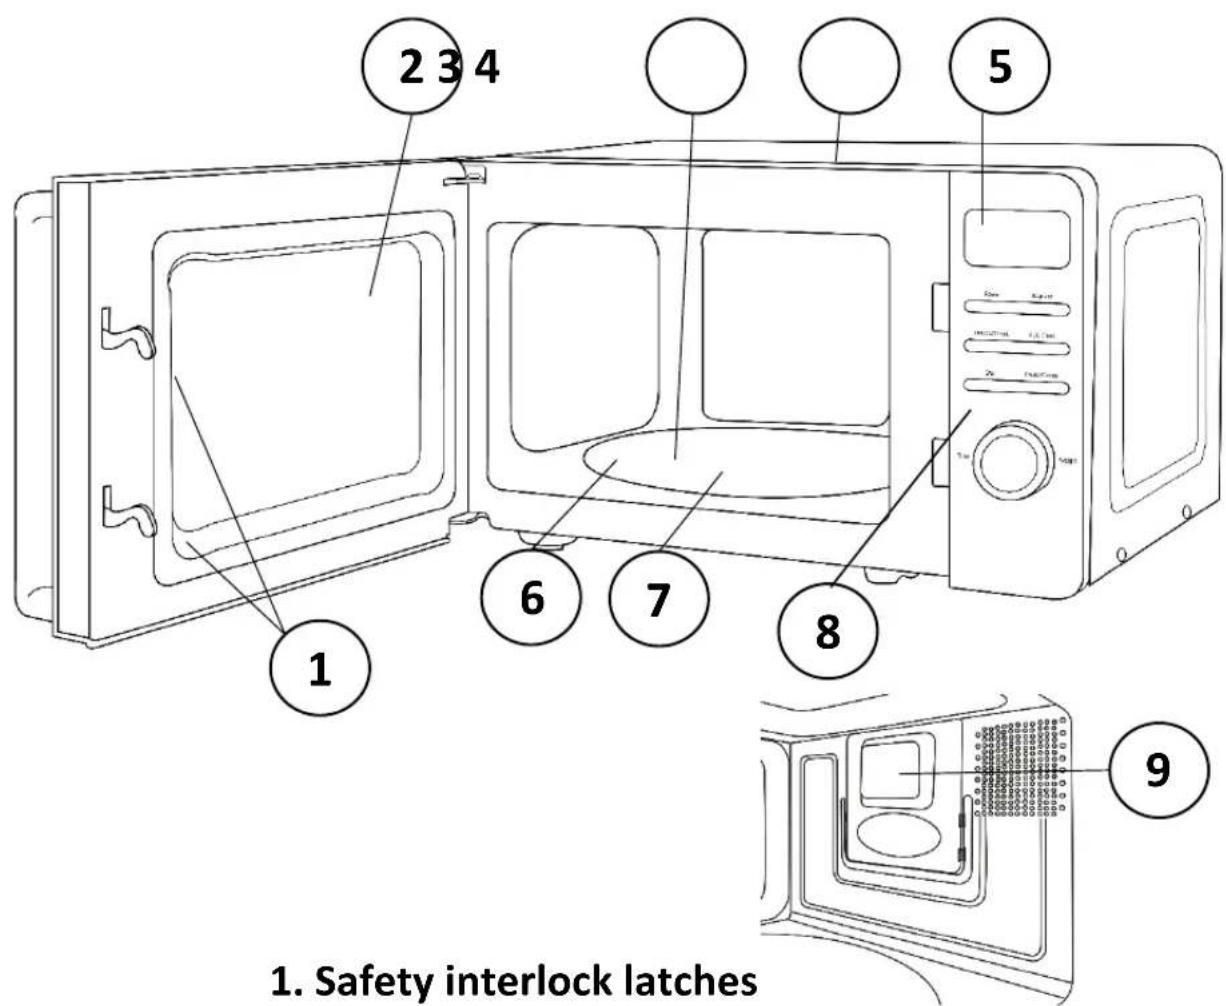
- Safety interlock latches
- Door assembly and window
- Glass turntable
- Microwave top
- Screen display
- Turntable ring
- Turntable coupling
- Control panel - buttons and dial
- Plastic waveguide cover (do not remove)
- Place the oven as far away from radios and televisions as possible. Using the oven may cause interference with the reception.
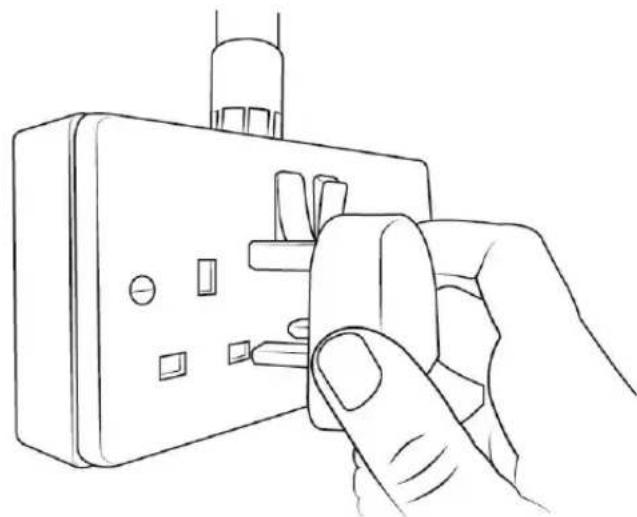
- Plug the oven into a suitable 13 amp mains socket, make sure the voltage is the same as on the rating label (do not use extension cables or mains socket adaptors.)
natural_image
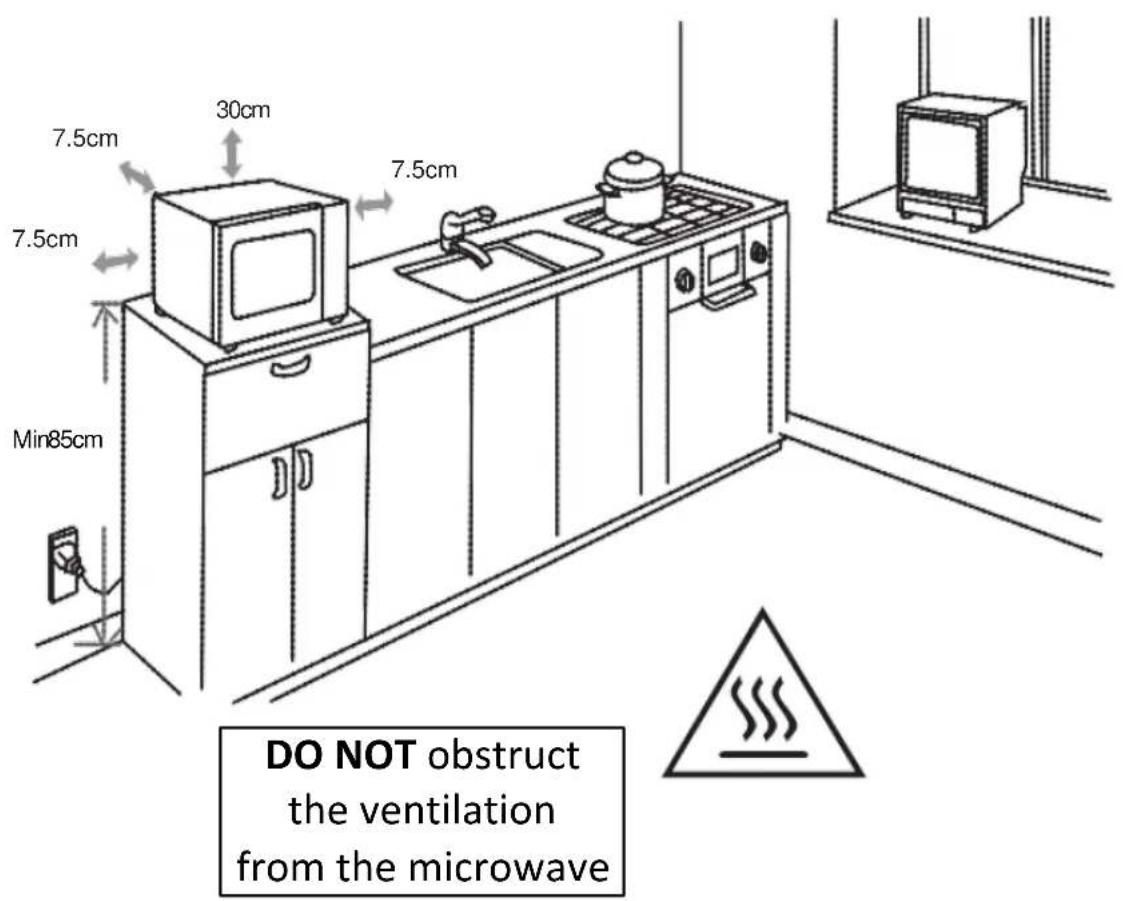
Line drawing of a hand inserting a plug into an electrical outlet (no text or symbols)- The microwave oven should be used freestanding only and must not be built-in or used in a cabinet.
- Select a level surface that provides enough space for the outlet vents.
The minimum installation height is 85cm.
A minimum clearance of 7.5cm is required between the oven and any adjacent walls. Leave a minimum clearance of 30cm above the oven.
WARNING:
DO NOT install the oven over a cooker or other heat or steam producing appliance as this will damage the microwave oven.
TURNTABLE INSTALLATION
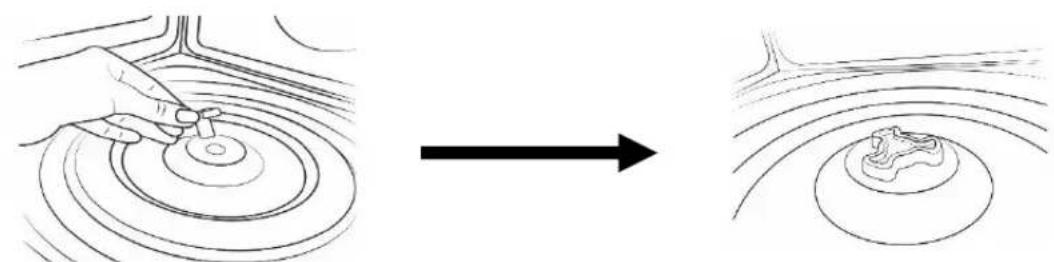
- Before first use, check that any securing tape and all packaging has been removed from the glass tray and turntable ring assembly.
• These parts must never be restricted from rotating.
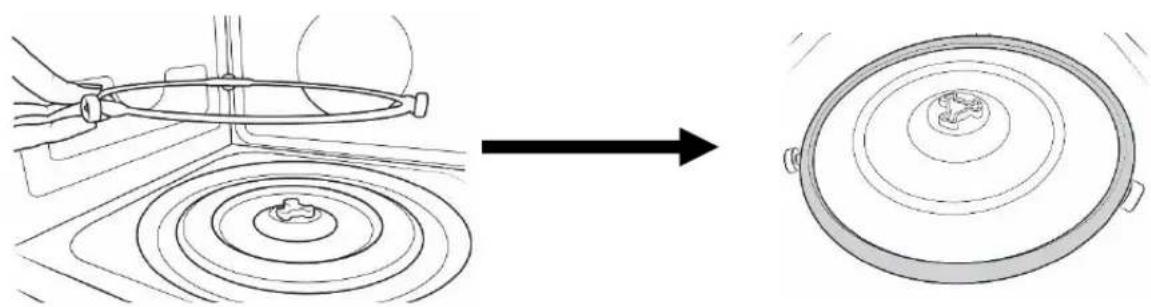
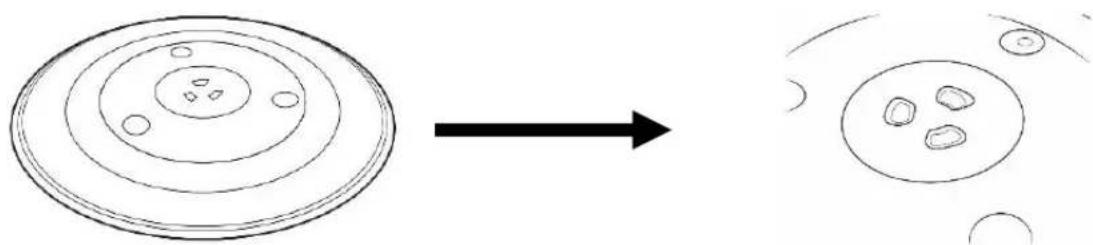
• Never place the glass tray upside down. - To assemble the turntable, follow the steps below in number order.
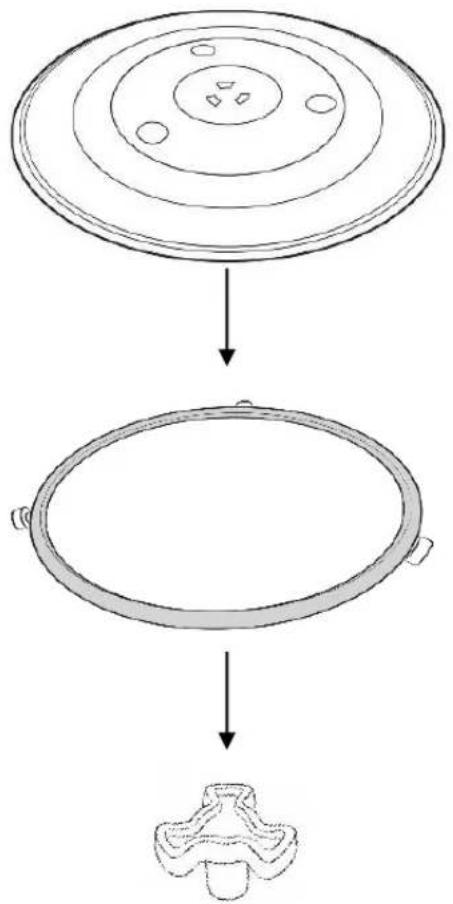
STEP 1) The turntable coupling should slot into the centre of microwave
natural_image
Diagram showing a hand using a tool to interact with a circular object, before and after a transformation (no text or symbols present)STEP 2) The turntable ring slots into the indents in the middle
natural_image
Diagram showing a mechanical component before and after transformation, with concentric circular patterns on the base (no text or symbols)STEP 3) The glass tray should align with the turntable coupling
natural_image
Diagram showing a circular structure transforming into a simplified circular diagram (no text or symbols)TURNTABLE INSTALLATION
The glass tray, turntable ring, and turntable coupling assembly must always be used during cooking (as shown below).
flowchart
graph TD
    A["Top Circular Component"] --> B["Bottom Circular Component"]
    B --> C["Cross Section"]
- Do not place the food directly onto the glass tray, always place on or in suitable microwaveable cookware.
Please check that crockery is microwave safe before using.
- If the glass tray or turntable ring assembly has been damaged in any way, please call our Customer Service team on 0345 209 7461.
CONTROL PANEL
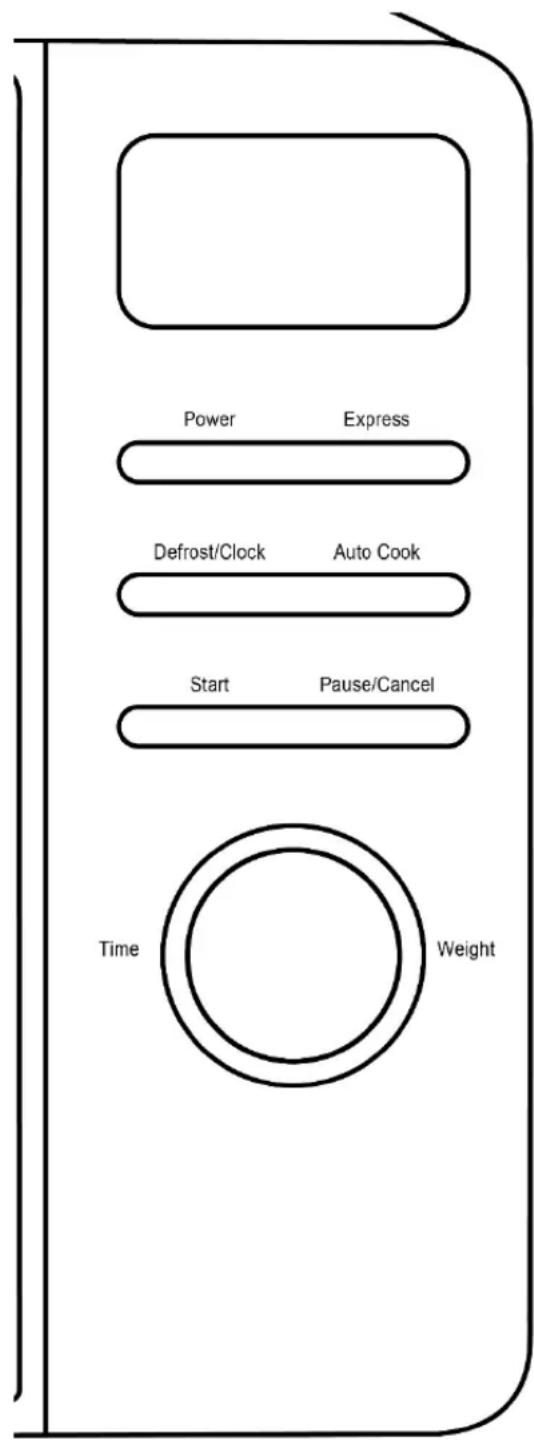
Screen Display
Cooking time, power, action indicators, and clock time are displayed.
Power
Press this button a number of times to set a cooking power level.
Express
Press to automatically add 30 seconds each time to the cooking time until 1 minute and 30 seconds.
Defrost/Clock
Press to set a pre-set defrost programme or set a pre-set cooking programme or to set clock.
Auto Cook
Press to choose 8 auto cook menus.
Start
Press to start the cooking process once you have selected a setting.
Pause/Cancel
Press once to pause a cooking cycle or twice to cancel and clear it.
Time/Weight Dial
Turn to select food you want to cook from the auto menu, or to select weight for defrost, or time for normal microwave power cooking. Confirm using the Start button.
HOW TO USE THE MICROWAVE
Turn on the power
Connect the main plug into a suitable 13amp mains socket.
Note: Make sure the voltage is the same as on the rating label located on the back of the microwave (do not use extension cables or mains socket adaptors.)
The LED light in the microwave display window will flash 3 times and then enter standby mode by showing '1:00'.
Setting the clock (24 hour)
For example, if you want to set the time to 08:30 (am:)
- Press the 'Defrost/Clock' button for 3 seconds. The display will show '1:00', and the clock symbol will be displayed.
- Turn the 'Time/Weight' dial clockwise until the display shows '8:', Press the 'Clock' button to confirm.
- The display will show '8:00' and the clock symbol will continue to flash.
- Set the minutes by turning the 'Time/Weight' dial clockwise until the display shows '08:30'. Press the 'Clock' button to confirm.
The clock is now set, the colon will continue to flash and the 'Clock' symbol will stay lit.
Note: If you do not turn the dial and press the 'Clock' button to confirm the time fairly quickly, the microwave will default to the time currently set on the screen.
Microwave Cooking
Once you have correctly installed the unit, turned on the power and set the clock, you are ready to start cooking.
Your microwave has 5 power levels, the lowest at 20%, then 40%, 60%, 80%, up to 100% (full power.)
Most recipes are cooked on full power – this should be indicated on the packaging of microwavable food.
-
To select a power level, press the 'Power' button.
-
When pressed once the screen display will show '100P' (100% power)
- When pressed twice the screen display will show '80P' (80% power) will
- When pressed three times the screen display will show '60P' (60% power)
- When pressed four times the screen display will show '40P' (40% power)
-
When pressed five times the screen display will show '20P' (20% power)
-
Once you have selected your microwave power you can turn the 'Time/Weight' dial clockwise to set the cooking time desired.
-
Press the 'Start' button to commence cooking.
The maximum cooking time is 60 minutes. To add more time during cooking, simply turn the 'Time/Weight' dial clockwise.
Do not operate the oven empty, this can cause irreparable damage.
Pausing cooking
If you want to pause the cooking to turn over or stir contents, simply open the door, then close again and press the 'Start' button to continue the cycle.
If you wish to stop cooking with time left on the display, take out the contents, close the door and press the 'Pause/Cancel' button twice to clear.
HOW TO USE THE MICROWAVE
Auto reminder
When cooking has finished the microwave will beep 3 times and the screen display will flash. If the door is not opened or 'Pause/Cancel' button not pressed, the microwave will continue to beep once every 3 minutes.
Express function
For quick and easy microwave cooking, you can press the 'Express' button to automatically add 30 seconds of cooking time each time until 1 minute and 30 seconds.
Defrost function
Ensure food is thoroughly defrosted before starting the cooking process.
- To defrost food, simply press the 'Defrost' button, and the screen display will flash. 'd1-d3' will be displayed. Turn the 'Time/Weight' dial clockwise to select the defrost weight desired.
- Once the weight is selected, press the 'Start' button to commence defrosting.
| d.1 | For defrostingmeat,theweightrangefrom0.1to2.0kg. |
| d.2 | For defrostingpoultry,theweightrangefrom0.2to3.0kg. |
| d.3 | For defrostingseafood,theweightrangefrom0.1to0.9kg. |
During defrosting, beep sounds will be heard two times to prompt you turn over the food. Open the door and turn over the food. Then close the door. Press 'Start' button again to continue defrosting.
When defrosting has finished the microwave will beep 3 times and the screen display will flash. 'End' will be displayed to indicate that the microwave has stopped operating and prompt you to take out your food.
The microwave generally penetrates 4cm into most foods. For even defrosting results, ensure you turn the food over during the cycle. Defrosting generally takes longer than the cooking time of food. Defrosted food should be consumed as soon as possible, do not put it back in the fridge or freeze again.
HOW TO USE THE MICROWAVE
Defrosting example
As an example, to defrost 0.4kg of poultry:
- Press the 'Defrost/Clock' button – 'd2' will be displayed.
- Turn the 'Time/Weight' dial clockwise until you reach the desired weight '0.4'
- To commence defrosting, press the 'Start' button.
- Half way through the defrosting cycle, three beeps will sound to prompt you to turn over the food. Open the door and turn over the food.
- Close the door and press the 'Start' button to continue defrosting.
Auto cooking function
As a digital microwave, the RHMD714 features a default cooking menu, convenient for simple cooking. If the colon on the display is flashing you are able to activate the auto menu by keep pressing the 'Auto Cook' button until you reach the desired cooking menu.
This will display: 'A1 - A8'
You will need to use your discretion regarding food type, temperature and weight as times may vary - below is a guideline for each auto cooking setting.
Automatic Delayed Function
As an example, if it is 12:30 mid-day, you want the microwave to start cooking at 14:20 for 9 minutes and 30 seconds.
- Make sure the clock is set as current time 12:30
- Press 'Power' button to select 100P full power.
- Turn the 'Time/Weight' dial to set the cooking time as 9 minutes and 30 seconds.
- Press the 'Defrost/Clock' button for 3 seconds to return to the current clock.
- Turn the 'Time/Weight' dial to set the auto cook starting time as 14:20.
- Press 'Defrost/Clock' button to confirm the delay programme.
HOW TO USE THE MICROWAVE
| Display Setting | Food Type Weights (kg) Method | ||
| A.1 Popcorn 0.1 | For a bag of corn, if the corn decreases its popping speed to one pop every couple of seconds, press ‘Pause/Cancel’ to stop. | ||
| A.2 | Reheat | 0.2 – 1.0 | Reheat food weighted up to 1.0kg. |
| A.3 | Beverage | 1 cup - 250ml2 cups - 500ml3 cups - 750ml | Heat 1-3 cups of liquid, each cup of approx. 250ml liquid. Make sure to use a wide top cup. |
| A.4 | Pizza | 1 slice - 150g2 slices - 300g | Warm 1-2 slices of fridge chilled pizza, each slice of pizza is approx. 150g |
| A.5 | Potato | 0.450.65 | To cook potato slices, cut into approx. 5mm width and length, to total weight of approx. 0.45kg or 0.65kg. Place the slices on a film covered dish to prevent water loss. |
| A.6 | Vegetable | 0.1 – 0.5 | To cook vegetables up to 0.5kg. |
| A.7 | Meat | 0.1 – 0.5 | To cook meat up to 0.5kg. |
| A.8 | Fish | 0.1 – 0.5 | To steam fish up to 0.5kg. Wash and remove scales, and make slits in the skin. Put the fish on a shallow dish, season and cover with a thin layer of film to prevent water loss. Stand for 2 minutes once cooked. |
Once you have turned the dial to select the appropriate setting, press the 'Start' button to commence cooking.
Make sure you monitor cooking progress as times can vary.
Multi Stage Cooking
As an example, if you want to cook the foods with 100% power for 3 minutes and then cook at 20% power for 9 minutes.
- press the 'Power' button to set the microwave power to 100%. The screen shows '100P'.
- Turn the 'Time/Weight' Dial to set the cooking time for 3 minutes.
- press the 'Power' button to set the microwave power to 20%. The screen shows '20P'.
- Turn the 'Time/Weight' Dial to set the cooking time for 9 minutes.
- Press 'Start' button to start the cooking.
Child lock function
The child lock function is ideal to stop children from altering cooking times if unsupervised. No buttons will function in this mode.
To set the lock, press and hold the 'Pause/Cancel' button for 3 seconds.
The lock is now functional.
To cancel the lock, again press and hold the 'Pause/Cancel' button for 3 seconds.
Utensil information
- Do not use metal pans or dishes with metal handles.
- Do not use anything with a metal trim.
- Do not use paper-covered wire twist-ties on plastic bags.
- Do not use melamine dishes as they contain a material which will absorb microwave energy. This may cause the dishes to crack or burn, and will slow down the cooking speed.
- Use only cookware that is approved to be used in a microwave oven.
- Do not cook using a container with a restricted opening, such as bottles, as they may explode.
- Do not heat baby bottles with the teat left on. Remove it if replacing the bottle back into the oven.
- Only use thermometers that are approved for microwave ovens.
- Do not use the microwave oven for heating utensils.
COOKING TIPS
Defrosting tips
Microwaves penetrate around 4cm into most food. To maximize defrosting effectiveness follow the below guidelines.
- For thick foods, turn regularly during operation in order to defrost evenly.
- If food weighs over 500g, it is advised to turn at least 2 times.
- Defrosted food should be consumed as soon as possible, it is not advisable to put back into the fridge or freeze again.
Cooking tips - The following may affect cooking results:
Food arrangement
If possible, thicker bits of food should be placed around the outside of the dish and the thinner parts toward the centre, spread out as evenly as possible. Do not overlap food if possible as this could result in uneven cooking results.
Cooking length
If you are unsure of cooking times it is advisable to start with a short cooking time and monitor cooking progress before adding further time. Overcooking could lead to a risk of fire. Ensure food is cooked thoroughly before consuming.
Cooking food evenly
Foods such as meat should be turned frequently to ensure more even cooking results. If the food is liquid based, stirring during the cooking time is advisable.
Allow standing time
When the microwave has stopped cooking, leave the food to rest for an adequate length of time to allow for cooking completion and cooling.
CLEANING THE MICROWAVE
• Before you clean the oven, turn it off and unplug it.
- Keep the inside of the oven clean. When food or liquids stick to the oven walls, wipe with a damp cloth. We recommend that you do not use harsh detergent or abrasives.
- On the right hand side wall of the cavity is the waveguide cover, microwaves are passed through this to enable your food to cook. It is important that this waveguide cover is kept clean at all times. To do this wipe with mild detergent and water, then dry.
- You should clean the outside of the oven with a damp cloth. Do not allow water to seep into the ventilation openings.
- Do not allow the control panel to become wet. Clean with a soft, damp cloth. Do not use detergents, abrasives or spray-on cleaners on the control panel.
- If steam builds up inside or around the outside of the oven door, wipe with a soft cloth. This may happen when the microwave oven is used in humid conditions.
- Regularly remove the glass turntable to clean it, and wash it in warm soapy water. Regularly clean the turntable support and oven floor. Simply wipe the bottom surface of the oven with mild detergent and water, then dry. You can wash the turntable support in mild soapy water.
- When removing the turntable support of the oven, make sure you put it back properly.
- If the inside of the oven smells, put a cup of water with the juice and skin of one lemon in a deep microwave bowl. Microwave it for three minutes, wipe thoroughly and then dry with a soft cloth.
PROBLEM SOLVING
WARNING: To reduce the risk of personal injury, always unplug the microwave before performing maintenance or trouble shooting checks.
The microwave oven may cause interference to your radio, TV or similar equipment. If this happens, you can stop the interference by moving the radio, TV or equipment as far away from your microwave oven as possible.
| Problem Potential reason | Potential solution | |
| If the microwave doesn’t work | 1. Microwave is not plugged in | Make sure the plug is plugged in securely into the mains and the plug is switched on. If it is not, remove the plug from the socket, wait 10 seconds and plug it in again securely. |
| 2. Plug is not working | The plug socket that the microwave is plugged into may have become faulty. Plug the microwave into another known good plug socket, ensure that the socket is turned on and check if the microwave now works. | |
| 3. The plug has a blown fuse or the mains circuit has a blown fuse/tripped fuse | Check the plug for a blown circuit fuse or a tripped main circuit breaker. If these seem to be working properly, test the socket with another appliance. | |
| 4. Microwave has developed a fault | Contact customer services to talk through the problem to see if any solution for the fault can be found. If not and the product is within its warranty period, then the microwave should be returned to the retailer it was purchased from for a replacement or refund. | |
| If the microwave power will not work | 1. Door is not closed | Make sure the door is securely closed. Otherwise, the microwave will not engage or operate. |
| 2. The power has not been set/the timer dial has not been turned. | Set the microwave power by pressing the ‘Power’ button. Select the time by turning the dial and pressing ‘Start’ to confirm. | |
| Not heating | Magnetron not working | The component that produces the microwaves is called a magnetron, if food is not being heated or is 'luke' warm then it is likely this component has developed a fault. If the microwave is within its warranty period, please contact customer services for further advice or take the microwave back to the retailer it was purchased from for a refund or replacement. |
PROBLEM SOLVING
| Problem Potential reason Potential solution | ||
| Sparking | 1. Burnt on food debris | Spillages or splashes can burn and catch fire, all food that is put into the microwave should be appropriately covered. All spillages or splashes must be cleaned, and all areas of microwave cleaned after each use. Burnt on food debris in the microwave, on the waveguide and the behind the waveguide can cause the microwave to 'spark'. This is because burnt on debris can be focused on by the microwaves and spark. Microwaves must be thoroughly cleaned after every use to ensure no food is burnt on to any part of the microwave. If the microwave does 'spark' the waveguide must be disposed, the microwave must be cleaned thoroughly and then contact customer services for a replacement wave guide. The replacement wave guide should be fitted and the microwave should operate normally. However, if the microwave 'sparks' again on first use (after the waveguide has been replaced and the microwave cleaned,) please contact customer services for further advice. |
| 2. Metal or foil | No metal or foil should be put inside a microwave as it can cause 'sparking' which can damage the microwave. The only metal accessories that should be used inside the microwave are the ones supplied by the manufacturer. | |
| 3. Pressure build up in food | Food with none porous skins (potatoes for example), must be pierced to allow steam to escape. As the build up of pressure can cause food to burst and create a 'fire hazard'. | |
| Heat spots | Operated empty or with no moisture | Microwaves cannot be run empty, microwaves need moisture to operate correctly. If microwaves are operated empty or are used to heat up plates (this is not permitted), the microwaves can focus on a single point inside the microwave. This can cause a heat spot, which can cause the area to become deformed, warped or start to melt. If microwaves are operated empty or to heat up foreign objects this will void the warranty. |
PROBLEM SOLVING
| Problem Potential | Potential reason Potential | solution |
| Condensation or excess water | 1. Food that is being cooked | By the very nature of how a microwave works, it 'excites' the water molecules in the food it is heating, causing them to move about and generate heat from within the food. Often when the food heats up it reaches the point where steam is released. Dependant on the food type being heated (and its water content level), the length of time being heated for – and so the amount of steam generated – it is inevitable that some of the steam will condense and form back into water droplets within the microwave cavity. This can usually be found on the inner walls or most commonly on the back of the glass door. If not cleaned up, these droplets can start to form small 'pools' of water. |
| 2. Cooling vents covered | Cooling vents allow the heat and steam to escape from the microwave. These cannot be covered as it can cause excessive water to settle inside the microwave or the microwave to overheat. The installation instructions in the instruction manual must be followed or the warranty will be void. | |
| Paint damage/ peeling | Maintenance | If the microwave is within its warranty period, please contact customer services for further advice or take the microwave back to the retailer it was purchased from for a refund or replacement |
| Light not working | Bulb not working | Due to the construction of microwaves and certain 'dangerous' components inside, the light bulb can only be changed by a qualified service engineer. If the microwave is within its warranty period, please contact customer services for further advice or take the microwave back to the retailer it was purchased from for a refund or replacement |
| Over heating | Cooling vents covered | Cooling vents allow the heat and steam to escape from the microwave. These cannot be covered as it can cause excessive water to settle inside the microwave or the microwave to overheat. The installation instructions in the manual must be followed or the warranty will be void. |
| Too noisy | 1. Glass turntable fitted incorrectly | Check that the glass turntable has been placed correctly on the turntable and is not hitting the walls/doors of the microwave during operation. |
| 2. Dishes/plate are too large for the microwave | Check that the dishes/plates are the correct size for the microwave and that they are not hitting the walls/door of microwave during operation. |
PROBLEM SOLVING
| Problem Potential reason | Potential solution | |
| Door not shutting/ locking | 1. Glass turntable fitted incorrectly | Check that the glass turntable has been placed correctly on the turntable and is not stopping the door from shutting correctly. |
| 2. Latches have become deformed | If the microwave is within its warranty period, please contact customer services for further advice or take the microwave back to the retailer it was purchased from for a refund or replacement. | |
| Turntable not rotating | 1. Turntable coupling not fitted or tape not removed | Check that the turntable coupling is fitted correctly and the transportation tape has been removed. |
| 2. Turntable roller ring not fitted or fitted incorrectly | Check that the coupling has be placed under the turntable and that it is position correctly. | |
| 3. Glass turntable fitted incorrectly | Check that the glass turntable has been placed correctly on the turntable. | |
| 4. Turntable has developed a fault | If the microwave is within its warranty period, please contact customer services for further advice or take the microwave back to the retailer it was purchased from for a refund or replacement. | |
At Russell Hobbs, we take all our customer feedback seriously.
Feel free to contact our Customer Service Team on
0345 209 7461 who will be more than happy to assist you.
This product is guaranteed for 12 months from the date of the original purchase. If any defect arises due to faulty materials or workmanship, the faulty product must be returned to the place of purchase.
Refund or replacement is at the discretion of the retailer.
The following conditions apply:
- The product must be returned to the retailer with the original proof of purchase.
- The product must be installed and used in accordance with the instructions contained in this instruction guide and any other instructions for use which are supplied.
- It must be used for domestic purposes only and for its intended use.
- This warranty does not cover wear and tear, damage, misuse or consumable parts.
SPARE PARTS
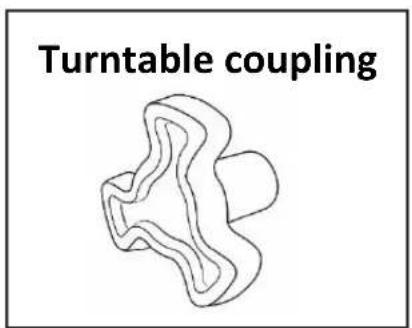
To check the availability of the following spare parts, simply contact our friendly Customer Services team on 0345 209 7461.
CONNECTION TO THE MAINS SUPPLY
WARNING- THIS APPLIANCE MUST BE EARTHED
This appliance is designed to operate from a mains supply of 220-240V\~ 50Hz.
Check that the voltage marked on the product corresponds with your supply voltage.
This product is fitted with a 13A plug complying with BS1363. If this plug is unsuitable or needs to be replaced, refer to customer services.
Important: The wires in the mains lead are coloured in accordance with the following code:
CONNECTION TO THE MAINS SUPPLY
For UK use only – PLUG
- As the colours of the wires in the mains lead of this appliance may not correspond with the coloured markings identifying the terminals in your plug, proceed as follows:
- The GREEN/YELLOW wire is the EARTH and must be connected to the terminal which is marked with the letter E or by the earth symbol or coloured GREEN or GREEN/YELLOW.
- The BLUE wire is the NEUTRAL and must be connected to the terminal marked with the letter N or coloured BLACK.
- The BROWN wire is the LIVE wire and must be connected to the terminal marked with the letter L or coloured RED.
• Always ensure that the plug cord grip is fastened correctly. - If a 13A (BS1363) fused plug is used it must be fitted with a 13amp fuse conforming to BS1362 and be BSI or ASTA approved.
If the fuse cover is lost the plug must not be used until a replacement is obtained from an electrical supplier.
If you need to remove the plug, cut it from the mains lead and dispose of it. NEVER attempt to re-use this plug or insert it into a socket outlet, as there is a very great risk of electrical shock.
NOTES
NOTES
NOTES
For Customer Services & Spare Parts please call: 0345 209 7461
Or visit us at http://mda.russellhobbs.com
Revision 1.2
CE
natural_image
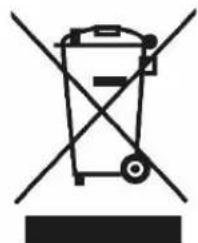
Symbol of a trash bin crossed out by two crossed lines, with no text or labels present.This symbol is known as the 'Crossed-out wheelie bin Symbol'. When this symbol is marked on a product/batteries, it means that the product/batteries should not be disposed of with your general household waste. Only discard electrical/electronic/battery items in separate collection schemes, which cater for the recovery and recycling of materials contained within. Your co-operation is vital to ensure the success of these schemes and for the protection of the environment. For your nearest disposal facility, visit www.recycle-more.co.uk or ask in store for details.
We reserve the right, due to possible changes to design, to alter the instruction manual without prior notice.
- SAFETY INSTRUCTIONS
- IMPORTANT SAFETY INSTRUCTIONS READ CAREFULLY AND KEEP FOR FUTURE REFERENCE
- WARNING:
- READ CAREFULLY AND KEEP FOR FUTURE REFERENCE WARNING:
- READ CAREFULLY AND KEEP FOR FUTURE REFERENCE
- ABOUT YOUR MICROWAVE
- Thank you for purchasing your Russell Hobbs microwave oven.
- How do microwaves work?
- PRODUCT INFORMATION
- Before you use your microwave oven
- PRODUCT OVERVIEW
- TURNTABLE INSTALLATION
- CONTROL PANEL
- Screen Display
- Power
- Express
- Defrost/Clock
- Auto Cook
- Start
- Pause/Cancel
- Time/Weight Dial
- HOW TO USE THE MICROWAVE
- Turn on the power
- Setting the clock (24 hour)
- Microwave Cooking
- Pausing cooking
- Auto reminder
- Express function
- Defrost function
- Defrosting example
- Auto cooking function
- Automatic Delayed Function
- Multi Stage Cooking
- Child lock function
- Utensil information
- COOKING TIPS
- Defrosting tips
- Food arrangement
- Cooking length
- Cooking food evenly
- Allow standing time
- CLEANING THE MICROWAVE
- PROBLEM SOLVING
- The following conditions apply:
- SPARE PARTS
- CONNECTION TO THE MAINS SUPPLY
- WARNING- THIS APPLIANCE MUST BE EARTHED
- For UK use only – PLUG
- NOTES
Brand : RUSSELL HOBBS
Model : A1/RHMD714RHMD714G
Category : Stroller