
CleanJet Volume CJ930T - Steam cleaner HOOVER - Free user manual and instructions
Find the device manual for free CleanJet Volume CJ930T HOOVER in PDF.


| Product Type | Steam Cleaner |
| Brand | Hoover |
| Model | CleanJet Volume CJ930T |
| Dimensions (H x W x D) | 110 x 30 x 25 cm |
| Weight | 4.5 kg |
| Power Supply | 220-240 V, 50-60 Hz |
| Water Tank Capacity | 0.8 L |
| Heating Time | 30 seconds |
| Steam Pressure | 3.5 bar |
| Cable Length | 5 m |
| Main Functions | Steam cleaning for floors, carpets, windows, kitchen surfaces, and upholstery |
| Accessories Included | Floor head, window squeegee, small brush, large brush, extension hose, measuring cup |
| Safety Features | Auto shut-off, child lock, pressure safety valve |
| Maintenance | Descale regularly, clean nozzles after use |
| Spare Parts Availability | Available on Hoover official website and authorized service centers |
| Repairability | Repairable by qualified technician; spare parts available for key components |
| Energy Class | A+ |
| Noise Level | 78 dB(A) |
| Usage | Indoor household use |
Frequently Asked Questions - CleanJet Volume CJ930T HOOVER
User questions about CleanJet Volume CJ930T HOOVER
0 question about this device. Answer the ones you know or ask your own.
Ask a new question about this device
Download the instructions for your Steam cleaner in PDF format for free! Find your manual CleanJet Volume CJ930T - HOOVER and take your electronic device back in hand. On this page are published all the documents necessary for the use of your device. CleanJet Volume CJ930T by HOOVER.
USER MANUAL CleanJet Volume CJ930T HOOVER
natural_image
Illustration of a vacuum cleaner with handle and hose (no text or symbols)USER MANUAL
IMPORTANT SAFETY REMINDERS
This cleaner should only be used for domestic cleaning, as described in this user guide. Please ensure that this guide is fully understood before operating the appliance.
Only use attachments recommended or supplied by Hoover.
WARNING: Electricity can be extremely dangerous. This appliance must be earthed. This plug is fitted with a 13 amp fuse (UK only).
IMPORTANT: The wires in the mains power lead are coloured in accordance with the following code: Blue - Neutral Brown - Live
STATIC ELECTRICITY. Some carpets can cause a small build up of static electricity. Any static discharge is not hazardous to health.
AFTER USE. Switch the cleaner off and remove the plug from the electricity supply. Always switch off and remove the plug before cleaning the appliance or attempting any maintenance task.
HOOVER SERVICE. To ensure the continued safe and efficient operation of this appliance we recommend that any servicing or repairs are only carried out by an authorised Hoover service engineer.
This appliance can be used by children aged from 8 years and above and persons with reduced physical, sensory or mental capabilities or lack of experience and knowledge if they have been given supervision or instruction concerning use of the appliance in a safe way and understand the hazards involved. Children shall not play with the appliance. Cleaning and user maintenance shall not be made by children without supervision.
IT IS IMPORTANT THAT YOU:
- Use indoors only.
- Use only on surfaces moistened by the cleaning process or small spills. Do not immerse product in liquid.
- Close supervision is necessary when any appliance is used by or near children. Do not allow cleaner to be used as a toy or to run unattended at any time.
- Keep hair, loose clothing, fingers, feet and all parts of body away from openings and moving parts.
- Do not pick up anything that is burning or smoking, such as cigarettes, matches, or hot ashes.
- DO NOT use aerosol sprays near cleaner. Aerosol sprays may be flammable.
- Do not pick up or use flammable or combustible materials such as gasoline or fine wood sandings or use in areas where they may be present.
- Avoid picking up hard, sharp objects with the cleaner. They may damage the machine.
IT IS IMPORTANT THAT YOU:
- Do not put any object into openings. Do not use with any opening blocked; keep free of dust, lint, hair, and anything that may reduce flow.
- Do not pull or carry by the cord, use the cord as a handle, close door on the cord or pull the cord around sharp edges or corners. Do not run appliance over the cord. Keep the cord away from heated surfaces.
• Always disconnect the cord from electrical outlet before servicing the cleaner. - Unplug the cleaner when not in use. Turn off all controls before unplugging.
- Do not unplug by pulling on the cord. To unplug, grasp the plug, not the cord.
- Never handle the plug or appliance with wet hands.
- Do not clean over floor electrical outlets.
• Do not use without the tanks in place. - Keep detergents and other cleaners out of children's reach.
- Do not pick up chlorine bleach, drain cleaner, gasoline or any other toxic
IT IS IMPORTANT THAT YOU:
material with this appliance.
- When using recommended chemicals with this machine, be certain the area is well ventilated.
- Do not use a flammable or combustible liquid to clean a floor.
- Follow manufacturer's instructions for all chemicals used with this machine. Do not exceed recommended mixing ratios.
- Store in a dry place. Do not expose the cleaner to freezing temperatures.
- Do not continue to use your cleaner if it appears to be faulty. If the power cord is damaged stop using the cleaner IMMEDIATELY. To avoid a safety hazard, an authorised Hoover service engineer must replace the power cord.
- Use the cleaner only for its intended use as described in the instructions.
CANTION: This product is intended for cleaning purpose only. Do not use the main suction head or upholstery brush to remove large spills.
GETTING TO KNOW YOUR CLEANER
Congratulations on the purchase of your new Hoover.
Please take the time to read this manual carefully.
You'll then be ready to make the most of the special features only the new Hoover can offer!
When first unpacking your cleaner please check all items are included:
Cleaner body
Upholstery brush Flexible hose Hose bag
In the unlikely event that any item is missing or you experience any problems with the product
Please contact the Hoover customer helpline:
Tel: 08444 995 599
Email: customer.services@hoovercandy.com
Should any faults occur with your cleaner during the first 12 months, contact the Hoover Customer Helpline on the number above.
If you are having difficulty in obtaining filters or any other accessories for your cleaner, contact the Hoover Customer helpline or order online at www.hooverspares.com

-4-
PREPARING YOUR CLEANER

Remove the contents of the packaging. You should find the following:
- Cleaner body
- Upholstery brush
- Flexible hose

To fold the handle press the handle release button and fold to the storage position.
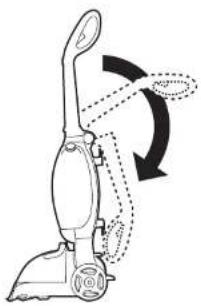
natural_image
Diagram of a vacuum cleaner with motion arrows indicating rotational movement (no text or symbols)(*Certain models only)

Raise the handle to the upright position until it locks in place.
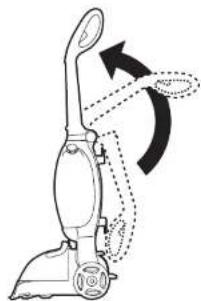
natural_image
Line drawing of a vacuum cleaner with motion arrows indicating rotation (no text or symbols)
Once the handle has been lowered lift the carry handle to allow the cleaner to be carried from room to room.
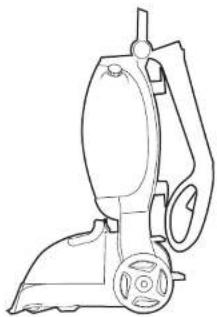
natural_image
Line drawing of a vacuum cleaner with handle and wheels (no text or symbols)-5-
BEFORE CLEANING A CARPET
• Vacuum thoroughly.
• Test for colourfastness
- Move the furniture
Test for colourfastness - Wet a white absorbent cloth with the solution. In a small, hidden area of your carpet, gently rub the surface with the dampened cloth.
Wait ten minutes and check for colour removal or bleed with a white paper towel.
If your carpet has more than one colour, check all colours.
When cleaning an entire room, move furniture out of the area to be cleaned. If the furniture is too heavy to move, place aluminium foil or wax paper under legs. This will prevent wood finishes from staining your carpet. Pin up furniture skirts and curtains.
NOTE: Do not over saturate your carpet.

IMPORTANT: This cleaner should not be used to dry vacuum the carpet.
FILLING THE CLEAN WATER TANK
The clean water tank holds the water and cleaning solution.
IMPORTANT: Always turn the cleaner off and disconnect from the electrical outlet before filling the clean water tank.

IMPORTANT: When filling the clean water tank, do not exceed the max fill line.
NOTE: Before using this appliance, please ensure dirty water tank release lever and inlet cover are fully locked.
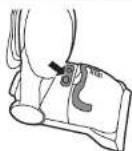

Remove the clean water tank cap.

natural_image
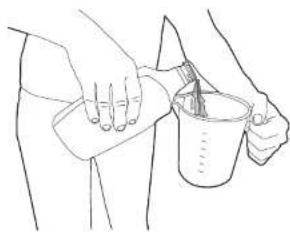
Line drawing of a hand holding a medical device over a seated body (no text or symbols)1 Add the required amount of cleaning fluid to a measuring jug. (approx. 40ml per 1L of water)
natural_image
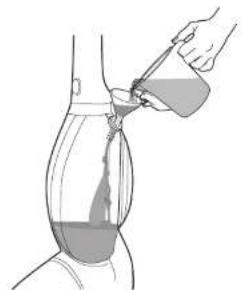
Line drawing of hands holding a cup and a wristband (no text or symbols)4 Pour the solution into the clean water tank. Do not exceed the max fill line.
natural_image
Illustration of a hand pouring liquid into a bottle (no text or symbols)2 Mix the solution with warm water. (Max. temperature - 40°C)

natural_image
Line drawing of a hand pouring liquid from a pipe into a container (no text or symbols)5 Replace the clean water tank cap

natural_image
Illustration of a hand holding a bottle with a small object inside, no text or symbols present
WARNING: Use only Hoover carpet cleaning solution. Using other solution brands may cause excess foaming and will prevent the cleaner from working effectively. Using other solutions may affect your warranty.
CLEANING CARPETS
Dry vacuum the carpet thoroughly before cleaning your carpet.
Ensure the carpet has been checked for colour fastness.

IMPORTANT: This cleaner should not be used to dry vacuum the carpet.

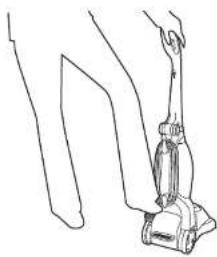
Press the cleaner release pedal and recline the cleaner.

natural_image
Line drawing of a person using a vacuum cleaner to lift a foot (no text or symbols)
Unwrap the power cord and plug the cleaner into the power supply.

natural_image
Line drawing of a vacuum cleaner with a power cord and cable (no text or symbols)
Press the solution mix trigger to release the solution.

natural_image
Line drawing of a hand holding an ear area, no text or symbols present
Press the ON/OFF pedal.
natural_image
Line drawing of a hand holding a small object, possibly a vacuum cleaner or tool, with no visible text or symbols.
For best results apply the solution on the forward stroke (press trigger) and recover the solution on the backward stroke (release trigger).

natural_image
Line drawing of a hand holding a vacuum cleaner with foot and legs, showing motion direction (no text or symbols)
WARNING: Use only Hoover carpet cleaning solution. Using other solution brands may cause excess foaming and will prevent the cleaner from working effectively. Using other solutions may affect your warranty.
USING THE UPHOLSTERY BRUSH
NOTE: Do not over saturate your upholstery. NOTE: The clean water tank will need to be filled with solution and water before use.
1 Take out the flexible hose and the upholstery brush

5 Press trigger to release solution.

2 Lift the the inlet cover

natural_image
Line drawing of a vacuum cleaner (no text or symbols)6 Pull upholstery brush back over spill to pick up liquid.
For best results apply solution on the forward stroke and release the trigger to recover on the back ward stroke.

3 Insert the hose connector

natural_image
Line drawing of a vacuum cleaner with handle and attached cable (no text or symbols)7 Upholstery brush can only work with the cleaner in the upright position
4 Press the ON/OFF pedal

natural_image
Line drawing of a mechanical device with lever and blade (no text or symbols)
natural_image
Line drawing of two different vacuum cleaner designs with no text or symbolsSTORAGE
Before storing the cleaner:
Turn the cleaner off and disconnect from the electrical socket.
Empty and rinse the dirty water tank. Allow to air dry.
Press the handle release button and lower the handle for storage.

natural_image
Line drawing of a vacuum cleaner with motion arrows indicating clockwise motion (no text or symbols)Do not store the cleaner on a wood surface unless the cleaner is completely dry.
* Certain models only
Put the flexible hose and the upholstery brush back into the bag for storage.

natural_image
Simple line drawing of a medical device with a bulb and tubing, no text or symbols presentCORD STORAGE
Turn the cleaner off and remove the plug from the electrical socket. Wind the power cord around the cord storage hooks.
Rotate the storage hooks to quickly release the full length of the power cord.

natural_image
Line drawing of a person holding a rope tied with a small object (no text or symbols)-9-
CORD CLIP
Do not run over the power cord.
Clip the power cord in the cord clip at the back of the handle to avoid accidentally running the cleaner over the cord and causing any damage

EMPTYING THE DIRTY WATER TANK

WARNING: DO NOT exceed the max fill line on the dirty water tank.

Press the dirty water tank release lever.

natural_image
Line drawing of a person's foot wearing a small device with a button (no text or symbols)
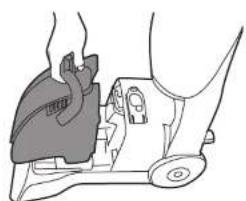
Remove the dirty water tank from the cleaner.
natural_image
Line drawing of a hand holding a device with a black tag, next to a white vehicle (no text or symbols)
Turn the tank cap anti-clockwise to open.

natural_image
Hand holding a button with a circular arrow, next to a device component (no text or symbols visible)
Empty the tank. Rinse the tank with clean water and allow to dry before storing the cleaner.

natural_image
Line drawing of a hand pouring liquid into a container (no text or symbols)
WARNING: Always switch the cleaner off and unplug it from the electrical socket before emptying the dirty water tank.
CLEANING THE EXHAUST FILTER
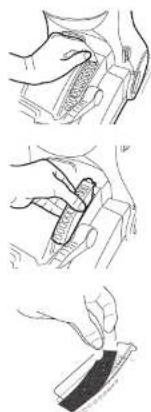
Press the exhaust filter release latch.
natural_image
Illustration of three sequential steps of a hand holding a tool, no text or symbols presentRemove the exhaust filter chamber.
Remove the filter from the chamber. Rinse under hand warm water to remove any debris. Allow to completely dry before returning to the cleaner

CLEANING THE PRE MOTOR FILTER
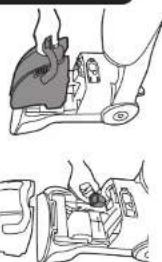
Remove the dirty water tank from the cleaner.
natural_image
Medical illustration showing a hand holding a heart and a car, with no visible text or symbolsTake out the pre motor filter, then clean it.


IMPORTANT: Clean the filters after each use.
WARNING: Ensure both filter are fitted to the cleaner before use.
CLEANING THE BRUSHBAR\*
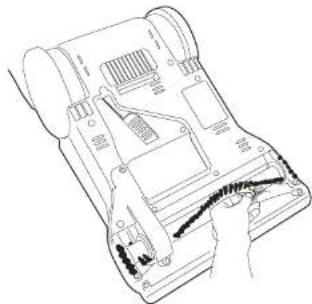
Turn the cleaner upside down. Remove any threads or debris from the brush bar.

natural_image
Illustration of a hand holding a grid-patterned document or paper, with no visible text or symbols.CLEANING THE AGITATOR\*
Remove any threads or debris ensuring the agitator can rotate freely.
natural_image
Technical line drawing of a mechanical component with no visible text or symbols
THIS FEATURE VARIES ACCORDING TO MODEL
Please check the underside of your cleaner and follow the appropriate instructions.
* Certain models only
CHANGING THE BRUSHBAR\*
1 Press the dirty water tank release lever and remove the dirty water tank. Unscrew 4 retaining screws on the top surface.

natural_image
Line drawing of a mechanical device with a hand adjusting a component (no text or symbols)3 Unscrew 2 retaining screws located on the underside of the detergent nozzle. Remove the brushbar from the nozzle.

natural_image
Line drawing of a hand using a tool to adjust or install a mechanical component (no text or symbols present)
THIS FEATURE VARIES ACCORDING TO MODEL Please check the underside of your cleaner and follow the appropriate instructions.
IMPORTANT: Switch the cleaner off and remove the plug from the electricity supply before dismantling cleaner
2 Turn the cleaner over. Remove the brushbar alignment brackets.

natural_image
Line drawing of a hand holding a device with a grid array (no text or symbols)4 Replace the brush bar and attach to the nozzle. Attach the alignment brackets and assemble to the cleaner.

CHANGING THE AGITATOR / BELT\*
1
Turn cleaner over and remove 7 retaining screws.

natural_image
Line drawing of a handheld electronic device with multiple ports and connectors (no text or symbols)4
Remove the agitator brackets.

natural_image
Technical line drawing of a mechanical device with attached clamps and connectors (no text or symbols)
THIS FEATURE VARIES ACCORDING TO MODEL
Please check the underside of your cleaner and follow the appropriate instructions.
* Certain models only

IMPORTANT: Switch the cleaner off and remove the plug from the electricity supply before dismantling cleaner.
2
Remove the belt cover and safety bar.

natural_image
Technical line drawing of a mechanical assembly with no visible text or symbols5
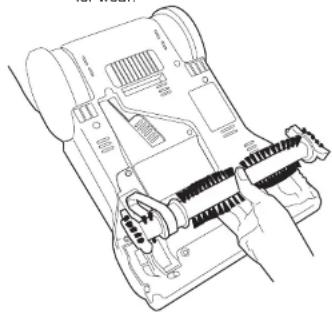
Replace the agitator by looping the belt round the agitator making sure it sits securely in the belt channel.

natural_image
Line drawing of hands connecting a device to a device with a coiled cable (no text or symbols)3
Slide the agitator assembly out of the cleaner and check the belt for wear.
natural_image
Line drawing of a hand inserting a cable into a device component (no text or symbols)6
Reassemble the agitator assembly to the cleaner ensuring the agitator can rotate freely.

natural_image
Line drawing of a hand inserting or adjusting a device into a component (no text or symbols visible)Troubleshooting
If your cleaner is not working properly run through the following checklist.
WARNING: To reduce the risk of personal injury, unplug the carpet washer before performing maintenance/troubleshooting checks.
Why won't the carpet washer turn on?
- It may not be plugged into the electrical outlet correctly: ensure that the plug is pushed in securely and switched on.
- The power button on the unit hasn't been fully depressed.
- If unit cuts out during use, disconnect the unit from the wall socket, allow to cool for one hour, clean the filter and empty the dirty water tank and check hose, brushbar for blockages.
Why won't the cleaner pick up solution/spills?
• The dirty water tank may be full. Empty the dirty water tank.
- Ensure the dirty water tank is fitted correctly and the tank cap is securely fitted.
- Check the brushbar for blockages.
Why won't the solution/clean water dispense?
• The solution/clean water tank may be empty.
- Ensure dirty water tank is fitted securely.
If there is any doubt call the Hoover Customer Helpline 08444 995 599 for advice. They may be able to assist you over the telephone.
Genuine HOOVER Spares
Tel. 08443 712 758
www.hooverspares.com
Always replace parts with genuine Hoover spares. When ordering parts, always quote your model number.
Hoover Customer Helpline
Should any faults occur with your cleaner during the first 12 months, contact the Hoover Customer Helpline on the number below.
Tel: 08444 995 599
Email: customer.services@hoovercandy.com
Hoover have a computerised nationwide service network of over 500 engineers who will quickly respond to your call and guarantee your repair for 12 months.
USE ONLY HOOVER SPARES
| SPARE PARTS | CODE |
| AGITATOR | Y30 35601321 |
| FLEXIBLE HOSE | D144 35601409 |
| UPHOLSTERY TOOL AND BRISTLES INSERT | MFT4 35601410 |
| FILTER& BRISTLES INSERT U70 35601411 | |
| BELT | V35 35601322 |
| BRUSH | F4 35601324 |
Quality
BSI ISO 9001
Hoover's factories have been independently assessed for quality. Our products are made using a quality system which meets the requirements of ISO 9001
Environment - WEEE Directive

This appliance is marked according to the European Directive 2011/65/EC on Waste Electrical and Electronic Equipment (WEEE).
By ensuring this product is disposed of correctly you will help prevent potential negative consequences for the environment and human health, which could otherwise be caused by inappropriate waste handling of this product.
The symbol on the product indicates that this product may not be treated as household waste. Instead it shall be handed over to the appliance collection point for recycling of electrical and electronic equipment.
Disposal must be carried out in accordance with the local environmental regulations for waste disposal.
For more detailed information about treatment, recovery and recycling of this product, please contact your local city office, your household waste disposal service or the shop where you purchased the product.

This product complies with the European Directives 2006/95/EC, 2004/108/EC and 2011/65/EC.
HOOVER Limited Pentrebach, Merthyr Tydfil, Mid Glamorgan CF48 4TU
GUARANTEE STATEMENT
The guarantee conditions for this appliance are as defined by our representative in the country in which it is sold. Details regarding these conditions can be obtained from the dealer from whom the appliance was purchased. The bill of sale or receipt must be produced when making any claim under the terms of this guarantee.
Subject to change without notice.

GENERATION FUTURE
Hoover Limited
Pentrebach
Merthyr Tydfil
Mid Glamorgan
CF48 4TU, UK
HOOVER CUSTOMER HELPINE
08444 995 599
© 2013 48008959/01


- IMPORTANT SAFETY REMINDERS
- IT IS IMPORTANT THAT YOU:
- GETTING TO KNOW YOUR CLEANER
- PREPARING YOUR CLEANER
- BEFORE CLEANING A CARPET
- FILLING THE CLEAN WATER TANK
- CLEANING CARPETS
- USING THE UPHOLSTERY BRUSH
- STORAGE
- CORD STORAGE
- CORD CLIP
- EMPTYING THE DIRTY WATER TANK
- CLEANING THE EXHAUST FILTER
- CLEANING THE PRE MOTOR FILTER
- CLEANING THE BRUSHBAR\*
- CLEANING THE AGITATOR\*
- THIS FEATURE VARIES ACCORDING TO MODEL
- CHANGING THE BRUSHBAR\*
- CHANGING THE AGITATOR / BELT\*
- Troubleshooting
- WARNING: To reduce the risk of personal injury, unplug the carpet washer before performing maintenance/troubleshooting checks.
- Why won't the carpet washer turn on?
- Why won't the cleaner pick up solution/spills?
- Why won't the solution/clean water dispense?
- Genuine HOOVER Spares
- Tel. 08443 712 758
- Hoover Customer Helpline
- Tel: 08444 995 599
- Quality
- BSI ISO 9001
- Environment - WEEE Directive
- GUARANTEE STATEMENT
Brand : HOOVER
Model : CleanJet Volume CJ930T
Category : Steam cleaner