
IFW 3540 J IX - Oven INDESIT - Free user manual and instructions
Find the device manual for free IFW 3540 J IX INDESIT in PDF.


| Product Type | Built-in Electric Oven |
| Model | IFW 3540 J IX |
| Brand | Indesit |
| Energy Source | Electric |
| Overall Dimensions (H x W x D) | 59.5 cm x 59.5 cm x 56.4 cm |
| Oven Capacity | 71 Liters |
| Energy Efficiency Class | A+ |
| Heating Functions | Conventional, Fan Assisted, Grill, Fan Grill, Bottom Heat, Defrost |
| Cleaning Type | Standard (Manual Cleaning) |
| Door Type | Hinged, Double Glazed |
| Safety Features | Child Lock, Overheat Protection |
| Display Type | Analog Timer and Temperature Dial |
| Weight | Approximately 34 kg |
| Power Consumption (Conventional) | 2.4 kWh |
| Power Consumption (Fan Forced) | 1.8 kWh |
| Acoustic Noise Level | 45 dB(A) |
| Control Type | Mechanical Knobs |
| Interior Light | Yes |
| Cooling Fan | Yes |
| Spare Parts Availability | Heating elements, thermostat, door gasket, knobs available through authorized service centers |
| Repairability Index | 7.5/10 |
Frequently Asked Questions - IFW 3540 J IX INDESIT
User questions about IFW 3540 J IX INDESIT
0 question about this device. Answer the ones you know or ask your own.
Ask a new question about this device
Download the instructions for your Oven in PDF format for free! Find your manual IFW 3540 J IX - INDESIT and take your electronic device back in hand. On this page are published all the documents necessary for the use of your device. IFW 3540 J IX by INDESIT.
USER MANUAL IFW 3540 J IX INDESIT
DAILY REFERENCE GUIDE

THANK YOU FOR PURCHASING AN INDESIT PRODUCT
To receive more comprehensive help and support, please register your product at www.indesit.com/register

WWW
You can download the Safety Instructions and the Use and Care Guide by visiting our website docs.indesit.eu and following the instructions on the back of this booklet.
Before using the appliance carefully read the Health and Safety guide
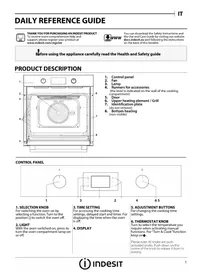
PRODUCT DESCRIPTION

- Control panel
- Fan
- Lamp
- Runners for accessories (the level is indicated on the wall of the cooking compartment)
- Door
- Upper heating element / Grill
- Identification plate (do not remove)
- Bottom heating (non-visible)
CONTROL PANEL
1. SELECTION KNOB
For switching the oven on by selecting a function. Turn to the position O to switch the oven off.
2. LIGHT
With the oven switched on, press to turn the oven compartment lamp on or off.
3. TIME SETTING
For accessing the cooking time settings, delayed start and timer. For displaying the time when the oven is off.
4. DISPLAY
5. ADJUSTMENT BUTTONS
For changing the cooking time settings.
6. THERMOSTAT KNOB
Turn to select the temperature you require when activating manual functions. For "Turn & Cook" function keep one.
Please note: All knobs are push activated knobs. Push down on the centre of the knob to release it from its seating.
ACCESSORY
WIRE RACK
BAKING TRAY
The number and type of accessories may vary depending on which model is purchased. Other accessories can be purchased separately from the After-sales Service.
USING THE ACCESSORIES
Insert the wire rack onto the level you require by holding it tilted slightly upwards and resting the raised rear side (pointing upwards) down first. Then slide it horizontally along the shelf runners as far as possible.
The other accessories, such as the baking tray, are inserted horizontally by sliding them along the shelf guides.
FUNCTIONS

CONVENTIONAL
For cooking any kind of dish on one shelf.

CONVECTION BAKE
To cook on a maximum of two shelves at the same time. It is a good idea to swap the
position of the baking trays halfway through cooking.

GRILL
For grilling steaks, kebabs and sausages, cooking vegetables au gratin or toasting bread.
cooking vegetables au gratin or toasting bread.
When grilling meat, we recommend using a dripping pan to collect the cooking juices: position the pan on any of the levels below the wire shelf and add 200 ml of drinking water.

GRATIN
For roasting large joints of meat (legs, roast beef, chicken). We recommend using a baking tray to collect the cooking juices: position the pan on any of the levels below the wire shelf and add 200 ml of drinking water.
tray to collect the cooking juices: position the pan on any of the levels below the wire shelf and add 200 ml of drinking water.

Use this function to brown the bottom of the dishes. It is advisable to place the food on the 1st/2nd level. The function can also be used for slow cooking, such as vegetables and meat stews; in this case, use the 3rd level. The oven does not have to be preheated.
Use this function to brown the bottom of the dishes. It is advisable to place the food on the 1st/2nd level. The function can also be used for slow cooking, such as vegetables and meat stews; in this case, use the 3rd level. The oven does not have to be preheated.

This mode is especially recommended for cooking pre-packed food quickly (frozen or pre-cooked). The best results are obtained if you use one cooking rack only. Pre-heating is not necessary for this cooking mode.
This mode is especially recommended for cooking pre-packed food quickly (frozen or pre-cooked). The best results are obtained if you use one cooking rack only. Pre-heating is not necessary for this cooking mode.

For cooking roasts and stuffed roasting joints on a single shelf. Food is prevented from drying out excessively by gentle, intermittent air circulation. When this ECO function is in use, the light will remain switched off during cooking but can be switched on again by pressing ⚙.
For cooking roasts and stuffed roasting joints on a single shelf. Food is prevented from drying out excessively by gentle, intermittent air circulation. When this ECO function is in use, the light will remain switched off during cooking but can be switched on again by pressing ⚙.

This function automatically selects an ideal temperature and time for baking a wide range of recipes including meat, fish, pasta, sweets and vegetables. Activate the function when the oven is cold.
This function automatically selects an ideal temperature and time for baking a wide range of recipes including meat, fish, pasta, sweets and vegetables. Activate the function when the oven is cold.
1. SETTING THE TIME
You will need to set the time when you switch on the appliance for the first time: press ∙ until the ⏻ icon and the two digits for the hour start flashing on the display.
Use + or - to set the hour and press to confirm. The two digits for the minutes will start flashing. Use + or - to set the minutes and press ⏰ to confirm.

Use + or - to set the hour and press to confirm. The two digits for the minutes will start flashing. Use + or - to set the minutes and press ⏰ to confirm.
Please note: When the icon is flashing, for example following lengthy power outages, you will need to reset the time.
2. REHEAT THE OVEN
A new oven may release odours that have been left behind during manufacturing: This is completely normal.
Before starting to cook food, we therefore recommend heating the oven with it empty in order to remove any possible odours.
Remove any protective cardboard or transparent film from the oven and remove any accessories from inside it.
Heat the oven to 250°C for about one hour, preferably using the "Convection bake" function. The oven must be empty during this time.
Follow the instructions for setting the function correctly.
Please note: it is advisable to air the room after using the appliance for the first time.
DAILY USE
1. SELECT A FUNCTION
To select a function, turn the selection knob to the symbol for the function you require: The display will light up and an audible signal will sound.

2. ACTIVATE A FUNCTION
MANUAL
To start the function you have selected, turn the thermostat knob to set the temperature you require.

Please note: During cooking you can change the function by turning the selection knob or adjust the temperature by turning the thermostat knob. The function will not start if the thermostat knob is on ●. You can set the cooking time, cooking end time (only if you set a cooking time) and a timer.
TURN & COOK
To start the "Turn & Cook" function, select the function by turning the selection knob to the relevant icon, keeping the thermostat knob on the ● icon. To end the cooking, turn the selection knob to "O".
Please note: You can set the cooking end time and timer. To obtain the best cooking results using the "Turn & Cook" function, follow the suggested weights for each kind of food in the following table.
| Food Recipe Weight (kg) | ||
| Meat Roast veal, Medium Roast Beef | 0.6 - 0.7 | |
| Chicken / Leg of lamb in pieces | 1.0 - 1.2 | |
| Fish Salmon fillet / Baked fish (whole) | 0.9 - 1.0 | |
| Fish en papillote 0.8 - 1.0 | ||
| Vegetable Stuffed vegetables 1.8 - 2.5 | ||
| Savoury pies Quiche Lorraine / Flan 1.0 - 1.5 | ||
| Pasta | Lasagne / Timbale of pasta or rice | 1.5 - 2.0 |
| Desserts | Leavened cake / Sponge cake / Plum Cake | 0.9 - 1.2 |
| Baked apples | 1.0 - 1.5 | |
| Bread | Bread Loaf | 0.5 - 0.6 |
| Plaited bread loaf | 0.5 - 0.8 | |
3. PREHEATING
Once the function starts, an audible signal and a flashing icon ⚫ on the display indicate that the preheating phase has been activated.
At the end of this phase, an audible signal and the fixed icon ⚫ on the display will indicate that the oven has reached the set temperature: At this point, place the food inside and proceed with cooking.
Please note: Placing the food in the oven before preheating has finished may have an adverse effect on the final cooking result.
. PROGRAMME COOKING
You will need to select a function before you can start programming cooking.
DURATION
Keep pressing ⏻ until the icon and "00:00" start flashing on the display.

Use for to set the cooking time you require, then press ☺ to confirm.
Activate the function by turning the thermostat knob to the temperature you require: An audible signal will sound and the display will indicate that cooking is complete.
Please note: To cancel the cooking time you have set, keep pressing ⚙ until the icon starts flashing on the display, then use — to reset the cooking time to "00:00". This cooking time includes a preheating phase.
PROGRAMMING THE END COOKING TIME/DELAYED START
After a cooking time has been set, starting the function can be delayed by programming its end time: Press ⏻ until the 🔊 icon and the current time start flashing on the display.

Use for to set the time you want cooking to end and press ☺ to confirm. Activate the function by turning the thermostat knob to the temperature you require: The function will remain paused until it starts automatically after the period of time that has been calculated in order for cooking to finish at the time you have set.

Please note: To cancel the setting, switch the oven off by turning the selection knob to position "O".
COOKING END
An audible signal will sound and the display will indicate that the function has finished.

Turn the selection knob to select a different function or to position "O" to switch the oven off.
Please note: If the timer is active, the display will show "END" alternately with the remaining time.
SETTING THE TIMER
This option does not interrupt or program cooking but allows you to use the display as a timer, either during while a function is active or when the oven is off.
Keep pressing ⬢ until the ⬡con and "00:00" start flashing on the display.

Use for to set the time you require and press to confirm.
An audible signal will sound once the timer has finished counting down the selected time.
Notes: To cancel the timer, keep pressing until the icon starts flashing, then use — to reset the time to "00:00".
COOKING TABLE
| RECIPE FUNCTION PREHEAT | TEMPERATURE(°C) | DURATION(MIN) | LEVEL AND ACCESSORIES | |||
| Leavened cakes |  | Yes 160 - 180 30-90 | 2/3 | |||
 | Yes 160 - 180 30 - 90 *** | 4 | 1 | |||
| Filled cake(cheese cake, strudel, fruit pie) |  | Yes 160-200 35-90 | 2 | |||
 | Yes 160-200 35 - 90 *** | 4 | 2 | |||
| Biscuits / tartlets |  | Yes 170 - 180 15 - 45 | 3 | |||
 | Yes 160 - 180 20 - 45 *** | 4 | 2 | |||
| Choux pastry |  | Yes 180 - 220 30 - 40 | 3 | |||
 | Yes 180-190 35 - 45 *** | 4 | 2 | |||
| Meringues |  | Yes | 90 | 150 - 200 | 3 | |
 | Yes | 90 | 140 - 200 | 4 | 2 | |
| Bread / Pizza |  | Yes 190-250 15-50 | 2 | |||
 | Yes 190-250 25 - 50 *** | 4 | 1 | |||
| Frozen pizza |  | No 220 - 250 15 - 25 | 3 | |||
 | Yes | 250 | 10 - 15 | 3 | ||
 | Yes | 250 10 - 20 *** | 4 | 2 | ||
| Salty cakes(vegetable pie, quiche) |  | Yes 175 - 200 45 - 60 | 3 | |||
 | Yes 175 - 190 | 45 - 60 * | 4 | 2 | ||
| Vol-au-vents / puff pastry crackers |  | Yes 190 - 200 20-30 | 3 | |||
| [GBZX] | Yes 180-190 | 15 - 40 * | 4 | 2 | ||
| Frozen Lasagna |  | Yes 200 - 220 30 - 50 | 3 | |||
| Lasagna / Baked pasta / Cannelloni / Flans |  | Yes 190 - 200 45-65 | 2 | |||
| Lamb / Veal / Beef / Pork 1 kg |  | Yes 190 - 200 | 80-110 | 3 | ||
| Chicken / Rabbit / Duck 1 kg |  | Yes 200-230 | 50-100 | 2 | ||
| Turkey / Goose 3 kg | [DMC2] | - | 190 - 200 100 - 160 | 2 | ||
| Baked fish / en papillote (fillet, whole) |  | Yes 170 - 190 30 - 45 | 2 | |||
| Stuffed vegetables(tomatoes, courgettes, aubergines) |  | Yes 180 - 200 50 - 70 | 2 | |||
| RECIPE FUNCTION PREHEAT | TEMPERATURE(°C) | DURATION(MIN) | LEVEL AND ACCESSORIES | ||
| Toasted bread | 5' 250 2 - 6 | 5...... | |||
| Fish fillets / slices | - 230 - 250 15 - 30** | 4 ...... 3...... | |||
| Sausages / Kebabs / Spare ribs / Hamburg-ers | - 250 15 - 30** | 5 ...... 4...... | |||
| Roast chicken 1-1.3 kg | Yes 200 - 220 55 - 70*** | 2 ...... 1...... | |||
| Roast beef rare 1 kg | Yes 200 - 210 35 - 50*** | 3...... | |||
| Leg of lamb / shank | Yes 200 - 210 60 - 90*** | 3____ | |||
| Roast potatoes | Yes 200 - 210 35 - 55*** | 3____ | |||
| Vegetable gratin | - 200 - 210 25 - 55 | 3____ | |||
| Lasagne and meat | Yes 200 50 - 100**** | 4 ...... 1...... | |||
| Meat & Potatoes | Yes 190 - 200 45 - 100**** | 4 ...... 1...... | |||
| Fish & vegetables | Yes 180 30 - 50**** | 4 ...... 1...... | |||
| Roast meat/stuffed roasting joints | - | 170 – 180 100 - 150 | 2____ |
The time indicated does not include the preheating phase: we recommend inserting the food in the oven and setting the cooking time only after the required temperature has been reached.
* Switch levels halfway through cooking. ** Turn food halfway through cooking. *** Turn food two-thirds of the way through cooking (if necessary). **** Estimated length of time: Dishes can be removed from the oven at different times depending on personal preference. Switch levels halfway through cooking.
Download the Use and Care Guide from docs.indesit.eu for the table of tested recipes, compiled for the certification authorities in accordance with the standard IEC 60350-1.
| FUNCTIONS | Conventional | Grill | Gratin | Convection Bake | Freasy Cook | Eco Convection Bake |
| ACCESSORIES | Wire rack | Baking pan or baking tray on wire rack | Baking tray / Drip tray or baking tray on wire rack | Baking tray / Drip tray | Baking tray / Drip tray with 200 ml of water |
| ...... |  |  | —— |  |
MAINTENANCE AND CLEANING
Do not use steam cleaners.
Use protective gloves during all operations.
Carry out the required operations when the oven is cold.
EXTERIOR SURFACES
Clean surfaces with a damp microfibre cloth. If they are very dirty, add a few drops of pH-neutral detergent. Finish off with a dry cloth.
Do not use corrosive or abrasive detergents. If any of these products inadvertently comes into contact with the surfaces of the appliance, clean immediately with a damp microfibre cloth.
INTERIOR SURFACES
After every use, leave the oven to cool and then clean it, preferably while it is still warm, to remove any deposits or stains caused by food residues. To dry any condensation that has formed as a result of cooking foods with a high water content, leave the oven to cool completely and then wipe it with a cloth or sponge.
Disconnect the oven from the power supply.
Do not use wire wool, abrasive scourers or abrasive/corrosive cleaning agents, as these could damage the surfaces of the appliance.
Clean the glass in the door with a suitable liquid detergent.
The door can be easily removed and refitted to facilitate cleaning of the glass.
- The top heating element of the grill can be lowered to clean the upper pane of the oven: Extract the heating element from its seating, then lower it. To return the heating element to its position, lift it up, pull it slightly towards you and make sure that the tab support is in its proper seating.
ACCESSORY
Soak the accessories in a washing-up liquid solution after use, handling them with oven gloves if they are still hot. Food residues can be removed using a washing-up brush or a sponge.
REMOVING AND REFITTING THE DOOR
- To remove the door, open it fully and lower the catches until they are in the unlock position.

- Close the door as much as you can.
Take a firm hold of the door with both hands – do not hold it by the handle.
Simply remove the door by continuing to close it while pulling it upwards (a) at the same time until it is released from its seating (b).

Put the door to one side, resting it on a soft surface.
- Refit the door by moving it towards the oven, aligning the hooks of the hinges with their seating and securing the upper part onto its seating.
- Lower the door and then open it fully. Lower the catches into their original position: Make sure that you lower them down completely.
- Try closing the door and check to make sure that it lines up with the control panel. If it does not, repeat the steps above.
CLICK&CLEAN - CLEANING THE GLASS
- After removing the door and resting it on a soft surface with the handle downwards, simultaneously press the two retaining clips and remove the upper edge of the door by pulling it towards you.

- Lift and firmly hold the inner glass with both hands, remove it and place it on a soft surface before cleaning it.
- To reposition the internal glass properly, be sure that the "R" can be seen in the left corner. First insert the long side of the glass indicated by "R" into the support seats, then lower it into position.

- Refit the upper edge: A click will indicate correct positioning. Make sure the seal is secure before refitting the door.
TROUBLESHOOTING
| Problem Possible cause Solution | ||
| The oven is not working. | Disconnection from the mains electricity.Fault. | Make sure that the oven is connected to the main electricity supply.Turn off the oven and restart it to see if the fault persists. |
| The display shows the letter “F” followed by a number. | Software fault. | Contact you nearest Client After-sales Service Centre and state the number following the letter “F”. |
USEFUL TIPS
HOW TO READ THE COOKING TABLE
The table indicates the best function to use for any given food, to be cooked on one or more shelves at the same time. Cooking times start from the moment food is placed in the oven, excluding pre-heating (where required). Cooking temperatures and times are purely for guidance and will depend on the amount of food and type of accessory used. Please use the lowest recommended settings to begin with and, if the food is not cooked enough, then switch to higher settings. Please use the accessories supplied and preferably dark-coloured metal cake tins and baking trays. You can also use Pyrex pans and accessories or ones made from china, but bear in mind that cooking times will be slightly longer.
COOKING DIFFERENT FOODS AT THE SAME TIME
Using the "Convection Bake" function, you can cook different foods simultaneously (for example: fish and vegetables), using different shelves. Switch shelves two-thirds of the way through cooking, if necessary. Remove the food which requires a shorter cooking time and leave the food which requires a longer cooking time in the oven.
PRODUCT FICHE
www The product fiche with energy data of this appliance can be downloaded from the Indesit website docs.indesit.eu
HOW TO OBTAIN THE USE AND CARE GUIDE
Download the Use and Care Guide from our website docs.indesit.eu (you can use this QR Code), specifying the product's commercial code.

Alternatively, contact our Client After-sales Service.
CONTACTING OUR AFTER-SALES SERVICE
You can find our contact details in the warranty manual. When contacting our Client After-sales Service, please state the codes provided on your product's identification plate.


- DAILY REFERENCE GUIDE
- THANK YOU FOR PURCHASING AN INDESIT PRODUCT
- PRODUCT DESCRIPTION
- SELECTION KNOB
- LIGHT
- TIME SETTING
- DISPLAY
- ADJUSTMENT BUTTONS
- THERMOSTAT KNOB
- ACCESSORY
- USING THE ACCESSORIES
- FUNCTIONS
- CONVENTIONAL
- CONVECTION BAKE
- GRILL
- GRATIN
- USE THIS FUNCTION TO BROWN THE BOTTOM OF THE DISHES. IT IS ADVISABLE TO PLACE THE FOOD ON THE 1ST/2ND LEVEL. THE FUNCTION CAN ALSO BE USED FOR SLOW COOKING, SUCH AS VEGETABLES AND MEAT STEWS; IN THIS CASE, USE THE 3RD LEVEL. THE OVEN DOES NOT HAVE TO BE PREHEATED
- THIS MODE IS ESPECIALLY RECOMMENDED FOR COOKING PRE-PACKED FOOD QUICKLY (FROZEN OR PRE-COOKED). THE BEST RESULTS ARE OBTAINED IF YOU USE ONE COOKING RACK ONLY. PRE-HEATING IS NOT NECESSARY FOR THIS COOKING MODE
- FOR COOKING ROASTS AND STUFFED ROASTING JOINTS ON A SINGLE SHELF. FOOD IS PREVENTED FROM DRYING OUT EXCESSIVELY BY GENTLE, INTERMITTENT AIR CIRCULATION. WHEN THIS ECO FUNCTION IS IN USE, THE LIGHT WILL REMAIN SWITCHED OFF DURING COOKING BUT CAN BE SWITCHED ON AGAIN BY PRESSING ⚙
- THIS FUNCTION AUTOMATICALLY SELECTS AN IDEAL TEMPERATURE AND TIME FOR BAKING A WIDE RANGE OF RECIPES INCLUDING MEAT, FISH, PASTA, SWEETS AND VEGETABLES. ACTIVATE THE FUNCTION WHEN THE OVEN IS COLD
- SETTING THE TIME
- YOU WILL NEED TO SET THE TIME WHEN YOU SWITCH ON THE APPLIANCE FOR THE FIRST TIME: PRESS ∙ UNTIL THE ⏻ ICON AND THE TWO DIGITS FOR THE HOUR START FLASHING ON THE DISPLAY
- REHEAT THE OVEN
- DAILY USE
- SELECT A FUNCTION
- ACTIVATE A FUNCTION
- MANUAL
- TURN & COOK
- PREHEATING
- PROGRAMME COOKING
- DURATION
- PROGRAMMING THE END COOKING TIME/DELAYED START
- COOKING END
- SETTING THE TIMER
- MAINTENANCE AND CLEANING
- EXTERIOR SURFACES
- INTERIOR SURFACES
- REMOVING AND REFITTING THE DOOR
- CLICK&CLEAN - CLEANING THE GLASS
- TROUBLESHOOTING
- USEFUL TIPS
- HOW TO READ THE COOKING TABLE
- COOKING DIFFERENT FOODS AT THE SAME TIME
- PRODUCT FICHE
- HOW TO OBTAIN THE USE AND CARE GUIDE
- CONTACTING OUR AFTER-SALES SERVICE
Brand : INDESIT
Model : IFW 3540 J IX
Category : Oven