
Bronze 200 - Pregnant MONITOR AUDIO - Free user manual and instructions
Find the device manual for free Bronze 200 MONITOR AUDIO in PDF.


| Type | Floorstanding loudspeaker |
| Enclosure type | 2.5-way, bass reflex with rear port |
| Tweeter | 25 mm C-CAM (Ceramic-Coated Aluminium/Magnesium) dome |
| Mid/Bass drivers | 2 x 130 mm C-CAM cone |
| Frequency response | 32 Hz – 30 kHz (±3 dB) |
| Sensitivity (1W@1m) | 88 dB |
| Impedance | 8 ohms (minimum 4.7 ohms) |
| Power handling (RMS) | 100 W (350 W peak) |
| Recommended amplifier power | 30 – 100 W |
| Dimensions (H x W x D) | 925 x 185 x 295 mm (including grille and terminals) |
| Weight (each) | 16.5 kg |
| Finish options | Walnut, Black Oak, White, Satin White |
| Connectivity | Single-wire binding posts (bi-wire capable) |
| Included accessories | Grille, rubber feet, floor spikes |
| Stand requirements | Free-standing (no stand needed) |
| Cleaning instructions | Wipe with a soft, dry cloth. Do not use solvents. |
| Safety precautions | Place on a stable surface. Do not expose to moisture. |
| Warranty | 5 years (subject to registration) |
Frequently Asked Questions - Bronze 200 MONITOR AUDIO
User questions about Bronze 200 MONITOR AUDIO
0 question about this device. Answer the ones you know or ask your own.
Ask a new question about this device
Download the instructions for your Pregnant in PDF format for free! Find your manual Bronze 200 - MONITOR AUDIO and take your electronic device back in hand. On this page are published all the documents necessary for the use of your device. Bronze 200 by MONITOR AUDIO.
USER MANUAL Bronze 200 MONITOR AUDIO
Attaching Feet and Spikes 2
For Carpeted Floors 2
For Wooden/ Hard Floors 2
Setting Up Your Loudspeakers 2
2 Channel Positioning 2
AV Positioning 3
Setting Up Bronze FX 3
Atmos 4
In-Ceiling 4
Bronze AMS Dolby Atmos® enabled speakers_4
Fixing Bronze FX & Bronze AMS to a Wall 4
Wiring 5
Single Wiring 5
Bi-Wiring 5
Bi-Amping 5
The Effects of Bi-Wiring and Bi-Amping 6
Port Bungs 6
Running-In Your Speakers 7
Retention Bolt Adjustment 7
Warranty 7
Owner Information 7
Specifications 8
Introduction:
The Bronze Series has been intricately engineered to optimise your audio experience, whether you're listening to your favourite album or watching the latest Hollywood blockbuster.
Consisting of eight different models, you can create the perfect sound system to suit your music or home cinema needs, from our compact bookshelf speakers to the powerful yet detailed performance of our larger floorstanding speakers. With the addition of our new Dolby Atmos® Enabled upward-firing speakers, you can add a whole new dimension to your favourite movie experiences.
Bronze Series is made for you, for your home, and for the performance you desire.
Attaching Feet and Spikes
For Carpeted Floors
(Bronze 200 and 500 only)
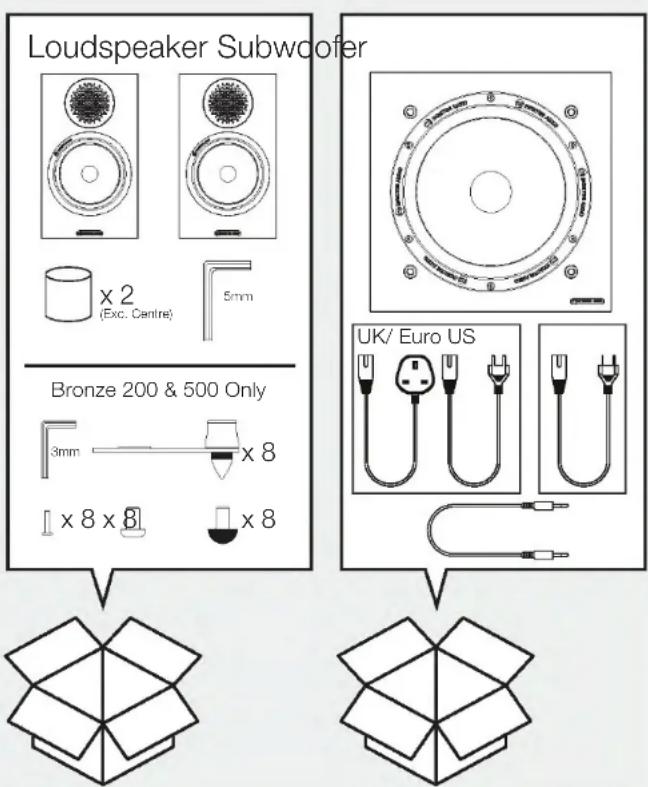
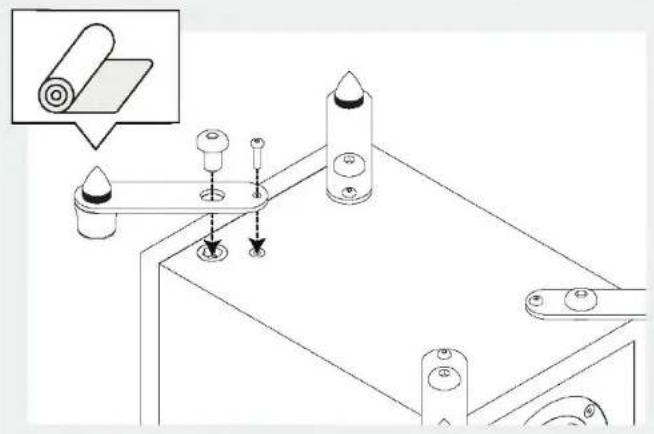
The spikes and ‘out-riggers’ are supplied assembled for use on carpeted floors or where spikes are appropriate. All that is required is to fix them to the speaker base using the supplied bolts (A & B).
You can check that the speaker is level on all sides by using a spirit level (not supplied). If it's slightly off-level, unscrew the spike and check again. Continue this process until the cabinet is fully level. Use the locking nuts on each foot to fix the spike in place and to stop any unwanted vibrations.
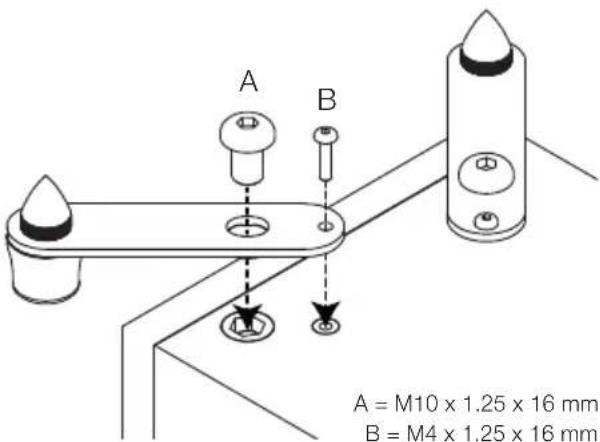

Please ensure there are no hidden wires under the carpet that could be damaged by the spikes.
For Wooden/ Hard Floors
(Bronze 200 and 500 only)
Remove the spikes and replace with the supplied rubber feet. Fix the 'out-riggers' to the speaker base with the padded side touching the cabinet using the supplied bolts (A & B).
You can check that the speaker is level on all sides by using a spirit level (not supplied). If it's slightly off-level, unscrew the rubber foot and check again. Continue this process until the cabinet is fully level. Use the locking nuts on each foot to fix them in place and to stop any unwanted vibrations.
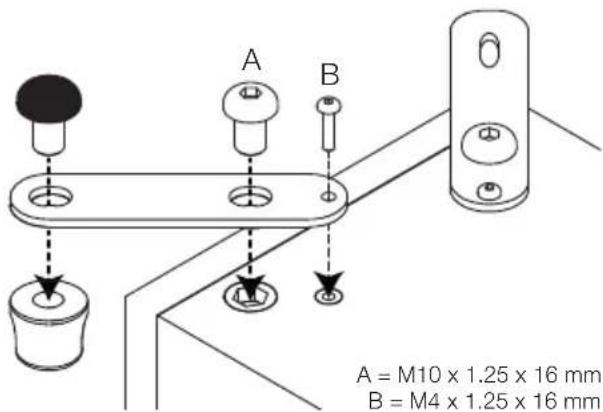
Setting Up Your Loudspeakers
2 Channel Positioning
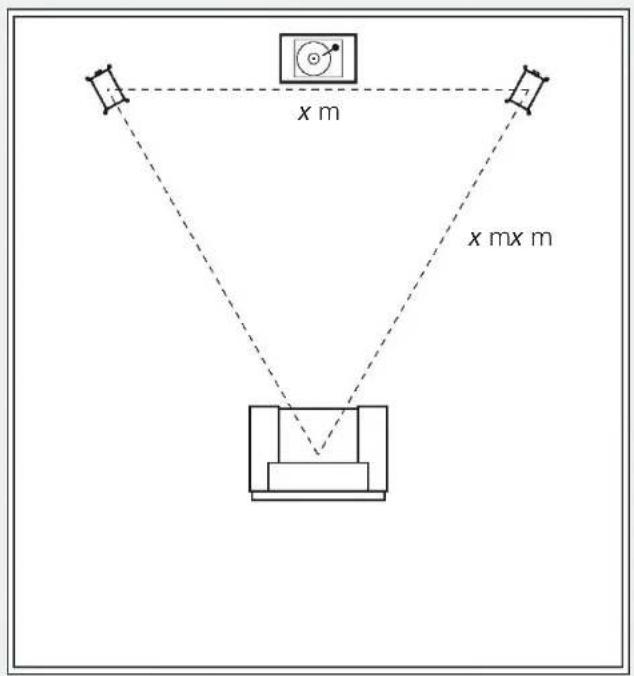
When arranging a 2 channel (stereo) system, the listening position and the loudspeakers should form an equilateral triangle. The speakers should be positioned approximately 6 - 10 feet (1.8 - 3 m) apart. The ideal distance from the rear wall varies depending on the speaker (see list below), however, for optimal performance they need to be a minimum of 3 feet (91 cm) from the side walls.
• Bronze 50 6 - 12 inches (15 - 30 cm)
• Bronze 100 & 200 8 - 14 inches (20 - 36 cm)
• Bronze 500 12 - 24 inches (30 - 61 cm)

NOTE: These are recommended distances for optimal performance. Actual results will vary dependant on room size and construction.
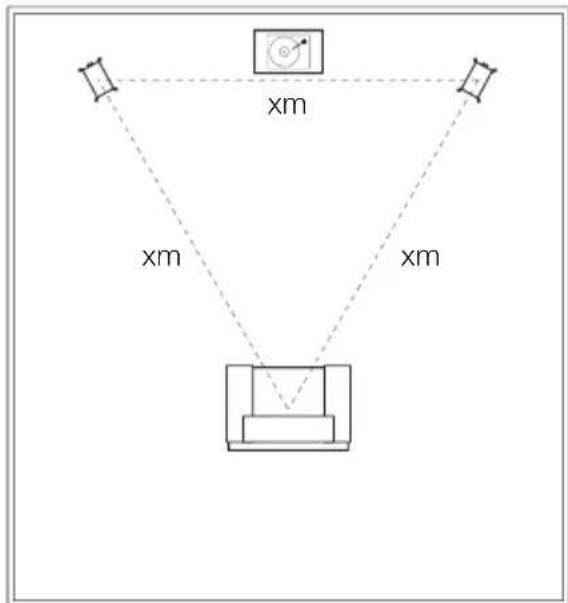
Experimentation is strongly advised when initially setting up the speakers, as environment and personal preference differ with every installation. If there is insufficient bass for example, try moving your speakers closer to a wall. The opposite approach is recommended if there is excess bass. Also see the information in the Port Bungs section. If stereo imaging is being lost, try ‘toeing’ them in slightly. The sound should appear to originate from the centre point between the speakers, not the actual speakers themselves.
AV Positioning
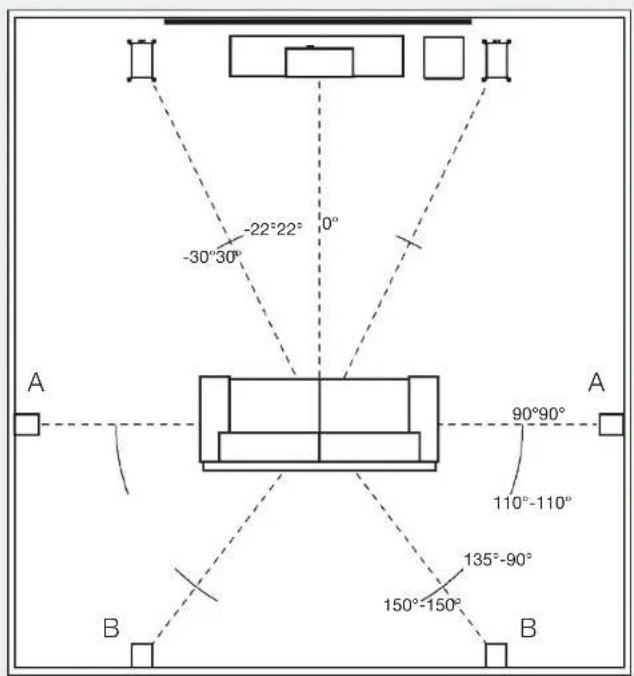
Please refer to the illustrations below for the ideal angles and positions of each speaker in your surround system. The speakers should be distanced from the wall according to the requirements of the speaker, which are listed in the 2-Channel Positioning section.
If the sound is too bass heavy or there is bass boom from the room when playing music (without a subwoofer), try moving the loudspeakers slightly further away from the wall(s). If this is not possible, then try the supplied port bungs. In a system with a subwoofer try adjusting the crossover frequency settings for the speakers and/or subwoofer or changing the subwoofer's position.
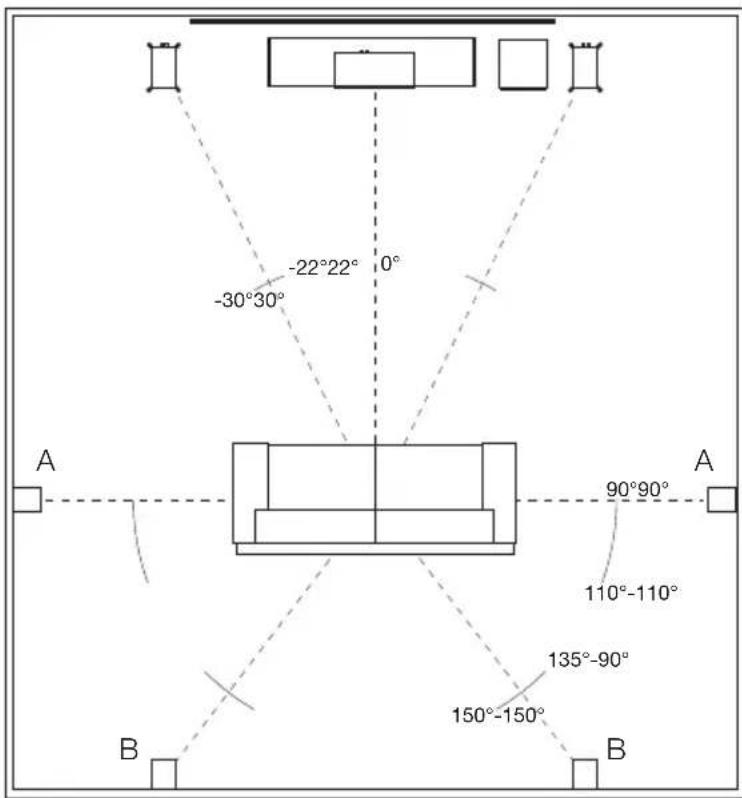
The Bronze C150 centre speaker should be positioned so that it is pointing at approximate ear height of the main listening position. Included with the Bronze C150 are 4 adhesive feet, stick these to the bottom of the cabinet for protection and to help isolate the speaker.
NOTE: Images are for illustrative purposes only. If using the Bronze FX please refer to the 'Setting Up the Bronze FX' section for further information.
A. Side surround speakers
B. Rear surround speakers
A 7.1 surround system will make use of side (position A) and rear speakers (position B). If setting up a 5.1 system you can place your surrounds in position (A) or (B).
Setting Up Bronze FX
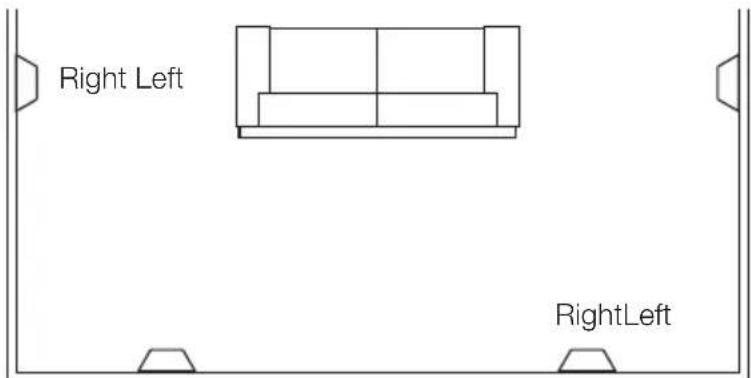
The Bronze FX features Di-Pole or Bi-Pole listening modes. In Bi-Pole mode, both the driver and tweeters are all in phase. In Di-Pole mode the tweeter on one side of the speaker is out of phase to the other tweeter and driver to create a diffused sound. The FX speakers should be wall mounted approximately 2 feet above ear height.
Di-Pole/ Bi-Pole switch: When used as part of 5.1 systems as a rear speaker, set the switch to Bi-Pole. Although there is nothing wrong with experimenting and trying the switch in the Di-Pole mode.
If part of a 7.1 system with 1 pair of Bronze FX's set the switch to Di-Pole. If using 2 pairs of Bronze FX's for side and rear effects, set them all to Di-Pole mode and swap the left and right handed side Bronze FX's. Keep the rear Bronze FX's handed correctly as illustrated here.

NOTE: Before adjusting any switches, please ensure that the amplifier is switched off. This will help to protect the amplifier.
Atmos
In-Ceiling
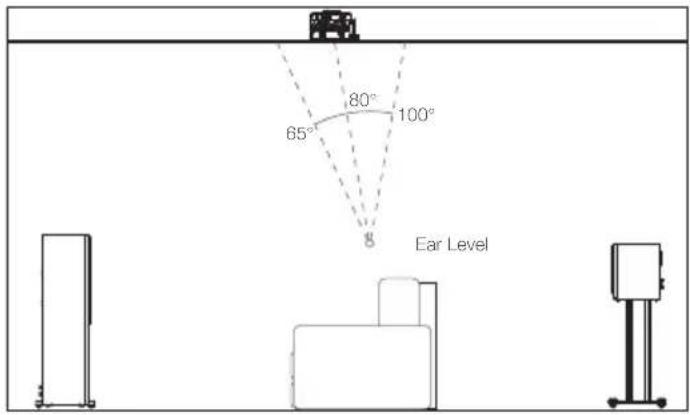
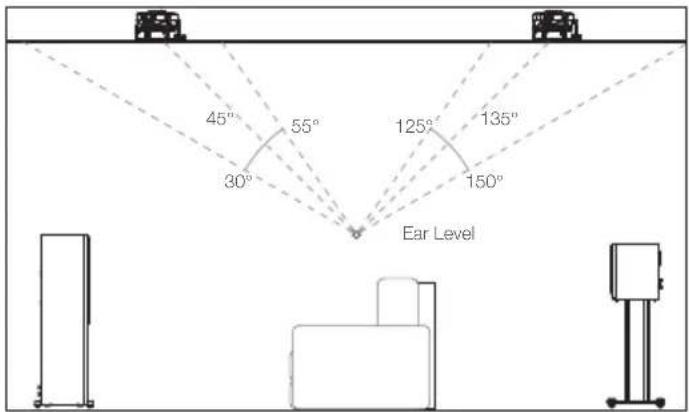
When arranging the overhead channels in an Atmos system we would recommend using our three-way in-ceiling speakers. These employ a unique pivoting midrange/tweeter module which offers a wider dispersion characteristic, and are ideal for Atmos duties. More information can be found on our website: monitoraudio.com
Please see below for ideal positioning of 2 or 4 Atmos speaker setups.
Bronze AMS Dolby Atmos ^® enabled speakers
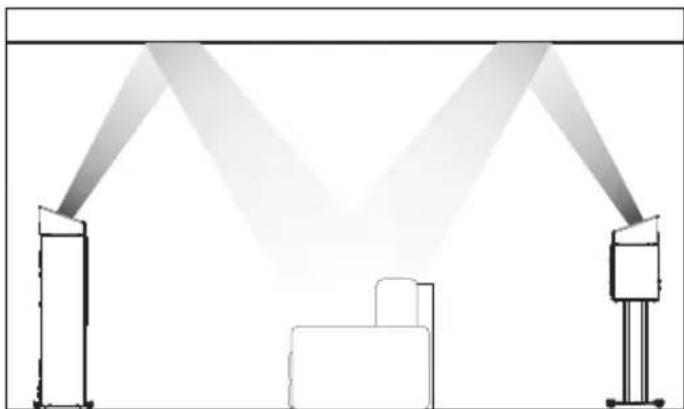
Our new Bronze AMS speakers offer a dedicated solution and alternative to in-ceiling Atmos installations. They can be positioned directly on top of the front and/or rear speakers in a 2 or 4 Atmos speaker setup. Additionally and alternatively, the Bronze AMS can also be wall mounted for use as surround or height speakers.
natural_image
Diagram of three vertical structures emitting light beams from a central platform, no text or symbols present
Fixing Bronze FX & Bronze AMS to a Wall

CAUTION: Always determine where the Bronze FX or Bronze AMS will be fixed and the structure of the wall. For safety reasons, if unsure of your ability to provide a secure and safe fixing, do not attempt to fix these speakers to a wall. Instead, please obtain the services of a competent and qualified trades person.

CAUTION: Ensure that water pipes or electricity cables do not run behind where the speakers are going to be secured. Work from secure steps and avoid trailing wires.

NOTE: We do not supply wall fixing screws and plugs with the Bronze FX or Bronze AMS. Please only use suitable fixings for the type of wall construction the speakers will be fixed to.
The Bronze FX and Bronze AMS comes with keyhole inserts. To fix the speakers to the wall, we would recommend using the wall fixing template enclosed within the packaging carton.
Wiring
Single Wiring
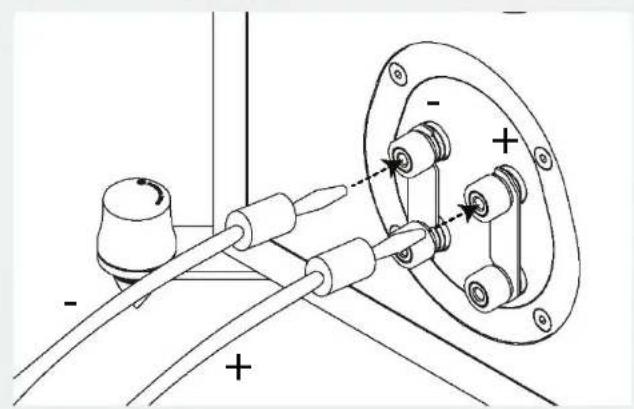
Single wiring is achieved via a single set of cables to the terminals on the back of the loudspeaker. Internally the loudspeaker crossover guides the frequencies to the appropriate driver/tweeter. Low frequencies to the bass drivers, mid frequencies to the mid/bass drivers and high frequencies to the tweeter.
It is perfectly acceptable to connect to the top, bottom terminals or even diagonally (experimentation is advisable to achieve the preferred results).


NOTE: When using this method you must keep the terminal links in place.
Bi-Wiring
Bi-wiring is accomplished by connecting separate pairs of speaker cables to the terminals on the loudspeaker from a single pair of connections on the amplifier. In the case of the Bronze Series, the bottom terminals connect to the bass driver(s) and the top terminals connect to the tweeter in 2 way loudspeakers, or the mid and tweeter in 2.5 way loudspeakers.


NOTE: When using this method the terminal links MUST be removed.
Bi-Amping
Bi-amping is the same as bi-wiring except you are introducing a second amplifier into the equation. In order to bi-amp you must connect a set of speaker cables to the top terminals on the loudspeaker from one amplifier and another set of speaker cables to the bottom terminals from the second amplifier.


NOTE: When wiring this method the terminal links MUST be removed.
The Effects of Bi-Wiring and Bi-Amping
Fundamentally a loudspeaker crossover varies the impedance seen by the speaker and by the power amplifier. When a full range audio signal is applied to the terminals of a full range speaker system, the bass driver(s) will only receive low frequency signals, the mid driver receives the mid band frequency signals and the tweeter only gets sent high frequency signals.
This means that if separate speaker cables are connected to the low and high frequency terminals, not only have the drive units had the frequency's directed and divided for them, but if using a bi-wire setup the two separate speaker cables will now also carry different signals due to the impedance. So the bass cables carry mostly the low frequencies, and the tweeter cable mostly the highs.
The effects of bi-wiring are subtle and depending on the cable construction and design it could be better to go for one better engineered cable than two for bi-wiring. Monitor Audio recommends experimenting with both configurations to find out which one works best in your system.
Bi-amping adds an additional amplifier to the system so that the one amplifier drives the low frequencies and the other amplifier drives the high frequencies. Bi-amping can therefore present a 'cleaner' signal at both the low frequency and high frequency speaker terminals, and because the high and low frequencies have already been separated, each has a minimal effect on the other - in essence the bass has less effect on the delicate treble. In order to best take advantage of bi-amping the amplifiers should be as independent from each other as possible. For instance, if using two stereo amplifiers you should use one stereo amplifier for the bass and the other for the treble, minimising the impact of the bass on the treble.
Port Bungs

WARNING: Care must be taken not to insert the port bungs too far into the port, as this may result in the foam bung being lost inside the cabinet.
If the loudspeaker is to be installed in a small room, typically 9 sqM (80 sqFT), or a room known to reproduce an accentuated bass response, it may be desirable to fit port bungs. However, experimentation is recommended with positioning of the loudspeaker in the room prior to fitting. To optimise performance from the loudspeaker it is important to ensure the loudspeaker is not positioned too close to a wall or near the corners of a room.
If the positioning of the loudspeaker is predetermined by room aesthetics or layout, you find you have accentuated bass or in the case speakers are to be sited in close proximity (less than the minimum suggested distances shown in the 2 Channel Positioning section) to a rear wall (such as on a bookshelf, positioned in a cabinet or on a stand close to a wall), we recommend fitting port bungs to the ports. This will reduce the bass 'boom' sometimes termed as overhang, and assist the loudspeakers to reproduce their best performance under these environmental conditions. 'Boom' is generally caused when bass energy from the loudspeaker 'excites' room modes and causes an accentuation at a particular frequency, or number of frequencies.
When fitting port bungs the overall bass extension will not be reduced, however bass energy/ output around the port tuning frequency will be reduced. This has the effect of reducing bass ‘boom’ while increasing bass clarity and apparent agility.
In all circumstances experimentation is highly recommended.
Running-In Your Speakers
Run your speakers in by playing music at low-mid listening levels for approximately 50-70 hours play time. You may find the sound will continue to improve even after the 70 hour mark.
This can be done naturally over time: like a fine wine the performance will improve with age.
Alternatively if you wish to run the speakers continuously on loop you can decrease the audible volume/presence by placing the speakers face-to-face so that the drivers/tweeters are directly aligned and as close as possible. Then connect the amplifier to your speakers so that one is as normal (in phase): positive to positive and negative to negative (red to red and black to black), and the other speaker out of phase: positive to negative and negative to positive inputs on the speaker.
Retention Bolt Adjustment
The Bronze Series has a bolt-through driver fixing to reduce cabinet colouration. Each bolt acts as a rigid brace, but also removes the need for conventional driver fixings as well, effectively decoupling the driver and front baffle to eliminate a further source of resonance.

NOTE: Should this bolt become loose over time, or has worked loose during transit, then please use the supplied hex key to tighten the bolt back up. This only needs to be a quarter turn after the strain has been taken by the bolt.
Warranty
Both the craftsmanship and the performance of this product is covered by the manufacturer's warranty against manufacturing defects provided that the product was supplied by an authorised Monitor Audio retailer under the consumer sale agreement. For the period of cover please refer to the product page on our website: monitoraudio.com for the product you have purchased.
When purchasing Monitor Audio products, please keep your receipt of purchase safe, as this validates your warranty.
Owner Information
Product Details
Model:
Product Serial No: ____
Date of Purchase: ____
Dealer Details
Dealer Name: ____
Address:
Post code:
E-mail address: ____
Specifications
| MODEL Bronze 50 Bronze | 100 Bronze 200 Bronze | 500 Bronze C150 Bronze FX Bronze AMS | ||||
| System Format | 2-way 2-way 2.5-way 2.5-way 2-way 2-way | |||||
| Frequency Response (-6dB in room) | 40 Hz - 30 kHz | 37 Hz - 30 kHz | 35 Hz - 30 kHz | 32 Hz - 30 kHz | 66 Hz - 30 kHz | 74 Hz - 30 kHz |
| Sensitivity (2.83v @ 1m) | 85 dB 87 dB | 88 dB 90 dB 88 dB 86 dB 86 dB | ||||
| Nominal Impedance | 8 Ohms | 8 Ohms | 8 Ohms | 8 Ohms | 8 Ohms | 8 Ohms |
| Minimum Impedance | 4.4 Ohms | 4.5 Ohms | 4.4 Ohms | 4.1 Ohms | 4.3 Ohms | 4 Ohms |
| Maximum SPL | 107 dBA (pair) | 110 dBA (pair) | 112 dBA (pair) | 116 dBA (pair) | 109 dBA (each) | 108 dBA (pair) |
| Power Handling (RMS) | 80 W | 100 W | 120 W | 200 W | 120 W | 80 W |
| Recommended Amplifier Requirements | 20 - 80 W | 30 - 100 W | 40 - 120 W | 60 - 200 W | 30 - 120 W | 20 - 80 W |
| Bass Alignment | Bass reflex HiVe II port system | Bass reflex HiVe II port system | Bass Reflex Dual HiVe II port system | Bass Reflex Dual HiVe II port system | Sealed cabinet | Sealed cabinet |
| Crossover Frequency | 2.5 kHz 2.2 kHz | L.F/M.F: 700 Hz M.F/H.F: 2.4 kHz | L.F/M.F: 550 Hz M.F/H.F: 2.7 kHz | 2.7 kHz | 2.8 kHz | |
| Drive Unit Complement | 1 × 5^1/2 C-CAM mid-bass driver 1 × 1 (25mm) C-CAM Gold Dome tweeter with UD Waveguide | 1 × 8 C-CAM mid-bass driver 1 × (25mm) C-CAM Gold Dome tweeter with UD Waveguide | 2 × 5^1/2 C-CAM mid-bass driver 1 × 1 (25mm) C-CAM Gold Dome tweeter with UD Waveguide | 2 × 8 C-CAM mid-bass driver 1 × 1 (25mm) C-CAM Gold Dome tweeter with UD Waveguide | 2 × 5^1/2 C-CAM mid-bass driver 1 × 1 (25mm) C-CAM Gold Dome tweeter with UD Waveguide | 1 × 5^1/2 C-CAM mid-bass driver 1 × 1 (25mm) C-CAM Gold Dome tweeter with UD Waveguide |
| External Dimensions Including Grille and Terminals (H x W x D) | 281 × 166 × 265 mm 11^1/16 × 6^9/16 × 10^7/16 | 376 × 231 × 325 mm 14^13/16 × 9^1/8 × 12^13/16 | 886 × 166 × 265 mm 34^13/16 × 6^9/16 × 10^7/16 | 951 × 231 × 325 mm 37^7/16 × 9^1/18 × 12^13/16 | 166 × 451 × 225 mm 6^9/16 × 17^3/4 × 8^8/16 | 287 × 284 × 124 mm 11^5/16 × 11^3/16 × 4^7/8 |
| External Dimensions including Outrigger Feet and Spikes (H x W x D) | N/A | N/A | 909 × 229 × 304 mm 35^13/16 × 9 × 11^15/16 | 974 × 294 × 364 mm 38^3/8 × 11^9/16 × 14^5/16 | N/A | N/A |
| Weight (Each) | 5.0 kg11 lb 0 oz | 7.8 kg17 lb 3 oz | 12.8 kg28 lb 4 oz | 18.0 kg39 lb 11 oz | 7.0 kg15 lb 7 oz | 3.9 kg8 lb 10 oz |
*waveguide optimised to comply with Dolby Atmos directivity targets.
Dolby, Dolby Atmos, and the double-D symbol are trademarks of Dolby Laboratories.

Monitor Audio Ltd.
24 Brook Road
Rayleigh, Essex
SS6 7XJ
England
Tel: +44 (0)1268 740580
Email: info@monitoraudio.co.uk
Web: monitoraudio.com
Designed & Engineered in the United Kingdom
Made In China
Version 1. 2020
BRONZE SERIES
Quick Start Guide

MONITOR AUDIO

monitoraudio.com/support

Feet (Bronze 200 & 500)
natural_image
Technical diagram of a mechanical assembly with cylindrical components and a magnified inset showing a rolled sheet (no text or symbols present)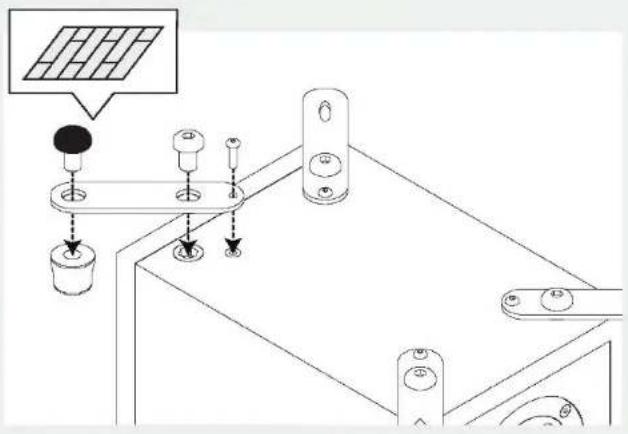
Wiring
natural_image
Technical diagram of a mechanical assembly with labeled components and directional arrows (no text or symbols)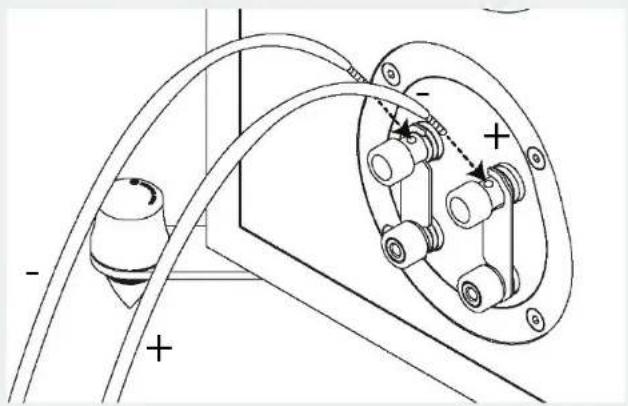
natural_image
Technical diagram of a mechanical assembly with labeled components and wiring (no readable text or symbols)2 Channel Stereo Surround Sound AV
7.1 = A + B
5.1 = A / B
natural_image
Solid dark gray vertical rectangle with rounded corners (no text or symbols)


monitoraudio.com/en/product-ranges/bronze-6g


5 Year Warranty
| EN | Frequency Response | Sensitivity (1W@1M) | Nominal Impedance | Maximum SPL (Pair) | Power Handling R.M.S | Recommended Amp Requirements R.M.S | Crossover Frequency | External Dimensions (including out-rigger plates, grille and feet + spikes, where fitted) (H x W x D) | Product Weight |
| FR | Réponse en fréquence | Sensibilité (1 W à 1 m) | Impédance nominale | SPL maximum (par paire) | Puissance nominale RMS | Configuration amplificateur RMS recommandée | Fréquence de crossover | Dimensions externes (incluant les plaques de balancier, grille et pieds + pointes) (H x L x P) | Poids du produit |
| IT | Risposta in frequenza | Sensibilità (1 W a 1 m) | Impedenza nominale | SPL massimo (coppia) | Tenuta di potenza RMS | Requisiti consigliati amplificatore RMS | Frequenza di crossover | Dimensioni esterne (inclusi stabilizzatori, griglia e punte e piedini) (A x L x P) | Peso del prodotto |
| DE | Frequenzbereich | Empfindlichkeit (1 W bel 1 M) | Nennimpedanz | Max. Schalldruckpegel (Paar) | Leistungsfähigkeit (RMS) | Empfohlene Verstärker-Anforderungen RMS | Übergangsfrequenz | Außenabmessungen (einschließlich Auslegerplatten, Gitter und Füße+Stifte) (H x B x T) | Produkt-gewicht |
| ES | Respuesta de frecuencia | Sensibilidad (1 W a 1 m) | Impedancia nominal | SPL máximo (Par) | Potencia (R.M.S) | Requisitos de amplificador recomendados R.M.S | Frecuencia de separación | Dimensiones externas (con placas estabilizadoras, rejillas y pies+punlas) (Al x An x P) | Peso del producto |
| PT | Frequència de resposta | Sensibilidade (1 W a 1 m) | Impedância nominal | SPL máximo (par) | Potência de áudio (RMS) | Requisitos de amplificação recomendados (RMS) | Frequência de crossover | Dimensões externas (incluindo extensores laterais, grelha e pés + espições) (A x L x P) | Peso do produto |
| NL | Frequentier-espons | Gevoeligheid (1W@1M) | Nominale impedantie | Maximum SPL (paar) | Vermogen (R.M.S.) | Aanbevolen versterk-ervereisten (R.M.S.) | Crossoverfrequentie | Externe afmetingen (inclusief stelplaten, grille en voetjes+spijkers) (H x B x D) | Gewicht product |
| CH | 频率响应 | 灵敏度 (1@1米) | 标称阻抗 | 最大声压级(一对) | 功率容量 R.M.S | 建议功放要求 R.M.S | 分音频率 | 外部尺寸(含外伸支架及螺纹组件+脚钉)(高x宽x长) | 重量 |
| RU | Частотный диапазон | Чуест'eum. (1 Bm @ 1 M) | Сопротивление | Макс. зв. давление | Мощность (RMS) | Рекомендованная мощность усилителя | Частота кроссовера | Габориты, включая опорную плиту, гриль и шипы (В x Ш x Г) | Bec |
| JA | 周波数応答 | 感度 (1W@1M) | 公称インピーダンス | 最大SPL (ペア) | 電力処理 (R.M.S) | 推奨アンプ要件 (R.M.S) | クロスオーバー周波数 | 外部寸法(アウトリガーブレートと脚部+スパイクを含む)(高さx幅x奥行) | 製品重量 |
| AR | الاستجابة للردد | الحصابية (وات في المتر) | ال narrowlyه القيابية | الحد الأقصى لمستوي مشط (الصويت النروج) | طريقة الت氖ام مع监察ه اجذر منوسط المربج) | منظيات المضير الموض بها (اجذر متوسط المربج) | تعداد قاطع dellaة | (اليابعاد الارجية ابما في ذلك الشبكة والقراط) (الطول × الم密码) | wouldnSemtech |
| PO | Pasmo przenoszenia | Czulosic (1 W @1 m) | Impedancja nominalna | Maksymalne SPL (dabierać do pary) | Moc ciągla R.M.S. | Zalecane parametry wzmacniacza R.M.S. | Częstotliwość zwrotnicy | Zewnętrzne wymiary (wraz z wysięgnikami, nózkami i kolcami (H x W x D) | Waga produktu |
| Bronze 50 | 40 Hz - 30 kHz | 87dB | 8 Ohms | 107 dBA (pair) | 80 W | 40 - 100 W | 2.5 kHz | 281 x 166 x 265 mm11 ^1/16 x 6 ^3/16 x 10 ^7/39 | 5 kg11 lb |
| Bronze 100 | 37 Hz - 30 kHz | 88dB | 8 Ohms | 110 dBA (pair) | 100 W | 40 - 120 W | 2.2k Hz | 376 x 231 x 325 mm14 ^1/16 x 9 ^3/1 x 12 ^1/39 | 7.8 kg17 lb 3 oz |
| Bronze 200 | 35 Hz - 30 kHz | 88dB | 8 Ohms | 112 dBA (pair) | 120 W | 60 - 150 W | L.F: 700 HzM.F: H.F: 2.4 kHz | 909 x 229 x 304 mm35 ^1/17 x 9 x 11 ^16/39 | 12.8 kg29 lb 4 oz |
| Bronze 500 | 32 Hz - 30 kHz | 90dB | 8 Ohms | 116 dBA (pair) | 200 W | 80 - 250 W | L.F/M.F: 550 HzM.F/H.F: 2.7 kHz | 974 x 294 x 364 mm35 ^5/8 x 11 ^5/16 x 14 ^5/39 | 18 kg39 lb 11oz |
| Bronze C150 | 66 Hz - 30 kHz | 90dB | 8 Ohms | 109 dBA (each) | 120 W | 60 - 150 W | 2.7 kHz | 166 x 451 x 225 mm6 ^6/16 x 17 ^3/4 x 8 ^5/39 | 7 kg15 lb 7 oz |
| EN | Low Frequency Limit | Upper Frequency Limit | Amplifier Output | Bass EQ Modes | Input Impedance | Mains Input Voltage (Factory Preset) | Power Consumption | Dimensions (Including grille, amp & feet) (H x W x D) | Product Weight |
| FR | Limite de fréquence basse | Limite de fréquence haute | Sortie de l'amplificateur | Modes d'égalisation de la basse | Impédance en entrée | Tension d'entrée principale (Préréglage d'usine) | Consommation électrique | Dimensions (grille, amplificateur et pied compris) (H x L x P) | Poids du produit |
| IT | Limite inferiore di frequenza | Limite superiore di frequenza | Uscita amplificatore | Modalità EQ bassi | Impedenza in ingresso | Voltaggio alimentazione in ingresso (preimpostata in fabbrica) | Consumo energetico | Dimensioni (inclusi griglia, amplificatore e piedini) (A x L x P) | Peso del prodotto |
| DE | Niederfrequenzgrenzwert | Oberfrequenz-grenzwert | Ausgang des Verstärkers | Bass-EQ-Modi | Eingangs-widerstand | Netzanschlusspannung (Werkseinstellungen) | Stromverbrauch | Abmessungen (mit Gitter, Verstärker und Füßen) (H x B x T) | Produkt-gewicht |
| ES | Limite inferior de frecuencia | Limite superior de frecuencia | Potencia del amplificador | Modos de equaliza-ción de bajos | Impedancia de entrada | Tensión de alimentación Restauración a los ajustes de fábrica | Consumo | Dimensiones (incluyendo rejilla, amplificador y pies) (Al x An x P) | Peso del producto |
| PT | Limite de baixa frequència | Limite de alta frequència | Saïda do amplificador | Modos de equalização de graves | Impedância de entrada | Tensão de entrada de corrente (predefinido de fábrica) | Consumo de energia | Dimensões (incluindo grelha, amplificador e pés) (A x L x P) | Peso do produto |
| NL | Limiet lage frequentie | Limiet hoge frequentie | Uitgang versterker | Standen Bas EQ | Impedantie ingang | Voltage netspanning (fabrieksinstelling) | Stroom-verbruik | Afmetingen (inclusief rooster, versterker en voeten) (H x B x D) | Gewicht product |
| CH | 低频下限 频率上限 器扩大输出 低通滤波器调整 输入阻抗 | 电源输入电压 (出厂预设) | 能耗 | 尺寸 (含格栅、功放器&脚部) (长x宽x深) | 重量 | ||||
| RU | Нижняя граничная частота | Верхняя граничная частота | Мощи. усилит. | Режимы НЧ-фильтра | Входное сопротивл. | Напряжение питания | Потребл. мощность | Габариты (В x Ш x Г), включая гриль, усилитель и опоры | Вес |
| JA | 下限周波数 上限周波数 アンプ出力 | 低音イコライザモード | 入力インピーダンス | 電源電圧 (出荷時設定) | 電力消費 | 寸法 (グリル、アンプ、脚部含む) (高さ x 幅 x 奥行) | 製品重量 | ||
| AR | على حد التردد المنخفض | أوضاع موازنة الجهير مخرج مشخر الصوت حد التردد Lebanon | مغUAWE DEL CHIL | جهد دHLAYI AKKIRI (ش顺利 الممنجع الممنجع الممنجع الممنجع الممنجع الممنجع الممنجع الممنجع الممنجع الممنجع الممنجع الممنجع الممنجع الممنجع الممنجع الممنجع الممنجع الممنجع الممنجع الممنجع الممنجع الممنجع الممنجع الممنجع الممنجع الممنج ge | اسپلاک الطالقة | البیماد (بیما في ذلك الشكة والمشخر والأفدار) (الطول × العرض × الارن restaurants) | وزن النت | ||
| PO | Granica częstotliwości niskich | Granica częstotliwości górnych | Wzmacniacz | Tryby korektora tonów niskich | Impedancja wejścia | Napięcie zasilania sieciowego (ustawienie fabryczne) | Pobór mosy | Wymiary (Z maskownica, wzmacniaczem i stopkami) (Wys. x Szer. x GL) | Waga produktu |
| BE | Найніжэйшая мягка частаты | Найвышэйшая мягка частаты | Выхад узмацяльніка | Ражьмы эквалайзера ніжкіх частот | Уваходны импеданс | Энергаспажыванне (Заводскія налады) | Спажываемая магутнасу | Габариты (в рашоткай, узмацяльнікам і ножками) (В x Ш x Г) | Вага |
| KA | Томен жилік шегі | Жоғары жилік шегі | Зорайтқыш шығысы | Бастың EQ режимдері | Кіріс кедері | Желілік кіріс кернеу (Зауыттық алдын ала орнату) | Куам тутынылуы | Өлшемдер (Торды, зорайтқышты және табанын қоса) (Б x E x К) | Салмағы |
| Bronze W10 | 20 Hz (Typical IEC room) | 40 - 120 HzVariable @ 24dB/Octave | 220 Watts Continuous | Music/ Movie/ Impact | >20K Ohms | 110 - 120 Vac / 220 - 240 VAC 50/60 Hz (Electronically Auto selected) | 400 W / 0.5Watts in Standby (ErP approved) | 366.5 x 321 x 364 mm14 7/15 x 12 5/8 x 14 6/15" | 13.4 Kg29 lb 9 oz |
Ω2) MONITOR AUDIO
Monitor Audio Ltd
24 Brook Road
Rayleigh, Essex
United Kingdom
SS6 7XJ
+44 1268 740 580
info@monitoraudio.com
© Monitor Audio
Version 2
2020
monitoraudio.com
Important Safety Instructions
- Please read these instructions.
- Please keep these instructions.
- Heed all warnings.
- Follow all instructions.
-
Do not use this apparatus with water.
-
Clean only with a dry cloth. Great care and attention has gone into the materials chosen to produce your Monitor Audio loudspeakers. A gentle wipe with a dry, clean cloth is all that is required to remove any dust. Treat them as you would a fine piece of furniture because that is how they have been designed. To clean the high gloss finishes use our "Lacquer Polish" that has been developed alongside Auto Glym. It can only be purchased from the online shop at www.monitoraudio.com (UK customers only).
-
Do not install near any heat source, such as radiators, heat registers, stoves, or other apparatus (including amplifiers) that produce heat.
-
Only use attachments/ accessories specified by Monitor Audio.
-
Use only with the cart, stand, tripod, bracket, or table specified by monitor Audio or sold with the apparatus. When a cart is used, use caution when moving the cart/ apparatus combination to avoid injury from tip-over.

-
Refer all servicing to qualified service personnel. Servicing is required when the apparatus has been damaged in any way, such as power supply cord or plug is damaged, liquid has been spilled or objects have fallen onto the apparatus, the apparatus has been exposed to rain or moisture, does not operate normally or has been dropped.
-
This apparatus shall not be exposed to dripping or splashing water and that no object filled with liquids such as vases shall be placed on the apparatus.
-
This exclamation point within an equilateral triangle is intended to alert the user to the presence of important maintenance (servicing) instructions in the literature accompanying the appliance.
-
No naked flame sources, such as lighted candles, should be placed on the apparatus.
-
Monitor Audio would discourage using its products in high humidity, extreme hot or cold or outdoor environments unless the product specifically advises suitability for such environments, for clarification of suitable products within the Monitor Audio range please contact a Monitor Audio representative
Re-cycling
Correct Disposal of Waste Electrical and Electronic Equipment (WEEE) by User in Private Households in the EU.
This symbol on the product or accessories indicates that they must not be disposed of with your household wastes throughout the EU. To prevent possible harm to the environment or human health from uncontrolled waste disposal, recycle it responsibly to promote the sustainable reuse of material resources. Instead it is your responsibility to dispose of your waste equipment by handing it over to a designated WEEE collection point for recycling. The separate collection and recycling of your waste equipment will help conserve natural resources and ensure that it is recycled in a manner that protects human health and the environment.

For more specific information about where you can take your equipment for recycling please contact your local city/council office, your local waste disposal service or the outlet where you purchased your Monitor Audio product.
RoHS Declaration of Conformity
Directive 2011/65/EU of the European Parliament and of the Council on the reduction of the use of certain hazardous substances in electrical and electronic equipment, June 2011.

Background
The RoHS directive restricts the use of Lead (Pb), Cadmium (Cd), Mercury (Hg), hexavalent Chromium (CrVI), polybrominated biphenyl (PBB) compounds, and polybrominated diphenyl ether (PBDE) compounds in electrical and electronic equipment sold in the European Union.
Guarantee and Service
To help us find your warranty details within our customer database, should the need arise, please take a few minutes to register your product(s) online at: monitoraudio.com.
This equipment has been fully tested prior to dispatch from the factory. Both the craftsmanship and the performance of this product is guaranteed against manufacturing defects for the period of five years from the date of purchase (see conditions below), provided that the product was supplied by an authorised Monitor Audio retailer under the consumer sale agreement. (The words 'consumer sale' shall be construed in accordance with section 15 of the supply of goods act 1973). Monitor Audio accepts no responsibility for defects arising from accident, misuse, abuse, wear and tear, modification or operation outside of that specified within this instruction manual. Neither will responsibility be accepted for damage or loss occurring during transit to or from the parties claiming under this guarantee.
This guarantee covers both labour and parts. The liability of Monitor Audio is limited to the cost of repair or replacement of the defective parts (at the discretion of Monitor Audio) and under no circumstances extends to consequential losses or damage.
Claims under this Guarantee
The equipment should be returned in its original packaging to the original supplier where possible, or to any other authorised Monitor Audio dealer. If it is not possible to return the equipment by hand, then it should be sent carriage prepaid via a reputable carrier. If the original packing is not available replacement packaging can be purchased from Monitor Audio.
If you have any difficulties complying with these requirements please contact us at the following address:
Customer Service
Tel: +44 (0)1268 740580
Monitor Audio Ltd.
Fax: +44 (0)1268 740589
24 Brook Road
Internet: www.monitoraudio.com
Rayleigh
Email: info@monitoraudio.co.uk
Essex, SS6 7XJ
England
This guarantee does not affect the statutory rights of the consumer under UK law.
Data Protection
We at Monitor Audio are committed to respecting the wishes and privacy of our customers. Any information you provide will be held in the strictest confidence and only used within the Monitor Audio organisation for the provision of services such as warranty claims or spare parts.
We may wish to contact you in the future to ensure you are happy with the products and standards of service we provide and to keep you up-to-date with the latest products and promotions we have to offer.
Should you wish not to be contacted by us either by post, e-mail or phone, please tick the box on the warranty form on the web site. Alternatively you can request not to be contacted in future by writing to Customer Service, at the address above.
EC Declaration of Conformity
We, Monitor Audio Ltd. (Manufacturer and Importer) 24 Brook Road
Rayleigh
Essex
SS6 7XJ
England

Declare in own responsibility, that the Monitor Audio products described in this manual is in compliance with Technical Standards/Council Directives:
(LVD) 2014/35/EU Low Voltage Directive (effective from 20 April, 2016)
EN60065: 2002+A1: 2006 Safety requirements for mains operated electronic and related apparatus for household and similar use.
(EMC) 2014/30/EU Electro Magnetic Compatibility (effective from 20 April, 2016)
EN 55032:2015 Electromagnetic Compatibility of Multimedia Equipment – Emission requirements (CISPR 32:2015.
EN55020: 12.94+A11:12.96 Electro magnetic immunity of broadcast receivers and associated equipment.
EN61000-3-2: 04.95+A1:1998+A2:1998 Electro magnetic compatibility (EMC) – Part 3: Limits – Section 2: Limits for harmonic current emissions (equipment input current up to and
including 16 Ampere per phase).
EN6100-3-3: 01.95 Electro magnetic compatibility (EMC) – Part 3: Limits – Section 3: Limits of voltage fluctuations and flicker in low-voltage supply systems for equipment with rated current up and including 16 Ampere per phase.
Signed by:

Name: D.S. Hartley
Position: Technical Director
Company: Monitor Audio Ltd
- Introduction:
- Attaching Feet and Spikes
- For Carpeted Floors
- For Wooden/ Hard Floors
- Setting Up Your Loudspeakers
- Channel Positioning
- AV Positioning
- Setting Up Bronze FX
- Atmos
- In-Ceiling
- Bronze AMS Dolby Atmos ® enabled speakers
- Fixing Bronze FX & Bronze AMS to a Wall
- Wiring
- Single Wiring
- Bi-Wiring
- Bi-Amping
- The Effects of Bi-Wiring and Bi-Amping
- Port Bungs
- WARNING: Care must be taken not to insert the port bungs too far into the port, as this may result in the foam bung being lost inside the cabinet.
- Running-In Your Speakers
- Retention Bolt Adjustment
- Warranty
- Owner Information
- Product Details
- Dealer Details
- BRONZE SERIES
- Ω2) MONITOR AUDIO
- Important Safety Instructions
- Re-cycling
- RoHS Declaration of Conformity
- Background
- Guarantee and Service
- Claims under this Guarantee
- Data Protection
- EC Declaration of Conformity
Brand : MONITOR AUDIO
Model : Bronze 200
Category : Pregnant