
Lagos 52 - Ceiling fan EGLO - Free user manual and instructions
Find the device manual for free Lagos 52 EGLO in PDF.


| Product Type | Ceiling fan |
| Brand | EGLO |
| Model | Lagos 52 |
| Dimensions (Height) | 45 cm (17.72 in) |
| Dimensions (Diameter) | 132 cm (52 in) |
| Weight | 5.59 kg (12.32 lb) with packaging |
| Power Consumption | 31.5 W |
| Rotational Speed | 170 rpm |
| Voltage | 220-240 V~ |
| Frequency | 50/60 Hz |
| Protection Class | I |
| Light Source | LED (integrated) |
| Remote Control | Yes, with 2 x AAA batteries (not included) |
| Number of Blades | 3 |
| Mounting | Downrod included |
| Suitable for Sloped Ceilings | Up to 13° |
| Minimum Ceiling Height | 2.3 m |
| Blade Clearance to Walls | At least 30 cm |
| Usage | Indoor, dry closed spaces |
| Safety | Must be installed by qualified electrician; RCD required |
| Certifications | CE, EU Declaration of Conformity |
Frequently Asked Questions - Lagos 52 EGLO
User questions about Lagos 52 EGLO
0 question about this device. Answer the ones you know or ask your own.
Ask a new question about this device
Download the instructions for your Ceiling fan in PDF format for free! Find your manual Lagos 52 - EGLO and take your electronic device back in hand. On this page are published all the documents necessary for the use of your device. Lagos 52 by EGLO.
USER MANUAL Lagos 52 EGLO
natural_image
Line drawing of a three-blade propeller with a conical top and fan base (no text or symbols)DE Bedienungsanleitung
EN Instruction Manual
FR Mode d'emploi
IT Istruzioni per l'uso
NL Handleiding
ES Instrucciones de uso
PT Instruções de operação
FI Käyttöohjeiden
SE Bruksanvisningar
CZ Návod k obsluze
HU Üzemeltetési utasítások
GR Οδηγίες χειρισμού
RO Instructiuni de utilizare
TR Kullanım talimatları
BG Инструкции за експлоатация
RU Инструкция по эксплуатации
SR Uputstvo за употребу
PL Instrukcja obsługi
 | Lesen Sie die Anweisungen! / Read the instructions! / Lisez les instructions ! / Leggere le istruzion! / Lees de gebruiksaanwijzingen! / Lea las instrucciones! / Leia as instruções! / Lue ohjeet! / Lis instruktionema! / Seznamte se s návodem! / Olvassa el az utasításokat. / Διαράστε τις οδηγιες! / Citiți instrucțiunile! / Talimatlan okuyuni / Прочетере инструкцииите! / Прочитайте инструкции! / Pročitajte uputstva! / Należy zapoznać się z instrukcją! |
 | Beachten Sie Warn- und Sicherheitshinweise! / Observe warnings and safety information! / Tenez compte des avertissements et des informations de sécurité ! / Rispettare le av- vertenze e le informazioni di sicurezza! / Waarschuwingen en veiligheidsinstructies in acht nemen! / Observe las advertencias y la información de seguridad! / Respite os avisos e as informações de segurança! / Huomioi varoitukset ja turvallisuutta koskevat ohjeet! / Följ varningarna och säkerhetsinformationen! / Ridte se výstražnými a bezpečnostní pokynyl! / Tartsa be a figyelmeztetéseket és a biztonsági tájekoztatást. / Άμαβάνετε υπόψη τις προεδικούρεις και τις πληροφορίες αφολείαιδ! / Respectati informatiâle de siguranță și avertismentele! / Uyarlara ve güvenlik bilgilerine dikkat edin! / Спазвайте предупрежденията и информацийта за безопасност! / Соблюдайте предупреждения и информацию по безопасности! / Pridržavajte se upozorenja i informację o bezbednost! / Stosonać się do ostrzežení i wskazówek bezpieczeństwa! |
 | Volt (Wechselspannung) / Volts (alternating voltage) / Volts (tension alternative) / Volt (voltaggio alternato) / Volt (wisselspanning) / Voltios (voltaje alterno) / Volts (tensão alter- nadá) / Volti (vaihtojännite) / Volt (växelspanning) / V (stidavé napěti) / Volt (váltakozófeszultésg) / Volts (evállaoóóvevn tóon) / Volti (current alternativ) / Volt (alternatif gerilim) / Волтове (променливо напрежение) / B (напряжение переменного тока) / Volti (promenjiv napon) / V (napieście przemienne) |
 | Watt (Wirkleistung) / Watts (effective power) / Watts (puissance effective) / Watt (potenza effettiva) / Watt (effectief vermogen) / Vatios (potencia efectiva) / Watts (potência efetiva) / Watti (teho) / Watt (effektstyrka) / W (účlinny vykon) / Watt (hasznos teljesítmény) / Watts (ešervýóc ióyúc) / Watt (putere efectiva) / Watt (aktif gűç) / Ватове (efektivna мощност) / Вт (полезная мощность) / Vati (efektivna snaga) / W (moc skuteczna) |
 | Entsorgen Sie die Verpackung und das Produkt umweltfreundlich! / Dispose of the packaging and the product in an environmentally friendly manner! / Éliminez l'emballage et le produit de manière respectueuse de l'environnement ! / Smaltire imballaggio e prodotto in conformità alla normativa ambientale vigente! / Zorg ervoor dat verpakking en product worden gerecycled! / Deseche el embalaje y el producto de forma respetuosa con el medio ambiente! / Elimine as embalagens e o produto de modo ecologico! / Pakkaus ja tuote on hävittettävä ympäristöystävällisellä tavalla! / Forpackningen och produkten ska bortskaffas på ett miljovänligt sätt! / Obala v ryrobek likvidujte ekologickym způsobem! / A csomag és a termék hulladékezelését környezetbarát módon végezze. / Απορρίμτε τη ουσκευσία και το προϊόν με τρόπο φίλικό για το περίβάλλον! / Éliminați ambalajul și produsul într-un mod favorabil protectiei mediului! / Ürüniü ve ambalajini cevreye duyarli bígemde íhma edin! / Trytripaïte otnadźvitte o otapokovanta i продукta no начин, kołto ne замърсьва околната среда! / Упилизируйте упаковку и изделие в соответствии с требованиями по защите окружающей среды! / Odložite pakovanje i proizvod na ekołoško prihvaltijiv način! / Opakowanie i produkt należy utylizować w sposób przyjazny dla środowiska! |
 | Schutzklasse I / Protection class I / Catégorie de protection I / Classe di protezione I / Beschermingsklasse I / Classe de protección I / Classe de proteção I / Suojausluokka I / Skyddsklass I / Tiida ochrany I / I. védelmi osztály / Bořúóc prostaoiac I / Clasa de protectje! / Koruma sinifi I / Клас на защита I / Класс защиты I / Nivo zašite I / Klasa ochrony I |
 | Zu ihrer Sicherheit / For your safety / Pour votre sécurité / Sicurezza dell'utente / Voor uw veiligheid / Por su seguridad / Para a sua segurança/ Turvallisuuttasi varten / För din säkerhet / Pro Vaši bezpečnost / A biztonság érdekében / Για την αφοράλειά σος / Pentru siguranța durnneavoastră / Güvenliginiz için / За Ваша безопасност / Для вашей безопасности / Radi vaše bezbednosti / Dotyczy bénéficierstwa użytkownika |
 | Dieser Deckenventilator ist ausschließlich für den Einsatz in trockenen, geschlossenen Räumen geeignet. / This ceiling fan is solely suitable for use in dry, closed indoor spaces. / Ce ventilateur de plafond doit uniquement être utilisé dans un endroit sec, fermé et en intérieur. / Il ventilatore a soffitto deve essere utilizzato esclusivamente all'interno di locali chiusi e asciutti. / Deze plafondventilator is uitsluitend geschikt voor gebruik in droge, gesloten binnenruimten. / Este ventilador de techo es adecuó únicamente para su uso en espacios cerrados y secos. / Esta ventoinha de teto é adequada apenas para utilização em espaços interiores secos e fechados. / Kattotuuletin soveltuu käytettäväksi aino- astaan kuivissa, suljetuisa sisátiloissa. / Den här takfälken är endast lämplig för torra, slutna inomhusområden. / Tento stropni ventilator je plně vhodný pro použiti v suchých, uzavřených vitričních prostorách. / A mennyezeti ventilator kizárolag száraz, zárt beltéri területeken hasznáható. / O uyňekkrupévocs ovesiktríporac oporríc čiva katállýlos, apokleistoká yα χρήση σε στένωύς, κλειτούς couterrikoύς χύρους. / Ventilatorul de tavan este destinat exclusiv utilizárii in spații interioare, uscate si inchise. / Bu tavan vantilatorů, sadece kuru ve kapali alanlarda kullanıma uygundur. / Tozai ventilator за таван е подходящ единствено за сухи и затворени выгрешни помещения. / Этот потолочный вентилатор предназначен для использования только в сухих и закрытых помещениях. / Ovaj plafonski ventilator je jedino pogodan za upotrebu u suvim i zatvorenim prostorijama. / Niniejszy wentylator suffitowy nadaje się wyłącznie do stosowania w suchych, zamkniętych pomieszczeniach wewnętrznych. |
 | Hertz (Frequenz) / Hertz (frequency) / Hertz (fréquence) / Hertz (frequenza) / Hertz (frequencia) / Hertz (frequencia) / Hertz (faquénica) / Hertz (frekvenc) / Hertz (frekvencia) / Hertz (ouyvótrta) / Hertz (frecventa) / Hertz (frekans) / Xerpové (pectora) / Гц (частора) / Herc (frekvencija) / Hz (częstotliwość) |
 | Vorsicht - heiße Oberflächen! / Caution - hot surfaces! / Attention - surfaces chaudes! / Attenzione - superfici calde! / Wees voorzichtig: hete oppervlakken! / Precaución - superficies calientes / Cuidado - superficies quentes! / Varo - kuuma pinta! / Försikität - varma ytori / Pozor - horké povrchyl / Vigýázat: forró felületek! / Prorocyŋ - kauteć, επιφάνιει; / Atentie - suprafepte fierbinții / Dikkat - sicak yüzey! / Внимание - гореши поверхности! / Осторожно — горячие поверхности! / Upozorenje - vele površine! / Uwaga - gorące powierzchnie! |
 | LED-Betriebsdauer / LED operating life / Durée de vie LED / Vita operativa LED / Levensduur van de LED / Vida operativa del LED / Vida útil do LED / LED-lampun käyttölkä / LED livslängd / Zivotnost LED diod / LED élettartama / Διάρκεια Φυης LED / Cicul de viaja al dispozitivului de iluminat cu LED / LED kalýma ömrů / Експлатационен срок на светодиод / Срок службы светодиодов / Radni vek LED sjalice / Zywotność diod LED |
 | Dieser Deckenventilator mit LED-Licht ist nicht für Dimmer oder elektronische Schalter geeignet. / This ceiling fan with LED light is not suitable for dimmer or electronic switches. / Ce ventilateur de plafond avec témoín lumineux à LED ne peut être raccordé à un gradateur ou un interrupteur électronique. / Il ventilatore a soffitto con luce LED non è compatibile con interruptori dimmerabili o eletronici. / Deze plafondventilator met LED-verlichting is niet geschikt voor dimmers of elektronische schakelaars. / Este ventilador de techo con luz LED no es adecuado para atenuadores de luz o rozotoptores electrónicos. Esta ventoinha de teto com luz LED não é compatível com interruptores de intensidade luminosa ou eletrónicos. / LED-valolla varustettu kattotuuletin ei sovellu käytettäväksi himmentimen tai sähköktatkaisimen kanssa. / Den här takfälkten med LED-belysning är ölámplig för ljures regulatorer eller elektroniska strömställare. / Tento stropni ventilator s LED osvětlenim není vhodný pro použiti se stmivači nebo elektronickými spinači. / A LED fényforást tartalmazó mennyezeti ventilator nem hasznáható fényeroszabályzóval és elektronikus kapcsolókkal. / O ovýknekprévoć svæniotriças oporríc µs φως LED čevin kartačlánlylos yα χρήση µe rooportém (dimmer) η πλεκτρονούς διακότες. / Ventilatorul de tavan cu luminá LED nu este compatibil pentru intrerupátoarele electronice sau cu reizeníjta reglabliä. / Bu LED îski tavan vantilatori, kvisi (dimmer) ya da elektronik anahtarla kullanima uygun değildir. / Tozai vентilator za taban сьс светодиодо осветление не е подраходця за димери или электронни превключватели. / Этот потолочный вентилатор не подходит для диммерных и электронных выключателей. / Plafonski ventilator sa LED svetlom nije pogodan za dimer ili elektronske prekidače. / Niniejszy wentylator sufitowy z oświetleniem LED nie nadaje się do współpracy ze ściemniaczami i przełącznikami elektronicznymi. |
This ceiling fan is solely suitable for use in dry, closed indoor spaces. It is not suitable for use in bathrooms or other consistently damp areas. This product is only intended for private household use. Do not operate at temperatures over 40 °C ( 104 °F ).
Please read this manual carefully before attempting the assembly or installation of your new ceiling fan. To ensure a safe and successful installation, please make sure to read this manual, ensure it is on hand for your installer to refer to, and keep in a safe place for future reference.
- ALL electrical work should only be carried out by a suitably qualified and licenced electrical contractor. This ceiling fan MUST be installed ONLY by a suitably qualified and licenced electrical contractor.
- This appliance can be used by children aged from 8 years and above and persons with reduced physical, sensory or mental capabilities or lack of experience and knowledge if they have been given supervision or instruction concerning use of the appliance in a safe way and understand the hazards involved. Children shall not play with the appliance. Cleaning and user maintenance shall not be made by children without supervision.
- Do NOT allow children to play with this appliance, and supervise children around electrical devises at all times.
- Before commencing any electrical work, ensure the power is disconnected and/or the mains switched off at the circuit box and ensure all pole isolation of the power supply.
- This ceiling fan can weigh up to 15Kg. The fixing point for your ceiling fan must be of sound construction, undamaged, and capable of supporting a load 4 times the weight of the fan plus the method of attachment. Verifying the stability of the mounting structure is the sole responsibility of the consumer and qualified installer.
- Care needs to be taken to ensure the installation location does not allow the fan blades to come into contact with any object or surface. There must be a minimum of 30 cm clearance between the blade tip (end) and the nearest wall or object. Reduced clearances to walls or ceilings can also reduce the amount of air your fan can move.
- The installation must also allow for a minimum clearance of 2.3 m between the floor and the bottom of the blades.
- The fan must be earthed.
- The fan must be connected to a mains supply only. Fans connected to alternate power systems such as Solar, Wind, Battery etc will not be covered under the terms of this warranty.
- Use ONLY the EGLO controller supplied with your fan. Use of non-standard or solid-state dimmer type controllers can cause inferior performance, and permanently induce a humming noise in your fan motor which cannot be repaired, and wich will not be covered under warranty.
- Do NOT change the direction of your fan whilst it is spinning. ONLY change the direction after the fan blades have come to a complete stop.
- Do NOT insert any object into the fan blades whilst in operation, as this can cause damage to the fan, and personal injury.
- Do NOT use ceiling fans and gas appliances in the same room at the same time.
- Only globes specified on the products rating label are to be used in EGLO ventilation products.
- All EGLO products are warranted to be free from defects in Workmanship and materials provided the products are used with a voltage supply within the range the product is designed to operate.
- This fan is designed for use indoors only.
- EGLO lighting will not be liable for any advice given to the consumer from any of our suppliers or third parties, related or otherwise.
- Proper performance relies on the right fan being correctly installed in the optimum location. Fans that do not perform as expected and which are not faulty cannot be replaced or exchanged under warranty.
- The important safeguards and instructions in this manual are not designed to cover every possible condition or circumstance. It is understood that common sense, caution and care are factors that cannot be built into the product, those using and maintaining this product must supply these factors.
- WARNING: If unusual oscillating movement is observed, immediately stop using the ceiling fan and contact the manufacturer, its service agent or suitably qualified persons.
- The replacement of parts of the safety suspension system device shall be performed by the manufacturer, its service agent or suitably qualified persons.
- The mounting of the suspension system shall be performed by the manufacturer, its service agent or suitably qualified persons.
- The fan is to be supplied through a residual current device (RCD) having a rated residual operating current not exceeding 30 mA.
- The fan is considered to be suitable for use in countries having a warm damp equable climate. It may also be used in other countries.
EN Before installation
- Carefully unpack your fan on a soft surface to avoid damage to the fan finish.
- Do not lay the motor housing on its side, as the decorative housings may become bent or damaged.
- Check that all parts are present before commencing assembly. Refer to Parts List.
- If any parts are missing, carefully check the packaging, polyfoam and plastic bags for the missing parts, and if they cannot be located, contact EGLO for assistance before commencing assembly or installation.
- Mounting bracket, 2. Canopy, 3. Canopy bottom cover, 4. Hanger ball, screw & pin, 5. Downrod, R pin & lock pin, 6. Coupling cover, 7. Coupler, 8. Motor, 9. Blades, 10. Plate, 11. Blade holder, 12. Decorative Cover & finial, 13. Remote Control
Tools required: Phillips head screwdriver, Flat head screwdriver, Pair of pliers, Wire cutter, Ladder, Wiring supply cable
Note: The use of electric drivers can overtighten the screws and damage threads, DO NOT use power tools for tightening screws.
FR Liste des pièces
natural_image
Technical line drawing of a mechanical component with two screws inserted (no text or symbols)Fig. 3
EN Selecting a location
- The ceiling fan must be installed in a location so that the blades are a minimum 300 mm spacing from the tip of the blade, to the nearest objects or walls.
- The ceiling fan must be installed in a location so that the blades are a minimum 2.3 m above the floor.
- The fixing point for your ceiling fan must be capable of supporting a load must be 4 times fans weight and the method of attachment. If the location does not have a solid mounting point, you will need to install a timber support between two ceiling joists. Refer to Figure 2.
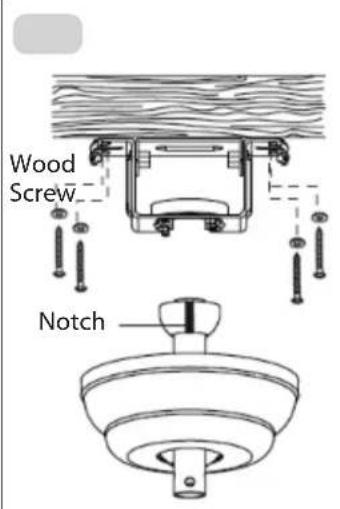
- INSTALLING THE HANGING BRACKET: Install the hanging bracket to the ceiling joist or timber support with the long installation screws provided. Pass the screws through the slotted holes in the hanging bracket and secure to the ceiling. Refer to Fig. 3.
- Ensure that at least 30 mm of the screw is threaded into the ceiling joist or timber support.
Note: Image is for representation only, and does not represent the actual bracket. Fixing point MUST be able to support a load 4 times the weight of the fan.
Note: The fixing screws included are designed for use with timber ceiling joists, for all other materials, the appropriate fixing screws will need to be purchased.
Note: Your fans hanging bracket allows for mounting on angled/sloped ceilings up to a 13-degree pitch.
FI Selecting a location

EN Assembling and installing the fan

Important: Check that the power is disconnected and/or the mains switched off at the circuit box to ensure all pole isolation of the power supply.
- Assemble the canopy, canopy cover and coupling cover over the downrod. Refer to Fig 4.
- Insert the wiring loom from the motor into and through the downrod. Attach the downrod to the coupler using the bolt, washer, and nut, and tighten firmly before inserting the R pin. Ensure the downrod is clamped with two screws on the coupler to prevent shaking and wobble during operation. Re-check that all screws are properly tightened, slide the coupling cover down to the downrod. Carefully lift the fan assembly up to the hanging bracket. Refer to Fig 5.
- Seat the hanger ball assembly into the bracket, ensuring the registration notch of the hanger ball is positioned on the stopper of the hanger bracket to prevent the fan from rotating when in operation. Refer to Fig 6.
- Wire the ceiling in accordance to; "Wiring Connections".
- After completing the mains electrical connection at the terminal block, connect the ceiling fan wiring by connecting the quick connector plugs
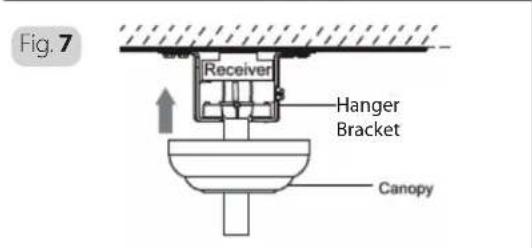
- Slide the receiver into the 'slot' in the hanger bracket, and store all wires neatly. Refer to Fig. 7.
- Raise the canopy up to the hanger bracket, and carefully tuck cables inside the canopy as you slowly raise it to the ceiling. Particular care must be given to ensure that no wires are damaged during this step, especially the remote antenna. Fix the canopy to the hanger bracket with the canopy screws provided.
EN Assembling and installing the fan
- Slide the canopy bottom cover up the downrod, and attach to the canopy. Refer to Fig. 8.
- Working one blade at a time, align the 3 holes on the blade holder with the holes on the blade and attach using the blade screws and washers provided. Refer to Fig. 9. Attach the decorative cover by twisting it onto the bottom of the shaft. Refer to Fig. 10.
- Re-check that all screws are properly tightened.
Note: The use of electric drivers can overtighten the screws and damage threads, DO NOT use power tools for tightening screws.
EN Wiring connections
WARNING!

FOR YOUR SAFETY ALL ELECTRICAL CONNECTIONS MUST ONLY BE UNDERTAKEN BY A QUALIFIED AND LICENSED ELECTRICIAN.
Note: If there are two or more DC ceiling fans installed in the one location/room, an isolation switch is required for EACH ceiling fan. This is required when programming the remote transmitter and receiver to pair together.
EN Operating elements remote control
- LED Indicator light
- Turn the fan OFF
- Fan speeds / ON (1= Low, 5= High)
- Timer control for the fan
(1H= Fan stops after 1 Hour, 8H= Fan stops after 8 Hours)
- Batteries for the transmitter (not included)
- Timer control for the fan (30 min= Fan stops after 30 minutes)
- Direction of the fan (Forward/Reverse)*
F/R*: Press and hold for 3 seconds to operate. The fan will slow down and change direction. During the slow down period, the fan speed function is disabled until direction has been changed
Inserting the battery into the remote control
- Open the battery cover.
- Insert the batteries and make sure that the + and - ends are in the correct position.
- Close the battery cover and press it down until it clicks into place.
Note: If not using the fan and remote for extended periods, remove the battery from the transmitter.
The remote control has been pre-paired for your convenience, however should you ever need to replace the remote control, follow these simple steps to pair the remote transmitter to the remote receiver:
- Within 30 seconds after the receiver is powered ON (connected), aim the transmitter towards the receiver and press the "FAN OFF" button on the transmitter for 2\~3 seconds.
- When you hear a "beep", the digital paring is complete.
- You can operate the fan normally.
Note: Please note that the digital paring will not function after 30 seconds since the receiver is powered on.
If the transmitter and receiver are not working or working properly, check:
- The battery is in the correct position and making good contact, and replace batteries if necessary.
- Is there any other radio frequency or remote-controlled devices nearby, devices using the same frequency can interfere with each device?
- Low voltage in the batteries can affect the operation and signal reception. The LED indicator light will flash when the battery is low, replace the battery immediately.

DE Umkehrfunktion
For a cooling effect during summer, your fan should run in a counter clockwise direction, forcing the room air down and outwards creating a wind chill effect that makes you feel cooler.
Winter (Reverse)
During the winter, your fan should run in a clockwise direction at low speed. This will gently draw the warmer air down from the ceiling, balancing the rooms temperature, and allowing you to lower your heating thermostat.
EN Cleaning and maintenance
All EGLO ceiling fans need be maintained regularly to ensure performance is maintained. Your fans natural movement can cause screws to loosen. Every 6 months, check that ALL screws are securely tightened with a screwdriver. All EGLO ventilation products should be cleaned regularly to insure against corrosion from salt, dust and moisture, both externally and internal (where allowed and possible). For cleaning, a soft brush or lint-free cloth should be used to prevent scratching the finish. Surface smudges or an accumulation of dirt and dust can easily be removed by using a mild detergent and only a slightly dampened cloth.
Note: Do NOT use abrasive cleaning agents as they may damage the finish.
natural_image
Line drawing of a ceiling-mounted air fan with a central propeller and two blades, shown with measurement rulers (no text or symbols)
DE Fehlersuche
WARNUNG!

DER DECKENVENTILATOR MUSS VOR BEGINN DER FEHLERSUCHE AUSGESCHALTET UND ISOLIERT WERDEN.
Please note that all ceiling fans are not the same, even fans of the same model, some may move more or less than others. Movement of a few centimetres is quite acceptable, and does not suggest the fan will fall if installed correctly.
All ceiling fan blades are weighed and grouped by weight. It is impossible to eliminate wobble altogether and should not be considered a fault. Ceiling fans tend to move during operation because they are not generally rigidly mounted.
To reduce the fan wobble:
• Check that all screws which fix the mounting bracket and down rod are tightly secured.
• Wobble may result from inconsistent blade level. Check this by measuring from the tip of the blade to the ceiling, and repeat on every blade.
If the measurements are different;
- Check that the blade screws are not overly tightened, or loose, causing the tip of the blade to be unlevelled.
- Out of shaped blades can unbalance the fan and cause wobble. Check by removing all blades and stacking on a flat level surface and ensure all blades are a uniform shape.
- Interchanging adjacent blades can redistribute the weight and result in smoother operation.
FR Dépannage
AVERTISSEMENT!

LE VENTILATEUR DE PLAFOND DOIT ÊTRE ÉTEINT ET ISOLÉ AVANT DE COMMENCER TOUT DÉPANNAGE
| PROBLEM | POSSIBLE CAUSE | POSSIBLE REMEDY |
| Fan or Light will not start. | Fuse or circuit breaker blown. | Turn power OFF.Check fuses and circuit breaker. (*) |
| Loose mains connections to fan. Turn power OFF. | Check connections at terminal block. (*) | |
| Controller/switch not in correct position. | Turn power OFF.Check that controller/switch is in the correct position. | |
| Light kit not connected correctly. | Turn power OFF.Check that light kit plug connector is connected securely. (*) | |
| Fan Wobbles. | Fan blades are not horizontal to the ceiling. | Refer to 'WOBBLE / BALANCING' section of this manual. |
| Blade screws are loose. | Check that all screws are securely tightened. Do NOT overtighten. | |
| Blades are out of shape. | Stack blades on a flat level surface, to ensure all blades are a uniform shape. Contact your retailer for replacement blades. | |
| Fan hanger ball not seated correctly in hanger bracket. | Turn power OFF.Support the fan very carefully, and rotate the hanger ball to ensure the registration slot is positioned on the stopper. (*) | |
| Noisy | Top canopy touching ceiling. | Lower the decorative canopy so that it does not contact the ceiling. |
| Loose blade screws. | Check that all screws are securely tightened. Do NOT overtighten. | |
| Hanging bracket not installed correctly. | Turn power OFF.Check and if necessary re-install the hanging bracket if not installed/ installed correctly. (*) | |
| Incorrect controller. | Turn power OFF.Change the controller to the supplied controller. (*) | |
| Fan needs to settle in. | Allow 6-8 hours of operating time to allow fan to 'settle in'. |
(*) May require the assistance of a qualified and licenced electrical contractor.
FR Check-list
Do not dispose of electrical appliances as unsorted municipal waste, use separate collection facilities. Contact your local council for more information regarding the collection systems available. If electrical appliances are disposed of in landfills or dumps, hazardous substances can leak into the ground water and get into the food chain, damaging your health and well-being.
FR Mise au rebut

Total output: 31.5 Watt
Rotational speed: 170 rpm
Dimensions: Height of body: 17.72 in (45 cm)
Fan diameter: 52 in (132 cm)
Weight: 12.32 lb (5,59 kg with packaging)
Remote Control
Battery: 2 x 1.5 V, Type AAA (not included)
FR Technical data
Saída total: 31.5 Watt
EN Declaration of conformity:
EGLO GmbH declares that the product 35026 and the supplied remote control comply with Directive 2014/53 / EU. The full text of the EU declaration of conformity can be found at the following Internet address: www.eglo.com


- EN Before installation
- FR Liste des pièces
- EN Selecting a location
- FI Selecting a location
- EN Assembling and installing the fan
- EN Wiring connections
- EN Operating elements remote control
- Inserting the battery into the remote control
- DE Umkehrfunktion
- Winter (Reverse)
- EN Cleaning and maintenance
- DE Fehlersuche
- WARNUNG!
- DER DECKENVENTILATOR MUSS VOR BEGINN DER FEHLERSUCHE AUSGESCHALTET UND ISOLIERT WERDEN.
- FR Dépannage
- AVERTISSEMENT!
- LE VENTILATEUR DE PLAFOND DOIT ÊTRE ÉTEINT ET ISOLÉ AVANT DE COMMENCER TOUT DÉPANNAGE
- FR Mise au rebut
- Remote Control
- FR Technical data
- EN Declaration of conformity:
Brand : EGLO
Model : Lagos 52
Category : Ceiling fan