
SP42H - Lawn mower MOUNTFIELD - Free user manual and instructions
Find the device manual for free SP42H MOUNTFIELD in PDF.


| Product Type | Petrol Lawn Mower |
| Brand | Mountfield |
| Model | SP42H |
| Cutting Width | 42 cm |
| Engine Type | 4-Stroke Petrol Engine |
| Engine Power | 2.8 kW |
| Starting System | Recoil Start |
| Drive Type | Self-Propelled (Rear Wheel Drive) |
| Cutting Height Adjustment | Central, 6 positions (25-75 mm) |
| Grass Collector Capacity | 60 L |
| Mulching Function | Yes (Mulching Plug Included) |
| Side Discharge | Yes (Optional) |
| Weight | 32 kg |
| Overall Dimensions (L x W x H) | 142 x 52 x 105 cm |
| Fuel Tank Capacity | 1.0 L |
| Oil Capacity | 0.6 L |
| Noise Level (LWA) | 96 dB(A) |
| Vibration Level | 8.5 m/s² |
| Wheel Diameter (Front/Rear) | 18 cm / 28 cm |
| Maintenance | Regular oil change, air filter cleaning, blade sharpening |
| Safety Features | Operator Presence Control (OPC), Blade Brake |
| Foldable Handle | Yes for easy storage |
Frequently Asked Questions - SP42H MOUNTFIELD
User questions about SP42H MOUNTFIELD
0 question about this device. Answer the ones you know or ask your own.
Ask a new question about this device
Download the instructions for your Lawn mower in PDF format for free! Find your manual SP42H - MOUNTFIELD and take your electronic device back in hand. On this page are published all the documents necessary for the use of your device. SP42H by MOUNTFIELD.
USER MANUAL SP42H MOUNTFIELD
Please Read These Instructions Before Using Your Mower
Mountfield
Operating Instructions
for models HP42H-SP42H-SP46H-SP53H Lawnmowers with Honda GCV 160 Autochoke engine

Product Codes:
295441038
295442038
295496038
295546038
Do not return this product to store, please call the Service Link Helpline.
Products with petrol in cannot be accepted back in store.
Supported by

For all your Warranty,
Parts and Service needs
0800 121 6585
www.servicelink.org.uk
EN ENGLISH (Original instructions)
- Safety precautions....3-4
- Know your mower ....4-6
- How to get mowing 7-9
- Maintenance....9-10
- Fault Finding ....10
GUARANTEE 11
Thank you for purchasing a Mountfield lawnmower. This machine will give you many years of safe and reliable service if operated in accordance with these instructions. Please read and understand these operating instructions before using your mower. Failure to do so could result in personal injury or damage to the equipment.

NEVER TIP THE MOWER ON ITS SIDE AS THIS WILL FLOOD THE AIR FILTER WITH OIL.
To access the underside, lift the front wheels by lowering the handle until it rests on the ground.
SAFETY PRECAUTIONS
Your lawnmower should be used with due care and attention. Symbols have therefore been placed on various parts of the machine to remind you of the main precautions to be taken. Their meaning is explained below. You are also asked to carefully read the safety regulations in the applicable chapter of this handbook

- Warning: Read the instruction manual before using the machine.
- Beware of thrown objects: Keep other people at a safe distance whilst working.
- Beware of cutting: Moving blades. Do not put hands or feet near the blades. Disconnect the spark plug before carrying out any repairs or maintenance.
- Only for electric lawnmowers.
- Only for electric lawnmowers.
DESCRIPTION OF SYMBOLS ON CONTROLS (where applicable)


- Engine stop 12. Drive on 13. Idle 14. Engine ignition 15. Grass catcher content indicator up (a) = empty / down (b) = full
| Maximum noise and vibration levels | HP42H | SP42H | SP46H | SP53H | |
| Acoustic pressure level | dB(A) | 83 | 83 | 82 | 84 |
| - Measurement uncertainty | dB(A) | 1.01 | 1.01 | 1.25 | 0.8 |
| Measured acoustic power level | dB(A) | 95 | 95 | 96 | 97 |
| - Measurement uncertainty | dB(A) | 1.05 | 1.05 | 0.4 | 1.12 |
| Guaranteed acoustic power level | dB(A) 96 96 96 98 | ||||
| Vibration level | m/s 2 | 7.27 | 7.27 | 6.48 | 7.22 |
| - Measurement uncertainty | m/s 2 | 0.7 | 0.7 | 0.5 | 0.7 |
IDENTIFICATION LABEL
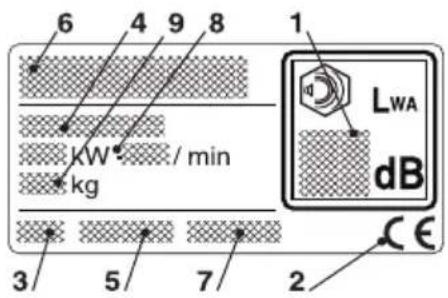

- Acoustic power level
- Conformity mark
- Year of manufacture
- Type of lawnmower
- Serial number
- Name and address of manufacturer
- Article code
- Engine power and speed
- Weight in kilograms
As soon as you have purchased the machine, do not forget to write the identification numbers (3-4-5-7) in the spaces on the last page of the manual.
KNOW YOUR MOWER

The following safety precautions must be observed at all times. Please read them carefully.
TRAINING
1) Read the instructions carefully. Get familiar with the controls and proper use of the equipment. Learn how to stop the engine quickly.
2) Only use the lawnmower for the purpose for which it was designed, i.e. for cutting and collecting grass. Any other use can be hazardous, causing damage to the machine. Examples of improper use may include, but are not limited to:
- transport of people, children or animals on the machine
– being transported by the machine
– using the machine to tow or push loads
– using the machine for leaf or debris collection
– using the machine to trim hedges, or for cutting vegetation other than grass
– use of the machine by more than one person
– using the blade on surfaces other than grass
3) Never allow children or people unfamiliar with these instructions to use the lawnmower. Local regulations may restrict the age of the operator.
4) Never use the lawnmower:
- When people, especially children, or pets are nearby
– If the operator has taken medicine or substances that can affect his ability to react and concentrate
5) Remember that the operator or user is responsible for accidents or hazards occurring to other people or their property
PREPARATION
1) While mowing, always wear sturdy footwear and long trousers. Do not operate the equipment when barefoot or wearing open sandals
2) Thoroughly inspect the area where the equipment is to be used and remove all objects which may be thrown by the machine or damage the cutter assembly and the engine (stones, sticks, metal wire, bones, etc.)
3) WARNING: DANGER! Engine fuel is highly flammable:
- Store fuel in containers specifically designed for this purpose
- Refuel using a funnel and outdoors only. Do not smoke while refuelling or whenever handling the fuel
- Add fuel before starting the engine. Never remove the cap of the fuel tank or add fuel while the engine is running or when the engine is hot.
- If fuel is spilt, do not attempt to start the engine but move the machine away from the area of spillage and avoid creating any source of ignition until the fuel has evaporated and the vapour dispersed
– Replace all fuel tanks and containers caps securely
4) Substitute faulty silencers. Never use the machine without the silencer
5) Before use, always inspect the machine, especially the condition of the blades and check that the screws and cutting assembly are not worn or damaged. Replace worn or damaged blades and screws in sets to preserve balance.
6) Before mowing, attach the discharge opening guards (grass-catcher or stone-guard)
OPERATION
1) Do not operate the engine in a confined space where dangerous carbon monoxide fumes can collect
2) Mow only in daylight or good artificial light
3) If possible, avoid operating the equipment in wet grass
4) Always be sure of your footing on slopes
5) Walk, never run and do not allow yourself to be pulled along by the lawnmower
6) Mow across the face of slopes, never up and down
7) Exercise extreme caution when changing direction on slopes
8) Do not mow on slopes of more than 20°
9) Exercise extreme caution when pulling the lawnmower towards you
10) Stop the blade if the lawnmower has to be tilted for transportation when crossing surfaces other than grass and when transporting the lawnmower to and from the area to be mowed
11) Never operate the lawnmower with defective guards, or without safety devices, such as the stone-guard and/or grass-catcher, in place
12) Do not change the engine governor settings or overspeed the engine
13) On power-driven models, disengage the drive clutch before starting the engine
14) Start the engine carefully, following the instructions and keeping feet well away from the blade
15) Do not tilt the lawnmower when starting the engine. Start the engine on a flat surface that is free of obstacles and tall grass
16) Do not put hands or feet near or under rotating parts. Keep clear of the discharge opening at all times
17) Never pick up or carry a lawnmower while the engine is running
18) Stop the engine and disconnect the spark plug wire:
– Before carrying out any work underneath the cutting deck or before unclogging the chute
– Before checking, cleaning or working on lawnmower
- After striking a foreign object. Inspect the lawnmower for damage and make repairs before restarting and operating the lawnmower
– If the lawnmower begins to abnormally vibrate (Immediately look for the cause of the vibrations and contact your local Dealer)
19) Stop the engine:
- Whenever you leave the lawnmower unattended. Remove the key from models with electric starters
- Before refuelling
– Every time you remove or replace the grass-catcher
– Before adjusting the grass cutting height
20) Reduce the throttle before turning off the engine and turn the fuel off when you have finished mowing, following the instructions in the engine handbook
21) When mowing, always keep to a safe distance from the rotating blade. This distance is the length of the handle.
MAINTENANCE AND STORAGE
1) Keep all nuts, bolts and screws tight to be sure the equipment is in safe working condition. Regular maintenance is essential for safety and performance.
2) Never store the equipment with fuel in the tank inside a building where vapour may reach a flame or a spark or a source of extreme heat
3) Allow the engine to cool before storing in an enclosed space
4) To reduce the fire hazard, keep the engine, exhaust silencer and fuel storage area free of grass, leaves, or excessive grease. Do not leave containers with grass cuttings in the vicinity
5) Check the stone-guard and grass-catcher frequently for wear and deterioration
6) If the fuel tank has to be drained, this should be done outdoors and when the engine is cool
7) Wear strong work gloves when removing and reassembling the blade
8) Keep the blade balanced during sharpening. All operations on the blade (dismantling, sharpening, balancing, remounting and/or replacing) require a certain familiarity and special tools. For safety reasons, these jobs are best carried out at a garden machinery specialist.
9) For safety reasons, never use the machine when it has worn or damaged parts. Parts are to be replaced and not repaired. Use genuine spare parts. Parts that are not of the same quality can damage the equipment and impair your safety.
10) If the machine is not going to be used for 28 days or more please drain all fuel from the machine. Stale fuel can cause damage to the carburettor.
TRANSPORTATION AND HANDLING
1) Whenever the machine is to be handled, raised, transported or tilted you must:
- wear strong working gloves
– grasp the machine at the points that offers a safe grip, taking account of the weight and its distribution
- use an appropriate number of people for the weight of the machine and the characteristics of the vehicle or the place where it is to be placed or collected
2) During transport, fasten the machine securely with ropes or chains
HOW TO GET MOWING
Your Mountfield lawnmower does not contain petrol or oil and these must be added before use.
Running the mower with insufficient oil can cause serious damage to the engine and will invalidate your warranty.

NEVER TIP THE MOWER ONTO ITS SIDE AS THIS WILL FLOOD THE AIR FILTER WITH OIL. To access the underside of the machine lift the front wheels by lowering the handle to the ground.
Carefully remove the mower from the carton and read these Operating Instructions. An Owner's Manual for the engine is also included. Please read this before starting the engine.

WARNING - Unpacking and completing the assembly should be done on a flat and stable surface, with enough space for handling the machine and its packaging, always making use of any suitable equipment.
Disposal of the packaging should be done in accordance with the local regulations in force.
HANDLE ASSEMBLY
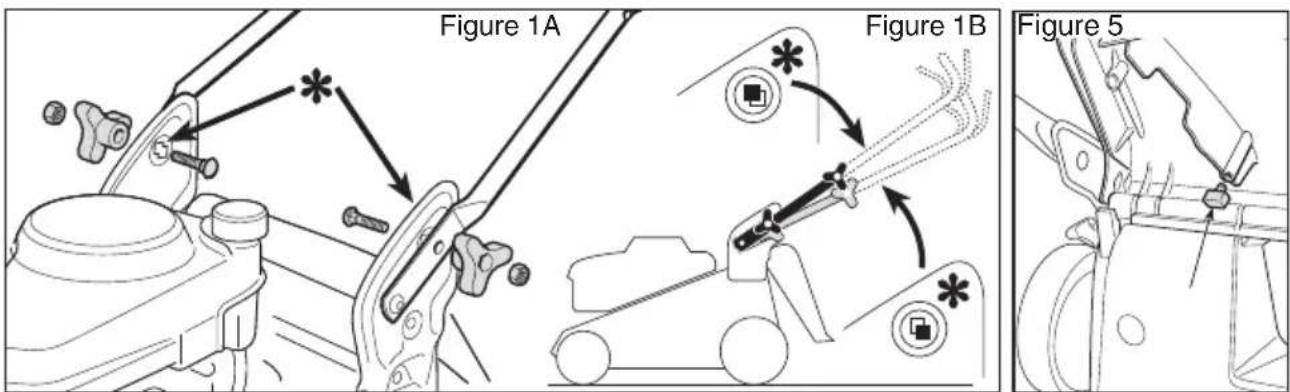
- Lift the lower handle into the working position. Secure it using the nuts and bolts supplied (Figure 1A). The handle can be adjusted in two different positions (Figure 1B).
- Fit the top handle using the bolts provided, making sure that the throttle cable is placed on the left hand side (Figure 2)
- Secure the OPC and throttle cable to the handle by the clamps provided (Figure 3). Take care that the cables are not secured too tightly (this may impair how the mower operates) or impair removal of the grass collector.
- Engage the Operator Presence Control (OPC) lever by pulling and holding it against the handle to release the engine brake. Pull the starter cord and fit into the cord guide as shown (Figure 4). Fit the cord guide on the upper handle using a 10mm spanner. Failure to use the cord guide will result in premature cord wear.
- Lift the rear safety deflector flap and assemble the plastic pin as shown in (Figure 5)


GRASS COLLECTOR
- Fit the cloth base by fastening the plastic bars onto the frame. It may help to use a screwdriver as shown in the drawing. Hook the handle in place (Figure 6).
- To fit the grass collector onto the mower, lift the rear safety deflector flap and hook the collector onto the pegs


Figure 6
STARTING YOUR MOWER
Read and understand the Safety Precautions before using your mower.
- Put Mountfield 4-stroke, or an SAE 10W-30 oil, in the oil filler (Figure 7). Do not overfill, the oil tank capacity is 0.55 litre. Mountfield oil, part number MX855, is available from any Mountfield stockist or B&Q store.
- Fill the fuel tank with UNLEADED petrol. Use only clean, fresh petrol - stale fuel may contain deposits that will clog the carburettor. Unleaded fuel can start to go stale after just 28 days. A fuel stabiliser is recommended to help prevent fuel becoming state. Do not overfill, the petrol level should be below the bottom of the fuel tank neck. Do not over tighten the fuel cap. The fuel cap breathes through the threads of the cap and over tightening can cause the engine to cut out.
- Ensure that the spark plug lead is securely connected to the spark plug.

- Turn on the fuel tap which is located beside the air filter (Close up in Figure 7)
- Pull and hold the Operator Presence Control (OPC) lever against the handle to disengage the engine brake.
- Pull the starter cord with a strong smooth pull. Do not remove the pull cord from the guide
• To engage the drive to the rear wheels, pull and hold the clutch lever against the handle
• To stop the drive, release the clutch lever
THE ENGINE WILL NOT START, OR CONTINUE TO RUN, UNLESS THE OPC LEVER IS HELD AGAINST THE HANDLE
NOTE: Using the choke is usually unnecessary when starting a warm engine. However, in cool weather it may still be necessary to use the choke to start the engine.
STOPPING YOUR MOWER
- Release the Operator Presence Control (OPC) lever; this will engage the engine brake and operate the ignition safety cut out device
ADJUSTING THE HEIGHT OF CUT
The height of cut adjustment not only determines the length of the cut grass, it also controls the airflow which carries clippings into the collector. If the discharge chute becomes blocked, increase the airflow by raising the height of cut. To prevent blockages when cutting long, thick grass, set the adjustment to the highest setting and cut the grass; then cut it again on a lower setting.
To adjust the height of cut:
- Stop the engine
- Put the mower on a level surface
- Adjust the cutting height lever by pulling outwards and moving into the required position (Figure 8)

BEFORE EACH USE
- Always ensure that the mower is in a safe working condition. Inspect the cutter blade for damage; check safety devices and guards; check that all nuts, bolts and screws are secure.
- Check the oil level as follows:
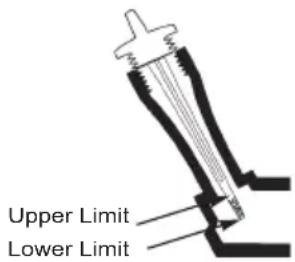
a) Remove the oil filler cap and wipe the dipstick clean (Figure 9). b) Refit the dipstick into the filler neck without screwing it down. Remove the dipstick and check the oil level; oil should be at the FULL mark. The oil tank capacity is about 0,55 litre or 20 fluid oz.
c) If the oil level is low add Mountfield oil part number MX855 or a SAE 10W-30 oil, to the upper limit on the dipstick. Do not overfill; the oil level should not be above the FULL mark. - Fill the fuel tank with unleaded petrol. Do not overfill, there is no need to fill tank to the top. The fuel tank need only contain enough fuel to complete the days mowing. If you run out of fuel, refilling must only be carried out once the engine has cooled. Fuel stored within the machine for 28 days or more can go stale and should be drained before further use.
Figure 9 Oil Filler Cap Dipstick
MAINTENANCE

Stop the engine and disconnect the spark plug lead before working on the machine.
DO NOT TIP THE MOWER ONTO ITS SIDE AS THIS WILL FLOOD THE AIR FILTER WITH OIL.
To access the underside of the machine, lift the front wheels by lowering the handle until it rests on the ground.
CUTTER BLADE
Examine the cutter blade regularly for wear or damage.
- A slightly worn blade can be re-sharpened by your local dealer
- If the blade is damaged it should be replaced. Replacement blade kits are available from your Mountfield stockist. If in doubt refer to your dealer, or telephone 0800 121 6585.
Blade must always be marked with part number 81004341/3 (HP42H-SP42H)
81004346/3 -81004460/0 (SP46H)
81004459/0 (SP53H)
CLUTCH CABLE ADJUSTMENT
- Make sure that the clutch lever is fully released
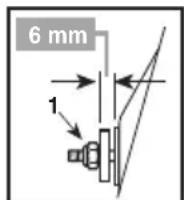
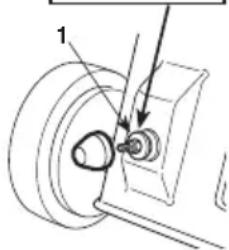
- Adjust the tension of the belt with the nut (1) to get the right measurement (6 mm) (Figure 10)
- Engage the clutch lever and check that the rear wheels lock when the mower is pulled backwards
- Start the mower and ensure it does not drive when the lever is disengaged
ENGINE
An engine Manufacturer's Owner's Manual is supplied with your mower.
Please read this, it provides detailed information on engine operation, maintenance and care. Repair work other than routine maintenance, should be carried out by an authorised dealer.
Figure 10
STORAGE
A little time spent on your mower after use will ensure many years of reliable mowing.
To access the underside of the cutter deck, ensure that the spark plug lead is disconnected. Then lift the front wheels by lowering the handle until it rests on the ground. Do not tip the mower onto its side, as this will flood the air filter with oil. Failure to maintain and care for your engine may invalidate the machine guarantee. Please see the guarantee statement for full terms and conditions.
AFTER EACH USE
- Remove any grass pulp from the underside of the cutter deck using a non-metallic instrument such as a piece of wood. Take care not to damage the paintwork.
- Examine the cutter blade for any damage. A damaged blade may upset the balance of your mower and cause excessive vibration. If in doubt refer to your dealer.
- Inspect the grass collector and clean it if necessary. If the mesh becomes clogged airflow will be reduced and impair grass collection.
- The handle can be folded down to reduce the amount of storage space required. Take care not to trap any of the operating cables when folding or unfolding the handle.
- Store the mower in a clean, dry area well away from any naked flames, sparks or heat source
LONG TERM - (if you are not using your mower for more than 28 days)
- Give the machine a thorough clean, paying particular attention to the underside
- Lubricate all moving parts
- Empty the fuel tank either by running the mower out of fuel or tip the machine backwards and onto the back right wheel to drain the fuel into a suitable container. To drain the carburettor it is necessary to slacken the drain screw. The drain screw is situated under the carburettor on the float bowl (see diagram 4 in the engine manual). A bolt holds the bowl in place on the very bottom, but on an angle slightly closer to you is another bolt with a red washer. This is the drain screw.
FAULT FINDING
| PROBLEM SOLUTION | |
| Engine will not start | Check there is ample clean, fresh fuel in the tank. Any stale fuel needs to be drained from the machine. |
| Check the cutter blade is not fouling the ground preventing free rotation. | |
| Engine will not stop | Check the Operator Presence Control (OPC) lever is fully released. |
| Remove spark plug lead to stop the engine using insulated gloves and refer to dealer. | |
| Engine smokes Engine may be overfilled with oil or may have been tipped. | |
| Engine running unevenly | Check the petrol filler cap isn't too tight - it should only be finger tight. If fuel is over 28 days old it has gone stale and will need replacing. |
| Failure to cut grass properly | Stop the engine and disconnect the spark plug lead using heat resistant gloves. |
| Check blade attachment bolt is tight. | |
| Check condition of blade.If seriously worn or damaged replace with a new one. | |
| Failure to collect grass properly | Stop the engine and disconnect the spark plug lead using heat resistant gloves |
| Check and make sure there is no build up of grass inside the casing. | |
| Check grass collector is allowing air to flow through the fabric. If it is clogged it should be washed carefully. | |
| If the grass collector is not clogged raise the height of cut to increase airflow. | |
| Check to ensure the engine is running at the correct speed (approximately from 2,800rpm to 3,000rpm) | |
| If conditions are too severe to use the grass collector, remove it and work with the deflector in position | |
| Machine vibrates excessively | This will certainly indicate that the blade has become badly damaged. Stop the engine, disconnect the spark plug lead and examine the blade assembly. Refer to your local dealer. |

This product is supported by Service Link. If you have been unable to find the information you require above please call the Service Link helpline. Here you will find 1-2-1 help and advice from garden machinery repair specialists.
Service link

What is Service Link? Service Link is an aftersales help and advice helpline with a national network of garden machinery repair specialists.
How can we help you? Here at Service Link we can help with all your trouble shooting, warranty, parts and service needs. Call us and speak to one of our advisors and if required, visit one of our 450 centres across the UK and Ireland.
How can you contact us? If in the unlikely event that this product does require our help please contact the helpline or 0800 121 6585 in the UK or 1800806149 in ROI. Lines open Monday-Saturday 9am to 5pm and Sundays 10am to 4pm. Also find us online at www.servicelink.org.uk.
CERTIFICATE OF CONFORMITY
A certificate of conformity is enclosed with the documentation as separate document. An EXAMPLE is here on the bottom.
Congratulations on the purchase of your Mountfield lawnmower. This product has been manufactured to the highest quality standards and is guaranteed for domestic use against faulty parts or manufacture for a period of 2 years (SP53H has a 3 year guarantee that is conditional on it being serviced by an authorised service centre by the end of the second year) from the date of purchase. Please note that if the machine is used commercially the guarantee period is 90 days from the date of purchase. If you experience any problem with your Mountfield lawnmower please call our technical helpline on 0800 121 6585 and our operators will endeavour to solve your problem. In the event your problem cannot be resolved over the phone the operator will refer you to one of our local authorised service centres.
This guarantee is subject to the following terms;
- This guarantee is not transferable. An original proof of purchase will be required in the event of a claim.
- The product must be serviced at the recommended intervals by an authorised service centre. A service schedule should be kept including invoicing and receipts. Please phone 0800 121 6585 to locate your nearest Mountfield service centre or visit www.servicelink.org.uk. Service procedures (for example carb cleaning, draining engine oil, blade sharpening, belt and cable adjustment) and consumable parts that require periodic replacement (for example the spark plug, air filter and oil) are not covered under this guarantee. This also applies to parts subject to fair wear and tear (for example wheels, bearings, starter cord, cables, belts and blade).
• Delivery and collection of the machine is your responsibility and not covered under this guarantee. - The guarantee does not cover any breakages or damage that are a result of the following; misuse, alteration, improper assembly or adjustment, neglect or accident.
• Expenses and costs incurred from loss of utility will not be compensated.
• The guarantee does not cover machines that are transported outside of the UK & Eire. - Where a mower is fitted with an engine not manufactured by Mountfield, the engine manufacturer guarantees the engine.
This guarantee is in addition to and does not detract from your contractual rights under statute or common law.
On delivery of your new Mountfield mower, we suggest that you complete the box to the right.
The information for your machine is on the serial number label, which is fixed on the cutter deck at the base of the handles. You will be asked for these details if you have any problems or require spare parts.
Please keep your receipt, proof of purchase will be required in the event of a claim.

Service Record
1st Service 2nd Service
Date of service ....
Next service due ....
Dealer's Signature ....
Dealer's Stamp:
Date of service ....
Next service due ....
Dealer's Signature ....
Dealer's Stamp:
- PLEASE READ THESE INSTRUCTIONS BEFORE USING YOUR MOWER
- MOUNTFIELD
- OPERATING INSTRUCTIONS
- EN ENGLISH (ORIGINAL INSTRUCTIONS)
- NEVER TIP THE MOWER ON ITS SIDE AS THIS WILL FLOOD THE AIR FILTER WITH OIL
- SAFETY PRECAUTIONS
- DESCRIPTION OF SYMBOLS ON CONTROLS (WHERE APPLICABLE)
- TRAINING
- PREPARATION
- OPERATION
- MAINTENANCE AND STORAGE
- TRANSPORTATION AND HANDLING
- HOW TO GET MOWING
- HANDLE ASSEMBLY
- GRASS COLLECTOR
- STARTING YOUR MOWER
- READ AND UNDERSTAND THE SAFETY PRECAUTIONS BEFORE USING YOUR MOWER
- THE ENGINE WILL NOT START, OR CONTINUE TO RUN, UNLESS THE OPC LEVER IS HELD AGAINST THE HANDLE
- STOPPING YOUR MOWER
- ADJUSTING THE HEIGHT OF CUT
- BEFORE EACH USE
- MAINTENANCE
- STOP THE ENGINE AND DISCONNECT THE SPARK PLUG LEAD BEFORE WORKING ON THE MACHINE
- CUTTER BLADE
- CLUTCH CABLE ADJUSTMENT
- ENGINE
- STORAGE
- AFTER EACH USE
- SERVICE LINK
- CERTIFICATE OF CONFORMITY
- SERVICE RECORD
Brand : MOUNTFIELD
Model : SP42H
Category : Lawn mower