VRTSL150 - Juicer ElectriQ - Free user manual and instructions
Find the device manual for free VRTSL150 ElectriQ in PDF.


| Product Type | Slow Masticating Vertical Juicer |
| Brand | ElectriQ |
| Model | VRTSL150 |
| Power Input | 150 W |
| Motor Speed | 55 RPM |
| Voltage | 220-240 V |
| Frequency | 50/60 Hz |
| Juicing Method | Cold Press (Masticating) |
| Number of Juicing Screens | 2 (Fine and Coarse) |
| Self-Cleaning Blade | Yes |
| Smart Mixer System | Yes |
| Safety Lock | Yes (Interlock) |
| Reverse Function | Yes |
| Material (Food Contact) | BPA-Free Plastic, Super Strong H9 Plastic |
| Dishwasher Safe Parts | Yes (Top Rack) |
| Maximum Continuous Run Time | 20-25 Minutes |
| Dimensions (Approx.) | 40 x 25 x 30 cm (Height x Width x Depth) |
| Weight (Approx.) | 4.5 kg |
| Warranty | 2 Years (Standard) |
| Application | Fruits, Vegetables, Leafy Greens, Nut Milks |
Frequently Asked Questions - VRTSL150 ElectriQ
User questions about VRTSL150 ElectriQ
0 question about this device. Answer the ones you know or ask your own.
Ask a new question about this device
Download the instructions for your Juicer in PDF format for free! Find your manual VRTSL150 - ElectriQ and take your electronic device back in hand. On this page are published all the documents necessary for the use of your device. VRTSL150 by ElectriQ.
USER MANUAL VRTSL150 ElectriQ
natural_image
Line drawing of a modern kitchen brush unit with three different designs (no text or labels)Thank you for choosing ElectriQ.
Please read this user manual before using this slow juicer and keep it safe for future reference.
Visit our page www.electrlQ.co.uk for our entire range of Intelligent Electricals
Contents
Features 3
Safety Instructions 4
Package content and parts 5
%assembly and Operation 6
Fruits and Vegetables Nutrition Tables 12
Cleaning and maintenance 15
Troubleshooting 17
Recipes 18
FEATURES
ElectrIQ VRTSL158 slow juicer and smoothie maker
Cold press juicer with high juice extraction
Low gear speed at only 55 RPM
High juice yield and less waste
Fine and coarse juicing screens
Self-cleaning blade
Smart mixer system
Quiet and energy efficient
Easy to assemble and store
Healthier juice
Large juice and pulp containers
ElectriQ extracts more juice, preserves nutrients, taste and colours while producing healthier juice
ElectrIQ slow masticating vertical juicer VRTSL158 juices fruits, vegetables, grasses, leafy greens or creates delicious nut milks with minimal effort.
Features a 158 watt energy powerful motor that spins at only 55 RPM ensuring fruits and vegetables are mechanically pressed without adding friction heat, preventing juice oxidation while retaining maximum nutrients.
Vertical modern space saving design
Low noise due to slow pressing system
Includes as standard two juicing screens catering for smooth juice lovers or pulp and fiber fanatics. Self-cleaning blade allows cleaning the unit between juicing different ingredients without disassembly.
Smart juice mixer allowing to blend few fruits seamlessly
BP% Free Plastic
Super strong H9 plastic auger and juicing screens
Easy to clean and dishwasher safe
Note: 9ue to continuous product development, products may not exactly correspond to the illustrations in this manual.
SAFETY INSTRUCTIONS
Important
- Carefully read the instructions before operating the unit
- This appliance is for indoor use only.
- Rating: This unit must be only connected to a 220-240 V / 50 Hz earthed outlet. Always check the rating label against your electrical supply.
- If you are in any doubt about the suitability of your electrical supply have it checked and, if necessary, retested by a qualified electrician.
- This juicer has been tested and is safe to use. However, as with any electrical appliances - use it with care.
- Disconnect the power plug from socket before dismantling, assembling or cleaning.
- Do not clean the unit by spraying it or immersing it in water.
- Never operate this appliance if the cord or plug is damaged. Ensure the power cord is not stretched or exposed to sharp object/edges.
- Do not pull the mains cable to disconnect the mains plug from the mains.
- Do not use the appliance if any part or any accessory is damaged or defective.
- A damaged supply cord or plug should be replaced by the manufacturer or a qualified electrician in order to avoid a hazard.
- Avoid touching any moving parts of the appliance.
- Never insert fingers, or any other objects apart from the food pusher though the feeder
- This appliance is not intended for use by persons (including children) with reduced physical, sensory or mental capabilities. It is also not intended for use by those with a lack of experience and knowledge, unless they have been given supervision or instruction concerning the use of the appliance by a person responsible for their safety.
- Do not leave children unsupervised with this appliance. - Any service other than regular cleaning should be only performed by an authorized service representative. Failure to comply could result in a voided warranty.
- Do not use the appliance for any other purposes than its intended use.
- Always place the unit on a dry and stable surface. Do not shake while is in use.
- Do not use the appliance in places with high humidity (>80%RH)
- Do not immerse the appliance in water or other liquids. If the appliance is immersed in water or other liquids by mistake, do not touch the appliance with your hands. Immediately remove the mains plug from the wall socket. If the appliance is immersed in water or other liquids, discard it.
Unit Safety Protection and Performance Tips
- Make sure the unit is correctly assembled and the safety locks engaged
- Do not run the juicer empty
- When juicing take regular breaks to avoid motor overheating, do not run for more than 30 minutes continuously
- Fruits and vegetables must be sliced to prevent overloading the motor. Root vegetables such as carrots must be cut in strips less than 2cm in diameters
• Always clean the juicer immediately after use.
PACKAGE CONTENTS
1x Cold Press Juicer with 2 juicing screens
1x User Manual
1x Juice Tank
1x Pulp Tank
1x Cleaning Brush
%ccount for all parts before disposing packing. Safely dispose of all plastic bags and other packaging components. They may be potentially dangerous to children.
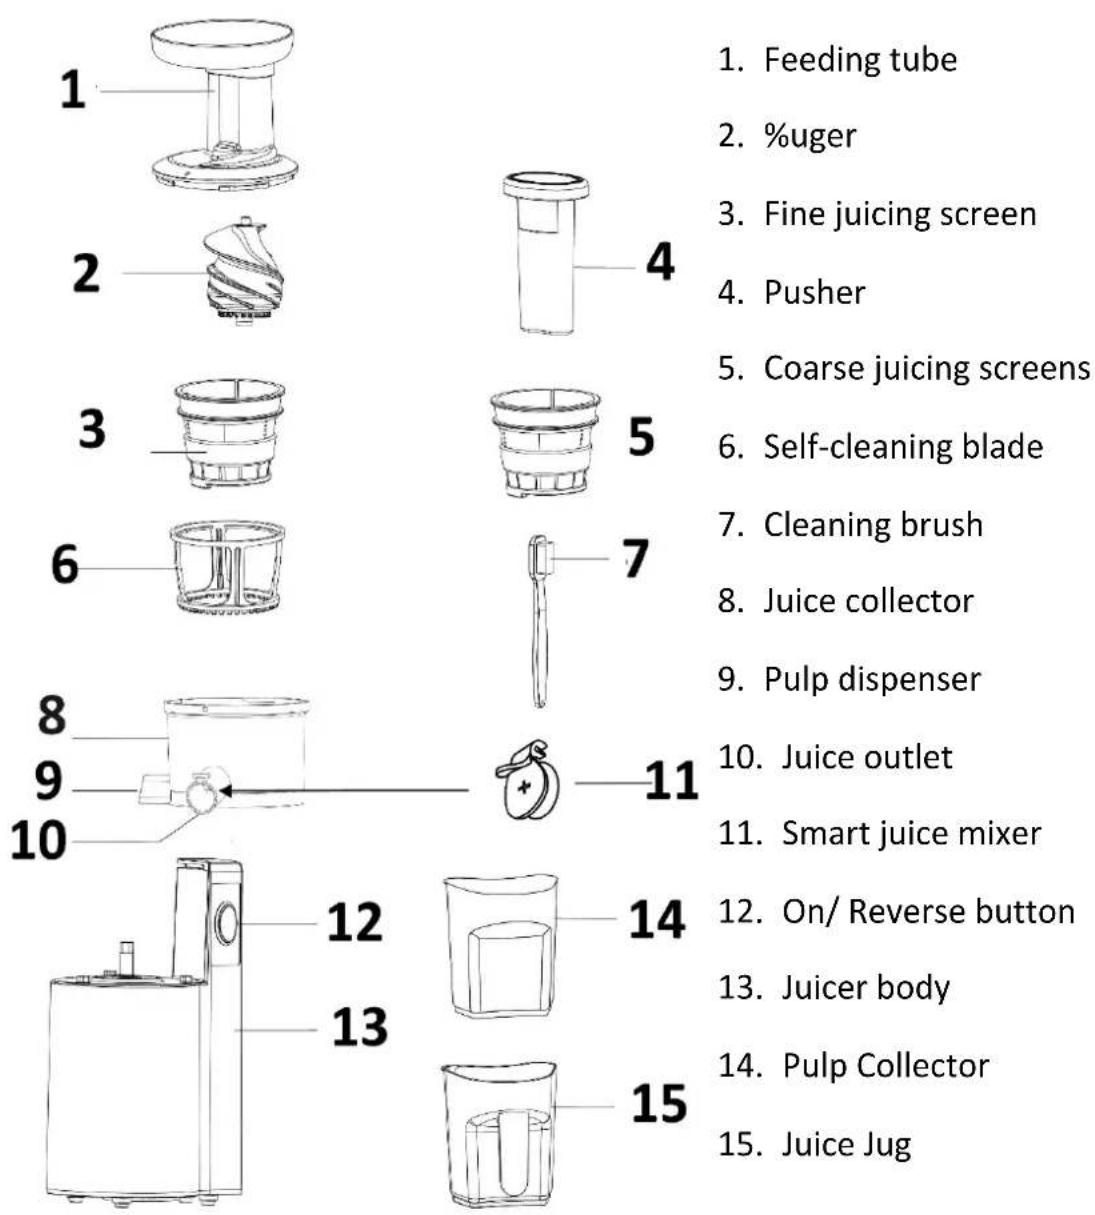
Quick Reference Guide
- Feeding tube
- %uger
- Fine juicing screen
- Pusher
- Coarse juicing screens
- Self-cleaning blade
- Cleaning brush
- Juice collector
- Pulp dispenser
- Juice outlet
- Smart juice mixer
- On/ Reverse button
- Juicer body
- Pulp Collector
- Juice Jug
Initial use
Preparation
- Clean the appliance and accessories before first use
- Wash the juicing bowl, juicing screens, auger, pusher, juice cup and pulp cup in warm soapy water with a soft cloth or nylon brush. Rinse and dry thoroughly. %Iso refer to the section "Cleaning and maintenance"
Assembly and Operation
Before assembly or disassembly, switch off the appliance, remove the mains plug from the wall socket and wait until the appliance has cooled down.
This appliance has a built-in safety lock; this feature ensures that you can only switch on the appliance if you have assembled the juicer correctly on the motor unit. When assembled correctly, the built-in safety lock will be unlocked.
Assembling the Juicer
Before you assemble the juicer, ensure that the power cord is unplugged.
- Place the motor base on a flat dry surface such as a countertop.
- Underneath the juice bowl is the pulp extraction silicon, which is used to remove the pulp from the spout of the juicing bowl. Ensure that the silicon is firmly inserted into the whole otherwise the juicer will not function properly.
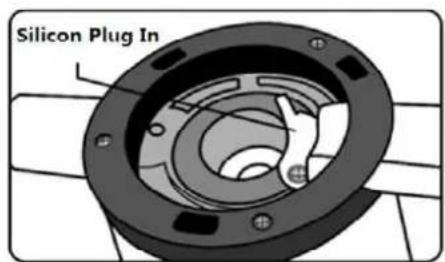
OK O
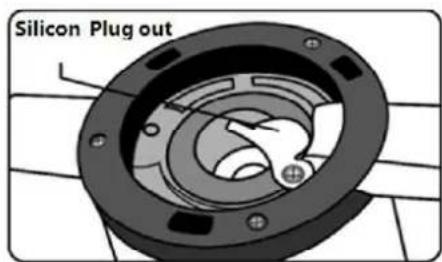
NOT OK

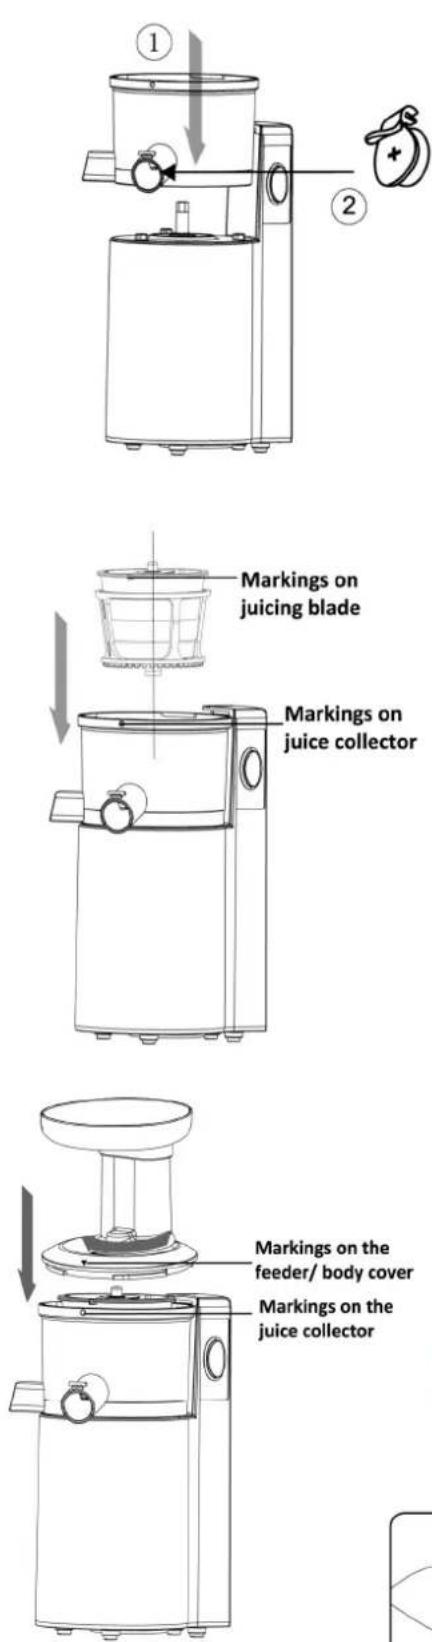
- While power is still disconnected place the juice collector on the top of the motor base. Make sure the 3 holes at the bottom of the collector are aligned than rotate in a clockwise direction until it locks into position
- Install the smart mixer by clicking it on the juice outlet
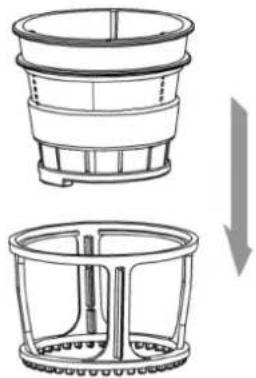
- Select your favourite juicing screen and insert it in the cleaning blade
- Place the assembled parts into the juicer collector
- Note that the triangle mark on the juicing blade (strainer) needs to align with the triangle mark on the juice collector. Ensure that the strainer is completely pushed down.
- Place the %uger into the strainer. Ensure that the %uger is in position by pressing down on it, and feeling the auger clicks into place.
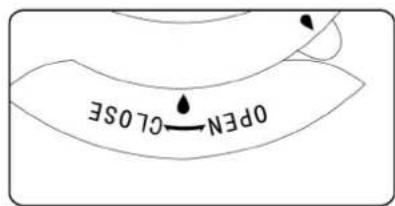
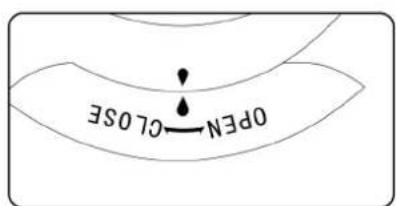
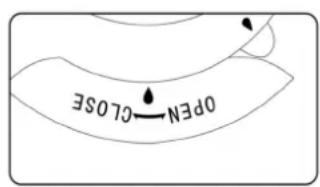
- Place the assembled feeder/ body cover onto the juice collector. %lign the mark on the cover with the mark on the juice collector bowl and turn it clockwise to the locked status. It should click into position as in the pictures bellow.
natural_image
Technical line drawing of a mechanical component with a downward arrow indicating transformation (no text or symbols)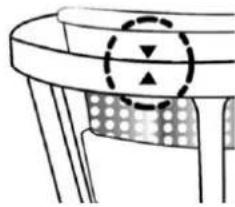
natural_image
Simple line drawing of a chair with a circular arrow and patterned seat (no text or symbols)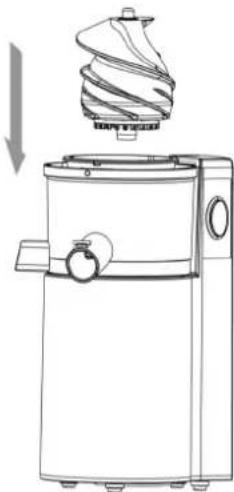
natural_image
Line drawing of a kitchen appliance with a spiral-shaped lid and handle (no text or symbols)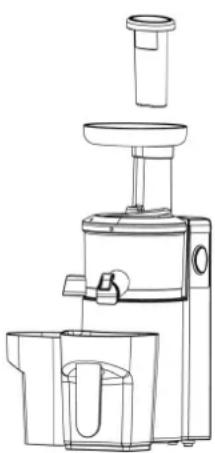
natural_image
Line drawing of a multi-stage juice maker with no text or symbols- Place the pulp cup so it fits in position on the left hand side of the juicer's main body. Place the juice jug under the juice outlet. Slide the food pusher down the feeder. The pusher can only fit one way. You are ready to juice now.
IMPORTANT: If the Juice bowl and lid cover are not correctly assembled, the juicer will not operate. This is a safety feature. Please follow the step by step procedure above to make sure the juicer operates correctly.
Using your Juicer
- Clean fruit and vegetables thoroughly, ready for juicing.
- If juicing fruit with stones or hard seeds, pit the fruit. Remove any hard inedible skins, i.e. skin of melons, pineapples and mangoes prior to juicing.
- If citrus fruits are being used, remove the skin prior to juicing.
- If pieces of fruit or vegetables are very large, chop them to a size that will fit down the juicer's feeder. Cut hard vegetable as carrots in long slim stripe.
- Fibrous fruits or vegetables must be cut in small pieces. Remove pineapple core before juicing and mix with soft fruits.
- Ensure the juicer is locked in position.
- Press the power switch to On to start juicing.
- Press the food pusher slowly down until all fruit or vegetables have gone through the juicer.
- Do not press the food pusher rapidly as the juicer will not be as effective.
-
The juice from the fruit and/or vegetables will flow directly into the juice collector and the pulp will be collected in the pulp bin.
-
Use the smart juice mixer to get the best juice mixing results when using several fruits. 90 not forget to open the juicer mixer cap before the juice collector bowl is full to avoid spillage.
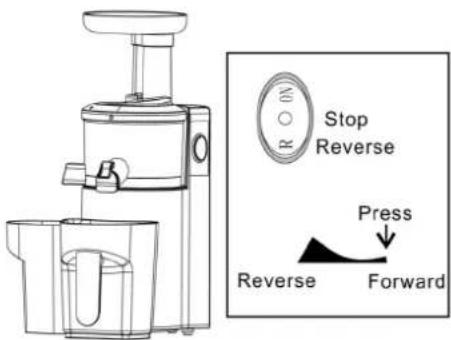
- If the juicer stops suddenly during the operation, return the button to middle position, than after few seconds press reverse. This will detach and push upwards the pulp trapped in-between auger and cleaning blade.
Repeat the operation 2-3 times until the juicer is working normal. Keep the juicer top in place with your hand while doing this. If simple reverse does not work disassemble the unit and clean the juice collecting bowl, strainer and cleaning blade.
- When juicing is complete, ensure that the juicer's control button is set to the middle OFF position, the power is turned off at the outlet and the juicer can be unplugged. It is now safe to disassemble the unit.
- If the Juice collector is stuck and does not detach easily from the base; plug in and press the reverse button "R" for 3-5 seconds. Repeat this process 2-3 times. Then push the bowl upward while turning.
- The juicer is equipped with a self-cleaning blade that insures continuous juicing operation.
②
CAUTION: do not put your hand or any other object in the feeder during operation.
Disassemble your juicer
Ensure the juicer is turned off and the power cord is unplugged from the power outlet. Reverse the assembly operation.
natural_image
Line drawing of a juice processing machine with a side view showing internal components (no text or symbols)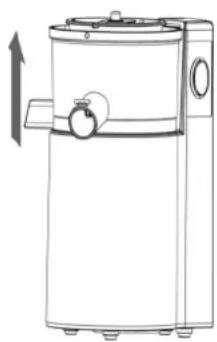
natural_image
Line drawing of a portable refrigerator with a side panel and upward arrow indicator (no text or symbols)③
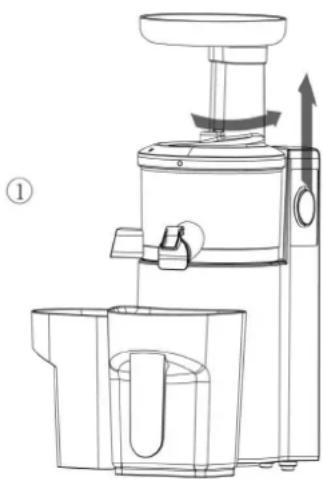
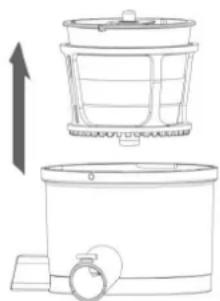
- Remove the juice collector lid by turning it to the open position (anti-clockwise).
- Lid will click out of the locked position
- Turn the juice collector anti-clockwise
- Remover the assembled juicing screen and self-cleaning blade
natural_image
Line drawing of a two-tiered kitchen appliance with an upward arrow indicating growth (no text or symbols)④
natural_image
Exploded view diagram of a mechanical device showing internal components and assembly (no text or labels)-
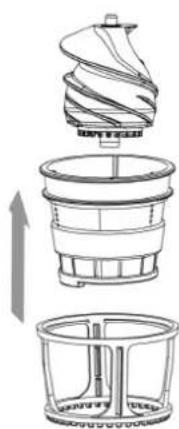
Remove the auger, the juicing screen, the cleaning blade.
-
The juice collector, auger, strainer (juicing blade) and cleaning blade can also be removed together. Grip the juice bowl and turn it to the open position (anti-clockwise) slightly, it will click out of position. The juicing bowl and all the internals can now be lifted off the motor base for cleaning.
Switching On / Off
Turn the power button to ON position. The juicer will start cold pressing your fruits, vegetables or leafy greens. The slow juicer is quiet and the auger rotates to around 55 RPM (the slower the better). You can use Reverse setting on the button if the auger gets blocked.
Notes:
9o not leave the juicer switched on continuously for more than 28-25 minutes - If the appliance stops working, possibly due to its thermal protection system, switch off the appliance and allow it to cool down for 28-38 minutes before switching it on again.
Juicing
Cut food items into pieces for optimal extraction. 9o not place grains, ice or frozen fruit into the juicer. 9o not push the food down with excessive force. The pusher is designed to gently push food down the feeder if food becomes stuck. Insert ingredients at a regular speed, allowing all the pulp to be extracted. For maximum efficiency, do not rush this process.
When juicing leafy greens or wheat grass, it is suggested that you mix it with fruits or other hard vegetables for optimal results. Soak nuts in water for minimum 18 hours
before making nut milk and add plenty of extra water. Use a strainer to filter nut milk to achieve smooth texture. Check the recipes at the end of the operating instructions for ideas.
The juice from fresh fruit and vegetables is high in nutritional content and an important part of a balanced diet. When selecting fruit and vegetables for juicing, always select fresh and well ripened specimens. Ripened and fresh fruit and vegetables carry more flavor and juice than those that are not properly ripened. Cold fruits or vegetables produce a better juice. Juice is best consumed when freshly made as this is when its vitamin and mineral content is highest. Cold pressed juice will keep better than normal centrifuged juice. 9epending on the fruits used you can refrigerate the juice for a maximum 24 hours. Your juicer can handle most varieties of fruit and vegetables. If using fruit with hard, inedible skin (i.e. watermelons, pineapple, mangoes etc.) always peel the skin before placing in the juicer. The skin of citrus fruit should also be removed before fruit is placed in the juicer. For better tasting citrus juice, also remove the inner white peel from bitter fruit like grapefruit. Fruits with stones or hard seeds (i.e. mangoes, nectarines, apricots, and cherries) should be pitted before juicing. % small amount of lemon can be added to apple juice to prevent the juice browning.
The juicer is not suitable for juicing very hard and starchy fruits or vegetables such as sugar cane. When juicing fruit and vegetables of different consistency it may help to juice different combinations, i.e. juice soft fruit first, (i.e. oranges) then follow with hard fruit (i.e. apples). This will help you achieve maximum juice extraction. If juicing herbs or leafy vegetables, wrap them together to form a bundle before placing in the juicer or combine them with other ingredients. Use the coarse juicing screen if you like a rawer juice with more fiber.
NOTES:
- The juicer will only function correctly if all parts have been assembled correctly.
- 9o not insert hands or other objects into the feeding tube to press food ingredients.
%lways use the provided pusher. 9o not exert too much pressure on the pusher. - Only operate the appliance when the pulp jug is placed under the pulp outlet.
Regularly empty the pulp jug when processing larger quantities of fruit or vegetables. Empty the pulp jug when it is full.
- Only operate the appliance when the juice jug is placed under the juice outlet.
Regularly empty the juice jug when processing larger quantities of fruit or vegetables. Empty the juice jug when it is full.
Refer to the following tables for the nutritional values of a wide range of fruits and vegetables.
Vegetables
Nutrition Facts
Raw, edible weight portion. Percent Daily Values (%DV) are based on a 2,000 calorie diet.
| Vegetables Serving Size (gram weight/ ounce weight) | Calories | Calories from Fat | Total Fat | Sodium Potassium | Total | Carbo-hydrate | Dietary Fiber | Sugars | Protein Vitamin A | Vitamin C | Calcium Iron | |||||||||
| (g) | %DV) | (mg) | (%DV) | (mg) | (%DV) | (g) | (%DV) | (g) | (%DV) | (g) | (g) | (%DV) | (%DV) | (%DV) | (%DV) | |||||
| Asparagus 5 spears (93 g/3.3 oz) | 20 | 0 | 0 | 0 | 0 | 0 | 230 | 7 | 4 | 1 | 2 | 8 | 2 | 2 | 10 | 15 | 2 | 2 | ||
| Bell Pepper 1 medium (148 g/5.3 oz) | 25 | 0 | 0 | 0 | 40 | 2 | 220 | 6 | 6 | 2 | 2 | 8 | 4 | 1 | 4 | 190 | 2 | 4 | ||
| Broccoli 1 medium stalk (148 g/5.3 oz) | 45 0 | 0.5 1 | 80 3 | 460 | 13 | 8 | 3 | 3 | 12 | 2 | 4 | 6 | 220 | 6 | 6 | |||||
| Carrot 1 carrot, 7" long, 1 1/4" diameter (78 g/2.8 oz) | 30 | 0 | 0 | 0 | 60 | 3 | 250 | 7 | 7 | 2 | 2 | 8 | 5 | 1 | 110 | 10 | 2 | 2 | ||
| Cauliflower 1/6 medium head (99 g/3.5 oz) | 25 | 0 | 0 | 0 | 30 | 1 | 270 | 8 | 5 | 2 | 2 | 8 | 2 | 2 | 0 | 100 | 2 | 2 | ||
| Celery 2 medium stalks (110 g/3.9 oz) | 15 0 | 0 | 0 | 115 | 5 | 260 | 7 | 4 | 1 | 2 | 8 | 2 | 0 | 10 | 15 | 4 | 2 | |||
| Cucumber 1/3 medium (99 g/3.5 oz) | 10 | 0 | 0 | 0 | 0 | 0 | 140 | 4 | 2 | 1 | 1 | 4 | 1 | 1 | 4 | 10 | 2 | 2 | ||
| Green (Snap) Beans 3/4 cup cut (83 g/3.0 oz) | 20 | 0 | 0 | 0 | 0 | 0 | 200 | 6 | 5 | 2 | 3 | 12 | 2 | 1 | 4 | 10 | 4 | 2 | ||
| Green Cabbage 1/12 medium head (84 g/3.0 oz) | 25 | 0 | 0 | 0 | 20 | 1 | 190 | 5 | 5 | 2 | 2 | 8 | 3 | 1 | 0 | 70 | 4 | 2 | ||
| Green Onion 1/4 cup chopped (25 g/0.9 oz) | 10 | 0 | 0 | 0 | 10 | 0 | 70 | 2 | 2 | 1 | 1 | 4 | 1 | 0 | 2 | 8 | 2 | 2 | ||
| Iceberg Lettuce 1/6 medium head (89 g/3.2 oz) | 10 | 0 | 0 | 0 | 10 | 0 | 125 | 4 | 2 | 1 | 1 | 4 | 2 | 1 | 6 | 6 | 2 | 2 | ||
| Leaf Lettuce 1 1/2 cups | 15 | 0 | 0 | 0 | 35 | 1 | 170 | 5 | 2 | 1 | 1 | 4 | 1 | 1 | 130 | 6 | 2 | 4 | ||
| shredded(85 g/3.0 oz) | |||||||||||||||||||
| Mushrooms5 medium(84 g/3.0 oz) | 20 0 0 0 | 15 0 | 300 | 9 3 1 | 1 4 | 0 3 0 2 | 0 2 | ||||||||||||
| Onion1 medium(148 g/5.3 oz) | 45 0 0 0 | 5 0 | 190 | 5 11 | 4 3 1 | 2 9 1 0 | 20 | 4 4 | |||||||||||
| Potato1 medium(148 g/5.3 oz) | 110 0 0 | 0 0 0 | 620 | 18 26 | 9 2 | 8 1 3 0 | 45 | 2 | 6 | ||||||||||
| Radishes7 radishes(85 g/3.0 oz) | 10 0 0 0 | 55 2 | 190 | 5 3 1 | 1 4 | 2 0 0 3 | 0 2 | 2 | |||||||||||
| SummerSquash1/2 medium(98 g/3.5 oz) | 20 0 0 0 | 0 0 | 260 | 7 4 1 | 2 8 | 2 1 6 3 | 0 2 | 2 | |||||||||||
| Sweet Cornkernels from 1medium ear(90 g/3.2 oz) | 90 20 2.5 | 4 0 | 0 250 | 7 18 | 6 2 8 | 5 4 2 | 10 0 | 2 | |||||||||||
| Sweet Potato1 medium, 5"long, 2"diameter(130 g/4.6 oz) | 100 0 0 | 0 70 | 3 440 | 13 23 | 8 4 | 16 7 2 | 120 | 30 4 | 4 | ||||||||||
| Tomato1 medium(148 g/5.3 oz) | 25 0 0 0 | 20 1 | 340 | 10 5 | 2 1 4 | 3 1 20 | 40 | 2 | 4 |
Most vegetables provide negligible amounts of saturated fat, trans fat, and cholesterol.
Fruits
Nutrition Facts
Raw, edible weight portion. Percent Daily Values (%DV) are based on a 2,000 calorie diet.
| Fruits Serving Size (gram weight/ ounce weight) | Calories | Calories from Fat | Total Fat | Sodium | Potassium | Total Carbo- hydrate | Dietary Fiber | Sugars | Protein | Vita min A | Vita min C | Calcium | Iron | |||||
| (g) | (%D V) | (mg) | (%D V) | (mg) | (%D V) | (g) | (%D V) | (g) | (%D V) | (g) | (g) | (%DV ) | (%DV ) | (%DV ) | (%DV) | |||
| Apple 1 large (242 g/8 oz) | 130 | 0 | 0 | 0 | 0 | 0 | 260 | 7 | 34 | 11 | 5 | 20 | 25 | 1 | 2 | 8 | 2 | 2 |
| Avocado California, 1/5 medium (30 g/1.1 oz) | 50 | 35 | 4.5 | 7 | 0 | 0 | 140 | 4 | 3 | 1 | 1 | 4 | 0 | 1 | 0 | 4 | 0 | 2 |
| Banana 1 medium (126 g/4.5 oz) | 110 | 0 | 0 | 0 | 0 | 0 | 450 | 13 | 30 | 10 | 3 | 12 | 19 | 1 | 2 | 15 | 0 | 2 |
| Cantaloupe 1/4 medium (134 g/4.8 oz) | 50 | 0 | 0 | 0 | 20 | 1 | 240 | 7 | 12 | 4 | 1 | 4 | 11 | 1 | 120 | 80 | 2 | 2 |
| Grapefruit 1/2 medium (154 g/5.5 oz) | 60 | 0 | 0 | 0 | 0 | 0 | 160 | 5 | 15 | 5 | 2 | 8 | 11 | 1 | 35 | 100 | 4 | 0 |
Grapes
3/4 cup 90 0 0 0 15 1 240 7 23 8 1 4 20 0 0 2 2 0
(126 g/4.5 oz)
Honeydew
Melon
1/10 medium 50 0 0 0 30 1 210 6 12 4 1 4 11 1 2 45 2 2
melon
(134 g/4.8 oz)
Kiwifruit
2 medium 90 10 1 2 0 0 450 13 20 7 4 16 13 1 2 240 4 2
(148 g/5.3 oz)
Lemon
1 medium 15 0 0 0 0 0 75 2 5 2 2 8 2 0 0 40 2 0
(58 g/2.1 oz)
Lime
1 medium 20 0 0 0 0 0 75 2 7 2 2 8 0 0 0 35 0 0
(67 g/2.4 oz)
Nectarine
1 medium 60 5 0.5 1 0 0 250 7 15 5 2 8 11 1 8 15 0 2
(140 g/5.0 oz)
Orange
1 medium 80 0 0 0 0 0 250 7 19 6 3 12 14 1 2 130 6 0
(154 g/5.5 oz)
Peach
1 medium 60 0 0.5 1 0 0 230 7 15 5 2 8 13 1 6 15 0 2
(147 g/5.3 oz)
Pear
1 medium 100 0 0 0 0 0 190 5 26 9 6 24 16 1 0 10 2 0
(166 g/5.9 oz)
Pineapple
2 slices,
3" diameter, 50 0 0 0 10 0 120 3 13 4 1 4 10 1 2 50 2 2
3/4" thick
(112 g/4 oz)
Plums
2 medium 70 0 0 0 0 0 230 7 19 6 2 8 16 1 8 10 0 2
(151 g/5.4 oz)
Strawberries
8 medium 50 0 0 0 0 0 170 5 11 4 2 8 8 1 0 160 2 2
(147 g/5.3 oz)
Sweet Cherries
21 cherries; 1 100 0 0 0 0 0 350 10 26 9 1 4 16 1 2 15 2 2
(140 g/5.0 oz)
Tangerine
1 medium 50 0 0 0 0 0 160 5 13 4 2 8 9 1 6 45 4 0
(109 g/3.9 oz)
Watermelon
1/18 medium melon; 2 melon; 80 0 0 0 0 0 270 8 21 7 1 4 20 1 30 25 2 4
melon;
2 cups diced
pieces
(280 g/10.0 oz)
Most fruits provide negligible amounts of saturated fat, trans fat, and cholesterol; avocados provide 0.5 g of saturated fat per ounce.
Provided by http://www.fda.gov
1leaning and maintenance
^3 he appliance must be cleaned immediately after each use. ^1 egular maintenance of your appliance will keep it safe and in proper operational order.
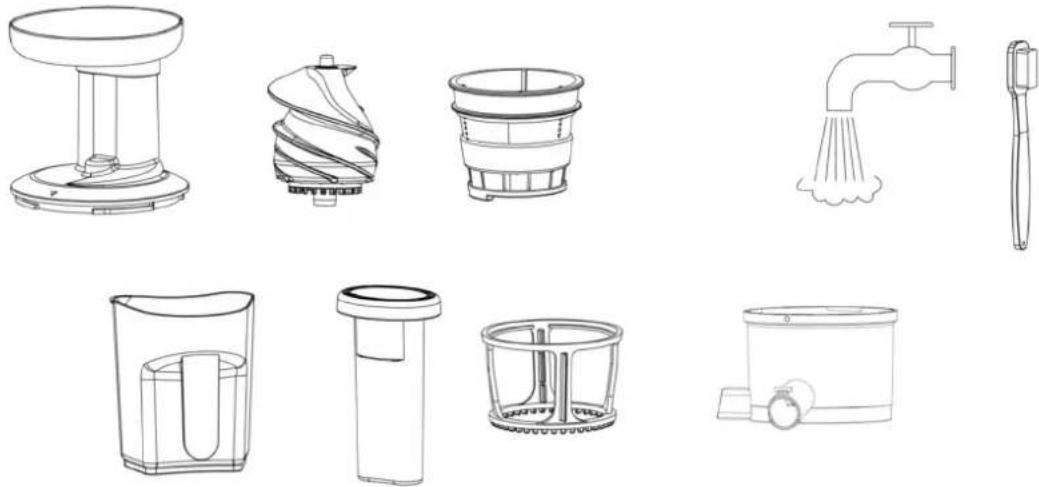
%ll the bellow parts can be cleaned using hot water under the tap or in a dishwasher top rack.
natural_image
Line drawings of various kitchen appliances including a blender, brush, and water filter (no text or labels)Notes:
Before cleaning or maintenance, switch off the appliance, remove the mains plug from the wall socket and wait until the appliance has cooled down.
- 90 not immerse the appliance in water or other liquids.
- 90 not use aggressive or abrasive cleaning agents to clean the appliance.
- 9o not use sharp objects to clean the appliance.
- 9o not sterilize any accessories with water with a temperature higher than 80^ or in the microwave to prevent deformation or damage. ^3he materials of all parts that come into contact with food must be clean and hygienic.
• 1regularly check the appliance for possible damage and stop using it if any damage.
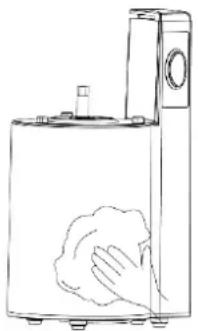
- Clean the outside of the appliance with a soft, damp cloth. Thoroughly dry the outside of the appliance with a clean, dry cloth.
- Clean the accessories:
• Disassemble the appliance.
- Clean the accessories in soapy water. Rinse the accessories under running water. Thoroughly dry the accessories.
- The easy way to clean the juicer is to use the self-cleaning blade provided with the juicer to wash the juicer between juicing different fruits or vegetables or before disassembly. After juicing, we recommend pouring tepid water through the juicer feeder and start the juicer with the smart mixer on for 2-3 minutes. Run this cycle for 2-3 times until the water comes clean. Empty the juice collector every time and never let it fill for more than 3/4. Should go through about 1 litre of water.
- Also use provided brush to clean the juicing screens. Simply place brush inside the juicing screen and under running water twist the brush left and right to remove the pulp from the strainer. When finished hold the screen up towards the light to ensure the fine mesh holes are not blocked. If the holes are blocked, soak the juicing screen in hot water with 10% lemon juice to loosen the blocked holes.
Tips:
If the juicing screen cannot be cleaned immediately after use, soak it in hot water. If pulp is left to dry on the screen, it may clog the fine mesh holes, thereby lessening the effectiveness of the juicer. Do not soak the strainer in bleach or any chemicals. Wash the juice bowl, auger, juicing screens, juice collector, pulp and juicing cup in warm soapy water then clean with the small nylon brush. Rinse and dry thoroughly. Discoloration of the plastic parts may occur with brightly colored fruit and vegetables. To help prevent this, wash parts immediately after use. If discoloration does occur, the plastic parts can be soaked in 10% lemon juice and water or they can be cleaned with a nonabrasive cleaner.
When not in use store your appliance and all its accessories and instruction manual in a safe and dry place.
natural_image
Line drawing of a kitchen appliance with a hand cleaning the surface (no text or symbols)Technical Specification
Voltage: 220-240V\~
Frequency: 50/60Hz
Power Input: 150 W
Speed: 55 RPM
Troubleshooting
| 3ault 1ause Troubleshooting | ||
| Not starting | Improper installation. | Reinstall the appliance following assembly instructions |
| Burnt smell coming from unit | Normal for first time use. Should disappear over the time. | Return the appliance to retailer for repair or exchange if unpleasant smell persists after repeated use. |
| The motor appears to struggle/cut out during use. | Too much food being juiced at once. Food is clogging the juicing auger. | Feed food into the feeder slower and use smaller size pieces.Turn the slow juicer to the off position and wait until juicer stops. Select the ‘Reverse’ position on the control switch until blockage is cleared. |
| Stopping during use | Excessive ingredients blocking the juicing bladeThe pusher is forced downMotor thermal control protection | Disconnect power, remove the surplus then reassemble.Use less force on pusherRestart after pausing 20-30 minutes. |
| The pulp appears to be very wet. | Large amounts of fibrous fruit and vegetables have caused excess pulp to build up in the juicing screen. | Stop juicing. Disassemble slow juicer and clean the juicing screen using the cleaning brush provided. See Disassembly and Cleaning section. When resume juicing feed food slowly into the feeder. |
| Juice comes out from the top of the juice bowl. | Too much food being juiced at once. | Feed food into the feeder slower and use smaller size pieces.Open the smart juice mixing cap. |
| Less juice is coming out from the juice outlet. | Large amounts of fibrous fruit and vegetables have caused excess pulp to build up. | Stop juicing. Disassemble slow juicer and clean the juicing screen using the cleaning brush provided. See Disassembly and Cleaning section. When resume juicing feed food slowly into the feeder. |
Note: For any other faults please contact the service centre.
Recipes
Wash all fruit and vegetables well before juicing. Only remove the skin from the fruit and vegetables when advised to do so. Cut fruit and vegetables to a size that will fit easily into the feeder of the slow juicer. Try to avoid cutting fruit and vegetables too far in advance of the actual juicing time as this will reduce the nutrient levels.
Minty Pink
Serves 2
6 mint leaves
1 celery stick, roughly chopped
1 rhubarb stick, roughly chopped
14 watermelon, skin and seeds removed
Feed the fruit and vegetables through the slow juicer in the order that they are written. Stir juice before serving.
7lue 4 You
Serves 2
1 cup blueberries or blackcurrants, fresh or frozen
1 pear
1 stick rhubarb, roughly chopped
1 kiwi
2 apples
Feed the fruit and vegetables through the slow juicer in the order that they are written.
Stir juice before serving.
Zestybeet
Serves 2
2 celery sticks, roughly chopped
1 beetroot, peeled
1 lemon
2 apples
Feed the fruit and vegetables through the slow juicer in the order that they are written. Stir juice before serving.
9azpacho (cold Spanish soup)
Serves 2 (use coarse screen)
12 red capsicum
12 green capsicum
12 cucumber peeled
1 celery stick, roughly chopped
% few springs of parsley
4 basil leaves
1 garlic clove
4 ripe tomatoes
Feed the fruit and vegetables through the slow juicer in the order that they are written. Stir before serving and garnish with extra virgin olive oil, a tbsp. of sherry vinegar and salt and freshly ground black pepper. On a hot summer day add ice cubes.
Morning 9reen
Serves 2
Few spinach leaves, roughly chopped
7 mint leaves
12 pineapple, skin removed
12 lime, 14 cup coconut water
Feed the fruit and vegetables through the slow juicer in the order that they are written.
Stir juice before serving.
Tropical Sundown
Serves 2
14 pineapple, skin removed
3 carrots, 1 beetroot
1 sliced strawberry to garnish
Feed the fruit and vegetables through the slow juicer in the order that they are written.
Stir juice before serving.
Tropical Sunrise
Serves 2
1 banana, skin removed
½ cup coconut flesh or shredded coconut
½ teaspoon cinnamon
1 pear
12 cup fresh dates
6 mint leaves
12 pineapple, skin removed
Feed the fruit and vegetables through the slow juicer in the order that they are written. Stir juice before serving.
^3/_4 sing the dry pulp from the Tropical Sunrise
Juice you can make these muffins;
Exotic Muffins
Makes 12
3 cups self-raising flour, sifted
12 cup sugar
1 egg, beaten
14 cup oil
1 ½ cups milk
1 tsp vanilla extract
%ll the pulp from the Tropical Sunrise Juice
-
Pre-heat the oven to 180^ C. Grease a 12 capacity large muffin pan.
-
In a large bowl combine the flour and sugar.
-
In a separate bowl, combine the rest of the ingredients until well blended.
-
34 sing a wooden spoon, fold the wet mix through the flour trying to combine all ingredients within 8 stirs of the wooden spoon.
-
Spoon the mix into the muffin pans to the top. Bake for 20 minutes or until done.
9inger Splash
Serves 2
4 carrots
6 brazil nuts
3cm piece ginger
1 apple
Feed the fruit and vegetables through the slow juicer in the order that they are written. Stir juice before serving.
Morning Kick
Serves 2
1 beetroot
fresh parsley
10cm piece of sweet potato
3 carrots
12 lemon
Feed the fruit and vegetables through the slow juicer in the order that they are written. Stir juice before serving.
Spicy Jump
Serves 2
1 green apple
fresh coriander
1 red chili
2 cucumbers,
1 lime
Feed the fruit and vegetables through the slow juicer in the order that they are written.
Stir juice before serving.
9reen 3uel
Serves 2
2 apples
½ cucumber
4 kale leaves, roughly chopped
1 lime
2 spinach leaves, roughly chopped
1 kiwi
Feed the fruit and vegetables through the slow juicer in the order that they are written. Stir juice before serving.
Tin Man 9reaser
Serves 2
3 carrots
fresh parsley
1 celery stalk, roughly chopped
1 tablespoon olive oil
1 stalk broccoli
4 asparagus spears
1 apple
Feed the fruit and vegetables through the slow juicer in the order that they are written. Stir juice before serving.
6igestive 3resh
Serves 2
2 apples
3 cm piece ginger
9 mint leaves
12 fennel bulb
Feed the fruit and vegetables through the slow juicer in the order that they are written.
Stir juice before serving.
7erry Merry
Serves 2
2 cups blueberries, fresh or frozen
2 kiwis
10 mint leaves
16 strawberries
Feed the fruit and vegetables through the slow juicer in the order that they are written. Stir juice before serving.
3resh Start
Serves 2
1 fennel bulb
1 pear
2 apples
2cm piece of ginger
1 celery stick, roughly chopped
1 orange, peeled
Feed the fruit and vegetables through the slow juicer in the order that they are written. Stir juice before serving.
9rape It Red
Serves 2
14 pineapple, skin removed
14 red cabbage
1½ cups red grapes
2 carrots
Feed the fruit and vegetables through the slow juicer in the order that they are written.
Stir juice before serving.
Pink Moments
Serves 2
14 pineapple, skin removed
3 plums, pitted
1 red grapefruit, peeled
Feed the fruit and vegetables through the slow juicer in the order that they are written. Stir juice before serving.
3resh 7breakfast Juice
Serves 2
3 oranges, peeled
½ Gallia melon, skin removed
2 carrots
1 lemon
Feed the fruit and vegetables through the slow juicer in the order that they are written. Stir juice before serving
6octor 8way
Serves 2
2 apples
fresh parsley
3 kale leaves, roughly chopped
1 kiwi
2 oranges, peeled
Feed the fruit and vegetables through the slow juicer in the order that they are written.
Stir juice before serving.
Lychee 9lee
Serves 2
2 pears, cut in half
14 pineapple, skin removed
8 lychees, fresh or tinned
12 lemon
Feed the fruit and vegetables through the slow juicer in the order that they are written.
Stir juice before serving.
8utumn 9arden
Serves 2
2 carrots
1cm piece ginger
1 beetroot
2 apples
Feed the fruit and vegetables through the slow juicer in the order that they are written. Stir juice before serving.
Minty 7erries
Serves 2
2 cups blueberries, fresh or frozen
2 kiwis
8 mint leaves
1 cup raspberries
1 apple
Feed the fruit and vegetables through the slow juicer in the order that they are written.
Stir juice before serving.
Use the pulp from the Minty Berry Juice to make this cheesecake
No 7ake 7erries 1heesecake
Serves 8
1 packet sweet biscuits, crushed
125g butter, melted
Filling:
250g cream cheese
395g can condensed milk
^1/3 cup fresh lemon juice
%ll the pulp from the Minty Berry Juice
-
Line a 25cm spring form cake pan with baking paper.
-
Combine the biscuits and butter and press crumb into the base of the cake pan. %allow to set in refrigerator for 1 hour.
-
In a food processor, combine all the filling ingredients and process for 2 minutes
-
Pour filling over the crumb base, spoon juice extraction pulp over the top of the cheese cake filling and using a butter knife, swirl berry mix through the cheese cake filling.
-
%allow to set in the refrigerator for 2 hours or overnight.
1hocolate and 9inger 7eetroot 1ake
Serves 10-12
2 cups self- raising flour
^3/_4 cup dark cocoa powder
2 teaspoons ground cinnamon
300g beetroot pulp
2 teaspoons grated ginger
300g unsalted butter, softened to room temperature
2 cups caster sugar
2 teaspoons vanilla extract
5 large eggs
150mls milk
Chocolate icing:
250g unsalted butter, softened to room temperature
1 cup icing sugar
100g dark chocolate, melted
-
Preheat the oven to 170^ C. Grease and line the base and sides of a 28cm spring form pan with baking paper.
-
Sift the flour, cocoa and cinnamon together. Fold through the beetroot and ginger.
-
Cream the butter, sugar and vanilla for 5 minutes, or until light and fluffy, regularly scrape down the sides of the bowl with a spatula.
-
%dd the eggs one at a time, beating thoroughly in between each egg.
-
Fold the flour and beetroot mixture into the egg mixture alternatively with the milk until well combined.
-
Pour batter into prepared cake pan. Bake for 50 to 55 minutes or until cake is firm to the touch and slightly pulling away from the sides of the pan. Cool completely before icing.
-
For the icing, beat butter until pale and fluffy; slowly add icing mixture whilst still beating. Fold through melted chocolate until well blended. Spread evenly over cake.
Maui Wowie
Serves 2
- 2 pineapple rounds
- 1 inch of ginger
• 1/4 cup of sparkling water
-
Chop up the pineapple and remove the rind from the rounds.
-
Turn the juicer on.
-
Place them in the feed tube and use the food pusher to push the pineapple through.
-
Chop up the ginger and place it in the feed tube. Use the food pusher to push the ginger through the juicer.
-
Now pour the sparkling water through the juicer, the water will help to get the juice out of the juicer. Enjoy your refreshing juice.
Veggie 6elight
Serves 2
3 inch round of wheatgrass
2 large carrots
1/2 cup alfalfa sprouts
3 celery stalks
8 spinach leaves
-
Chop up the carrots and celery stalks. Turn the juicer on.
-
Place the ingredients in the feed tube one after another and use the food pusher to push them through.
Enjoy your healthy juice.
Sunshine Juice
2 oranges
1/2 cup of raspberries
1 banana
3 fresh mint leaves
-
Peel the oranges and turn them into slices. Turn the juicer on.
-
Place the orange pieces into the feed tube and use the food pusher to push the food through the tube.
-
Place the raspberries into the feed tube and use the food pusher to push the fruit through.
-
Peel the banana and cut into slices. Place the banana slices into the feed tube and use the food pusher to push it through the juicer.
-
Put the mint leaves into the feed tube and use the food pusher to push the food through.
Enjoy a delicious morning juice.
Mean 9reen
/erves 4
6 kale leaves
1 cucumber
4 celery stalks
2 green apples
1/2 inch lemon
-
Chop up the kale leaves.
-
^3 urn the juicer on.
-
¼lace the kale into the feed tube and use the food pusher to push the kale leaves through the juicer.
- Chop up the cucumber and place in the feed tube. 34 se the food pusher to push the cucumber through the juicer.
- Chop up the celery stalks and place in the feed tube. 34 se the food pusher to push the celery through the juicer.
- /lice the apples and remove the seeds. ¼lace the apple slices in the feed tube and push through with the food pusher.
- ^1 emove the peel from the lemon. ^2 /lace the lemon piece in the feed tube and use the food pusher to push the lemon through the juicer.
Enjoy a nutritious juice.
Watermelon Punch
/erves 4
1/2 watermelon
1 lemon
5 oranges
1/2 pineapple
-
^1 emove skin from the watermelon and chop up into small pieces.
-
^3 urn the juicer on.
- ¼lace the watermelon pieces into the feed tube and use the food pusher to push through the juicer.
- ^1 emove the peel and rind from the lemon. Chop the lemon into smaller pieces and put in the feed tub. ^3/4 se the food pusher to push the lemon through the juicer.
- ¼eel the oranges and turn into slices. ¼lace the orange slices into the feed tube and use the food
pusher to push the orange through the juicer.
- Chop up and remove the peel from the pineapple. ¼ut the pineapple pieces into the feed tube and use the food pusher to push the pineapple through the juicer.
Enjoy a juice with a punch.
Raw Nuts Milk
Makes 1 litre
500g raw almonds*
750ml filtered water
Maple syrup (may use agave syrup, raw honey) ¼inch of salt (optional)
1 tsp vanilla extract (optional)
- /oak raw almonds for at least 10 hours. Best keep them in a glass jug in refrigerator.
- 9rain the water and replace with 750 ml clean filtered or bottled water
- Juice the almonds together with the water in the Electrl½ /low Juicer, making sure to input equal parts water and nuts. ¾se a ladle to feed the juicer with an equal quantity of water / nuts. ¾se the coarse blade if you want a creamier milk, or the fine blade if you want a skimmed milk.
- You can add the remaining water on the dry pulp. Vigorously mix the water and dry pulp than rejoice to extract most from the nuts
- Mix the nuts milk well then use a strainer or a cheese cloth (jam muslin cloth) to filter the remaining pulp from the milk
- ¼lace the nut milk into a glass bottle or a jug. /tir in the sweet syrup, vanilla extract and / or salt pinch to taste (optional). Mix well. Keep refrigerated and use within 3-5 working days
IMPORT8NT: You need to feed the nuts and water together otherwise water will be coming out without milking the nuts.
250 g hazelnuts / 250 g almonds makes a tasty milk
* can be replaced with hazelnuts, soya beans etc.
ElectrIQ UK SUPPORT www.ElectrIQ.co.uk/support
Please, for your own convenience, make these simple checks before calling the service line.
If the unit still fails to operate call: 0871 620 1057 or complete the online form
- Is the unit plugged into the mains?
- Is the fuse OK?
- Switch the unit off. Restart the unit.
Office hours: 9AM - 5PM Monday to Friday
www.ElectrlQ.co.uk
Unit 2, The Nursery
Berristow Lane
South Normanton
Derbyshire, DE55 2FX
- Contents
- FEATURES
- SAFETY INSTRUCTIONS
- Important
- Unit Safety Protection and Performance Tips
- PACKAGE CONTENTS
- Quick Reference Guide
- Initial use
- Preparation
- Assembly and Operation
- Assembling the Juicer
- Using your Juicer
- Disassemble your juicer
- Switching On / Off
- Notes:
- Juicing
- Refer to the following tables for the nutritional values of a wide range of fruits and vegetables.
- Grapes
- Honeydew
- Melon
- Kiwifruit
- Lemon
- Lime
- Nectarine
- Orange
- Peach
- Pear
- Pineapple
- Plums
- Strawberries
- Sweet Cherries
- Tangerine
- Watermelon
- 1leaning and maintenance
- Tips:
- Technical Specification
- Recipes
- Minty Pink
- 7lue 4 You
- Zestybeet
- 9azpacho (cold Spanish soup)
- Morning 9reen
- Tropical Sundown
- Tropical Sunrise
- Exotic Muffins
- 9inger Splash
- Morning Kick
- Spicy Jump
- 9reen 3uel
- Tin Man 9reaser
- 6igestive 3resh
- 7erry Merry
- 3resh Start
- 9rape It Red
- Pink Moments
- 3resh 7breakfast Juice
- 6octor 8way
- Lychee 9lee
- 8utumn 9arden
- Minty 7erries
- No 7ake 7erries 1heesecake
- 1hocolate and 9inger 7eetroot 1ake
- Maui Wowie
- Veggie 6elight
- Sunshine Juice
- Mean 9reen
- Watermelon Punch
- Raw Nuts Milk
- ElectrIQ UK SUPPORT www.ElectrIQ.co.uk/support
Brand : ElectriQ
Model : VRTSL150
Category : Juicer