eiQ-65UHDT2SM - Television ElectriQ - Free user manual and instructions
Find the device manual for free eiQ-65UHDT2SM ElectriQ in PDF.


| Product Type | Television |
| Brand | ElectriQ |
| Model | eiQ-65UHDT2SM |
| Screen Size | 65 inches (164 cm) |
| Resolution | 4K UHD (3840 x 2160) |
| Display Technology | LED LCD |
| Smart TV Platform | Android TV |
| Refresh Rate | 60 Hz |
| Audio Output | 2 x 10 W speakers |
| HDMI Ports | 3 |
| USB Ports | 2 |
| Wi-Fi | 802.11 b/g/n |
| Ethernet | 1 x RJ45 |
| Dimensions (W x H x D) - Without Stand | 1463 x 843 x 69 mm |
| Dimensions (W x H x D) - With Stand | 1463 x 908 x 308 mm |
| Weight - Without Stand | 21.0 kg |
| Weight - With Stand | 21.5 kg |
| Power Supply | AC 100-240V, 50/60Hz |
| Energy Efficiency Class | A |
| VESA Mounting | 400 x 200 mm |
| Cleaning Instructions | Wipe with a soft, dry cloth. Do not use liquid cleaners. |
| Warranty | 2 years |
Frequently Asked Questions - eiQ-65UHDT2SM ElectriQ
User questions about eiQ-65UHDT2SM ElectriQ
0 question about this device. Answer the ones you know or ask your own.
Ask a new question about this device
Download the instructions for your Television in PDF format for free! Find your manual eiQ-65UHDT2SM - ElectriQ and take your electronic device back in hand. On this page are published all the documents necessary for the use of your device. eiQ-65UHDT2SM by ElectriQ.
USER MANUAL eiQ-65UHDT2SM ElectriQ
49/50/55/65/75 inch UHD LED TV
natural_image
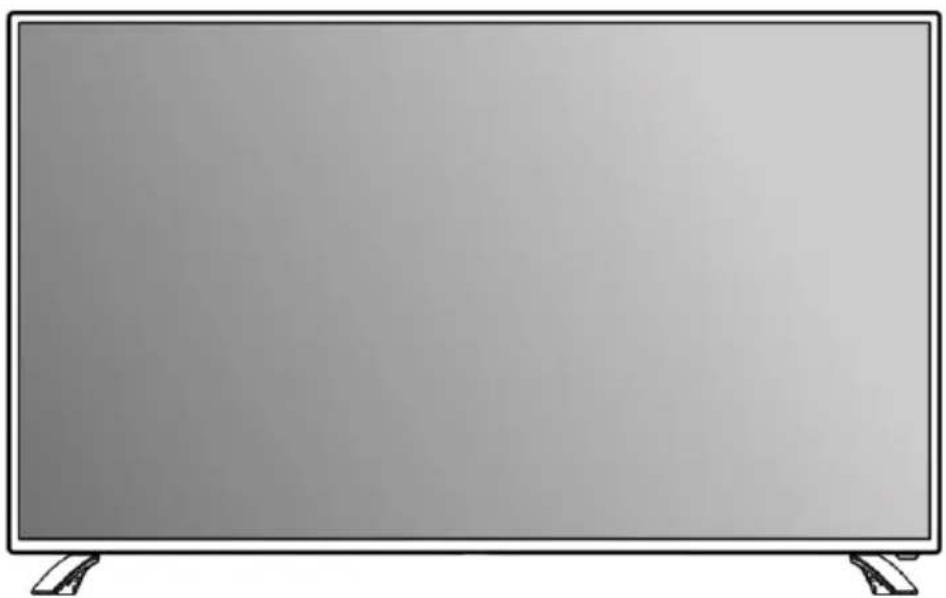
Front view of a flat-screen television displaying with no visible text or symbols on the screen.eiq-49UHDT2SM
eiq-50UHDT2SM
eiq-55UHDT2SM
eiq-65UHDT2SM
eiq-75UHDT2SM
LEDTV
CONTENTS
Safety Information 2
What is Included 4
TV Stand Installation / Removal 5
Wall Mounting 7
Getting Started 8
Input / Output Terminals 10
Connecting to External Devices 12
Remote Control 14
Settings 16
Smart TV 25
Specification 31
Support and Disposal 34
SAFETY INFORMATION
- Read these instructions – All the safety and operating instructions should be read before this product is operated.
- Keep these instructions – The safety and operating instructions should be retained for future reference.
- Heed all warnings – All warnings on the appliance and in the operating instructions should be adhered to.
- Follow all instructions – All operating and usage instructions should be followed.
- Do not use this equipment near water – The appliance should not be used near water or moisture e.g. in a wet basement or near a swimming pool.
- Clean only with a dry cloth. Do not use solvents or petroleum based fluids.
• Do not block any ventilation openings. - Do not install near any heat sources such as radiators, stoves or other apparatus (including amplifiers) that produce heat.
- Do not tamper with the supplied plug. This plug is a BS1363 standard plug.
- Protect the power cord from being walked on or pinched, particularly at the plug and at the point where they exit from the appliance.
- Only use attachments/accessories specified by the manufacturer.
- Use only with a cart, stand, tripod, bracket or table specified by the manufacturer or sold with the apparatus. When a cart or stand is used, use caution when moving it to avoid any injuries or damage from it tipping over.
- Unplug the apparatus during lightning storms or when unused for long periods of time.
- Refer all servicing to qualified personnel. Servicing is required when the apparatus has been damaged in any way, such as when the power supply cord or plug is damaged, liquid has been spilled or objects have fallen into the apparatus or it has been exposed to rain or moisture, it does not operate normally or has been dropped.
- Please keep the unit in a well ventilated environment.
• The TV set should only be connected to a mains power supply with 220-240V 50Hz - To prevent overload, do not share the same power supply socket with too many other electronic components.
- Do not place any connecting wires where they may be stepped on or tripped over.
- Do not place heavy items on the cable as this may cause damage.
-
Hold the mains plug, not the wires, when removing from a socket.
-
Pull the plug out immediately and seek professional help if the mains plug or cable is damaged, liquid has spilt onto the set, if accidentally exposed to water or moisture, if anything accidentally penetrates the ventilation slots or if the set does not work normally.
- Do not remove the safety covers. There are no user serviceable parts inside. Trying to service the unit yourself is dangerous and may invalidate the product's warranty. Only qualified personnel should service this apparatus.
- To avoid battery leakage, remove batteries from the remote control when not in use for a long period, or as soon as they become exhausted
- Do not block the ventilation slots on the back cover. The TV can be placed in a cabinet but ensure at there is at least 5cm (2") clearance all around.
- Do not tap or shake the TV screen, this may damage internal components.
- WARNING: To reduce the risk of fire or electric shock, do not expose this apparatus to rain or moisture. The apparatus shall not be exposed to dripping or splashing and objects filled with liquids, such as vases, shall not be placed on the apparatus.
- WARNING: The wall plug socket is used as a disconnection device and should remain readily accessible.
- WARNING: The batteries shall not be exposed to excessive heat such as direct sunlight or fire.
This warning sign is to warn of dangerous voltage inside the product.
CAUTION: To reduce the risk of electric shock, DO NOT remove the cover (or back). No user serviceable parts inside. Refer servicing to qualified service personnel.

This warning sign is to alert you of important Instructions accompanying the product.

This equipment is a Class II or double insulated electrical appliance. It does not require a grounded connection.
AT FULL VOLUME, PROLONGED LISTENING MAY DAMAGE THE USER'S HEARING.
WHAT IS INCLUDED
natural_image
Blank whiteboard with a gray border and no visible text, symbols, or markings.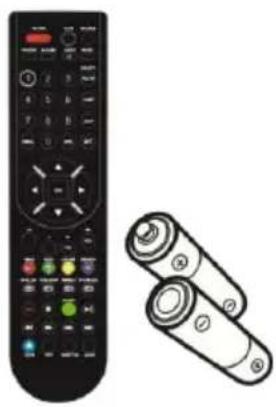
natural_image
Illustration of a remote control with two connected USB flash drives (no text or symbols visible)TV Set Remote Control (2 x AAA Batteries)
49"/50"/55"/65" Base Stand
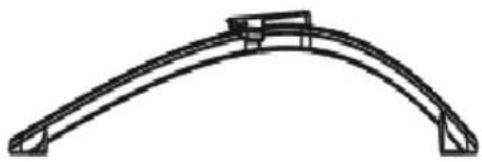
natural_image
Simple line drawing of an arched structure with two vertical supports (no text or symbols)User Manual
6 Bolts

natural_image
Six black screwdrivers arranged in two rows (no text or symbols visible)75" Base Stand
natural_image
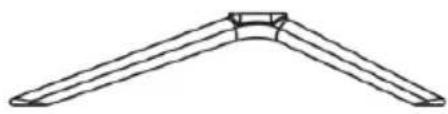
Simple line drawing of a symmetrical V-shaped object with no text or symbolsTV STAND INSTALLATION/REMOVAL
49/50 Inch (eiq-49UHDT2SM/eiq-50UHDT2SM)
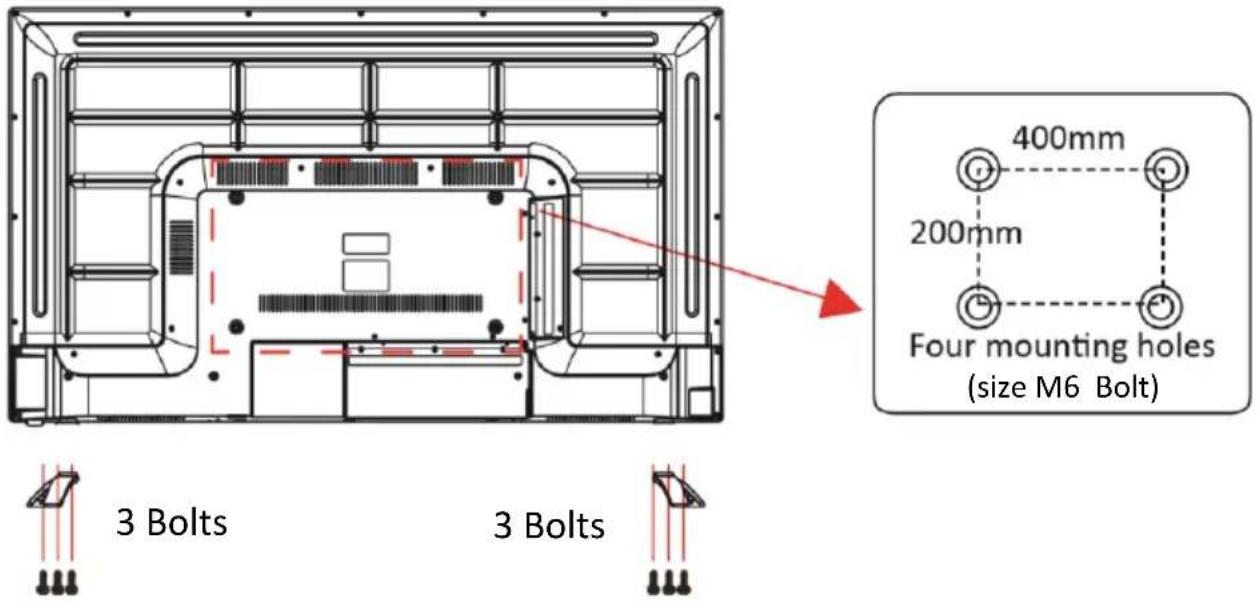
55 Inch (eiq-55UHDT2SM)
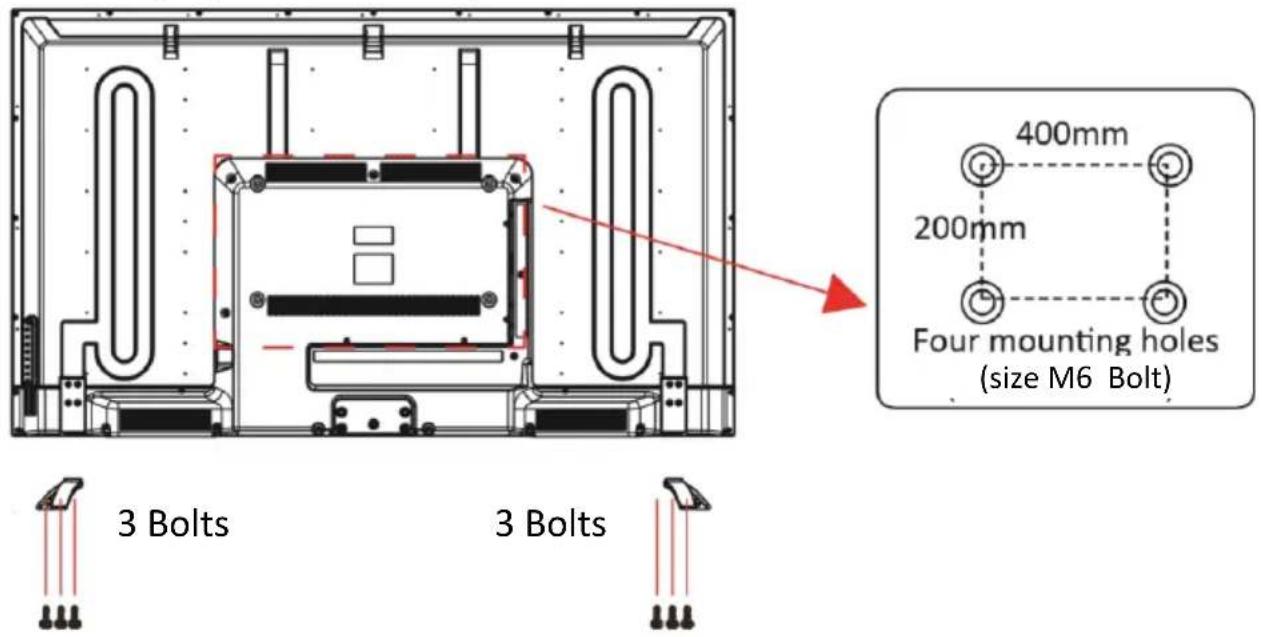
65 Inch (eiq-65UHDT2SM)
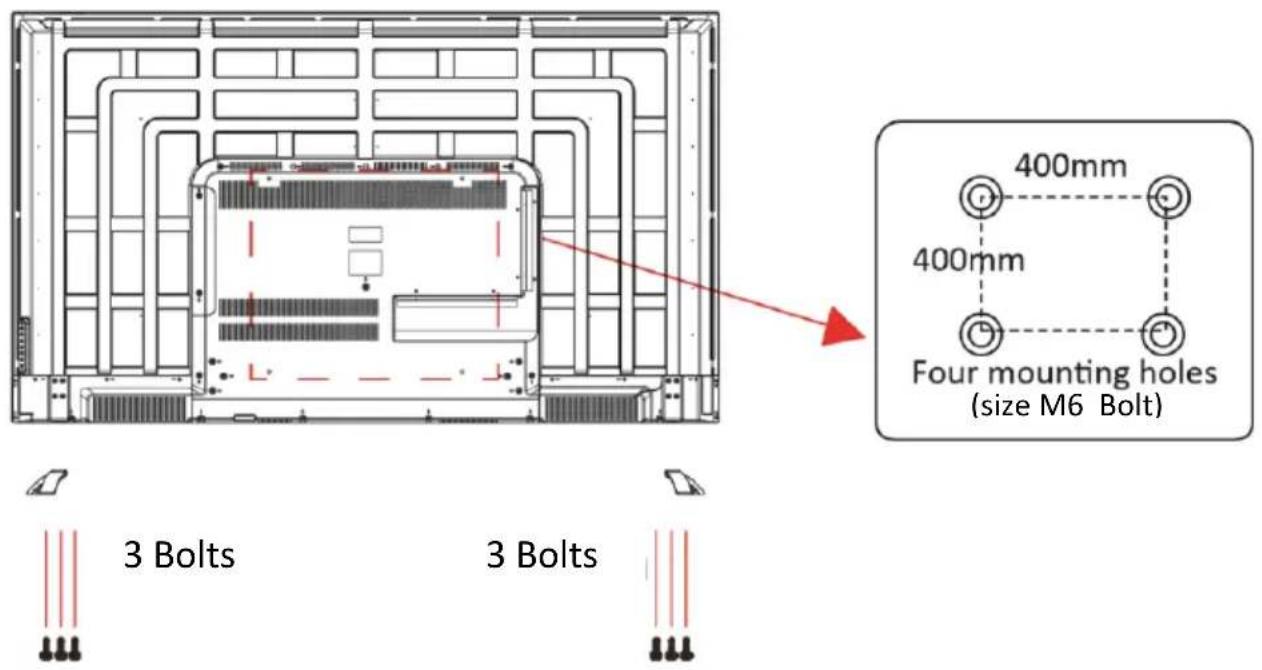
75 Inch (eiq-75UHDT2SM)
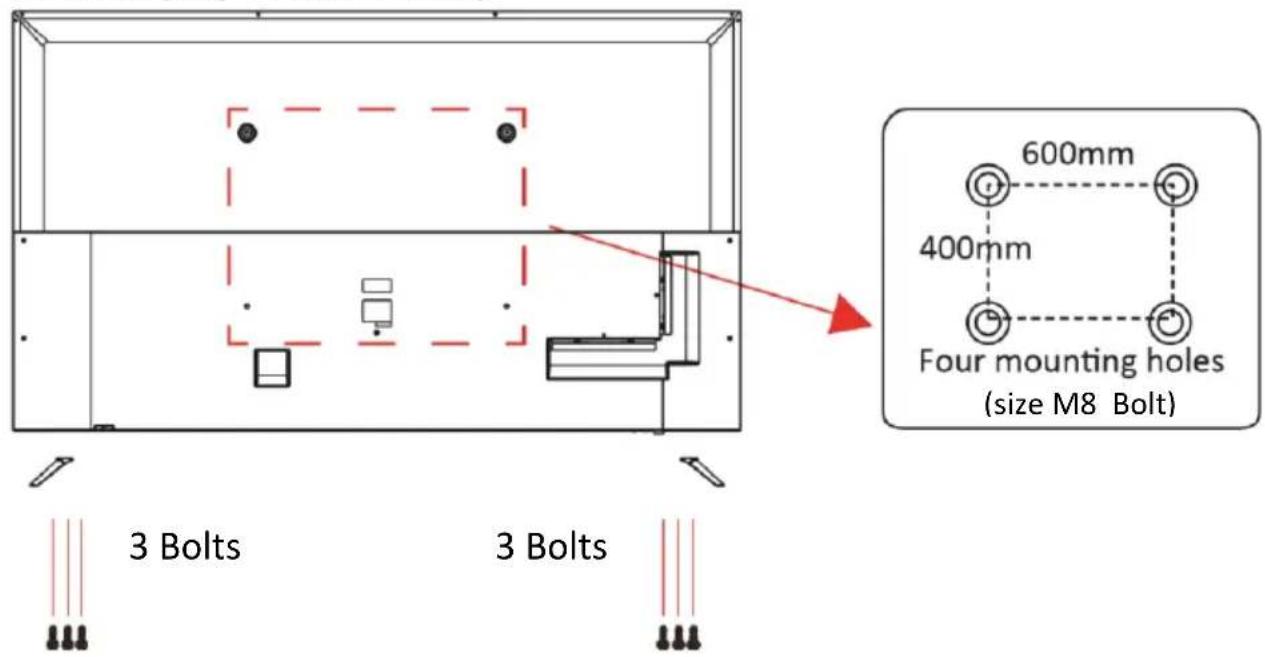
WALL MOUNTING
- The TV is provided with mounting holes for a VESA approved wall mounting bracket (not supplied).
- The VESA mounting pattern is: 49 Inch- 400x200mm and the size of the bolts is 4 x M6 x 10(not supplied). 50 Inch- 400x200mm and the size of the bolts is 4 x M6 x 10(not supplied). 55 Inch- 400x200mm and the size of the bolts is 4 x M6 x 12(not supplied). 65 Inch- 400x400mm and the size of the bolts is 4 x M6 x 20(not supplied). 75 Inch- 600x400mm and the size of the bolts is 4 x M8 x 20(not supplied).
- Do not use bolts longer than the size specified above for your model or damage will occur to the internal components.
NOTE: Do not install this product until this manual has been read and understood thoroughly. Please keep these instructions for future reference.
Due to the heavy weight and dimensions of the LCD screens and their fragile nature, we recommend that they are unpacked and assembled by 2 people and professional installers are used to wall mount them (Wall mounting is optional). If you do not understand the instructions, or are unsure how to install this product, please contact a professional for assembly advice and assistance.
Careful consideration should be made regarding the location the television is to be wall mounted as some walls are not suitable for installation. If the television is to be mounted on drywall, the mount must be anchored into a wooden stud, concrete block or brick behind the drywall. Installing on drywall alone will not support the weight of the display.
When drilling holes it is particularly important to take care of electrical cables, water or gas pipes in the wall. Please follow the instructions provided by the wall bracket manufacturer and ensure that all fixing screws supplied are used. Electriq and its distributors and dealers are not liable or responsible for damage or injury caused by improper installation, improper use or failure to observe these safety instructions. In such cases any guarantee will expire.
GETTING STARTED
BUTTON FUNCTIONS
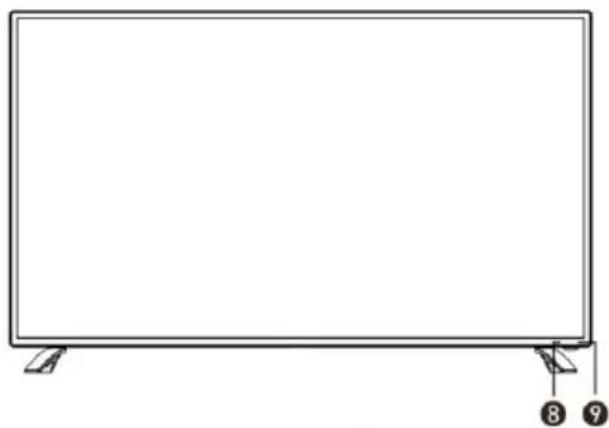
49 Inch
(eiq-49UHDT2SM / eiq-50UHDT2SM)
- POWER Button: To turn ON/OFF the TV.
- SOURCE Button: To select the input source.
- MENU Button: To enter menu setting page.
- VOL-: To decrease the volume level.
- VOL+: To increase the volume level.
- CH-: To select previous channel.
- CH+: To select next channel.
- Remote Control Sensor.
- Power Indicator: In standby mode the indicator light will display red, when the unit is switched on, the indicator light will display green.
natural_image
Front view of a flat-screen monitor with mounting feet and numbered indicators (8, 9) at the base (no text or symbols on the screen)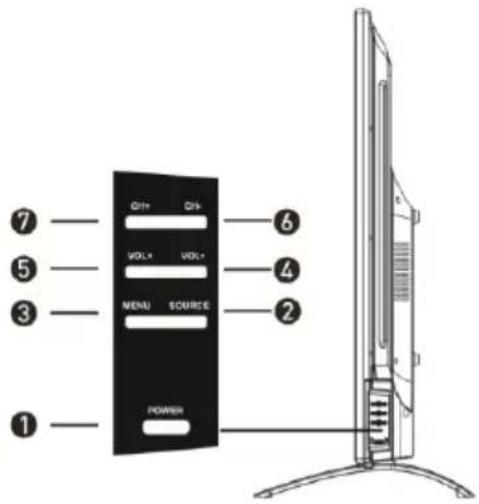
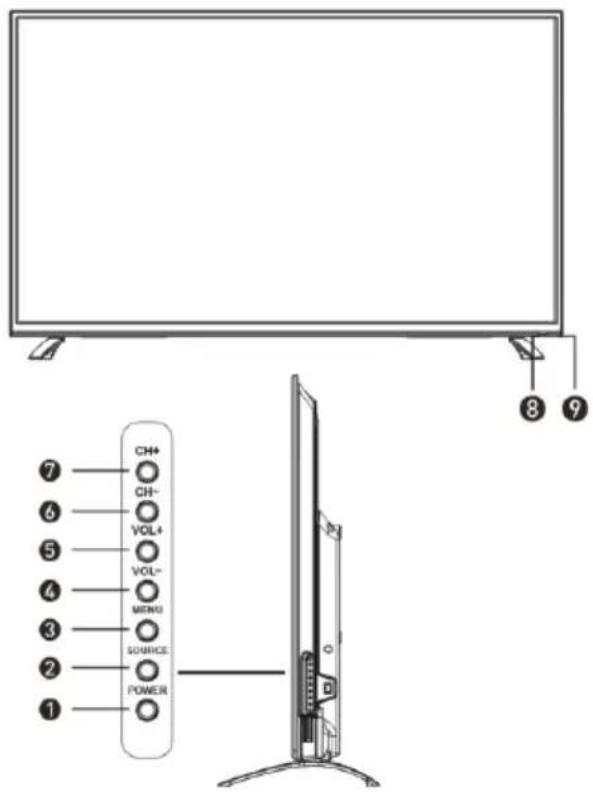
55/65 Inch (eiq-55/65UHDT2SM)
- POWER Button: To turn ON/OFF the TV.
- SOURCE Button: To select the input source.
- MENU Button: To enter menu setting page.
- VOL-: To decrease the volume level.
- VOL+: To increase the volume level.
- CH-: To select previous channel.
- CH+: To select next channel.
- Remote Control Sensor.
- Power Indicator: In standby mode the indicator light will display red, when the unit is switched on, the indicator light will display green.
75 Inch eiq-75UHDT2SM
- IR RECEIVER: Receives infrared signals from the remote control.
- INDICATOR LED: Status indicator
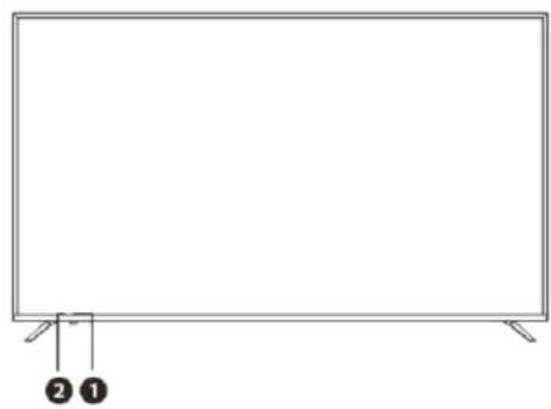
natural_image
Front view of a blank rectangular TV with two labeled connectors at the bottom (no text or symbols on the screen)JOYSTICK:
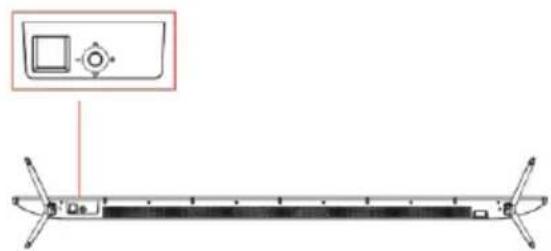
POWER: Press the button in
SOURCE: Push forward and hold for 1-2 seconds.
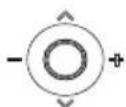
VOLUME: Move to right or left.
CHANNEL: Move forward or backwards
natural_image
Pure diagram of a horizontal bar with supports and a small square icon above it, no text or symbols present.MENU: Pull the joystick back and hold for 1 – 2
seconds. The joystick can then be used to navigate the menus.
INPUT/OUTPUT TERMINALS
49/55 Inch (eiq-49UHDT2SM / eiq-50UHDT2SM/ eiq-55UHDT2SM)
- Bottom USB x 2. Provides access to SMART TV. Connect smart remotes, keyboards, gaming accessories or usb flash drive Side USB x 2 can be used for DTV recording, timeshift or as a media player file.
Note: only connect low power USB flash drives or externally powered hard drives to the 4 x USB ports as they only provide 0.5 Amps power.
- RF: Antenna connection.
- HDMI x3.
- YPbPr: Connect to the YPbPr video output terminal of the DVD player.
- VIDEO: Video input.
- AUDIO IN L/R: Stereo audio input
- Coaxial: Digital audio coaxial output.
- RJ45: Wired internet connection
INPUT/OUTPUT TERMINALS
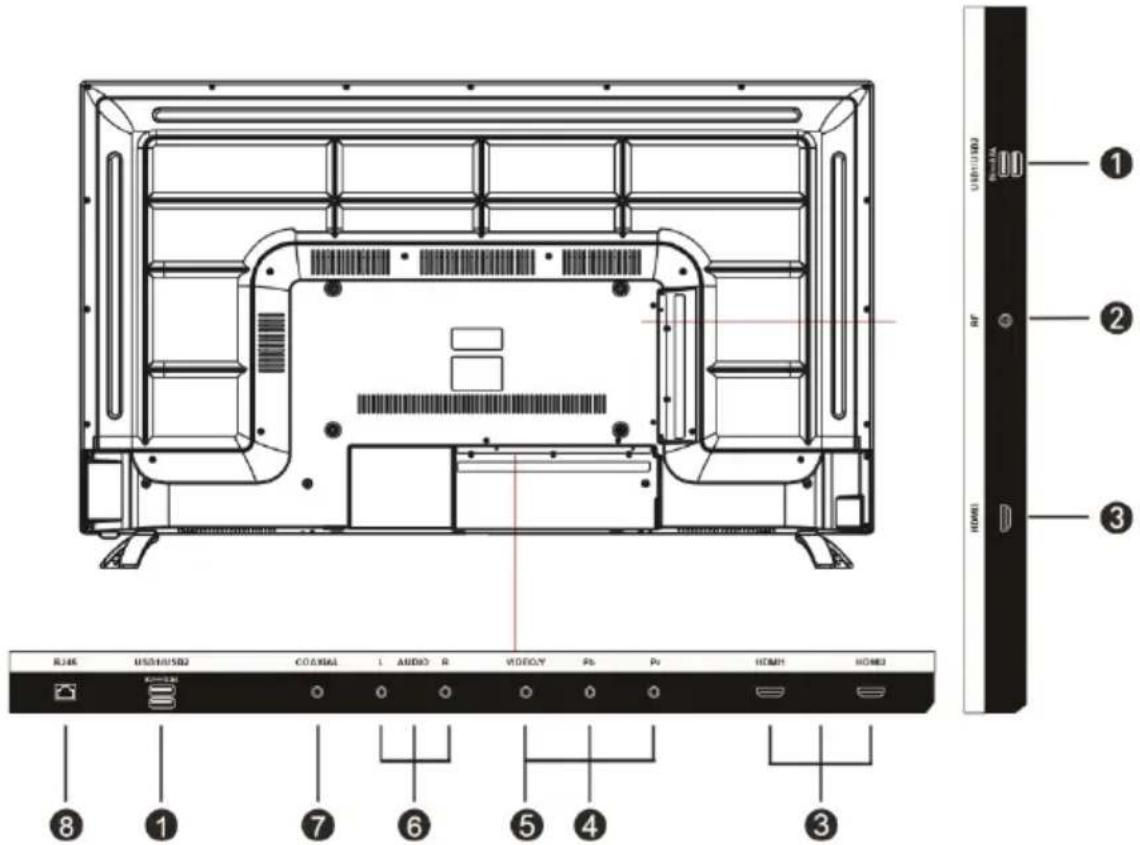
65/75 Inch (eiq-65UHDT2SM / eiq-75UHDT2SM)
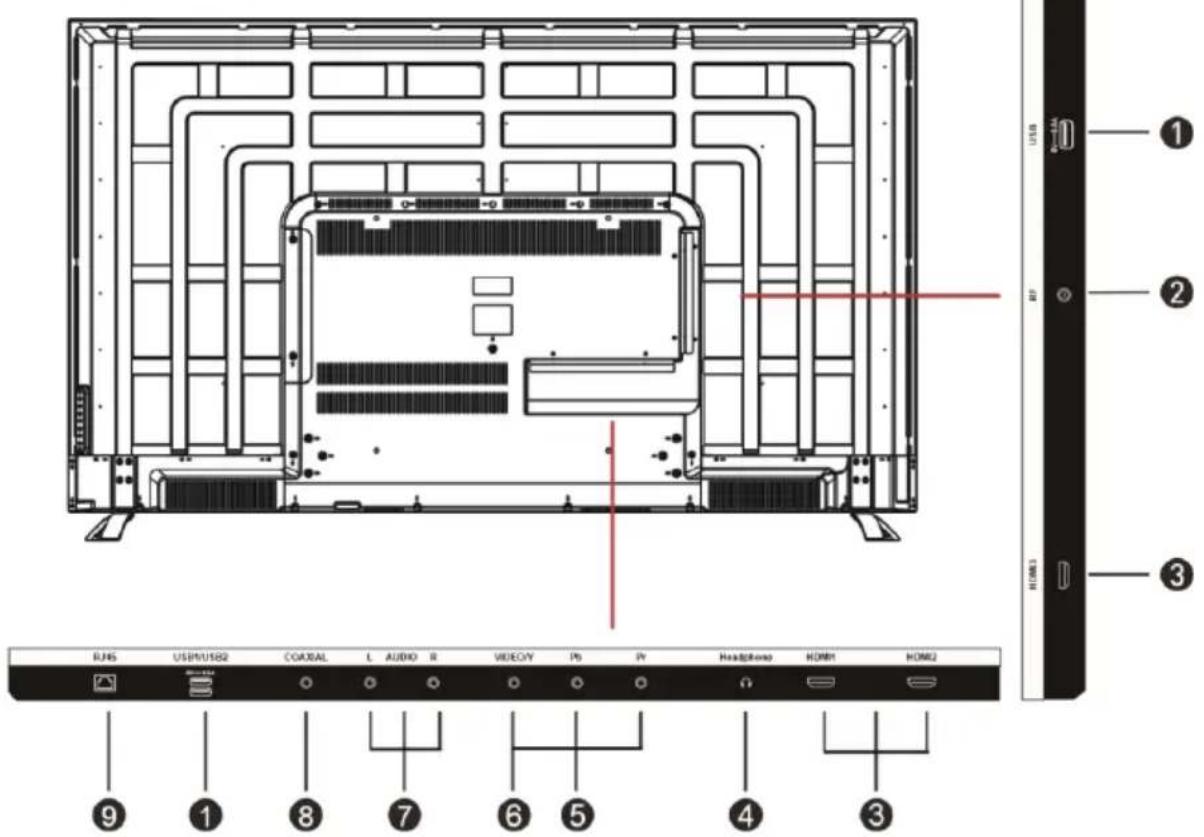
- Bottom USB x 2. Provides access to SMART TV. Connect smart remotes, keyboards, gaming accessories or usb flash drive Side USB x 1 can be used for DTV recording, timeshift or as a media player file.
Note: only connect low power USB flash drives or externally powered hard drives to the 3 x USB ports as they only provide 0.5 Amps power.
- RF: Antenna connection.
- HDMI x3. 4. Headphone
- YPbPr: Connect to the YPbPr video output terminal of the DVD player.
- VIDEO: Video input.
- AUDIO IN L/R: Stereo audio input
- Coaxial: Digital audio coaxial output.
- RJ45: Wired Internet Connection.
CONNECTING TO EXTERNAL DEVICES
49/50/55 Inch
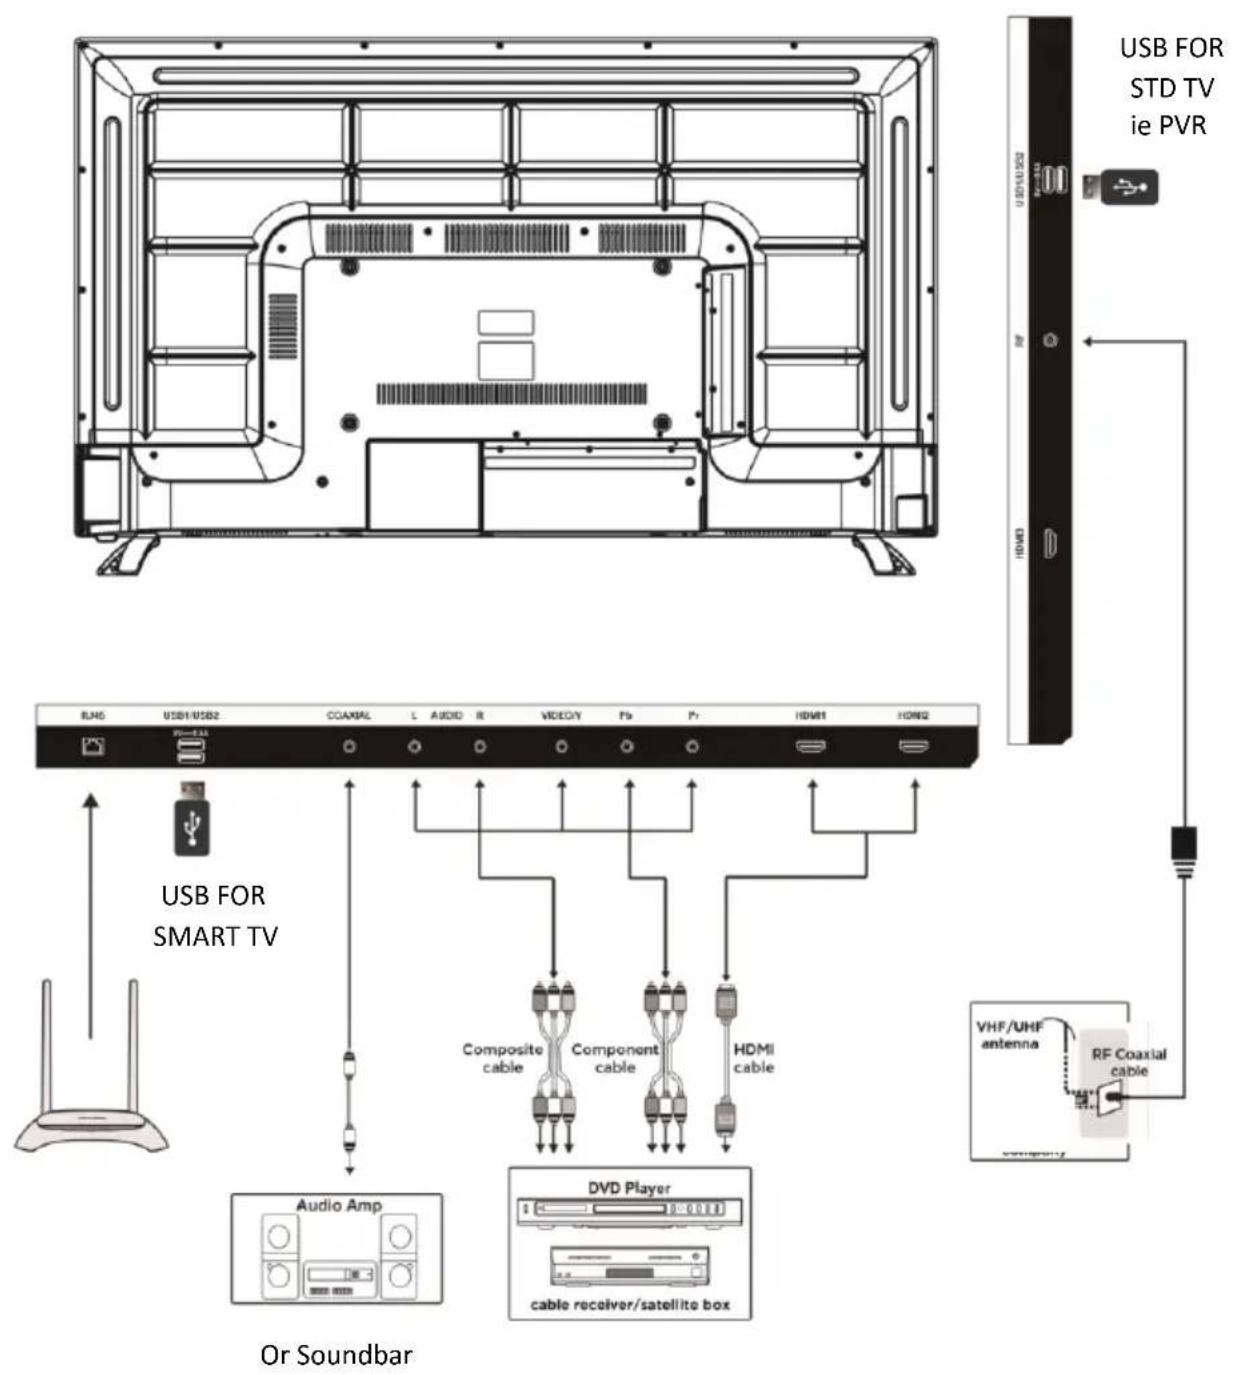
CONNECTING TO EXTERNAL DEVICES
65/75 Inch
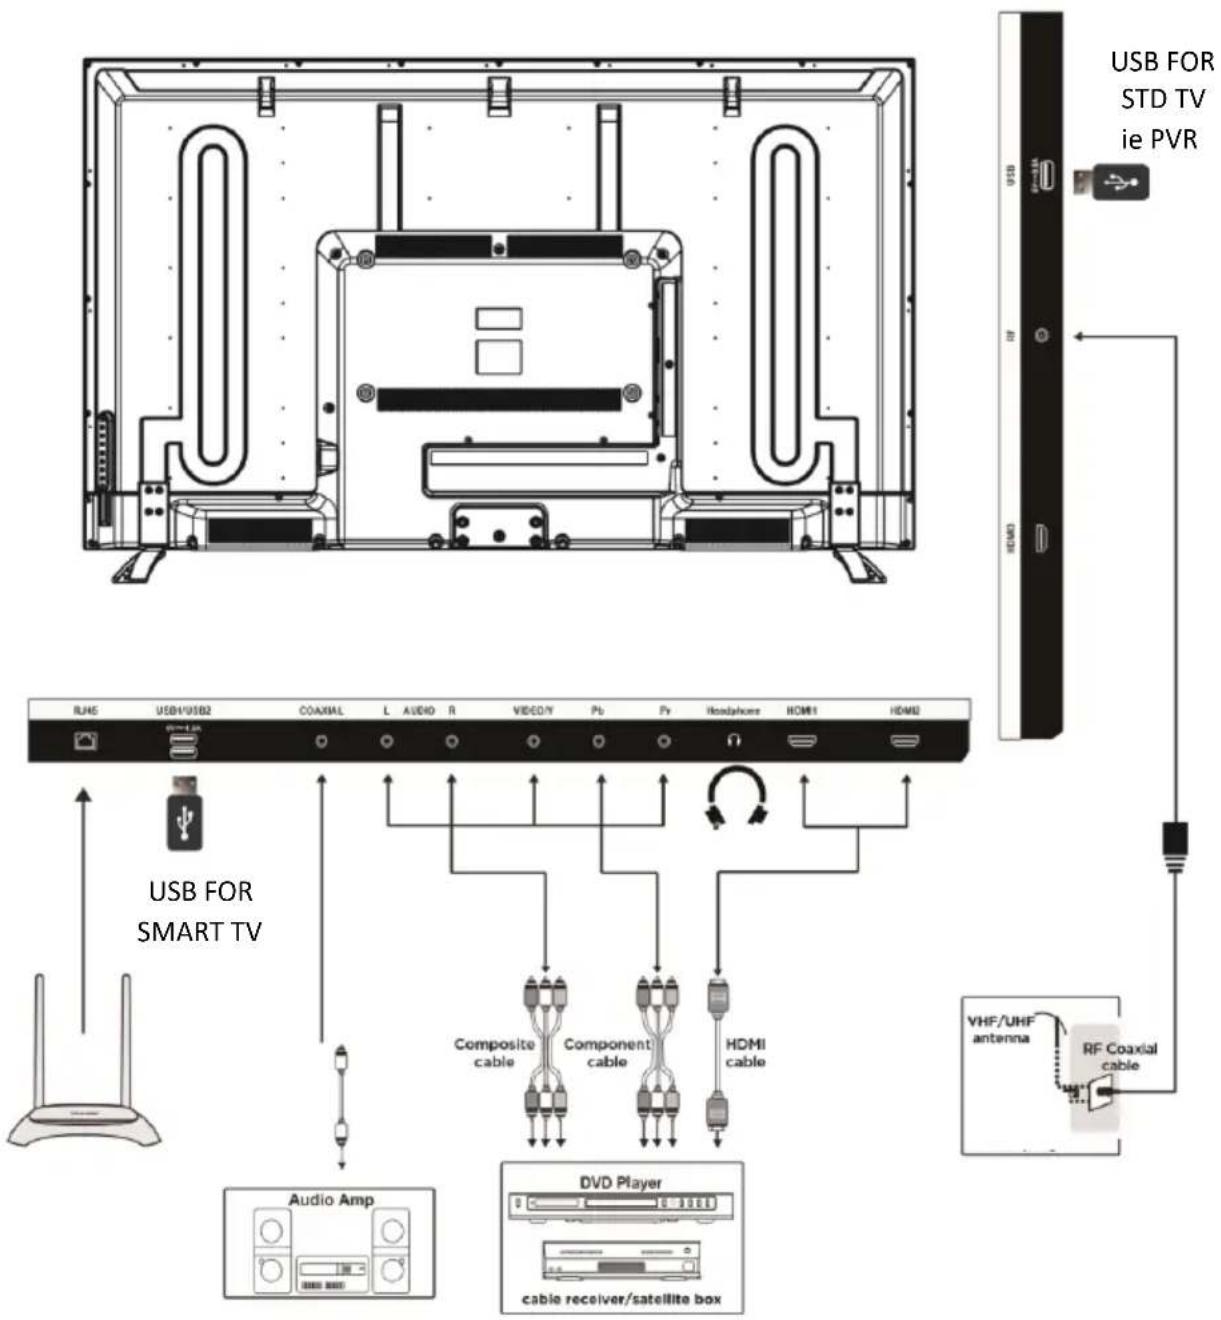
Or Soundbar
REMOTE CONTROL
-
POWER: Turn on the TV/Standby.
-
MUTE: Mute or restore the sound.
-
SOURCE: Press to change the signal source.
-
S. MODE: Audio setting options.
-
P. MODE: Output image mode selection.
-
AUDIO: Switch the audio channel when DVD or multimedia playing. I/II: In the TV mode, press this button to select the stereo size.
-
P. SIZE: Press to select the different picture size.
-
NUMBER KEYS: Change the channel.
-
FAV. CH: Show the list of favourite channels.
-
SLEEP: Auto Power Off Timer.
-
JUMP: Return to the previous channel tuned.
-
MENU: Show Menu.
-
EXIT: Exit the Menu.
-
INFO: Show information about the current program
-
NAVIGATION KEYS (Up, Down, Left, Right and OK): To move in the menus and confirm settings.
-
V+ / V-: Increase / decrease volume.
-
P+ / P-: Next / Previous channel.
-
BACK: Key navigation.
-
MENU: Contextual menu and options.
-
MOUSE: Turns on / off the mouse emulation. When turned on use the arrows to navigate and OK to select. To return to keys navigation press mouse key again.
-
SEARCH: function enable quick text search.


Press the appropriate colour to direct access functions in TELETEXT or EPG OSD mode.
- TIME SHIFT: In DTV mode, press TIME SHIFT button to start the delay function, press the ▶ button to start playing delay program, press the ■ button to terminate the delay function.

Reveals hidden information such as the answers to a quiz in TELETEXT Mode.
- PVR LIST: IN DTV mode, displays the executed PVR LIST.

Displays the main index in TELETEXT mode.
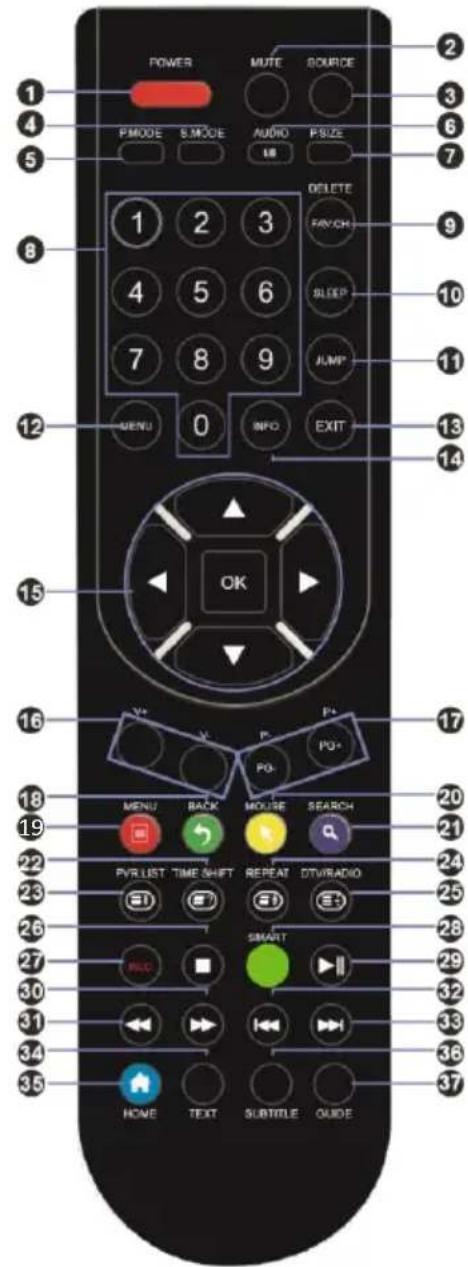
- REPEAT: Repeat mode.
Displays the top, bottom or all of the page.
- DTV/RADIO: In DTV mode, press DTV/RADIO button to enter DTV or RADIO mode.
Freeze a multi-page selection on TELETEXT mode.
-
▪ op Playback.
-
REC: In DTV mode, press REC button to start recording, press ■ button stop recording.
-
Smart : Provides quick access to the smart TV functions.
-
Play/Pause.
30.Fast Forward playback.
31. Rewind playback.
32.Previous file or chapter.
33.Nextfile or chapter.
- TEXT: Turn on and off the Teletext function.
- ⚠: Function returns to the main Smart TV menu.
- SUBTITLE: Select subtitle of media video file (requires the support of disk or file).
- GUIDE: Show the Electronic Program Guide (EPG).
BATTERY INSTALLATION
- Open the battery cover.
- Insert 2 AAA batteries in the battery compartment, matching the polarities correctly.
- Replace the battery cover.
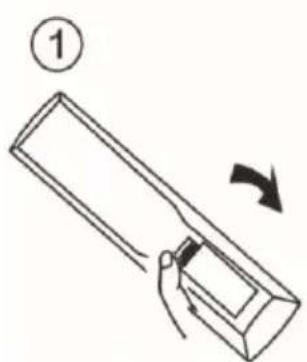
natural_image
Simple line drawing of a hand holding a rectangular object with an arrow indicating rotation (no text or symbols)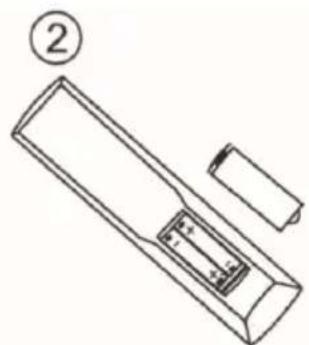
natural_image
Line drawing of a remote control box with a battery and labeled component (no text or symbols)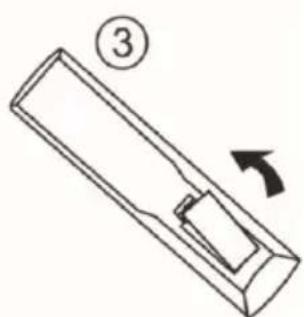
natural_image
Simple line drawing of a rectangular object with an arrow indicating rotation (no text or symbols)Settings
Initial Setup
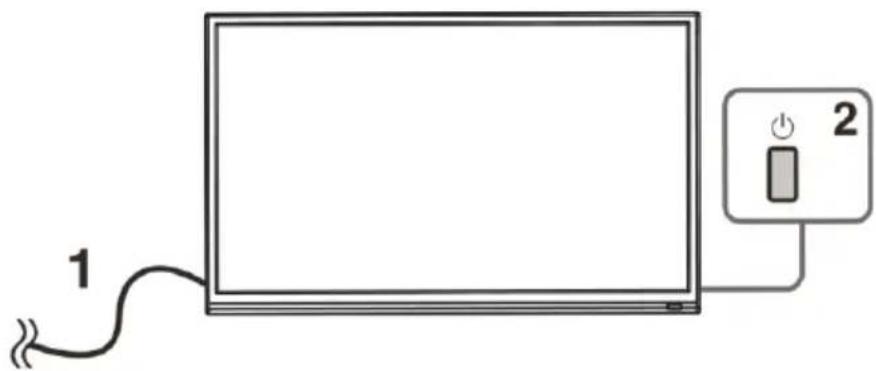
natural_image
Simple line drawing of a monitor connected to a power outlet with labeled terminals 1 and 2 (no text or symbols on the device itself)- Connecting your TV to the power outlet;
- Press the POWER button on the remote to turn on the TV, and the LED indicator will go green. CAUTION: Always disconnect the TV from the power outlet when the TV will not be used for a long period of time. The POWER button on the television and remote is only used for switching the TV into standby and does not disconnect the device from the mains voltage. To completely disconnect the mains voltage, please remove the power plug from the socket.
- Press the key ▼/▲/◄/► and following the picture as bellow to operate the subject.
NOTE:
The picture is for reference only.
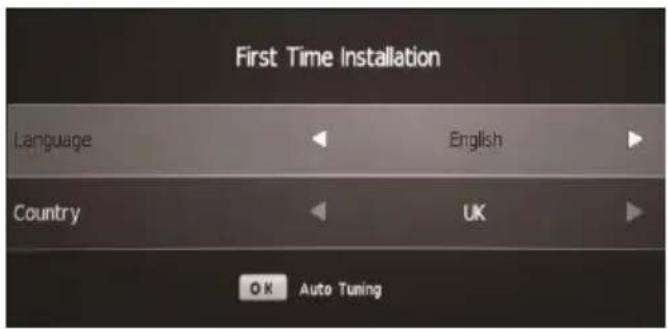
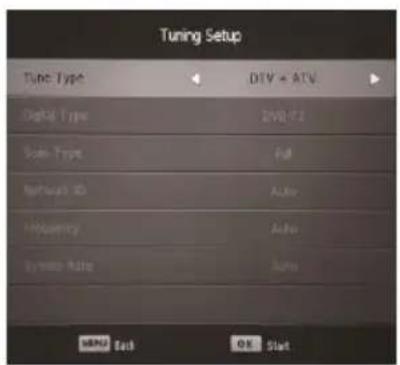
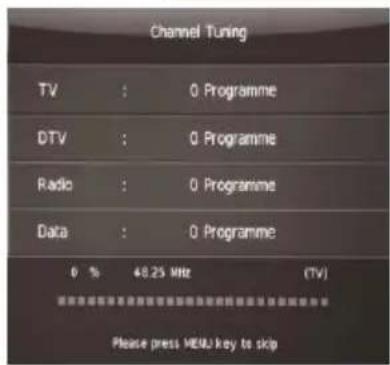
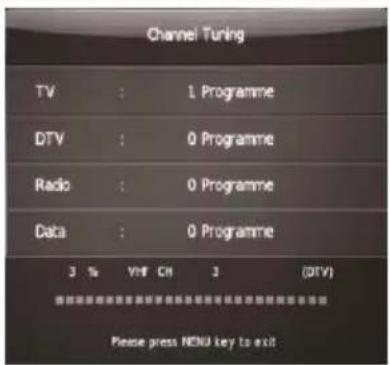
Press the ▼/▲ /◀ /▶ buttons to amend the settings on screen and press OK to finish.
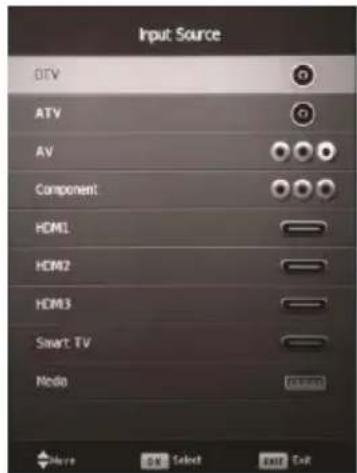
Select Input Source
Press the SOURCE button to display the input source list, Press ▼ / ▲ or the SOURCE button to select the input source you require, Press the OK button to select the input source, Press the EXIT button to quit.
Basic Operation
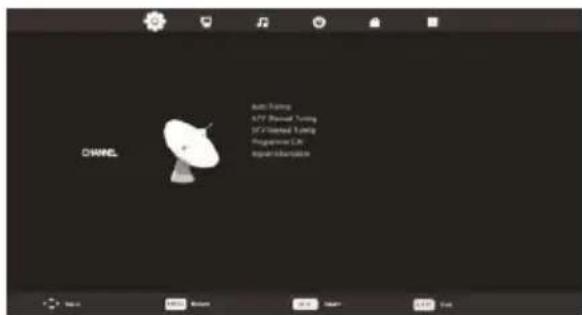
- Press the MENU button on the remote control, to display the on screen menu
- Use the ◀ / ▶ buttons to select the required sub menu between the options at the top of the screen (Channel, Picture, Sound, Time, Lock and Setup).
- Use the ▼/▲ buttons to highlight your chosen option within the menu, then use the ◀/▶ buttons to change the setting.
- Press the MENU to exit the menu.
Channel Menu
Press MENU button to display the main menu, and Use the ▼/▲ buttons to highlight your chosen option within the menu
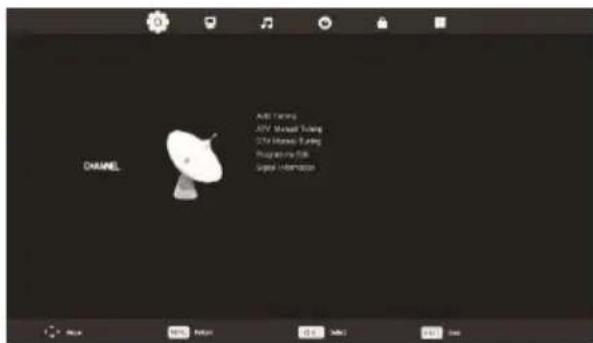
After finishing your adjustment, Press MENU button to return back to the previous menu.
Tuning Setup
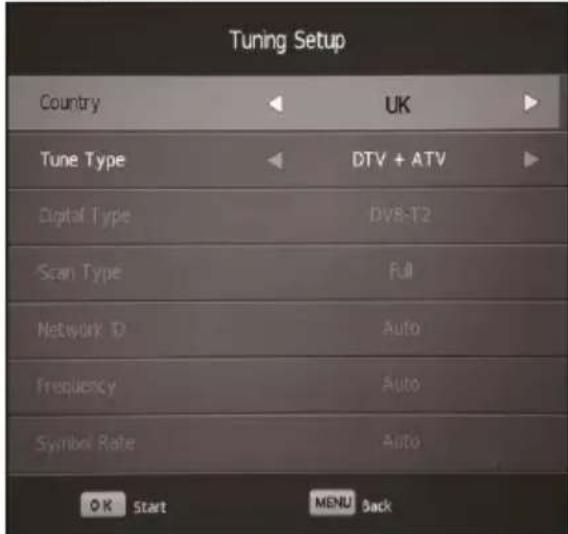
The Tuning Setup menu allows the Television to be re-tuned, please ensure the country and Tune type are correctly set before pressing OK to start the tuning process.
ATV Manual Tuning
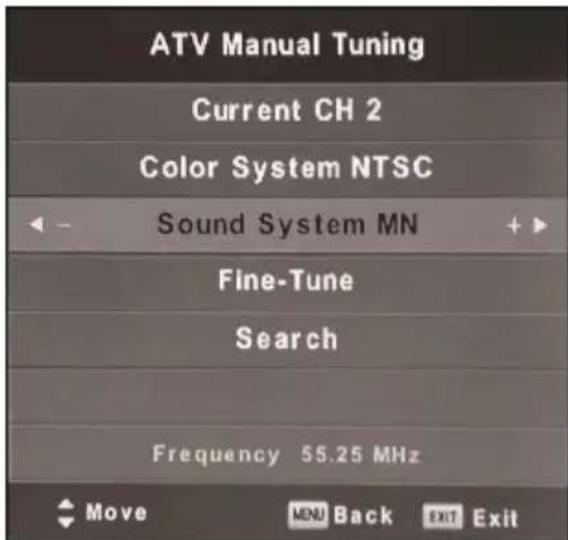
The ATV Manual Tuning allows analogue channels to be tuned individually. Please note terrestrial TV is no longer transmitted in analogue in the UK.
DTV Manual Tuning
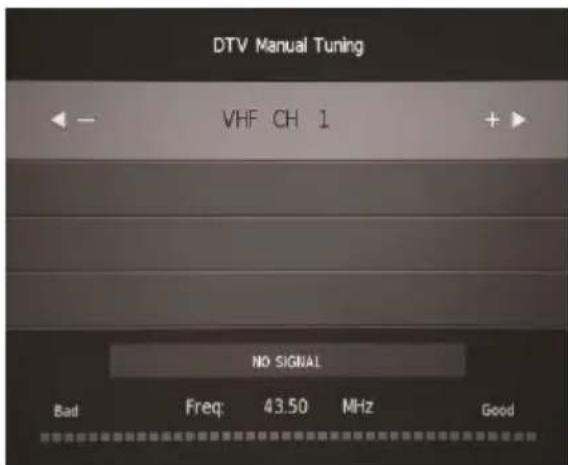
DTV manual tuning allows you to add missing channels, rather than retuning all channels.
Programme Edit
This allows the order of your channels to be amended.
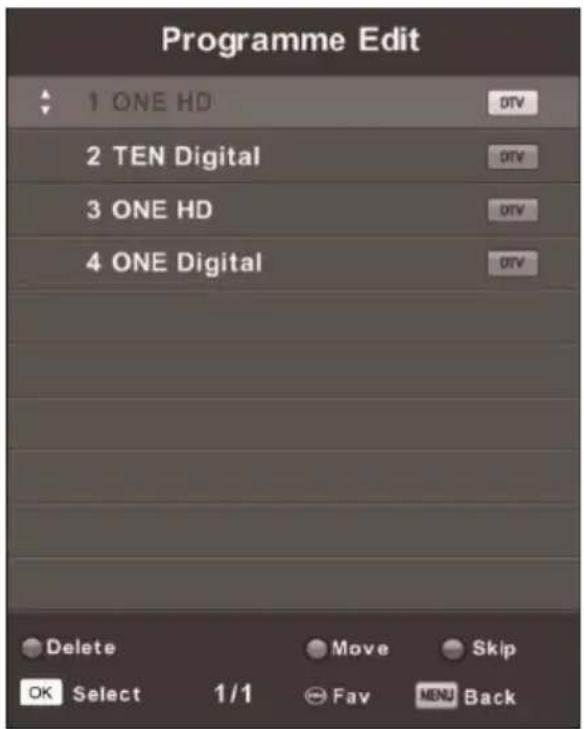
The three coloured buttons are the shortcut key for programming the channels. Press the ▼ / ▲ buttons to highlight the channel you want to delete, move or skip.
Press the Red button to delete the selected channel.
Press the Yellow button to skip the select channel. (When using the CH+/- buttons to scroll through channels, a skipped channel will not be displayed)
Press the Blue button to select a channel for moving. Then press the ▼ / ▲ buttons to move it to the required, and press Blue button again to confirm the move.
Signal Information
This option is only available when viewing a channel within the DTV, and shows details regarding the current channel including signal strength and quality.
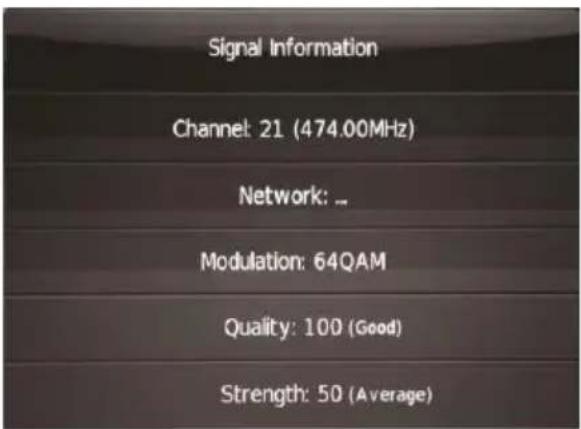
After finishing within the current screen, Press the MENU button to return back to the main menu.
Picture Menu
Press MENU button to display the main menu, and use the ◀ / ▶ to move to the Picture menu screen.
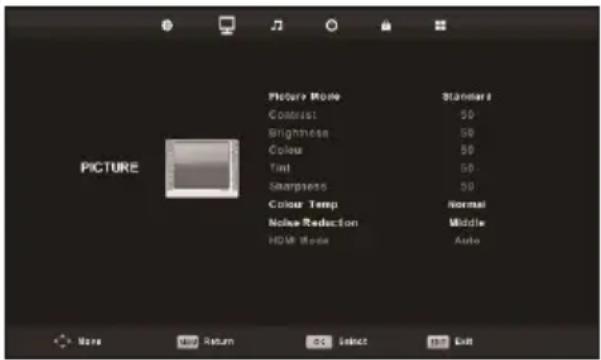
Within this mode you can select between the preset picture modes. If the Personal Picture mode is chosen, this allows the Contrast, Colour and Brightness to be set individually.
After finishing your adjustment, Press the MENU button to return back to the previous menu.
Sound Menu
Press MENU button to display the main menu, and use the ◀ / ▶ to move to the Sound menu screen.
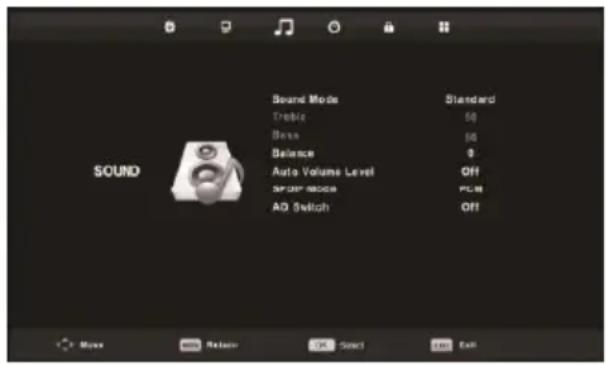
Within this mode you can select between the preset picture modes. If the Personal Sound mode is chosen, this allows the Treble and Bass to be set individually.
After finishing your adjustment, Press the MENU button to return back to the previous menu.
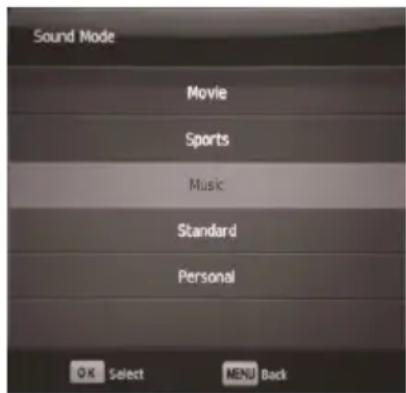
After finishing your adjustment, Press MENU button to return back to the previous menu.
NOTE:
Balance: This option can adjust the output between the two speakers, it enables you to set the sound so it is balanced when listened to from your favourite position.
Auto Volume Level: This option is used for reducing the differences in volume between different channels and programs automatically.
Time Menu
Press MENU button to display the main menu, and use the ◀ / ▶ to move to the Time menu screen.
This allows the system time and Time Zone to be set, as well as giving options for auto standby.
Note: In the case of loss of power, the clock settings will be lost.
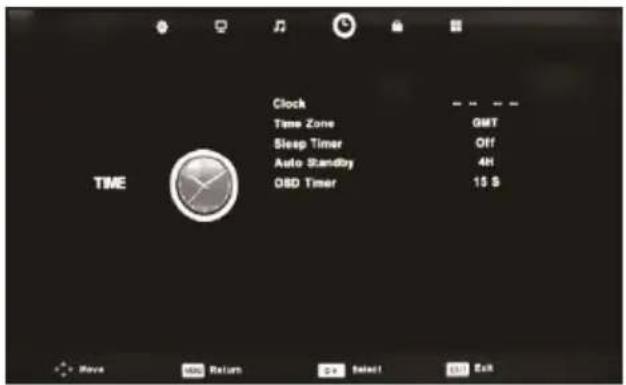
After finishing your adjustment, Press MENU button to return back to the main menu.
Lock System Menu
Press MENU button to display the main menu, and use the ◀ / ▶ to move to the Time menu screen.
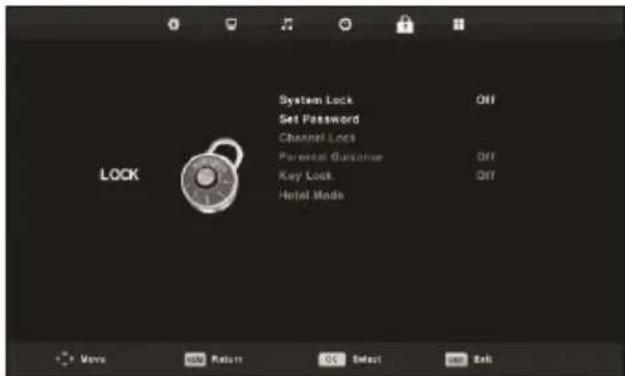
This allows individual channels to be locked, and Parental guidance to be turned on.
The default password is 0000, if the set password is forgotten, please contact the manufacturer.
Setup Menu
Press MENU button to display the main menu, and use the ◀ / ▶ to move to the Setup menu screen.
After finishing your adjustment, press MENU button to save and return back to the previous menu.
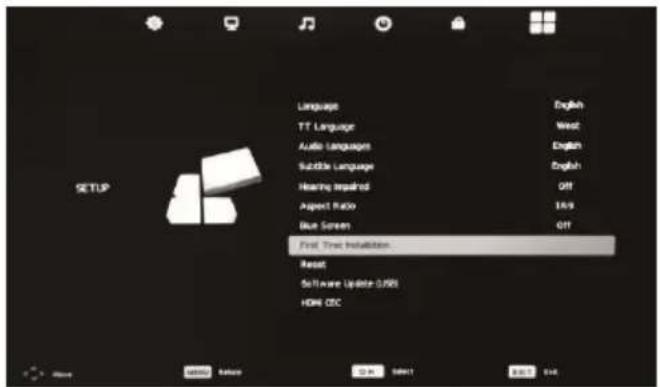
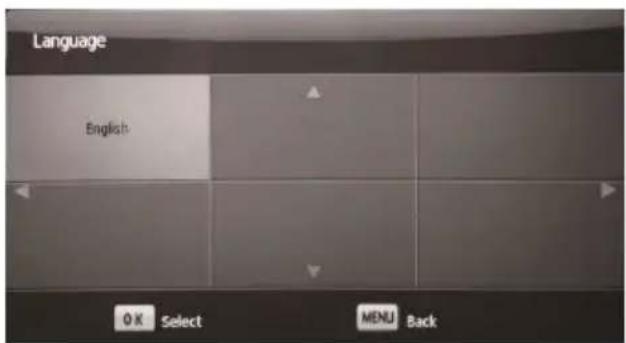
Language
Select the language the menu will be displayed in. The default is English.
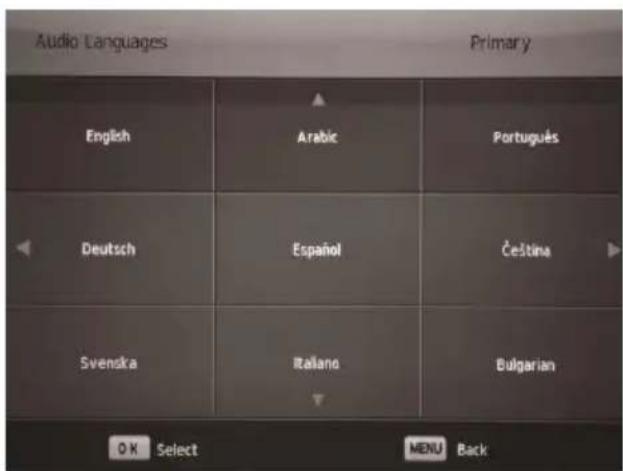
Audio Languages
Allows the Primary Audio language to be set. The default is English.
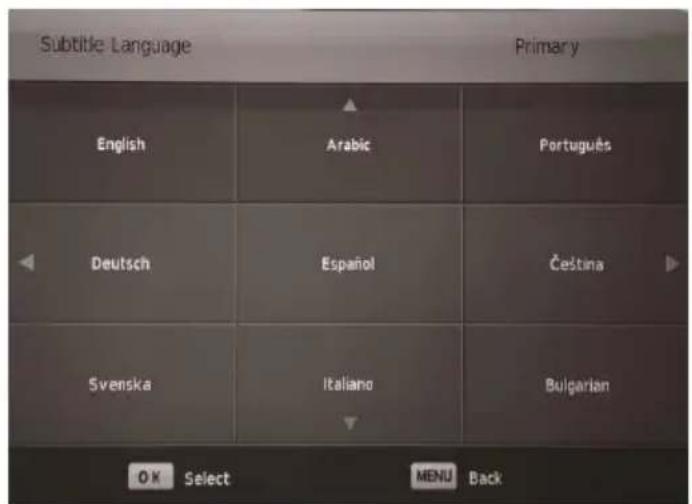
Subtitle Language
Select the language displayed in subtitles. The default is English.
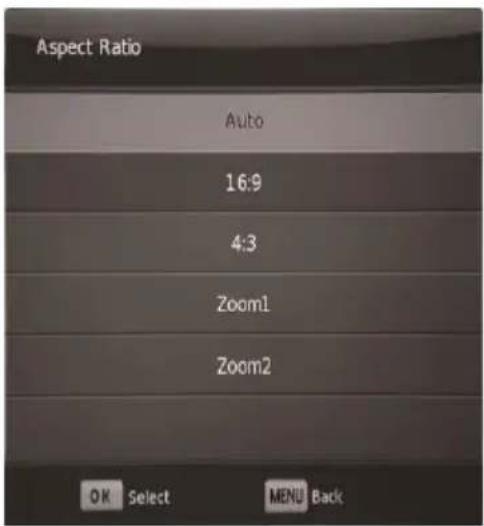
Aspect Ratio
Allows the Aspect ratio of the screen displayed to be changed.
Blue Screen
In Analogue television mode, the screen will show blue, rather than snow when no reception is received.
First Time Installation
This allows the user to go through the initial setup again. If this option is greyed out, the Reset option should be chosen.
Reset
Will return the Television back to its factory state ( Does not affect the Smart Function), and can be used to remove all settings changed by the user.
Software Update (USB)
If you have been provided with updated firmware by the manufacturer, for the TV (Not for Android Smart Functions), this can be installed by inserting the USB into the side USB ports and selecting this option.
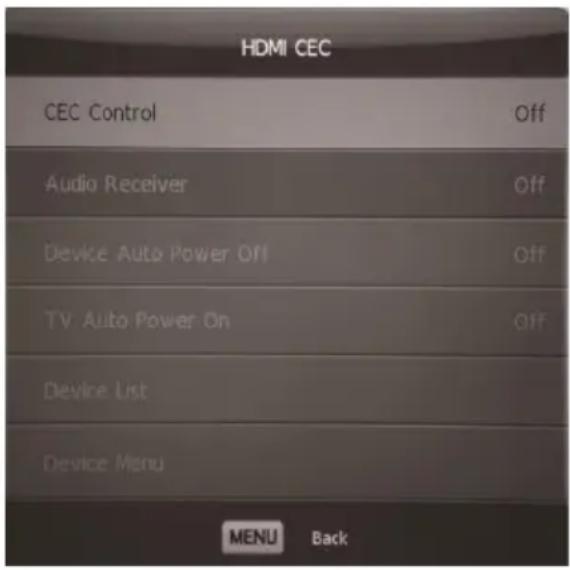
HDMI CEC
Press ▼ / ▲ button to select HDMI CEC, then press Enter button to enter the sub-menu.
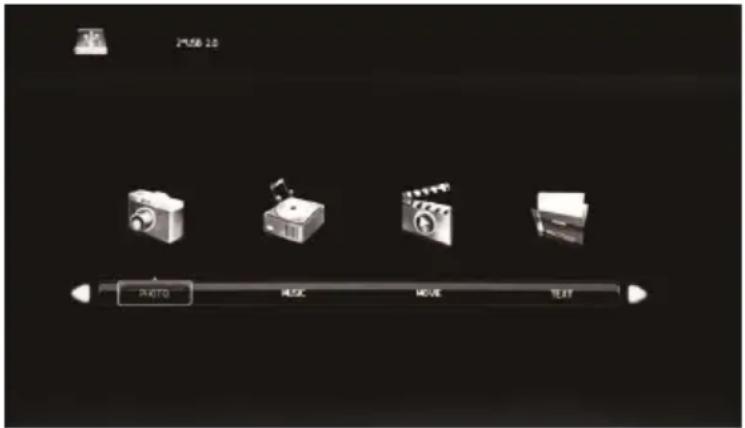
Media Operation
Note: Before operating USB menu, Plug a USB device into a side USB port, then press the SOURCE button and change the Input Source to MEDIA using the ◀ / ▶ buttons. The type of media can then be selected using the ◀ / ▶ buttons.

ss to play or pause.

Press to skip to the next item.

ss to play faster.

Press to play the previous song.

Press to play backward.

Press to stop.
Photo Music
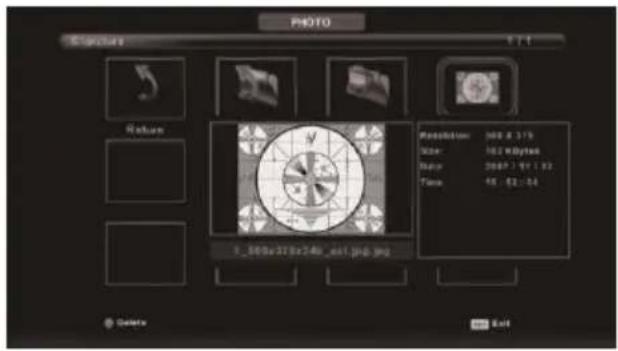
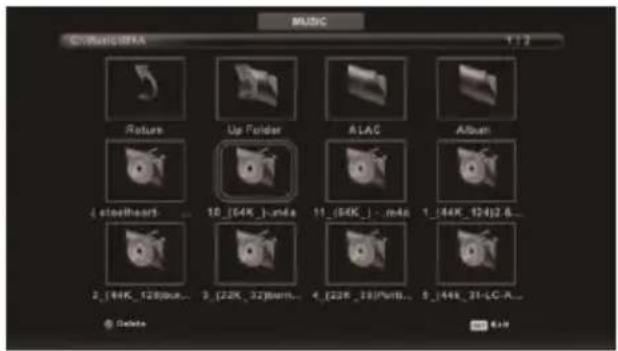
Press the CH+/- buttons to switch between the File List and the Player screens.
Movie Text
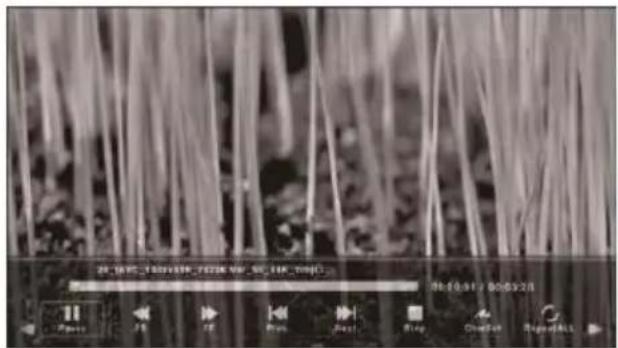
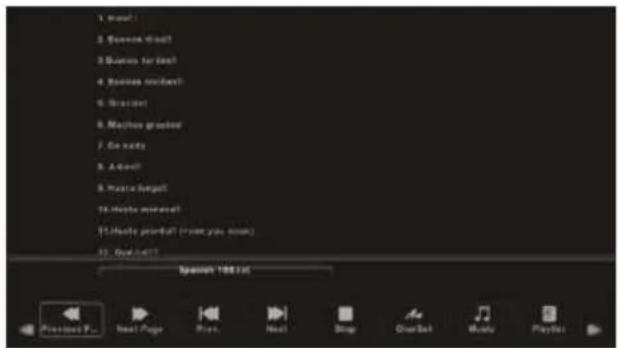
When a file is highlighted, the file information will appear on the right.
SMART TV
1.1 Welcome Page
When you first enter the Smart function, the welcome Page will be shown. It will help you to configure the the smart functions of your new television.
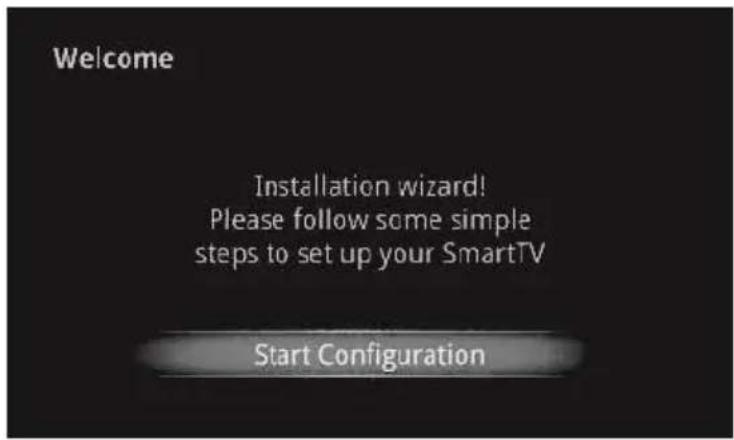
To skip this wizard, press "HOME" key.
Once the setup has been completed, the wizard will not be displayed when next entering the Smart Function
Setup page
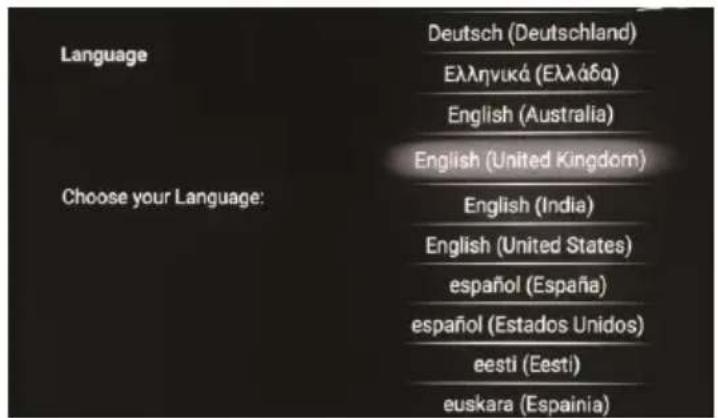
Select Language
Select network type:
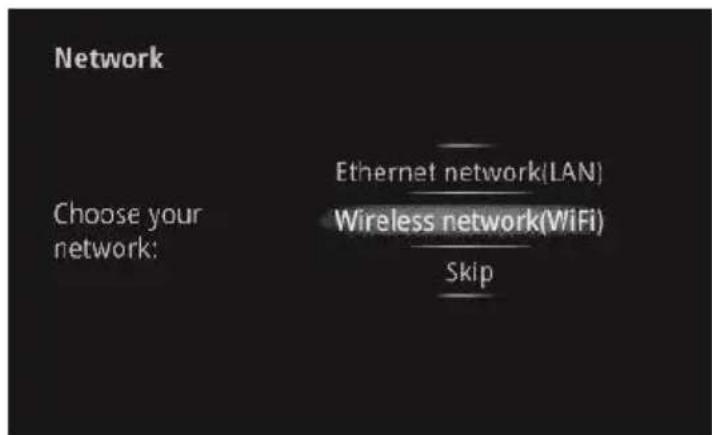
If you do not want to choose your network, you can skip this step by selecting "Skip", the network settings can also be adjusted within the menu of the SMART function.
Select Wireless Network (Wi-Fi)
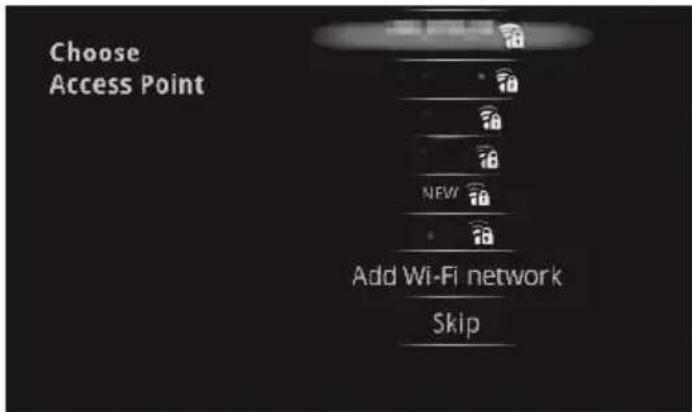
If the WIFI option is chosen, a list of detected Access points will be displayed. Select the one which relates to your network and enter the password from your Router. Please note this is case sensitive.
Select Ethernet Network (LAN)
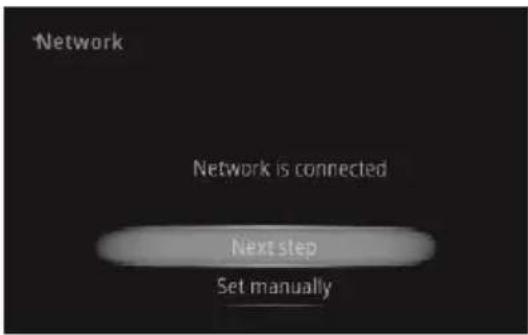
If an Ethernet cable is connected and the Ethernet Network option is selected, your network should be automatically.
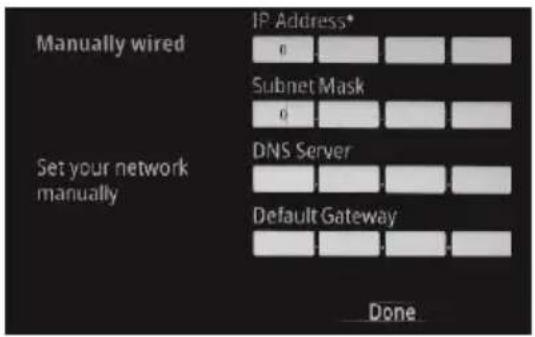
Configure Ethernet Manually
If the Television does not connect to Ethernet automatically, the network settings can be entered manually. Please request these details from your network administrator.
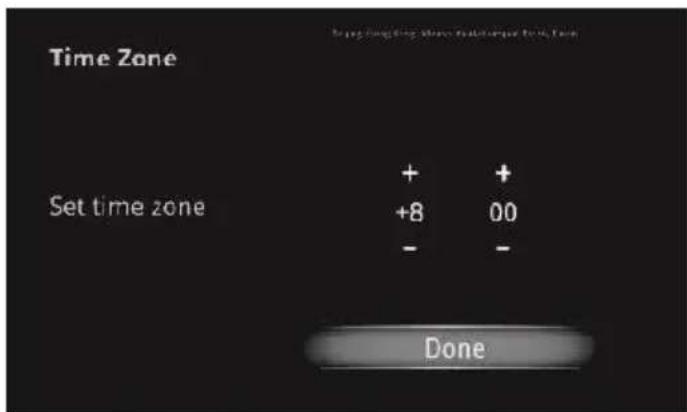
Set up the correct Time Zone
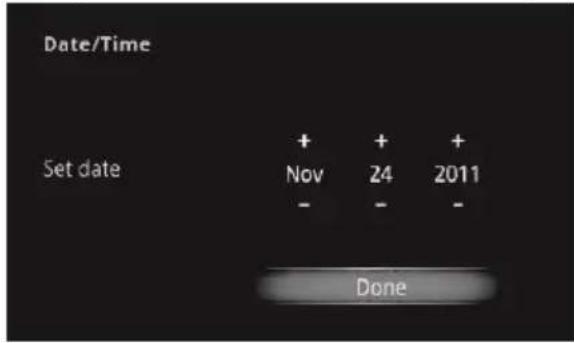
If the television was not connected to a network in the last step, the setup will require for the Time Zone, Date and Time to be entered manually. (UK Time Zone GMT +/- 0:00)
Setup the Date and Time Manually
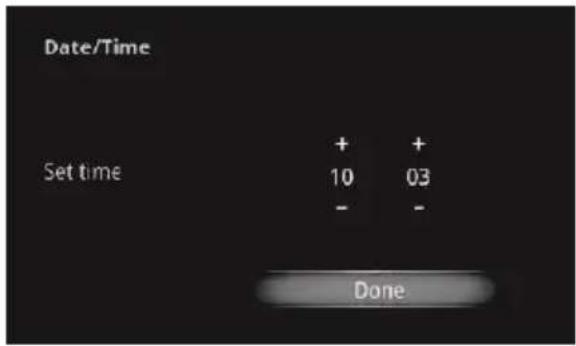
Configuration
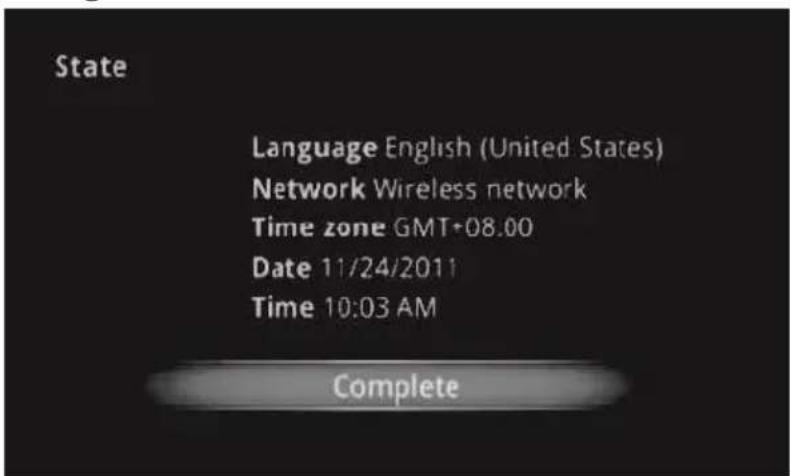
The TV will then show the settings on the screen, press the complete button to confirm.
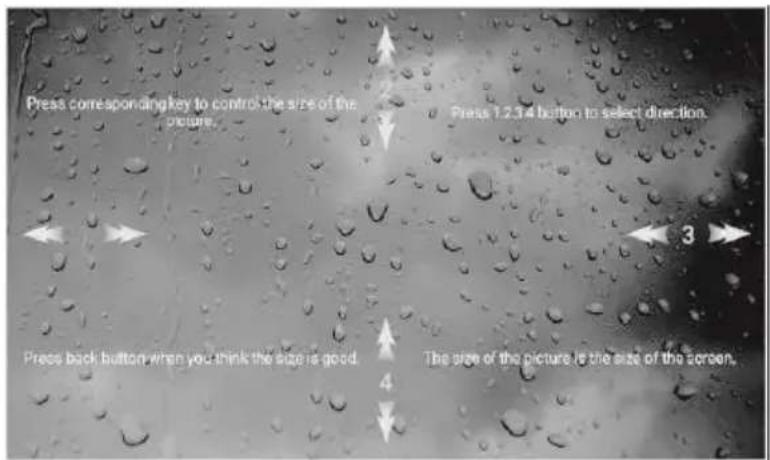
The Screen size can then be adjusted using the arrow buttons on remote control
Main Launcher
Press the arrow buttons ◀ / ▶ to select between the headers ( Favorite, Web, Apps, Settings) the sub-screen and press ▼ into sub-screen.
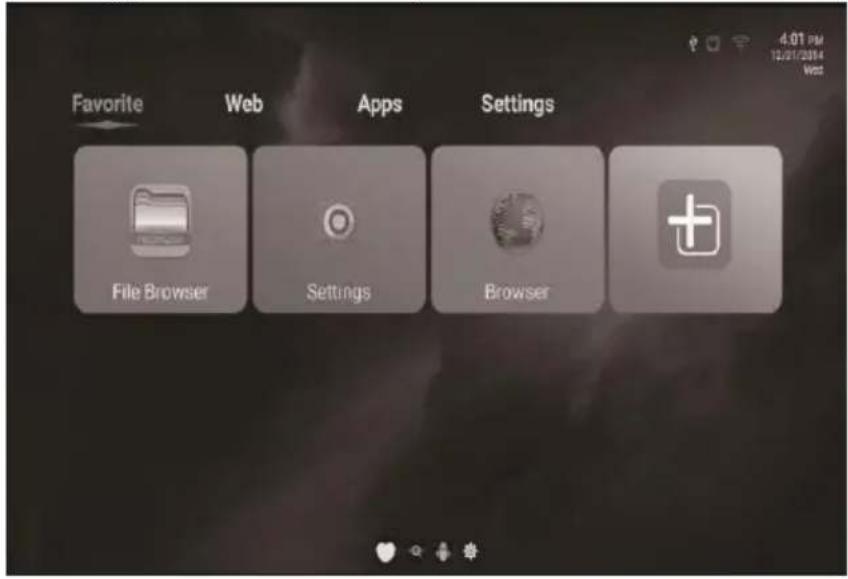
| FUNCTION | DESCRIPTION | |
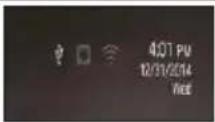 | Main Information tab contains : Time information, USB/Ethernet/ Wifi connectivity status (White for working, grey for standby) | |
 | All Apps are displayed in this sub screen. | |
 | The Browser tab contains bookmarks and a search bar. It allows you surf the internet from your Television. | |
 | Add your favourite APPs to this directory, using the button. | |
 | The Settings screen contains most of the options for customising and configuring the settings of the SMART function, such as language and network settings. | |
Smart Settings Menu
| FUNCTION | DESCRIPTION |
Wifi-settings | Provides options to turn on the Wi-Fi to connect to wireless networksCan also be set to receive an alert when an open Wi-Fi network becomes available |
Ethernet | Turn on/off the Ethernet.Also gives the options of manually setting:IP address, Subnet Mask, DNS Server, Default Gateway etc |
Advance settings | Contains all of the android settings for the SMART TV. |
Factory reset | Will return the Smart functions of the television back to their factory defaults. |
App manage | Management application, allowing apps to be deleted or moved to external storage. |
Language & input | Allows the Language of the Smart function to be changed, and for the language of the keyboard layout to be set. |
System updates | Local updateUpdate system via update.zip from USB flash drive or micro SD cardNet updateOTA network upgrade |
Date & Time | Automatic date & time (Need network)Set dateSet timeSelect time zoneUser 24-hour formatSelect date format : dd/mm/yyyy ;mm/dd/yyyy ; yyyy/mm/dd |
About device | Android versionBuild number |
Applications – There are a number of ways to add different apps to your smart TV
Install from USB Flash Drive
- Open the "File Browsers"
- Choose your USB flash drive ( Ensure it is entered into one of the bottom ports) or any other mass storage's folder
- Find your application, and select it
- Press the install button
- Once installed you can find the application in tab "Apps"
Download & install from Browser
- Open the Browser.
- Press search key and input your website address
- Download the APK file which you like if there is a link for download (If you have problems with downloading, please make sure there is, enough space in your internal storage)
Install from AppInstaller
- Open the AppInstaller
- Find the icon of the application, and enter it
- Press the install button
- You can find the application in tab after installation.
SPECIFICATION
eiq-49UHDT2SM
| TV System | PAL DVB-T2/T |
| Maximum | 3840 x 2160 |
| Brightness | 260 CD/m2 |
| Static Contrast | 1100:1 |
| Response Time | 6ms |
| Consumption | 108W |
| Power Supply | AC100-240V – 50/60Hz |
| Connectivity | Composite Video InputComponent Video InputHDMI input x 3RF Antenna InputRJ 45Coaxial Output |
| Data Interface | USB x 4 |
| Supported System Files | FAT32 and FAT16 |
eiq-50UHDT2SM
| TV System | PAL DVB-T2/T |
| Maximum | 3840 x 2160 |
| Brightness | 260 CD/m2 |
| Static Contrast | 1100:1 |
| Response Time | 6ms |
| Consumption | 108W |
| Power Supply | AC100-240V – 50/60Hz |
| Connectivity | Composite Video InputComponent Video InputHDMI input x 3RF Antenna InputRJ 45Coaxial Output |
| Data Interface | USB x 4 |
| Supported System Files | FAT32 and FAT16 |
eiq-55UHDT2SM
| TV System | PAL DVB-T2/T |
| Maximum | 3840 x 2160 |
| Brightness | 280 CD/m2 |
| Static Contrast | 1200:1 |
| Response Time | 8ms |
| Consumption | 140W |
| Power Supply | AC100-240V – 50/60Hz |
| Connectivity | Composite Video InputComponent Video InputHDMI input x 3RF Antenna InputRJ 45Coaxial Output |
| Data Interface | USB x 4 |
| Supported System Files | FAT32 and FAT16 |
eiq-65UHDT2SM
| TV System | PAL DVB-T2/T |
| Maximum | 3840 x 2160 |
| Brightness | 300 CD/m2 |
| Static Contrast | 1200:1 |
| Response Time | 6ms |
| Consumption | 220W |
| Power Supply | AC100-240V – 50/60Hz |
| Connectivity | Composite Video InputComponent Video InputHDMI input x 3RF Antenna InputRJ 45Coaxial OutputHeadphone Output |
| Data Interface | USB x 3 |
| Supported System Files | FAT32 and FAT16 |
eiq-75UHDT2SM
| TV System | PAL DVB-T2/T |
| Maximum | 3840 x 2160 |
| Brightness | 350 CD/m2 |
| Static Contrast | 1200:1 |
| Response Time | 8ms |
| Consumption | 300W |
| Power Supply | AC100-240V – 50/60Hz |
| Connectivity | Composite Video InputComponent Video InputHDMI input x 3RF Antenna InputRJ 45Coaxial OutputHeadphone Output |
| Data Interface | USB x 3 |
| Supported System Files | FAT32 and FAT16 |
Multimedia Playback Format
| Multimedia Categories | File Extension |
| Video | *.avi/MPEG(*.mpeg,*.dat,*vob) / MPEG-4(*.mp4) / TS(*.ts,*.trp,*tp) / MKV(*.mkv) / VC-1 / RMVB(*.rm,*.rmvb) |
| Music | *.mp3/AAC(*.aac,*m4a)/*.wav |
| Photo | *.jpg/*.jpeg |
| Text | *.txt |
Remote Control
| Signal Type | Infrared |
| Control Distance | 8 meters |
| Control Angle | 30° (Horizontal) |
| Power Supply | AAA 1.5V x 2 |
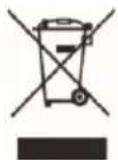
PRODUCT DISPOSAL
Do not dispose this product as unsorted municipal waste. Collection of such waste must be handled separately as special treatment is necessary.
Recycling facilities are now available for all customers at which you can deposit your old
electrical products. Customers will be able to take any old electrical equipment to participating civic amenity sites run by their local councils. Please remember that this equipment will be further handled during the recycling process, so please be considerate when depositing your equipment. Please contact the local council for details of your local household waste recycling centres.
TROUBLESHOOTING
| Problem | Solution |
| No power | Insert the power plug securely into the power outlet. |
| No picture | Ensure that the equipment is connected properly. |
| Distorted or no sound | · Ensure the equipment is connected properly· Ensure that the input setting for the TV and stereo system are correct.· Adjust the master volume to a suitable volume by pressing V+/V- button.· Check audio settings are correct.· Check set isn't muted.· Unplug headphones· Check the antenna connection. |
| Remote control not working | · Check the batteries are installed with the correct polarities.· Replace the batteries with new, fully charged ones.· Point directly at the remote sensor on the TV and try again.· Operate at a distance of no more than 6m.· Remove any obstacles between the remote control and the sensor. |
| Buttons on the TV don't do anything | Disconnect the power plug and then reconnect it. (The unit may not be operating properly due to lightning, static, or other factors.) |
| Poor picture or no picture | · Adjust the indoor aerial, use an amplified aerial or external digital antenna.· Have the DTV antenna checked or installed by a professional installer· Move anything that may cause interference.· Retry Auto tuning the unit.· Try another channel. |
| Noise or other interference | Electronic equipment near the unit may be causing interference. Relocate the unit or move the equipment. |
electriQ UK SUPPORT
Complete online support form on www.electriQ.co.uk/support
Service Line: 0871 620 1057
Office hours: 9AM - 5PM Monday to
Friday www.electriQ.co.uk Unit 2, The
Nursery
Berristow Lane South Normanton
Derbyshire, DE55 2FX
- CONTENTS
- SAFETY INFORMATION
- TV STAND INSTALLATION/REMOVAL
- WALL MOUNTING
- GETTING STARTED
- BUTTON FUNCTIONS
- Inch
- (eiq-49UHDT2SM / eiq-50UHDT2SM)
- 55/65 Inch (eiq-55/65UHDT2SM)
- Inch eiq-75UHDT2SM
- JOYSTICK:
- INPUT/OUTPUT TERMINALS
- CONNECTING TO EXTERNAL DEVICES
- REMOTE CONTROL
- BATTERY INSTALLATION
- Settings
- Initial Setup
- NOTE:
- Select Input Source
- Channel Menu
- Programme Edit
- Signal Information
- Picture Menu
- Sound Menu
- Time Menu
- Lock System Menu
- Setup Menu
- Language
- Audio Languages
- Subtitle Language
- Aspect Ratio
- Blue Screen
- First Time Installation
- Reset
- Software Update (USB)
- HDMI CEC
- Media Operation
- SMART TV
- Welcome Page
- Setup page
- Select Language
- Select network type:
- Configure Ethernet Manually
- Set up the correct Time Zone
- Main Launcher
- Applications – There are a number of ways to add different apps to your smart TV
- Install from USB Flash Drive
- Download & install from Browser
- Install from AppInstaller
- SPECIFICATION
- PRODUCT DISPOSAL
- electriQ UK SUPPORT
Brand : ElectriQ
Model : eiQ-65UHDT2SM
Category : Television