eiQMWCOM25 - Microwaves ElectriQ - Free user manual and instructions
Find the device manual for free eiQMWCOM25 ElectriQ in PDF.


| Brand | ElectriQ |
| Model | eiQMWCOM25 |
| Product Type | Microwave Oven |
| Color | Black |
| Rated Voltage | 240V~50Hz |
| Rated Output Power | 1000 W |
| Rated Input Power | 1550 W |
| Rated Current | 15 A |
| Oven Capacity | 25 L |
| External Dimensions (WxDxH) | 511 x 432 x 311 mm |
| Net Weight | Approx. 14.83 kg |
| Control Type | Digital control panel with buttons and display |
| Microwave Power Levels | 100%, 70%, 50%, 20%, 0% |
| Preset Programs | 10 user-customizable (up to 100 via settings) |
| Cooking Modes | Manual, preset, multi-stage, double quantity |
| Power Saving Mode | Yes, auto-enter after 15-120 seconds of standby |
| Door Interlock Safety | Yes, prevents operation when door open |
| Overheat Protection | Yes, via safety interlocks |
| Display Type | Digital screen for time and settings |
| Material (Front) | Stainless steel and glass |
| Cleaning Instructions | Regular cleaning with mild soap; avoid steam cleaners and abrasives |
Frequently Asked Questions - eiQMWCOM25 ElectriQ
User questions about eiQMWCOM25 ElectriQ
0 question about this device. Answer the ones you know or ask your own.
Ask a new question about this device
Download the instructions for your Microwaves in PDF format for free! Find your manual eiQMWCOM25 - ElectriQ and take your electronic device back in hand. On this page are published all the documents necessary for the use of your device. eiQMWCOM25 by ElectriQ.
USER MANUAL eiQMWCOM25 ElectriQ
natural_image
Black microwave oven with digital display and control panel (no visible text or symbols on main body)Read these instructions carefully before using your microwave oven, and keep them safe for future reference.
CONTENTS
IMPORTANT SAFETY INFORMATION 3
SETTING UP YOUR OVEN 7
YOUR NEW APPLIANCE 8
CONTROL PANEL 8
OPERATION INSTRUCTIONS 9
POWER SAVING MODE 9
MANUAL OPERATION 9
PAUSE COOKING 9
WHEN THE COOKING PROGRAM HAS FINISHED 9
USING THE PRESET COOKING PROGRAMS 10
X2 BUTTON (DOUBLE QUANTITY) 10
ENQUIRY FUNCTION 10
PROGRAMMING THE PRESETS 11
MULTI STAGE COOKING 11
SERVICE MODE 12
MICROWAVE SETTINGS 12
FACTORY RESET 12
CARE AND CLEANING 14
USE OF SUITABLE UTENSILS 15
TROUBLESHOOTING 16
SPECIFICATIONS 16
ELECTRIQ UK SUPPORT 16
PRECAUTIONS TO AVOID POSSIBLE EXPOSURE TO EXCESSIVE MICROWAVE ENERGY
- Do not attempt to operate this oven with the door open since this can result in harmful exposure to microwave energy. It is important not to break or tamper with the safety interlocks.
- Do not place any object between the oven front face and the door or allow dirt or cleaner residue to accumulate on sealing surfaces.
- WARNING: If the door or door seals are damaged, the oven must not be operated until it has been repaired by a competent person.
If the apparatus is not maintained in a good state of cleanliness, its surface could be degraded and affect the lifespan of the apparatus and lead to a dangerous situation.
IMPORTANT SAFETY INSTRUCTIONS
To reduce the risk of fire, electric shock, injury to persons or exposure to excessive microwave energy when using your appliance, follow basic precautions, including the following:
- Read and follow the specific: "PRECAUTIONS TO AVOID POSSIBLE EXPOSURE TO EXCESSIVE MICROWAVE ENERGY".
- This appliance can be used by children aged from 8 years and above and persons with reduced physical, sensory or mental capabilities or lack of experience and knowledge if they have been given supervision or instruction concerning use of the appliance in a safe way and understand the hazards involved. Children shall not play with the appliance. Cleaning and user maintenance shall not be made by children unless they are older than 8 and supervised. Children less than 8 years of age shall be kept away unless continuously supervised.
- Keep the appliance and its cord out of reach of children less than 8 years.
- If the supply cord is damaged, it must be replaced by the manufacturer, its service agent or similarly qualified persons in order to avoid a hazard.
- WARNING: Ensure that the appliance is unplugged before replacing the lamp to avoid the possibility of electric shock.
- WARNING: It is hazardous for anyone other than a competent person to carry out any service or repair operation that involves the removal of the cover which gives protection against exposure to microwave energy.
- WARNING: Liquids and other foods must not be heated in sealed containers since they are liable to explode.
- When heating food in plastic or paper containers, keep an eye on the oven due to the possibility of ignition.
- Only use utensils that are suitable for use in microwave ovens.
- If smoke is emitted, switch off the appliance and keep the door closed in order to stifle any flames.
- The contents of feeding bottles and baby food jars shall be stirred or shaken and the temperature checked before consumption, in order to avoid burns.
- The oven should be cleaned regularly and any food deposits removed.
- Failure to maintain the oven in a clean condition could lead to deterioration of the surface that could adversely affect the life of the appliance and possibly result in a hazardous situation.
- Do not use a temperature probe with this oven.
- Metallic containers for food and beverages must not be used during microwave cooking.
- The appliance must not be cleaned with a steam cleaner.
- CAUTION: This appliance is designed only for cooking food and is intended for indoor use only and should not be used for any other purpose or in any other application, such as for heating a room.
- The microwave oven is intended for heating food and beverages. Drying of food or clothing and heating of warming pads, slippers, sponges, damp cloths and similar may lead to risk of injury, ignition or fire.
- The microwave is not intended to be operated by means of an external timer or separate remote-control system.
- If it is necessary to use an extension cord, its marked electrical rating must be at least as great as the electrical rating of the appliance, and must be 3 core including the earth.
- Incorrect repairs are dangerous. Repairs may only be carried out and damaged power cables replaced by a suitably qualified and competent electrician.
- If the appliance is defective, unplug the unit and contact the retailer or manufacturer for support.
- The cable insulation on electrical appliances may melt when touching hot parts of the appliance. Never bring electrical appliance cables into contact with the microwave.
- During use the appliance will become hot
- Accessories and ovenware may become very hot. Always use oven gloves to remove accessories or ovenware from the cooking compartment.
- Alcoholic vapours may catch fire in the hot cooking compartment. Never prepare food containing large quantities of drinks with a high alcohol content. Only use small quantities of drinks with a high alcohol content. Open the appliance door with care.
- Foods with peel or skin may burst or explode during, or even after, heating. Never cook eggs in their shells or reheat hard-boiled eggs. Never cook shellfish or crustaceans. Always prick the yoke when baking or poaching eggs. The skin of foods that have a peel or skin, such as apples, tomatoes, potatoes and sausages, may burst. Before heating, prick the peel or skin.
Risk of scalding!
- When you open the appliance door, hot steam may escape. Open the appliance door with care. Keep children at a safe distance.
- Microwave heating of beverages can result in delayed eruptive boiling, therefore care must be taken when handling the container. This means that the liquid reaches boiling temperature without the usual steam bubbles rising to the
surface. Even if the container only vibrates a little, the hot liquid may suddenly boil over and spatter.
- When heating, always place a spoon in the container. This will prevent delayed boiling.
Risk of injury!
- Scratched glass in the appliance door may develop into a crack. Do not use a glass scraper, sharp or abrasive cleaning aids or detergents.
- Unsuitable ovenware may crack. Porcelain or ceramic ovenware can have small perforations in the handles or lids. These perforations conceal a cavity below. Any moisture that penetrates this cavity could cause the ovenware to crack.
- Only use microwave-safe ovenware
CAUSES OF DAMAGE
Caution!
- Creation of sparks: Metal e.g. a spoon in a glass must be kept at least 2 cm from the oven walls and the inside of the door. Sparks could irreparably damage the glass on the inside of the door.
- Water in the hot cooking compartment: Never pour water into the hot cooking compartment. This will cause steam. The temperature change can cause damage.
- Moist food: Do not store moist food in the closed cooking compartment for long periods.
- Do not use the appliance to store food. This can lead to corrosion.
- Heavily soiled seal: If the seal is very dirty, the appliance door will no longer close properly during operation. Always keep the seal clean.
- Operating the microwave without food: Operating the appliance without food in the cooking compartment may lead to overloading. Never switch on the appliance unless there is food in the cooking compartment. An exception to this rule is a short crockery test (see the section "Microwave, suitable crockery").
- Using the appliance door for standing on or placing objects on: Do not stand or place anything on the open appliance door. Do not place ovenware or accessories on the appliance door.
- Transporting the appliance: Do not carry or hold the appliance by the door handle. The door handle cannot support the weight of the appliance and could break.
- Microwave popcorn: Never set the microwave power too high. Use a power setting no higher than 600 watts. Always place the popcorn bag on a glass plate. The disc may jump if overloaded.
- The oven should be cleaned regularly and any food deposits removed since they may explode, even after microwave heating has ended.
- Failure to maintain the oven in a clean condition could lead to deterioration of the surface that could adversely affect the life of the appliance and possibly result in a hazardous situation.
READ CAREFULLY AND KEEP FOR FUTURE REFERENCE
TO REDUCE THE RISK OF INJURY TO PERSONS ENSURE THE UNIT IS CORRECTLY EARTHED.
DANGER: Electric Shock Hazard - Touching some of the internal components can cause serious personal injury or death. Do not disassemble this appliance.
WARNING: Electric Shock Hazard - Incorrectly earthed units can result in electric shock.
When it comes to connecting your appliance, please follow the instructions below carefully.
- This appliance is designed to be plugged into to the power supply.
- The plug contains an earth pin, and the microwave must be connected to a properly earthed socket.
- If there is not any appropriate earthed electrical outlet that conforms to regulations then one must be installed by a qualified electrician.
- The earthed electrical outlet must be near to the microwave.
- In case of any damage to the supply cable, you must call and arrange a certified and qualified electrician to replace the cable for you.
- You may damage the microwave if it is wired incorrectly. Any damage due to incorrect wiring will not be covered under the warranty.
- This appliance is only designed to connect to a standard 220-240V connection.
- The electrical cable must not touch hot parts of the appliance or the back of the appliance, otherwise the cable may get damaged and cause the appliance to short-circuit.
- The retailer and manufacturer have no responsibility against any kind of damage or loss that is caused from not following safety norms.
SETTING UP YOUR OVEN
• Ventilation slots and intakes must not be covered.
- Remove all packing material and accessories.
- Examine the oven for any damage such as dents or damage to the door. Do not attempt to use if the oven is damaged.
Select a level surface that provides enough open space for the intake and outlet vents.
A 10 cm space should be kept between the appliance and the wall behind, the same space should be left to the right of the microwave and a 30cm clearance above.
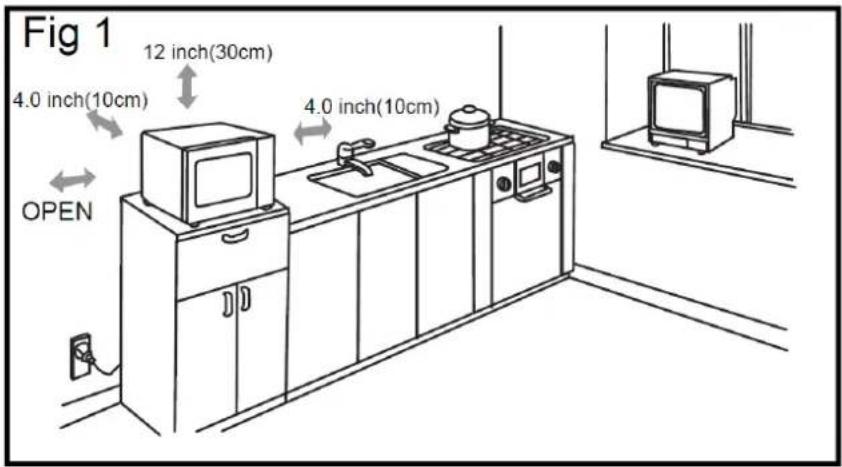
- Never remove the feet of the appliance, nor block the air intake and exhaust opening. The left side must be unobstructed.
- Blocking the intake and/or outlet openings can damage the oven.
- Place the oven far away as possible from radios and TVs. Operation of the microwave oven may cause interference to your radio or TV reception.
- Plug your oven into a standard household outlet. Be sure the voltage and the frequency is the same as the voltage and the frequency on the rating label.
- Warning: The plug socket and appliances which are liable to be affected by heat and moisture should be kept away from any vents on the oven.
YOUR NEW APPLIANCE
Use this section to familiarise yourself with your new appliance. The control panel and the individual operating controls are explained. You will find information on the cooking compartment and the supplied accessories
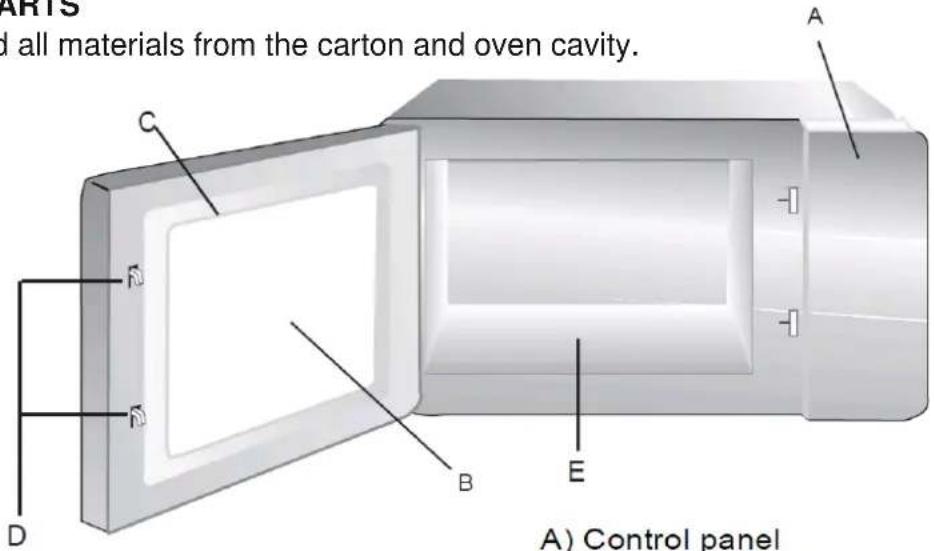
NAMES OF OVEN PARTS
Remove the oven and all materials from the carton and oven cavity.
CONTROL PANEL
A) Control panel
B) Observation window
C) Door assembly
D) Safety interlock system
E) Ceramic board
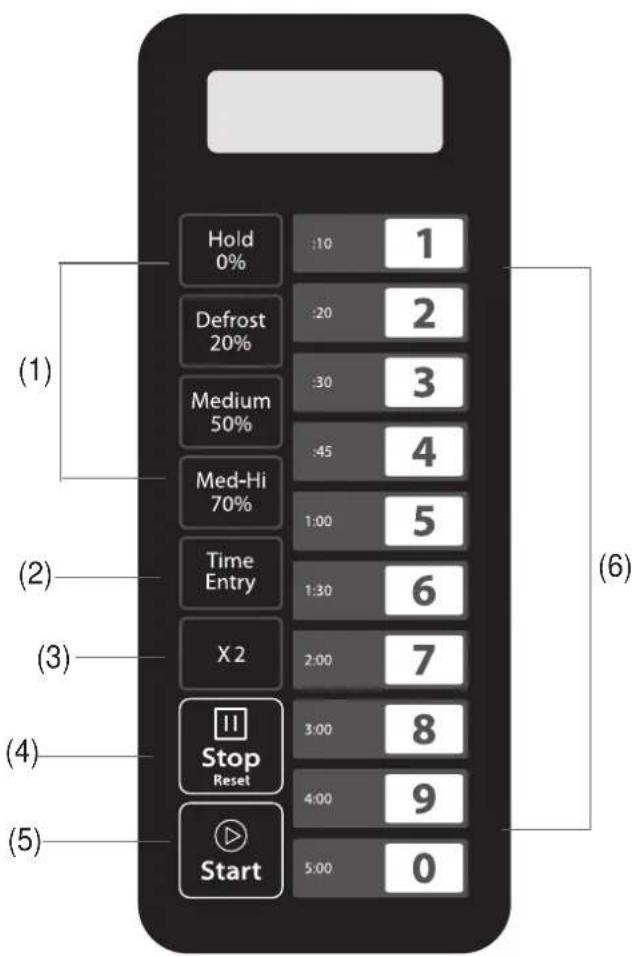
Power Level Buttons
2 Time Cook Button
3 X2 Button
4 Stop/Cancel Button
5 Start Button
6 Number / Preset Buttons
When first powered up the microwave will enter standby mode and “-- --” will be displayed on the screen. Before using the controls of the microwave the door must be opened and closed to enter Standby Mode, “0:00” will be displayed on the screen.
POWER SAVING MODE
The microwave will enter Power Saving Mode if while in standby mode the button is pressed, or if there is no input during the standby duration (Default: 60 Seconds). During Power Saving Mode the buttons are disabled and the screen will be blank. To exit Power Saving Mode open and close the microwave door to enter Standby Mode.
MANUAL OPERATION
- With the microwave in standby press the Time Entry button, "00:00" will be displayed on the screen.
- Type in the cooking time required, eg for 1 minute and 25 seconds, press 1, then 2, then 5.
- The microwave will default to full power, to choose a different power level press the appropriate power level button. To revert to full power press the same button again.
| Level | High | M. High | Med. | Defrost | Hold |
| Power | 100% | 70% | 50% | 20% | 0% |
| Display | PL10 | PL7 | PL5 | PL2 | PL0 |

- Press Start to start cooking. The microwave will display the remaining cooking time.
PAUSE COOKING
The cooking operation can be paused by pressing the Stop Button, or by opening the microwave door*. While paused the cooking operation can be restarted by pressing the Start button, or cancel by pressing the Stop Button. This would return the microwave to standby mode.
*The setting for door opening can be changed between pausing operation and cancelling cooking. See the Microwave Settings section.
WHEN THE COOKING PROGRAM HAS FINISHED
By default when the cooking program completes, the microwave will give a 3 second bleep while displaying "END", before returning to standby mode. This can be changed so that
the microwave will continue to bleep until either the door is opened or is pressed. See the Microwave Settings Section for more information.
USING THE PRESET COOKING PROGRAMS
The microwave can also be used with a range of presets. By default the microwave has 10 presets, which can be amended. This can be changed to 100 presets, information on changing the number of presets available is given in the Microwave Settings Section.
The default values for each preset are given below. These can be amended using the Preset Programming instructions.
| Button | Cooking Time | Power Level (%) | Cooking Factor (%) |
| 1 | 0:10 | 100 | 80 |
| 2 | 0:20 | 100 | 80 |
| 3 | 0:30 | 100 | 80 |
| 4 | 0:45 | 100 | 80 |
| 5 | 1:00 | 100 | 80 |
| 6 | 1:30 | 100 | 80 |
| 7 | 2:00 | 100 | 80 |
| 8 | 3:00 | 100 | 80 |
| 9 | 4:00 | 100 | 80 |
| 0 | 5:00 | 100 | 80 |
With the oven in standby press a preset button to start the preset associated with that button. The display will show the remaining cooking time.
X2 BUTTON / DOUBLE QUANTITY
The X2 button can be used in conjunction with the presets when cooking double the usual quantity. This adds the cooking factor percentage (Default is 80% for all presets) to the cooking time.
i.e If the cooking time is 1 minute, and the cooking factor is 80%, using this button would add 80% to the cooking time, so the microwave will run for 1:48.
To use the double quantity function press the X2 button, followed by the chosen preset.
ENQUIRY FUNCTION
Time
During microwave cooking, press the button to display the current power level. After a couple of seconds, the microwave will revert to showing the remaining cooking time.
PROGRAMMING THE PRESETS
The presets are fully customisable. To program a preset
- Open the microwave door and hold the "1" button for 5 seconds.
The microwave will bleep to indicate you have entered the programming mode and "ProG" will be displayed on the screen.
-
Press the preset number you wish to amend (Type the number if set to 100 presets – See the Microwave Settings section)
-
Type in the cooking time required, eg for 1 minute and 25 seconds, press 1, then 2, then 5. (Please note it cannot exceed the maximum cooking time – See Microwave Settings section)
-
If the power level required is not 100%, choose the desired power level by pressing the appropriate power level button on the control panel.
The power level selected will be displayed on the screen
| Level | High | M. High | Med. | Defrost | Hold |
| Power | 100% | 70% | 50% | 20% | 0% |
| Display | PL10 | PL7 | PL5 | PL2 | PL0 |
-
To change the cooking factor (The percentage increase when the X2 button is used), press the X2 button, and the first number of the percentage required. i.e. to set it to 50% press the X2 button, followed by 5.
-
Press the button to save the program.
If the cooking time set exceeds the maximum cooking time, the oven will bleep 3 times, please restart from step 3 with a shorter cooking time.
- Close the door or press Stop RTO exit programming mode.
MULTI STAGE COOKING
It is possible to use multi stage cooking to set a maximum of 3 cooking stages. Multi stage cooking can be set both for manual operation and as a preset cooking option. To do this, once the time and power level have been set for the cooking stage, press the button before entering the settings for the second and third stages. Once the stages have been entered, press the button.
Example: To create preset 3 as multi stage, with the first stage at M. High for 1 minute 25 seconds, and the second at Med, for 5 minutes and 40 seconds follow the steps:
-
With the microwave in standby, open the door, and hold "1" for 5 seconds
-
Press "3" to amend the preset on button 3.
-
Press "1", "2", "5" to input the cooking time. 1:25 will display on the screen.
-
Press -Hi70% and PL7 will display on the screen.
-
Press Time Entry to confirm the first stage, S-2 will display on the screen to indicate entering programming for stage 2
-
Press "5", "4", "0" to input the cooking time. 5:40 will display on the screen.
-
Press and PL5 will display on the screen.
Press start save the program.
SERVICE MODE
To access the service mode
- Open the door of the microwave
- Hold "3" for 5 seconds to enter service mode.
The Display will show "SErU"
To check the number of times the door of the microwave has been opened Press "3"
To reset the door counter, while in service mode press Start followed by "4" within 3 seconds. The counter will clear and "4-CL" will be displayed.
MICROWAVE SETTINGS
Many settings for microwave are customisable, allowing it to be set up to suit its intended use. To change the settings:
- Open the oven door
- Hold "2" for 5 seconds
The Buzzer will sound, and the microwave will display "OP: --" - Repeatedly press the option number of the setting that requires changing, to scroll through the available options. The currently selected option will be displayed on the screen.
i.e To change the Bleep Volume to low (21), Repeatedly press "2" to scroll between 20 (Off) and 23 (High) until "OP:21" is displayed on the screen. - When the desired value is shown on the screen, Press Start to save the new setting. To exit without making a change press or close the oven door.
Please see the table on the following page for details of the settings that can be amended and their default values.
FACTORY RESET
To return the microwave back to its factory default settings, press Start and "0" at the same time.
| Option | Setting | Description | Default |
| 1End of Cooking Time | Sets what the microwave will do when the cooking program has finished | ||
| 10 | 3 Second Bleep | Yes | |
| 11 | Continuous Bleep until user input | ||
| 12 | 5 Quick Bleeps, repeating until user input | ||
| 2Bleep Volume | Volume of alerts from the microwave | ||
| 20 | Off | ||
| 21 | Low | ||
| 22 | Medium | Yes | |
| 23 | High | ||
| 3Keypad Tone | Select if Microwave bleeps when keys are pressed | ||
| 30 | Off | ||
| 31 | On | Yes | |
| 4Standby Time | Select how long the microwave will stay in standby before entering power saving mode | ||
| 40 | 15 Seconds | ||
| 41 | 30 Seconds | ||
| 42 | 60 Seconds | Yes | |
| 43 | 120 Seconds | ||
| 5On the Fly | When disabled, the Start button must be pressed after selecting a preset. | ||
| 50 | Disabled | ||
| 51 | Enabled | Yes | |
| 6Door Reset | Select if opening the door clears the current operation and returns the microwave to standby mode | ||
| 60 | Disabled | Yes | |
| 61 | Enabled | ||
| 7Max Cooking Time | Select the maximum cooking time – Applies to both presets and manual cooking operation | ||
| 70 | 60 Minutes | Yes | |
| 71 | 10 Minutes | ||
| 8Manual Programming | Select whether the user can input their own cooking times, or can only used the pre-programmed presets | ||
| 80 | Disabled | ||
| 81 | Enabled | Yes | |
| 9Number of Presets | Select the number of user definable presets that can be set up. | ||
| 90 | 10 | Yes | |
| 91 | 100 |
CARE AND CLEANING
With careful care and cleaning your microwave oven will retain its looks and remain in good order. We will explain here how you should care for and clean your appliance correctly.
Risk of electric shock! Penetrating moisture may cause an electric shock. Do not use any high-pressure cleaners or steam cleaners.
Risk of burns! Never clean the appliance immediately after switching off. Let the appliance cool down.
Risk of serious damage to health! Microwave energy may escape if the cooking compartment door or the door seal is damaged. Never use the appliance if the cooking compartment door or the door seal is damaged. Contact the after-sales service.
Notes
Slight differences in colour on the front of the appliance are caused by the use of different materials, such as glass, plastic and metal.
Shadows on the door panel which look like streaks, are caused by reflections made by the oven light. Unpleasant odours, e.g. after fish has been prepared, can be removed very easily. Add a few drops of lemon juice to a cup of water. Place a spoon into the container as well, to prevent delayed boiling (ensure the spoon is kept at least a few centimetres from the edge of the oven to prevent arcing). Heat the water for 1 to 2 minutes at maximum microwave power.
CLEANING AGENTS
To ensure that the different surfaces are not damaged by using the wrong cleaning agent, observe the information in the table. Do not use
- Sharp or abrasive cleaning agents.
- Metal or glass scrapers to clean the glass in the appliance door.
• Metal or glass scrapers to clean the door seal. - Hard scouring pads and sponges.
- Cleaning agents with high concentrations of alcohol.
Wash new sponge cloths thoroughly before use.
Allow all surfaces to dry thoroughly before using the appliance following cleaning
| Area | Cleaning agents |
| Appliance front | Hot soapy water: Clean with a dish cloth and dry with a soft cloth. Do not use glass cleaners, metal scrapers or glass scrapers for cleaning. |
| Appliance front with stainless steel | Hot soapy water: Clean with a dish cloth and dry with a soft cloth. Remove flecks of limescale, grease, starch and albumin (e.g. egg white) immediately. Corrosion can form under such residues. Special stainless steel cleaning agents can be obtained from specialist shops. Do not use glass cleaners or metal or glass scrapers for cleaning. |
| Cooking compartment | Hot soapy water or a vinegar solution: Clean with a dish cloth and dry with a soft cloth.If the oven is very dirty: Do not use oven spray or other aggressive oven cleaners or abrasive materials. Scouring pads, rough sponges and pan cleaners are also unsuitable. These items scratch the surface. Ensured the interior is thoroughly dried before use. |
| Door panels | Glass cleaner:Clean with a dish cloth. Do not use a glass scraper. |
| Seal | Hot soapy water:Clean with a dish cloth, do not scour. Do not use a metal or glass scraper for cleaning. |
USE OF SUITABLE UTENSILS
See the table on "Materials you can use in microwave oven or to be avoided in microwave oven." There may be certain non-metallic utensils that are not safe to use for microwaving. If in doubt, you can test the utensil in question following the procedure below.
Utensil Test:
- Fill a microwave-safe container with 1 cup of cold water (250ml) along with the utensil in question.
- Cook on maximum power for 1 minute.
- Carefully feel the utensil. If the empty utensil is warm, do not use it for microwave cooking.
- Do not exceed 1 minute cooking time.
| Materials you can use in microwave oven | |
| Utensils | Remarks |
| Browning dish | Follow manufacturer's instructions. The bottom of browning dishes must be at least 3/16 inch (5mm) above the turntable (Use a rack). Incorrect usage may cause the turntable to break. |
| Dinnerware | Microwave-safe only. Follow the manufacturer's instructions. Do not use cracked or chipped dishes. |
| Glass jars | Always remove lid. Use only to heat food until just warm. Most glass jars are not heat resistant and may break. |
| Glassware | Heat-resistant oven glassware only. Make sure there is no metallic trim. Do not use cracked or chipped glassware. |
| Oven cooking bags | Follow manufacturer's instructions. Do not close with a metal tie. Make slits to allow steam to escape. |
| Paper plates and cups | Use for short-term cooking/warming only. Do not leave oven unattended while cooking. |
| Paper towels | Use to cover food for reheating and absorbing fat. Use with supervision for a short-term cooking only. |
| Parchment paper | Use as a cover to prevent splattering or a wrap for steaming. |
| Plastic | Microwave-safe only. Follow the manufacturer's instructions. Should be labelled "Microwave Safe". Some plastic containers soften, as the food inside gets hot. "Boiling bags" and tightly closed plastic bags should be slit, pierced or vented as directed on the packaging. |
| Plastic wrap | Microwave-safe only. Use to cover food during cooking to retain moisture. Do not allow plastic wrap to touch food. |
| Thermometers | Microwave-safe only |
| Wax paper | Use as a cover to prevent splattering and retain moisture. |
| Materials to be avoided in microwave oven | |
| Utensils | Remarks |
| Aluminium tray | May cause arcing. Transfer food into microwave-safe dish. |
| Food carton with metal handle | May cause arcing. Transfer food into microwave-safe dish. |
| Metal or metal trimmed utensils | Metal shields the food from microwave energy. Metal trim may cause arcing. |
| Metal twist ties | May cause arcing and could cause a fire in the oven. |
| Paper bags | May cause a fire in the oven. |
| Plastic foam | Plastic foam may melt or contaminate the liquid inside when exposed to high temperature. |
| Wood | Wood will dry out when used in the microwave oven and may split or crack. |
TROUBLESHOOTING
| Problem | Possible cause | Remedy/information |
| The appliance does not work. | Faulty circuit breaker. | Look in the fuse box and check that the circuit breaker for the appliance is in working order. |
| Power Switched off | Check that the wall switch is in the on position. | |
| Power cut | Check whether the kitchen light works. | |
| The microwave does not switch on. | Door not fully closed. | Check whether food residue or debris is trapped in the door. |
| It takes longer than before for the food to heat up in the microwave | The selected microwave power level is too low. | Select a higher power level. |
| A larger amount than usual has been placed in the appliance. | Double the amount = almost double the cooking time. | |
| The food was colder than usual. | Stir or turn the food during cooking. |
SPECIFICATIONS
| Model: | EIQMWCOM25 |
| Rated Voltage: | 240V~ 50Hz |
| Rated Output Power | 1000 W |
| Rated Input Power | 1550W |
| Rated Current | 15A |
| Oven Capacity: | 25L |
| External Dimensions: | 511x432x311mm |
| Net Weight: | Approx. 14.83 kg |
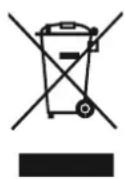
According to Waste of Electrical and Electronic Equipment (WEEE) directive, WEEE should be separately collected and treated. If at any time in future you need to dispose of this product please do NOT dispose of this product with household waste. Please send this product to WEEE collecting points where available.
ElectrIQ UK Support
www.ElectrIQ.co.uk/support
0871 620 1057
Office hours: 9AM - 5PM Monday to Friday
www.ElectrlQ.co.uk
Unit J6, Lowfields Business Park
Lowfields Way, Elland
West Yorkshire, HX5 9DA
- CONTENTS
- PRECAUTIONS TO AVOID POSSIBLE EXPOSURE TO EXCESSIVE MICROWAVE ENERGY
- IMPORTANT SAFETY INSTRUCTIONS
- Risk of scalding!
- Risk of injury!
- CAUSES OF DAMAGE
- Caution!
- READ CAREFULLY AND KEEP FOR FUTURE REFERENCE
- TO REDUCE THE RISK OF INJURY TO PERSONS ENSURE THE UNIT IS CORRECTLY EARTHED.
- SETTING UP YOUR OVEN
- YOUR NEW APPLIANCE
- NAMES OF OVEN PARTS
- POWER SAVING MODE
- MANUAL OPERATION
- PAUSE COOKING
- WHEN THE COOKING PROGRAM HAS FINISHED
- USING THE PRESET COOKING PROGRAMS
- X2 BUTTON / DOUBLE QUANTITY
- ENQUIRY FUNCTION
- PROGRAMMING THE PRESETS
- MULTI STAGE COOKING
- SERVICE MODE
- MICROWAVE SETTINGS
- FACTORY RESET
- CARE AND CLEANING
- Notes
- CLEANING AGENTS
- USE OF SUITABLE UTENSILS
- Utensil Test:
- ElectrIQ UK Support
Brand : ElectriQ
Model : eiQMWCOM25
Category : Microwaves