SILENT16 - Air-conditioner ElectriQ - Free user manual and instructions
Find the device manual for free SILENT16 ElectriQ in PDF.


| Product Type | Portable Air Conditioner |
| Model | SILENT16 |
| Brand | ElectriQ |
| Cooling Capacity | 12000 BTU/h |
| Power Consumption (Cooling) | 1100 W |
| Power Supply | 220-240 V ~ 50 Hz |
| Refrigerant | R290 |
| Noise Level (Low/High) | 44 / 52 dB(A) |
| Air Flow | 420 m³/h |
| Dimensions (WxDxH) | 43 x 35 x 70 cm |
| Weight | 18 kg |
| Modes | Cool, Fan, Dehumidify |
| Control Type | Touch Panel + Remote Control |
| Timer | Yes (1-24 hours) |
| Auto Swing | Vertical louvres |
| Air Filter | Washable mesh filter |
| Drainage | Self-evaporative (continuous drain optional) |
| Safety Features | Auto restart, overheat protection, child lock |
| Maintenance | Clean filter every 2 weeks |
| Spare Parts Availability | Contact ElectriQ support |
Frequently Asked Questions - SILENT16 ElectriQ
User questions about SILENT16 ElectriQ
0 question about this device. Answer the ones you know or ask your own.
Ask a new question about this device
Download the instructions for your Air-conditioner in PDF format for free! Find your manual SILENT16 - ElectriQ and take your electronic device back in hand. On this page are published all the documents necessary for the use of your device. SILENT16 by ElectriQ.
USER MANUAL SILENT16 ElectriQ
natural_image
Line drawing of a large industrial air purifier with control panel and cooling unit (no text or symbols)Thank you for choosing ElectriQ
Please read this user manual before using this innovative Air Conditioner and keep it safe for future reference.
Visit our page www.electriQ.co.uk for our entire range of Intelligent Electricals
SAFETY INSTRUCTIONS 3
FEATURES AND PARTS LIST 4
INSTALLATION 5
OPERATION AND SETTINGS 7
WATER-DRAINAGE 9
MAINTENANCE 10
TROUBLESHOOTING 11
APPENDIX 12
TECHNICAL DATA 12
SAFETYINSTRUCTIONS
Important!
- Carefullyreadtheinstructionsbeforeoperatingtheunit
- This appliance is for indoor use only.
• Rating: This unit must be only connected to a 220-240V/50Hz earthed outlet.
• Installationmustbeinaccordancewithregulationsofthecountrywheretheunitisused. - If you are in any doubt about the suitability of your electrical supply have it checked and, if necessary, modified by a qualified electrician.
- This air conditioner has been tested and dissafetouse. However, as with any electrical appliances - use it with care.
- Disconnectthepowerplugfromsocketbeforedismantling,assemblingorcleaning.
- Avoidtouchinganymovingpartsoftheappliance.
- Neverinsertfingers, pencilsoranyotherobjectsthoughtheguard
-
This appliance is not intended for use by persons (including children) with reduced physical, sensoryormentalcapabilities.Itisalsonotintendedforusebythosewithalackof experienceandknowledge,unlessth eyhavebeengivensupervisionorinstruction concerningtheuseoftheappliancebyapersonresponsiblefortheirsafety.
Donotleavechildrenunsupervisedwiththisappliance. -
Donotcleantheunitbysprayingitorimmersingitinwater.
- Neverconnecttheunittoanelectricaloutletusinganextensioncord.Ifanoutletisnot available,oneshouldbeinstalledbyaqualifiedelectrician.
- Neveroperatethisapplianceifthecordorplugisdamaged.Ensurethepowerco rdisnot stretchedorexposedtosharpobject/edges.
- A damaged supply cord should be replaced by the manufacturer or a qualified electrician in ordertoavoidahazard.
- Any service other than regular cleaning or filter replacement should be performed by an authorized servicerepresentative. Failure to comply could result in avoided warranty.
- Donotusetheapplianceforanyotherpurposesthanitsintendeduse.
- Theairconditionerunitmustalwaysbestoredandtrans portedupright,otherwise irreparabledamagemaybecausedtothecompressor;ifindoubtwesuggestwaiting atleast24hoursbeforestartingtheunit.
- Avoid restarting the air conditioning unit unless 3 minutes have passed since being turned off. This prevents damage to the compressor.
- Neverusethemainsplugasaswitchtostartandturnofftheairconditioningunit. Use the provided ON/OFFswitchlocatedonthecontrolpanel.
- Alwaysplacetheunitonadryandstables surface.
- Theappliances should not be installed in laundry or wetrooms
EnergySavingandUnitSafetyProtectionTips
- Donotcoverorrestricttheairflowfromtheoutletorinletgrills.
- For maximum performance the minimum distance from a wall or objects should be 50cm.
- Keepthefiltersclean.Undernormalconditions,filtersshouldonlyneedcleaningonceeverythreeweeks(approximately).Sincethefiltersremoveairborneparticles,morefrequent cleaningmaybene cessary,dependingontheairquality.
- For the initial startup set the fan speed to maximum and the thermostat to 4-5 degrees lower than the current temperature. After, set the fans switch to low and set the thermostat to your desired setting.
- To protect the unit we recommend not using the cooling function when the ambient temperature is higher than 35^ .
FEATURES AND PARTS LIST
1. Features
- Self-evaporative system - no external water tank needed
- Designer inspired luxury model
- LED screen, indicates temperature and operation mode
- On/Off timer function – allows you to choose when the unit operates
- Compressor protection technology
2. Parts list:
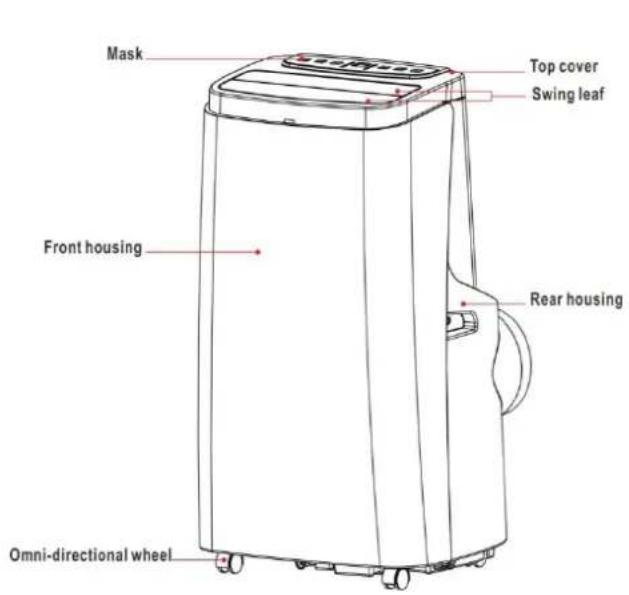
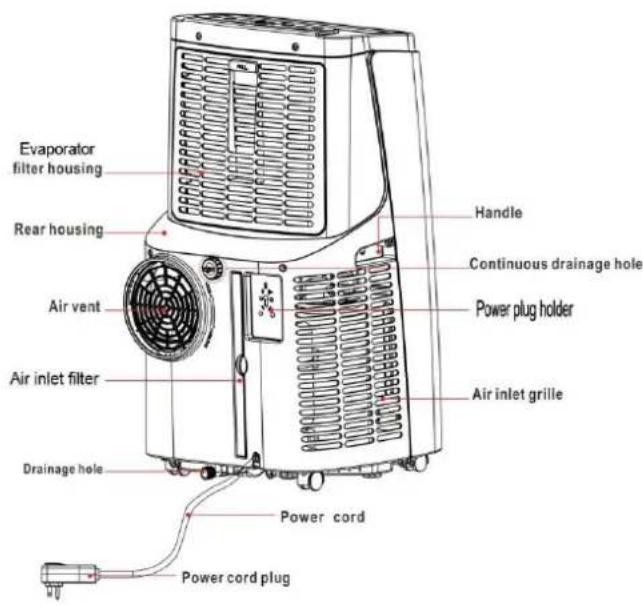
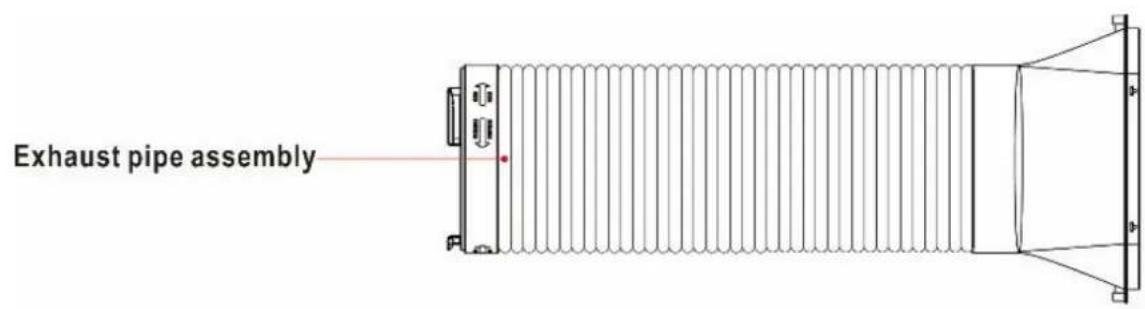

INSTALLATION
Installation:
Warning: Before using this unit, please keep it upright for at least 3-4 hours.
This unit can easily be moved from one room to another.
While moving the unit please note that it must always be kept upright and then placed on an even surface.
- Assemble the fishtail connector on to the hose.

natural_image
Diagram showing a cylindrical container being converted into a coiled cable or mesh structure (no text or symbols present)- Assemble the exhaust hose to the air conditioner body.
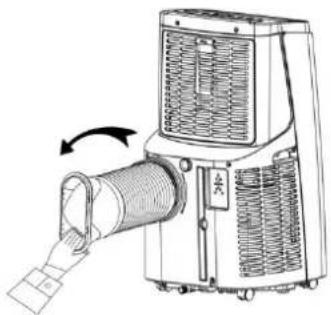
natural_image
Line drawing of a portable air conditioner unit with cooling fan and heat exchanger (no text or symbols)Extend one head of the hose and screw it into the unit anti-clockwise. The hose can be removed by screwing the hose clockwise. Note: to screw it into place should take no less than three rotations.
-
In the same way connect the hose to the assembled adaptor (at least three rotations).
-
Installation of window kits.
Partially open the window and then fix the window kit to the window.
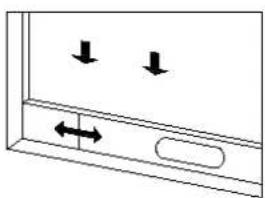
natural_image
Simple line drawing of a window with two downward arrows and an arrow inside, no text or symbols present.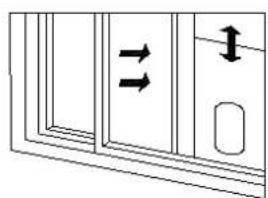
natural_image
Pure diagram of a door with double-headed arrows indicating flow or movement, no text or symbols present- Make sure the unit is upright and there are no obstructions to the air inlets and outlet grills.
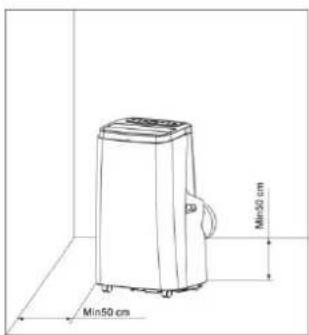
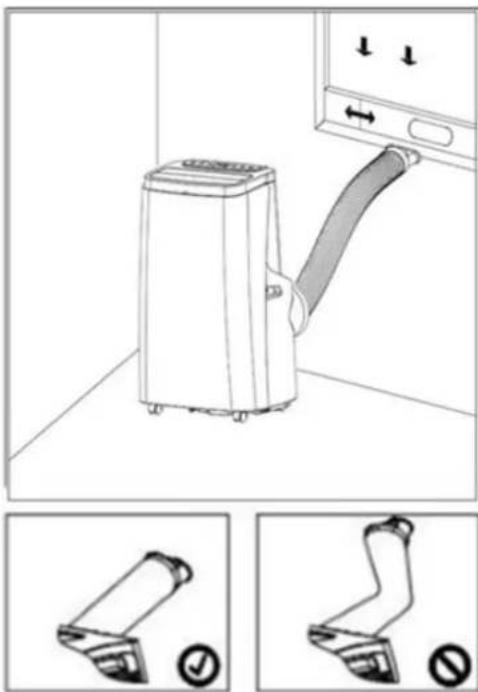
- Fix the other end of the hose to the air-outlet window kit.
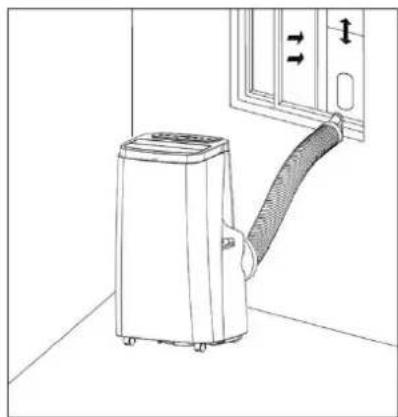
natural_image
Line drawing of a small air conditioner unit with a coiled hose, placed near a door (no text or symbols)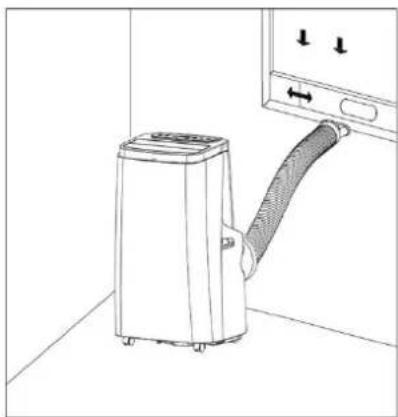
natural_image
Line drawing of a small air conditioner unit attached to a wall-mounted control panel (no text or symbols)Note: The window kit is only designed to be installed with sliding or sash windows or doors. The window kit is not designed or to be used with any other style of windows. However, the fish tail adaptor can be used with most windows / doors. When using the cooling mode ensure that the opening left is as small as possible. The best form of installation is through a wall duct. By properly venting, you expel hot air from your room while efficiently cooling it.
Important safeguards
The length of the soft hose extends from 28 cm to 150 cm. If hose is extended above this length the unit may malfunction and this can invalidate the warranty. The outlet vent must be well ventilated and not obstructed as this will cause the unit to overheat. Avoid bending the air hose more than 30 degrees
OPERATION AND SETTINGS
This portable air conditioner boasts 3 functions: cooling, dehumidifying and fan. The fan has two speeds: high and low. Temperature range settings are: 16 - 31^ . The unit will also display operating function, temperature, fault diagnostic and protective functions on the LCD screen.
1. Controlinstruction Controlpanel
flowchart
graph TD
    A["TIMER"] --> B["FAN"]
    B --> C["UP"]
    C --> D["Sleep"]
    D --> E["Color Panel"]
    E --> F["cool: °C"]
    E --> G["dry: °F"]
    E --> H["fan: Hr"]
    E --> I["Sleep: Sleep"]
    E --> J["Full: on/off"]
    K["DOWN"] --> L["MODE"]
    M["POWER"] --> N["MODE"]
    O["1"] --> P["2"]
    Q["3"] --> R["4"]
    S["5"] --> T["6"]
    U["7"] --> V["POWER"]
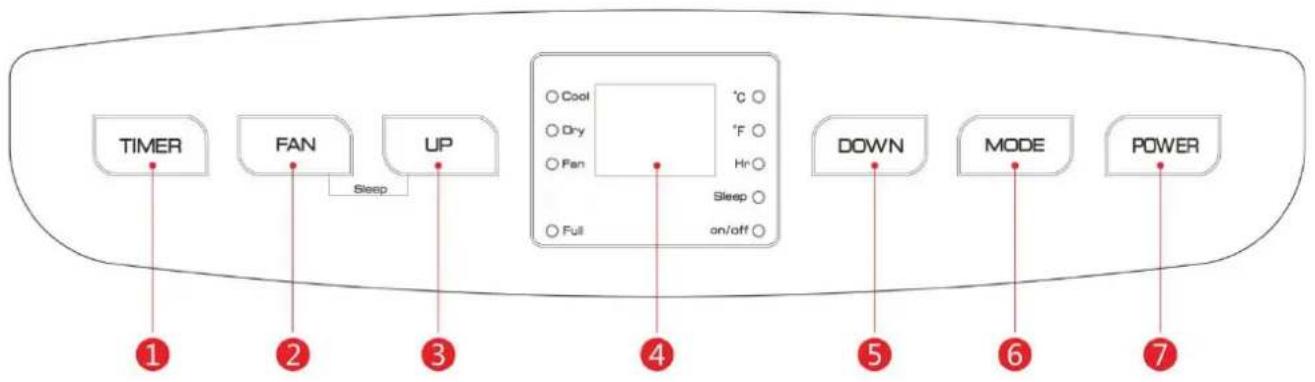
① Timing Key
② Fan Speed Selection Key
③ Up Key
4 Display window
⑤ Down key
⑥ Mode selection key
⑦ Power key
When plugged in the unitis automatically in standby status.
'POWER' button (7) press the key to turn on and turn offthe machine. In the case of power on, press the key to turn offthe machine; in the case of power off, press the key to turn on the machine.
'MODE' button (6) In the case of power on, press the key to choose cooling, fan, dehumidification mode.
'UP' (3) and 'DOWN' (5) button: settemperature and timer.
In cooling mode, the temperature can range from 16 – 31°C. Timer is 1-24 hrs.
Pressing UP and DOWN buttons simultaneously, shiftsbetween °C and °F.
'FAN'button(2)
a) In cooling and fan mode, press the key to select high, medium or low speed operation.
b) In dehumidification mode, the fan key does not operate, and the fan will default to low speed operation.
'TIMER' button (1):
Press the button to select your desired operating times.
Use the ▲ and ● buttons to adjust hours from 1-24. You can only set the auto-shut off timer while the unit is operating (on) You can only set the auto-start timer while the unit is switched off (standby) After you have set the timer the timer will initiate and the units will start/ stop after the selected time. If you adjust the timer or press the power key previous settings will be cleared. Timer functions cannot be combined or repeated.
Sleep Mode:
In the cooling Mode, Press the "UP" and "FAN" buttons together to turn on the sleep mode, then the unit will work on Energy-Saving and lowest fan mode.
Note: The sleep mode is not operational in dehumidifying or Fan mode. Please use the remote control to set the sleep mode, it cannot be set from the air con touch control panel.
2. Operating Instructions of the Remote Control
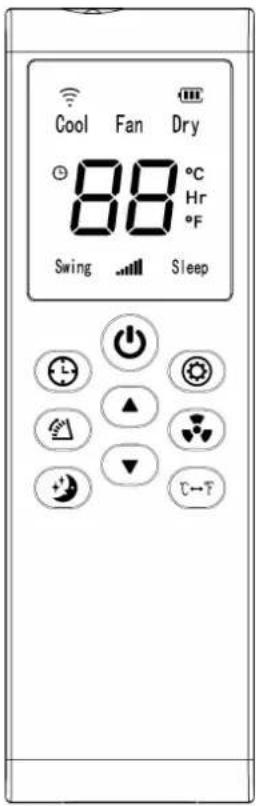
2.1 Power: Press the ⏻ key to turn on or off the machine.
2.2 Mode: press the key to switch between cooling, fan, dehumidification and heating mode (optional).
2.3 Up: press the ▲ key to increase temperature and timer set value.
2.4 Down: press the ▼ key to reduce temperature and timer set value
2.5 Fan: press the key to cycle between high, medium and low fan speed.
2.6 Timer: press the key to set timer value.
2.7 Swing: Press the key to open or close swing style. Air flow of the air outlet can blow at different angles.
2.8 Press the key to switch between Celsius and Fahrenheit.
2.9 Sleep Mode: Press the key to turn on the sleep mode.
3. Multi protective function
3.1. Frost Protection Function:
In cooling, dehumidification or economic power saving mode, if the temperature of the exhaust pipe is too low, the machine will automatically enter protection status; if the temperature of the exhaust pipe rises to a certain temperature, it can automatically revert to normal operation.
3.2. Overflow Protection Function:
When water in the water pan exceeds the warning level, the machine will automatically sound an alarm, and the LDC temperature display area will show "FL". At this point, you need to move the drainage pipe connecting the machine or the water outlet to sewer or other drainage area to empty the water (details see Drainage Instructions at the end of this chapter). After the water is emptied, the machine will automatically return to the original state.
3.3. Automatic Defrosting (heating and cooling models have this function):
The machine has automatic defrosting function: during defrosting, heating symbol on the display screen will flash.
3.4. Automatic Thermal Protection:
To protect the service life of the machine, the machine has automatic thermal protection in heating mode. During the protection period, the compressor and the lower motor will stop operation and will automatically return to normal heating state after the temperature of the machine recovers.
3.5. Protection Function of the Compressor
To increase the service life of the compressor, it has a 3-minute delay booting protection function after the compressor is turned off.
WATER-DRAINAGE
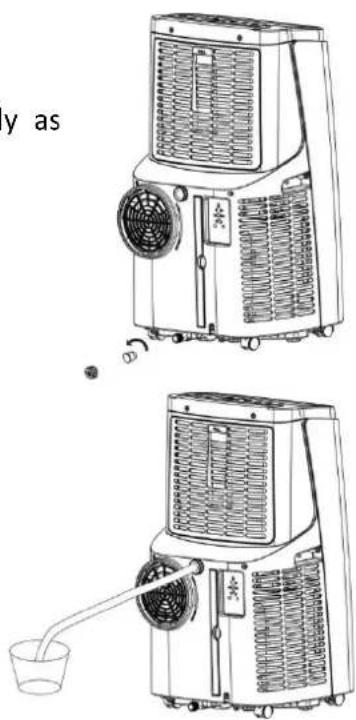
1. Manual drainage:
1.1 When the internal water tank is full the unit will stop working.
1.2 Shut off the unit and unplug. Try not to move the model abruptly as cause water to spill out from internal water tank.
1.3 Place a tray under the water plug.
1.4 Screw off the drain plug and unplug the water rubber stopper - water will drain from the container.
1.5 Put the water rubber stopper back and screw the drain
1.6 Plug cap back into place
2. Continuous drainage:
2.1 Screw off the drain plug cap and unplug the water rubber stop
2.2 Use a water pipe to connect to the water outlet.
2.3 You can plumb this pipe into your current plumbing system, lea outside or use a water pump.
natural_image
Line drawings of two different air purifiers with cooling fans and a water bottle, no text or symbols presentNote: This model has a self-evaporative function, which reduces the need to empty the water tank. If the unit is vented correctly most of the water is reused to cool the condenser coils and any excess is evaporated. Please do not use continuous drainage if you intend to use the self-evaporating facility.
Maintenance
1. Cleaning:
Before cleaning and maintenance, turn off the machine and unplug the plug.
Clean the surface
Clean surface of machine with a wet soft cloth. Don't use chemicals, such as benzene, alcohol, gasoline, e otherwise, the surface of the air conditioning will be damaged or even the whole machine will be damaged
Air filter cleaning
If the filter screen is clogged with dust, and the effectiveness of the air conditioning is reduced, be sure clean the filter screen once every two weeks.
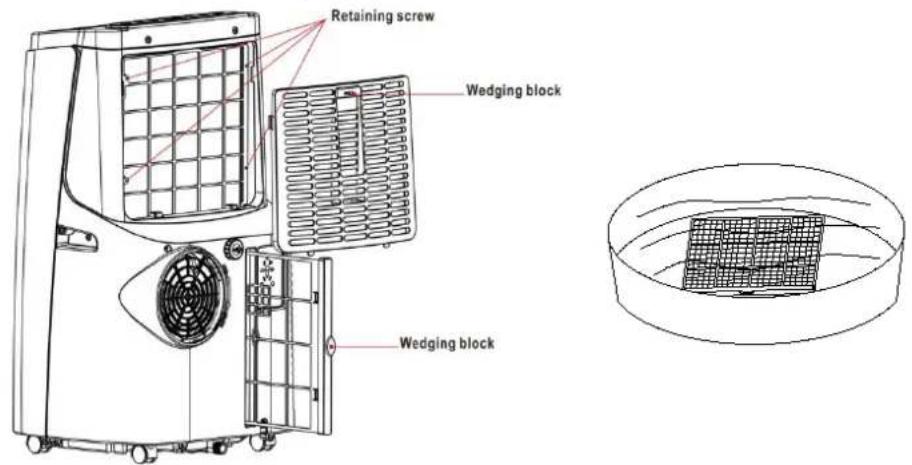
A: Clean the upper filter screen frame
a: Clasp the wedging block of the Evaporator filter screen frame with hands. Force down from the outside t remove the Evaporator filter screen frame. Unscrew four screws fixing the Evaporator filter screen and th rear housing to remove the Evaporator filter screen (as shown in the above figure).
b: Put the Evaporator filter screen into warm water with neutral detergent (about 40 °C /104°F) and dry it in
the shade after rinsing clean.
B: Clean the lower filter screen frame
a: Hold the handle of the air inlet filter screen frame, and pull it outward gently to remove it.
b: Put the air inlet filter screen into warm water with neutral detergent (about 40°C / 104 °F) and dry it in the
shade after rinsing clean.
2. End of Season Maintenance:
- Pull out the plug from the drainage hole and empty the internal tank. You can also drain the water by leaning the unit.
- Then switch the unit to low fan mode.
- Keep the unit in this mode for half day - until the conduit is dried. Doing this helps to keep the inside unit dry and prevents mould developing
- Turn off the unit and pull out the plug.
- Coil the wire and bind it together, then put it into the accessories space.
-
Separate the air-exhaust pipe and store it safely.
-
Covertheunitandkeepitinadryplace.
- Takethebatteriesoutofremotecontrolandstoreordispose, themsafely Keepallaccessorieswiththeunitreadyfornextseason.
Troubleshooting
Donotrepairordisassembletheairconditioningbyyourself.Unqualifiedrepairwillleadtofailure ofthewarrantycard,andmaycausedamagetousersortheirproperties.
| ProblemsReasons | Solutions | |
| Theair conditioning doesnotwork. | Thereisnoelectricity. | Turnitonafterconnectingittoasocketwith electricity. |
| The overflow indicator displays "FL". | Discharge the water inside. | |
| Theambienttemperatureistoolow ortoohigh | Recommendtousethemachineinatthe temperatureof7-35 °C(44-95°F). | |
| Incoolingmode,theroom temperatureislowerthantheset temperature;inheatingmode,the roomtemperatureishigherthanthe settemperature. | Changethesettemperature. | |
| In dehumidification mode,the ambienttemperatureislow. | Themac hineisplacedinaroomwithan ambienttemperatureofgreaterthan17 °C.(62 °F). | |
| Thecoolingor heatingeffectis notgood | Thereisdirectsunlight.PulltheCurtain. | |
| Doorsorwindowsareopen;thereare alotofpeople;orincoolingmode, thereareothersourcesofheat. | Closedoorsandwindows,andaddnewair conditioning. | |
| Thefilterscreenisdirty.Cleanorreplacethefilterscreen. | ||
| Theairinletoroutletisblocked.Clearobstructions. | ||
| BigNoise | Theairconditioningisnot placedona flatsurface. | Puttheairconditioningonaflatandhard place(toreducenoise). |
| compressordoes notwork. | Overheatprotectionstarts. | Waitfor3minutesuntilthetemperatureis lowered,andthenrestartthemachine. |
| Theremote controldoesnot work. | Thedistancebetweenthemachine andtheremotecontrolistoofar. | Lettheremotecontrolgetclosetotheair conditioning,andmakesurethattheremote controldirectlyfacestothedirectionofthe remote-controlreceiver. |
| Theremotecontrolisnotaligned withthedirectionoftheremote controlreceiver. | ||
| Batteriesaredead.Replacebatteries. | ||
| Displays'E1'.Thepipetemperaturesensoris abnormal. | Checkthepipetemperaturesensorand relatedcircuitry. | |
| Displays'E2'Theroomtemperaturesensoris abnormal. | Checktheroomtemperaturesensorand relatedcircuitry. | |
If problems not listed in the table occur or recommended solutions do not work, please contact the professionalserviceorganization.
APPENDIX
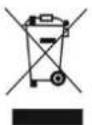
Disposal: Donotdisposethisproductasunsortedmunicipalwaste. Colleconofstichwaste mustbehandledseparatelyasspecialtreatmen tisnecessary. Recyclingfacilitiesarenow availableforallcustomersatwhichyoucandeposityouroldelectricalproducts.Customers willbeabletotakeanyoldelectricalequipmen ttopardipangtivicamenitysitesrunby
theirlocalcouncils.Pleaseremembertha tthisequipmentwillbefurtherhandleduringtherecycling process,sopleasebeconsideratewhendeposi tingyourequirement.Pleasecontachellocalcouncil fordetailsofyourlocalhouseholdwasterecyclingcenters.
TECHNICALDATA
| SILENT 12 | SILENT 16 | |
| Capacity | 3.52 KWh / 12,000 BTU | 6.69 KWh / 16,000 BTU |
| Rated Input | 1.34 KW | 1.70 KW |
| Running Current | 6A | 6A |
| Air Flow | 400 m3/h | 400 m3/h |
| EER Rate | A | |
| Compressor | Rotary, R410A gas | |
| Noise | 38-48 dB(A) Sound Energy<65dB(A) Sound Power | |
| Thermostat | 16-31 °C | |
| Moisture Removal | 26.4 L | 40 |
| Permitted Excessive | 0.8 / 3.2 MPa | |
| Maximum Allowable Pressure | 1.0 / 5.0 MPa | |
| Power Supply | 220-240V/50 Hz | |
| Net Weight | 28 KG | 30 KG |
| Dimension(L*D*H) | 420*360*722 mm | |
| Unit must be ventedoutside when in Air Cooling and Heating mode. For the purposes of EU regulation EN12102 this is a local air conditioner and produces less than 65dB(A)sound energy. | ||
ElectriQ UK SUPPORT www.ElectriQ.co.uk/support
Please, for your own convenience, make these simple checks before calling the service line. If the unit still fails to operate call: 0871 620 1057 or complete the online form
- Has the unit been standing upright for at least 2 hours?
- Is the unit plugged into the mains? Is the fuse OK?
- Switch the unit off and wait three minutes to see if the issue is resolved.
- Check whether the water tank is full.
www.ElectriQ.co.uk
Unit 2, The Nursery
Berristow Lane
South Normanton
Derbyshire, DE55 2FX
Office hours: 9AM - 5PM Monday to Friday
- SAFETYINSTRUCTIONS
- Important!
- EnergySavingandUnitSafetyProtectionTips
- FEATURES AND PARTS LIST
- Features
- Parts list:
- INSTALLATION
- Installation:
- Important safeguards
- OPERATION AND SETTINGS
- Controlinstruction Controlpanel
- 'FAN'button(2)
- 'TIMER' button (1):
- Sleep Mode:
- Operating Instructions of the Remote Control
- Multi protective function
- Frost Protection Function:
- Overflow Protection Function:
- Automatic Defrosting (heating and cooling models have this function):
- Automatic Thermal Protection:
- Protection Function of the Compressor
- WATER-DRAINAGE
- Manual drainage:
- Continuous drainage:
- Maintenance
- Cleaning:
- Clean the surface
- Air filter cleaning
- A: Clean the upper filter screen frame
- B: Clean the lower filter screen frame
- End of Season Maintenance:
- APPENDIX
- ElectriQ UK SUPPORT www.ElectriQ.co.uk/support
Brand : ElectriQ
Model : SILENT16
Category : Air-conditioner