
BWC6038FS - Wine cellar BAUMATIC - Free user manual and instructions
Find the device manual for free BWC6038FS BAUMATIC in PDF.


| Product Type | Freestanding Wine Cellar |
| Brand | Baumatic |
| Model | BWC6038FS |
| Capacity | 38 bottles (standard 0.75 L) |
| Temperature Range | 5 °C to 20 °C |
| Number of Temperature Zones | Single zone |
| Control Type | Electronic with digital display |
| Interior Light | LED interior light |
| Cooling System | Compressor cooling with vibration reduction |
| Defrost Method | Manual defrost |
| Door Type | Solid door with reversible hinge |
| Door Lock | Yes, with key |
| Shelves Material | Wooden shelves (slides out) |
| Energy Efficiency Class | G (EU energy label, typical) |
| Power Supply | 220-240 V, 50 Hz |
| Power Consumption | Approx. 85 kWh per year |
| Noise Level | Approx. 39 dB(A) |
| Climate Class | SN-ST (temperate to subtropical) |
| Dimensions (H x W x D) | 820 x 595 x 595 mm |
| Weight | 35 kg |
| Color | Stainless steel / black |
Frequently Asked Questions - BWC6038FS BAUMATIC
User questions about BWC6038FS BAUMATIC
0 question about this device. Answer the ones you know or ask your own.
Ask a new question about this device
Download the instructions for your Wine cellar in PDF format for free! Find your manual BWC6038FS - BAUMATIC and take your electronic device back in hand. On this page are published all the documents necessary for the use of your device. BWC6038FS by BAUMATIC.
USER MANUAL BWC6038FS BAUMATIC
natural_image
Front view of a silver refrigerator with multiple side panels showing internal components (no visible text or labels)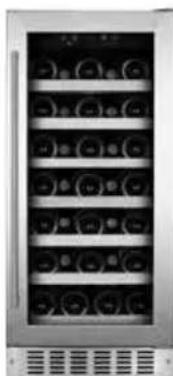
natural_image
Front view of a refrigerated rack cabinet with multiple circular compartments (no visible text or labels)
natural_image
Front view of a stainless steel refrigerator with multiple side panels (no visible text or labels)
natural_image
Front and back view of a stainless steel double-door refrigerator with multiple side panels showing internal compartments (no visible text or labels)
LABOUR WARRANTY

PARTS GUARANTEE
Baumatic
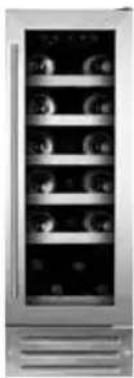
natural_image
Front view of a silver double-chamber refrigerator with multiple rings and control panels (no visible text or labels)BWC3019FS
30cm 19Bottles

natural_image
Front view of a server rack with multiple circular units and ventilation grilles (no visible text or labels)BWC3832FS
38cm 32Bottles
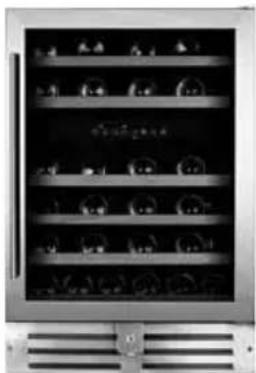
natural_image
Front view of a stainless steel refrigerator with multiple shelves and display cases (no visible text or labels)BWC6046FS
60cm 46Bottles
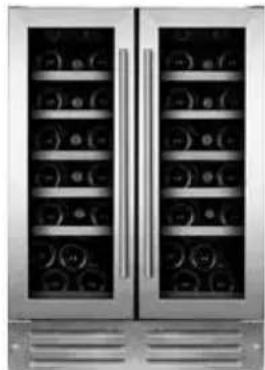
natural_image
Front and back view of a dual-chamber refrigerator with illuminated panels (no visible text or symbols)BWC6038FS
60cm 38Bottles
--CONTENTS--
01 SAFETY INFORMATION
03 SCRAPPING OLD APPLIANCES
03 Conformity
03 Energy Saving
04 Service
04 DESCRIPTION OF APPLIANCE
04 Product Features
05 Control Panel
06 Interior Light
06 The Wine Cabinet Shelves
07 USING YOUR WINE CABINET
07 Before Switching On
07 During First Use
07 Turning The Appliance On And Off
08 Unlocking The Control Panel
08 The Interior Light
08 Setting The Temperature Range
09 Setting The Temperature
10 Changing Between Fahrenheit And Celsius
10 Silent Mode
11 Function Indicator
11 Loading The Wine Cabinet
13 Storing Your Wines
14 Wine Storage Problems
16 CLEANING AND MAINTENANCE
17 Removing The Shelves For Cleaning
17 Defrosting
18 Moving Your Wine Cabinet
18 Power Failure
18 Vacation Time
18 Disconnecting From Power
19 INSTALLATION
19 Electrical Connection
20 Positioning
21 Built-In Installation
24 Adjusting the height and leveling off your wine cabinet
24 Installing The Handle
25 Reversing The Door Of Your Wine Cooler
30 TROUBLESHOOTING
32 TECHNICAL DATA
Thank you for purchasing this product.
Before using your Wine Cabinets, please carefully read this instruction manual in order to maximize its performance. Store all documentation for subsequent use or for other owners. This product is intended solely for household use or similar applications such as:
--the kitchen area for personnel in shops, offices and other working environments
--on farms, by clientele of hotels, motels and other environments of a residential type
--at bed and breakfasts (B & B)
--for catering services and similar applications not for retail sale.
This appliance must be used only for purposes of storage of wine, beer and soft drinks, any other use is considered dangerous and the manufacturer will not be responsible for any omissions. Also, it is recommended that you take note of the warranty conditions.
SAFETY INFORMATION
The Wine Cabinets contains a refrigerant gas (R600a: isobutane) and insulating gas (cyclopentane), with high compatibility with the environment, that are, however, inflammable.
We recommend that you follow the following regulations so as to avoid situations dangerous to you:
Before performing any operation, unplug the power cord from the power socket.
- The refrigeration system positioned behind and inside the Wine Cabinets contains refrigerant. Therefore, avoid damaging the tubes.
- If in the refrigeration system a leak is noted, do not touch the wall outlet and do not use open flames. Open the window and let air into the room. Then call a service centre to ask for repair.
- Do not scrape with a knife or sharp object to remove frost or ice that occurs. With these, the refrigerant circuit can be damaged, the spill from which can cause a fire or damage your eyes.
- Do not install the appliance in humid, oily or dusty places, nor expose it to direct sunlight and to water.
- Do not install the appliance near heaters or inflammable materials.
- Do not use extension cords or adapters.
- Do not excessively pull or fold the power cord or touch the plug with wet hands.
- Do not damage the plug and/or the power cord; this could cause electrical shocks or fires.
- It is recommended to keep the plug clean, any excessive dust residues on the plug can be the cause fire.
- Do not use mechanical devices or other equipment to hasten the defrosting process.
- Absolutely avoid the use of open flame or electrical equipment, such as heaters, steam cleaners, candles, oil lamps and the like in order to speed up the defrosting phase.
- Do not use or store inflammable sprays, such as spray paint, near the Wine Cabinets. It could cause an explosion or fire.
- Do not use electrical appliances inside the wine storage compartments, unless they are of the type recommended by the manufacturer.
- Do not place or store inflammable and highly volatile materials such as ether, petrol, LPG, propane gas, aerosol spray cans, adhesives, pure alcohol, etc. These materials may cause an explosion.
- Do not store medicine or research materials in the Wine Cabinets. When the material that requires a strict control of storage temperatures is to be stored, it is possible that it will deteriorate or an uncontrolled reaction may occur that can cause risks.
- Maintain the ventilation openings in the appliance enclosure or in the built-in structure, free of obstruction.
- Do not place objects and/or containers filled with water on the top of the appliance.
- Do not perform repairs on this Wine Cabinets. All interventions must be performed solely by qualified personnel.
- This appliance can be used by children aged from 8 years and above and by persons with reduced physical, sensory or mental capabilities or with a lack of experience and knowledge; provided that they have been given adequate supervision or instruction concerning how to use the appliance in a safe way and understand the hazards involved.
- Children should not play with the appliance. Cleaning and user maintenance should not be made by children without supervision
SCRAPPING OLD APPLIANCES
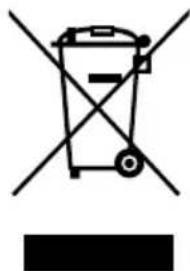
natural_image
Symbol of a trash bin with crossed lines indicating no waste or restriction, and a solid black rectangle below (no text or labels)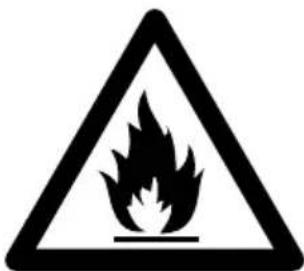
This appliance is marked according to the European directive 2012/19/EU on Waste Electrical and Electronic Equipment (WEEE).
WEEE contains both polluting substances (which can cause negative consequences for the environment) and basic components (which can be re-used). It is important to have WEEE subjected to specific treatments, in order to remove and dispose properly all pollutants, and recover and recycle all materials.
Individuals can play an important role in ensuring that WEEE does not become an environmental issue; it is essential to follow some basic rules:
--WEEE should not be treated as household waste;
--WEEE should be handed over to the relevant collection points managed by the municipality or by registered companies. In many countries, for large WEEE, home collection could be present.
In many countries, when you buy a new appliance, the old one may be returned to the retailer who has to collect it free of charge on a one-to-one basis, as long as the equipment is of equivalent type and has the same functions as the supplied equipment.
Conformity
By placing the C mark on this product, we are confirming compliance to all relevant European safety, health and environmental requirements which are applicable in legislation for this product.
Energy Saving
--Always ensure good ventilation. Do not cover ventilation opening or grille.
--Always keep fan louvers clear.
--Do not place appliance in areas of direct sunlight or close to a stove, heather or similar object.
--Open or keep the doors open as little as possible
--Remove dust present on the rear of the appliance
Service

natural_image
Illustration of five different tools: pliers, wrench, screwdriver, and tool holder (no text or symbols)- You should not attempt to repair the appliance yourself, as this could cause injury or a more serious malfunction. If you require a service call then please contact the Customer Care Department
DESCRIPTION OF APPLIANCE
Product Features
BWC3019FS: Single Zone--19 Bottles

A. Control Panel
B. Glass Door
C. Handle
D. Beech Shelves
E. Front Vent
F. Adjustable Foot
BWC3832FS: Single Zone--32 Bottles

A. Control Panel
B. Glass Door
C. Handle
D. Beech Shelves
E. Front Vent
F. Adjustable Foot
BWC6046FS: Dual Zone--46 Bottles
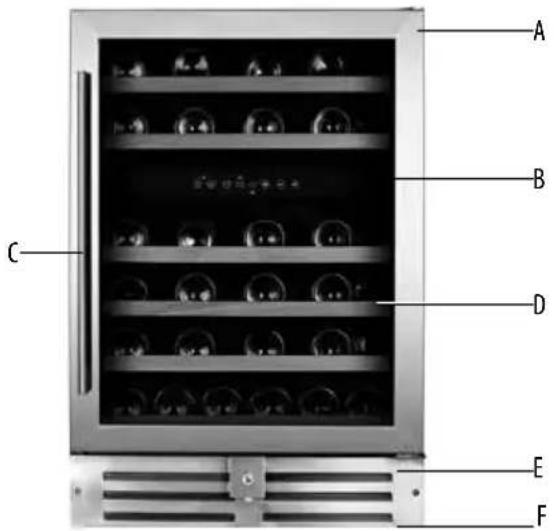
A. Glass Door
B. Control Panel
C. Handle
D. Beech Shelves
E. Front Vent
F. Adjustable Foot
BWC6038FS: Dual Zone--38 Bottles

A1. Control Panel (Left)
A2. Control Panel (Right)
B. Glass Door
C. Handle
D. Beech Shelves
E. Front Vent
F. Adjustable Foot
Control Panel
Single Zone:BWC3019FS, BWC3832FS, BWC6038FS(Left & Right)

A. Power
B. Lighting
C. Display Window
D. Temp. Plus
E. Temp.Minus
F. Lock/Unlock G. Function Indicator H.
°C/°F Switch
*BWC6038FS is without Function Indicator
Dual Zone: BWC6046FS

A. Power
B. Lock/Unlock
C. Lighting
D. °C/°F Switch
E. Upper Zone Display Window
F. Function Indicator 1
G. Lower Zone Display Window
H. Function Indicator 2
I. Temp. Plus
J. Temp.Minus K. Zone Select
Interior Light
Note: The LED light has a long life span. Once it is broken, it is mandatory to call aftersales center to get a new one.
A replacement made by unqualified people without supervision from electrical engineer would result in electrical shock and injury.
o The cooling zone has an interior light. The light can be switched on and off by using the light button.
The Wine Cabinet Shelves
To prevent damaging the door gasket, make sure the door is fully open when pulling shelves out of the rail compartment.
o For easy access to the bottles stored, pull the shelves out approximately 1/3 of the way.
o For a model without telescopic rails, 2 plastic Stoppers of each shelf are on the left and right side of the interior cabinet to prevent the shelf from falling out.

USING YOUR WINE CABINET
Before Switching On
o Make sure that it has been installed by a suitably qualified person, as per the information contained in the installation instructions.
o After delivery, wait for eight hours before connecting the appliance to your mains supply. This will allow any refrigerant gasses that may have been disturbed during the transportation process to settle.
o The outside of the appliance and the removable accessories contained within it, should be cleaned with a solution of liquid detergent and water.

natural_image
Cartoon illustration of a smiling refrigerator with sunglasses and a bowl of food (no text or symbols)o The interior of the appliance should be cleaned with a solution of sodium bicarbonate dissolved in lukewarm water. The interior and accessories should be thoroughly dried, after the cleaning process has been completed.
o There can be an odour when you first switch on the
appliance. It will lessen as the appliance starts to cool.
During First Use
IMPORTANT: When you use the Wine Cabinet for the first time or restart the appliance after it has been turned off for a long time, there could be a few degrees variance between the temperature you select and the one indicated on the LED display. This is normal and it is due to the length of activation time. Once the Wine Cabinet has been running for a few hours everything will be back to normal.
o When you first switch on the appliance, the compressor will run continuously until the Wine Cabinet reaches a cool enough temperature.
o During this period of time, you should try not to open the door frequently or place bottles inside of the appliance.
o If the unit is switched off or unplugged, you must allow at least 5 minutes before restarting the appliance or reconnecting it to your mains supply.
Turning The Appliance On And Off
BWC3019FS, BWC3832FS, BWC6046FS, BWC6038FS
o When the Wine Cooler is connected to the power outlet it will turn on automatically.

o Press and hold the power button for 10 seconds to turn the appliance on and off.
o Even if the safety lock is activated, the appliance can still be turned off by pressing and holding the power button for 10 seconds.
* For BWC6038FS, the power of Left and Right Zone will be turn off/on at the same time no matter the operation above on Left or Right Zone.
Unlocking The Control Panel
BWC3019FS, BWC3832FS, BWC6046FS, BWC6038FS
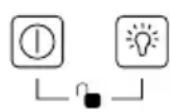
o To unlock the control panel, press the power and light buttons simultaneously for 3 seconds. A beep will sound to indicate that the control panel has unlocked.
o The control panel will automatically lock after 10 seconds if no buttons are pressed. A beep will sound to indicate that the control panel has locked.
o When the control panel is locked, no buttons can be operated except for the power button to turn the appliance off.
The Interior Light
BWC3019FS, BWC3832FS, BWC6046FS, BWC6038FS

o When the control panel is unlocked, you can use the light button to switch the interior light on and off.
o The light will remain on unless it is turned off manually by pressing the light button.
Setting The Temperature Range
BWC3019FS, BWC3832FS
o The appliance is with 4 temperature ranges for option, the ranges list of each model is as below.

o To change temperature range, when the control panel is locked, press the temperature minus button for 3 seconds, the display window will flash "E"--"F"--"H"--"L" in loop with a sound of beep by every pressing.
o Leave the display window flashing for 3 seconds, a beep will sound to indicate that the setting is confirmed.
o The default range of Single Zone is E: 5-22 °C (41-72 °F).
| Display Temp. Range (Single Zone) | ||
| E (Default) 5 - | 22 °C (41 | °F-72°F) |
| F 2 - 20 °C | (36 | °F-68°F) |
| H 10 - 19 °C | (50 | °F-66°F) |
| L 0 - 20 °C | (36 | °F-68°F) |
BWC6046FS
o The default range of Dual Zone is E: 5-12 °C (41-54 °F) for the upper zone and 12-22 °C (54-72 °F) for the lower zone
| Display | Temp.Range (Dual Zone) | |
| Upper Zone Lower Zone | ||
| E (Default) 5 - | 12 °C (41 °F-54°F) | 12 - 22 °C (54°F-72°F) |
| F 2 - 12 °C | (36 °F-54°F) | 12 - 20 °C (54°F-68°F) |
| H 5 - 12°C | (41 °F-54°F) | 8 - 19 °C (46°F-66°F) |
| L 2 - 10°C | (36 °F-50°F) | 12 - 22 °C (54°F-72°F) |
BWC6038FS
o The default temperature setting range is E: 5-22 °C (41-72 °F) for Left Zone, F:2 - 22 °C(36°F-72°F) for Right Zone.
Setting The Temperature
BWC3019FS, BWC3832FS, BWC6038FS
o Use the temperature plus button and minus button to select the temperature you want the Wine Coolers to operate at.

o Each press of the temperature plus button will increase the set temperature by 1^ C/ 1^ F.
o Each press of the temperature minus button will decrease the set temperature by 1^ C/ 1^ F.
o The first touch of these buttons will automatically set the previous set temperature.
When the display shows the desired temperature, release all buttons and the display will change to show the actual temperature inside of the cabinet after about 10 seconds.
BWC6046FS
o Use the zone selection button to choose which zone you want to set the temperature for. The relevant LED display will flash to show you can set the temperature for that zone.
o Use the temperature plus and minus buttons to select the temperature you want the wine cabinet to operate at.
o The first touch of these buttons will automatically set the previous set temperature.
o Each press of the temperature plus button will increase the set temperature by 1^ C/ 1^ F. Each press of the temperature minus button will decrease the set temperature by 1^ C/ 1^ F.
When the display shows the desired temperature release all buttons and the display will change to show the actual temperature inside of the cabinet after about 10 seconds.
Changing Between Fahrenheit And Celsius
o You can select whether the temperature display shows Celsius or Fahrenheit.
BWC3019FS, BWC3832FS, BWC6038FS

o To alter what the temperature display is showing, press the Celsius and Fahrenheit switch. This will change the temperature display for both cooling zones.
* For BWC6038FS, the Celsius and Fahrenheit of Left and Right Zone will be changed at the same time no matter the operation above on Left or Right Zone.
BWC6046FS

o To alter what the temperature display is showing, press the Celsius and Fahrenheit switch. This will change the temperature display for both cooling zones
Silent Mode
BWC3019FS, BWC3832FS, BWC6046FS
o The appliance is with Silent Mode, which will slow down the fans speed when the inside temperature reaches the temperature set.

o The Silent Mode is set as "On" by default, to turn off it, when the control panel is under locked condition, press and hold the light mark for 3 seconds, the icon °C or °F will stay on to indicate the Silent Model is off.

To turn on Silent Mode again, when the control panel is under locked condition, press and hold the light mark for 3 seconds, the icon °C or °F will flash every 2 seconds continuously to indicate the Silent Model is working.
Function Indicator BWC3019FS, BWC3832FS
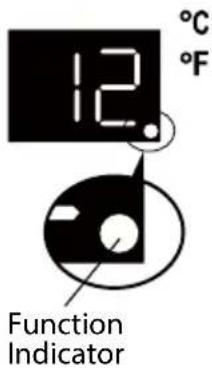
o When the compressor starts to work, the Indicator will stay on;
o In other conditions, the Indicator will be off.
BWC6046FS

Function Indicator ^1

Function Indicator ^2
o The Indicator 1 will flash every 2 seconds when the unit is plugged in; o The Indicator 1 will stay on when the compressor starts to work; o The Indicator 2 will flash every 3 seconds when the heating function of lower zone starts to work; o The Indicator 2 will stay on when the cooling function of lower zone starts to work.
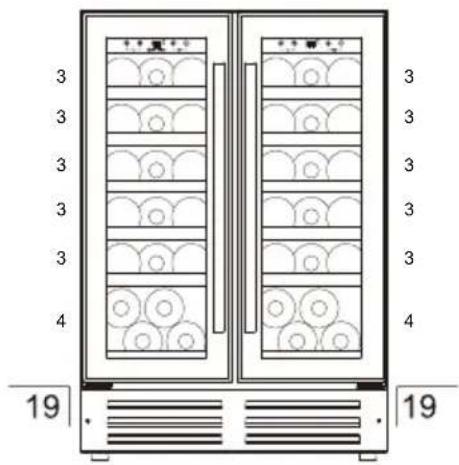
Loading The Wine Cabinet

natural_image
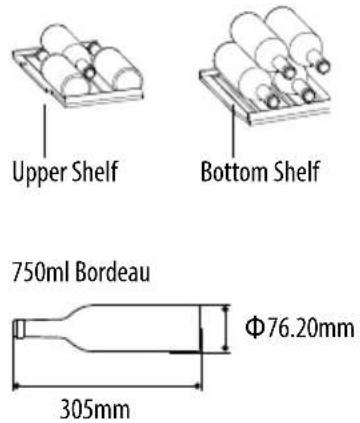
Cartoon illustration of a smiling man holding an open book with an exclamation mark (no text or symbols present)IMPORTANT: Your appliance is ideally suited to store 0.75 litre Bordeaux style wine bottles. You must make sure that they do not prevent the door from shutting properly.
o Always check that you can close the door without it fouling on a wine bottle, before shutting it.
o When loading several bottles of wine at once, it will take longer for the appliance to cool the individual bottles.
o As many bottles may differ in size and dimensions, the actual number of bottles you are able to store may vary. The maximum storage number is based on standard 0.75 litre Bordeaux style wine bottles.
BWC3019FS
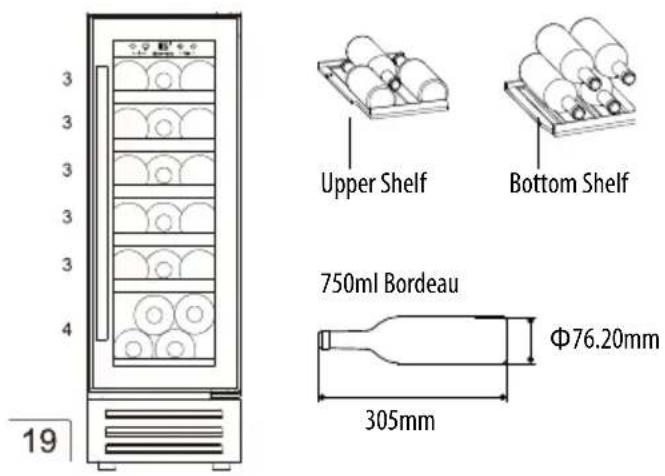
BWC3832FS
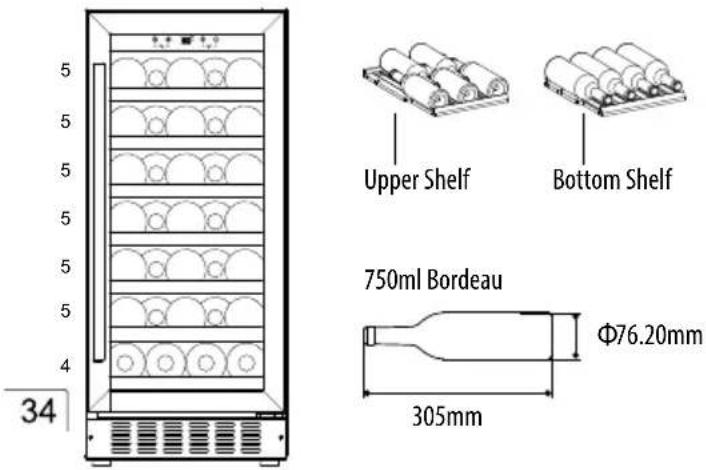
BWC6046FS
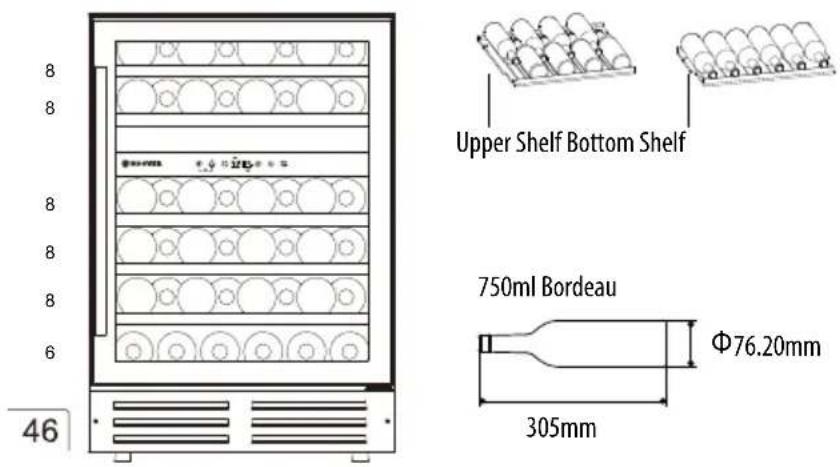
BWC6038FS
Storing Your Wines
The chart below indicates the ideal storage temperatures for different types of wine:
| Type of wine | Temperature (Celsius) | Temperature (Fahrenheit) |
| Red wine (*) 15.5 – 18.5°C | 59.9 – 65.3°F | |
| White wine (**) 10 - 15°C | 50 – 59°F | |
| Sparkling wines/ Champagne | 7.2 – 9.5°C | 45 – 49.1°F |
| Rose wine 9.5 – 10.5°C | 49.1 – 50.9°F | |
| Vintage wine | 13°C 55°F |
* Light red wines, such as Beaujolais, Pinot Noir and Cabernet Franc benefit from being served slightly cooler than full-bodied reds.
** Chardonnay is often served too cold. You should chill it at a warmer temperature inside of your Wine Cabinet. Or leave it to warm slightly when you remove it from your Wine Cabinet.
o Temperature stability is the most important factor when it comes to storing wine.
o Exposure to light, vibrations or fluctuations in temperature and humidity can all cause wine to spoil. When properly stored, wines not only maintain their quality but many will actually improve in aroma, flavour and complexity as they mature.
o Wines kept at a higher temperature will age faster. Wine that is exposed to temperatures that are greater than 21^ C ( 70^ F) will suffer from poorer flavour and aroma.
o If wine is kept at too low a temperature, this can result in the development of harmful deposits. A humidity of 70% is ideal for keeping
corks from shrinking.
o After a bottle of wine has been opened, the wine comes into contact with air. So it is best to store the remainder of the bottle upright, to minimize the surface area of the wine that is coming into contact with the air.
Once opened, wine will remain in a drinkable condition for two days for delicate whites or three days for rich reds, as long as the bottle as been resealed. You should make sure that the seal is firm by checking the stopper.
o Special stoppers that keep wine sparkling and Champagne bubbling for one or two days after opening, can be bought at most good wine shops.
o When stored correctly, white wines can keep well for up to two years. Full bodied reds will age well for ten years and dessert wines will age well for up to twenty years.
o When you buy a bottle of wine, you should transfer it to a suitable storage location immediately (if you are not going to store it in your Wine Cabinet).
o Cheaper bottles of wine will not age as well as more expensive ones.
To make the most of the bouquet and taste of your wine, never fill more than half a glass at a time. It will also help if the shape of your wine glass is appropriate for your wine. The size and shape of your wine glass's bowl will determine the intensity and complexity of the bouquet. The stem should be long enough to allow you to avoid hand contact with the bowl of the glass and should be tulip-shaped or tapered at the top.
Wine Storage Problems
Corking- a tiny percentage of bottled wine (about 1%) will suffer from this. The cork reacts with the wine and gives it a musty, unpleasant taste. It is the most common wine storage problem and is caused by harmless bacteria growing on the cork. As unfortunate as this is, there is nothing to do but to discard all of the wine in the affected bottle. This is not to be confused with small fragments of cork floating in the wine itself, which will not impair the flavour.
Oxidisation- when wine has been opened and left for longer than a day; it tends to lose its aroma and colour, giving an overall flat taste. The only way to avoid this, it to either drink the wine on the same day it was opened or to use a vacuum device specially designed for removing oxygen from opened wine bottles. If you use such a device, the wine should still be consumed shortly afterwards.
Ullage- this is loss of wine from the bottle by evaporation or leakage. Signs of ullage include wine seeping around the cork, a protruding cork or a stained label. It can happen if the bottle has been allowed to get too
warm. The wine may still be drinkable, if the leakage was recent; however, you should be aware that if the wine cools down again, contraction can cause more air to be sucked into the bottle and result in further deterioration.
Slight effervescence in still wine- this isn't really a problem with the way the wine has been stored, but as a result of incomplete malolactic fermentation before the wine was bottled. A good way to get rid of the effervescence is to let the wine breathe. Alternatively you can use a bottle vacuum device, after about five minutes the effervescence will vanish.
Sediment- this is not normally a problem, however both red and white wines can produce sediment after a number of months in a bottle. The sediment consists of tartrate crystals and is totally harmless. If anything the building of sediment can be considered a good sign because it means that the wine was not subjected to much (if any) filtering, meaning that the flavours and aromas should be preserved better.
A good way to get around sediment (if it is a problem) is to stand the bottle upright, the day before opening, so that the sediment can settle to the bottom of the bottle.
You can also decant your wine; decanting will “open up” the flavour of both young and old wines, but younger wines in particular. To decant, pour the wine slowly and evenly into your decanter.
CLEANING AND MAINTENANCE
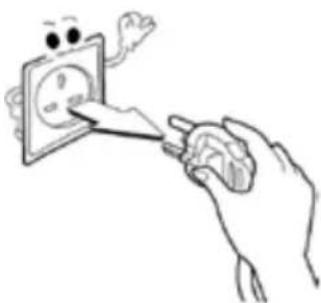
WARNING: PLEASE ENSURE THAT YOUR APPLIANCE IS DISCONNECTED FROM YOUR MAINS SUPPLY BEFORE ATTEMPTING TO CLEAN IT.
natural_image
Illustration of a hand holding a cartoon-style electrical socket with a face and a knife inserted, no text or symbols present.o Do not clean the appliance by pouring water onto it or spraying water over it.

natural_image
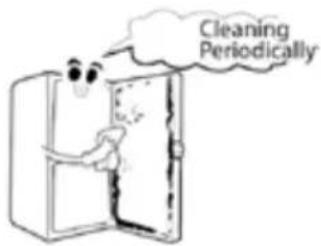
Illustration of a hand holding a box with a sad face, next to a broken-out cross symbol (no text or labels)o The interior of the Wine Cabinet should be cleaned periodically, using a solution of bicarbonate of soda and lukewarm water.
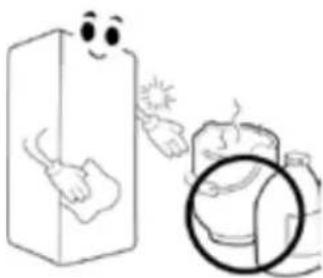
o Clean the accessories separately with soap and water. Do not clean them in a dishwasher.
natural_image
Illustration of a smiling face pointing at a rectangular box with hands, next to a magnified view of a person holding a phone (no text or symbols present)o Do not use abrasive products, detergents or soaps.

natural_image
Cartoon illustration of a gift box and a milk cart with a surprised face (no text or symbols)o After washing the appliance, wipe over the area that you have cleaned with a damp cloth and then dry it thoroughly.
o When cleaning is complete, dry your hands and then reconnect the plug to your mains supply.
Removing The Shelves For Cleaning
o Before removing a Shelf from the appliance, it is necessary to remove all the bottles on the Shelf.
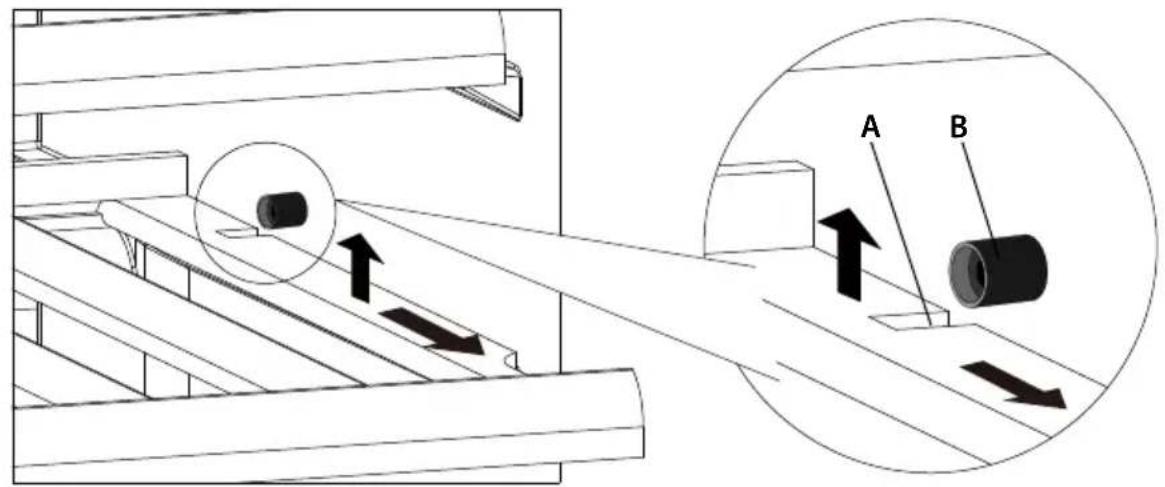
o Move the shelf to the position where the notch of the wooden shelf is directly under the plastic stopper and lift the wooden shelf. Please ensure these are replaced when the shelf is put back.
o Make sure the shelves are fully engaged before loading any bottle into the cabinet. Pull the shelves out all the way to the STOPPER position and push them back in several times to make sure the shelves are properly engaged.
A·Notch B·Plastic Stopper
natural_image
Technical diagram of a mechanical assembly with labeled components A and B, showing motion indicators (no text or symbols beyond labels)Defrosting
o Defrosting occurs automatically inside of the Wine Cabinet during operation. The defrost water is collected by the evaporating tray and evaporates automatically.
o The evaporating tray and defrost water drain hole should be cleaned periodically. This will prevent water from collecting in the bottom of the Wine Cabinet, instead of flowing down the defrost drainage channel and drain hole.
o You can also pour a small amount of water down the drain hole to clean inside of it.
o You should be careful to make sure that wine bottles do not touch the
rear wall of the appliance, as this can interrupt the automatic defrosting process and deflect water into the base of your Wine Cabinet.
Moving Your Wine Cabinet
If you need to move your Wine Cabinet to another location you should follow the steps outlined below.
o Remove all items from the Wine Cabinet.
o Securely tape down all loose items such as the shelves inside of the appliance.
o Turn the adjustable foot up to the base to avoid damage.
o Tape the door closed.
o Ensure the appliance stays secure in the upright position during transportation. Also protect the outside of the appliance with a blanket or similar item.
Power Failure
o If power is cut to the appliance, for a few hours it will be able to maintain the temperature inside the cabinet. Providing that the number of times that the door is opened is kept to a minimum.
o If the power cut is for longer than a few hours, then you will need to store the contents in an alternate location to prevent them being affected by temperature rise.
IMPORTANT: If the appliance is unplugged, the power is lost or turned off you must wait 5 minutes before restarting the Wine Cabinet. If you attempt to restart before this time delay, the compressor could be damaged.
Vacation Time
Short vacations: Leave the Wine Cabinet in operation for holidays of less than 3 weeks.
Long vacations:
o If your appliance is not going to be in use for a period of time, you should remove the bottles of wine and switch off the appliance
o The interior should be cleaned with a solution of bicarbonate of soda and lukewarm water.
o The interior should then be thoroughly dried.
o To prevent mould growth, the door should be left slightly ajar.
Disconnecting From Power
o If the unit is unplugged, or there is a power cut, you must wait for 5 minutes before restarting. Attempting to restart the Wine Cabinet before 5 minutes has elapsed, may cause it not to function.
INSTALLATION
MPORTANT: Before installation and usage read all the instructions and make sure that the voltage (V) and the frequency (Hz) indicated on the rating plate are exactly the same as the voltage and frequency in your home. The rating plate can be found on the front left edge of the inside of the Wine Cabinet.
The manufacturer declines all responsibility in the event of the installer failing to observe all the accident prevention regulations in force, which are necessary for normal use and the regular operation of the electric system.
Electrical Connection

natural_image
Cartoon illustration of a person reading a document with an exclamation mark (no text or symbols present)YOUR Wine Cabinet IS INTENDED FOR FITTED AND PERMANENT INSTALLATION.
We recommend that the appliance is connected by a qualified electrician, who is a member of the N.I.C.E.I.C. and who will comply with the I.E.E. and local regulations.
o Your wine cabinet comes supplied with a 13 amp plug fitted. If in future you need to change the fuse in this plug, then a 13 amp ASTA approved (BS 1362) fuse must be used.
o The wiring in the mains lead is coloured as follows:
Brown.....Live
Blue......Neutral
Green and yellow......Earth
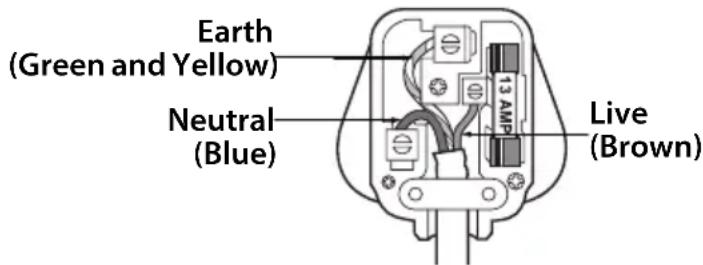
o As the colours of the wires in the appliance's mains lead may not correspond with the coloured markings identifying the terminals in your spur box, please proceed as follows:
The brown wire must be connected to the terminal marked "L" (live), or coloured red.
The blue wire must be connected to the terminal marked "N" (neutral), or coloured black.
The green and yellow wire must be connected to the terminal marked "E" (earth), or by the earth symbol, or coloured green and yellow.
o When the connection is completed, no stray strands or cut wire should be present. The cord clamp must be secured over the outer sheath.
Positioning
o It is advisable that your appliance is only installed in a location where the ambient temperature of the room, corresponds with the climate classification that is stated on the rating plate of your appliance. Your appliance may not function correctly if the ambient temperature falls outside of the following ranges.
| Climate classification | Appropriate ambient temperature | |
| SN 10 - 32 °C | (50 | °F-90°F) |
| N 16 - 32 °C | (61 | °F-90°F) |
| ST 16 - 38 °C | (61 | °F-100°F) |
| T 16 - 43 °C | (61 | °F-109°F) |
o Positioning the appliance requires two people in order to avoid injuries or damage to the appliance.
o Your appliance should not be located in direct sunlight or exposed to continuous heat or extremes of temperature (e.g. next to a radiator or boiler). If this is not feasible, then you should install an insulation plate between the appliance and the adjacent heat source.
o You should check whether there is an electrical socket available, which will be accessible after your appliance is installed.
o Place the appliance flatly and firmly on a solid base.
o Anything positioned above the appliance must be at least 10 cm away to allow sufficient cooling of the condenser. You must allow a 5 cm gap to the rear and either side of the appliance.
o Be sure to leave enough space for the opening of the door, to avoid damage to the appliance or personal injury.
Built-In Installation
BWC3019FS

BWC3832FS

BWC6046FS
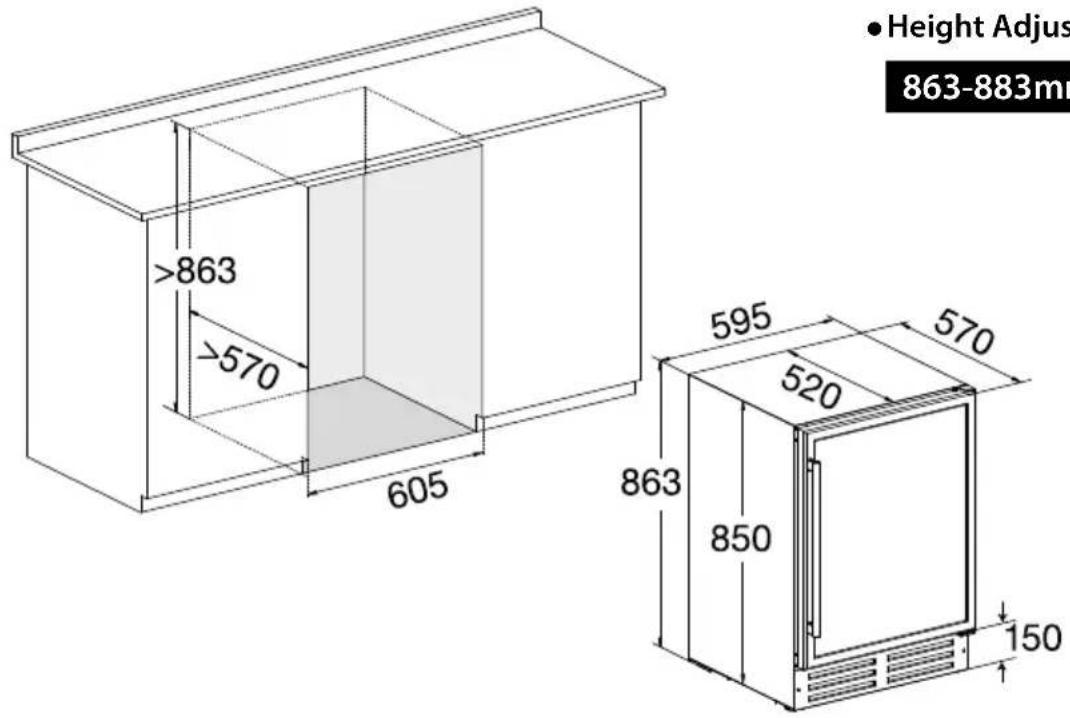
- Height Adjustable:
863-883mm
BWC6038FS
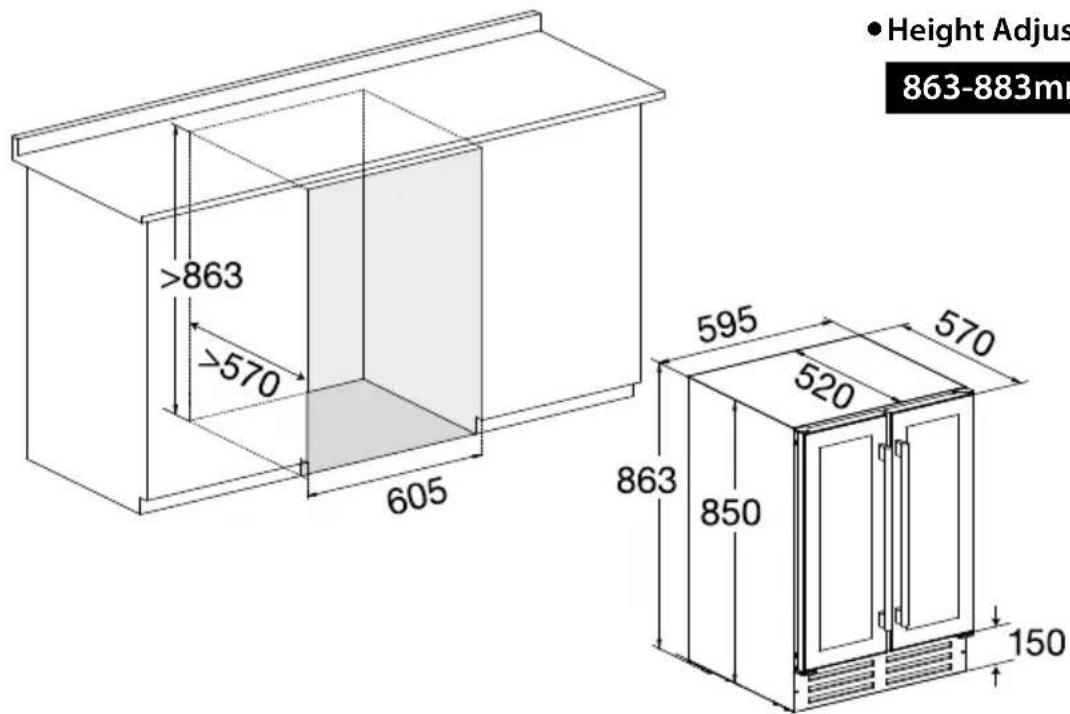
- Height Adjustable:
863-883mm
o Your Wine Cabinet can be used as a freestanding or a built in unit. The clearances shown in the above drawing should be followed for both types of installation.
o In particular, the depth dimension must be observed.
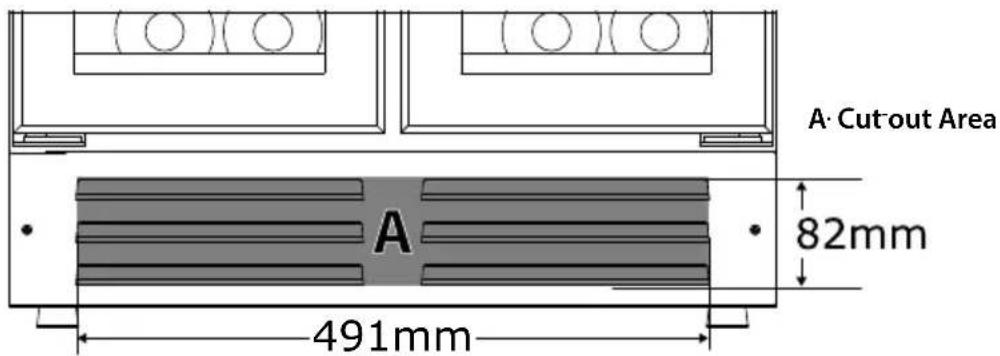
IMPORTANT: The vent at the base of the appliance is for ventilation. Nothing should be placed in front of this vent; otherwise your Wine Cooler may not operate properly.
o A decorative plinth can be fitted to the front of the base vent as long as the cut out shown in the diagram below is made in the plinth. This cut out is required whether the vent is removed or not.
BWC3019FS

BWC3832FS

BWC6046FS

BWC6038FS
Adjusting the height and leveling off your wine cabinet
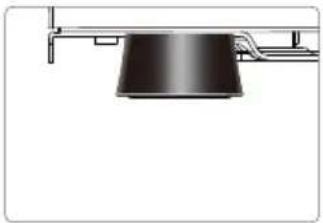
o The appliance is equipped with adjustable feet, so that the height may be adjusted to level the cabinet on uneven floor surfaces.
o We recommend that two people carry out this procedure.
o The height must be adjusted prior to building the appliance into the housing unit and it should be set at such a height that the top panel of the appliance fits exactly below the kitchen worktop.
natural_image
Pure diagram of a mechanical component with no text, numbers, or symbolso Tilt the appliance approximately 60^ to allow access to the adjustable feet.
o Take care to ensure the cabinet is supported at all times.
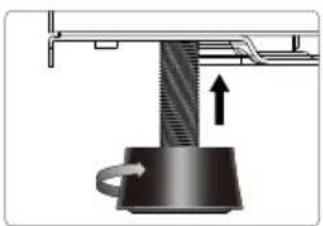
natural_image
Mechanical assembly diagram showing a rotating component with an upward arrow indicating motion (no text or symbols)o Twist the foot into a suitable position to level the cabinet.

natural_image
Mechanical assembly diagram showing a rotating component with a downward arrow indicating motion (no text or symbols)o Repeat these steps for the other adjustable feet.
IMPORTANT: If the appliance is not level, then the door and door seal may be affected.
IMPORTANT: Do not move the appliance when the feet are adjusted high.
Installing The Handle

o Remove the door Gasket slightly to expose the two screw holes.
oFix the Handle by screwing the two Handle Screws tightly, the Handle Screws with Washers are pre-installed inside the screw holes, pls.do not unscrew the Handle Screws too much in case the Washers fell off.
o Replace the Gasket.
Reversing The Door Of Your Wine Cooler

natural_image
Cartoon illustration of a person reading a document with an exclamation mark (no text or symbols present)This appliance has the capability of the door opening from either the left or right hand side.
Any parts that you remove from the appliance whilst reversing the door, should be retained for later use.
BWC3019FS, BWC3832FS, BWC6046FS

o Open the glass door and remove the two screws from Pivot Hinge under the right bottom corner of the glass door.
o Be careful to support the glass door with both hands to prevent it dropping after removing the screws.
Right Lower Hinge
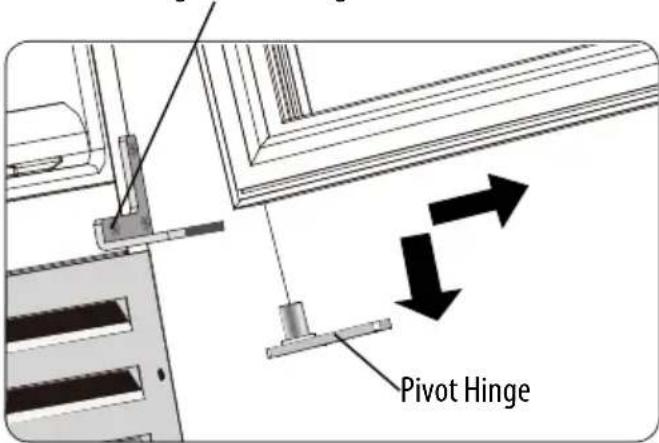
o Pull down to remove the glass door and place it on a padded surface to prevent scratching it.
o Remove the right top hinge and right lower hinge.


o Pull out the 6 Plastic Caps at the front left corner of the cabinet. And move them all to the right side.

o Take the left top hinge and left lower hinge from the plastic bag that contained this manual then install them in the designated positions on the left side of the cabinet.
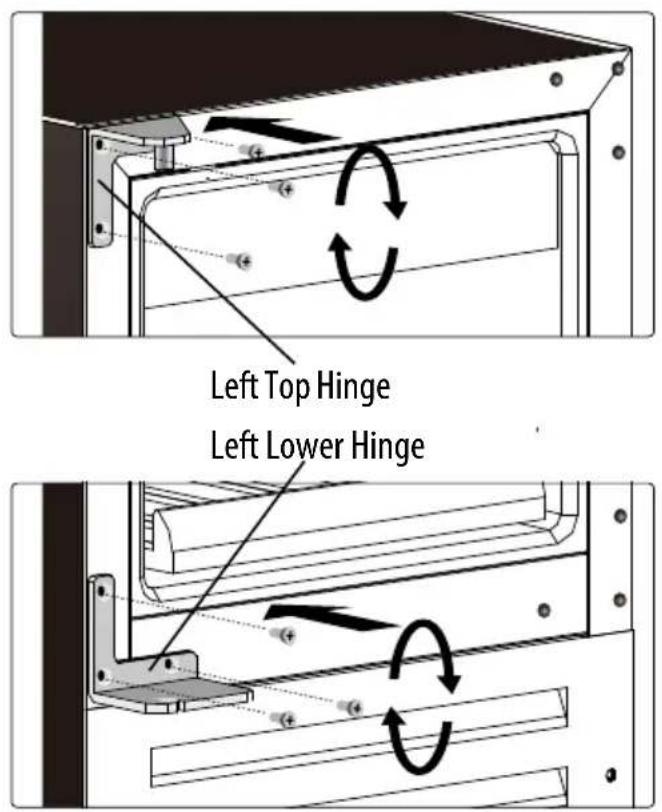
o Turn the glass door around 180° and reinstall it.

o Insert the Pivot Hinge into the Left Lower Hinge hole of the door.
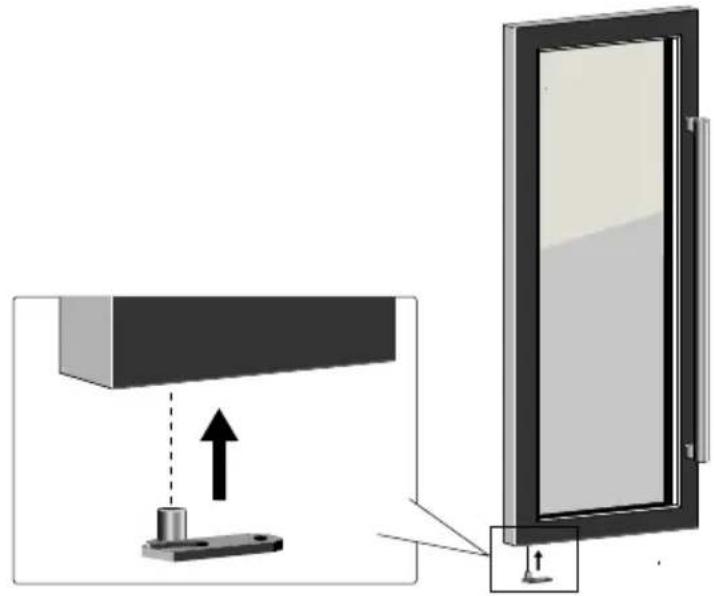
natural_image
Diagram showing a mechanical assembly with a bracket and a door, no text or symbols presento Install the door to the left hinge side by tightening the Support Rod with the 2 screws.

IMPORTANT: Check that the door opens and shuts correctly, without fouling, after you have completed the door reversal process.
After the door has been reversed, you should check the door seal of the Wine Coolers. The seal should not be creased or crushed; otherwise there will be a gap between it and the inside of the door.
o The seal must adhere properly all the way around the door.
o If the seal is not adhering to the cabinet properly, then you should either:-
a) Use a warm damp cloth and manipulate the seal until it does adhere to the cabinet properly, all the way around the door.
or
b) Use a hair dryer on its lowest heat setting and lightly heat the areas of the door seal that are not adhering correctly. The heat will make the seal more pliable and this will allow you to manipulate the seal into the correct position.
IMPORTANT: DO NOT HEAT THE DOOR SEAL ON ANYTHING BUT THE LOWEST HEAT SETTING, OR HEAT THE SEAL FOR A LONG PERIOD OF TIME. OTHERWISE DAMAGE MAY BE CAUSED TO THE DOOR SEAL, WHICH WOULD NOT BE RECTIFIED UNDER THE GUARANTEE FREE OF CHARGE.
IMPORTANT: WHEN YOU HAVE REVERSED THE DOOR OF THE APPLIANCE, IF YOU HAVE PLACED THE APPLIANCE ON ITS BACK, YOU MUST WAIT FOR 8 HOURS BEFORE SWITCHING THE APPLIANCE BACK ON.
TROUBLESHOOTING
IMPORTANT: If your Wine Cabinet appears not to be operating properly, before contacting the Customer Care Department, please refer to the checklist below.
| No. | PROBLEM POSSIBLE CAUSE | |
| 1 | The Wine Cabinet does not operate | Not plugged in.The appliance is turned off.The circuit breaker tripped or a blown fuse. |
| 2 | The Wine Cabinet is not cold enough | Check the temperature control setting.External environment may require a higher setting.The door is opened too frequently.The door is not closed completely.The door gasket does not seal properly. |
| 3 | Automatically turn-on and turn-off frequently | The room temperature is hotter than normal.A large amount of contents has been added to the Wine Cabinet.The door is opened too frequently.The door is not closed completely.The temperature control is not set correctly.The door gasket does not seal properly. |
| 4 | The lighting does not work | Not plugged in.The circuit breaker tripped or a blown fuse.The lighting is turned off. |
| 5 | Too much vibration | Check to assure that the appliance is level.Check to assure no parts inside the cabinet or in the compressor chamber are loose. |
| 6 | The Wine Cabinet seems to make too much noise | The rattling noise may come from the flow of the refrigerant which is normal.As each cycle ends you may hear gurgling sounds caused by the flow of refrigerant.Contraction and expansion of the inside walls may cause popping and crackling noises.The appliance is not level. |
| 7 | The door will not close properly. | The Wine Cabinet is not level.The door was reversed and not properly installed.The gasket is dirty.The shelves are out of position. |
| 8 | The display window is shown with “HH” or “LL” instead of a digital figure and/or with continuous beep sound. | The temperature probe is out of order. |
DO NOT ATTEMPT TO REPAIR THE APPLIANCE YOURSELF.
Please note that if an engineer is asked to attend whilst the product is under guarantee and finds that the problem is not the result of an appliance fault, then you may be liable for the cost of the call out charge.
The appliance must be accessible for the engineer to perform any necessary repair. If your appliance is installed in such a way that an engineer is concerned that damage will be caused to the appliance or your kitchen, then he will not complete a repair.
This includes situations where appliances have been tiled in, sealed in with sealant, have wooden obstructions placed in front of the appliance, like plinths. Or any installation other than the one specified has been completed.
Please refer to the conditions of guarantee that appear on the warranty card that you receive with the appliance.
IMPORTANT: A policy of continuous improvement and reserves the right to adjust and modify its products without prior notification.
TECHNICAL DATA
| Manufacturer HOOVER | ||||
| Product Category | 2 - Refrigeration-cellar, Cellar and Wine storage appliances | |||
| Model Number | BWC3019FS BWC3832FS | BWC6046FS BWC6038FS | ||
| Energy Efficiency Class (1) | B | B | C | D |
| Annual Energy Consumption (2) | 169kWh 188kWh 252kWh | 288kWh | ||
| Storage Volume of Fridge Compartment | 57 88 135 116 | |||
| Storage Volume of Freezer Compartment | N/A N/A N/A | N/A | ||
| Star Rating | N/A N/A N/A | N/A | ||
| Coldest Storage Temperature | 5°C 5°C | 5°C(Upper Zone)12°C(Lower Zone) | 5°C | |
| Frost Free Compartments | N/A N/A N/A | N/A | ||
| Temperature Rise Time | N/A N/A N/A | N/A | ||
| Freezing Capacity | N/A N/A N/A | N/A | ||
| Climate Class (3) | N N | N N | ||
| Noise Level | 39dB | 39dB | 39dB | 39dB |
| Installation Type | Built-in | Built-in | Built-in | Built-in |
(1) On a scale from A+++ (highest efficiency) to G (lowest efficiency).
(2) Annual energy consumption based on standard test results for 24 hours. The actual energy consumption will depend on how the appliance is used and where it is located.
(3) This appliance is intended to be used at an ambient temperature between “16°C” (lowest temperature) and “32°C” (highest temperature).
Baumatic
Code: 34002153 Model: BWC3019FS
CANDY HOOVER GROUP Via Comolli,16-20861 Brugherio-Italy
WINE COOLER
Climate Type: N
Capacity: 58L
Rated Volt./Freq.: 220-240V 50Hz
Rated Current: 0.50A
Light Power: Max 0.5W
Refrigerant: R600a(19g)
Blowing Gas: Cyclopentane
Unit Size(mm): 295*570*863
N.W.(Kg): 29


CIRCUIT DIAGRAM
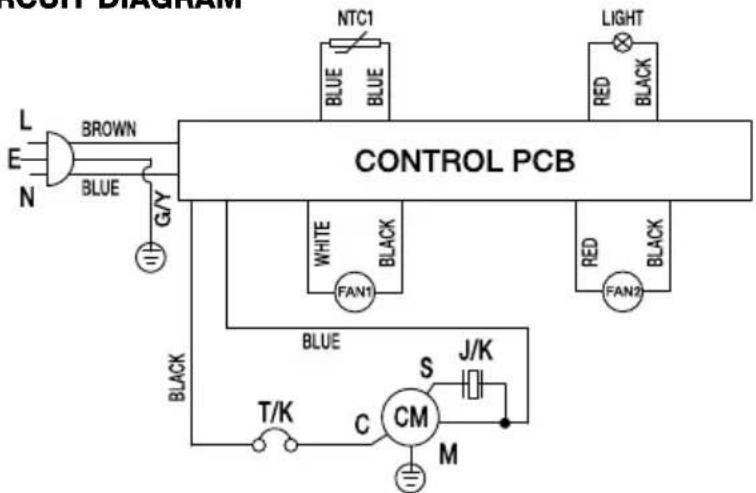
flowchart
graph TD
    L["Power Source L"] --> BROWN["BROWN"]
    E["Power Source E"] --> BROWN
    N["Power Source N"] --> BROWN
    BROWN --> G/Y["G/Y"]
    G/Y --> CONTROLPCB["CONTROL PCB"]
    CONTROLPCB --> NTC1["NTC1"]
    CONTROLPCB --> BLUE1["BLUE"]
    CONTROLPCB --> BLUE2["BLUE"]
    CONTROLPCB --> BLUE3["BLUE"]
    CONTROLPCB --> BLUE4["BLUE"]
    CONTROLPCB --> BLUE5["BLUE"]
    CONTROLPCB --> BLUE6["BLUE"]
    CONTROLPCB --> BLUE7["BLUE"]
    CONTROLPCB --> BLUE8["BLUE"]
    CONTROLPCB --> BLUE9["BLUE"]
    CONTROLPCB --> BLUE10["BLUE"]
    CONTROLPCB --> BLUE11["BLUE"]
    CONTROLPCB --> BLUE12["BLUE"]
    CONTROLPCB --> BLUE13["BLUE"]
    CONTROLPCB --> BLUE14["BLUE"]
    CONTROLPCB --> BLUE15["BLUE"]
    CONTROLPCB --> BLUE16["BLUE"]
    CONTROLPCB --> BLUE17["BLUE"]
    CONTROLPCB --> BLUE18["BLUE"]
    CONTROLPCB --> BLUE19["BLUE"]
    CONTROLPCB --> BLUE20["BLUE"]
    CONTROLPCB --> BLUE21["BLUE"]
    CONTROLPCB --> BLUE22["BLUE"]
    CONTROLPCB --> BLUE23["BLUE"]
    CONTROLPCB --> BLUE24["BLUE"]
    CONTROLPCB --> BLUE25["BLUE"]
    CONTROLPCB --> BLUE26["BLUE"]
    CONTROLPCB --> BLUE27["BLUE"]
    CONTROLPCB --> BLUE28["BLUE"]
    CONTROLPCB --> BLUE29["BLUE"]
    CONTROLPCB --> BLUE30["BLUE"]
    CONTROLPCB --> BLUE31["BLUE"]
    CONTROLPCB --> BLUE32["BLUE"]
    CONTROLPCB --> BLUE33["BLUE"]
    CONTROLPCB --> BLUE34["BLUE"]
    CONTROLPCB --> BLUE35["BLUE"]
    CONTROLPCB --> BLUE36["BLUE"]
    CONTROLPCB --> BLUE37["BLUE"]
    CONTROLPCB --> BLUE38["BLUE"]
    CONTROLPCB --> BLUE39["BLUE"]
    CONTROLPCB --> BLUE40["BLUE"]
    CONTROLPCB --> BLUE41["BLUE"]
    CONTROLPCB --> BLUE42["BLUE"]
    CONTROLPCB --> BLUE43["BLUE"]
    CONTROLPCB --> BLUE44["BLUE"]
    CONTROLPCB --> BLUE45["BLUE"]
    CONTROLPCB --> BLUE46["BLUE"]
    CONTROLPCB --> BLUE47["BLUE"]
    CONTROLPCB --> BLUE48["BLUE"]
    CONTROLPCB --> BLUE49["BLUE"]
    CONTROLPCB --> BLUE50["BLUE"]
    CONTROLPCB --> BLUE51["BLUE"]
    CONTROLPCB --> BLUE52["BLUE"]
    CONTROLPCB --> BLUE53["BLUE"]
    CONTROLPCB --> BLUE54["BLUE"]
    CONTROLPCB --> BLUE55["BLUE"]
    CONTROLPCB --> BLUE56["BLUE"]
    CONTROLPCB --> BLUE57["BLUE"]
    CONTROLPCB --> BLUE58["BLUE"]
    CONTROLPCB --> BLUE59["BLUE"]
    CONTROLPCB --> BLUE60["BLUE"]
    CONTROLPCB --> BLUE61["BLUE"]
    CONTROLPCB --> BLUE62["BLUE"]
    CONTROLPCB --> BLUE63["BLUE"]
    CONTROLPCB --> BLUE64["BLUE"]
    CONTROLPCB --> BLUE65["BLUE"]
    CONTROLPCB --> BLUE66["BLUE"]
    CONTROLPCB --> BLUE67["BLUE"]
    CONTROLPCB --> BLUE68["BLUE"]
    CONTROLPCB --> BLUE69["BLUE"]
    CONTROLPCB --> BLUE70["BLUE"]
    CONTROLPCB --> BLUE71["BLUE"]
    CONTROLPCB --> BLUE72["BLUE"]
    CONTROLPCB --> BLUE73["BLUE"]
    CONTROLPCB --> BLUE74["BLUE"]
    CONTROLPCB --> BLUE75["BLUE"]
    CONTROLPCB --> BLUE76["BLUE"]
    CONTROLPCB --> BLUE77["BLUE"]
    CONTROLPCB --> BLUE78["BLUE"]
    CONTROLPCB --> BLUE79["BLUE"]
    CONTROLPCB --> BLUE80["BLUE"]
    CONTROLPCB --> BLUCC[BLUX/Black/Black/Black/Black/Black/Black/Black/Black/Black/Black/Black/Black/Black/Black/Black/Black/Black/Black/Black/Black/Black/Black/Black/Black/Black/Black/Black/Black/Black/Black/Black/Black/Black/Black/Black/Black/Black/Black/Black/Black/Black/Black/Black/Black/Black/Black/Black/Black/Black/Black/ Black/BLUX/Black/BLUX/Black/BLUX/Black/BLUX/Black/BLUX/Black/BLUX/Black/BLUX/Black/BLUX/Black/BLUX/Black/BLUX/Black/BLUX/Black/BLUX/Black/BLUX/ Black/BLUX/ Black/BLUX/ Black/BLUX/ Black/BLUX/ Black/BLUX/ Black/BLUX/ Black/BLUX/ Black/BLUX/ Black/BLUX/ Black/BLUX/ Black/BLUX/ Black/BLUX/ Black/BLUX/ Black/BLUX/ Black/BLUX/ Black/BLUX/ Black/BLUX/ Black/BLUX/ Black/BLUX  / Black/BLUX  / Black/BLUX  / Black/BLUX  / Black/BLUX  / Black/BLUX  / Black/BLUX  / Black/BLUX  / Black/BLUX  / Black/BLUX  / Black/BLUX  / Black/BLUX  / Black/BLUX  / Black/BLUX  / Black/BLUX  / Black/BLUX  / Black/BLUX  / Black/BLUN  / Black/BLUN  / Black/BLUN  / Black/BLUN  / Black/BLUN  / Black/BLUN  / Black/BLUN  / Black/BLUN  / Black/BLUN  / Black/BLUN  / Black/BLUN  / Black/BLUN  / Black/BLUN  / Black/BLUN  / Black/BLUN  / Black/BLUN  / Black/BLUN  / Black/M |

    %% Blue lines indicate connections to the circuit. The diagram shows connections between black lines and light lines.
CM:COMPRESSOR TK:OVERLOAD PROTECTOR JK:PTC STARTING RELAY
Made In China
SN:
Baumatic
Code: 34002155 Model: BWC3832FS
CANDY HOOVER GROUP Via Comolli,16-20861 Brugherio-Italy
WINE COOLER
Climate Type: N
Capacity: 88L
Rated Volt./Freq.: 220-240V 50Hz
Rated Current: 0.65A
Light Power: Max 0.5W
Refrigerant: R600a(17g)
Blowing Gas: Cyclopentane
Unit Size(mm): 380*570*853
N.W.(Kg): 35.4


CIRCUIT DIAGRAM

flowchart
graph TD
    A["L"] --> B["BROWN"]
    C["E"] --> D["BLUE"]
    E["N"] --> F["G/Y"]
    B --> G["CONTROL PCB"]
    D --> G
    F --> G
    G --> H["NTC1"]
    G --> I["BLUE"]
    G --> J["BLUE"]
    G --> K["WHITE"]
    G --> L["FAN1"]
    G --> M["BLACK"]
    G --> N["Black"]
    G --> O["RED"]
    G --> P["FAN2"]
    G --> Q["BLACK"]
    G --> R["T/K"]
    G --> S["C"]
    S --> T["S"]
    T --> U["J/K"]
    U --> V["M"]
    V --> W["CM"]
    W --> X["S"]
    X --> Y["J/K"]
CM:COMPRESSOR TK:OVERLOAD PROTECTOR JK:PTC STARTING RELAY
Made In China
SN:
 | Code: 34002154 Model: BWC6046FS | CANDY HOOVER GROUP Via Comolli,16-20861 Brugherio-Italy | |
| WINE COOLER Climate Type: N Capacity: 145L Rated Volt./Freq.: 220-240V 50Hz Rated Current: 0.55A Light Power: Max 0.5W Refrigerant: R600a(29g) Blowing Gas: Cyclopentane Unit Size(mm): 595*570*863 N.W.(Kg): 48.4 | CIRCUIT DIAGRAM CONTROL PCB CM:COMPRESSOR TK:OVERLOAD PROTECTOR JK:PTC STARTING RELAY Made In China | ||
| CE | |||
| SN: | |||
 | Code: 34002156 Model: BWC6038FS | CANDY HOOVER GROUP Via Comolli,16-20861 Brugherio-Italy | |
 | CIRCUIT DIAGRAM | ||
| Climate Type: N | NTC1 NTC2 LIGHT 1 LIGHT 2 BLUE WHITE RED BLACK CONTROL PCB1 BLUE WHITE WHITE RED BLACK YELLOW MAIN CONTROL PCB YELLOW FAN1 BLACK BLACK BLACK BLACK CONTROL PCB2 BLUE SJK TK CM M POWER PCB | ||
| Capacity: 116L | |||
| Rated Volt./Freq.: 220-240V 50Hz | |||
| Rated Current: 0.65A | |||
| Light Power: Max 0.5Wx2 | |||
| Refrigerant: R600a(24g) | |||
| Blowing Gas: Cyclopentane | |||
| Unit Size(mm): 595*570*863 | |||
| N.W.(Kg): 48 | |||
| CE | CM:COMPRESSOR Y.V.:SOLENOID VALVE JK:PTC STARTING RELAY TK:OVERLOAD PROTECTOR Made In China | ||
| SN: | |||
| Baumatic | Code: 34002156 Model: BWC6038FS | CANDY HOOVER GROUP Via Comolli,16-20861 Brugherio-Italy | |
| WINE COOLER Climate Type: N Capacity: 116L Rated Volt./Freq.: 220-240V 50Hz Rated Current: 0.65A Light Power: Max 0.5Wx2 Refrigerant: R600a(24g) Blowing Gas: Cyclopentane Unit Size(mm): 595*570*863 N.W.(Kg): 48 | CIRCUIT DIAGRAM MAIN CONTROL PCB CM:COMPRESSOR JK:PTC STARTING RELAY Y.V.:SOLENOID VALVE TK:OVERLOAD PROTECTOR Made In China | ||
| CE | |||
| SN: | |||
| Baumatic | Code: 34002156 Model: BWC6038FS | CANDY HOOVER GROUP Via Comolli,16-20861 Brugherio-Italy | |
| WINE COOLER Climate Type: N Capacity: 116L Rated Volt./Freq.: 220-240V 50Hz Rated Current: 0.65A Light Power: Max 0.5Wx2 Refrigerant: R600a(24g) Blowing Gas: Cyclopentane Unit Size(mm): 595*570*863 N.W.(Kg): 48 | CIRCUIT DIAGRAM MAIN CONTROL PCB CM:COMPRESSOR JK:PTC STARTING RELAY Y.V.:SOLENOID VALVE TK:OVERLOAD PROTECTOR Made In China | ||
| CE | |||
| SN: | |||
| BaumaticCode: 34002156CANDY HOOVER GROUPModel: BWC6038FSVia Comolli,16-20861 Brugherio-Italy | |
| WINE COOLERClimate Type: NCapacity: 116LRated Volt./Freq.: 220-240V 50HzRated Current: 0.65ALight Power: Max 0.5Wx2Refrigerant: R600a(24g)Blowing Gas: CyclopentaneUnit Size(mm): 595*570*863N.W.(Kg): 48CE [IMAGE] | CIRCUIT DIAGRAMNTC1 NTC2 LIGHT 1 LIGHT 2CONTROL PCB1BLUE WHITE RED BLACK RED BLACKBROWN MAIN CONTROL PCBYELLOW BLACK WHITE BLACK BLUE BLACK RED CONTROL PCB2FAN1 FAN2 FAN3 RED D.C BLACK POWER PCBCM:COMPRESSOR JK:PTC STARTING RELAYY.V.:SOLENOID VALVE TK:OVERLOAD PROTECTOR Made In China |
| SN: | |
 | |
 | |
 | Hz |
| Rated Current: | 0.65A |
| Light Power: | Max 0.5Wx2 |
| Refrigerant: | R600a(24g) |
| Blowing Gas: | Cyclopentane |
| Unit Size(mm): | 595*570*863 |
| N.W.(Kg): | 48 |
| Climate Type: NCapacity: 116LRated Volt./Freq.: 220-240V 50HzRated Current: 0.65ALight Power: Max 0.5Wx2Refrigerant: R600a(24g)Blowing Gas: CyclopentaneUnit Size(mm): 595*570*863N.W.(Kg): 48 | MAIN CONTROL PCBCM:COMPRESSORY.V.:SOLENOID VALVE JK:PTC STARTING RELAYTK:OVERLOAD PROTECTOR Made In China | |
| CE | ||
| SN: | ||
| Climate Type: NCapacity: 116LRated Volt./Freq.: 220-240V 50HzRated Current: 0.65ALight Power: Max 0.5Wx2Refrigerant: R600a(24g)Blowing Gas: CyclopentaneUnit Size(mm): 595*570*863N.W.(Kg): 48 | MAIN CONTROL PCBCM:COMPRESSORY.V.:SOLENOID VALVE JK:PTC STARTING RELAYTK:OVERLOAD PROTECTOR Made In China | |
| CE | ||
| SN: | ||
| Climate Type: NCapacity: 116LRated Volt./Freq.: 220-240V 50HzRated Current: 0.65ALight Power: Max 0.5Wx2Refrigerant: R600a(24g)Blowing Gas: CyclopentaneUnit Size(mm): 595*570*863N.W.(Kg): 48 | MAIN CONTROL PCBCM:COMPRESSORY.V.:SOLENOID VALVE JK:PTC STARTING RELAYTK:OVERLOAD PROTECTOR Made In China | |
| CE | ||
| SN: | ||
 | |
| Light Power: Max 0.5Wx2 | |
| Refrigerant: R600a(24g) | |
| Blowing Gas: Cyclopentane | |
| Unit Size(mm): 595*570*863 | |
| N.W.(Kg): 48 | |
| CE | |
 | |
| Refrigerant: R600a(24g) | |
| Blowing Gas: Cyclopentane | |
| Unit Size(mm): 595*570*863 | |
| N.W.(Kg): 48 | |
| CE | CM:COMPRESSORY.V.:SOLENOID VALVE JK:PTC STARTING RELAYTK:OVERLOAD PROTECTOR Made In China |
| SN: | |
 Blowing Gas: CyclopentaneUnit Size(mm): 595*570*863N.W.(Kg): 48CE [IMAGE] Blowing Gas: CyclopentaneUnit Size(mm): 595*570*863N.W.(Kg): 48CE [IMAGE] | [IMAGE]CM:COMPRESSORY.V.:SOLENOID VALVE JK:PTC STARTING RELAYTK:OVERLOAD PROTECTOR Made In China | |
| SN: | ||
 BUnit Size(mm): 595*570*863N.W.(Kg): 48CE [IMAGE] BUnit Size(mm): 595*570*863N.W.(Kg): 48CE [IMAGE] | [IMAGE]CM:COMPRESSORY.V.:SOLENOID VALVE JK:PTC STARTING RELAYTK:OVERLOAD PROTECTOR Made In China | |
| SN: | ||
 |  | CM:COMPRESSORY.V.:SOLENOID VALVE | JK:PTC STARTING RELAYTK:OVERLOAD PROTECTOR | Made In China |
 | ||||
 |
Baumatic
Customer Care Telephone
0844 692 3605
Spare Part Telephone
0844 692 3606
Baumatic
Part of the Candy Hoover Group Via Comolli, 16-20861 Brugherio, Italy
www.baumatic.co.uk


- Baumatic
- --CONTENTS--
- SAFETY INFORMATION
- SCRAPPING OLD APPLIANCES
- DESCRIPTION OF APPLIANCE
- USING YOUR WINE CABINET
- CLEANING AND MAINTENANCE
- INSTALLATION
- TROUBLESHOOTING
- TECHNICAL DATA
- Thank you for purchasing this product.
- SAFETY INFORMATION
- SCRAPPING OLD APPLIANCES
- Conformity
- Energy Saving
- Service
- DESCRIPTION OF APPLIANCE
- Product Features
- BWC3832FS: Single Zone--32 Bottles
- Dual Zone: BWC6046FS
- Interior Light
- The Wine Cabinet Shelves
- USING YOUR WINE CABINET
- Before Switching On
- During First Use
- Turning The Appliance On And Off
- BWC3019FS, BWC3832FS, BWC6046FS, BWC6038FS
- Unlocking The Control Panel
- The Interior Light
- Setting The Temperature Range
- BWC3019FS, BWC3832FS
- BWC6046FS
- BWC6038FS
- Setting The Temperature
- BWC3019FS, BWC3832FS, BWC6038FS
- Changing Between Fahrenheit And Celsius
- Silent Mode
- BWC3019FS, BWC3832FS, BWC6046FS
- Function Indicator BWC3019FS, BWC3832FS
- Loading The Wine Cabinet
- Storing Your Wines
- Wine Storage Problems
- CLEANING AND MAINTENANCE
- Removing The Shelves For Cleaning
- Defrosting
- Moving Your Wine Cabinet
- Power Failure
- Vacation Time
- Long vacations:
- Disconnecting From Power
- INSTALLATION
- Electrical Connection
- Positioning
- Built-In Installation
- BWC3019FS
- BWC3832FS
- Adjusting the height and leveling off your wine cabinet
- Installing The Handle
- Reversing The Door Of Your Wine Cooler
- TROUBLESHOOTING
- DO NOT ATTEMPT TO REPAIR THE APPLIANCE YOURSELF.
- WINE COOLER
Brand : BAUMATIC
Model : BWC6038FS
Category : Wine cellar