
CMP41DS - Mp3 player BUSH - Free user manual and instructions
Find the device manual for free CMP41DS BUSH in PDF.


| Product Type | Multimedia Player (MP3 player) |
| Brand | Bush |
| Model | CMP41DS |
| Product Code | CMP41D |
| Dimensions | 95 × 42 × 9.4 mm |
| Weight | 44 g |
| Power Supply | Internal rechargeable battery, 240mAh, 3.7V |
| Internal Memory | 8 GB |
| Supported OS | Windows 2000, XP or above |
| Interface | USB 2.0 |
| Music Formats | MP3, WMA, OGG, APE, FLAC, WAV, AAC, M4A |
| Video Formats | AVI, FLV, MP4, 3GP |
| Photo Formats | JPG, BMP, GIF, TIFF, PNG |
| Recording Formats | MP3, WMA, WAV |
| Functions | Music, Video, Photo, FM Radio, Camera, Video Camera, EBook, Recorder, Stopwatch, Calculator, Calendar |
| Earphone Jack | 3.5 mm |
| Charging | Via USB cable to PC/laptop |
| Care | Wipe with lint-free duster; do not use liquids |
| Safety | Keep away from water; unplug during lightning storms; no user-serviceable parts |
| Spare Parts / Repairability | No user-serviceable parts; refer servicing to qualified personnel |
| Warranty | 12 months from date of purchase |
| Guarantor | Argos Limited |
Frequently Asked Questions - CMP41DS BUSH
User questions about CMP41DS BUSH
0 question about this device. Answer the ones you know or ask your own.
Ask a new question about this device
Download the instructions for your Mp3 player in PDF format for free! Find your manual CMP41DS - BUSH and take your electronic device back in hand. On this page are published all the documents necessary for the use of your device. CMP41DS by BUSH.
USER MANUAL CMP41DS BUSH
Table of contents

natural_image
Simple line drawing of a computer monitor with a control knob (no text or symbols)Product Code
CMP41D
Care & maintenance....2
Disposal information 2
Rechargeable battery disposal....2
Accessories included....3
Overview of controls....3
Getting started 3
Button functions 4
Connecting to a PC 4
Connecting to a PC (cont) 5
Earphone connection....5
Music playback 5
Audio function menu ....5
EQ modes....5
Play mode 6
Add to my playlist 6
Set rating 6
Add a tag....6
A-B repeat 6
Delete a track....
Advanced audio menu 6
User EQ....6
Information 7
Video playback....7
Video function menu 7
Playback mode....7
Scan speed 7
Add a tag....7
Screen size....7
Video resume 7
Delete a video....7
Information 7
Photo browser....8
Photo function menu 8
Thumbnail/ List view 8
Slide show 8
FM radio 9
Auto scan....9
Storing/ removing preset stations....9
Recalling preset stations....9
Delete a preset station....9
FM record function....9
Record quality....9
Record gain....9
FM Sensitivity 9
Tuner region....10
Mute 10
Camera....10
Basic camera controls 10
Camera function menu....10
Video camera....10
Basic video camera controls 10
Video camera function menu....11
6 EBook....11
Ebook function menu 11
Audio recorder....12
Audio recorder function menu....12
Stopwatch....12
Calculator....12
Calendar 13
Settings....13
Display....13
Power saving....13
Date & time 13
Language....13
Advanced 13
Technical specifications....14
Troubleshooting....14

Safety information
Important – Please read these instructions fully before using
CAUTION: TO REDUCE THE RISK OF ELECTRIC SHOCK, DO NOT REMOVE ANY COVER. NO USER-SERVICEABLE PARTS INSIDE, REFER ANY SERVICING TO QUALIFIED SERVICE PERSONNEL.
- Please read this owner's guide
- Please take the time to follow the instructions in this owner's guide carefully. It will help you set up and operate your system properly and enjoy all of its advanced features.
- Please save this owner's guide for future reference.
- The product label is located on the back of the product.
- Heed all warnings - on the product and in the owner's guide.
- Do not use this apparatus near water or moisture.
- Do not use this product near a bathtub, washbowl, kitchen sink, and laundry tub, in a wet basement, near a swimming pool, or anywhere else that water or moisture is present.
- Only use attachments/accessories specified by the manufacturer.
- Unplug this apparatus during lightning storms or when unused for long periods of time - to prevent damage to this product.
• Refer all servicing to qualified service personnel
- Servicing is required when the apparatus has been damaged in any way: such as liquid has been spilled or objects have fallen into the apparatus; the apparatus has been exposed to rain or moisture, does not operate normally, or has been dropped -
- Do not attempt to service this product yourself.
- Opening or removing covers may expose you to dangerous voltages or other hazards.
• To prevent risk of fire or electric shock, avoid overloading wall outlets, extension cords, or integral convenience receptacles.
- Use suitable power sources - Plug the product into a suitable power source, as described in the operating instructions or as marked on the product. Before making any electrical connections, ensure the following:
- Do not bend, stretch or pull the supply cable in order to avoid electric shock.
- The supply voltage should be the same as that indicated in the technical specifications and the appliance rating plate.

This product complies with European low voltage (2006/95/EC) and electromagnetic compatibility (2004/108/EC) directives.
Care & maintenance
Care and cleaning
- All care and cleaning operations should be carried out with the unit unplugged from the mains power.
- Occasionally wipe the cabinet with a lint free duster. Never clean the unit with liquids or solvents.
Disposal information

WEEE marking "Information for the consumer" Disposal of your old product Your product is designed and manufactured with high quality materials and components, which can be
recycled and reused. When this crossed out wheeled bin symbol is attached to a product it means the product is covered by the European Directive 2002/96/EC. Please make yourself aware of the local collection system for electrical and electronic products. Please act according to your local rules and do not dispose of your old products with your normal household waste. The correct disposal of your old product will help prevent potential negative consequences for the environment and human health.
Rechargeable battery disposal
Your product contains a built-in rechargeable battery covered by the European Directive 2006/66/EC. To safeguard the functionality and safety of your product, always take your product to an official collection point or service centre where a professional can remove the battery.
Please inform yourself about the local rules on separate collection of batteries because the correct disposal will help prevent negative consequences for the environmental and human health. Please do not dispose of your batteries with your normal household waste. Always bring your product to a professional to remove the battery.
This product complies with Electromagnetic compatibility (2004/108/EC) directives.
Functions & controls
Please familiarize yourself with the parts and accessories listed below
Accessories included
- 1 x CMP41D • 1 x Instruction manual • 1 x USB charging cable • 1 x earphones
Overview of controls
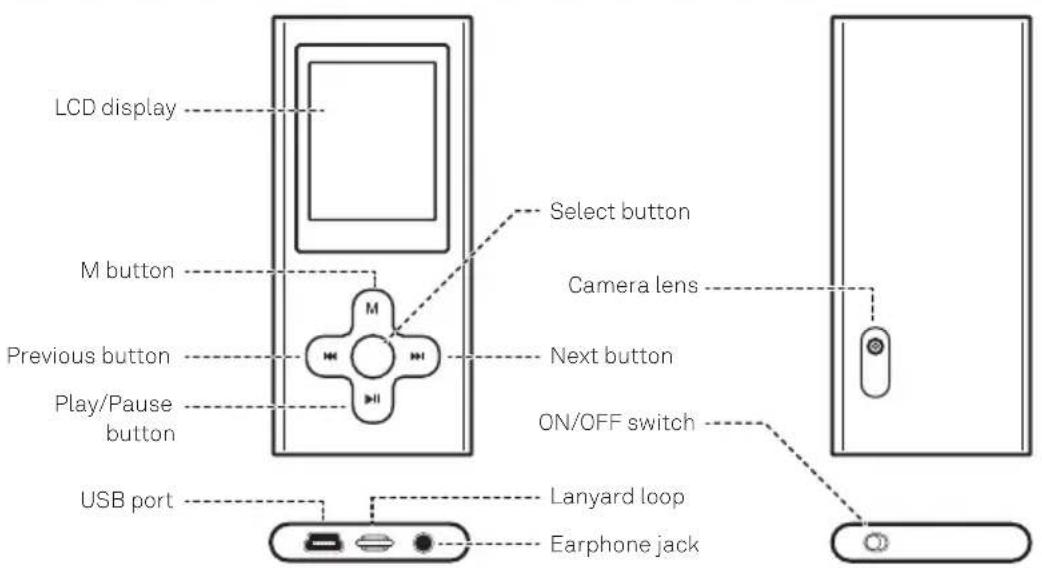
Getting started
Before use your player will require charging fully. Follow the below instructions to charge.

natural_image
Simple line drawing of a laptop connected to a right-hand console (no text or symbols)1: Set the ON/Off switch to the 'ON' position.
2: Using the usb charging cable connect the mini usb plug into the usb charge socket on the bottom of the unit. Connect the other end of the cable to a laptop/pc usb input & power on the pc/laptop.
3: Once connected the player will power up and present you with three options:- Power & Data (Charge the device & connect to a pc/laptop), Charge (Charge only) & Charge & Play (Use the device while charging). Select the 'Charge' option using the ◀◀/▶◀ button and select by pressing the 'M' button.
4: During charging you will see the charge animation in the top right corner of the display.

When the charge is at maximum the dots no longer animate.
User instructions
Button functions
| To Press | |||
| General | Power On/ OffTurn On/ OffScroll through listsSelect optionReturn to previous menuVolume upVolume down | Switch the On/ Off switchHold the Play/Pause button for 3 second◀◀/▶▶▶▶▶▶▶▶▶▶▶▶▶▶▶▶▶▶▶▶▶▶▶▶▶▶▶▶▶▶▶▶▶▶▶▶▶▶▶▶▶▶▶▶▶▶▶▶▶▶▶▶▶▶▶▶▶▶▶▶▶▶▶▶▶▶▶▶▶▶▶▶▶▶▶▶▶▶▶▶▶▶▶▶▶▶▶▶▶▶▶▶▶▶▶▶▶▶▶▶▲▶▶▶▶▶▶▶▶▶▶▶▶▶▶▶▶▶▶▶▶▶▶▶▶▶▶▶▶▶▶▶▶▶▶▶▶▶▶▶▶▶▶▶▶▶▶▶▶▶▶▶▶▶▶▶▶▶▶▶▶▶▶▶▶▶▶▶▶▶▶▶▶▶▶▶▶▶▶▶▶▶▶▶▶▶▶▶▶▶▶▶▶▶▶▶▶▶▶▶>▶▶▶▶▶▶▶▶▶▶▶▶▶▶▶▶▶▶▶▶▶▶▶▶▶▶▶▶▶▶▶▶▶▶▶▶▶▶▶▶▶▶▶▶▶▶▶▶▶▶▶▶▶▶▶▶▶▶▶▶▶▶▶▶▶▶▶▶▶▶▶▶▶▶▶▶▶▶▶▶▶▶▶▶▶▶▶▶▶▶▶▶▶▶▶▶▶▶▶ ▶▶▶▶▶▶▶▶▶▶▶▶▶▶▶▶▶▶▶▶▶▶▶▶▶▶▶▶▶▶▶▶▶▶▶▶▶▶▶▶▶▶▶▶▶▶▶▶▶▶▶▶▶▶▶▶▶▶▶▶▶▶▶▶▶▶▶▶▶▶▶▶▶▶▶▶▶▶▶▶▶▶▶▶▶▶▶▶▶▶▶▶▶▶▶▶▶▶▶▶◀▶▶▶▶▶▶▶▶▶▶▶▶▶▶▶▶▶▶▶▶▶▶▶▶▶▶▶▶▶▶▶▶▶▶▶▶▶▶▶▶▶▶▶▶▶▶▶▶▶▶▶▶▶▶▶▶▶▶▶▶▶▶▶▶▶▶▶▶▶▶▶▶▶▶▶▶▶▶▶▶▶▶▶▶▶▶▶▶▶▶▶▶▶▶▶▶▶▶▶▼▶▶▶▶▶▶▶▶▶▶▶▶▶▶▶▶▶▶▶▶▶▶▶▶▶▶▶▶▶▶▶▶▶▶▶▶▶▶▶▶▶▶▶▶▶▶▶▶▶▶▶▶▶▶▶▶▶▶▶▶▶▶▶▶▶▶▶▶▶▶▶▶▶▶▶▶▶▶▶▶▶▶▶▶▶▶▶▶▶▶▶▶▶▶▶▶▶▶▶●▶▶▶▶▶▶▶▶▶▶▶▶▶▶▶▶▶▶▶▶▶▶▶▶▶▶▶▶▶▶▶▶▶▶▶▶▶▶▶▶▶▶▶▶▶▶▶▶▶▶▶▶▶▶▶▶▶▶▶▶▶▶▶▶▶▶▶▶▶▶▶▶▶▶▶▶▶▶▶▶▶▶▶▶▶▶▶▶▶▶▶▶▶▶▶▶▶▶▶- ▶▶▶▶▶▶▶▶▶▶▶▶▶▶▶▶▶▶▶▶▶▶▶▶▶▶▶▶▶▶▶▶▶▶▶▶▶▶▶▶▶▶▶▶▶▶▶▶▶▶▶▶▶▶▶▶▶▶▶▶▶▶▶▶▶▶▶▶▶▶▶▶▶▶▶▶▶▶▶▶▶▶▶▶▶▶▶▶▶▶▶▶▶▶▶▶▶▶> ▶▶▶▶▶▶▶▶▶▶▶▶▶▶▶▶▶▶▶▶▶▶▶▶▶▶▶▶▶▶▶▶▶▶▶▶▶▶▶▶▶▶▶▶▶▶▶▶▶▶▶▶▶▶▶▶▶▶▶▶▶▶▶▶▶▶▶▶▶▶▶▶▶▶▶▶▶▶▶▶▶▶▶▶▶▶▶▶▶▶▶▶▶▶▶▶▶▶▲▶> ▶▶▶> ▶▶> ▶▶> ▶▶> ▶▶> ▶▶> ▶▶> ▶▶> ▶▶> ▶▶> ▶▶> ▶▶> ▶▶> ▶▶> ▶▶> ▶▶> ▶▶> ▶▶> ▶▶> ▶▶> ▶▶> ▶▶> ▶▶> ▶▶> ▶▶> ▶▶> ▽> ▽> ▽> ▽> ▽> ▽> ▽> ▽> ▽> ▽> ▽> ▽> ▽> ▽> ▽> ▽> ▽> ▽> ▽> ▽> ▽> ▽> ▽> ▽> ▽> ▽> ▽> ▽> ▽> ▽> ▽> ▽> ▽> ▽ > ▽> ▽> ▽> ▽> ▽> ▽> ▽> ▽> ▽> ▽> ▽> ▽> ▽> ▽> ▽> ▽> ▽> ▽> ▽> ▽> ▽> ▽> ▽> ▽> ▽> ▽> ▽> ▽> ▽> ▽> ▽> ▽> ▽>□> ▽> ▽> ▽> ▽> ▽> ▽> ▽> ▽> ▽> ▽> ▽> ▽> ▽> ▽> ▽> ▽> ▽> ▽> ▽> ▽> ▽> ▽> ▽> ▽> ▽> ▽> ▽> ▽> ▽> ▽> ▽> ▽> ▽) ▽> ▽> ▽> ▽> ▽> ▽> ▽> ▽> ▽> ▽> ▽> ▽> ▽> ▽> ▽> ▽> ▽> ▽> ▽> ▽> ▽> ▽> ▽> ▽> ▽> ▽> ▽> ▽> ▽> ▽> ▽> ▽> ▽>△> ▽> ▽> ▽> ▽> ▽> ▽> ▽> ▽> ▽> ▽> ▽> ▽> ▽> ▽> ▽> ▽> ▽> ▽> ▽> ▽> ▽> ▽> ▽> ▽> ▽> ▽> ▽> ▽> ▽> ▽> ▽> ▽> ▽ | ○ |
| Music | Play/ Pause tracksSkip to the next trackFast forwardSkip back to previous trackFast rewind | Press the Play / Pause buttonPress the ▶◀◀ ▶◀◀ ▶◀◀ ▶◀◀ ▶◀◀ ▶◀◀ ▶◀◀ ▶◀◀ ▶◀◀ ▶◀◀ ▶◀◀ ▶◀◀ ▶◀◀ ▶◀◀ ▶◀◀ ▶◀◀ ▶◀◀ ▶◀◀ ▶◀◀ ▶◀◀ ▶◀◀ ▶◀◀ ▶◀◀ ▶◀◀ ▶◀◀ ▶◀< | |
| Movie | Play/ Pause a movieSkip to next movieFast forwardSkip back to previous movieFast rewind | Press the Play / Pause buttonPress the ▶◀◀ ▶◀◀ ▶◀◀ ▶◀◀ ▶◀◀ ▶◀◀ ▶◀◀ ▶◀◀ ▶◀◀ ▶◀◀ ▶◀◀ ▶◀◀ ▶◀◀ ▶◀◀ ▶◀◀ ▶◀◀ ▶◀◀ ▶◀◀ ▶◀◀ ▶◀◀ ▶◀◀ ▶◀◀ | |
| Images | Select imageSkip to next imageSkip to previous image | Select buttonPress the ▶◀◀ ▶◀◀ ▶◀◀ ▶◀◀ ▶◀◀ ▶◀◀ ▶◀◀ ▶◀◀ ▶◀◀ ▶◀◀ ▶◀◀ ▶◀◀ ▶◀◀ ▶◀◀ ▶◀◀ ▶◀◀ ▶◀◀ ▶◀◀ ▶◀◀ ▶◀◀ ▶◀◀ ▶◀◀ ▶◀◀ ▶◀◀ | |
| FM Radio | Skip 0.05MHz Press either | ◀◀/ ▶◀◀ ▶◀◀ ▶◀◀ ▶◀◀ ▶◀◀ ▶◀◀ ▶◀◀ ▶◀◀ ▶◀◀ ▶◀◀ ▶◀◀ ▶◀◀ ▶◀◀ ▶◀◀ ▶◀◀ ▶◀◀ ▶◀◀ ▶◀◀ ▶◀◀ ▶◀◀ ▶◀◀ ▶◀◀ ▶◀◀ ▶◀◀ ▶◀ (< | |
| Camera | Zoom Press either | ◀◀/ ▶◀◀ ▶◀◀ ▶◀◀ ▶◀◀ ▶◀◀ ▶◀◀ ▶◀◀ ▶◀◀ ▶◀◀ ▶◀◀ ▶◀◀ ▶◀◀ ▶◀◀ ▶◀◀ ▶◀◀ ▶◀◀ ▶◀◀ ▶◀◀ ▶◀◀ ▶◀◀ ▶◀◀ ▶◀◀ ▶◀◀ ▷ | |
| Video Camera | Record/ PauseSave recording | Select buttonPress the 'M' button |
Connecting to a PC
Once the unit is charged or during charging you can copy files to the player.
1: Follow steps 1-2 of 'Getting started' to connect the player to a pc/laptop.
2: Once connected the player will power up and present you with three options:- Power & Data (Charge the device & connect to a pc/ laptop), Charge (Charge only) & Charge & Play (Use the device while charging). Select the 'Power & Data' option using the ◀◀/▶◀ buttons and select by pressing the 'M' button.
3: When the unit is connected a hardware driver is automatically installed and the device is then available in the list of devices (Named CMP41_8G). On some operating systems an auto play window will appear. Choose to take no action and click OK to close the window.
4: Double click 'My Computer' Or 'Computer' on some operating systems. Look for 'Removable disks or storage' option and locate the device named 'CMP41_8G' and double click.
NOTE: Do not disconnect the USB cable at any time when copying data to or from the device.
User instructions
Connecting to a PC (cont)
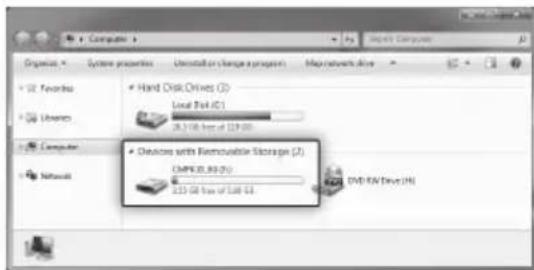
5: Drag & drop media files into the applicable folders on the removable device.
6: Close the removable device window and disconnect the player from your pc/laptop after data transfer has completed.
Earphone connection
Instructions for earphone usage.
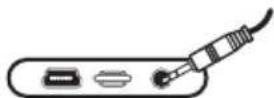
1: Connect the 3.5mm earphone plug into the EARPHONE socket on the bottom of the unit.

To prevent possible hearing damage, do not listen at high volume levels for long periods.
In music mode, when the volume is adjusted to 85dB the above icon will appear on the display. Press the 'M' button to continue.
If you hear no sound during playback, do not turn the volume up as the music may suddenly begin at a high volume.
Excessive sound pressure from earphones and headphones can cause hearing loss. To avoid damaging your ears, adjust the volume to the lowest safe level before playing, and turn up to the desired level when playback has started.
Music playback
1: Select 'MUSIC' from the main menu.
2: Select a track from the 'Dir List' or use one of the filters to help you locate the album/ track you wish to play. Press the 'SELECT' button to begin playback.
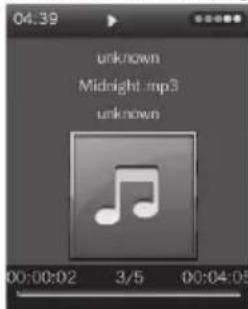
3: To skip through the available tracks on the device use the 🔊/ 🔊 buttons.
4: Press the 'Play/Pause' button to begin playback of a selected track. To pause playback press the 'Play/Pause' button once more.
5: Press and hold either ◀◀/▶buttons to fast forward or rewind the current track during playback.
6: To adjust the volume levels press the 'SELECT' button and then use the ◀◀/▶buttons to increase or decrease the level.
Audio function menu
1: During playback press and hold the 'M' button to enter the audio function menu.
EQ modes
You can apply various sound EQ's to audio following the below steps.
1: Select 'Select EQ' and press the 'SELECT' button to enter the EQ menu.
2: Select one of the following options:- Normal, Pop, Classic, Soft, Jazz, Rock, dbb (dynamic bass boost) & User eq (see 'Audio function menu' 'User EQ').
3: Press the 'SELECT' button to save the setting and return back to the audio function menu.
User instructions
Play mode
Select a playback mode from the below options.
Sequence Play tracks in sequence
Repeat One Repeat a single track
Repeat All Repeat all tracks
Shuffle Play tracks in a random order
Add to my playlist
Select this option to add the selected track to a playlist.
1: Select 'Add to my Playlist' and press the 'SELECT' button to enter the Playlist menu.
2: Choose which playlist 1-5 you wish to add the track to.
3: Press the 'M' button repeatedly to return back to the music playback screen.
Set rating
Choose a track rating between 1-5.
1: Select 'Set Rating' and press the 'SELECT' button to enter the rating menu.
2: Use the ◀◀/▶buttons to select a rating from 1-5 and then press the 'SELECT' button to store the setting.
Add a tag
Similar to playlist you can tag multiple tracks to appear in the 'tag list' on the music filter menu.
1: Select 'Add Tag' and press the 'SELECT' button to tag the current track.
2: From the Music filter menu (EG:-Select 'MUSIC' from the main menu) select 'Tag List' to display all tagged tracks.
A-B repeat
1: Select 'AB Repeat' and press the 'SELECT' button to begin the AB repeat setup process.
2: Press the 'Play/ Pause' button to set the 'A' marker (beginning of the repeat section). Press the 'Play/ Pause' button once more to set the 'B' marker (end of the repeat section).
3: The selected audio will now repeat for the specified amount of times (see point 4).
A-B repeat (cont)
4: To specify the amount of repeat times select 'Advanced' from the audio function menu and select 'Replay Times'. Press the 'SELECT' button.
5: Use the ◀◀/▶buttons to set the number of times the replay is to repeat. Press the 'SELECT' button to activate.
6: From the advanced audio function menu you can choose 'Replay Interval' to specify the length of time in-between each 'repeat'. Use the ◀◀/buttons to set the interval time. Press the 'SELECT' button to activate.
Delete a track
1: Select 'Delete' and press the 'SELECT' button.
2: Press 'Yes' when asked 'Delete disk file?'.
Advanced audio menu
1: Select 'Advanced' from the audio function menu and press the 'SELECT' button.
Scan speed
Specify the speed at which the fast forward/ fast rewind scan functions operate.
1: Select 'Scan Speed' and press the 'SELECT' button.
2: Use the ◀◀/▶buttons to increase or decrease the scan speed from: - 2X, 4X, 8X, 16X & 32X.
3: Press the 'SELECT' button to store the setting.
User EQ
This function allows you to create your own EQ setting. Selectable in 'EQ modes'.
1: Select 'EQ Settings' and press the 'SELECT' button.
2: Press the 'SELECT' button once more to enter the 'User EQ' programme screen.
3: Use the ◀◀/▶buttons to increase or decrease the gain slider for each frequency range.
4: Use the 'Play/Pause' button to switch frequency range sliders.
5: Press the 'SELECT' button to store the EQ setting.
6: Follow steps 1-3 of 'EQ modes' page 5 to enable the new EQ setting.
User instructions
Information
When selected this function displays the information tags for the current track.
1: Select 'Information' and press the 'SELECT' button.
Video playback
1: Select 'VIDEO' from the main menu.
2: Select a video from the 'Dir List' or use one of the filters to help you locate the video file you wish to play. Press the 'SELECT' button to begin playback.
3: To skip through the available videos on the device use the / buttons.
4: Press the 'Play/Pause' button to begin playback of a selected track. To pause playback press the 'Play/Pause' button once more.
5: Press and hold either ◀◀◀ /▶buttons to fast forward or rewind the current track during playback.
6: To adjust the volume levels press the 'SELECT' button and then use the ◀◀/▶buttons to increase or decrease the level.
Video function menu
1: During playback press and hold the 'M' button to enter the video function menu.
Playback mode
Select a playback mode from the below options.
Sequence Play tracks in sequence
Repeat One Repeat a single track
Repeat All Repeat all tracks
Shuffle Play tracks in a random order
Scan speed
Specify the speed at which the fast forward/ fast rewind scan functions operate.
1: Select 'Scan Speed' and press the 'SELECT' button.
2: Use the ◀◀/▶buttons to increase or decrease the scan speed from:- 1X, 2X, 3X, & 4X.
3: Press the 'SELECT' button to store the setting.
Add a tag
Similar to a playlist you can tag multiple videos to appear in the 'tag list' on the video filter menu.
1: Select 'Add Tag' and press the 'SELECT' button to tag the current track.
2: From the Video filter menu (EG:-Select 'VIDEO' from the main menu) select 'Tag List' to display all tagged tracks.
Screen size
1: Select 'Screen Size' and press the 'SELECT' button to display the options.
2: Choose from 'Full Screen', 'Original Size' & 'Scale'.
Video resume
Allows video's to be resumed from the last play position.
1: Select 'Resume' and press the 'SELECT' button.
2: Use the ◀◀/▶▶buttons to select YES or NO when asked. Press the 'SELECT' button to store the setting.
Delete a video
1: Select 'Delete' and press the 'SELECT' button.
2: Press 'Yes' when asked 'Confirm to delete'.
Information
When selected this function displays the information tags for the current video.
1: Select 'Information' and press the 'SELECT' button.
User instructions
Photo browser
1: Select 'PHOTO' from the main menu.
2: Choose a photo from the 'Dir List' you wish to view and press the 'SELECT' button to view.

natural_image
Black-and-white photo of a leafy plant with visible light spots, captured in a video editing interface (no text or symbols on the image itself)3: Press and hold the 'M' button to display information about the current image.
Photo function menu
1: When viewing a single image (Not during a slide show) press the 'Play/Pause' button to display the 'Photo function menu'.
Rotate
1: Select 'Rotate' and press the 'SELECT' button to display the rotate options of 90, 180 & 270.
2: Use the ◀◀/▶buttons to select one of the options and press the 'SELECT' button to activate.
Zoom
1: Select 'Zoom' and press the 'SELECT' button to display the zoom options.
2: Use the ◀◀/▶buttons to select one of the options and press the 'SELECT' button to activate.
Slide interval/ Slide effect
Please see 'Slide show' section for details.
Delete
1: Select 'Delete' and press the 'SELECT' button.
2: Press 'Yes' when asked 'Confirm to delete'.
Information
This function displays information for the current photo.
1: Select 'Information' and press the 'SELECT' button.
Thumbnail/ List view
1: To view the 'Dir List' in a thumbnail format select 'Scan Mode' from the main PHOTO menu.
2: Select 'List Mode' or 'Thumbnail' and press the 'SELECT' button to store the setting.
Slide show
Should you wish to view all images in a slide show follow the below steps.
1: Select a photo from the 'Dir List' you wish to view and press the 'SELECT' button.
2: When the image has loaded press the 'SELECT' button again to begin a slide show of the available images (in the selected folder). Pressing the 'SELECT' button once more stops the slide show on the current image.
3: To change the slide show transition effect, select 'Slide Effect' from the main 'PHOTO' menu.
4: Choose from the available transitions and press the 'SELECT' button to store the setting.
5: To adjust the slide show interval between each image, select 'Slide Interval' from the main 'PHOTO' menu.
6: Set the amount of seconds between each image and press the 'SELECT' Button to store the setting.
NOTE: The slide effect and interval settings are also available from the 'Photo function menu'.
User instructions
FM radio
When using the FM radio it is essential you have earphones connected as they act as an antenna.
1: Select 'FM RADIO' from the main menu. The default mode is 'tuning mode'.
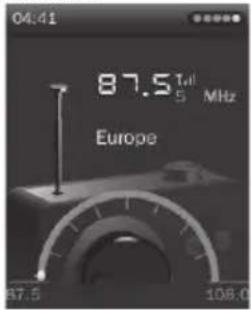
2: Use the buttons to advance up or down the frequency range in 0.05MHz increments.
3: To switch to 'channel selection mode' press the 'Play/Pause' button.
Auto scan
You can perform an auto scan and store all strong signals as preset channels.
1: Ensure you are in 'tuning mode'. Press and hold the 'M' button to display the 'Radio function menu'.
2: Select 'Auto Search' and press the 'SELECT' button. The frequency band will be scanned and all strong stations will be stored in to presets.
Storing/ removing preset stations
1: Ensure you are in 'tuning mode'. When you have tuned a station press and hold the 'M' button.
2: Select 'Save Channel'.
3: Select a channel from 1-20 and press the 'SELECT' button to store the current station to that channel.
Recalling preset stations
1: Ensure you are in 'channel selection mode'. Use the /buttons to cycle through the stored stations.
2: Alternatively you can press and hold the 'M' button and select 'Channel List'
3: Select a channel and press the 'SELECT' button to activate.
Delete a preset station
1: Ensure you are in 'channel selection mode'. Select the channel you wish to delete.
2: Press and hold the 'M' button and select 'Delete channel'.
FM record function
1: When you have tuned a station press and hold the 'M' button.
2: Select 'FM Record'. The FM record mode is activated and automatically begins recording the current station.
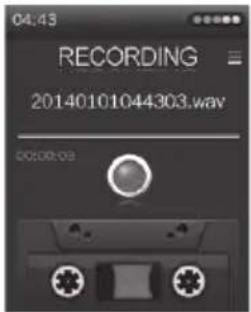
3: Press the 'SELECT' button to pause the recording. Press once more to resume recording.
4: When the recording is finished press the 'M' button to save the file. If you are asked to stop the recording, select Yes.
Record quality
1: Press and hold the 'M' button and select 'Record Quality'.
2: Set the record quality from Low, Medium & High. Press the 'SELECT' button to store the setting.
Record gain
1: Press and hold the 'M' button and select 'Record Gain'.
2: Set the record gain level from 1-5. Press the 'SELECT' button to store the setting.
FM Sensitivity
1: Press and hold the 'M' button and select 'FM Sensitivity'.
2: Set the sensitivity level from Low, Medium & High. Press the 'SELECT' button to store the setting.
User instructions
Tuner region
1: Press and hold the 'M' button and select 'Tuner Region'.
2: Set the required region and press the 'SELECT' button to store the setting.
Mute
1: Press and hold the 'M' button and select 'Mute'.
2: To re-enable the audio follow step '1' again.
Camera
1: Select 'CAMERA' from the main menu.
Basic camera controls
Photo shooting
1: Press the 'SELECT' button to take a photo.
2: Use the ▶ button to zoom in. Press repeatedly to cycle between 1X, 2X & 3X.
Camera function menu
1: Press and hold the 'M' button to display the menu.
Picture playback
Select to review photos
White balance
Select a setting which best suits your environment to try and balance the colours.
Brightness
Adjust the brightness level of the display.
Exposure mode
Select a mode to best suit your environment :- Auto, Indoor or outdoor.
Sticker photo
Choose from a number of preset fun backgrounds to enhance your portrait photos.
Special effect
Choose from three colour effects of: Black & White, Sepia or Negative.
Resolution
Specify the resolution of photographs saved to the internal memory.
Memory free space
Displays the available free space on the internal memory.
Self timer
Set a shutter time delay in seconds.
Continuous shooting
When set the camera will continue to take a photo for the time you set until you press the 'M' button.
Shutter sound
Choose from a list of shutter sounds.
Date stamp
When enabled this setting adds a Date or Time & Date stamp to each photograph taken there after.
Video camera
1: Select 'VIDEO CAMERA' from the main menu.
Basic video camera controls
Video shooting
1: Press the 'SELECT' button to begin recording.
2: Press the 'SELECT' button to pause recording.
3: Use the ▶ button to zoom in. Press repeatedly to cycle between 1X, 2X & 3X.
4: To save the recording press the 'M' button.
NOTE: The zoom function is only available when in stop mode.
User instructions
Video camera function menu
1: Press and hold the 'M' button to display the menu.
Video playback
Select to review videos
White balance
Select a setting which best suits your environment to try and balance the colours.
Brightness
Adjust the brightness level of the display.
Exposure mode
Select a mode to best suit your environment :- Auto, Indoor or outdoor.
Special effect
Choose from three colour effects of: Black & White, Sepia or Negative.
Resolution
Specify the resolution of photographs saved to the internal memory.
Memory free space
Displays the available free space on the internal memory.
Record quality
Set the record quality from High, Medium, Low & Auto.
Record gain
Increase or decrease the audio gain on the video recordings.
EBook
Follow the below steps to view text documents.
1: Select 'TOOLS' from the main menu. And then select 'EBOOK' from the tools menu.
2: Select a text document from the 'Dir List' or use one of the filters to help you locate the txt file you wish to view. Press the 'SELECT' button to begin viewing.
3: To skip through the pages of the document use the /buttons.

4: Press the 'SELECT' button to switch to auto page viewing mode. This function will automatically skip pages according to the 'Auto reading speed' setting.
5: Press the 'SELECT' button once more to resume standard viewing mode.
NOTE: The ebook format is ‘.TXT’ so you may need to copy and paste ebook’s in any other format into a text document and re-save.
Ebook function menu
1: Press and hold the 'M' button to display the menu.
Skip to
Use the ◀◀/▶buttons to adjust the percentage of the document you wish to jump to.
Auto reading speed
Adjust this setting to determine how quickly the pages are skipped when auto page viewing is enabled.
User instructions
Add a tag
Similar to a playlist you can tag multiple text documents to appear in the 'tag list' on the ebook filter menu.
1: Select 'Add Tag' and press the 'SELECT' button to tag the current text document.
2: From the ebook filter menu select 'Tag List' to display all tagged tracks.
Font size
Adjust the size of the displayed type font.
Font colour
Adjust the colour of the display type font.
Page effect
Apply a page turning effect.
Delete
1: Select 'Delete File' and press the 'SELECT' button.
2: Press 'Yes' when asked 'Confirm to delete'.
Audio recorder
1: Select 'TOOLS' from the main menu. And then select 'RECORDER' from the tools menu.

2: Press the 'SELECT' button to begin recording. Press once more to pause recording.
3: When the recording is finished press the 'M' button to save the file. If you are asked to stop the recording, select Yes.
Audio recorder function menu
1: Press and hold the 'M' button to display the menu.
Record format
Select the format the recordings are saved in. Choose from WAV, MP3 or WMA.
Record quality
Select the recording quality from Low, medium & high.
Record gain
Set the record gain level from 1-5.
Stopwatch
1: Select 'TOOLS' from the main menu. And then select 'STOPWATCH' from the tools menu.

2: Press the 'SELECT' button to begin the stopwatch. Press again to stop.
3: Press the ▶ button to set lap time.
4: Press and hold the 'M' button to clear the recorded times.
Calculator
1: Select 'TOOLS' from the main menu. And then select 'CALCULATOR' from the tools menu.

2: Use the 1 button to skip through the buttons.
3: Press the 'SELECT' button to activate the selected button.
User instructions
Calendar
1: Select 'TOOLS' from the main menu. And then select 'CALENDAR' from the tools menu.

2: Press the 'SELECT' button to cycle between Year, Month & Day.
3: Use the ◀◀/▶buttons to navigate the days on the bottom section.
Settings
NOTE: After changing any setting(s) press and hold the 'Play/ Pause' button to enter standby to apply the change(s).
Display
Backlight brightness
Adjust the brightness to the required level
Backlight
Adjust the time setting so that the backlight dims after the preset time. Set to OFF for the backlight to remain on at all times.
Power saving
Idle time
Specify a duration for the player to power off when idle.
Sleep time
When listening to audio or watching a video you can allocate a timer to switch the unit into standby mode. Set the time duration you wish the player to switch off.
Date & time
Set Date
Use the 'Play/ Pause' button to cycle between Day, Month & Year. The◀◀/▶buttons adjust the digits.
Set time
Use the 'Play/ Pause' button to cycle between Hour & Minutes. The ▶◀◀ /▶buttons adjust the digits.
Language
Select the required language for the interface.
Advanced
Information
Displays system information when selected.
Set key tone
Select from various key tones.
Effect setting
Assign a transition effect when switching between menus.
Format internal memory
When activated this function will erase all files stored on the internal memory.
Reset default settings
When activated this function resets all settings to the default factory standards.
NOTE: No files will be deleted using this setting.
User instructions
Troubleshooting
In the unlikely event of difficulties with your appliance please follow the trouble shooting guide below.
If the problem persists, contact the retailer if the machine is still under guarantee.
Customer helpline: 0870 600 3030
Problem Reason(s) Solution(s)
| No Power | The unit requires chargingConnect to a PC or laptop using the supplied cable to charge. |
| No Sound | Volume is too lowPlayback is not initiatedNo audio files have been copied to the internal memoryThe earphones have not been connected correctlyIncrease the volumePress the PLAY/PAUSE buttonFollow ‘Connecting to a PC’ instructions on page 4 of this manualInsert the 3.5mm earphone plug into the earphone socket on the MP3 player |
| Sound is distorted | Volume is too highReduce the volume |
Technical specifications
Power Supply 240mAh,3.7V
Dimensions 95×42×9.4mm
Weight 44g
Capacity 8GB internal flash memory
Supported OS...... Windows 2000, XP or above
Interface USB 2.0
Supported music formats....MP3,WMA,OGG,APE,FLAC,WAV,AAC,M4A
Voice record formats ...... MP3,WMA,WAV
Video playback format ......AVI, FLV, MP4, 3GP
Supported photo format ....JPG, BMP & GIF, TIFF, PNG
BUSH
PRODUCT GUARANTEE
This product is guaranteed against manufacturing defects for a period of

Year
This product is guaranteed for twelve months from the date of original purchase.
Any defect that arises due to faulty materials or workmanship will either be replaced, refunded or repaired free of charge where possible during this period by the dealer from whom you purchased the unit.
The guarantee is subject to the following provisions:
- The guarantee does not cover accidental damage, misuse, cabinet parts, knobs or consumable items.
- The product must be correctly installed and operated in accordance with the instructions contained in this manual.
- It must be used solely for domestic purpose.
- The guarantee will be rendered invalid if the product is re-sold or has been damaged by inexpert repair.
- Specifications are subject to change without notice.
- The manufacturer disclaims any liability for the incidental or consequential damages.
- The guarantee is in addition to, and does not diminish your statutory or legal rights.
Guarantor: Argos Limited 489 - 499 Avebury Boulevard Central Milton Keynes MK9 2NW
- Table of contents
- Product Code
- CMP41D
- Safety information
- Important – Please read these instructions fully before using
- Care & maintenance
- Care and cleaning
- Disposal information
- Rechargeable battery disposal
- Functions & controls
- Please familiarize yourself with the parts and accessories listed below
- Getting started
- User instructions
- Connecting to a PC
- Connecting to a PC (cont)
- Earphone connection
- Music playback
- Audio function menu
- EQ modes
- Play mode
- Add to my playlist
- Set rating
- Add a tag
- A-B repeat
- A-B repeat (cont)
- Delete a track
- Advanced audio menu
- Scan speed
- User EQ
- Information
- Video playback
- Video function menu
- Playback mode
- Screen size
- Video resume
- Delete a video
- Photo browser
- Photo function menu
- Rotate
- Zoom
- Slide interval/ Slide effect
- Delete
- Thumbnail/ List view
- Slide show
- FM radio
- Auto scan
- Storing/ removing preset stations
- Recalling preset stations
- Delete a preset station
- FM record function
- Record quality
- Record gain
- FM Sensitivity
- Tuner region
- Mute
- Camera
- Basic camera controls
- Photo shooting
- Camera function menu
- Picture playback
- White balance
- Brightness
- Exposure mode
- Sticker photo
- Special effect
- Resolution
- Memory free space
- Self timer
- Continuous shooting
- Shutter sound
- Date stamp
- Video camera
- Basic video camera controls
- Video shooting
- Video camera function menu
- EBook
- Ebook function menu
- Skip to
- Auto reading speed
- Font size
- Font colour
- Page effect
- Audio recorder
- Audio recorder function menu
- Record format
- Stopwatch
- Calculator
- Calendar
- Settings
- Display
- Backlight brightness
- Backlight
- Power saving
- Idle time
- Sleep time
- Date & time
- Set Date
- Set time
- Language
- Advanced
- Set key tone
- Effect setting
- Format internal memory
- Reset default settings
- Troubleshooting
- Technical specifications
- BUSH
- PRODUCT GUARANTEE
Brand : BUSH
Model : CMP41DS
Category : Mp3 player