
SLJ200 - Juicer BRANDT - Free user manual and instructions
Find the device manual for free SLJ200 BRANDT in PDF.


| Product type | Slow masticating juicer |
| Brand | Brandt |
| Model | SLJ200 |
| Dimensions (L x W x H) | 30 x 20 x 35 cm |
| Net weight | 4.5 kg |
| Power supply | 220-240 V, 50/60 Hz, 150 W |
| Rotation speed | Approximately 80 rpm |
| Pulp container capacity | 1.0 L |
| Juice pitcher capacity | 0.8 L |
| Body material | ABS plastic, stainless steel (filter) |
| Automatic shut-off function | Yes (in case of overload) |
| Quick cleaning function | Cleaning brush included, dishwasher-safe parts |
| Maintenance and cleaning | Easy disassembly, rinse immediately after use |
| Safety | Safety lid lock, motor with thermal protection |
| Spare parts and repairability | Filter, strainer, pitcher, pusher available as spare parts |
| Warranty | 2 years (parts and labor) |
Frequently Asked Questions - SLJ200 BRANDT
User questions about SLJ200 BRANDT
0 question about this device. Answer the ones you know or ask your own.
Ask a new question about this device
Download the instructions for your Juicer in PDF format for free! Find your manual SLJ200 - BRANDT and take your electronic device back in hand. On this page are published all the documents necessary for the use of your device. SLJ200 by BRANDT.
USER MANUAL SLJ200 BRANDT
natural_image
Monochrome illustration of a glass of juice with floating citrus slices and leaves, symbolizing tea and fruit (no text or symbols)MANUEL D'INSTRUCTION FR INSTRUCTION MANUAL EN MANUAL DE INSTRUCCIONES ES GEBRUIKSHANDLEIDING NL اللغة العربية
Extracteur de jus Juicer Extractor de jugo Sapextractor جهاز استخلاص العصير
SLJ200
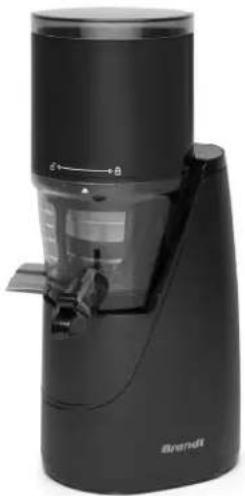
natural_image
Black brand coffee maker with glass lid and side arm, no visible text or symbols on the device itselfChère Cliente, Cher Client,
natural_image
Exploded view diagram of a smart blender with internal components and top panel (no text or labels)Etape 4 :
flowchart
graph TD
    A["1: Hand holding pencil, presser"] --> B["2: Uricator with brush, open mouth"]
    B --> C["3: Stabilized cup with spiral top, then into cup with side arm"]
    C --> D["4: Process with water tap, hands cleaning cup, and hand holding cup"]
    D --> E["5: Add cup with liquid, hands cleaning cup"]
Thank you for buying a BRANDT product and for your confidence in our company.
This product has been designed and manufactured for you considering your lifestyle and your requirements, so that it meets your expectations in the best way possible. We have invested it with our expertise, spirit of innovation and all the enthusiasm which has driven us for more than 60 years.
So that we are always able to satisfy your requirements as well as possible, our customer service is available, ready to listen and suggestions.
You can also visit our website www.brandt.com where you will find our latest innovations as well as additional useful information.
BRANDT is happy to support you daily and hopes you will enjoy your purchase to the full.

Important: Before starting your machine, please read this guide for installation and use carefully in order to familiarise yourself with how it operates quickly.
CONTENTS
1) FOR THE USER'S ATTENTION....15
a) Safety Instructions....15
b) Technical Data....18
c) Environmental Protection....18
2) PREPARATION OF YOUR MACHINE ....19
a) Description of the Juicer....19
b) Before Using for the First Time 20
c) Instructions for Use ....20
3) LOOKING AFTER AND CLEANING YOUR MACHINE....22
a) Cleaning Instructions 22
1) FOR THE USER'S ATTENTION

Keep these instructions with your machine. If you use this machine to another person second-hand, make sure you give the new owner these instructions. Please read these instructions before installing and using your machine. They are written for your safety and that of others.
a) Safety Instructions
Installation and connection
- This machine is for domestic use only. It may only be used in a covered, enclosed and heated environment such as kitchen or any other room meeting the same specifications.
- Having taken your product out of its packaging, check that the machine is in perfect condition and, in particular, that the plug or the power cable is not damaged. If there is any doubt contact your dealer's after-sales service.
- Before connecting the machine make sure that the mains voltage corresponds to that indicated on the machine's rating plate.
- The use of adaptors and/or extension leads is not recommended. If these items prove to be indispensable, only use adaptors and extension leads compliant with the safety standards in force.
- This machine is not intended to be put into operation using an external timer or a separate remote control system.
-
Before using this machine place it on a smooth, dry, stable surface.
-
Keep the machine and its power cable of children under the age of 8.
- Children must be supervised to ensure they do not play with the machine.
Use of the machine
- This machine is not intended to (including children) with reduced physical, sensory or mental capacities, or people with no experience or knowledge, unless they have the advantage of supervision or prior instructions about the use of the machine by someone responsible for their safety.
- This machine may be used by children aged provided that they are supervised or instructed in using the machine completely safely and they understand the dangers incurred properly.
- Make sure all the components of the machine have been correctly assembled before turning it on.
- Do not leave the machine when it is working because it could be a source of danger.
- Only use this machine for processing food.
- Do not operate the machine continuously for more than 20 minutes.
- Do not put your fingers inside the spout when the machine is in use.
- Do not use objects inside the machine (e.g. a soup spoon)
- Do not use foods with a body that is too hard in the machine (e.g. nuts).
-
Do not press the buttons on the machine with wet hands.
-
Do not use the machine and do not place any of its parts on hot surfaces or close to them (gas or electric hobs or ovens).
- Never unplug the power cable when the machine is in operation.
- To avoid short-circuits do not plug another machine requiring a lot of power into the same socket.
- The use of accessories not recommended by the manufacturer of the machine may cause danger or injuries.
- Switch off the appliance and disconnect from supply before changing accessories or approaching parts that move in use.
Maintenance and cleaning
- Before cleaning ensure that the power cable for the machine is unplugged.
- The power cable cannot be replaced. If the cable is damaged the machine should be discarded. However, this product is guaranteed by your distributor. For more d please refer to the guarantee conditions provided by your distributor.
- To protect yourself from the risk of electric s immerse the base of the machine in water or other liquids.
- Do not use chemical products, steel wool or abrasive cleaners to clean the outside of the machine. This risks damaging it.
- Cleaning and maintenance of the machine should not be carried out by children.
- For cleaning surfaces in contact with food please refer to the "Cleaning Instructions" section.
Non-compliant use
- Only use this machine for the purposes described in this manual.
- The manufacturer denies all responsibility in the event of non-compliant use.
- This machine is exclusively intended for dc private dwellings. The use of this product in communal or professional premises such as rooms for breaks in offices or workshops, camping or hotel premises, does not represent compliant use as defined by the manufacturer.
b) Technical Data
| Model SLJ200 | |
| Power supply 220 V 50/60 Hz | |
| Consumption 200 W | |
| Dimensions mm (H x W x D) 425 x 175 x 240 | |
| Net weight 4.7 Kg | |
c) Environmental Protection
At the end of its life this product must not be discarded with household waste. It must be taken to a recycling centre or to your dealer. This makes it possible to avoid consequences resulting from inappropriate disposal that are harmful to health and the environment, and to recycle materials to save energy and significant resources.
A logo appears on the product reminding you not to discard it with household waste. For further information, contact your council offices or the shop where you bought this product.
a) Description of the Juicer
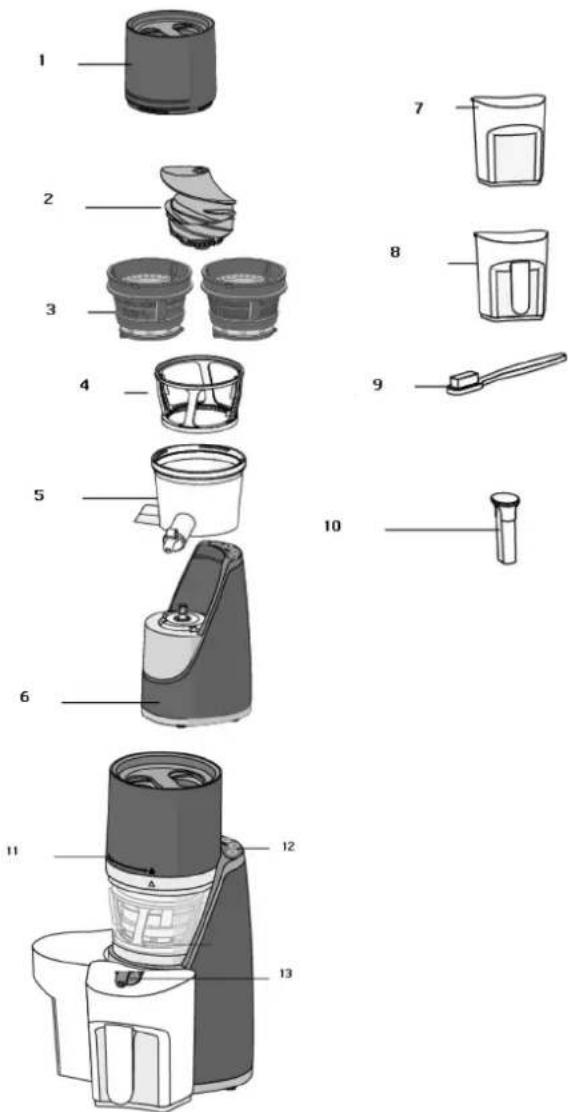
| Number | Name |
| 1 Feed tubes (guide the fruit and vegetables towards the endless screw) | |
| 2 Endless screw (presses the food finely) | |
| 3 2 filters (extract the juice from the food after crushing) | |
| 4 Basket (drives the screen and the endless screw) | |
| 5 Bowl fitted with 2 spouts (one for the juice and the other for the pulp) | |
| 6 Body | |
| 7 Waste collection receptacle | |
| 8 Juice collection receptacle | |
| 9 Cleaning brush | |
| 10 Pusher | |
| 11 Unlocking pictogram | |
| 12 Control panel | |
| 13 Juice run-off cap | |
b) Before Using for the First Time
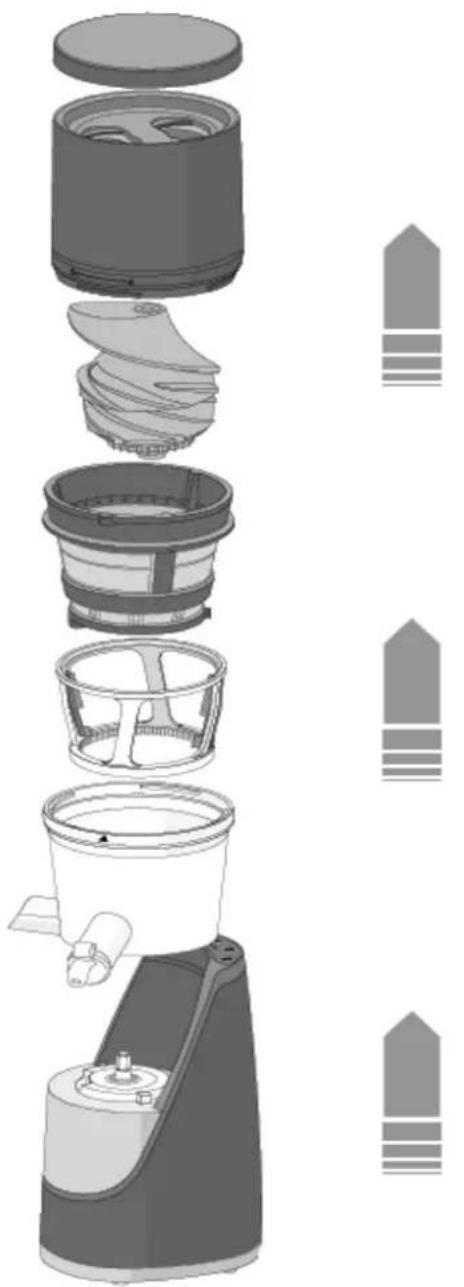
- Assembly
natural_image
Exploded view diagram of a smart blender with internal components and top panel (no text or labels)Step 4:
Align the bowl and the feed tube so that the arrow on the bowl faces the locking pictogram. The feed tube will not close correctly if the endless screw and the bowl are not properly assembled.
Step 3:
Insert the endless screw and make sure it clicks in correctly.
Step 2:
Assemble the parts in the following order: bowl>basket>filter. Make sure that the arrow on the bowl is aligned with the arrow on the sieve.
The basket must be correctly assembled between the two other parts.
N.B.: Two filters are supplied, one with large and one with small holes. If you don't want any pulp select the one with small holes.
Step 1:
Place the bowl on the body of the machine.
c) Instructions for Use
• Before Using for the First Time
- Unpack the machine and remove all the paper and plastic. Makes sure no pieces of packaging remain inside the machine.
- Wash and wipe the motor unit and the other parts of the machine with a slightly damp cloth.
- Place the two receptacles beneath the spouts.
- "Juice" Function
This function is used to produce juice with a single fruit or vegetable.
- Clean the food and cut it into strips so that they fit the feed tube. Don't hesitate to push the food into the juicer with the pusher.
- Press the "Juice" button on the touch control panel to start the machine. The juice will then run off on one side and the waste (skin, seeds, etc.) comes out the other side.
- When the juice has been completely extracted press the "Stop" button.
- "Mix" Function
This function is used to produce juice with several fruits or vegetables.
- Clean the food and cut it into strips so that they fit the feed tube. Don't hesitate to push the food into the juicer with the pusher.
- Close the juice run-off cap and then press the "Juice" button to make the juice (put in the food randomly).
- After making the juice press the "Mix" button and the machine will mix the preparation in the bowl. The rotation direction then changes about every 5 seconds to give an even mixture.
- Then press "Stop" to stop the machine.
- Finally open the juice run-off cap so that the juice flows into the receptacle.
Caution: If the juicer gets stuck during the process press the "Rev." button continuously. The machine will work in the opposite direction and remove the food blockage. Then press the "Juice" button to restart the machine.
Remarks/advice
- Food with skin that is too hard or inedible (pineapples, kiwis, melons, citrus fruit, etc.) must be peeled first.
- Preferably choose fresh fruit and vegetables.
- It is also possible to use frozen fruit and vegetables when they are out of season. However, allow them to defrost completely before putting them in the juicer.
3) LOOKING AFTER AND CLEANING YOUR MACHINE
a) Cleaning Instructions
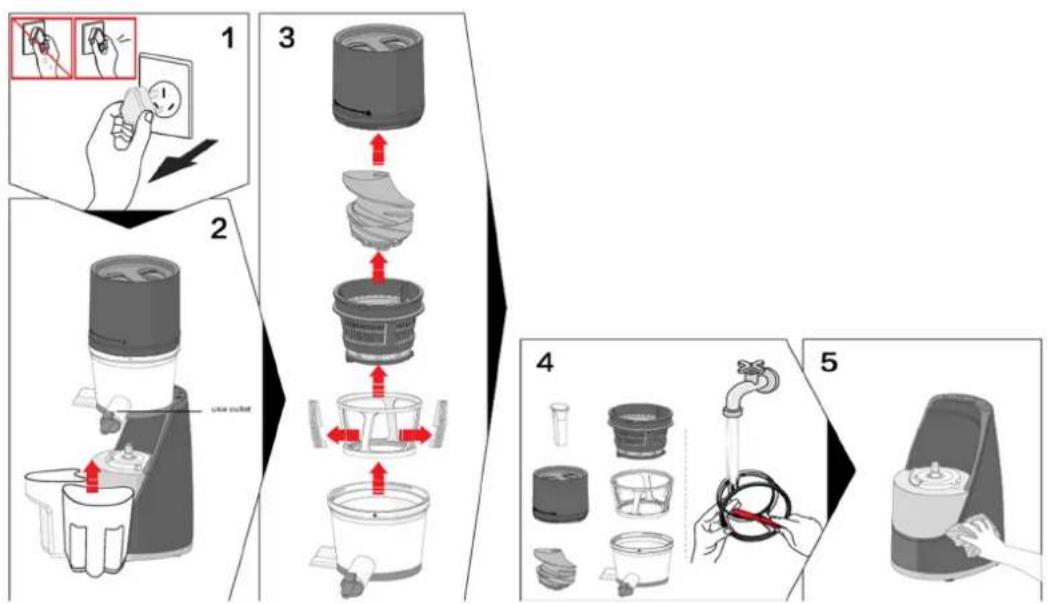
flowchart
graph TD
    A["1: Handwashing with a brush"] --> B["2: Stopping cup with water drop"]
    B --> C["3: Stopping cup with light bulb"]
    C --> D["4: Stopping cup with water tap and cloth"]
    D --> E["5: Final product with handwashing and cleaning"]
- Make sure that the motor has stopped completely and unplug the power cable from the socket. Do not touch the power cable with wet hands.
- Remove the bowl from the base.
-
Dismantle the parts as indicated below:
-
Unlock the feed tube by turning it anti-clockwise.
- Remove the endless screw.
-
Remove the filter and the basket.
-
Rinse each part using the cleaning brush. You can also wash them in soapy water.
Caution Never use a metal brush, abrasive cleaning products, aggressive detergents or pointed cleaning tools. Do not wash the parts in the dishwasher.
- Wipe the machine body with a soft, damp cloth and then dry it carefully.
- After cleaning, allow the parts to dry in air and store them in a clean place with the lid on the feed tube.
Caution Always wash the feed tube immediately after use. Otherwise the pulp and residues may dry, which would make cleaning difficult. Poor cleaning can also cause reduced performance of the machine.
BRANDT FRANCE - Simplified Joint Stock Company with capital of 1,000,000 Euros 89/91 Boulevard Franklin Roosevelt - 92854 Rueil-Malmaison (France)
natural_image
Exploded view diagram of a smart blender with internal components and top panel (no text or labels)Etapa 4:
flowchart
graph TD
    A["1: Hand holding a fan or brush"] --> B["2: Cutting into a blender"]
    B --> C["3: Stopping a cup or bowl with lid"]
    C --> D["4: Cover and wash in a pot with liquid"]
    D --> E["5: Washing machine with hand and sink"]
natural_image
Exploded view diagram of a smart blender with internal components and external structure (no text or labels)Stap 4:
flowchart
graph TD
    A["1: Hand washing plate with a brush"] --> B["2: Brush cleaning brush with lid"]
    B --> C["3: Stopping cup with candle"]
    C --> D["4: Cover cup with brush and sink"]
    D --> E["5: Hand washing machine with brush and cup"]
flowchart
graph TD
    A["1: Hand holding pencil"] --> B["2: Brush cleaning with lid"]
    B --> C["3: Stopping into bowl with lid"]
    C --> D["4: Cover in cup with lid and sink"]
    D --> E["5: Packaging with handle and sink"]
natural_image
Exploded view diagram of a smart blender with internal components (no text or labels)


4:الخطوة
- Etape 4 :
- CONTENTS
- 1) FOR THE USER'S ATTENTION
- a) Safety Instructions
- Installation and connection
- Use of the machine
- Maintenance and cleaning
- Non-compliant use
- b) Technical Data
- c) Environmental Protection
- a) Description of the Juicer
- b) Before Using for the First Time
- Step 4:
- Step 3:
- Step 2:
- Step 1:
- c) Instructions for Use
- - "Juice" Function
- - "Mix" Function
- Remarks/advice
- 3) LOOKING AFTER AND CLEANING YOUR MACHINE
- a) Cleaning Instructions
- Etapa 4:
- Stap 4:
Brand : BRANDT
Model : SLJ200
Category : Juicer