
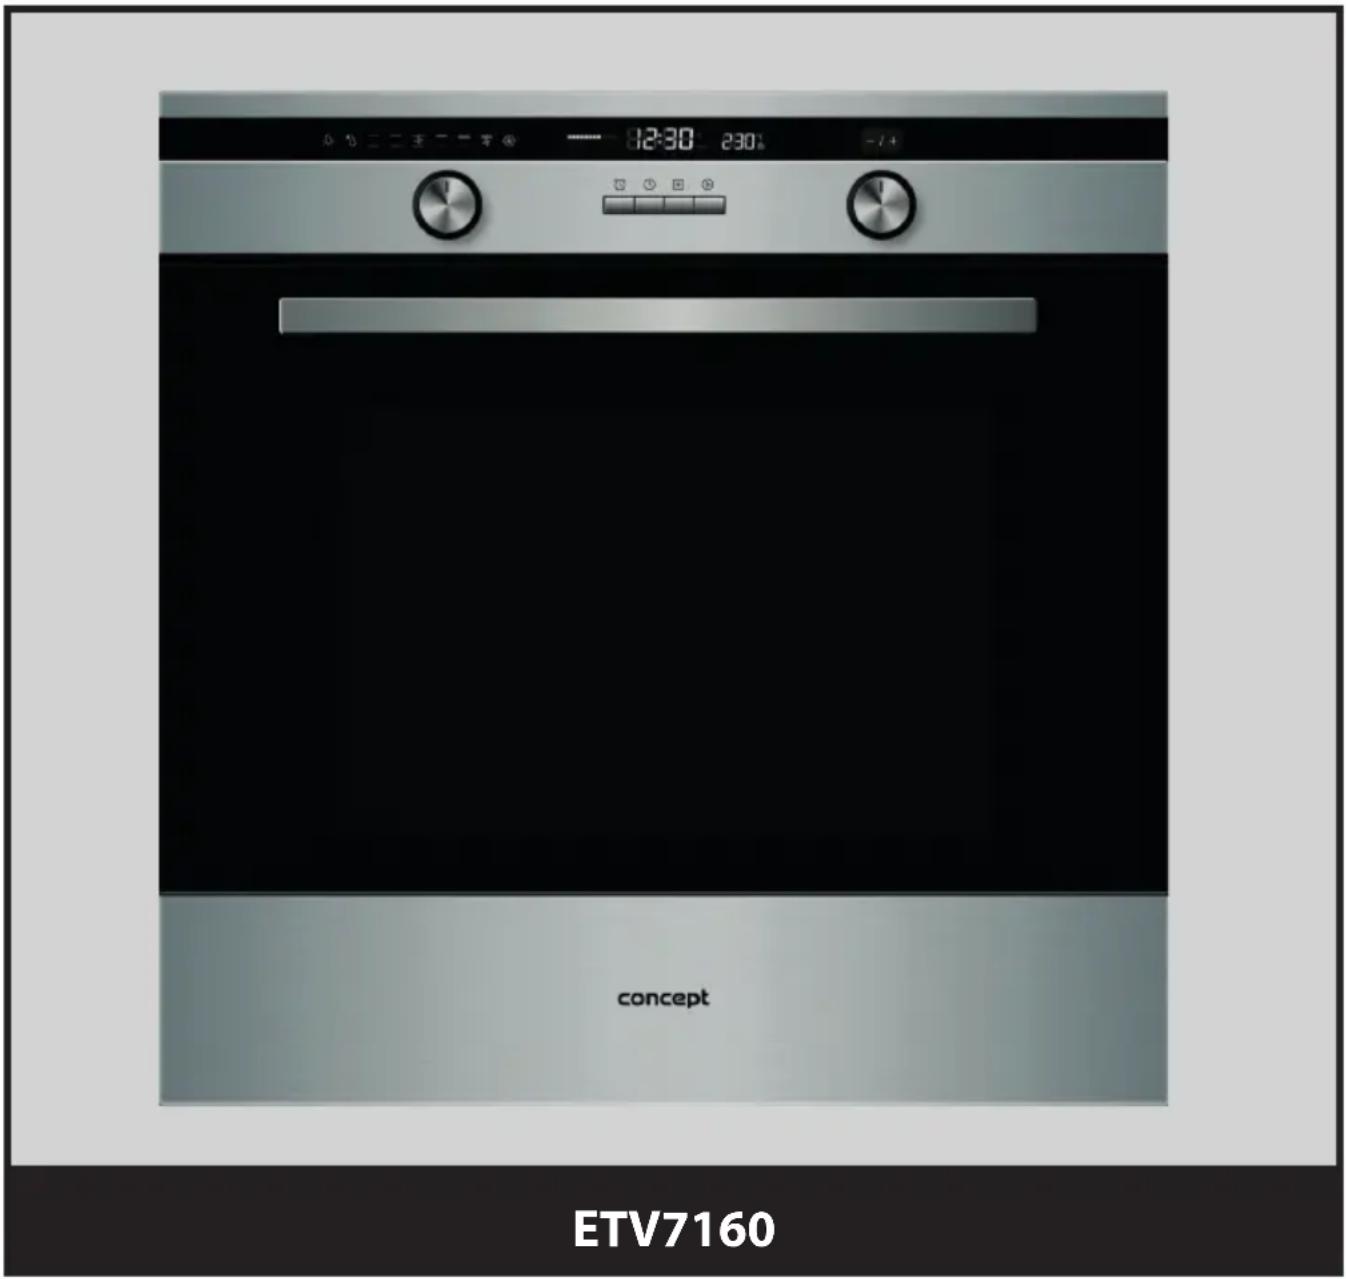
ETV7160 - Oven Concept - Free user manual and instructions
Find the device manual for free ETV7160 Concept in PDF.


| Product Type | Built-in Electric Oven |
| Brand | Concept |
| Model | ETV7160 |
| Energy Source | Electric |
| Capacity | 65 L |
| Dimensions (H x W x D) | 595 x 595 x 560 mm |
| Weight | 30 kg |
| Power Consumption | 3000 W |
| Temperature Range | 50-250°C |
| Oven Functions | Convection, Grill, Fan-forced, Bottom heat |
| Self-cleaning | Easy-clean enamel interior |
| Safety Features | Child lock, Cool touch door, Auto shut-off |
| Control Type | Rotary knobs with digital timer |
| Interior Light | Yes |
| Door Type | Drop-down hinged |
| Number of Shelves | 2 |
| Reparability | Spare parts available for 10 years |
| Energy Class | A |
| Warranty | 2 years |
| Brand Origin | Germany |
Frequently Asked Questions - ETV7160 Concept
User questions about ETV7160 Concept
0 question about this device. Answer the ones you know or ask your own.
Ask a new question about this device
Download the instructions for your Oven in PDF format for free! Find your manual ETV7160 - Concept and take your electronic device back in hand. On this page are published all the documents necessary for the use of your device. ETV7160 by Concept.
USER MANUAL ETV7160 Concept
Built-in multifunctional electric oven
concept
PODĚKOVÁNÍ
natural_image
Line drawing of a metal rack or filter structure with no text or symbols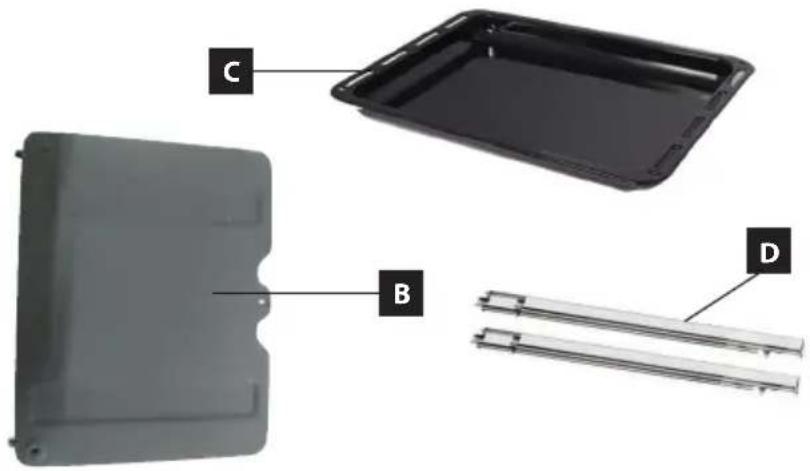
natural_image
Interior view of an oven with visible structural components and ventilation ducts (no text or symbols)Teleskopické výsuvy
natural_image
Interior view of an oven with visible grating and ventilation ducts, labeled 'Obr. 1' (no text or symbols on the main subject)natural_image
Close-up of hands adjusting a mechanical component (no visible text or symbols)Obr. 2
natural_image
Two-panel image showing a hand pressing down on a screen with white arrows indicating motion or force (no text or symbols)Obr. 3
natural_image
Two grayscale industrial scenes: a pipe with wet pavement and a hand pouring liquid into a machine (no visible text or symbols)Obr. 4
Obr. 5
POZOR!
natural_image
Simple line drawing of a mechanical component with a rotating arrow (no text or symbols)Obr. 7
OCHRANA ŽIVOTNÍHO PROSTŘEDÍ
natural_image
Symbol of a trash bin crossed with no text or numbers, representing waste sorting or disposal (no text present)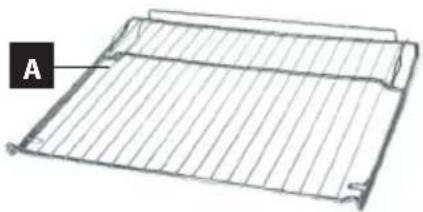
natural_image
Line drawing of a metal rack or mesh structure with no text or symbols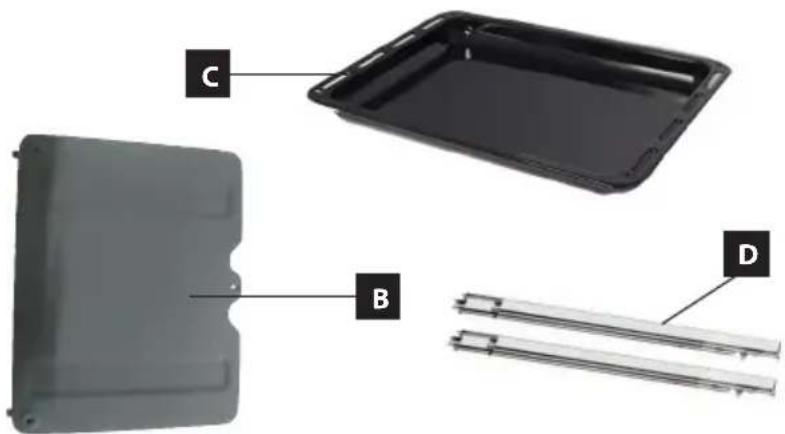
natural_image
Interior view of an oven with visible structural components and ventilation ducts (no text or symbols)Teleskopické výsuvy
natural_image
Interior view of an oven with visible grating and ventilation ducts, labeled 'Obr. 1' (no text or symbols on the main subject)natural_image
Close-up of hands performing a mechanical assembly or repair operation (no visible text or symbols)Obr. 2
natural_image
Two-panel image showing a hand pressing down on a black electronic device with white arrows indicating motion or force (no text or symbols)Obr. 3
natural_image
Two grayscale industrial scenes: a conveyor belt and a mechanical device with a white arrow pointing to a flow or particle (no visible text or symbols)Obr. 4
Obr. 5
POZOR!
natural_image
Simple line drawing of a mechanical component with a rotating arrow (no text or symbols)Obr. 7
OCHRANA ŽIVOTNÉHO PROSTREDIA
natural_image
Symbol of a trash bin crossed with no text or numbers, representing waste sorting or restriction (no text present)natural_image
Diagram of a metal mesh grid structure with labeled point A (no text or symbols beyond label)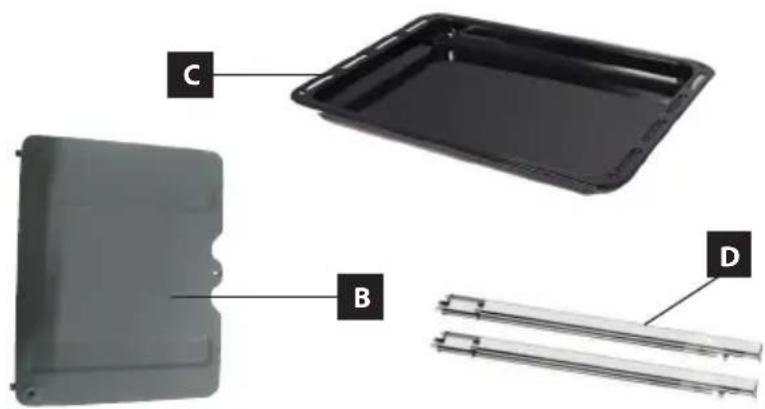
natural_image
Interior view of an oven with visible structural framework and ventilation duct (no text or symbols)natural_image
Interior view of an oven with visible grating and ventilation ducts, labeled 'Rys. 1' (no text or symbols on the main subject)UWAGA!
natural_image
Close-up of hands adjusting a mechanical component (no visible text or symbols)Rys. 2
natural_image
Two views of a computer monitor with a hand pressing the screen, showing white arrows indicating motion (no text or symbols present)Rys. 3
natural_image
Two-panel image showing a pipe or container with a white arrow pointing to a flow inside a mechanical device (no text or symbols visible)Rys. 4
Rys. 5
UWAGA!
natural_image
Simple line drawing of a mechanical component with a rotating arrow (no text or symbols)Rys. 7
OCHRONA ŚRODOWISKA NATURALNEGO
natural_image
Symbol of a trash bin crossed with a diagonal line, no text or numbers present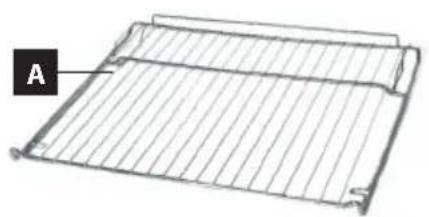
natural_image
Line drawing of a grid-patterned rack or tray structure with no text or symbols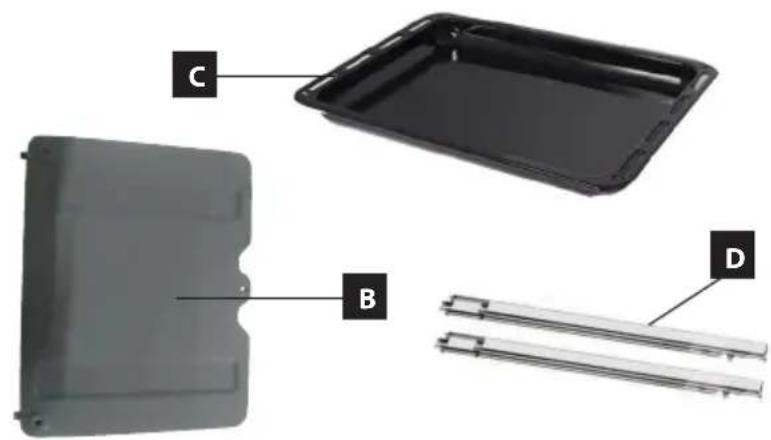
natural_image
Interior view of an oven with visible fan and cooling rack (no text or symbols)natural_image
Interior view of an oven with visible tray and ventilation grilles, labeled 'Att. 1' (no text or symbols on the main subject)UZMANIBU!
natural_image
Close-up of hands performing a mechanical assembly or repair operation (no visible text or symbols)Att. 2
natural_image
Two-panel image showing a hand pressing down on a screen with arrows indicating the motion (no text or symbols visible)Att. 3
natural_image
Two-panel image showing a metal pipe joint and a close-up of a mechanical component with an arrow indicating direction (no text or symbols)Att. 4
Att. 5
UZMANIBU!
natural_image
Simple line drawing of a mechanical component with a rotating arrow (no text or symbols)Att. 7
APKÄRTËJÄS VIDES AIZSARDZİBA
natural_image
Symbol of a trash bin crossed with no text or numbers, representing waste sorting or disposal (no text present)Thank you for purchasing a Concept product. We hope you will be satisfied with our product throughout its service life.
Please study the entire Operating Manual carefully before you start using the product. Keep the manual in a safe place for future reference. Make sure that all other people using the appliance are familiar with the contents of the instruction manual.
TABLE OF CONTENTS
Technical Features
Important Notices
Condensation
Product Description
Control Panel Description
Individual Baking Functions
Baking Tips
Operating Instructions
Basic Functions of the Unit
Advanced Functions of Baking
Correct Positioning of the Grills or Pans in the Appliance
Telescopic Rails
Cleaning and Maintenance
Installation of the appliance
Servicing
Protection of the Environment
TECHNICAL FEATURES
| Technical Features | |
| Voltage 220-240V ~ 50Hz | |
| Maximum input 3000 W | |
| Input of the upper heater 950 W | |
| Input of the lower heater 1100 W | |
| Input of the circular heater 2000 W | |
| Input of the grill heater 2000 W | |
| Temperature setting range 0 – 250°C | |
| Installation dimensions (w x d x h) 560 x 570 x 595 mm | |
| External dimensions (w x d x h) 595 x 575 x 595 mm | |
| Internal dimensions (w x d x h): 480 x 430 x 330 mm | |
| Internal volume 70 l | |
| Weight | 31,2 kg |
The manufacturer reserves the right to make possible technical changes and to correct print errors and differences in the illustrations without previous notice.
IMPORTANT NOTICES
Upon delivery of the electric appliance
- Check the package and unit immediately after delivery for any damage that may have occurred during shipping.
- CAUTION! Some edges of the unit that are hidden after installation may be sharp! Proceed with caution to prevent injury!
- If the appliance is damaged, do not operate it. Contact the supplier as soon as possible.
- Remove all the packaging and marketing materials from the unit before the first use.
- Keep the packaging material out of the reach of children or dispose of it properly.
During installation
- Use the unit only as described in this operating manual.
- This unit may be used in households and similar places, for instance:
- Kitchenettes in shops/stores, offices and other workplaces.
- Appliances used in agriculture.
- Appliances used by guests in hotels, motels and other places.
-
Appliances used in bed-and-breakfast establishments.
-
Do not use the unit if you are barefoot.
- Do not touch the appliance with damp or wet hands.
- Do not put oversized food or metal objects inside the appliance. These could cause a fire.
- Do not store anything inside the appliance.
- Do not sit or stand on the open door of the appliance.
- Do not allow children or irresponsible people to handle the appliance. Use the appliance out of the reach of such people.
• Children should not play with the appliance.
• Take extra care when using the appliance near children.
- Do not let anyone use the appliance as a toy.
- This appliance may be used by children aged 8+ and people with reduced physical, sensory or mental capabilities, or without any appropriate experience and knowledge only if they are under supervision or were acquainted with the operating instructions for safe usage of the appliance and understand its risks.
- CAUTION! A large volume of steam may be released or grease may splash out when you open the door. Be very cautious. There is a risk of scalding!
- Do not touch hot surfaces or heaters during use or shortly after use of the unit.
- Turn off the appliance and disconnect the plug from the mains outlet in the event of any failure.
- When disconnecting the unit from the wall outlet, never pull the power cord. Grasp the plug and disconnect it by pulling.
- Do not immerse the power cord or plug in water or any other liquid.
- Check the appliance and the supply cable regularly for any damage.
- Never turn the appliance on if damaged.
- Do not use the unit if the door or packing is damaged. Have the unit repaired in an authorised service centre.
- Do not use any accessories other than those recommended by the manufacturer.
- Do not use accessories that have a damaged surface finish, are worn, or have other defects.
- Cleaning and maintenance by the user may not be done by children under the aged of 8 and only under supervision.
CAUTION!
Open the unit only for a short time to put in or take out food, so as to prevent injury caused e.g. by tripping. Children could lock themselves in the unit (risk of suffocation), or be exposed to other dangers.
Condensation
When baking foods with a high content of water, cautiously open the door. Hot air comes into contact with cold air and steam may condense on the door, which turns to water and may subsequently trickle into the lower section of the appliance. You reduce this phenomenon by opening the door less frequently. Wipe off any condensed water with a cloth or kitchen paper to prevent damage to the furniture below the appliance.
Possible failures
- Only qualified personnel may repair and intervene in the unit.
- The unit should be disconnected from the electric network during repairs and interventions. Turn off the circuit-breaker and disconnect the plug from the mains socket.
- When disconnecting the unit from the wall outlet, never pull the power cord. Grasp the plug and disconnect it by pulling.
Failure to follow the manufacturer's instructions invalidates the warranty.
PRODUCT DESCRIPTION
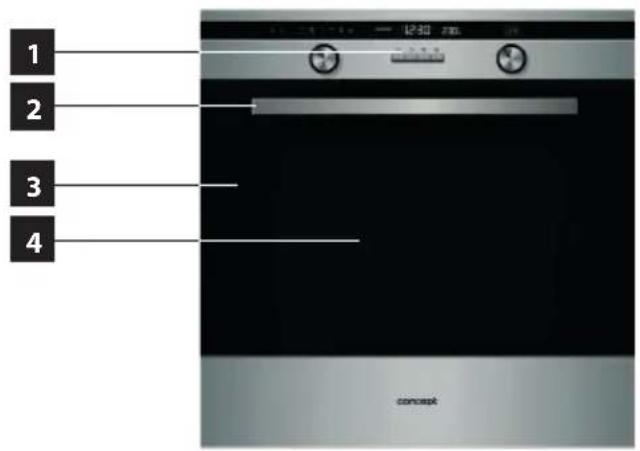
1 Control panel
2 Door handle
3 Door
4 Triple-glass window of the door
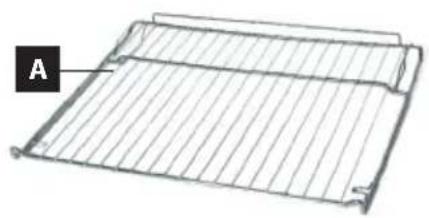
Accessories
A Grill
B Catalytic plates
C Shallow roasting sheet
D Telescopic Rails
natural_image
Line drawing of a metal rack or grid structure with no text or symbols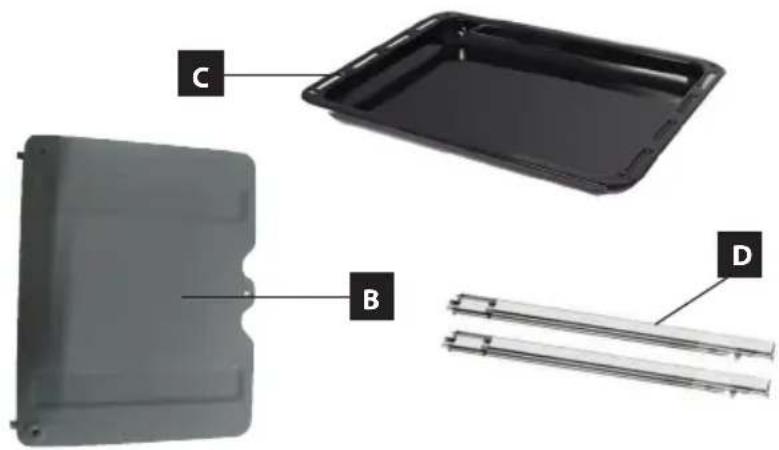
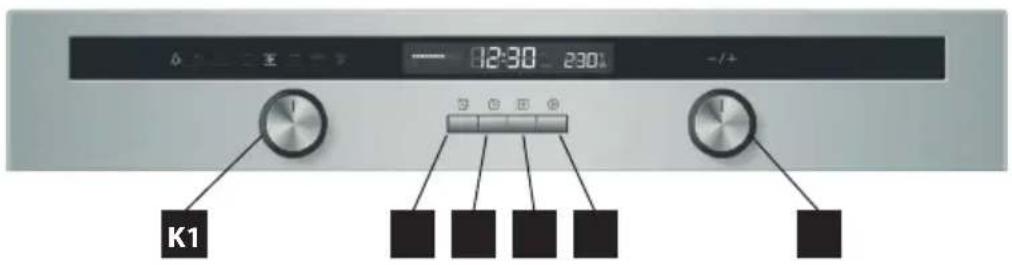
Control Panel Description
K1 Baking function selector
K2 Temperature selector
1 Remind button
2 Time button
3 Stop (Pause) button
4 Start button
Individual Baking Functions
| Symbol Function description | |
 | Light bulb:Enables the user to monitor the baking without the need to open the door. The light is activated upon selection of any function (except ECO function). |
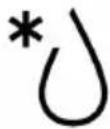 | Defrosting:Air circulation allows faster defrosting. This is a safe, but quick method for defrosting of foods.Air at room temperature is forced into the internal space of the appliance.Note:This function is suitable for defrosting food or raw products before final preparation. |
 | Lower heating:The lower heating body in the lower section of the appliance provides more concentrated distribution of heat within the appliance.The default temperature is 60°C.The temperature can be set within the range of 60°C – 120 °C (in increments of 5°C).Note:This function is suitable for low baking of foods, such as pot roast, pastry, pizza, where it is important to get a crispy base. |
  | Upper and bottom heater:For conventional cooking both the bottom and the top heater are on.The default temperature is 220°C.The temperature can be set within the range of 50°C – 250 °C (in increments of 5°C).Upper and bottom heater with fan:Combination of the bottom and the top heater together with a fan produces more even cooking.This baking function saves 30-40% of energy.Prepared food is lightly browned on the outside but still moist and tender on the inside.The default temperature is 220°C.The temperature can be set within the range of 50°C – 250 °C (in increments of 5°C).Note: This function is suitable for grilling or roasting big pieces of meat at high temperature. |
 | ECO function:Energy-saved cooking.When this function is selected, the display shows E.Note: This function is specially designed for a certain type of baking, where the food is cooked at a lower temperature but for a longer period of time than when using the upper and lower heating together with fan functions. |
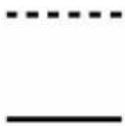
 ---- ---- | Grill heater:The grilling heater is switched on and off as necessary to maintain the temperature in the appliance.The default temperature is 210°C.The temperature can be set within the range of 180°C – 240 °C (in increments of 30°C). |
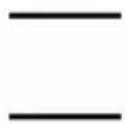
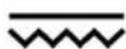 ---- ---- | Grill heater and upper heater:The top and the grill heater are on simultaneously.The default temperature is 210°C.The temperature can be set within the range of 180°C – 240 °C (in increments of 30°C). |
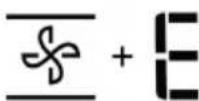
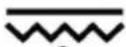 [IMAGE] [IMAGE] | Grill heater with fan and upper heater:The top heating and the grill with a fan operate simultaneously.The default temperature is 210°C.The temperature can be set within the range of 180°C – 240 °C (in increments of 30°C). |
 | Circular heater with fan:The circular heater together with the fan improves the air circulation in the appliance and evenly distributes the heat in the appliance.The default temperature is 180°C.The temperature can be set within the range of 50°C – 240 °C (in increments of 5°C). |
BAKING TIPS
• The exact values of temperature for each kind of dish and the different ways of baking have to be tried out.
- During baking open the door of the appliance as infrequently as possible. Otherwise the temperature mode of baking would be disturbed, the time of baking would extend and the food could be burnt.
- Marinated meat and meat without bones roast faster than unprepared meat. To check thorough roasting of meat, press it (e.g. with a fork). If it does not release juices it is done.
- Meat which is larded or covered with bacon must not be roasted at high temperature, so that the grease does not sputter.
- When roasting big pieces of meat juices evaporate, which then condense on the appliance door. This is natural and it does not imply any danger to the use of the appliance. After the end of baking, wipe the appliance door and the surrounding space in the appliance dry.
- The pastry will swell only after 2/3 of the stated baking time has elapsed. The time of baking depends on the type of filling (fruits, jam).
- Whipped dough should not contain too much water, which extends the time of baking.
- Do not put utensils directly on the bottom of the appliance, otherwise they would prevent the spreading of heat and thus could cause damage to the enamel because of overheating.
- When baking in several pans, different dishes put into the oven at the same time may not be ready at the same time.
- Baking pans are not designed for long-term storage of food (more than 48 hours). For longer storage transfer the food to a suitable utensil.
- When baking without the fan we recommend pre-heating the appliance for approximately 10 – 15 minutes. Do not open the appliance door unnecessarily during baking.
- Before grilling, preheat the grill for about 5 minutes (until the grill heater is red-hot). The grill grid with food should be placed as close as possible to the heater. To collect the drippings, put a pan with a little water under the grill. Grilling will enable browning and a crispy surface on the roasted meat.
CAUTION!
When using the grill, the accessible parts of the appliance may become too hot. Prevent children from accessing the hot parts of the appliance.
- When baking with the fan it is not necessary to pre-heat the appliance, except for baking food with very short baking times, or in the case of baking food with a high water content (e.g. fruit cakes) to prevent condensation of water vapours. In this appliance, various foods with similar baking/roasting times can be prepared in two trays simultaneously, even if the baking/roasting time differs. The scent and taste of the foods do not influence each other. Putting in and taking food out of the appliance does not result in huge heat losses. The temperature is quickly compensated by the fan. The baking temperatures are lower than those used in the standard baking mode (by 20 – 30°C for pastry and by 30 – 40°C for meat); the time of baking is longer (by approx. 5 – 10 minutes). When baking small pastries in two pans, we recommend swapping the height of both pans after 2/3 of the baking time or taking the pan that is ready sooner out earlier.
- When defrosting, lay the frozen food in the packaging on a dish, put it on the grill in the centre of the appliance and switch-on the appliance in Defrost mode. The appliance door must be closed.
- When grilling with the fan and upper heater it is not necessary to pre-heat the appliance. Grill with the appliance door closed. When grilling this way set the thermostat as needed within the range from 50 to 200°C. The distance between the food and the grill heater must correspond to the required results:
- smaller distance for a brown surface and underdone inside,
- bigger distance for thorough roasting of the food.
For catching the dripping gravy, place a plate with a little water under the meal.
OPERATING INSTRUCTIONS
Before the first use
Prior to using a new unit, wipe the inside with a wet cloth for hygienic reasons. Wash all the removable parts in warm water with a detergent, or in a dishwasher.
Then, heat the unit without food at maximum temperature (250°C) for 30 minutes. You can find the information related to the temperature and heating time adjustment in the paragraph Appliance Fundamental Functions (page 69). The unit may emit a slight smell and smoke, which should disappear after a while. Air the room well during this process.
Note: Baking selector (K1) and temperature selector (K2) pop-up upon pressing so that it is possible to control the appliance. If you want to prevent accidental changing of settings during baking or after the baking is finished, fix them in the inserted position by pushing down to stop.
Daytime setting
- After connecting the appliance to the mains, the symbol 0:00 will appear on the display.
- Press button (2) to activate the mode of setting the time of day (the hour position starts blinking).
- Turn the selector (K2) to set the time in hours (in the range 0 to 23).
- Upon pressing button (2) the numbers start blinking.
- Turn the selector (K2) to set the time in minutes (in the range 0 to 59).
- Press button (2) to end the setting of the time of day. The symbol „:“ starts blinking. This activates the time and it is shown on the display.
Daytime setting change
- Push the button (2) in the standby mode. It will activate the daytime setting (clock digit will start blinking).
- Turn the selector (K2) to set the time in hours (in the range 0 to 23).
- Upon pressing button (2) the numbers start blinking.
- Turn the selector (K2) to set the time in minutes (in the range 0 to 59).
- Press button (2) to end the setting of the time of day. Symbol „:“ will blink.
This activates the time and it is shown on the display.
Appliance Basic Functions
- Place the pan with the food in the selected position.
- Turn function selector (K1) to select the required baking function. The display simultaneously also shows the pre-set baking temperature for the given function.
- Turn selector (K2) to set the required temperature.
- Press button (4) to confirm the start of baking. Upon pressing button (4) the display shows the pre-set time 9:00 and the blinking desired temperature.
- To end baking, press button (3) twice.
Note: For this basic function, it is not necessary to have the time of day set.
ADVANCED BAKING FUNCTIONS
The advanced functions extend the baking possibilities and thus provide more convenient use of the unit.
Setting the baking time
- Turn function selector (K1) to select the required baking function. The selected function is displayed on the left side of the panel above button (K1). The display simultaneously also shows the pre-set baking temperature for the given function.
- Turn selector (K2) to set the required temperature.
- Press button (4) to confirm the start of baking. Upon pressing button (4) the display shows the pre-set time 9:00 and the blinking desired temperature.
- By turning function selector (K1), it is possible to pre-set the baking time. Upon pressing button (4), the pre-set baking time is confirmed.
- By turning temperature selector (K2), it is possible to pre-set the baking temperature. Upon pressing button (4), the set baking temperature is confirmed.
- If button (4) is not pressed within 3 seconds after setting the desired value, the appliance jumps back to the previous state (applies to the setting of time and temperature).
Note:
- If step 2 is omitted, after pressing button (4) the selected baking function is activated with the pre-set temperature and time, which is shown on the display.
- When setting the baking time using selector (K1), the minutes are changed in the following steps: 0:00-0:30 in increments of 1 minute 0:30-9:00 in increments of 5 minutes
Start/Pause/Cancel
- After selecting the function using selector (K1) and setting of the desired baking temperature using selector (K2), press button (4) to start baking.
- If the baking is interrupted, press button (4) to continue baking.
- To interrupt baking, press button (3) once.
- To cancel baking, press button (3) twice.
Activation of the light in the appliance
- By turning selector (K1), you select the corresponding function to activate the light in the appliance ().
- You confirm activation of the light in the appliance by pressing button (4). The display shows 0:00. On the left side of the panel, the appropriate icon for activation of the light in the appliance is illuminated and the symbol ":" blinks.
Reminder function
This function will help remind you about the start of baking at the set time and can be set in the range 0:01 to 9:59. This function can be set only when the appliance is in standby mode. To set the reminder function, do the following:
- Press button (1).
- Turn selector (K2) to set the hours (the time can be set in the range from 0 to 9).
- Press button (1) again.
- Turn selector (K2) to set the minutes (the time can be set in the range from 0 to 59).
- To confirm the set time push the button (4). The time will count down.
Note:
- After completion of the countdown of the set time, ten beeps are emitted.
- When setting the reminder function, you can cancel this by pressing button (3).
- To cancel the set reminder time, press button (3) twice.
Display of the time of day during baking
- During baking, it is possible to display both the time of day using button (2), as well as the set reminder time using button (1).
- The time of day and the reminder time are visible for 3 seconds, after which the display shows the previous state (set baking time and temperature).
Note: For this function, the time of day must be set on the unit.
Child lock function
- To activate the child lock, press buttons (4) and (3) simultaneously for 3 seconds.
- After this period an audible signal is heard and the display shows icon, which indicates that the appliance is locked.
- To deactivate the child lock, press buttons (4) and (3) simultaneously for 3 seconds.
- After this period an audible signal is heard and icon disappears from the display.
Energy saving features
- If the display shows the time of day, or if the reminder function is set, press button (4) for 3 seconds. The display goes off and the energy-saving function is set.
- If the appliance is in standby mode and if no action is taken within 10 minutes, the display goes off and the energy-saving function is set automatically.
- To cancel the energy-saving function, press any button, or turn any of the selectors (K1 or K2).
Segments on the display
The set baking time is calculated in the form of individual segments, which gradually go off according to the elapsed time.
Note:
- After setting the time and temperature of the selected baking program, the display shows 10 segments.
- These segments gradually go off according to the elapsed baking time.
E.g. Set time 0:01 - each segment is equal to 6 seconds
Set time 0:02 - each segment is equal to 12 seconds, etc.
Notes
- The light comes on upon activation of any baking function.
- To set a function other than the current baking function, the active baking function must be cancelled by pressing button (3) twice.
- If the baking function is set and button (4) is not pressed within 5 minutes after setting the program, the time of day appears on the display. The setting for the selected program shall be deleted.
- Upon pressing any button, or turning one of the selectors, an audible signal is emitted.
- At the end of the selected baking function, a five-fold audio signal is emitted.
- At the end of the reminder function, a ten-fold audio signal is emitted.
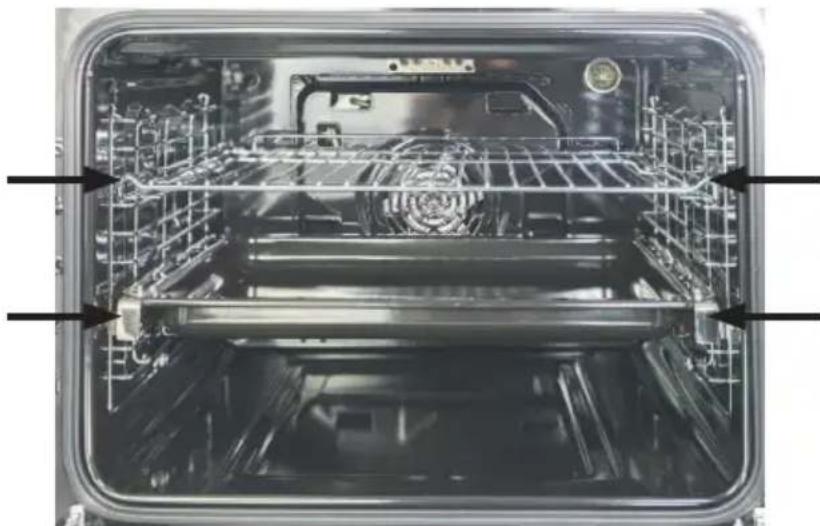
Correct positioning of the grill or pan in the appliance
The grill or pan must be positioned correctly (at the same height) in the side racks.
natural_image
Interior view of an oven with visible structural components and ventilation grilles (no text or symbols)Telescopic rails
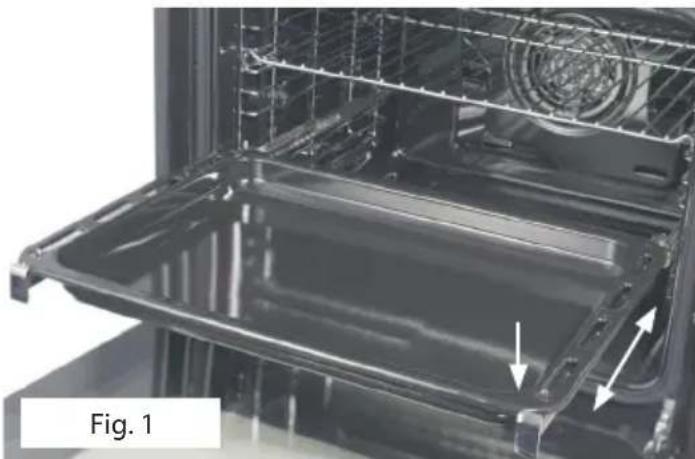
The telescopic rails allows detraction of the baking pans, and hence ease access when inserting or removing baking pans or when checking food during baking (Fig. 1).
natural_image
Interior view of an oven with visible tray and ventilation duct (no text or symbols)CAUTION!
The telescopic rails get very hot during operation. Risk of burns! When putting the baking pans in, place them on the protrusions at the ends of the rails.
When putting in or taking out the baking pans proceed with caution and make sure the pans do not slide down from the rails. It is possible to use the telescopic rails at all heights. To change the height of the telescopic rails follow these steps:
- Take the baking pans and grill from the appliance.
- Unscrew the screws on the internal sides of the appliance and remove the side racks.
- Unscrew the screws, which are in the bottom section of the telescopic rails.
- Remove the rails from the ride racks.
- Place the rails at the desired height position and fasten.
- Re-install the ride racks with telescopic rails in the interior of the appliance.
Cooling fan
The fan is located on the upper side of the appliance and provides the circulation of cool air in the equipment. The fan switches on automatically when the appliance is switched on. If the baking program ends or is interrupted by the cooling fan, it remains active until the temperature of the appliance drops below the safe limit.
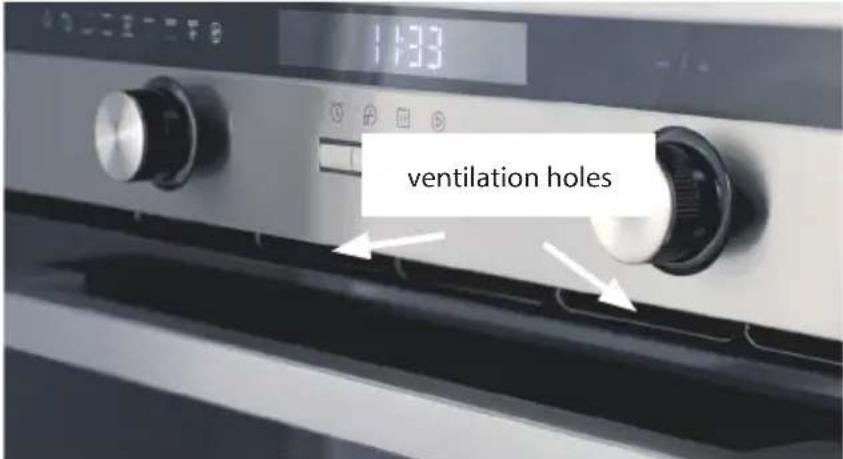
CLEANING AND MAINTENANCE
For the sake of good appearance and reliability, keep the appliance clean. The modern design of the unit facilitates the maintenance to the minimum. The parts of the appliance that come into contact with food have to be cleaned regularly.
- Prior to any maintenance or cleaning, disconnect the power cord from the mains or switch off the circuit breaker of the appliance mains outlet.
- Wait until the inside of the appliance is no longer hot but is still lukewarm – cleaning is easier than when it is cold.
- Clean the outer surface of the appliance with a damp cloth, soft brush or light sponge and then wipe it dry.
- The bottom and ceiling of the appliance can be wiped with a damp cloth, soft brush or sponge. In the case of heavy dirt, use hot water with a non-aggressive detergent.
- Do not use coarse abrasive cleaners or sharp metal scrapers to clean the door glass of the appliance, since they can scratch the glass surface or the glass may break.
- Never leave aggressive or acidic substances (lemon juice, vinegar) on the enamelled, varnished or stainless parts.
- Do not use a steam cleaner to clean the appliance!
• The baking pans may be washed in a dishwasher.
Cleaning glass parts
If the door glass needs cleaning, follow the instructions below:
- Open the glass door fully.
- According to Fig. 2, press the "levers" near the hinges on both sides of the door to unlock the locks.
- When the locks are unlocked, it is possible to remove both the inner and the middle glass for easier cleaning.
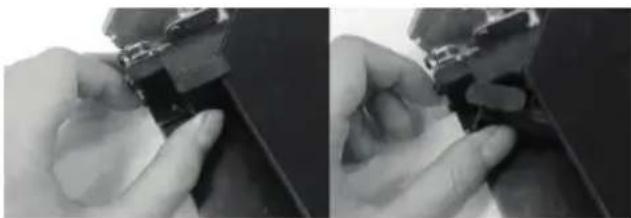
natural_image
Close-up of hands adjusting a mechanical component (no visible text or symbols)Fig. 2
natural_image
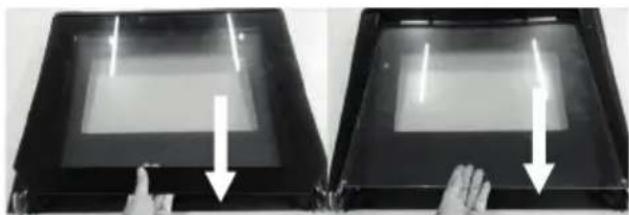
Two-panel image showing a hand pressing down on a transparent screen, with arrows indicating the motion direction (no text or symbols visible)Fig. 3
natural_image
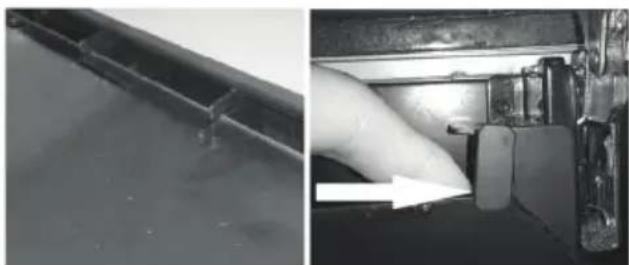
Two-panel image showing a metal strip and a hand operating a mechanical device with a white arrow pointing to the handle (no visible text or symbols)Fig. 5 Fig. 4
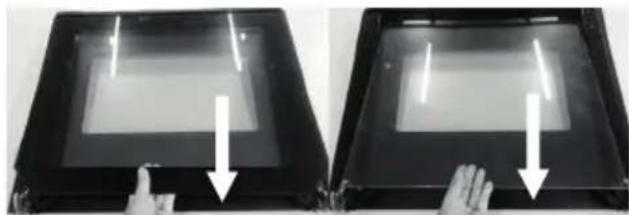
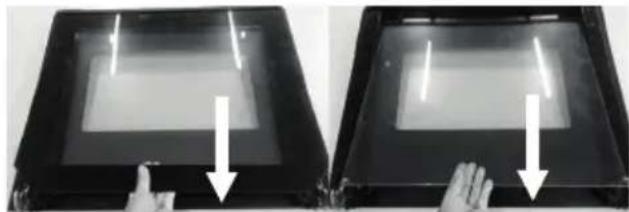
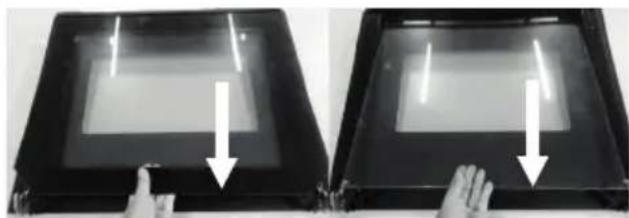
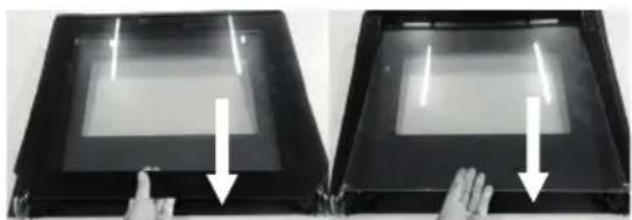
- When removing, lift the glass up and then pull it towards the oven as shown in Fig. 3. Do not lift the glass too high, some of the plastic parts of the upper cover may break.
- After cleaning, put both the inner and the middle glass back to the door in the opposite direction than they were removed.
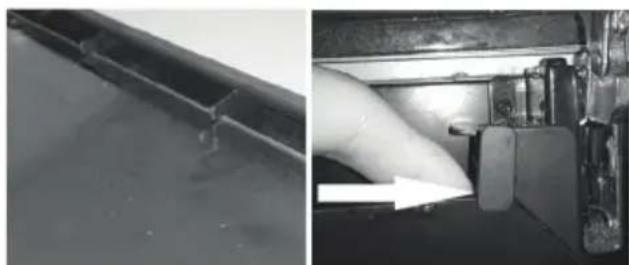
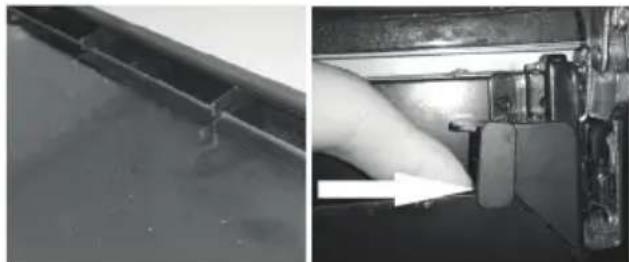
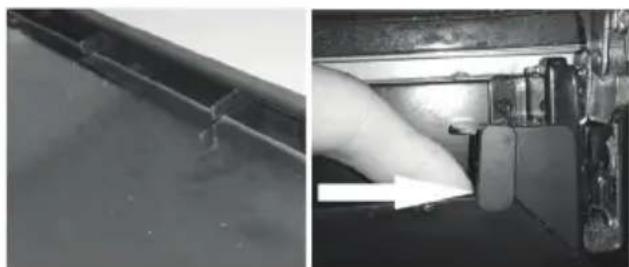
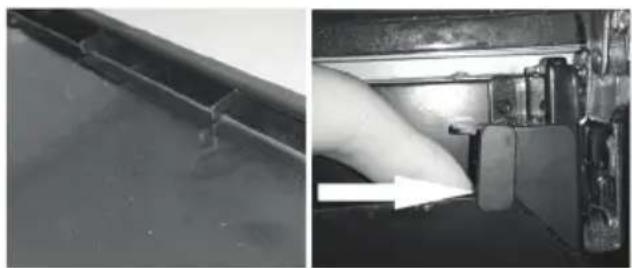
- The inner and the middle glass must be placed properly in the cut outs in the upper plastic cover (see Fig. 4).
- Finally, push the „levers“ on both sides back as shown in Fig. 5.
Caution!
Be careful when manipulating the door during cleaning. The hinges are designed to the weight of all 3 glass panes. If you remove one or both of the glass panes, the weight of the door is reduced and it can get closed unintentionally, which can lead to damage of the glass panes.
Note:
- For cleaning the glass panes, use a soft sponge and anti-grease detergent and then rinse them under running water. Never wash the glass panes in a dishwasher!
- The middle glass is fitted with rubber pads at the corners. When removing, be careful not to lose them.
These rubber pads prevent unpleasant vibrations when the fan function is turned on.
APPLIANCE INSTALLATION
- Do not lift the appliance by holding it by the handle of the door!
- Defects caused by incorrect installation are not covered by the warranty.
- Only the customer, not the manufacturer, is responsible for the appliance installation.
- The manufacturer bears no responsibility for damage caused to people, animals or objects as a result of incorrect installation.
- To ensure correct function of the appliance, install it in suitable furniture.
- The unit should be installed in standardised kitchen furniture designed for built-in appliances or in properly adapted furniture of dimensions according to Fig. 6.
- The appliance may be located either under a kitchen cabinet or in a stand-alone cabinet (Fig. 6).
- The kitchen furniture must be made of heat-resistant material (at least 120^ ). The materials and used glues must be resistant to the warming of the unit according to the ČSN EN 60335-2-6 standard. Materials and glues which do not meet the stated standard may deform or come unstuck.
- All the protective covers must be fixed at their positions so that it is not possible to remove them without using a special tool.
- The rear board of the kitchen unit must be removed to ensure proper circulation of air around the appliance.
- If a cook top is above the appliance, a gap of at least 50 mm must be between them.
• Dimensions are in mm.
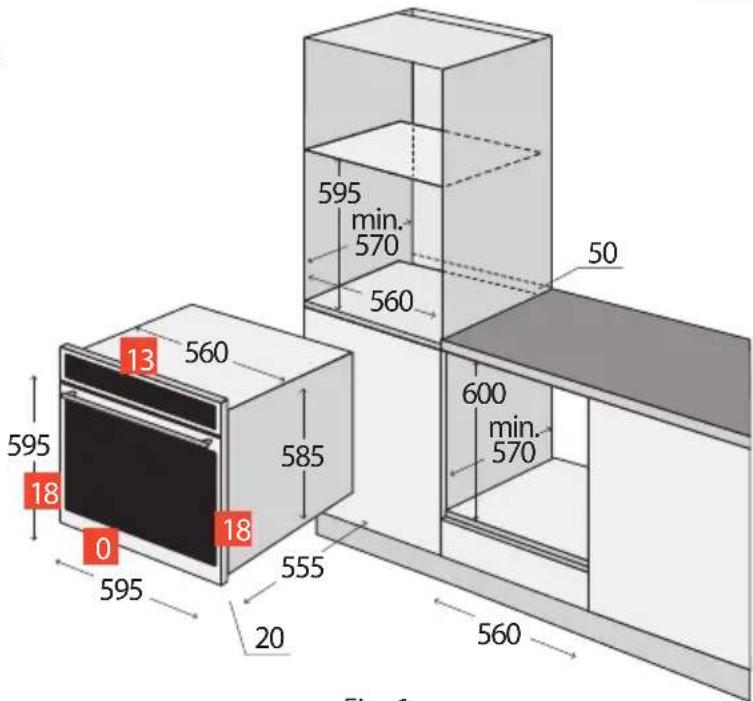
Fig. 6
Connecting to the mains
- Make sure the mains voltage and current protection correspond to the values on the rating plate. We recommend using a separate outlet circuit with a 16A circuit breaker.
- Use grounded wall outlets only.
- Do not use adapter sockets, connectors or extension cables. They could create a risk of overheating.
- The supply cable plug has to be freely accessible even after the installation of the unit.
- Only a qualified expert can perform connection changes.
- The electrical safety of the appliance can only be guaranteed if the protective terminal of the appliance is connected to the protective conductor of the mains.
- The manufacturer bears no responsibility for damage caused to people or objects as a result of a missing or bad protective connection.
- The power cord must be located so that it does not come into contact with hot parts of the appliance and so that it is not deformed or excessively bent.
Follow the installation instructions below:
-
Remove all the packaging and marketing materials from the unit before the first use.
-
For the sake of efficient air circulation the unit has to be located according to the dimensions on Fig. 6 and the design of the cabinet must enable air flow into its bottom part. The gap behind the rear wall of the built-in appliance must be at least 50 mm.
- Put the unit on the edge of the cabinet and run the power cord through the rear wall of the cabinet so that its plug is accessible after installation.
- Push the unit carefully to the selected place in the cabinet. Be careful not to squeeze the power cord.
- Attach the unit to the cabinet by screwing two screws in the holes in the front wall of the cabinet. The holes can be seen after opening the door.
- Plug the supply cable into the wall outlet.
Removal
To uninstall the appliance, it is important to proceed correctly:
- First, unplug the power cord from the mains (pull out the plug or switch off the circuit breaker).
- Remove the attachment screws.
- Slide out the appliance and at the same time pull out the power cord carefully.
SERVICING
Replacing a bulb
To illuminate the interior of the appliance, a halogen bulb of high thermal resistance is used (25 W/230V T300°C).
To remove the bulb proceed as follows:
- Disconnect the appliance from the power supply, or switch off the appropriate circuit breaker.
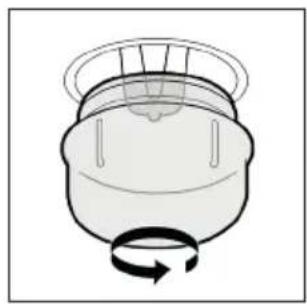
- Unscrew the glass cover in the anti-clockwise direction according to Fig. 7 and replace the bulb with a bulb of the same type and parameters.
- When installing a new bulb, use a rag or paper wipe to hold the bulb.
- Re-install the glass cover.
natural_image
Simple line drawing of a container with a rotating arrow indicating rotation (no text or symbols)Fig. 7
PROTECTION OF THE ENVIRONMENT
- Packaging materials and obsolete appliances should be recycled.
• The transport box may be disposed of as sorted waste.
• Polyethylene bags should be handed over for recycling.
Appliance end-of-service-life recycling:
natural_image
Symbol of a trash bin crossed with a diagonal line, no text or numbers presentThis appliance is marked in compliance with Directive 2012/19/EU of the European Parliament and of the Council on waste electrical and electronic equipment (WEEE). A symbol on the product or its packaging indicates that this product should not go into household waste. It must be taken to the collection point of an electric and electronic equipment recycling facility. By making sure this product is disposed of properly, you will help prevent the negative effects on the environment and human health that would otherwise result from inappropriate disposal of this product. Disposal must be done according to the waste management regulations. You can learn more about recycling this product from your local authorities, a household waste disposal service or in the shop where you bought this product.
CONCEPT POLSKA sp. z o.o.
- PODĚKOVÁNÍ
- Teleskopické výsuvy
- POZOR!
- OCHRANA ŽIVOTNÍHO PROSTŘEDÍ
- OCHRANA ŽIVOTNÉHO PROSTREDIA
- UWAGA!
- OCHRONA ŚRODOWISKA NATURALNEGO
- UZMANIBU!
- APKÄRTËJÄS VIDES AIZSARDZİBA
- TABLE OF CONTENTS
- TECHNICAL FEATURES
- IMPORTANT NOTICES
- Upon delivery of the electric appliance
- During installation
- CAUTION!
- Condensation
- Possible failures
- PRODUCT DESCRIPTION
- Accessories
- Control Panel Description
- BAKING TIPS
- OPERATING INSTRUCTIONS
- Before the first use
- Daytime setting
- Daytime setting change
- Appliance Basic Functions
- ADVANCED BAKING FUNCTIONS
- Setting the baking time
- Note:
- Start/Pause/Cancel
- Activation of the light in the appliance
- Reminder function
- Display of the time of day during baking
- Child lock function
- Energy saving features
- Segments on the display
- Notes
- Correct positioning of the grill or pan in the appliance
- Telescopic rails
- Cooling fan
- CLEANING AND MAINTENANCE
- Cleaning glass parts
- APPLIANCE INSTALLATION
- Connecting to the mains
- Follow the installation instructions below:
- Removal
- SERVICING
- Replacing a bulb
- To remove the bulb proceed as follows:
- PROTECTION OF THE ENVIRONMENT
- Appliance end-of-service-life recycling:
- CONCEPT POLSKA sp. z o.o.
Brand : Concept
Model : ETV7160
Category : Oven