
FLR32TS511SMART - Television HYUNDAI - Free user manual and instructions
Find the device manual for free FLR32TS511SMART HYUNDAI in PDF.


| Product Type | 32 inch LED TV |
| Model | FLR32TS511SMART |
| Display Diagonal | 32 inches (81 cm) |
| Display Resolution | 1920 x 1080 pixels (Full HD) |
| Energy Efficiency Class | A+ |
| Power Consumption (On Mode) | 31 W |
| Power Consumption (Standby) | 0.5 W |
| Power Supply | 220-240 V AC, 50 Hz |
| Weight (with stand) | 6.75 kg |
| Dimensions with Stand (WxHxD) | 735 x 495 x 196 mm |
| Dimensions without Stand (WxHxD) | 735 x 438 x 77/89 mm |
| VESA Wall Mount | 200 x 100 mm, screws M4 (length 5-8 mm) |
| Tuner | DVB-T2/C/S2 (digital terrestrial, cable, satellite) |
| Connectivity | HDMI, USB, Ethernet, WiFi (802.11 a/b/g/n), CI slot, Headphone, VGA, YPbPr, SPDIF, AV |
| Operating System / Smart TV | HbbTV, Internet Portal, Audio Video Sharing |
| Special Features | USB Media Playback, EPG, Teletext, Sleep Timer, Child Lock, Game Mode, Picture Off, CI+, CEC |
| Audio Output Power | 2 x 6 W RMS |
| Operating Conditions | 0°C to 40°C, max 85% humidity |
| Accessories Included | Remote control, 2x AAA batteries, instruction book |
Frequently Asked Questions - FLR32TS511SMART HYUNDAI
User questions about FLR32TS511SMART HYUNDAI
0 question about this device. Answer the ones you know or ask your own.
Ask a new question about this device
Download the instructions for your Television in PDF format for free! Find your manual FLR32TS511SMART - HYUNDAI and take your electronic device back in hand. On this page are published all the documents necessary for the use of your device. FLR32TS511SMART by HYUNDAI.
USER MANUAL FLR32TS511SMART HYUNDAI
Licensed by Hyundai Corporation, Korea
Obsah
CEC a CEC RC Passthrough....11
CLASS 1 LASER PRODUCT
natural_image
Close-up of a cylindrical object with two labeled terminals (no visible text or symbols)Připojení napájení
CEC a CEC RC Passthrough
CEC a CEC RC Passthrough....37
CLASS 1 LASER PRODUCT
natural_image
Diagram of a cylindrical device with labeled components and positive/negative terminals (no readable text or symbols)Pripojit' Napájanie
CEC a CEC RC Passthrough
CEC i CEC RC Passthrough 64
natural_image
Close-up of a cylindrical battery with two charging terminals and a central conical tip, showing charge distribution (no text or symbols visible)CEC i CEC RC Passthrough
Markings on the Product.... 82
Environmental Information.... 83
Features 84
Accessories Included.... 84
Standby Notifications....84
TV Control Switch & Operation.... 84
Inserting the Batteries into the Remote 85
Connect Power 85
Antenna Connection 85
License Notification 85
Remote Control 87
Connections.... 88
Switching On/Off....89
First Time Installation.... 89
Media Playback via USB Input 90
Media Browser Menu....90
CEC and CEC RC Passthrough....90
E-Manual (if available)....91
TV Menu Contents.... 92
General TV Operation 96
Using the Channel List 96
Configuring Parental Settings....96
Electronic Programme Guide (EPG) 96
Teletext Services 97
Software Upgrade.... 97
Troubleshooting & Tips....97
PC Input Typical Display Modes....98
AV and HDMI Signal Compatibility 98
Supported Video File Formats for USB Mode ..... 99
Supported Picture File Formats for USB Mode ..... 99
Supported Audio File Formats for USB Mode ..... 99
Supported Subtitle File Formats for USB Mode .. 100
Supported DVI Resolutions 101
Connectivity....102
Using Audio Video Sharing Network Service.....105
Internet Portal....105
In extreme weather (storms, lightning) and long inactivity periods (going on holiday) disconnect the TV set from the mains.
The mains plug is used to disconnect TV set from the mains and therefore it must remain readily operable. If the TV set is not disconnected electrically from the mains, the device will still draw power for all situations even if the TV is in standby mode or switched off.
Note: Follow the on screen instructions for operating the related features.
IMPORTANT - Please read these instructions fully before installing or operating

WARNING: Never let people (including
children) with reduced physical, sensory or mental capabilities or lack of experience and / or knowledge use electrical devices unsupervised.
- Use this TV set at an altitude of less than 2000 meters above the sea level, in dry locations and in regions with moderate or tropical climates.
- The TV set is intended for household and similar general use but may also be used in public places.
- For ventilation purposes, leave at least 5cm of free space around the TV.
- The ventilation should not be impeded by covering or blocking the ventilation openings with items, such as newspapers, table-cloths, curtains, etc.
- The power cord plug should be easily accessible. Do not place the TV, furniture, etc. on the power cord. A damaged power cord/plug can cause fire or give you an electric shock. Handle the power cord by the plug, do not unplug the TV by pulling the power cord. Never touch the power cord/plug with wet hands as this could cause a short circuit or electric shock. Never make a knot in the power cord or tie it with other cords. When damaged it must be replaced, this should only be done by qualified personnel.
- Do not expose the TV to dripping or splashing of liquids and do not place objects filled with liquids, such as vases, cups, etc. on or over the TV (e.g., on shelves above the unit).
-
Do not expose the TV to direct sunlight or do not place open flames such as lit candles on the top of or near the TV.
-
Do not place any heat sources such as electric heaters, radiators, etc. near the TV set.
- Do not place the TV on the floor and inclined surfaces.
- To avoid danger of suffocation, keep plastic bags out of the reach of the babies, children and domestic animals.
- Carefully attach the stand to the TV. If the stand is provided with screws, tighten the screws firmly to prevent the TV from tilting. Do not over-tighten the screws and mount the stand rubbers properly.
- Do not dispose of the batteries in fire or with hazardous or flammable materials.
Warning: Batteries must not be exposed to excessive heat such as sunshine, fire or the like.
 | Caution | Serious injury or death risk |
 | Risk of electric shock | Dangerous voltage risk |
 | Maintenance | Important maintenance component |
Markings on the Product
The following symbols are used on the product as a marker for restrictions and precautions and safety instructions. Each explanation shall be considered where the product bears related marking only. Note such information for security reasons.

Class II Equipment: This appliance is designed in such a way that it does not require a safety connection to electrical earth.

Class II Equipment With Functional
Earthing: This appliance is designed in such a way that it does not require a safety connection to electrical earth, the earth connection is used for functional purposes.

Protective Earth Connection: The marked
terminal is intended for connection of the protective earthing conductor associated with the supply wiring.

Hazardous Live Terminal: The marked
terminal(s) is/are hazardous live under normal operating conditions.

Caution, See Operating Instructions: The
marked area(s) contain(s) user replaceable coin or button cell batteries.

Class 1 Laser Product:
This product contains Class 1 laser source that is safe under reasonably foreseeable conditions of operation.
WARNING
Do not ingest the battery, Chemical Burn Hazard This product or the accessories supplied with the product may contain a coin/button cell battery. If the coin/button cell battery is swallowed, it can cause severe internal burns in just 2 hours and can lead to death.
Keep new and used batteries away from children.
If the battery compartment does not close securely, stop using the product and keep it away from children.
If you think batteries might have been swallowed or placed inside any part of the body, seek immediate medical attention.
WARNING
Never place a television set in unstable or inclined locations. A television set may fall, causing serious personal injury or death. Many injuries, particularly to children, can be avoided by taking simple precautions such as;
- Using cabinets or stands recommended by the manufacturer of the television set.
- Only using furniture that can safely support the television set.
- Ensuring the television set is not overhanging the edge of the supporting furniture.
- Not placing the television set on tall furniture (for example, cupboards or bookcases) without anchoring both the furniture and the television set to a suitable support.
- Not standing the television set on cloth or other materials placed between the television and supporting furniture.
- Educating children about the dangers of climbing on furniture to reach the television set or its controls. If your existing television set is being retained and relocated, the same considerations as above should be applied.
WALL MOUNTING WARNINGS
- Read the instructions before mounting your TV on the wall.
- The wall mount kit is optional. You can obtain from your local dealer, if not supplied with your TV.
- Do not install the TV on a ceiling or on an inclined wall.
- Use the specified wall mounting screws and other accessories.
- Tighten the wall mounting screws firmly to prevent the TV from fall. Do not over-tighten the screws.
WARNING
Apparatus connected to the protective earthing of the building installation through the MAINS connection or through other apparatus with a connection to protective earthing – and to a television distribution system using coaxial cable, may in some circumstances create a fire hazard. Connection to a television distribution system has therefore to be provided through a device providing electrical isolation below a certain frequency range (galvanic isolator, see EN 60728-11)
Environmental Information
This television is designed to be environment friendly. To reduce energy consumption, you can follow these steps:
If you set the Energy Saving to Minimum, Medium, Maximum or Auto the TV will reduce the energy consumption accordingly. If you like to set the Backlight to a fixed value set as Custom and adjust the Backlight (located under the Energy Saving setting) manually using Left or Right buttons on the remote. Set as Off to turn this setting off.
Note: Available Energy Saving options may differ depending on the selected Mode in the System>Picture menu.
The Energy Saving settings can be found in the System>Picture menu. Note that some picture settings will be unavailable to be changed.
If pressed Right button while Auto option is selected or Left button while Custom option is selected, "Screen will be off in 15 seconds." message will be displayed on the screen. Select Proceed and press OK to turn the screen off immediately. If you don't press any button, the screen will be off in 15 seconds. Press
any button on the remote or on the TV to turn the screen on again.
Note: Screen Off option is not available if the Mode is set to Game.
When the TV is not in use, please switch off or disconnect the TV from the mains plug. This will also reduce energy consumption.
Features
- Remote controlled colour TV
- Fully integrated digital terrestrial/cable/satellite TV (DVB-T2/C/S2)
- HDMI inputs to connect other devices with HDMI sockets
- USB input
- OSD menu system
- Stereo sound system
- Teletext
• Headphone connection
• Automatic programming system - Manual tuning
• Automatic power down after up to eight hours. - Sleep timer
- Child lock
• Automatic sound mute when no transmission. - NTSC playback
• AVL (Automatic Volume Limiting) - PLL (Frequency Search)
- PC input
• Game Mode (Optional) - Picture off function
- Programme recording
- Programme timeshifting
- Ethernet (LAN) for Internet connectivity and service
• 802.11 a/b/g/n built in WIFI Support
• Audio Video Sharing
• HbbTV
Accessories Included
- Remote Control
- Batteries: 2 x AAA
- Instruction Book
Standby Notifications
If the TV does not receive any input signal (e.g. from an aerial or HDMI source) for 3 minutes, it will go into standby. When you next switch-on, the following message will be displayed: "TV switched to stand-by mode automatically because there was no signal for a long time." Press OK to continue.
If the TV is on and it isn't being operated for a while it will go into standby. When you next switch-on, the following message will be displayed. "TV switched to stand-by mode automatically because no operation was made for a long time." Press OK to continue.
TV Control Switch & Operation

- Up direction
- Down direction
- Volume / Info / Sources List selection and Standby-On switch
The Control button allows you to control the Volume / Programme / Source and Standby-On functions of the TV.
To change volume: Increase the volume by pushing the button up. Decrease the volume by pushing the button down.
To change channel: Press the middle of the button, the information banner will appear on the screen. Scroll through the stored channels by pushing the button up or down.
To change source: Press the middle of the button twice(for the second time in total), the source list will appear on the screen. Scroll through the available sources by pushing the button up or down.
To turn the TV off: Press the middle of the button down and hold it down for a few seconds, the TV will turn into standby mode.
Notes:
- If you turn the TV off, this circle starts again beginning with the volume setting.
- Main menu OSD cannot be displayed via control button.
Operation with the Remote Control
Press the Menu button on your remote control to display main menu screen. Use the directional buttons to select a menu tab and press OK to enter. Use the directional buttons again to select or set an item. Press Return/Back or Menu button to quit a menu screen.
Input Selection
Once you have connected external systems to your TV, you can switch to different input sources. Press the Source button on your remote control consecutively to select the different sources.
Changing Channels and Volume
You can change the channel and adjust the volume by using the Volume +/- and Programme +/- buttons on the remote.
Inserting the Batteries into the Remote
Lift the cover on the back of the remote gently. Insert two AAA batteries. Make sure the (+) and (-) signs match (observe correct polarity). Place the cover back on.

natural_image
Diagram of a battery cell with electrodes and charge indicators (no text or symbols)Connect Power
IMPORTANT: The TV set is designed to operate on 220-240V AC, 50 Hz socket. After unpacking, allow the TV set to reach the ambient room temperature before you connect the set to the mains. Plug the power cable to the mains socket outlet.
Antenna Connection
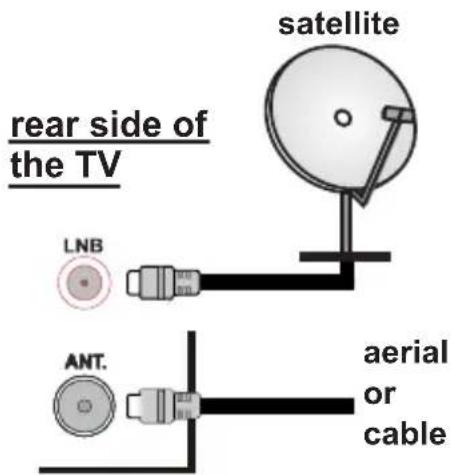
Connect the aerial or cable TV plug to the AERIAL INPUT (ANT) socket or satellite plug to the SATELLITE INPUT (LNB) socket located on the back of the TV.
License Notification
The terms HDMI and HDMI High-Definition Multimedia Interface, and the HDMI Logo are trademarks or registered trademarks of HDMI Licensing Administrator, Inc. in the United States and other countries.

Manufactured under license from Dolby Laboratories. Dolby, Dolby Audio and the double-D symbol are trademarks of Dolby Laboratories.
YouTube and the YouTube logo are trademarks of Google Inc.
This product contains technology subject to certain intellectual property rights of Microsoft. Use or distribution of this technology outside of this product is prohibited without the appropriate license(s) from Microsoft.
Content owners use Microsoft PlayReady™ content access technology to protect their intellectual property, including copyrighted content. This device uses PlayReady technology to access PlayReady-protected content and/or WMDRM-protected content. If the device fails to properly enforce restrictions on content usage, content owners may require Microsoft to revoke the device's ability to consume PlayReady-protected content. Revocation should not affect unprotected content or content protected by other content access technologies. Content owners may require you to upgrade PlayReady to access their content. If you decline an upgrade, you will not be able to access content that requires the upgrade.
Information for Users on Disposal of Old Equipment and Batteries
[European Union only]
Equipment bearing these symbols should not be disposed as general household waste.
You should look for appropriate recycling facilities and systems for the disposal of these products.
Notice: The sign Pb below the symbol for batteries indicates that this battery contains lead.
![HYUNDAI FLR32TS511SMART - [European Union only] - 1](/content/2026/05/969440/images/574c23e6c1f9a1261909aad1c68e61c713c35d3cb820f96045ea3073e26e9974.jpg)
![HYUNDAI FLR32TS511SMART - [European Union only] - 2](/content/2026/05/969440/images/c2edf96a29b1186524d2baec58db8cd8eeddc5107d28c68fc425b9f84481bc0c.jpg)
| Specification | |
| TV Broadcasting | PAL BG/I/DKSECAM BG/DK |
| Receiving Channels | VHF (BAND I/III) - UHF(BAND U) - HYPERBAND |
| Digital Reception | Fully integrated digital terrestrial-cable-satellite TV(DVB-T-C-S)(DVB-T2, DVB-S2 compliant) |
| Number of Preset Channels | 10 000 |
| Channel Indicator On Screen Display | |
| RF Aerial Input 75 Ohm (unbalanced) | |
| Operating Voltage 220-240V AC, 50Hz. | |
| Audio German+Nicam Stereo | |
| Audio Output Power(WRMS.) (10% THD) | 2 x 6 |
| Power Consumption (W) 65 | |
| Networked Standby (W) < 3 | |
| Weight (Kg) 6,75 | |
| TV Dimensions DxLxH(with foot) (mm) | 196 x 735 x 495 |
| TV Dimensions DxLxH(without foot) (mm) | 77/89 x 735 x 438 |
| Display 32" | |
| Operation temperature and operation humidity | 0°C up to 40°C, 85%humidity max |
Wireless LAN Transmitter Specifications
| Frequency Ranges Max Output Power | |
| 2400 - 2483,5 MHz (CH1-CH13) < 100 mW | |
| 5150 - 5250 MHz (CH36 - CH48) < 200 mW | |
| 5250 - 5350 MHz (CH52 - CH64) < 200 mW | |
| 5470 - 5725 MHz (CH100 - CH140) | < 200 mW |
Country Restrictions
This device is intended for home and office use in all EU countries (and other countries following the relevant EU directive) without any limitation except for the countries mentioned below.
| Country Restriction | |
| Bulgaria | General authorization required for outdoor use and public service |
| France In-door use only for 2454-2483.5 MHz | |
| Italy | If used outside of own premises, general authorization is required |
| Greece | In-door use only for 5470 MHz to 5725 MHz band |
| Luxembourg | General authorization required for network and service supply(not for spectrum) |
| Norway | Radio transmission is prohibited for the geographical area within a radius of 20 km from the centre of Ny-Ålesund |
| Russian Federation | In-door use only |
The requirements for any country may change at any time. It's recommended that user checks with local authorities for the current status of their national regulations for both 2.4 GHz and 5 GHz wireless LAN's.
Remote Control
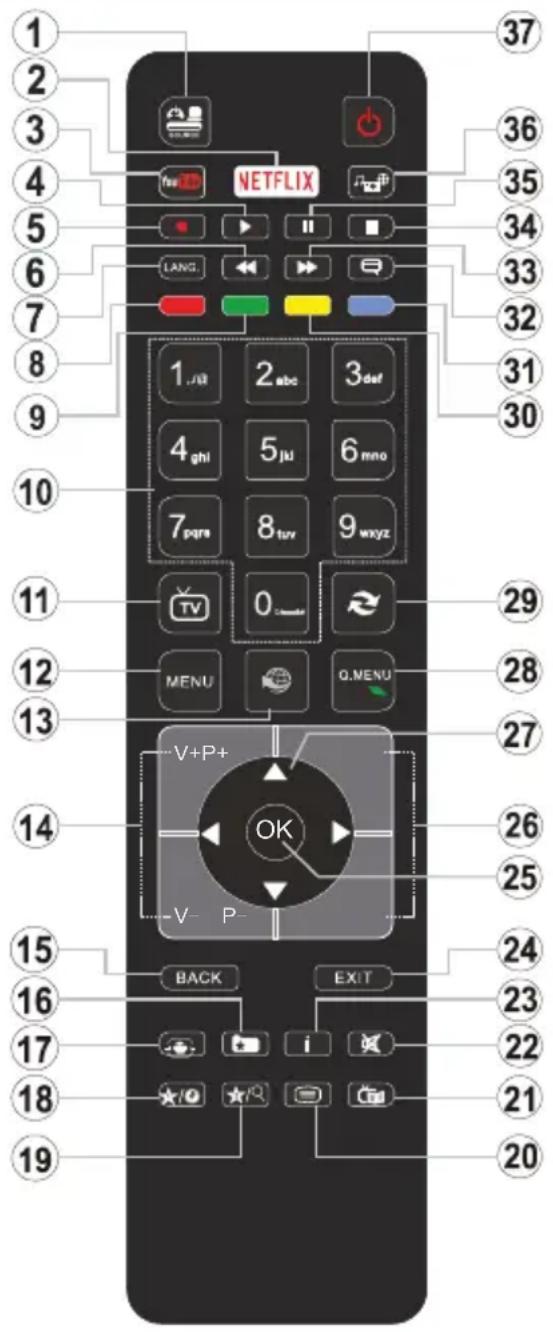
(\*) MY BUTTON 1 & MY BUTTON 2:
These buttons may have default functions depending on the model. However you can set a special function to these buttons by pressing on them for five seconds when on a desired source or channel. A confirmation message will be displayed on the screen. Now the selected MY BUTTON is associated with the selected function.
Note that if you perform First Time Installation, MY BUTTON 1&2 will return to their default function.
- Source: Shows all available broadcast and content sources
- Netflix: Launches the Netflix application.
- YouTube: Launches the YouTube application.
- Play: Starts to play selected media
- No function
- Rapid reverse: Moves frames backwards in media such as movies
- Language: Switches between sound modes (analogue TV), displays and changes audio/subtitle language (digital TV, where available)
- Red button
- Green button
- Numeric buttons: Switches the channel, enters a number or a letter in the text box on the screen.
- TV: Displays channel list / Switches to TV Source
- Menu: Displays TV menu
- Internet: Opens the portal page, where you can reach many web based applications
- Volume +/-
- Back/Return: Returns to previous screen, opens index page (in TXT mode)
- Favourites: Displays user specified favourite channels
- Screen: Changes the aspect ratio of the screen
- My button 1 (*)
- My button 2 (*)
- Text: Displays teletext (where available), press again to superimpose the teletext over a normal broadcast picture (mix)
- EPG (Electronic programme guide): Displays the electronic programme guide
- Mute: Completely turns off the volume of the TV
- Info: Displays information about on-screen content
- Exit: Closes and exits from displayed menus or returns to previous screen
- OK: Confirms user selections, holds the page (in TXT mode), views channel list (DTV mode)
- Programme + / -
- Directional buttons: Helps navigate menus, content etc. and displays the subpages in TXT mode when pressed Right or Left
- Quick Menu: Displays a list of menus for quick access
- Swap: Quickly cycles between previous and current channels or sources
- Yellow button
- Blue button
- Subtitles: Turns subtitles on and off (where available)
- Rapid advance: Moves frames forward in media such as movies
- Stop: Stops the media being played
- Pause: Pauses the media being played
- Media browser: Opens the media browsing screen
- Standby: Switches On / Off the TV
| Connector Type Cables Device | See the illustrations on the left side. You can use YPbPr to VGA cable to enable YPbPr signal via VGA input. You cannot use VGA and YPbPr at the same time. To enable PC/YPbPr audio, you will need to use the back audio inputs with a YPbPr/PC audio cable for audio connection. When using the wall mounting kit (available from a third party in the market, if not supplied), we recommend that you plug all your cables into the back of the TV before mounting on the wall. Insert or remove the CI module only when the TV is SWITCHED OFF. You should refer to the module instruction manual for details of the settings. The/Each USB input of your TV supports devices up to 500mA. Connecting devices that have current value above 500mA may damage your TV. When connecting equipment using a HDMI cable to your TV, to guarantee sufficient immunity against parasitic frequency radiation, you have to use a high speed shielded (high grade) HDMI cable with ferrites. | |||
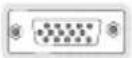 | VGA Connection (back) |  |  | |
AUDIO IN  | PC/YPbPr Audio Connection (back) |  YPbPr/PC Audio Cable YPbPr/PC Audio Cable | 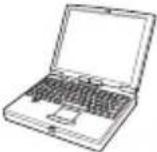 | |
| [40X7] | HDMI Connection (side&back) |  |  | |
| SPDIF [554K] | SPDIF (Optical Out) Connection (back) |  | [528H] | |
| BACK AV [570W] | Back AV (Audio/Video) Connection (back) | [02X6]AV Cable | [1+Y+TO] | |
HEADPHONE  | Headphone Connection (side) | [8X25] | ||
YPBPR  | YPbPr Video Connection (back) | [20AX]PC to YPbPr Connection Cable |  | |
 | USB Connection (side) |  |  | |
 | CI Connection (side) |  |  | |
| LAN [7532] | Ethernet Connection (back) |  LAN / Ethernet Cable LAN / Ethernet Cable |  | |

If you want to connect a device to the TV, make sure that both the TV and the device are turned off before making any connection. After the connection is done, you can turn on the units and use them.
Switching On/Off
To Switch the TV On
Connect the power cord to a power source such as a wall socket (220-240V AC, 50 Hz).
To switch on the TV from standby mode either:
- Press the Standby button, Programme +/- or a numeric button on the remote control.
- Press the middle of side function switch on the TV in.
To Switch the TV Off
Press the Standby button on the remote control or press the middle of the side function switch on the TV in and hold it down for a few seconds, the TV will switch into standby mode.
To power down the TV completely, unplug the power cord from the mains socket.
Note: When the TV is switched into standby mode, the standby LED can blink to indicate that features such as Standby Search, Over Air Download or Timer is active. The LED can also blink when you switch on the TV from standby mode.
First Time Installation
When turned on for the first time, the language selection screen is displayed. Select the desired language and press OK.
On the next screen, set your preferences using the directional buttons.
Notes: Depending on the Country selection you may be asked to set and confirm a PIN at this point. The selected PIN cannot be 0000. You have to enter it if you are asked to enter a PIN for any menu operation later.
M7(*) operator type will be defined according to the Language and Country selections that you made in the First Time Installation.
(*) M7 is a digital satellite service provider.
About Selecting Broadcast Type
Digital Aerial: If Digital Aerial broadcast search option is turned on, the TV will search for digital terrestrial broadcasts after other initial settings are completed.
Digital Cable: If Digital Cable broadcast search option is turned on, the TV will search for digital cable broadcasts after other initial settings are completed. According to your other preferences a confirmation message may be displayed before starting to search. Select YES and press OK to proceed. To cancel operation, select NO and press OK. You can select Network or set values such as Frequency, Network ID and Search Step. When finished, press OK button. Note: Searching duration will change depending on the selected Search Step.
Satellite: If Satellite broadcast search option is turned on, the TV will search for digital satellite broadcasts after other initial settings are completed. Before
satellite search is performed some settings should be made. Before the satellite search starts, a menu will be displayed where you can select to start an M7 operator installation or a standard installation. To start an M7 operator installation set the Install Type as Operator and the Satellite Operator as the related M7 operator. Then highlight Preferred Scan option and set as Automatic channel scan and press OK to start the automatic search. These options can be preselected depending on the Language and Country selections that you made in the earlier steps of the first time installation process. You may be asked to select HD/SD or country specific channel list according to your M7 operator type. Select one and press OK to proceed.
Wait till the scan is finished. Now the list has been installed.
While performing an M7 operator installation, if you want to use the satellite installation parameters that differ from the default settings select the Preferred Scan option as Manual channel scan and press the OK button to proceed. Antenna Type menu will be displayed next.
In order to search for satellite channels other than M7 channels you should start a standard installation. Select the Install Type as Standard and press the OK button to proceed. Antenna Type menu will be displayed next.
There are three types of antenna selection. You can select Antenna Type as Direct, Single Satellite Cable or DiSEqC switch by using “” or “” buttons.
- Direct: If you have a single receiver and a direct satellite dish, select this antenna type. Press OK to continue. Select an available satellite on the next screen and press OK to scan for services.
- Single Satellite Cable: If you have multiple receivers and a single satellite cable system, select this antenna type. Press OK to continue. Configure settings by following instructions on the next screen. Press OK to scan for services.
- DiSEqC switch: If you have multiple satellite dishes and a DiSEqC switch, select this antenna type. Then set the DiSEqC version and press OK to continue. You can set up to four satellites (if available) for version v1.0 and sixteen satellites for version v1.1 on the next screen. Press OK button to scan the first satellite in the list.
Analogue: If Analogue broadcast search option is turned on, the TV will search for analogue broadcasts after other initial settings are completed.
Additionally you can set a broadcast type as your favourite one. Priority will be given to the selected broadcast type during the search process and the channels of it will be listed on the top of the Channel List. When finished, press OK to continue.
You can activate Store Mode option at this point. This option will configure your TV's settings for store environment and depending on the TV model being used, the supported features of it may be displayed on the top of the screen as an info banner. This option is intended only for store use. It is recommended to select Home Mode for home use. This option will be available in System>Settings>More menu and can be turned off/on later.
Depending on the model of your TV and the country selection Privacy Settings menu may appear at this point. Using this menu you can set your privacy privileges. Highlight a feature and use Left and Right directional buttons to enable or disable. Read the related explanations displayed on the screen for each highlighted feature before making any changes. You can use Programme +/- buttons to scroll up and down to read the entire text. You will be able to change your preferences at any time later from the Settings>Privacy Settings menu. If the Internet Connection option is disabled Network/Internet Settings screen will be skipped and not displayed.
Press OK button on the remote control to continue and the Network/Internet Settings menu will be displayed, if you confirm the previously displayed message asking whether you want to do the network settings. Please refer to Connectivity section to configure a wired or a wireless connection. If you want your TV to consume less power in standby mode, you can disable the Wake On option by setting it as Off. After the settings are completed press OK button to continue. To skip to the next step without doing anything select No and press the OK button when the message is displayed asking whether you want to do the network settings.
After the initial settings are completed TV will start to search for available broadcasts of the selected broadcast types.
After all the available stations are stored, scan results will be displayed. Press OK to continue. The Edit Channel List menu will be displayed next. You can edit the channel list according to your preferences or press the Menu button to quit and watch TV.
While the search continues a message may appear, asking whether you want to sort channels according to the LCN(^*) . Select Yes and press OK to confirm.
(*) LCN is the Logical Channel Number system that organizes available broadcasts in accordance with a recognizable channel number sequence (if available).
Notes:
To search for M7 channels after the First Time Installation, you should perform the first time installation again. Or press the Menu button and enter the Installation>Automatic Channel Scan>Satellite menu. Then follow the same steps mentioned above in the satellite section.
Do not turn off the TV while initializing first time installation. Note that, some options may not be available depending on the country selection.
Media Playback via USB Input
You can connect 2.5" and 3.5" inch (hdd with external power supply) external hard disk drives or USB memory stick to your TV by using the USB inputs of the TV.
IMPORTANT! Back up the files on your storage devices before connecting them to the TV. Manufacturer will not be responsible for any file damage or data loss. Certain types of USB devices (e.g. MP3 Players) or USB hard disk drives/memory sticks may not be compatible with this TV. The TV supports FAT32 and NTFS disk formatting.
Wait a little while before each plugging and unplugging as the player may still be reading files. Failure to do so may cause physical damage to the USB player and the USB device itself. Do not pull out your drive while playing a file.
You can use USB hubs with your TV's USB inputs. External power supplied USB hubs are recommended in such a case.
It is recommended to use the TV's USB input(s) directly, if you are going to connect a USB hard disk.
Note: When viewing image files the Media Browser menu can only display 1000 image files stored on the connected USB device.
Media Browser Menu
You can play photo, music and movie files stored on a USB disk by connecting it to your TV. Connect a USB disk to one of the USB inputs located on the side of the TV. Pressing the Menu button while in the Media Browser mode will access the Picture, Sound and Settings menu options. Pressing the Menu button again will exit from this screen. You can set your Media Browser preferences by using the Settings menu.
| Loop/Shuffle Mode Operation | |
| Start playback with the Play button and activate | All files in the list will be continuously played in original order |
| Start playback with the OK button and activate | The same file will be played continuously (repeat) |
| Start playback with the Play button and activate | All files in the list will be played once in random order |
| Start playback with the Play button and activate | All files in the list will be continuously played in the same random order. |
CEC and CEC RC Passthrough
This function allows to control the CEC-enabled devices, that are connected through HDMI ports by using the remote control of the TV.
The CEC option in the System>Settings>More menu should be set as Enabled at first. Press the Source button and select the HDMI input of the connected CEC device from the Sources List menu. When
new CEC source device is connected, it will be listed in source menu with its own name instead of the connected HDMI ports name(such as DVD Player, Recorder 1 etc.).
The TV remote is automatically able to perform the main functions after the connected HDMI source has been selected.
To terminate this operation and control the TV via the remote again, press Quick Menu button on the remote, highlight the CEC RC Passthrough and set as Off by pressing Left or Right button. This feature can also be enabled or disabled under the System>Settings>More menu.
The TV supports also ARC(Audio Return Channel) feature. This feature is an audio link meant to replace other cables between the TV and the audio system (A/V receiver or speaker system).
When ARC is active, TV does not mute its other audio outputs automatically. So you need to decrease TV volume to zero manually, if you want to hear audio from connected audio device only (same as other optical or co-axial digital audio outputs). If you want to change connected device's volume level, you should select that device from the source list. In that case volume control keys are directed to connected audio device.
Note: ARC is supported only via the HDMI2 input.
System Audio Control
Allows an Audio Amplifier/Receiver to be used with the TV. The volume can be controlled using the remote control of the TV. To activate this feature set the Speakers option in the System>Settings>More menu as Amplifier. The TV speakers will be muted and the sound of the watched source will be provided from the connected sound system.
Note: The audio device should support System Audio Control feature and CEC option should be set as Enabled.
E-Manual (if available)
You can find instructions for your TV's features in the E-Manual.
To use E-Manual, press to the Info button while main menu is displayed on the screen or press Quick Menu button, select Information Booklet and press OK.
By using the directional buttons select a desired category. Every category includes different topics. Select a topic and press OK to read instructions.
To close the E-Manual screen press the Exit or Menu button.
Note: The contents of the E-Manual may vary according to the model.
TV Menu Contents
| System - Picture Menu Contents | ||
| Mode | You can change the picture mode to suit your preference or requirements. Picture mode can be set to one of these options: Cinema, Game(optional), Sports, Dynamic and Natural. | |
| Contrast Adjusts the light and dark values on the screen. | ||
| Brightness Adjusts the brightness values on the screen. | ||
| Sharpness | Sets the sharpness value for the objects displayed on the screen. | |
| Colour Sets the colour value, adjusting the colours. | ||
| Energy Saving | For setting the Energy Saving to Custom, Minimum, Medium, Maximum, Auto, Screen Off or Off.Note: Available options may differ depending on the selected Mode. | |
| Backlight | This setting controls the backlight level. The backlight function will be inactive if the Energy Saving is set to an option other then Custom. | |
| Advanced Settings | ||
| Dynamic Contrast You can change the dynamic contrast ratio to desired value. | ||
| Noise Reduction | If the signal is weak and the picture is noisy, use the Noise Reduction setting to reduce the amount of noise. | |
| Colour Temp | Sets the desired colour temperature value. Cool, Normal, Warm and Custom options are available. | |
| White Point | If the Colour Temp option is set as Custom, this setting will be available. Increase the 'warmth' or 'coolness' of the picture by pressing Left or Right buttons. | |
| Picture Zoom Sets the desired image size format. | ||
| Film Mode | Films are recorded at a different number of frames per second to normal television programmes. Turn this feature on when you are watching films to see the fast motion scenes clearly. | |
| Skin Tone Skin tone can be changed between -5 and 5. | ||
| Colour Shift Adjust the desired colour tone. | ||
| HDMI Full Range | While watching from a HDMI source, this feature will be visible. You can use this feature to enhance blackness in the picture. | |
| PC Position Appears only when the input source is set to VGA/PC. | ||
| Autoposition Automatically optimizes the display. Press OK to optimize. | ||
| H Position | This item shifts the image horizontally to the right hand side or left hand side of the screen. | |
| V Position This item shifts the image vertically towards the top or bottom of the screen. | ||
| Dot Clock | Dot Clock adjustments correct the interference that appear as vertical banding in dot intensive presentations like spreadsheets or paragraphs or text in smaller fonts. | |
| Phase | Depending on the input source(computer etc.) you may see a hazy or noisy picture on the screen. You can use phase to get a clearer picture by trial and error. | |
| Reset | Resets the picture settings to factory default settings (except Game mode). | |
| While in VGA (PC) mode, some items in Picture menu will be unavailable. Instead, VGA mode settings will be added to the Picture Settings while in PC mode. | ||
| System - Sound Menu Contents | ||
| Volume Adjusts the volume level. | ||
| Equalizer | Selects the equalizer mode. Custom settings can be made only when in User mode. | |
| Balance Adjusts whether the sound comes from the left or right speaker. | ||
| Headphone | Sets headphone volume.Please ensure before using headphones that the headphone volume is set to a low level, to prevent damage to your hearing. | |
| Sound Mode You can select a sound mode (If the viewed channel supports). | ||
| Audio Link | Press OK to open the Audio Link menu screen. Using this screen you can discover and connect the sound devices to your TV wirelessly. | |
| AVL (Automatic Volume Limiting) | Sets the sound to obtain fixed output level between programmes. | |
| Headphone/Lineout | When you connect an external amplifier to your TV using the headphone jack, you can select this option as Lineout. If you have connected headphones to the TV, set this option as Headphone.Please ensure before using headphones that this menu item is set to Headphone. If it is set to Lineout, the output from the headphone socket will be set to maximum which could damage your hearing. | |
| Dynamic Bass Enables or disables the Dynamic Bass. | ||
| Surround sound | Surround sound mode can be changed as On or Off. | |
| Digital Out Sets digital out audio type. | ||
| System - Settings Menu Contents | ||
| Conditional Access | Controls conditional access modules when available. | |
| Language You may set a different language depending on the broadcaster and the country. | ||
| Privacy Settings (*) | Manage your privacy privileges for smart TV related applications. Press OK to enter the menu and set according to your preferences. | |
| Parental | Enter correct password to change parental settings. You can easily adjust Menu Lock, Maturity Lock, Child Lock or Guidance in this menu. You can also set a new PIN or change the Default CICAM PIN using the related options.Note: Some menu options may not be available depending on the country selection in the First Time Installation. Default PIN can be set to 0000 or 1234. If you have defined the PIN(is requested depending on the country selection) during the First Time Installation use the PIN that you have defined. | |
| Timers | Sets sleep timer to turn off the TV after a certain time. Sets timers for selected programmes. | |
| Date/Time | Sets date and time. | |
| Sources | Enables or disables selected source options. | |
| Network/Internet Settings | Displays network/internet settings. | |
| Accessibility | Displays accessibility options of the TV. | |
| Hard of Hearing Enables any special feature sent from the broadcaster. | ||
| Audio Description | A narration track will be played for the blind or visually impaired audience. Press OK to see all available Audio Description menu options. This feature is available only if the broadcaster supports it. | |
| Netflix | You can view your ESN(*) number and deactivate Netflix.(*) ESN number is an unique ID number for Netflix, created especially to identify your TV. | |
| More | Displays other setting options of the TV. | |
| Menu Timeout | Changes timeout duration for menu screens. | |
| Standby LED | If set as Off, the standby LED will not light up when the TV is in standby mode. | |
| HBBTV (*) | You can enable or disable this feature by setting it as On or Off. | |
| Software Upgrade | Ensures that your TV has the latest firmware. Press OK to see the menu options. | |
| Application Version Displays current software version. | ||
| Subtitle Mode | This option is used to select which subtitle mode will be on the screen (DVB subtitle / Teletext subtitle) if both is available. Default value is DVB subtitle. This feature is available only for the country option of Norway. | |
| Auto TV OFF | Sets the desired time for the TV to automatically go into standby mode when not being operated. | |
| Biss Key | Biss is a satellite signal scrambling system that is used for some broadcasts. If you need to enter Biss key on a broadcast, you can use this setting. Highlight Biss Key and press OK to enter keys on the desired broadcast. | |
| Store Mode | Select this mode for store display purposes. Whilst Store Mode is enabled, some items in the TV menu may not be available. | |
| Audio Video Sharing | Audio Video Sharing feature allows you to share files stored on your smartphone or tablet pc. If you have a compatible smartphone or tablet pc and the appropriate software is installed, you can share/play photos on your TV. See instructions of your sharing software for more information. Audio Video Sharing mode will not be available with internet portal feature. | |
| Power Up Mode | This setting configures the power up mode preference. Last State and Standby options are available. | |
| Virtual Remote Enable | or disable the virtual remote feature. | |
| CEC | With this setting you can enable and disable CEC functionality completely. Press Left or Right button to enable or disable the feature. | |
| CEC Auto Power On | This function allows the connected HDMI-CEC compatible device to turn on the TV and switch to its input source automatically. Press Left or Right button to enable or disable the feature. | |
| Speakers | To hear the TV audio from the connected compatible audio device set as Amplifier. You can use the remote control of the TV to control the volume of the audio device. | |
| Smart Remote | Press OK to open the Smart Remote menu screen. Using this screen you can discover and connect the remote controller devices to your TV wirelessly. | |
| Show All Cookies (*) | Displays all saved cookies. | |
| Delete All Cookies (*) | Deletes all saved cookies. | |
| OSS Displays Open Source | Software license information. | |
(*) These features may not be available depending on the model of your TV and the selected country in the First Time Installation.
| Installation Menu Contents | |
| Automatic channel scan (Retune) | Displays automatic tuning options. Digital Aerial: Searches and stores aerial DVB stations. Digital Cable: Searches and stores cable DVB stations. Analogue: Searches and stores analogue stations. Satellite: Searches and stores satellite stations. |
| Manual channel scan | This feature can be used for direct broadcast entry. |
| Network channel scan | Searches for the linked channels in the broadcast system. Digital Aerial: Searches for aerial network channels. Digital Cable: Searches for cable network channels. |
| Analogue fine tune | You can use this setting for fine tuning analogue channels. This feature is not available if no analogue channels are stored. |
| Satellite Settings | Displays satellite settings. Satellite list: Displays available satellites. You can Add, Delete satellites or Edit satellite settings on the list. Antenna installation: You can change satellite antenna settings and/or start a satellite scan. |
| Installation Settings (Optional) | Displays installation settings menu. Standby Search(*): Your TV will search for new or missing channels while in standby. Any new found broadcasts will be shown. Dynamic Channel Update(*): If this option is set as Enabled, the changes on the broadcasts such as frequency, channel name, subtitle language etc., will be applied automatically while watching. (*) Availability depends on model. |
| Setup Home Transponder | Using this menu, you can edit the main and backup home transponder parameters, including the Pid of the related M7 operator, which are used to download the channel list. Set your preferences and press the Green button to save the settings. Then start an M7 operator installation using the Automatic channel scan>Satellite menu. |
| Clear Service List | Use this setting to clear channels stored. This setting is visible only when the Country option is set to Denmark, Sweden, Norway or Finland. |
| Select Active Network | This setting allows you to select only the broadcasts within the selected network to be listed in the channel list. This feature is available only for the country option of Norway. |
| First time installation | Deletes all stored channels and settings, resets TV to factory settings. |
General TV Operation
Using the Channel List
The TV sorts all stored stations in the Channel List. You can edit this channel list, set favourites or set active stations to be listed by using the Channel List options. Press the OK/TV button to open the Channel List. You can filter the listed channels by pressing the Blue button or open the Edit Channel List menu by pressing the Green button in order to make advanced changes in the current list.
Note: The commands Move, Delete and Edit name in the Edit Channel List menu are not available for channels that are being broadcasted from an M7 operator.
Managing the Favourite Lists
You can create four different lists of your favourite channels. Enter the Channel List in the main menu or press the Green button while the Channel List is displayed on the screen in order to open the Edit Channel List menu. Select the desired channel on the list. You can make multiple choices by pressing the Yellow button. Then press the OK button to open the Channel Edit Options menu and select Add/Remove Favourites option. Press the OK button again. Set the desired list option to On. The selected channel/s will be added to the list. In order to remove a channel or channels from a favourite list follow the same steps and set the desired list option to Off.
You can use the Filter function in the Edit Channel List menu to filter the channels in the Channel list permanently according to your preferences. Using this Filter option, you can set one of your four favourite lists to be displayed every time the Channel list is opened. The filtering function in the Channel list menu will only filter the currently displayed Channel list in order to find a channel and tune in to it. These changes will not remain the next time the Channel list is opened if you don't save them. To save the changes on the list press the Red button after filtering while the Channel list is displayed on the screen.
Configuring Parental Settings
The Parental Settings menu options can be used to prohibit users from viewing of certain programmes, channels and using of menus. These settings are located in the System>Settings>Parental menu.
To display parental lock menu options, a PIN number should be entered. After coding the correct PIN number, Parental Settings menu will be displayed.
Menu Lock: This setting enables or disables access to all menus or installation menus of the TV.
Maturity Lock: If this option is set, TV gets the maturity information from the broadcast and if this maturity level is disabled, disables access to the broadcast.
Note: If the country option in the First Time Installation is set as France, Italy or Austria, Maturity Lock's value will be set to 18 as default.
Child Lock: If this option is set to ON, the TV can only be controlled by the remote control. In this case the control buttons on the TV will not work.
Internet Lock: If this option is set to ON, the open browser application in the portal will be disabled. Set to OFF to release the application again.
Set PIN: Defines a new PIN number.
Default CICAM PIN: This option will appear as greyed out if no CI module is inserted into the CI slot of the TV. You can change the default PIN of the CI CAM using this option.
TV PIN(*): By enabling or disabling this option you can allow or restrict some M7 operator channels to send PIN queries. These PIN queries provide an access control mechanism for related channels. If this option is set as On, the channels which send PIN queries can not be accessed without entering the right PIN first.
(*) This menu option will only be available if an M7 operator installation is performed.
Note: Default PIN can be set to 0000 or 1234. If you have defined the PIN(is requested depending on the country selection) during the First Time Installation use the PIN that you have defined.
Some options may not be available depending on the model and/or on the country selection in the First Time Installation.
Electronic Programme Guide (EPG)
Some channels send information about their broadcast schedules. Press the Epg button to view the Programme Guide menu.
There are 3 different types of schedule layouts available, Timeline Schedule, List Schedule and Now/Next Schedule. To switch between them follow the instructions on the bottom of the screen.
Timeline Schedule
Zoom (Yellow button): Press the Yellow button to see events in a wider time interval.
Filter (Blue button): Views filtering options.
Select Genre (Subtitles button): Displays Select Genre menu. Using this feature, you can search the programme guide database in accordance with the genre. Info available in the programme guide will be searched and results matching your criteria will be highlighted.
Options (OK button): Displays event options.
Event Details (Info button): Displays detailed information about selected events.
Next/Prev Day (Programme +/- buttons): Displays the events of previous or next day.
Search (Text button): Displays Guide Search menu. Now (Swap button): Displays current event of the highlighted channel.
List Schedule(\*)
(*) In this layout option, only the events of the highlighted channel will be listed.
Prev. Time Slice (Red button): Displays the events of previous time slice.
Next/Prev Day (Programme +/- buttons): Displays the events of previous or next day.
Event Details (Info button): Displays detailed information about selected events.
Filter (Text button): Views filtering options.
Next Time Slice (Green button): Displays the events of next time slice.
Options (OK button): Displays event options.
Now/Next Schedule
Navigate (Directional buttons): Press the Directional buttons to navigate through the channels and events.
Options (OK button): Displays event options.
Event Details (Info button): Displays detailed information about selected events.
Filter (Blue button): Views filtering options.
Event Options
Use the directional buttons to highlight an event and press OK button to display Event Options menu. The following options are available.
Select Channel: Using this option, you can switch to the selected channel.
Set Timer on Event / Delete Timer on Event: After you have selected an event in the EPG menu, press the OK button. Select Set Timer on Event option and press the OK button. You can set a timer for future events. To cancel an already set timer, highlight that event and press the OK button. Then select Delete Timer on Event option. The timer will be cancelled.
Notes: You cannot switch to any other channel or source while there is an active timer on the current channel.
It is not possible to set timer for two or more individual events at the same time interval.
Teletext Services
Press the Text button to enter. Press again to activate mix mode, which allows you to see the teletext page and the TV broadcast at the same time. Press once more to exit. If available, sections in the teletext pages will become colour-coded and can be selected by pressing the coloured buttons. Follow the instructions displayed on the screen.
Software Upgrade
Your TV is capable of finding and updating the firmware automatically via the broadcast signal or via Internet.
Software upgrade search via user interface
On the main menu select System>Settings and then More. Navigate to Software upgrade and press the OK button. In Upgrade options menu select Scan for upgrade and press OK button to check for a new software upgrade.
If a new upgrade is found, it starts to download the upgrade. After the download is completed confirm the question asking about rebooting the TV by pressing the OK to continue with the reboot operation.
3 AM search and upgrade mode
Your TV will search for new upgrades at 3:00 o'clock if Automatic scanning option in the Upgrade options menu is set to Enabled and if the TV is connected to an aerial signal or to Internet. If a new software is found and downloaded successfully, it will be installed at the next power on.
Note: Do not unplug the power cord while led is blinking during the reboot process. If the TV fails to come on after the upgrade, unplug, wait for two minutes then plug it back in.
Troubleshooting & Tips
Tv will not turn on
Make sure the power cord is plugged in securely to wall outlet. Check if batteries are exhausted. Press the Power button on the TV.
Poor picture
- Check if you have selected the correct TV system.
- Low signal level can cause picture distortion. Please check antenna access.
- Check if you have entered the correct channel frequency if you have done manual tuning.
- The picture quality may degrade when two devices are connected to the TV at the same time. In such a case, disconnect one of the devices.
No picture
- This means your TV is not receiving any transmission. Make sure the correct source has been selected.
• Is the antenna connected properly?
• Is the antenna cable damaged? - Are suitable plugs used to connect the antenna?
- If you are in doubt, consult your dealer.
No sound
- Check if the TV is muted. Press the Mute button or increase the volume to check.
- Sound may be coming from only one speaker. Check the balance settings from Sound menu.
Remote control - no operation
- The batteries may be exhausted. Replace the batteries.
Input sources - can not be selected
- If you cannot select an input source, it is possible that no device is connected. If not;
- Check the AV cables and connections if you are trying to switch to the input source dedicated to the connected device.
PC Input Typical Display Modes
The following table is an illustration of some of the typical video display modes. Your TV may not support all resolutions.
| Index | Resolution Frequency |
| 1 | x480 60Hz |
| 2 | x480 75Hz |
| 3 | x600 56Hz |
| 4 | x600 60Hz |
| 5 | x600 72Hz |
| 6 | x600 75Hz |
| 7 | 4x768 60Hz |
| 8 | 4x768 70Hz |
| 9 | 4x768 75Hz |
| 10 | 52x864 75Hz |
| 11 | 30x768 60Hz |
| 12 | 60x768 60Hz |
| 13 | 30x960 60Hz |
| 14 | 30x1024 60Hz |
| 15 | 30x1024 75Hz |
| 16 | 00x1050 60Hz |
| 17 | 40x900 60Hz |
| 18 | 40x900 75Hz |
| 19 | 20x1080 60Hz |
AV and HDMI Signal Compatibility
| Source Supported Signals Available | |||
| Back AV | PAL O | ||
| SECAM | O | ||
| NTSC4.43 | O | ||
| NTSC3.58 | O | ||
| YPbPr | 480i, 480p | 60Hz | O |
| 576i, 576p | 50Hz | O | |
| 720p | 50Hz,60Hz | O | |
| 1080i | 50Hz,60Hz | O | |
| HDMI | 480i, 480p | 60Hz | O |
| 576i, 576p | 50Hz | O | |
| 720p | 50Hz,60Hz | O | |
| 1080i | 50Hz,60Hz | O | |
| 1080p | 24Hz, 25Hz, 30Hz, 50Hz, 60Hz | O | |
(X: Not Available, O: Available)
In some cases a signal on the TV may not be displayed properly. The problem may be an inconsistency with standards from the source equipment (DVD, Set-top box, etc.). If you do experience such a problem please contact your dealer and also the manufacturer of the source equipment.
Supported Video File Formats for USB Mode
| Extension Video Codec Max. Resolution & Frame Rate & Bit Rate | ||
| .mpg, .mpeg, .dat, .vob | MPEG1/2, H.264, VC1 | H.264: 1080Px2@30fps - 50Mbps, 1080P@60fps - 50Mbps Other: 1080P@60fps - 50Mbps |
| .ts, .trp, .m2ts | ||
| .avi MPEG1/2, MPEG4, H.264, MJPEG | ||
| .mp4, .m4a, .m4v, .mov, .qt, .3gp, .3g2, .3gpp | MPEG1/2, H.263, MPEG4, H.264 | |
| .mkv MPEG 1/2, MPEG4, H.264 | ||
| .flv Sorenson Sp, MPEG4, H.264 | ||
| .ogm, .ogg MPEG1/2, MPEG4 | ||
| .asf, .wmv MPEG4, WMV3, VC1 | ||
| .rm, .rmvb RV30, RV40 | ||
| .webm VP9, VP8 | ||
| .mp4, .mov, .3gpp, .3gp, MPEG transport stream, .ts,.trp, .tp, .mkv | HEVC/H.265 | |
Supported Picture File Formats for USB Mode
| Extension Specification | Resolution (width x height) | |
| .jpg, .jpeg | Baseline 8192 x 8192 | |
| Progressive 3000 x 3000 | ||
| .bmp | RGB 1/4/8/16/24/32 bit | 8192 x 8192 |
| RLE 4/8 bit | ||
| .gif | 87a | |
| 89a (Only 1 picture at animation format) | ||
| .png | Grayscale, 24/32 bit per pixel | |
| Interlace format | ||
| Progressive | ||
| .tiff, .tif Tagged image file format | ||
| .webp | Lossy compression VP8 key frame version number support 0~3 | |
| Lossless compression | ||
Supported Audio File Formats for USB Mode
| Extension Format | |
| .mp3 .mp3 | |
| .ac3 | .ac3 |
| .aac | .AAC |
| .wma | .WMA |
| .amr | .AMR-NB, .AMR-WB |
| .wav | . MPEG La, .AAC, .PCM |
| .flac | . FLAC |
External Subtitles
| Extension Specification | |
| .ssa SubStation Alpha | |
| .ass Advanced SubStation Alpha | |
| .srt Subripper | |
| .sub Micro DVD / SubViewer | |
| .sub + .idx VOBSub | |
| .txt Micro DVD / TMPlayer / MPL2 | |
| .mpl MPL2 | |
| .smi Sami | |
| .jss JACOSUB | |
| .ttml TTML | |
| .txt / .sub DVDSUBTITLE | |
| .lrc - |
Internal Subtitles
| Extension | Specification |
| .mkv VOBSub | |
| .mkv ASS / SSA / TEXT | |
| .dat, .mpg, .mpeg, .vob DVD | Subtitle |
| .mp4 DVD Subtitle, TEXT |
Supported DVI Resolutions
When connecting devices to your TV's connectors by using DVI converter cable(DVI to HDMI cable - not supplied), you can refer to the following resolution information.
| 56Hz 60Hz 66Hz 70Hz 72Hz 75Hz | ||||||
| 640x400 | ☑ | |||||
| 640x480 | ☑ ☑ | ☑ ☑ | ||||
| 800x600 | ☑ ☑ | ☑ ☑ ☑ | ||||
| 832x624 | ☑ | |||||
| 1024x768 | ☑ ☑ | ☑ ☑ ☑ | ||||
| 1152x864 | ☑ ☑ | ☑ | ||||
| 1152x870 | ☑ | |||||
| 1280x768 | ☑ | ☑ | ||||
| 1360x768 | ☑ | |||||
| 1280x960 | ☑ | ☑ | ||||
| 1280x1024 | ☑ | ☑ | ||||
| 1400x1050 | ☑ | ☑ | ||||
| 1440x900 | ☑ | ☑ | ||||
| 1600x1200 | ☑ | |||||
| 1680x1050 | ☑ | |||||
| 1920x1080 | ☑ | |||||
Connectivity
Wired Connectivity
To Connect to a Wired Network
- You must have a modem/router connected to an active broadband connection.
- Connect your TV to your modem/router via an ethernet cable. There is a LAN port at the rear (back) of your TV.

LAN input on the rear side of the TV
To configure wired settings please refer to the Network/Internet Settings section in the System>Settings Menu.
- You might be able to connect your TV to your LAN depending on your network's configuration. In such a case, use an ethernet cable to connect your TV directly to the network wall outlet.

LAN input on the rear side of the TV
Configuring Wired Device Settings
Network Type
The Network Type can be selected as Wired Device, Wireless Device or Disabled, in accordance with the active connection to the TV set. Select this as Wired Device if you are connecting via an ethernet cable.
Internet Speed Test
Highlight Internet Speed Test and press the OK button. TV will check the internet connection bandwidth and display the result when complete.
Advanced Settings
Highlight Advanced Settings and press the OK button. On the next screen you can change the IP and DNS settings of the TV. Highlight the desired one and press Left or Right button to change the setting from Automatic to Manual. Now you can enter the Manual IP and / or Manual DNS values. Select the related item in the drop down menu and enter the new values using the numeric buttons of the remote. Press the OK button to save settings when complete.
Wireless Connectivity
To Connect to a Wireless Network
The TV cannot connect to the networks with a hidden SSID. To make your modem's SSID visible, you should change your SSID settings via the modem's software.
To Connect to a wireless LAN, you should perform the following steps:
- To configure your wireless settings please refer to the Network/Internet Settings section in the System>Settings Menu.

A Wireless-N router (IEEE 802.11a/b/g/n) with simultaneous 2.4 and 5 GHz bands is designed to increase bandwidth. These are optimized for smoother and faster HD video streaming, file transfers and wireless gaming.
- The frequency and channel differ depending on the area.
- The transmission speed differs depending on the distance and number of obstructions between the transmission products, the configuration of these products, the radio wave conditions, the line traffic and the products that you use. The transmission may also be cut off or may get disconnected depending on the radio wave conditions, DECT phones or any other WiFi 11b appliances. The standard values of the transmission speed are the theoretical maximum values for the wireless standards. They are not the actual speeds of data transmission.
-
The location where the transmission is most effective differs depending on the usage environment.
-
The Wireless feature of the TV supports 802.11 a,b,g & n type modems. It is highly recommended that you should use the IEEE 802.11n communication protocol in order to avoid any possible problems while watching videos.
- You must change your modem's SSID when there are any other modems around with the same SSID. You can encounter connection problems otherwise. Use a wired connection if you experience problems with a wireless connection.
Configuring Wireless Device Settings
Open the Network/Internet Settings menu and select Network Type as Wireless Device to start connection process.
The TV will scan the wireless networks automatically. A list of available networks will be displayed. Please select your desired network from the list.
Note: If the modem supports N mode, you should set N mode settings.
If the selected network is protected with a password, please enter the correct key by using the virtual keyboard. You can use this keyboard via the directional buttons and the OK button on the remote control.
Wait until the IP address is shown on the screen.
This means that the connection is now established. To disconnect from a wireless network, highlight Network Type and press Left or Right buttons to set as Disabled.
Highlight Internet Speed Test and press the OK button to check your internet connection speed. Highlight Advanced Settings and press the OK button to open the advanced setting menu. Use directional and numeric buttons to set. Press the OK button to save settings when complete.
Other Information
The status of the connection will be displayed as Connected or Not Connected and the current IP address, if a connection is established.
Connecting to your mobile device via WiFi
- If your mobile device has WiFi feature, you can connect it to your TV via a router, in order to access the content in your device. For this, your mobile device must have an appropriate sharing software.
- Connect to your router following the steps stated above in the Wireless Connectivity section.
- Afterwards, engage your mobile device with the router and then activate the sharing software on your mobile device. Then, select files that you want to share with your TV.
-
If the connection is established correctly, you will be able to access the shared files from your mobile device via the Media Browser of your TV.
-
Enter the Media Browser menu and the playback device selection OSD will be displayed. Select your mobile device and press the OK button to continue.
- If available, you can download a virtual remote controller application from the server of your mobile device application provider.
Note: This feature may not be supported on all mobile devices.
Wake ON
Wake-on-LAN (WoL) and Wake-on-Wireless LAN (WoWLAN) are standards that allow a device to be turned on or woken up by a network message. The message is sent to the device by a program executed on a remote device connected to the same local area network, such as a smartphone.
Your TV is WoL and WoWLAN compatible. To enable this feature set the Wake On option in the Network/Internet Settings menu as On. It is necessary that both the device, from which the network message will be sent to the TV, and the TV are connected to the same network. Wake On feature is only supported for Android OS devices and can only be used via YouTube and Netflix applications.
In order to use this feature the TV and the remote device should be connected at least once while the TV is on. If the TV is powered off, the connection should be reestablished, the next time it is switched on. Otherwise this feature will be unavailable. This does not apply, when the TV is switched into the standby mode.
The performance of some devices in the market, may vary due to the software architecture. In order to use Wake On feature with a better performance, please make sure that your device has latest firmware version.
Wireless Display
Wireless Display is a standard for streaming video and sound content by Wi-Fi Alliance. This feature provides the ability to use your TV as wireless display device.
Using with mobile devices
There are different standards which enable sharing of screens including graphical, video and audio content between your mobile device and TV.
Plug the wireless USB dongle to TV first, if the TV doesn't have internal WiFi feature.
Then press the Source button on the remote and switch to Wireless Display source.
A screen appears stating that the TV is ready for connection.
Open the sharing application on your mobile device. These applications are named differently for each brand, please refer to the instruction manual of your mobile device for detailed information.
Scan for devices. After you select your TV and connect, the screen of your device will be displayed on your TV.
Note: This feature can be used only if the mobile device supports this feature. If you experience problems with the connection check if the operating system version you use supports this feature. There may be incompatibility problems with the operating system versions which are released after the production of this TV. Scanning and connecting processes differ according to the programme you use.
Connecting Other Wireless Devices
Your TV supports another short range wireless connection technology too. A pairing is required before using these kind of wireless devices with the TV set. You should do the followings to pair your device with the TV:
- Set the device to pairing mode
- Start device discovery on the TV
Note: Refer to the user manual of the wireless device to learn how to set the device to pairing mode.
You can connect audio devices or remote controllers wirelessly to your TV. Unplug or switch off any other connected audio device in order for wireless connection feature to work correctly. For audio devices you should use the Audio Link option in the System>Sound menu, for remote controllers the Smart Remote option in the System>Settings>More menu. Select the menu option and press the OK button to open the related menu. Using this menu you can discover and connect the devices that use the same wireless technology and start to use them. Follow the on-screen instructions. Start the device discovery. A list of available wireless devices will be displayed. Select the device you want to connect from the list and press the OK button to connect. If "Device connected" message is displayed, the connection is successfully established. If the connection fails try it again.
Note: Wireless devices may operate within the same radio frequency range and may interfere with one another. To improve the performance of your wireless device place it at least 1 meter away from any other wireless devices.
Connectivity Troubleshooting
Wireless Network Not Available
- Ensure that any firewalls of your network allow the TV wireless connection.
- Try searching for wireless networks again, using the Network/Internet Settings menu screen.
If the wireless network does not function properly, try using the wired network in your home. Refer to the Wired Connectivity section for more information on the process.
If the TV does not function using the wired connection, check the modem (router). If the router does not have a problem, check the internet connection of your modem.
Connection is Slow
See the instruction book of your wireless modem to get information on the internal service area, connection speed, signal quality and other settings. You need to have a high speed connection for your modem.
Disruption during playback or slow reactions
You could try the following in such a case:
Keep at least three meters distance from microwave ovens, mobile telephones, bluetooth devices or any other Wi-Fi compatible devices. Try changing the active channel on the WLAN router.
Internet Connection Not Available / Audio Video Sharing Not Working
If the MAC address (a unique identifier number) of your PC or modem has been permanently registered, it is possible that your TV might not connect to the internet. In such a case, the MAC address is authenticated each time when you connect to the internet. This is a precaution against unauthorized access. Since your TV has its own MAC address, your internet service provider cannot validate the MAC address of your TV. For this reason, your TV cannot connect to the internet. Contact your internet service provider and request information on how to connect a different device, such as your TV, to the internet.
It is also possible that the connection may not be available due to a firewall problem. If you think this causes your problem, contact your internet service provider. A firewall might be the reason of a connectivity and discovery problem while using the TV in Audio Video Sharing mode or while browsing via Audio Video Sharing feature.
Invalid Domain
Ensure that you have already logged on to your PC with an authorized username/password and also ensure that your domain is active, prior to sharing any files in your media server program on your PC. If the domain is invalid, this might cause problems while browsing files in Audio Video Sharing mode.
Using Audio Video Sharing Network Service
Audio Video Sharing feature uses a standard that eases the viewing process of digital electronics and makes them more convenient to use on a home network.
This standard allows you to view and play photos, music and videos stored in the media server connected to your home network.
1. Server Software Installation
The Audio Video Sharing feature cannot be used if the server programme is not installed onto your PC or if the required media server software is not installed onto the companion device. Please prepare your PC with a proper server programme.
2. Connect to a Wired or Wireless Network
See the Wired/Wireless Connectivity chapters for detailed configuration information.
3. Play Shared Files via Media Browser
Select Media Browser by using the directional buttons from the main menu and press OK. The media browser will then be displayed.
Audio Video Sharing
Select the desired media type on the main media browser menu and press OK. If sharing configurations are set properly, Device Selection screen will be displayed after selecting the desired media type. If available networks are found, they will be listed on this screen. Select media server or network that you want to connect to using the Up or Down buttons and press OK. If you want to refresh the device list, press the Green button. You can press Menu to exit.
If you select the media type as Videos and choose a device from the selection menu. Then select the folder with video files in it on the next screen and all the available video files will be listed.
To play other media types from this screen, you can go back to main Media Browser screen and select the media type as desired and then perform the network selection again. Or press the Blue button to switch to next media type quickly without changing the network. Refer to the Media Browser menu section for further information on file playback.
If a problem occurs with the network, please switch your television off at the wall socket and back on again. Trick mode and jump are not supported with the Audio Video Sharing feature.
PC/HDD/Media Player or any other devices that are compatible should be used with a wired connection for higher playback quality.
Use a LAN connection for quicker file sharing between other devices like computers.
Note: There may be some PC's which may not be able to utilize the Audio Video Sharing feature due to administrator and security settings (such as business PC's).
Internet Portal
HINT: A broadband internet connection is required for high quality viewing. You must set the country option accordingly in the First Time Installation for proper operation of the internet portal.
Portal feature adds your TV a feature that allows you to connect a server on the Internet and view the content provided by this server over your Internet connection. Portal feature allows you to view the music, video, clip or web content with defined short-cuts. Whether you can view this content without interruption depends on the connection speed provided by your internet service provider.
Press the Internet button on your remote control to open internet portal page. You will see icons of the available applications and services on the portal screen. Use the directional buttons on your remote to select the desired one. You may view the desired content by pressing OK after selecting. Press Back/Return button to return back to the previous screen.
Moreover, you can access some features using the short-cut feature defined for the coloured or numeric buttons of your remote.
Press the Exit button to quit the Internet portal mode.
PIP Window (depending on portal service)
Current source content will be displayed in the PIP window, if you switch to portal mode while on any active source.
If you switch to portal mode while watching TV channels, current programme will be displayed in the PIP window.
Notes:
Possible application dependent problems may be caused by the content service provider.
Portal service content and the interface may be changed at any time without prior notice.
Third party internet services may change, be discontinued or restricted at any time.
Internet Browser
To use the internet browser, enter the portal first. Then launch the Internet application on the portal.
(*) The appearance of the internet browser logo may change In the initial screen of the browser, the thumbnails of the predefined (if any) links to web sites available will be displayed as Speed Dial options along with the Edit Speed Dial and the Add to Speed Dial options.
To navigate the web browser, use the directional buttons on the remote or a connected mouse. To see the browser options bar, move the cursor to the top of the page or press the Back/Return button. History, Tabs and Bookmarks options and the browser bar which contains previous/next buttons, the refresh button, the adress/search bar, the Speed Dial and the Opera buttons are available.
To add a desired website to the Speed Dial list for quick access, move the cursor to the top of the page or press the Back/Return button. The browser bar will appear. Highlight the Speed Dial - button and press the OK button. Then select Add to Speed Dial option and press the OK button. Fill in the blanks for Name and Address, highlight OK and press the OK button to add. Whilst you are on the site you wish to add to the Speed Dial list, highlight the Opera-0 button and press the OK button. Then highlight Add to Speed Dial option in the submenu and press the OK button again. Name and Address will be filled automatically according to the site you are visiting. Highlight OK and press the OK button to add.
You can also use the Opera menu options to manage the browser. Highlight the Opera- button and press the OK button to see available page specific and general options.
There are various ways to search or visit websites using the web browser.
Enter the address of a website(URL) into the search/address bar and highlight the Submit button on the virtual keyboard and press the OK button to visit the site.
Enter keyword/s into the search/address bar and highlight the Submit button on the virtual keyboard and press the OK button to start a search for the related websites.
Highlight a Speed Dial thumbnail and press the OK button to visit the related website.
Your TV is compatible with USB mice. Plug your mouse or wireless mouse adaptor into the USB input of your TV for easier and quicker navigation.
Some web pages include flash content. These are not supported by the browser.
Your TV does not support any download processes from the internet via the browser.
All sites on the internet might not be supported. According to the site; content problems may occur. In some circumstances video contents might not be able to be played.
HBBTV System
HbbTV (Hybrid Broadcast Broadband TV) is a new industry standard that seamlessly combines TV services delivered via broadcast with services delivered via broadband and also enables access to Internet only services for consumers using connected TVs and set-top boxes. Services delivered through HbbTV include traditional broadcast TV channels, catch-up services, video-on-demand, EPG, interactive advertising, personalisation, voting, games, social networking and other multimedia applications.
HbbTV applications are available on channels where they are signalled by the broadcaster (currently various channels on Astra broadcast HbbTV applications). The broadcaster marks one application as "autostart" and this one is started by the platform automatically. The autostart applications are generally launched with a small red button icon to notify the user that there is an HbbTV application on that channel. Press the red button to open the application page. After the page is displayed you can go back to the initial red button icon state by pressing the red button again. You can toggle between the red button icon mode and full UI mode of the application via pressing red button. It should be noted that the red button switching capability is provided by the application and some application may behave differently.
If you switch to another channel while an HbbTV application is active (either in red button icon mode or full UI mode), the following scenarios can occur.
• The application can continue running.
• The application can be terminated.
- The application can be terminated and another autostart red button application can be launched.
HbbTV allows the applications to be retrieved both from broadband or broadcast. The broadcaster may enable both ways or one of them. If the platform does not have an operational broadband connection, the platform can still launch applications transmitted on broadcast.
The autostart red button applications generally provide links to other applications. An example of this is shown below. The user then can switch to other applications by using the links provided. The applications should provide a way to terminate themselves, usually Exit button is used for this.

Figure b: EPG application, broadcast video is shown on the left bottom, can be terminated by pressing 0.
HbbTV applications use keys on the remote control to interact with the user. When an HbbTV application is launched, the control of some keys are owned by the application. For example, numeric channel selection may not work on a teletext application where the numbers indicate teletext pages.
HbbTV requires AV streaming capability for the platform. There are numerous applications providing VOD (video on demand) and catch-up TV services. The user can use play, pause, stop, forward, and rewind keys on the remote control to interact with the AV content.
Note: You can enable or disable this feature from the More menu in System>Settings menu.
Tartalomjegyzék
natural_image
Diagram of a battery cell with internal conduction and charge carriers, no text or symbols present| A | Product Fiche | ||
| B | Commercial Brand:HYUNDAI(HP TRONIC) | ||
| C | Product No. | 10116119 | |
| D | Model No. | FLR32TS511SMART | |
| E | Energy efficiency class | A+ | |
| F | Visible screen size (diagonal,approx.) (inch/cm) | 32 inches | 81 cm |
| G | On mode average power consumption (Watt) | 31 | |
| H | Annual energy consumption (kWh/annum) | 45 | |
| I | Standby power consumption (Watt) | 0,5 | |
| J | Off mode power consumption (Watt) | 0 | |
| K | Display resolution (px) | 1920x1080 | |
| A | B | C | D | E | F | Visible screen size(diagonal, approx.) (inch/cm) | |
| English | Product Fiche Commercial Brand Product No | Model No. Energy efficiency class | |||||
| Deutsch | Produkt-Datenblatt | Markenzeichen | Produkt-Nr. | Modell-Nr. | Energieeffizienzklasse | Sichtbare Bildschirmgröße(diagonal,ca.) (Zoll /cm) | |
| العربية | العربية الحرفية | العربية الحرفية | العربية الحرفية | العربية الحرفية | العربية الحرفية | العربية الحرفية | العربية الحرفية |
| Български | Справочен лист с техническите данни | Търговска марка | Продукт No | Модел No | Клас на енергийна ефективност | Видим размер на экрана(диагонал,прибл.) (инча /см ) | |
| čeština | Produktový list | Značka výrobce | Čísло produktu | Model č. | Energetická třída | Viditelná velikost obrazovky(uhlopička,přibl.(palců /cm) | |
| Dansk | Produktoplysningsskema | Varemærke | Produktnr. | Model nr. | Energieffektivitetsklasse | Synlig skærmistørreise (diagonalt,ca.) (HK/cm) | |
| Suomi | Tuote fiche | Kaupallinen merkki | Tuote nro. | Malli nro. | Virran tehokkuusluokka | Nakyván kuvaruudun koko(diagonaalinen,n.) (tuumaa/cm) | |
| Français | Fiche du produit | Marque commerciale | Produit N° | Modèle N° | Classe d'efficacité énergétique | Taille d'ecran visibile (diagonale,approx.) (pouces/cm) | |
| Hrvatski | SAŽETAK PROIZVODA | Trgovačka marka | Br. proizvoda | Br. modela | Klasa energetske učinkovitosti | Vidljiva velicina ekrana(dijagonalna,približno) (inča/cm) | |
| Nederlands | Productfiche | Commercieel merk. | Productnr. | Modelnr. | Energie efficiëntie klasse | Zichtbare schermigrootte(diagonaal,ca.) (inches/cm) | |
| Español | Ficha del Producto | Marca Comercial | N° de Producto | N° de Modelo | Clasificación Energética | Tamaño de pantalla visible(diagonal,aprox.) (pulgadas/cm) | |
| Svenska | Produktspecifikation | Varumärke | Produktnr. | Modellnr. | Energiklass | Synlig skærmistoriek(diagonal,ungefärlig) (tum/cm) | |
| Italiano | Scheda prodotto | Marchio commerciale | Numero prodotto | Numero modello | Classe di efficienza energetica | Dimensioni visibili dello schermo(diagonale,circa)(pollici/cm) | |
| Polski | KARTA PRODUKTU Marka produktu Nr produktu Nr modelu | Klasa efektywności energetycznej | Widoczny obraza ekranu(przekątna,okolo)(cali/cm) | ||||
| Magyar | Termékismertető adatlap | Kereskedelmi márka | Termékszám | Modellszám | Energiahatékonysági osztály | Latható képtartomány (diagonális,kb.) (inches/cm) | |
| Norsk | Produktinformasjon | Kommersiell merkevare | Produkt nr. | Modell nr. | Energieffektivitet klasse | Synlig skjermistørreise (diagonal, ca.) (tommer/cm) | |
| Português | Ficha do produto | Marca Comercial | Produto N° | Modelo N° | Classificação eficiência energética | Tamanho ecrà visível (diagonal, aprox.) (polegadas/cm) | |
| Română | Fişă produs | Marcă comercială | Nr. Produs | Nr. Model | Clasa de eficiență energetică | Dimenistunea ecranului vizibil(diagonală, aprox.) (inch/cm) | |
| Русский | Справочный листок технических данных изделия | Торговая марка | Номер изделия | Номер модели | Класс энергопотребления | Видимый размер экрана (по диагонали, приблизительно)(дюймов/см) | |
| беларуская | Справочный листок технических данных изделия | Торговая марка | Номер изделия | Номер модели | Класс энергопотребления | Видимый размер экрана (по диагонали,Около)(дюймов/см ) | |
| македонски | Технички податоци | Комерцијална марка | Производ бр. | Модел бр. | Класа на енергетска ефикасност | Големина на видлив екран(дијагонала, окопу) (инчи/cm) | |
| український | Технічні дані | Кормеційна марка | Артикул | Модель | Клас енергоспоживання | Видимий розмір екрана (диагональ, Приблизно) (дюймів/см) | |
| Srpski | Tehničke odlike | Komercijalna marka | Proizvod br. | Model br. | Klasa energetske efikasnosti | Veličina vidljivog ekrana (dijagonala, tokom) (inča/cm) | |
| Slovenčina | Produktový list | Značka výrobcu | Čísло produktu | Model č. | Energetická trieda | Viditelná verkost obrazovky(uhloprička,zhruba) (palcov/cm) | |
| Slovenščina | Opis izdelka | Komercialna znamka | Št. Izdelka | Št. Modela | Razred energetske učinkovitosti | Vidna velikost zaslona (diagonala, pribl.) (palcev/cm) | |
| Елляник | Делтіо проїєю тос | Еупторіко огіма | Ар. Проїєю тос | Ар. Монтелов | Каттуорія евергекаків апобосты | Орато мегубос одовіг (діогушіюς,тер.) (інтіс/см) | |
| Bosanski | Техніčki podaci | Komercijalna marka | Produkt br. | Model br. | Klasa energetske efikasnosti | Vidljiva veličina ekrana (diagonala, približno.) (incá/cm) | |
| لاويки | لاويки علیزی | لاويки علیزی | لاويки علیزی | لاويки علیزی | لاويки علیزی علیزی | (о/уди)(діоги,діоги) (то) топ тип | |
| Türkçe | Ürün fişi | Ticari Marka | Ürün No. | Model No. | Enerji verimliliği sınıfı | Gorulien ekran boyutu (çapraz, yakışk.) (inch/cm) | |
| Shqip | Tě dhēnat e produktit | Marka tregtare | Nr. i produktit. | Nr. i modelit. | Klasa e eficiencès sè energjisë | Madhësla e ekranit té dukshëm (diagonal, afërsisht) (inch/cm) | |
| Lietuvių | Gaminio etiketė | Gamintojas | Gaminio Nr. | Modelio Nr. | Energetinio efektyvumo klasė | Matomas ekran odydis (jstrizainė,approx.) (colių/cm) | |
| Latviešu | Produkta apraksts | Marka | Produkta nr. | Modeja nr. | Energoefektivitätes klase | Ekran aizmers (pa diognali, apnçram) (collas/cm) | |
| Eesti | TOOTEKIRJELDUS | Tootja firma | Toote nr. | Mudeli nr. | Energiaklass | Vaadatava ekraani suurus (diagonaal, umbes) (tolli/cm) | |
| فازمی | مشخصات محصول | مارک تجاری | 朦داره محصول | 朦داره منل | گروه کارابی اترزی | (شامز صنعت کاول مطاده (هندستی، تغیری) (بین) (س lanternی متر) | |
| G | H | I | J | K | ||||||
| English | On mode average power consumption (Watt) | Annual energy consumption (kWh/annum) | Standby power consumption (Watt) | Off mode power consumption (Watt) | Display resolution (px) | |||||
| Deutsch | Durchschnittlicher Stromverbrauch im eingeschaltetem Zustand (Watt) | Jährlicher Energieverbrauch (kWh/Jahr) Standby-Stromverbrauch | (Watt) | Stromverbrauch im ausgeschaltetem Zustand (Watt) Display-Auflösung (px) | ||||||
| عربية | متوسط استهلاك الطاقة عند التغير (فروط) | (استهلاك السنوي ل typالاكويل واملاستampaة) | (استهلاك الطاقة في wrροσ الامstdاند) (فروط) | (استهلاك الطاقة في wrροσ الإيغق) (فروط) | (وροσ χων χων χων χων χων χων χων χων χων χων χων χων χων χων χων χων χων χων χων χων χων χων χων χων χων χω ν χων χων χων χων χων χων χων χων χων χων χων χων χων χων χων χων χων χων χων χων χων χων χων χων χως χων χων χων χων χων χων χων χων χων χων χων χων χων χων χων χων χων χων χων χων χων χων χων χων χωκ χων χων χων χων χων χων χων χων χων χων χων χων χων χων χων χων χων χων χων χων χων χων χων χων χωυ χων χων χων χων χων χων χων χων χων χων χων χων χων χων χων χων χων χων χων χων χων χων χων χων χωύ χων χων χων χων χων χων χων χων χων χων χων χων χων χων χων χων χων χων χων χων χων χων χων χων χωι χων χων χων χων χων χων χων χων χων χων χων χων χων χων χων χων χων χων χων χων χων χων χων χων χωί χων χων χων χων χων χων χων χων χων χων χων χων χων χων χων χων χων χων χων χων χων χων χων χων χωα χων χων χων χων χων χων χων χων χων χων χων χων χων χων χων χων χων χων χων χων χων χων χων χων χωγ χων χων χων χων χων χων χων χων χων χων χων χων χων χων χων χων χων χων χων χων χων χων χων χων χωο χων χων χων χων χων χων χων χων χων χων χων χων χων χων χων χων χων χων χων χων χων χων χων χων χω | (الله) | ||||
| Български | Средна консумация на електроенергия във включено състояние(Watt) | Годишна консумация на електроенергия (kWh/Годишна) | Консумация на електроенергия в режим на готовност (Watt) | Консумация на електроенергия в изключено състояние (Watt) | Разделителна способност на дисплея(пиксела) | |||||
| čeština | Pruměrná spotřeba elektrické energie v zapnutém režimu (Watt) | Roční spotřeba energie (kWh/Roční) | Spotřeba elektrické energie v pohovostním režimu (Watt) | Spotřeba elektrické energie ve vypnutém režimu (Watt) Rozlišení disp | Резолуция заслona (piksela) | |||||
| Dansk | Gennemsnitligt stromforbrug i taend tilstand (Watt) | Ärligt energiforbrug (kWh/Ärligt) | Strømforbrug (standby)(Watt) | Strømforbrug i slukket tilstand (Watt) | Skærmoplopsning (px) | |||||
| Suomi | Päällä-tilan keskimääräinen virrankulutus (Wattia) | Vuosittainen sähkönkulutu (kWh/Vuosittainen) | Vakovirran kulutus (Wattia) | Pois-tilan virrankulutus (Wattia) | Näytön erottelukyky (pikselia) | |||||
| Français | Consommation énergétique moyenne en mode "marche" (Watt) | Consommation énergétique annuelle (kWh/annuel) | Consommation d'énergie en veille (Watt) | Consommation d'énergie en mode "arrê!" (Watt) | Résolution de l'écran (px) | |||||
| Hrvatski | Prosječna potrošnja el. energije kada je proizvod uključen (Watta) | Godišnja potrošnja el. Energije (kWh/Godišnja) | Potrošnja el. energije u modu pripravnosti (Watta) | Potrošnja el. energije kada je proizvod isključen (Watta) | Rezolucija zaslona (piksela) | |||||
| Nederlands | Aan-modus gemiddeld stroomverbruik (Watt) | Jaarlijks energieverbruik (kWh/Jaarlijks ) | Stand-by stroomverbruik (Watt) | Jit-modus stroomverbruik (Watt) | Schermresolutie (px) | |||||
| Español | Consumo eléctrico medio, en funcionamiento (Vatio) | Consumo eléctrico anual (kWh/anual) Consumo en modo en espera (Watio) | Consumo eléctrico modo apagado (Vatio) | Consumo eléctrico modo apagado (Vatio) | Resolución de pantalla (px) | |||||
| Svenska | Strömkonsumtion i PÄ-läge (Watt) | Energiokonsumtion per år (kWh/Arlig) | Strömkonsumtion i viloläge (Watt) | Strömkonsumtion i AV-läge (Watt) | Skärmupplösning (pixlar) | |||||
| Italiano | Consumo di corrente medio da accesa (Watt) | Consumo annuale di energia (kWh/annuo) | Consumo di corrente in modalità standby (Watt) | Consumo di corrente da spenta (Watt) | Risoluzione del display (px) | |||||
| Polski | Srednie zużycie energii w trybie wiączonym (Watów) | Roczne zużycie energii (kWh/Roczne) | Srednie zużycie energii w trybie oczekiwania (Watów) | Zużycie energii w trybie wyłączonym (Watów) | Rozdzielczość obrazu (pikseli) | |||||
| Magyar | Energiafogyasztás bekapcsolva hagyott üzemmódban (Watt) Éves energiafogyasztás | (kWh/Éves) | Energiafogyasztás standby üzemmódban (Watt) | Energiafogyasztás kikapcsolt üzemmódban (Watt) | Képernyőfelbontás (px) | |||||
| Norsk | Pámodus gjennomsnittlig strømforbruk (Watt) | Ärlig strømforbruk (kWh/Ärlig) | Hvilemodus strømforbruk (Watt) | Av-modus strømforbruk (Watt) | Skjermoplopsning (piksel) | |||||
| Português | Consumo energia em modo médio (Watt) | Consumo annual energia (kWh/anual) Consumo energia em stand-by (Watt) | Consumo energy em modo alimentação (Watt) | Consumo energy em modo alimentação (Watt) | Resolução do visor (pixel) | |||||
| Română | Consum electric mediu în modul pornit (Watt) | Consum anual de energie (kWh/anual) | Consum electric în stare de repaus (Watt) | Consum electric în modul oprit (Watt) | Rezoluția ecranului (pixel) | |||||
| Русский | Средний расход энергии в режиме включения (BAT) | Ежегодный расход энергии (kBT+Гот) | Расход энергии в режиме ожидания (BAT) | Расход энергии в режиме выключения (BAT) | Разрешение экрана пикселей) | |||||
| беларуская | Средний расход энергии в режиме включения (BAT) | Ежегодный расход энергии (kWh/Гадавое) | Расход энергии в режиме ожидания (BAT) | Расход энергии в режиме выключения (BAT) | Разрешение экрана пикселей) | |||||
| македонски | Просечна потрошувачка кога е включен | Годишна потрошувачка на енергија (kWh/Годишна) | Потрошувачка во мирување (BATи) | Потрошувачка кога е исклучен (BATи) | Резолуција на екран пиксели) | |||||
| український | Середня споживана потужність у робочому режимі (Вт) | Середньорична споживана потужність (kWh/Рчне) | Споживана потужність у режимі очікування (Вт) | Споживана потужність у вимкненому стані (Вт) | Роздільна здатність екрана пикселів) | |||||
| Srpski | Prosečna potrošnja kada je uključení (Vatt) | Godišnja potrošnja energije (kWh/Godišnja) | Potrošnja tokom mirovanja (Vatt) | Potrošnja kada je isključení (Vatt) | Rezolucija displeja (piks.) | |||||
| Slovenčina | Priemerná spotreba elektrickej energie v zapnutom režime (Wattov) | Ročná spotreba energie (kWh/Ročná) | Spotreba elektrickej energie v pohovostnom režime (Wattov) | Spotreba elektrickej energie vo vypnutom režime (Wattov) | Rezlišenie displeja (pixl.) | |||||
| Slovenščina | Poraba električne energije v povprečnem načinu (Wattov) | Letna poraba energije (kWh/Letna) | Poraba energije v stanju pripravljenosti (Wattov) | Poraba energije načinu izklopa (Wattov) | Resolucija zaslona (piks.) | |||||
| Еллэнvik | Місн катавалшон реціматох лютопру́йа (Watt) | Етіріона катавалшон евірүєйа (kWh/Eтіріона) | Катавалшон реціматох стіні авалові (Watt) | Катавалшон реціматох стіні авалові (Watt) | Аvvілуан обов’ян (Піл'єл.) | |||||
| Bosanski | Prosječna potrošnja kada je uključení (Watt) | Godišnja potrošnja energije (kWh/Godišnja) | Potrošnja tokom mirovanja (Watt) | Potrošnja kada je isključení (Watt) | Rezolucija ekranа (piks.) | |||||
| Түркçe | (ОКИЧУЗИЗ ПАЗЯ НУХИНА УЧИЗ НУХИЗ НУХИЗ НУХИЗ НУХИЗ НУХИЗ НУХИЗ НУХИЗ НУХИЗ НУХИЗ НУХИЗ НУХИЗ НУХИЗ НУХИЗ НУХИЗ НУХИЗ НУХИЗ НУХИЗ НУХИЗ НУХИЗ НУХИЗ НУЖИЗ НУЖИЗ НУЖИЗ НУЖИЗ НУЖИЗ НУЖИЗ НУЖИЗ НУЖИЗ НУЖИЗ НУЖИЗ НУЖИЗ НУЖИЗ НУЖИЗ НУЖИЗ НУЖИЗ НУЖИЗ НУЖИЗ НУЖИЗ НУЖИЗ НУЖИЗ НУХИЗ НУЖИЗ НУЖИЗ НУЖИЗ НУЖИЗ НУЖИЗ НУЖИЗ НУЖИЗ НУЖИЗ НУЖИЗ НУЖИЗ НУЖИЗ НУЖИЗ НУЖИЗ НУЖИЗ НУЖИЗ НУЖИЗ НУЖИЗ НУЖИЗ НУХИЗ НУХИЗ НУЖИЗ НУЖИЗ НУЖИЗ НУЖИЗ НУЖИЗ НУЖИЗ НУЖИЗ НУЖИЗ НУЖИЗ НУЖИЗ НУЖИЗ НУЖИЗ НУЖИЗ НУЖИЗ НУЖИЗ НУЖИЗ НУЖИЗ НУХИЗ НУЖИЗ НУХИЗ НУЖИЗ НУЖИЗ НУЖИЗ НУЖИЗ НУЖИЗ НУЖИЗ НУЖИЗ НУЖИЗ НУЖИЗ НУЖИЗ НУЖИЗ НУЖИЗ НУЖИЗ НУЖИЗ НУЖИЗ НУЖИЗ НУЖИЗ НУХИЗ НУХИЗ НУХИЗ НУЖИЗ НУЖИЗ НУЖИЗ НУЖИЗ НУЖИЗ НУЖИЗ НУЖИЗ НУЖИЗ НУЖИЗ НУЖИЗ НУЖИЗ НУЖИЗ НУЖИЗ НУЖИЗ НУЖИЗ НУЖИЗ НУХИЗ НУЖИЗ НУЖИЗ НУХИЗ НУЖИЗ НУЖИЗ НУЖИЗ НУЖИЗ НУЖИЗ НУЖИЗ НУЖИЗ НУЖИЗ НУЖИЗ НУЖИЗ НУЖИЗ НУЖИЗ НУЖИЗ НУЖИЗ НУЖИЗ НУЖИЗ НУХИЗ НУЖИЗ НУХИЗ НУХИЗ НУЖИЗ НУЖИЗ НУЖИЗ НУЖИЗ НУЖИЗ НУЖИЗ НУЖИЗ НУЖИЗ НУЖИЗ НУЖИЗ НУЖИЗ НУЖИЗ НУЖИЗ НУЖИЗ НУЖИЗ НУЖИЗ НУХИЗ НУХИЗ НУЖИЗ НУХИЗ НУЖИЗ НУЖИЗ НУЖИЗ НУЖИЗ НУЖИЗ НУЖИЗ НУЖИЗ НУЖИЗ НУЖИЗ НУЖИЗ НУЖИЗ НУЖИЗ НУЖИЗ НУЖИЗ НУЖИЗ НУЖИЗ НУХИЗ НУХИЗ НУХИЗ НУХИЗ НУЖИЗ НУЖИЗ НУЖИЗ НУЖИЗ НУЖИЗ НУЖИЗ НУЖИЗ НУЖИЗ НУЖИЗ НУЖИЗ НУЖИЗ НУЖИЗ НУЖИЗ НУЖИЗ НУЖИЗ НУХИЗ НУЖИЗ НУЖИЗ НУЖИЗ НУжИЗ НУЖИЗ НУЖИЗ НУЖИЗ НУЖИЗ НУЖИЗ НУЖИЗ НУЖИЗ НУЖИЗ НУЖИЗ НУЖИЗ НУЖИЗ НУЖИЗ НУЖИЗ НУЖИЗ НУЖИЗ НУЖИЗ НУЖИЗ НУЖИЗ НУЖИЗ НУжИЗ НУЖИЗ НУЖИЗ НУЖИЗ НУЖИЗ НУЖИЗ НУЖИЗ НУЖИЗ НУЖИЗ НУЖИЗ НУЖИЗ НУЖИЗ НУЖИЗ НУЖИЗ НУЖИЗ НУЖИЗ НУжИЗ НУЖИЗ НУЖИЗ НУЖИЗ НУжИЗ НУЖИЗ НУЖИЗ НУЖИЗ НУЖИЗ НУЖИЗ НУЖИЗ НУЖИЗ НУЖИЗ НУЖИЗ НУЖИЗ НУЖИЗ НУЖИЗ НУЖИЗ НУЖИЗ НУЖИЗ НУХИЗ НУЖИЗ НУЖИЗ НУЖИЗ НУХИЗ НУЖИЗ НУЖИЗ НУЖИЗ НУЖИЗ НУЖИЗ НУЖИЗ НУЖИЗ НУЖИЗ НУЖИЗ НУЖИЗ НУЖИЗ НУЖИЗ НУЖИЗ НУЖИЗ НУЖИЗ НУХИЗ НУЖИЗ НУЖИЗ НУХИЗ НУХИЗ НУЖИЗ НУЖИЗ НУЖИЗ НУЖИЗ НУЖИЗ НУЖИЗ НУЖИЗ НУЖИЗ НУЖИЗ НУЖИЗ НУЖИЗ НУЖИЗ НУЖИЗ НУЖИЗ НУЖИЗ НУХИЗ НУЖИЗ НУХИЗ НУЖИЗ НУХИЗ НУЖИЗ НУЖИЗ НУЖИЗ НУЖИЗ НУЖИЗ НУЖИЗ НУЖИЗ НУЖИЗ НУЖИЗ НУЖИЗ НУЖИЗ НУЖИЗ НУЖИЗ НУЖИЗ НУЖИЗ НУХИЗ НУЖИЗ НУХИЗ НУХИЗ НУХИЗ НУЖИЗ НУЖИЗ НУЖИЗ НУЖИЗ НУЖИЗ НУЖИЗ НУЖИЗ НУЖИЗ НУЖИЗ НУЖИЗ НУЖИЗ НУЖИЗ НУЖИЗ НУЖИЗ НУЖИЗ НУХИЗ НУХИЗ НУХИЗ НУХИЗ НУХИЗ НУЖИЗ НУЖИЗ НУЖИЗ НУЖИЗ НУЖИЗ НУЖИЗ НУЖИЗ НУЖИЗ НУЖИЗ НУЖИЗ НУЖИЗ НУЖИЗ НУЖИЗ НУЖИЗ НУХИЗ НУХИЗ НУХИЗ НУХИЗ НУХИЗ НУХИЗ НУХИЗ НУХИЗ НУХИЗ НУХИЗ НУХИЗ НУХИЗ НУХИЗ НУХИЗ НУХИЗ НУХИЗ НУХИЗ НУХИЗ НУХИЗ НУXIIH | (ОКИЧ) | ||||||||
| (ОКИЧ) | ||||||||||
| A | VESA WALL MOUNT MEASUREMENTS | ||
| B | Hole Pattern Sizes (mm) | W | H |
| 200 100 | |||
| C | Screw Sizes | ||
| D | Length (X) | min. (mm) | 5 |
| max. (mm) | 8 | ||
| E | Thread (Y) | M4 | |
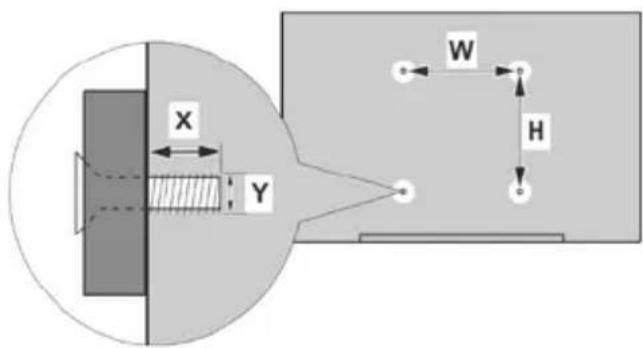
- Obsah
- CLASS 1 LASER PRODUCT
- Připojení napájení
- CEC a CEC RC Passthrough
- Pripojit' Napájanie
- CEC i CEC RC Passthrough
- IMPORTANT - Please read these instructions fully before installing or operating
- WARNING: Never let people (including
- children) with reduced physical, sensory or mental capabilities or lack of experience and / or knowledge use electrical devices unsupervised.
- Markings on the Product
- Class II Equipment With Functional
- Protective Earth Connection: The marked
- Hazardous Live Terminal: The marked
- Caution, See Operating Instructions: The
- Class 1 Laser Product:
- WARNING
- WALL MOUNTING WARNINGS
- Environmental Information
- Features
- Accessories Included
- Standby Notifications
- TV Control Switch & Operation
- Notes:
- Operation with the Remote Control
- Input Selection
- Changing Channels and Volume
- Inserting the Batteries into the Remote
- Connect Power
- Antenna Connection
- License Notification
- Information for Users on Disposal of Old Equipment and Batteries
- [European Union only]
- Country Restrictions
- Remote Control
- (\*) MY BUTTON 1 & MY BUTTON 2:
- Switching On/Off
- To Switch the TV On
- To Switch the TV Off
- To power down the TV completely, unplug the power cord from the mains socket.
- First Time Installation
- About Selecting Broadcast Type
- Media Playback via USB Input
- Media Browser Menu
- CEC and CEC RC Passthrough
- System Audio Control
- E-Manual (if available)
- General TV Operation
- Using the Channel List
- Managing the Favourite Lists
- Configuring Parental Settings
- Electronic Programme Guide (EPG)
- Timeline Schedule
- List Schedule(\*)
- Now/Next Schedule
- Event Options
- Teletext Services
- Software Upgrade
- Software upgrade search via user interface
- AM search and upgrade mode
- Troubleshooting & Tips
- Tv will not turn on
- Poor picture
- No picture
- No sound
- Remote control - no operation
- Input sources - can not be selected
- PC Input Typical Display Modes
- Supported DVI Resolutions
- Connectivity
- Wired Connectivity
- To Connect to a Wired Network
- Configuring Wired Device Settings
- Network Type
- Internet Speed Test
- Advanced Settings
- Wireless Connectivity
- To Connect to a Wireless Network
- Configuring Wireless Device Settings
- Other Information
- Connecting to your mobile device via WiFi
- Wake ON
- Wireless Display
- Using with mobile devices
- Connecting Other Wireless Devices
- Connectivity Troubleshooting
- Wireless Network Not Available
- Connection is Slow
- Disruption during playback or slow reactions
- Internet Connection Not Available / Audio Video Sharing Not Working
- Invalid Domain
- Using Audio Video Sharing Network Service
- Server Software Installation
- Connect to a Wired or Wireless Network
- Play Shared Files via Media Browser
- Audio Video Sharing
- Internet Portal
- PIP Window (depending on portal service)
- Internet Browser
- HBBTV System
- Tartalomjegyzék
Brand : HYUNDAI
Model : FLR32TS511SMART
Category : Television