
DSIO 3T224 E Z UK - Dishwasher INDESIT - Free user manual and instructions
Find the device manual for free DSIO 3T224 E Z UK INDESIT in PDF.
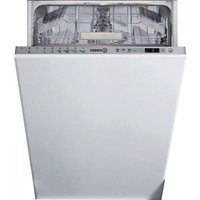


| Product Type | Built-in Dishwasher |
| Brand | Indesit |
| Model | DSIO 3T224 E Z UK |
| Dimensions (HxWxD) | 850 x 600 x 600 mm (estimated) |
| Weight | Approx. 45 kg (estimated) |
| Power Supply | 220-240 V, 50 Hz |
| Energy Consumption (Eco program) | 0.74 kWh/cycle |
| Water Consumption (Eco program) | 9.0 L/cycle |
| Number of Programs | 9 |
| Program List | Eco, Auto Intensive, Auto Normal, Delicates, Rapid 30', Baby Care, Extra, Soak, Push&GO |
| Options | Delay (1-12 h), Half Load, Tablet, Extra |
| Salt and Rinse Aid Dispensers | Yes, with refill indicators |
| Water Hardness Setting | Adjustable, 5 levels |
| Upper Rack Height Adjustment | Two positions, lever-operated |
| Foldable Flaps | Yes, adjustable positions |
| Cutlery Basket | Yes, with top grid |
| Filter Assembly | Three-piece cylindrical, cup, and plate filters |
| Spray Arms | Upper and lower, removable for cleaning |
| Safety Features | Door safety switch, auto shut-off during inactivity |
| Spare Parts Availability | Through authorized after-sales service |
| Warranty | See warranty booklet for details |
Frequently Asked Questions - DSIO 3T224 E Z UK INDESIT
User questions about DSIO 3T224 E Z UK INDESIT
0 question about this device. Answer the ones you know or ask your own.
Ask a new question about this device
Download the instructions for your Dishwasher in PDF format for free! Find your manual DSIO 3T224 E Z UK - INDESIT and take your electronic device back in hand. On this page are published all the documents necessary for the use of your device. DSIO 3T224 E Z UK by INDESIT.
USER MANUAL DSIO 3T224 E Z UK INDESIT
THANK YOU FOR BUYING AN INDESIT PRODUCT.
In order to receive more complete assistance, please register your appliance on: www.indesit.eu/register

You can download the Safety Instructions and the Use and Care Guide by visiting our website docs.indesit.eu and following the instructions on the back of this booklet.
Before using the appliance, carefully read the Health and Safety guide.
PRODUCT DESCRIPTION
APPLIANCE
- Upper rack
- Foldable flaps
- Upper rack height adjuster
- Upper spray arm
- Lower rack
- Space Zone
- Cutlery basket
- Lower spray arm
- Filter Assembly
- Salt reservoir
- Detergent and Rinse Aid dispensers
- Rating plate
- Control panel
CONTROL PANEL
- ON-OFF / Reset button with indicator light
- Program selection button
- Salt refill indicator light
- Rinse Aid refill indicator light
- Program number and delay time indicator
- Display
- Delay indicator light
- Half Load indicator light
- Push & Go button
- Delay button
- Half Load button with indicator light
- Tablet (Tab) button with indicator light
- START/Pause button with indicator light
FIRST TIME USE SALT, RINSE AID AND DETERGENT
ADVICE REGARDING THE FIRST TIME USE
After installation, remove the stoppers from the racks and the retaining elastic elements from the upper rack.
FILLING THE SALT RESERVOIR
The use of salt prevents the formation of LIMESCALE on the dishes and on the machine's functional components.
- It is important that the salt reservoir be never empty.
- It is important to set the water hardness.
The salt reservoir is located in the lower part of the dishwasher (see PRODUCT DESCRIPTION) and should be filled when the SALT REFILL indicator light in the control panel is lit.

- Remove the lower rack and unscrew the reservoir cap (anticlockwise).
- Only the first time you do this: fill the salt reservoir with water.
- Position the funnel (see figure) and fill the salt reservoir right up to its edge (approximately 1 kg); it is not unusual for a little water to leak out.
- Remove the funnel and wipe any salt residue away from the opening.
Make sure the cap is screwed on tightly, so that no detergent can get into the container during the wash program (this could damage the water softener beyond repair).
Whenever you need to add salt, it is mandatory to complete the procedure before the beginning of the washing cycle.
SETTING THE WATER HARDNESS
To allow the water softener to work in a perfect way, it is essential that the water hardness setting is based on the actual water hardness in your house. This information can be obtained from your local water supplier.
The factory setting is for average (3) water hardness.
- Switch on the appliance by pressing the ON/OFF button.
- Switch off the appliance by pressing the ON/OFF button.
- Hold down button P for 5 seconds, until you hear a beep.
- Switch on the appliance by pressing the ON/OFF button.
- The current selection level number and the salt indicator light both flash.
- Press button P to select the desired hardness level (see WATER HARDNESS TABLE).
| Water Hardness Table | |||
| Level | °dHGerman degrees | °fHFrench degrees | |
| 1 | Soft 0 - 6 0 - 10 | ||
| 2 | Medium | 7 - 11 | 11 - 20 |
| 3 | Average | 12 - 17 | 21 - 30 |
| 4 | Hard | 18 - 34 | 31 - 60 |
| 5 | Very hard | 35 - 50 | 61 - 90 |
- Switch off the appliance by pressing the ON/OFF button. Setting is complete!
As soon as this procedure is complete, run a program without loading.
Only use salt that has been specifically designed for dishwashers.
After the salt has been poured into the machine, the SALT REFILL indicator light switches off.
If the salt container is not filled, the water softener and the heating element may be damaged as a result.
FILLING THE RINSE AID DISPENSER
Rinse aid makes dish DRYING easier. The rinse aid dispenser A should be filled when the RINSE AID REFILL ✗Indicator light in the control panel is lit.

- Open the dispenser B by pressing and pulling up the tab on the lid.
- Pour in the rinse aid (max.110 ml), making sure it does not overflow from the dispenser. If this happens, clean the spill immediately with a dry cloth.
- Press the lid down until you hear a click to close it.
NEVER pour the rinse aid directly into the appliance tub.
ADJUSTING THE DOSAGE OF RINSE AID
If you are not completely satisfied with the drying results, you can adjust the quantity of rinse aid used.
- Switch the dishwasher on using the ON/OFF button.
- Switch it off using the ON/OFF button.
- Press button P three times - a beep will be heard.
- Switch it on using the ON/OFF button.
- The current selection level number and rinse aid indicator light flash.
- Press button P to select the level of rinse aid quantity to be supplied.
- Switch it off using the ON/OFF button.
Setting is complete!
If the rinse aid level is set to ZERO (ECO), no rinse aid will be supplied. The LOW RINSE AID indicator light will not be lit if you run out of rinse aid.
A maximum of 5 levels can be set according to the dishwasher model. The factory setting is specific to the model, please follow instruction above to check this for your machine.
- If you see bluish streaks on the dishes, set a low number (1-2).
- If there are drops of water or limescale marks on the dishes, set a mid-range number (3-4).
FILLING THE DETERGENT DISPENSER
To open the detergent dispenser use the opening device A. Introduce the detergent into the dry dispenser B only. Place the amount of detergent for pre-washing directly inside the tub.

- When measuring out the detergent refer to the mentioned earlier information to add the proper quantity. Inside the dispenser B there are indications to help the detergent dosing.
- Remove detergent residues from the edges of the dispenser and close the cover until it clicks.
- Close the lid of the detergent dispenser by pulling it up until the closing device is secured in place.
The detergent dispenser automatically opens up at the right time according to the program.
If all-in-one detergents are used, we recommend using the TABLET button, because it adjusts the program so that the best washing and drying results are always achieved.
PROGRAMS TABLE
| Program | Drying phase | Available options*) | Detergent container | Duration of wash program (h:min)** | Water consumption (litres/cycle) | Energy consumption (kWh/cycle) | |||
| Tub | B | ||||||||
| 1 | Eco 50° | ECO | √ | √ | √ | 4:00 9.0 0.74 | |||
| 2 | Auto Intensive |  | 65° | √ | -2:20 √3:00 | 16.0 - 18.0 1.20 | -1.40 | ||
| 3 | Auto Normal |  | 55° | √ | √ | 2:10 - 2:50 14.5 | -16.0 1.05 - 1.25 | ||
| 4 | Delicates |  | 45° | √ | -1:40 12.0 | 1.00 | |||
| 5 | Rapid 30' | 50°  | - | -0:30 9/0 0.50 | |||||
| 6 | Baby Care | 70'  | √ | - | √ | 1:40 12.0 1.30 | |||
| 7 | Extra 65° |  | - | √ | -1:30 12.0 1.20 | ||||
| 8 | Soak |  | - | - | - | 0:10 4.5 0.01 | |||
| 9 | Push&GO |  | 50° | √ | - | √ | 1:20 10.0 1.10 | ||
ECO program data is measured under laboratory conditions according to European Standard EN 50242.
Note for Test Laboratories:
For information on comparative EN testing conditions, please send an email to the following address: assistenza_en_lvs@indesitcompany.com
Pre-treatment of the dishes is not needed before any of the programs.
*) Not all options can be used simultaneously.
**) The duration of the program shown on the display or in the booklet is an estimate calculated on standard conditions. The actual time may vary depending on many factors such as temperature and pressure of the incoming water, room temperature, amount of detergent, quantity and type of load, load balancing, additional selected options and sensor calibration. The sensor calibration can increase program duration up to 20 min.
Standby consumption: Left-on mode consumption: 5 W - Off mode consumption: 0.5 W
PROGRAMS DESCRIPTION
Instructions on wash cycle selection.
1 ECO
Normally soiled crockery. Standard program, the most efficient in terms of its combined energy and water consumption.
2 AUTO INTENSIVE
Automatic program for heavily soiled dishes and pans (not to be used for delicate items).
3 AUTO NORMAL
Automatic program for normally soiled pans and dishes.
4 DELICATES
Program for delicate items, which are more sensitive to high temperatures, for example glasses and cups.
5 RAPID 30'
Program to be used for lightly-soiled dishes with no dried food residues.
6 BABY CARE
Program combined with the Baby Care specially-designed basket ensures the best cleaning results and sanitization of baby accessories (soother, pacifiers, teats) while washing also normally or heavily soiled crockery.
7 EXTRA
Program that allows to wash very big items loaded in the lower rack.
8 SOAK
Use to refresh crockery planned to be washed later. No detergent to be used with this program.
9 PUSH&GO
Everyday wash and dry cycle that ensures great cleaning performance in a short time without the need to pre-treat dishes.
Notes:
Please note that cycles like Rapid or Fast are most effective for lightly soiled dishes. To reduce consumption even further, only run the dishwasher when it is full.
OPTIONS AND FUNCTIONS
OPTIONS can be selected directly by pressing the corresponding button (see CONTROL PANEL).
If an option is not compatible with the selected program (see PROGRAMS TABLE), the corresponding LED flashes rapidly 3 times and beeps will sound. The option will not be enabled.

PUSH & GO
The Push&Go button is an easily distinguishable button that allows you direct access to the Push&Go program, a wash and dry cycle that ensures great cleaning performance in a short time. You don't have to worry which program to choose, Push&Go cycle will do the work for you.
To select the Push&Go program, switch on the appliance, press only the Push&Go button for 3 seconds, and close the door within 4 seconds.

DELAY
The start time of the program may be delayed for a period of time between 1 and 12 hours.
- Press the DELAY button: the corresponding symbol appears on the display; each time you press the button, the time (1h, 2h, etc. up to max. 12h) from the start of the selected wash cycle will be increased.
- Select the wash program, press the START/PAUSE button, and within 4 seconds close the door: the timer will begin counting down.
- Once this time has elapsed, the indicator light switches off and the wash cycle begins.
To adjust the delay time and select a shorter period of time, press the DELAY button. To cancel it, press the button repeatedly until the selected delayed start indicator light switches off.
The DELAY function cannot be set once a wash cycle has been started.

HALF LOAD using the upper or lower rack

If there are not many dishes to be washed, a half load cycle may be used in order to save water, electricity and detergent. Select the wash cycle and then press the HALF LOAD button: the indicator corresponding to the chosen rack lights up and the wash cycle starts only in the upper or lower rack.
Remember to load the upper or lower rack only, and to reduce the amount of detergent accordingly.

TABLET (Tab)
This setting allows you to optimize the performance of the program according to the type of detergent used.
Press the TABLET button (the indicator light will light up) if you use combined detergents in tablet form (rinse aid, salt and detergent in 1 dose).
If you use powder or liquid detergent, this option should be off.

EXTRA
EXTRA makes it possible to carry out a heavy-duty wash cycle of large crockery up to a max height of 53cm: baking pans, oven grids, dripping pans, hob grids, large saucepans, serving dishes, pizza dishes, stainless-steel hood filters. Remove the upper rack to load bulky crockery.

Release the two locks (right and left) and pull out the rack.
When the upper rack is fitted, the locks must be always closed.

In order for the water to reach the crockery everywhere, arrange it as shown in the Figure.
Do not start the dishwasher without the upper rack using wash cycles other than EXTRA.
To carry out the wash cycle Extra, pour the detergent DIRECTLY INTO THE TUB and not into the dispenser.

OPERATION INDICATOR
A LED light projected on the floor indicates that the dishwasher is working. One of the following operating modes can be selected:
a) Disabled function.
b) When the cycle starts the light goes on for a few seconds, stays off during the cycle, and flashes at the end of the cycle. c) The light stays on during the cycle and flashes at the end of the cycle (default mode).
If the delayed start was set, the light goes on either for the first few seconds or the entire duration of the countdown, based on whether mode b) or c) was set.
The light goes off every time the door is opened. To select the mode you prefer, switch on the machine, hold down button P until one of the three letters appears on the display, press button P until you reach the desired letter (or mode), hold down button P to confirm the selection.
LOADING THE RACKS
UPPER RACK
Load delicate and light dishes: glasses, cups, saucers, low salad bowls.
The upper rack has tip-up supports which can be used in a vertical position when arranging tea/dessert saucers or in a lower position to load bowls and food containers.
(loading example for the upper rack)
ADJUSTING THE HEIGHT OF THE UPPER RACK
The height of the upper basket can be adjusted: high position to place bulky crockery in the lower basket and low position to make the most of the tip-up compartments by creating more space upwards.
The upper rack is equipped with a Upper Rack height adjuster (see figure), without pressing the levers, lift it up by simply holding the rack sides, as soon as the rack is stable in its upper position. To restore to the lower position,

Press the levers (A) at the sides of the rack and move the basket downwards.
We strongly recommend that you do not adjust the height of the rack when it is loaded.
NEVER raise or lower the basket on one side only.
FOLDABLE FLAPS WITH ADJUSTABLE POSITION
The side foldable flaps can be folded or unfolded to optimize the arrangement of crockery inside the rack.
Wine glasses can be placed safely in the foldable flaps by inserting the stem of each glass into the corresponding slots.
Depending on the model:
- To unfold the flaps, slide them up and rotate, or release them from the snaps and pull them down.
- To fold the flaps, rotate them and slide them down, or pull them up and attach them to the snaps.

LOWER RACK
For pots, lids, plates, salad bowls, cutlery, etc. Large plates and lids should ideally be placed at the sides to avoid interference with the spray arm.
The lower rack has tip-up supports which can be used in a vertical position when arranging plates or in a horizontal position (lower) to load pans and salad bowls easily.
(Loading example for the lower rack)
The lower rack has a Space Zone A (in selected models with different numbers and positions), a special pull-out support in the rear of the rack that can be used to support frying pans or baking pans in an upright position, thus taking up less space.
To use it, just get hold of the coloured grip and pull it upwards B while rotating it forward. The supports can slide right and left to fit the size of the crockery.


CUTLERY BASKET
It is fitted with top grids for improved cutlery arrangement. It must only be positioned at the front of the lower rack.

Knives and other utensils with sharp edges must be placed in the cutlery basket with the points facing downwards or they must be positioned horizontally in the tip-up compartments on the upper rack.
DAILY USE
1. CHECK WATER CONNECTION
Check that the dishwasher is connected to the water supply and that the tap is open.
2. SWITCH ON THE DISHWASHER
Open the door and press the ON/OFF button.
3. LOAD THE RACKS
(see LOADING THE RACKS).
4. FILLING THE DETERGENT DISPENSER
(see PROGRAMS TABLE).
5. CHOOSE THE PROGRAM AND CUSTOMISE THE CYCLE
Select the most appropriate program in accordance with the type of crockery and its soiling level (see PROGRAMS DESCRIPTION) by pressing the P button.
Select the desired options (see OPTIONS AND FUNCTIONS).
6. START
Start the wash cycle by pressing the START/Pause button (LED is lit) and closing the door within 4 seconds. When the program starts, you will hear a single beep. If the door was not closed within 4 seconds, an alarm sound will be played. In this case, open the door, press
the START/Pause button and close the door again within 4 seconds.
7. END OF WASH CYCLE
The end of the wash cycle is indicated by beeps and by the flashing of the wash cycle number on the display. Open the door and switch off the appliance by pressing the ON/OFF button.
Wait for a few minutes before removing the crockery to avoid burns. Unload the racks, beginning with the lower one.
The machine will switch off automatically during certain extended periods of inactivity to minimize electricity consumption. If the crockery is only lightly soiled or if it has been rinsed with water before being placed in the dishwasher, reduce the amount of detergent used accordingly.
MODIFYING A RUNNING PROGRAM
If a wrong program was selected, it is possible to change it, provided that it has only just begun: open the door, press and hold the ON/OFF button, and the machine will switch off.
Switch the machine back on using the ON/OFF button and select the new wash cycle and any desired options. Start the wash cycle by pressing the START/Pause button (LED is lit) and closing the door within 4 seconds.
ADDING EXTRA CROCKERY
Without switching off the machine, open the door (the START/Pause LED starts blinking) (beware of HOT steam!) and place the crockery inside the dishwasher. Press the START/Pause button and close the door within 4 seconds. The cycle will resume from the point at which it was interrupted.
ACCIDENTAL INTERRUPTIONS
If the door is opened during the wash cycle, or if there is a power cut, the cycle stops. Press the START/Pause button and close the door within 4 seconds. The cycle will resume from the point at which it was interrupted.
For more information about the functions, you can request or download from the WEB a Use & Care Guide by following the instructions on the last page. www
ADVICE AND TIPS
TIPS
Before loading the baskets, remove all food residues from the crockery and empty the glasses. You do not need to rinse beforehand under running water.
Arrange the crockery so that it is held in place firmly and does not tip over; and arrange the containers with the openings facing downwards and the concave/convex parts placed obliquely, thus allowing the water to reach every surface and flow freely.
Warning: lids, handles, trays and frying pans do not prevent the sprayer arms from rotating.
Place any small items in the cutlery basket.
Very soiled dishes and pans should be placed in the lower basket because in this sector the water sprays are stronger and allow a higher washing performance.
After loading the appliance, make sure that the sprayer arms can rotate freely.
HYGIENE
To avoid odour and sediment which can be accumulated in the dishwasher please run a high temperature program at least one a month. Use a tea spoon of detergent and run it without the loading to clean your appliance.
UNSUITABLE CROCKERY
- Wooden crockery and cutlery.
- Delicate decorated glasses, artistic handicraft and antique crockery. Their decorations are not resistant.
- Parts in synthetic material which do not withstand high temperatures. • Copper and tin crockery.
- Crockery soiled with ash, wax, lubricating grease or ink.
The colours of glass decorations and aluminium/silver pieces can change and fade during the washing process. Some types of glass (e.g. crystal objects) can become opaque after a number of wash cycles too.
DAMAGE TO GLASS AND CROCKERY
- Only use glasses and porcelain guaranteed by the manufacturer as dishwasher safe.
- Use a delicate detergent suitable for crockery
- Collect glasses and cutlery from the dishwasher as soon as the wash cycle is over.
CARE AND MAINTENANCE
CLEANING THE FILTER ASSEMBLY
Regularly clean the filter assembly so that the filters do not clog and that the waste water flows away correctly.
The filter assembly consists of three filters which remove food residues from the washing water and then recirculate the water: to obtain the best washing results, you need to keep them clean.
The dishwasher must not be used without filters or if the filter is loose.
After several washes, check the filter assembly and if necessary clean it thoroughly under running water, using a non-metallic brush and following the instructions below:
- Turn the cylindrical filter A in an anti-clockwise direction and pull it out (Fig 1).
- Remove the cup filter B by exerting a slight pressure on the side flaps (Fig 2).
- Slide out the stainless-steel plate filter C (Fig 3).
- Inspect the trap and remove any food residues. NEVER REMOVE the wash-cycle pump protection (black detail) (Fig 4).


After cleaning the filters, re-place the filter assembly and fix it in position correctly; this is essential for maintaining the efficient operation of the dishwasher.
CLEANING THE SPRAY ARMS
On occasions, food residue may become encrusted onto the spray arms and block the holes used to spray the water. It is therefore recommended that you check the arms from time to time and clean them with a small non-metallic brush.
To remove the upper spray arm, turn the plastic locking ring in an anti-clockwise direction. The upper spray arm should be replaced so that the side with the greater number of holes is facing upwards.

The lower spray arm may be removed by pulling it upwards.

CLEANING THE WATER INLET HOSE
If the water hoses are new or have not been used for an extended period of time, let the water run to make sure it is clear and free of impurities before performing the necessary connections. If this precaution is not taken, the water inlet could become blocked and damage the dishwasher.
TROUBLESHOOTING
Your dishwasher may not work properly.
Before contacting the Service Centre check if the problem can be solved by going through the following list.
| PROBLEMS POSSIBLE CAUSES SOLUTIONS | ||
| The dishwasher won't start or does not respond to commands. | The appliance has not been plugged in properly. | Insert the plug into the socket. |
| Power outage. The dishwasher starts automatically when the power returns. | ||
| The dishwasher door is not closed. Vigorous push the door until you hear the "click". | ||
| It does not respond to commands. | Switch off the appliance by pressing the ON/OFF button, switch it back on after approximately one minute and reset the program. | |
| The dishwasher won't drain. | The wash cycle has not finished yet. Wait until the wash cycle finishes. | |
| The drain hose is bent. Check that the drain hose is not bent (see INSTALLATION INSTRUCTION). | ||
| The sink drain pipe is blocked. Clean the sink drain pipe. | ||
| The filter is clogged up with food residues. Clean the filter (see CLEANING THE FILTER ASSEMBLY). | ||
| The dishwasher makes excessive noise. | The dishes are rattling against each Position the crockery correctly (see LOADING THE RACKS). | |
| An excessive amount of foam has been produced. | The detergent has not been measured out correctly or it is not suitable for use in dishwashers (see FILLING THE DETERGENT DISPENSER). Reset the current cycle by switching OFF the dishwasher, then switch it on again, select a new program, press START/Pause and close the door within 4 seconds. Please do not add any detergent. | |
| The dishes are not clean. | The crockery has not been arranged properly. | Arrange the crockery correctly (see LOADING THE RACKS). |
| The spray arms cannot rotate freely, being hindered by the dishes. | Arrange the crockery correctly (see LOADING THE RACKS). | |
| The wash cycle is too gentle. Select an appropriate wash cycle (see PROGRAMS TABLE). | ||
| An excessive amount of foam has been produced. | The detergent has not been measured out correctly or it is not suitable for use in dishwashers (see FILLING THE DETERGENT DISPENSER). | |
| The cap on the rinse aid compartment has not been shut correctly. | Make sure the cap of the rinse aid dispenser is closed. | |
| The filter is soiled or clogged. | Clean the filter assembly (see CARE AND MAINTENANCE). | |
| There is no salt. | Fill the salt reservoir (see FILLING THE SALT RESERVOIR). | |
MAINTENANCE AND TROUBLESHOOTING GUIDE
For more information, maintenance procedures and troubleshooting, see the Use and Care Guide
The Use and Care Guide can be obtained by:
- After-Sales Service; phone number see in warranty booklet.
- download from website: docs.indesit.eu
- use QR code

TECHNICAL DATASHEET
The technical data containing the energy consumption data can be downloaded from the website: docs.indesit.eu
CONTACTING AFTER-SALES SERVICE
When you contact the After-Sales Service, you must provide the codes shown on the rating plate attached to the left or right side inside the door of the dishwasher. The phone number is listed in the warranty booklet or on the website: www.indesit.eu


- BEFORE USING THE APPLIANCE, CAREFULLY READ THE HEALTH AND SAFETY GUIDE
- PRODUCT DESCRIPTION
- FIRST TIME USE SALT, RINSE AID AND DETERGENT
- ADVICE REGARDING THE FIRST TIME USE
- FILLING THE SALT RESERVOIR
- SETTING THE WATER HARDNESS
- FILLING THE RINSE AID DISPENSER
- ADJUSTING THE DOSAGE OF RINSE AID
- FILLING THE DETERGENT DISPENSER
- PROGRAMS TABLE
- PROGRAMS DESCRIPTION
- INSTRUCTIONS ON WASH CYCLE SELECTION
- ECO
- AUTO INTENSIVE
- AUTO NORMAL
- DELICATES
- RAPID
- BABY CARE
- EXTRA
- SOAK
- PUSH&GO
- NOTES
- OPTIONS AND FUNCTIONS
- PUSH & GO
- DELAY
- HALF LOAD USING THE UPPER OR LOWER RACK
- TABLET (TAB)
- OPERATION INDICATOR
- LOADING THE RACKS
- ADJUSTING THE HEIGHT OF THE UPPER RACK
- FOLDABLE FLAPS WITH ADJUSTABLE POSITION
- CUTLERY BASKET
- DAILY USE
- CHECK WATER CONNECTION
- SWITCH ON THE DISHWASHER
- LOAD THE RACKS
- CHOOSE THE PROGRAM AND CUSTOMISE THE CYCLE
- START
- END OF WASH CYCLE
- MODIFYING A RUNNING PROGRAM
- ADDING EXTRA CROCKERY
- ACCIDENTAL INTERRUPTIONS
- ADVICE AND TIPS
- TIPS
- HYGIENE
- UNSUITABLE CROCKERY
- DAMAGE TO GLASS AND CROCKERY
- CARE AND MAINTENANCE
- CLEANING THE FILTER ASSEMBLY
- THE DISHWASHER MUST NOT BE USED WITHOUT FILTERS OR IF THE FILTER IS LOOSE
- CLEANING THE SPRAY ARMS
- CLEANING THE WATER INLET HOSE
- TROUBLESHOOTING
- MAINTENANCE AND TROUBLESHOOTING GUIDE
- TECHNICAL DATASHEET
- CONTACTING AFTER-SALES SERVICE
Brand : INDESIT
Model : DSIO 3T224 E Z UK
Category : Dishwasher