
ARD-12 - Air conditioner Artrom - Free user manual and instructions
Find the device manual for free ARD-12 Artrom in PDF.


| Product Type | Portable Air Conditioner |
| Brand | Artrom |
| Model | ARD-12 |
| Dimensions (approx.) | Height: 700 mm, Width: 450 mm, Depth: 350 mm |
| Weight (approx.) | 28 kg |
| Power Supply | 220-240 V / 50 Hz |
| Fuse Rating | T3.15AL AC250V |
| Maximum Power Input | Refer to data plate (approx. 1500 W typical) |
| Refrigerant | R410A, 0.46 kg, GWP = 2087.5 |
| Operating Modes | Cooling, Heating, Dehumidification, Ventilation |
| Temperature Control Range | Cooling: 16°C – 32°C; Heating: 16°C – 32°C |
| Airflow Speeds | Low, Mid, High |
| Timer | 1 – 24 hours (on/off) |
| Sleep Mode | 10-hour intelligent sleep mode |
| Remote Control | Infrared with CR2032 battery |
| Drainage | Automatic vaporization in cool/heat; continuous drainage in dehumidification |
| Filter Type | Washable mesh filters (upper and lower) |
| Maintenance | Clean filters every 2 weeks; wipe casing with damp cloth |
| Safety Features | Compressor overload protection (3-minute delay start); auto shut-off with full tank (error P1) |
| Accessories Included | Flexible exhaust pipe, window kit, drainage tube, remote control with battery |
| EU Disposal Directive | Compliant with WEEE (2012/19/EU) and Battery Directive (2006/66/EC) |
Frequently Asked Questions - ARD-12 Artrom
User questions about ARD-12 Artrom
0 question about this device. Answer the ones you know or ask your own.
Ask a new question about this device
Download the instructions for your Air conditioner in PDF format for free! Find your manual ARD-12 - Artrom and take your electronic device back in hand. On this page are published all the documents necessary for the use of your device. ARD-12 by Artrom.
USER MANUAL ARD-12 Artrom
natural_image
Exterior view of a white air conditioner unit (no visible text or symbols)INSTRUCCIONES DE USO
VISTA POSTERIOR
natural_image
Pure diagram of a cylindrical object with evenly spaced horizontal lines, no text or symbols present.natural_image
Line drawing of a white cylindrical device with a coiled cable extending from its side (no text or symbols)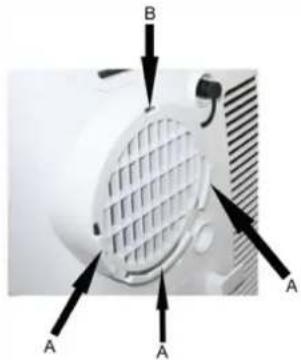
natural_image
Close-up of a white fan or vent with a grid-patterned grille and directional arrows labeled A and B (no text or symbols beyond labels)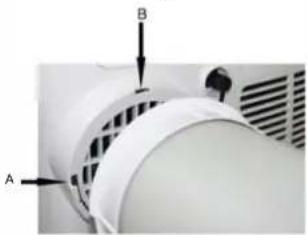
natural_image
Close-up of a white cylindrical device with labeled points A and B, showing internal components and ventilation grille (no readable text or symbols)
natural_image
Close-up of a cylindrical mechanical component with attached clamps (no visible text or symbols)natural_image
Simple line drawing of a two-panel window with a single circular dot on the left pan (no text or symbols)natural_image
Simple 3D diagram of a window with a small circular object on the left side (no text or symbols)natural_image
Diagram of a cylindrical object with a separate circular component, showing internal parallel lines and an arrow indicating direction (no text or symbols)natural_image
Close-up of a metallic cylindrical mechanical component with a looped end (no text or symbols visible)
natural_image
Close-up of a white industrial fan or vent with a circular component and two arrows pointing to the side (no visible text or symbols)natural_image
Line drawing of a mechanical device with a handle and cylindrical body (no text or symbols)natural_image
Line drawing of a portable water heater with lid and side panel (no text or symbols)Deshumidificación
natural_image
Line drawing of a portable air conditioner unit with ventilation grille and control panel (no text or symbols)Deshumidificación
¡ATENCIÓN!
- TECLA ON/OFF
- TECLA SPEED
- TECLA SWING
- TECLA TIMER
- TECLA SLEEP
- TECLA "+" AND "-"
- TECLA FAN
- TECLA HEAT
- TECLA COOL
- TECLA DRY
(1) TECLA ON/OFF
(6) “+” and “-” TECLA
natural_image
Close-up of hands installing or adjusting a wall-mounted panel with a grid pattern (no visible text or symbols)natural_image
Close-up of a hand adjusting a white ventilation grille next to a wall-mounted air conditioner unit (no text or symbols visible)natural_image
Line drawing of hands cutting a grid-lined cutting board with a flat tool (no text or symbols)natural_image
Diagram showing car interior layout with seat, door, and cross symbol (no text or labels)natural_image
Exterior view of a white air conditioner unit (no visible text or symbols)ISTRUZIONI PER L'USO
VISTA POSTERIORE

1) PANNELLO DI CONTROLLO E TASTI PER IL FUNZIONAMENTO SENZA TELECOMANDO
2) ALETTA E MANDATA ARIA
3) FRONTALE
4) MANIGLIA
5) INGRESSO ARIA
6) MANIGLIA
7) FORO DRENAGGIO (DEUMIDIFICAZIONE)
8) INGRESSO ARIA
9) PRESA DI CORRENTE
10) USCITA CAVO ALIMENTAZIONE
11) FORO DRENAGGIO (RAFFRESCAMENTO)
12) FILTRO SUPERIORE (DIETRO LA GRIGLIA)
13) INGRESSO ARIA SUPERIORE
14) FILTRO INFERIORE (DIETRO LA GRIGLIA)
15) INGRESSO ARIA INFERIORE
16) GANCIO CAVO DI ALIMENTAZIONE
17) RUOTE
18) TELECOMANDO

(18)
Raffrescamento: 16°C B.S. / 35°C B.S.
Riscaldamento: 5°C B.S. / 27°C B.S.
natural_image
Pure diagram of a coiled tube or pipe with no text, numbers, or symbols

natural_image
Line drawing of a white mechanical device with a coiled handle and a circular top (no text or symbols)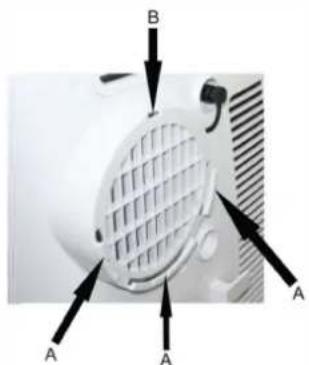
natural_image
Close-up of a white air vent with grid pattern and directional arrows (no text or symbols)
natural_image
Close-up of a white cylindrical device with labeled points A and B, showing internal components and a textured surface (no readable text or symbols)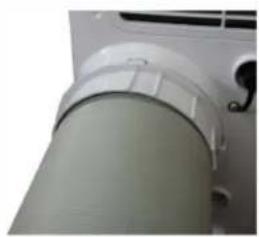
natural_image
Close-up of a cylindrical mechanical component with a metallic sleeve and mounting bracket (no visible text or symbols)natural_image
Simple geometric diagram of two adjacent rectangles with a dot on the left side (no text or symbols)natural_image
Close-up of a metallic cylindrical mechanical component with a looped end (no text or symbols visible)natural_image
Simple 3D diagram of a window with a circular object on the left side (no text or symbols)natural_image
Diagram of a cylindrical mechanical component with a separate inset showing an arrow indicating direction (no text or symbols)natural_image
Close-up of a white cylindrical device with ventilation grilles and mounting holes (no visible text or symbols)natural_image
Line drawing of a mechanical device with a threaded handle and circular base (no text or symbols)natural_image
Line drawing of a portable electric heater with lid and side button (no text or symbols)Deumidificazione
natural_image
Line drawing of a portable air conditioner unit with ventilation grille and control panel (no text or symbols)Deumidificazione
ATTENZIONE!
natural_image
Close-up of a hand pressing down on a white air conditioner cover (no visible text or symbols)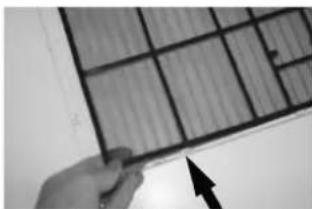
natural_image
Hand holding a grid-like object with an arrow pointing to it (no visible text or symbols)natural_image
Close-up of a white air conditioner panel with ventilation grilles and ventilation ducts (no text or symbols visible)
natural_image
Close-up of a person adjusting a white ventilation grille on a computer tower (no visible text or symbols)natural_image
Line drawing of hands cutting a grid paper with a circular cutter (no text or symbols)natural_image
Diagram showing car interior compartments with a box and cross symbol (no text or labels)Portable air conditioning with heat pump
C€
EN
ARD-12

natural_image
Exterior view of a white industrial air purifier with control panel and ventilation slots (no visible text or symbols)OPERATING INSTRUCTIONS
Read the instructions carefully before operating the appliance or carrying out maintenance work. Observe all the safety instructions; failure to observe the instructions may lead to accidents and/or damage. Store these instructions in a safe place for future reference.
GENERAL OPERATING AND SAFETY INSTRUCTIONS
- This appliance is a local air conditioner designed for domestic use.
- Only use this air conditioner as described in this manual.
- Ensure that the required voltage and frequency (220-240 V/50 Hz) match the available power source.
- Fuse style T3.15AL AC250V, the electricity passing through the fuse cannot be above 3.15A.
- This appliance can be used by children aged from 8 years and above and people with reduced physical, sensory or mental capabilities or lack of experience and knowledge if they have been given supervision or instruction concerning use of the appliance in a safe way and understand the hazards involved.
- Children shall not play with the appliance.
- Cleaning and user maintenance shall not be made by children without supervision.
- Ensure that the electricity system is able to deliver the operating current required by the air conditioner, in addition to that normally absorbed by other appliances (electrical appliances, lighting system, etc.). Please refer to the maximum power input data shown on the air conditioner's data plate.
- Connection to the electricity grid must take place in accordance with current installation standards.
- Ensure that the automatic switches and system protection valves are able to withstand a start-up current of 6A (normally for less than 1 second).
- The power socket must always include an efficient earth connection.
- Make sure that the plug is properly inserted into the socket. Do not use multiple adapters. Do not touch the plug with wet hands. Make sure that the plug is clean.
-
Do not use the plug for starting/stopping the air conditioner: use the ON/OFF button on the remote control or control panel instead.
-
Do not install the air conditioner in rooms potentially subject to water sprays (e.g. laundries).
- This air conditioner can be used by children of 8 years or older and by persons with reduced physical, sensory and mental abilities, or lacking the necessary experience and knowledge, provided they are supervised or instructed on its use by a person responsible for their safety, so that they are fully aware of the attendant risks.
- Before moving or cleaning the appliance, ensure that it is unplugged from the socket.
- Do not move the air conditioner while it is operating; first turn the appliance off, then check and remove any condensate which may have formed.
- To turn the appliance off, set the remote control to OFF and remove the plug from the socket. Pull on the plug only. Do not pull the cord.
- Do not use the appliance if the cord or plug are damaged. Contact a service centre to replace a damaged power cord, so as to avoid any safety risks.
- If your air conditioner is not fitted with a supply cord and a plug, an all-pole switch must be installed in the fixed wiring and the distance between contacts should be no less than 3.0 mm.
PRECAUTION!
- Do not insert any objects into the air conditioner: this is very dangerous as the fan turns at high speed.
- Ensure that air circulates freely around the unit. Do not cover the air intake and delivery grilles with drapes or any other means.
WARNING!
- The air conditioner must be positioned at least 50 cm from the wall or any other obstacles, on a flat and stable surface so as to avoid water leaks.
- The air conditioner is fitted with a system to protect the compressor from overload. This means that the compressor only starts 3 minutes after its previous stoppage.
- Please wait at least 3 minutes before starting the unit. This helps prevent the compressor from being damaged.
WARNING!
In the event of an anomaly, switch the appliance off and unplug from the socket. Do not dismantle or attempt to repair or modify the product. In the event of a malfunction, contact the service centre directly.
WARNING!
- Do not expose the air conditioner to direct sunlight, as the colour of the materials may change; moreover, the appliance may overheat causing the protection mechanism to intervene and switch the appliance off.
- Do not use insecticides, oils, detergents or spray paints near the appliance; do not use aggressive chemical detergents to clean the casing: this may damage the finish and colour.
- Close all open windows to maximise air conditioning efficiency.
The manufacturer will not be held liable if safety and accident prevention rules are not observed.
FRONT VIEW

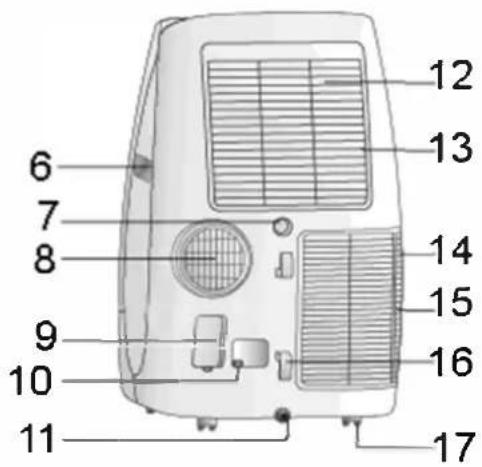
REAR VIEW
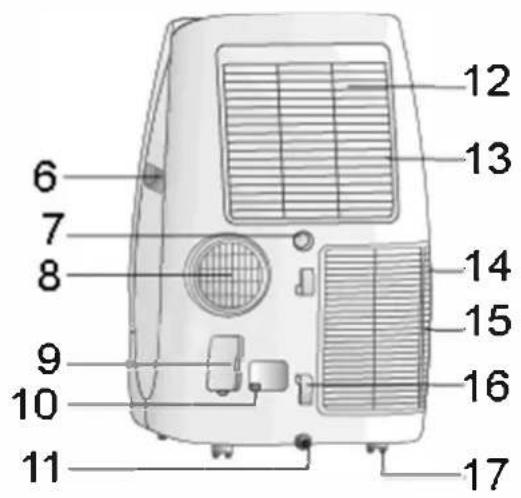
1) CONTROL PANEL AND BUTTONS FOR OPERATION WITHOUT REMOTE CONTROL
2) FIN AND AIR FLOW OUTLET
3) FRONT
4) HANDLES
5) AIR INTAKE
6) HANDLES
7) DRAINAGE HOLE (DEHUMIDIFICATION)
8) AIR INTAKE
9) POWER PLUG SOCKET
10) POWER CORD OUTLET
11) DRAINAGE HOLE (COOLING)
12) UPPER FILTER (BEHIND GRILLE)
13) UPPER AIR INTAKE
14) LOWER FILTER (BEHIND GRILLE)
15) LOWER AIR INTAKE
16) POWER CORD BUCKLE
17) CASTERS
18) REMOTE CONTROL
(18)

Min/max operating limits (internal temperature)
Cooling: 16 °C DB / 35 °C DB
Heating (Softy plus): 5 °C DB / 27 °C DB
Dehumidification: 16 °C DB / 35 °C DB
Cooling mode room temperature adjustment range: 16 °C DB / 32 °C DB
APPLIANCE START-UP
Open the packaging and pull out the box. Remove the product and the other elements supplied (illustrated in the box below).
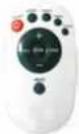
Infrared remote control. + button battery (CR2032/3V)
Round fitting (1) for positioning between the air discharge outlet and the flexible pipe.
Flexible pipe.
End fitting for window (2).


natural_image
Pure diagram of a cylindrical object with evenly spaced horizontal lines, no text or symbols present.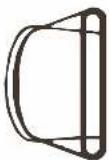
Window unit kit with plug.

Round fitting for window unit, for positioning between the end of the tube and the window unit itself.

Drainage tube (continuous drainage).

Position the product vertically on a flat and stable surface, as close as possible to a window and at least 50 cm from walls or other nearby obstacles.
USE WITH END FITTING FOR WINDOW
-
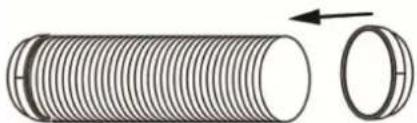
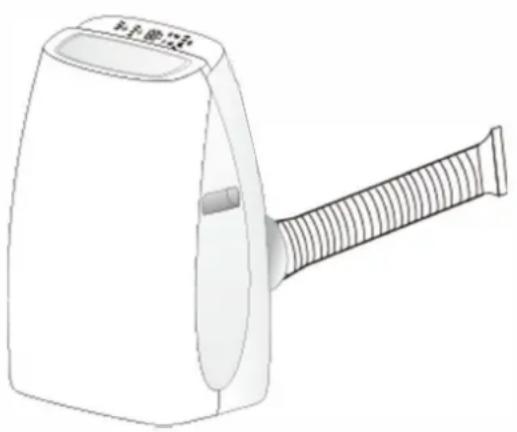
Connect the round fitting (1) to the flexible pipe, extend the tube until it reaches the outside and connect to the rear of the air conditioner.
-
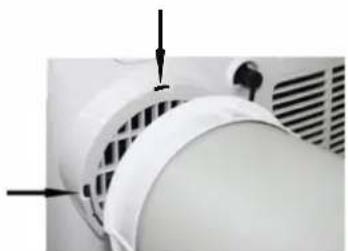
Slide the flat fitting downwards into the grooves (A) and secure it with the hook on top (B).
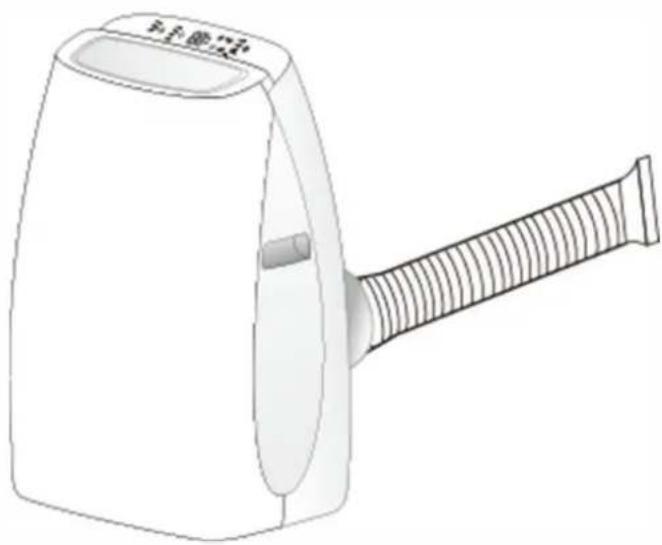
natural_image
Line drawing of a white cylindrical device with a coiled cable extending from its side (no text or symbols)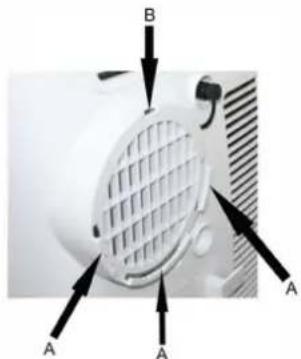
natural_image
Close-up of a white fan or vent with a grid pattern and directional arrows labeled A and B (no text or symbols beyond labels)
natural_image
Close-up of a white cylindrical device with labeled points A and B, showing internal structure and ventilation grille (no text or symbols beyond labels)
natural_image
Close-up of a cylindrical mechanical component with a metallic clip and mounting holes (no visible text or symbols)- Connect the end part of the flexible pipe to the round fitting for the window (2).
The drainage tube can be compressed to minimum 45 mm and extended to maximum 1500 mm. It is advisable to keep the tube compressed to the minimum.
- Open the windows and lock one of the two leaves with the handle.
Place the end fitting against the fixed leaf of the window and
draw the other leaf against it.


USE WITH WINDOW UNIT KIT
-
Make a hole having a diameter of roughly 133 mm on the glass window.
-
Avoid tight bends and folds in the flexible pipe.
-
Insert the window unit into the window.

natural_image
Simple line drawing of a two-panel window with a single circular dot on the left (no text or symbols)
natural_image
Simple 3D diagram of a window with a small circular object on the left side (no text or symbols)-
Insert the round fitting into the retractable flexible pipe and insert the latter with its round fitting into the window unit without the plug.
-
Insert the round fitting onto the flexible pipe.
natural_image
Diagram of a cylindrical pipe with a separate inset showing a circular opening (no text or symbols)
natural_image
Close-up of a metallic cylindrical mechanical component with a looped end (no text or symbols visible)- Insert the flexible pipe thus mounted into the rear of the air conditioner.
natural_image
Close-up of a white industrial fan or vent with ventilation grilles and mounting features (no visible text or symbols)If the air conditioner is not used for prolonged periods, disconnect the pipe and plug the window unit. Connect the power cord to a suitable electric socket (220–240 V). Insert the supplied batteries into the remote control and make sure the poles match. Select the desired operating mode from the remote control.
HOW TO USE THE APPLIANCE
This appliance can be used for PEARL cooling, heating (only model PEARL TOP), dehumidification and ventilation.
When switching between modes, the fan continues to turn but the compressor stops: the compressor will re-start after 3 minutes. This delay protects the compressor from potential damage.
natural_image
Illustration of a white portable device with a coiled cable extending from its side (no text or symbols)Cooling, Heating, Ventilation

natural_image
Line drawing of a portable electric heater with lid and side panel (no text or symbols)Dehumidification
THE DISCHARGE TUBE MUST BE CONNECTED to the appliance AT ALL TIMES: the only exception is when the appliance is used in dehumidification mode only, in which case the appliance should be left to discharge directly into the room for maximum efficiency (see the “Dehumidification Mode” paragraph).
Clean the air filters under the easily removable rear grille regularly to keep the air conditioner working efficiently.
OPERATING MODES
1. COOLING MODE (COOL)
- The "Cool" LED on the control panel will turn on.
- The temperature can be adjusted to between 16^ and 32^ .
- In this mode, each time the ON/OFF button is pressed the unit switches off, the appliance saves the temperature setting and retains this setting when it is switched on again.
- In this mode, the fan speed can be adjusted and the Timer and SLEEP functions can be set.
- For more silent operation, run the fan at low speed.
2. HEATING MODE (HEAT) (Pearl top)
- The "Heat" LED on the control panel will turn on.
- The temperature can be adjusted to between 16^ and 32^ .
- In this mode, each time the ON/OFF button is pressed the unit switches off, the appliance saves the temperature setting and retains this setting when it is switched on again.
- In this mode, the fan speed can be adjusted and the Timer and SLEEP functions can be set.
- For more silent operation, run the fan at low speed.
3. DEHUMIDIFICATION MODE (DRY)
- Press the MODE button to select the dehumidification mode.
- The temperature is controlled by the electronic board and cannot be adjusted.
- In this mode, each time the ON/OFF button is pressed the unit switches off, the appliance saves the settings and retains them when it is switched on again.
- The fan speed is set to low and cannot be adjusted.
NOTE
The air conditioner does not cool the room when operating as a dehumidifier.
When the appliance is used as a dehumidifier, the flexible pipe must not be connected.
For maximum dehumidification efficiency, leave the rear discharge attachment free to discharge directly into the environment.
The dehumidification mode is recommended during autumn and winter.
If used during summer, it is best to leave the flexible pipe attached so that the hot air is discharged towards the outside rather than into the room.
During dehumidification, continuous drainage should be implemented (see the next chapter, "HOW TO ELIMINATE CONDENSA TE").
4. VENTILATION MODE (FAN ONLY)
- Press the MODE button until the Fan icon appears.
- In this mode, the fan speed can be adjusted.
- The temperature cannot be adjusted.
HOW TO ELIMINATE CONDENSATE

Cooling & Heating (Pearl top)
This appliance automatically vaporises condensate in the cooling and heating mode. Ensure that when the unit is operating in cooling and heating mode, the rubber caps closing the drainage holes on the rear of the appliance are properly positioned.
When the air conditioner operates in cooling and heating mode, there is no need for continuous condensate drainage; only in specific weather conditions with very high air humidity levels may water deposit inside the unit. When the internal container is full, the display visualises message "P1" and the appliance stops functioning.
To empty the container, switch the air conditioner off and unplug it. Remove the cap form the rear drainage hole and direct it over a normal drain.
Ensure that the tube is not twisted or bent. The tube must slope downwards. Re-close the drainage hole with the cap and resume use of the air conditioner.

natural_image
Line drawing of a portable air conditioner unit with ventilation grille and control panel (no text or symbols)Dehumidification
WARNING!
When using the air conditioner in dehumidification mode, it is advisable to always arrange for continuous drainage, so as to maximise dehumidification efficiency.
Connect one end of the PVC pipe provided to the rear discharge hole and place the other end above a drain.
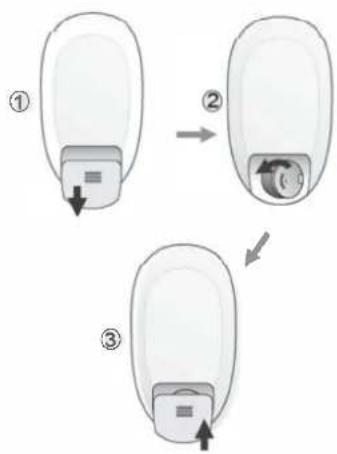
- Slide to open the cover according to the direction indicated by the arrowhead.
- Insert the batteries (CR2032/3V) into the remote control and make sure the poles match.
- Put back the cover.
- Aim the remote control towards the receiver on the air-conditioner.
- The remote control should be within 8 meters away from
the receiver.
- No obstacles between the remote control and the receiver.
- Do not drop or throw the remote control.
- Do not put the remote control under the strong sun rays or heating devices and other heating sources as well.
- Take the battery out of remote controller when you don't use it for a long time.
- When the operation sound can not be heard indoor unit or the transmission symbol on the display screen does not flash, the battery need to be replaced.
- If the rest phenomenon occurs when pressing the button of the remote control, the electrical quantity is deficient and the battery need to be replaced.
- Waste batteries should be disposed of properly.
Note:
* The picture is general remote controller, contains almost all the function buttons. They may be slightly different from material abject (depend on model).
flowchart
graph TD
    A["①"] --> B["②"]
    B --> C["③"]
    style A fill:#f9f,stroke:#333
    style B fill:#ccf,stroke:#333
    style C fill:#cfc,stroke:#333

INFORMATION FOR CORRECT DISPOSAL OF THE PRODUCT IN ACCORDANCE WITH EUROPEAN DIRECTIVE
2006/66/EC
Please replace batteries when flat: at the end of their useful life, batteries must not be disposed of with unsorted waste. They must be taken to designated recycling centres or returned to a retailer providing this service. Separate disposal of batteries prevents potential negative effects on the environment and human health due to inadequate disposal, and also allows for recovering and recycling their constituent materials, resulting in significant savings in terms of energy and resources. The separate disposal obligation is underlined by the crossed-out dustbin symbol appearing on the battery. Illegal disposal of the product by the user is subject to administrative penalties as per current regulations.
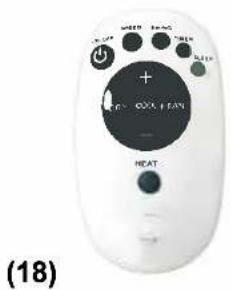
FOR OPTIMAL REMOTE CONTROL OPERATION, POINT THE TRANSMITTER HEAD TOWARDS THE RECEIVER ON THE AIR CONDITIONER.

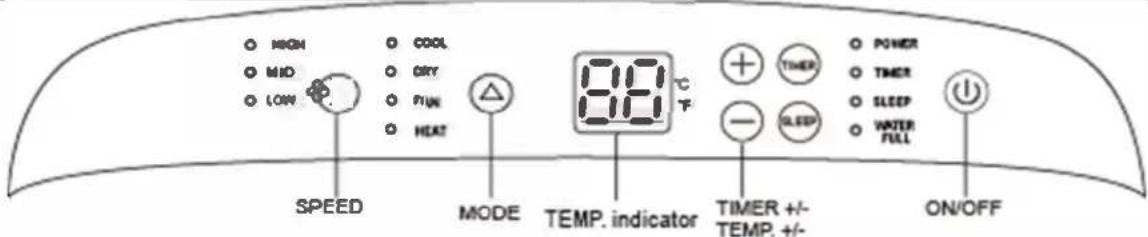
- ON/OFF BUTTON
- SPEED BUTTON
- SWING BUTTON
- TIMER BUTTON (LCD ON/OFF)
- SLEEP BUTTON
- “+” AND “-” BUTTON
- FAN BUTTON
- HEAT BUTTON
- COOL BUTTON
- DRY BUTTON

(1) "ON/OFF" BUTTON
Press the ON/OFF button to turn on or off the air conditioner.
(2) "SPEED" BUTTON
Press "SPEED" to set the wind speed (LOW, MID or HIGH).
(3) "SWING" BUTTON
Press "SWING" top turn on or off the swing function.
(4) "TIMER" BUTTON
a. When the air conditioner is turned off, press "TIMER" to set a time to turn on the air conditioner. Press "+" or "-" to set the time, and press "TIMER" again to confirm it.
b. When the air conditioner is turned on, press "TIMER" to set a time to turn off the air conditioner. Press "+" or "-" to set the time, and press "TIMER" again to confirm it.
c. After setting the time, press "TIMER" again to cancel the set time.
Note: After setting the time, press "TIMER" again to confirm it in 5 seconds. Without any operation in 5 seconds, the air conditioner will confirm the time automatically. Press "TIMER" after confirming the time will cancel the set time.
(5) "SLEEP" BUTTON
a. In operating mode, press "SLEEP" to enter the 10-hour intelligent sleep mode. After 10 hours, the air conditioner will exit the sleep mode and restore its previous mode.
b. In sleep mode, press "SLEEP" again, or press "MODE" or "ON/OFF" to exit the sleep mode.
Note: The sleep mode cannot be started in ventilation mode.
(6) "+" and "-" BUTTON
Press “+” or “-” to regulate the temperature (the unit is 1°C) and set the time (the unit is 1h). The temperature ranges from 16°C to 32°C, and the time ranges from 1h to 24h.
(7) "FAN" BUTTON
Press "FAN" to start the Ventilation mode.
(8) "HEAT" BUTTON
Press "HEAT" to start the heating mode.
(9) "COOL" BUTTON
Press "COOL" to start the refrigeration mode.
(10) "DRY" BUTTON
Press "DRY" to start the dehumidification mode.
Note: Only when temperature reaches 16^ C can we turn on the dehumidification mode, besides, the drain pipe must be installed.
CARE AND MAINTENANCE
WARNING!
Before carrying out any cleaning or maintenance operations, unplug the appliance.
1. Cleaning the air filters

The air filters must be checked at least once every two weeks of use. Operating the appliance with dirty or clogged filters will decrease the air conditioner's efficiency and may cause serious problems.
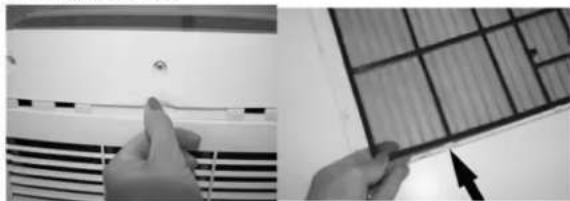
To remove filter 1: release the grille by pressing the filter tab, then slide the filter away from the tabs by pulling it gently towards the side.
natural_image
Close-up of hands installing or adjusting a solar panel on an air conditioner cover (no text or symbols visible)To remove filter 2: use a screwdriver to loosen the two screws holding the filter then pull the filter cover towards the right.

natural_image
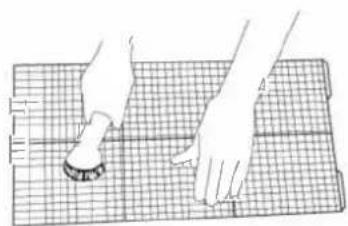
Close-up of a hand adjusting a wall-mounted air conditioner unit (no visible text or symbols)Use a vacuum cleaner to remove the dust from the filters. Should this not suffice, wash the filter with lukewarm water and some neutral detergent (if necessary), then rinse it thoroughly in cold water and leave it to dry in air before putting it back in place. Once the filter has been replaced, close the grille and resume use of the air conditioner.
natural_image
Line drawing of hands using a cutting tool on a grid mat (no text or symbols)2. Cleaning the casing.
Use a damp and soft cloth to clean the outer surface of the appliance.
Do not use excessively hot water, solvents, petrol or other aggressive chemical compounds, talcum powder or brushes: these may damage the surface or colour of the casing.
Remove any stains using lukewarm water with a little neutral detergent.
Do not pour water onto the air conditioner to clean it, as this may damage its internal components or cause a short-circuit.
3. Storage.
When you do not expect to use the air conditioner for a long time, clean the filters before storing it away.
Keep the appliance in a vertical position at all times. Do not place heavy objects on top of the air conditioner. It is advisable to protect the appliance with a plastic sheet.
4. Transport.
Where possible, transport the air conditioner in a vertical position.
Should this not be possible, rest it on its right-hand side; when the appliance reaches its final destination, place it immediately in the vertical position and wait at least 4 hours before operating it in cooling mode.

natural_image
Line drawing of a car interior with seat, front panel, and cross symbol (no text or labels)- For complete safety, regularly check the condition of the power cord; should it be damaged as a result of wear, contact the Service Centre to replace it.
TIPS FOR MAXIMISING COMFORT AND MINIMISING CONSUMPTION
CHECK that:
• the unit intake and delivery grilles are always free;
• the air filters are always clean; a dirty filter will decrease the passage of air and reduce the unit's performance;
- all doors and windows are closed, so as to avoid infiltration of unconditioned air;
• the flexible pipe is correctly positioned, without tight bends or curves;
• the room temperature is above 18 °C for the cooling mode, and above 10 °C for the dehumidification mode.
REGULATION (EU) No. 517/2014 - F-GAS
The unit contains R410A, a fluorinated greenhouse gas with global warming potential (GWP) = 2087.50. Kg. 0,46 = 0,960 Tonn CO _2 equiv.
Do not release R410A into the atmosphere.

INFORMATION FOR THE CORRECT DISPOSAL OF THE PRODUCT IN ACCORDANCE WITH EUROPEAN DIRECTIVE 2012/19/EU
This appliance may not be scrapped with domestic waste at the end of its life cycle. We call your attention to the crucial role played by the consumer in the re-use, recycling and other forms of recovery of such waste. The appliance must be scrapped by a sorted waste disposal centre or by returning it to the retailer (no charge is levied for this service), when you purchase a new equivalent appliance.
Sorted disposal of electric and electronic equipment prevents the negative effects on the environment and human health resulting from improper scrapping, and also allows the materials from which it is made to be recovered and recycled, with significant savings in terms of energy and resources.
The sorted disposal requirement is indicated by the crossed waste bin label affixed to the appliance.

www.artrom.es
natural_image
Exterior view of a white air conditioner unit (no visible text or symbols)INSTRUCTIONS D'UTILISATION
VUE DE DOS

1) PANNEAU DE COMMANDE ET TOUCHES POUR LE FONCTIONNEMENT SANS TÉLÉCOMMANDE
2) AILETTE ET ADMISSION D'AIR
3) PANNEAU AVANT
4) POIGNÉES
5) ENTRÉE D'AIR
6) POIGNÉES
7) ORIFICE DE DRAINAGE (DÉSHU MIDIFICATION)
8) ENTRÉE D'AIR
9) CONNECTEUR DE PUISSANCE
10) SORTIE CORDON D'ALIMENTATION
11) ORIFICE DE DRAINAGE (RAFRAÎCHISSEMENT)
12) FILTRE SUPÉRIEUR (DERRIÈRE LA GRILLE)
13) ENTRÉE D'AIR SUPÉRIEURE
14) FILTRE INFÉRIEUR (DERRIÈRE LA GRILLE)
15) ENTRÉE D'AIR INFÉRIEURE
16) CROCHET DE CORDON D'ALIMENTATION
17) ROULETTES
18) TÉLÉCOMMANDE
natural_image
Pure 3D illustration of a cylindrical object with evenly spaced horizontal lines (no text or symbols)
natural_image
Line drawing of a white cylindrical device with a coiled cable extending from its side (no text or symbols)
natural_image
Close-up of a white air vent with grid pattern and directional arrows (no text or symbols)
natural_image
Close-up of a white cylindrical device with labeled points A and B, showing internal components and ventilation grille (no text or symbols beyond labels)
natural_image
Close-up of a cylindrical mechanical component with a flanged end and a small inset view (no visible text or symbols)natural_image
Simple line drawing of a two-panel window with a single circular dot on the left pan (no text or symbols)natural_image
Close-up of a metallic cylindrical mechanical component with a looped end (no text or symbols visible)natural_image
Simple 3D illustration of a window with a small white object inside, no text or symbols present.natural_image
Diagram of a cylindrical object with internal grooves and an arrow indicating direction (no text or symbols)natural_image
Close-up of a white industrial fan or vent with ventilation grilles and a black arrow pointing to a component (no visible text or symbols)natural_image
Line drawing of a handheld device with a coiled cable extending from its side (no text or symbols)natural_image
Line drawing of a portable electronic device with lid and side panel (no text or symbols)Déshumidification
natural_image
Line drawing of an air conditioner unit with ventilation grille and control panel (no text or symbols)Déshumidification
ATTENTION!
natural_image
Close-up of hands installing or adjusting a solar panel on an air conditioner cover (no text or symbols visible)natural_image
Close-up of a person adjusting a white ventilation grille next to an air conditioner unit (no text or symbols visible)natural_image
Illustration of hands cutting a grid paper with a circular cutter (no text or symbols)natural_image
Diagram of a car interior showing seat, front panel, and rear seats with no text or symbolsnatural_image
Exterior view of a white air conditioner unit (no visible text or symbols)GEBRAUCHSANLEITUNG
HINTERANSICHT

natural_image
White remote control with black buttons and a red scroll, labeled (18) at bottom left (no readable text or symbols beyond labels)natural_image
Pure diagram of a cylindrical object with evenly spaced horizontal lines, no text or symbols present.
natural_image
Line drawing of a white cylindrical device with a coiled cable extending from its side (no text or symbols)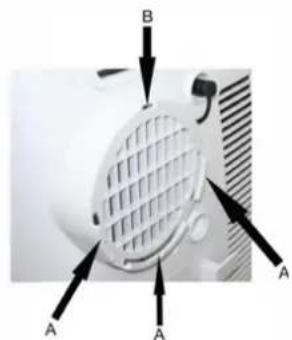
natural_image
Close-up of a white air vent with labeled arrows pointing to the grille (no text or symbols present)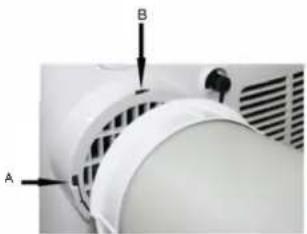
natural_image
Close-up of a white cylindrical device with labeled points A and B, showing internal components and a knob (no text or symbols beyond labels)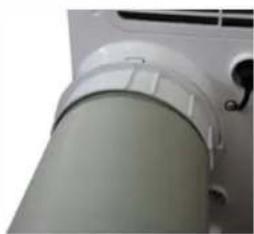
natural_image
Close-up of a cylindrical mechanical component with a metallic end and internal features (no visible text or symbols)natural_image
Simple line drawing of a two-panel window with a single dot on the left pan (no text or symbols)natural_image
Close-up of a metallic spiral mechanical component with a looped end (no text or symbols visible)natural_image
Simple 3D diagram of a window with a circular object on the left side (no text or symbols)natural_image
Diagram of a cylindrical pipe with a separate inset showing a cross-section (no text or symbols)natural_image
Close-up of a white cylindrical device with ventilation grilles and mounting holes (no visible text or symbols)natural_image
Line drawing of a handheld device with a coiled cable and label '三子舱' (three-year-old cabin) on the top (no other text or symbols)natural_image
Line drawing of a portable electric kettle with lid and side arm (no text or symbols)Entfeuchten
natural_image
Line drawing of a portable air conditioner unit with ventilation grille and control panel (no text or symbols)Entfeuchten
ACHTUNG!
natural_image
Close-up of hands installing or adjusting a solar panel array on an air conditioner cover (no text or symbols visible)natural_image
Close-up of a hand adjusting a white ventilation grille next to a white air conditioner unit (no text or symbols visible)natural_image
Line drawing of hands using a tool on a grid cutting board (no text or symbols)natural_image
Simple line drawing of a car interior with no text, numbers, or symbols
- INSTRUCCIONES DE USO
- Deshumidificación
- ¡ATENCIÓN!
- TECLA ON/OFF
- “+” and “-” TECLA
- ISTRUZIONI PER L'USO
- Deumidificazione
- ATTENZIONE!
- Portable air conditioning with heat pump
- OPERATING INSTRUCTIONS
- GENERAL OPERATING AND SAFETY INSTRUCTIONS
- PRECAUTION!
- WARNING!
- APPLIANCE START-UP
- USE WITH END FITTING FOR WINDOW
- USE WITH WINDOW UNIT KIT
- HOW TO USE THE APPLIANCE
- OPERATING MODES
- COOLING MODE (COOL)
- HEATING MODE (HEAT) (Pearl top)
- DEHUMIDIFICATION MODE (DRY)
- NOTE
- VENTILATION MODE (FAN ONLY)
- HOW TO ELIMINATE CONDENSATE
- Cooling & Heating (Pearl top)
- Dehumidification
- INFORMATION FOR CORRECT DISPOSAL OF THE PRODUCT IN ACCORDANCE WITH EUROPEAN DIRECTIVE
- 2006/66/EC
- FOR OPTIMAL REMOTE CONTROL OPERATION, POINT THE TRANSMITTER HEAD TOWARDS THE RECEIVER ON THE AIR CONDITIONER.
- "ON/OFF" BUTTON
- "SPEED" BUTTON
- "SWING" BUTTON
- "TIMER" BUTTON
- "SLEEP" BUTTON
- "+" and "-" BUTTON
- "FAN" BUTTON
- "HEAT" BUTTON
- "COOL" BUTTON
- "DRY" BUTTON
- CARE AND MAINTENANCE
- Cleaning the air filters
- Cleaning the casing.
- Storage.
- Transport.
- TIPS FOR MAXIMISING COMFORT AND MINIMISING CONSUMPTION
- CHECK that:
- REGULATION (EU) No. 517/2014 - F-GAS
- INFORMATION FOR THE CORRECT DISPOSAL OF THE PRODUCT IN ACCORDANCE WITH EUROPEAN DIRECTIVE 2012/19/EU
- INSTRUCTIONS D'UTILISATION
- Déshumidification
- ATTENTION!
- GEBRAUCHSANLEITUNG
- Entfeuchten
- ACHTUNG!
Brand : Artrom
Model : ARD-12
Category : Air conditioner