
PV 6 Wifi - Heating Beha - Free user manual and instructions
Find the device manual for free PV 6 Wifi Beha in PDF.


| Product Type | Connected Electric Radiator |
| Brand | Beha |
| Model | PV 6 Wifi |
| Dimensions (L x H x D) | 60 x 40 x 20 cm |
| Weight | 5 kg |
| Power Supply | 230 V / 50 Hz |
| Power | 1500 W |
| Connectivity | Built-in Wi-Fi |
| Main Features | Programmable thermostat, Eco mode, timer, control via mobile app |
| Maintenance and Cleaning | Unplug and clean with a soft dry cloth. Do not use abrasive products. |
| Safety | Automatic shutdown in case of overheating, frost protection, child safety lock |
| Spare Parts and Repairability | Available from the manufacturer or on the official Beha website |
| General Information | User manual provided, compatible with voice assistants (Google Home, Alexa) |
Frequently Asked Questions - PV 6 Wifi Beha
User questions about PV 6 Wifi Beha
0 question about this device. Answer the ones you know or ask your own.
Ask a new question about this device
Download the instructions for your Heating in PDF format for free! Find your manual PV 6 Wifi - Beha and take your electronic device back in hand. On this page are published all the documents necessary for the use of your device. PV 6 Wifi by Beha.
USER MANUAL PV 6 Wifi Beha
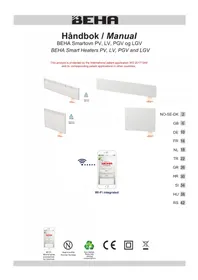
BEHA Smart Heaters PV, LV, PGV and LGV
This product is protected by the international patent application WO 20171948 and its corresponding patent applications in other countries.


NO-SE-DK 2
GB 6
DE 10
FR 14
NL 18
TR 22
GR 26
HR 30
SI 34
HU 38
RS 42

Wi-Fi integrated

Wi-Fi
World wide
connection
by internet.

Approved by Nemko Norway.

Eco-design Reducing energy consumption


For rengjøring:
Bakplaten har to T-spor. Veggfestet har to armer som kan monteres i disse hullene.
Passord:
Må inneholde minst 8 tegn.
Electrical connection....7
Installation....8
Dimensions and wattages 8
Use without mobile app control ....8
Create mobile app control account 9
Directions for use....9
Technical information 9
This manual is also available at http://beha.no/Service/FDV-Bruks-og-monteringsanvisning/Elvarme
Please read the manual carefully before use of the heaters, and save it for later reference.
The heaters may be used without mobile app control.
Use of heaters via app control:
When you use the heater for the first time, it will be ready for router connection for 3 minutes. We recommend that you wait to connect power to the heater until the mobile app is downloaded and you have established an account. Please keep your router password ready.
QR codes for downloading the app to smartphone/tablet: see also page 9.
IPHONE:

ANDROID:

SAFETY
IMPORTANT

Safety information
When using any electrical appliance, basic precautions should always be followed to reduce the risk of fire and injuries. Please read the entire user manual before using heater.
- Before use, remove all packaging.
- Turn the switch to OFF and remove the plug from the wall socket when the heater is not in use and when cleaning.
CAUTION! Parts of this product will become hot and may cause burns. Pay especially attention where children and vulnerable people are present.
- Children aged from 3 years and less than 8 years shall only switch on/off the appliance provided that it has been placed or installed in its intended normal operating position and they have been given supervision or instruction concerning use of the appliance in a safe way and understand the hazards involved. Children aged from 3 years and less than 8 years shall not plug in, regulate and clean the appliance or perform user maintenance.

Warning: In order to avoid overheating, do not cover the heater.
- This appliance can be used by children aged from 8 years and above and persons with reduced physical, sensory or mental capabilities or lack of experience and knowledge if they have been given supervision or instruction concerning use of the appliance in a safe way and understand the hazards involved. Children shall not play with the appliance. Cleaning and user maintenance shall not be made by children without supervision.
• Children of less than 3 years should be kept away unless continuously supervised.
• Furthermore, do not use the heater in areas where gasoline, paint, or flammable liquids are used or stored. - The wall socket in which the heater is connected to should be visible and accessible.
- The heater must not be located immediately below a wall socket.

- Do not operate any heater with a damaged cord or plug. The cable must not come into contact with hot surfaces of the heater during operation.
- Do not cover the cord with carpets. Do not step on the cable.
- Ensure that no foreign objects are placed in the heater's air outlets as it can cause electrical failure or fire.
- The heater should not be repaired, dismantled or modified.
Electrical connection and use
Before connecting, please ensure that the voltage is 220-240V \~ 50Hz. The heater should be connected to a socket in the room it is intended to be used. Do not connect the heater to sockets in adjacent rooms using an extension cable.
Distance
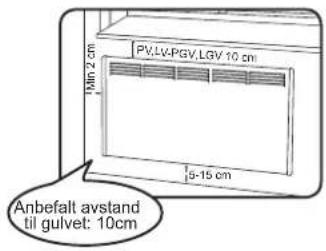
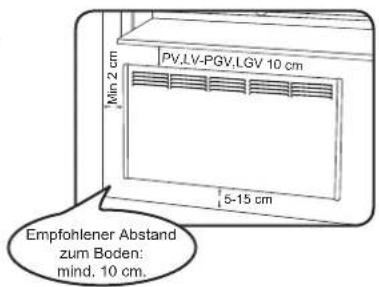
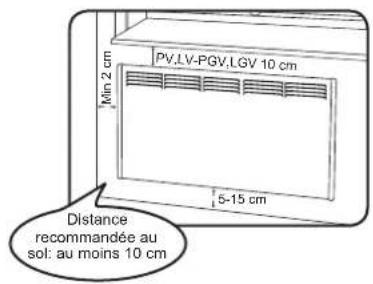
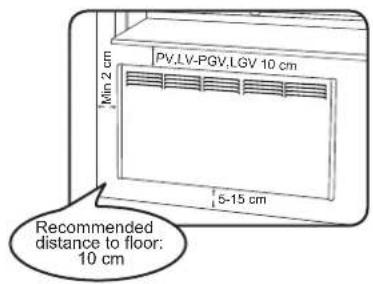
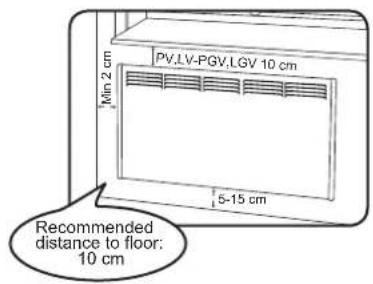
The heater should be located away from furniture, curtains or other flammable objects. Mounting distances are stated on page 8.
Care and Maintenance
- Remove power connection and make sure the heater is cooled down before cleaning.
- Clean the outside with a damp cloth.
- Never use abrasive cleaners or submerse the heater in water or other liquids.
- When cleaning or relocating the heater should be turned off and the cord unplugged. In that order. Do not remove the plug from the socket by pulling the cord. Remove the plug from the socket by gripping the plug and gently pull it out of the wall socket.
- Do not touch the heater with wet hands.
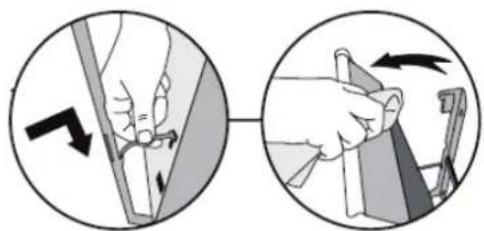
Easy cleaning:
The heater tilts forward on the fixing bracket for the ease of cleaning behind.
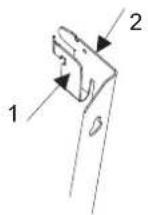
Removing wall bracket:
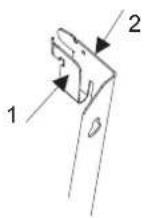
Remove wall bracket from heater by pressing lip 1 and push lightly downwards on lip 2. Pull the bracket out gently.
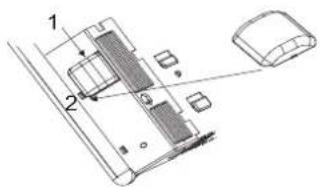
Protection and safety lid:
- Remove the lid by pressing the two sides together and pull out.
- When placing the lid the mark shall point towards the front of the heater.


Fixing the wall bracket:
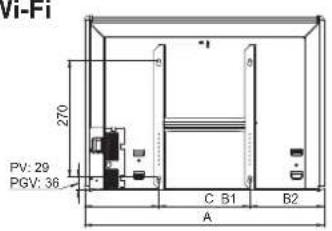
Insert a screw in the lower key hole approx. 13 cm above the floor. Level the bracket and insert the other 3 screws. When the heater is installed the distance below should be approx. 10 cm.
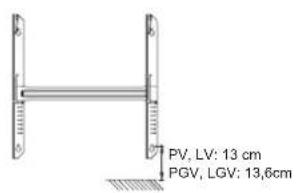

At the bottom of the back plate there are two small triangle tracks. Place the heater onto the tracks and push the heater towards the lips on top of the bracket in an upright position.
Heater sizes
| Type | Watt | A mm | B1/B2 mm | C mm |
| PV | 400 | 431 | 147/73 | 210 |
| 600 | 555 | 172 | 210 | |
| 800 | 679 | 184 | 310 | |
| 1000 | 803 | 246 | 310 | |
| 1250 | 927 | 158 | 610 | |
| 1500 | 1175 | 282 | 610 | |
| 2000 | 1423 | 406 | 610 | |
| LV | 500 | 803 | 246 | 310 |
| 750 | 1051 | 220 | 610 | |
| 1000 | 1299 | 344 | 610 | |
| 1250 | 1671 | 380 | 910 |
| Type | Watt | A mm | B1/B2 mm |
| PGV | 400 | 440 | 152/78 |
| 600 | 564 | 177 | |
| 800 | 688 | 189 | |
| 1000 | 812 | 251 | |
| 1250 | 936 | 163 | |
| LGV | 750 | 1060 | 225 |
| 1000 | 1308 | 349 |
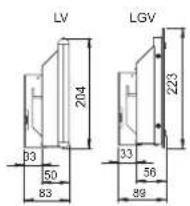
PV * Wi-Fi
PGV * Wi-Fi

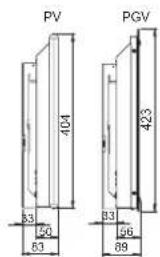
LV * Wi-Fi
LGV * Wi-Fi


Use of the heater
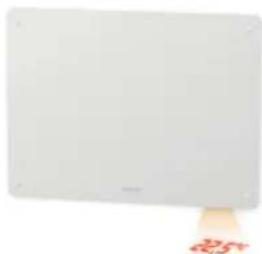
Switch on the heater. The heater is factory set at 22 °C. Scrolling the thermostat wheel changes the temperature setting. When the selected temperature is shown for the first time it will be displayed on the floor for 3 minutes. When adjusting the temperature later it will be displayed for 10 seconds.
After a power outage or the power is switched off and then on again, the Wi-Fi symbol will be displayed on the floor together with the temperature for 3 minutes. After a power outage the heater will restart at the set temperature.
Using the heater with mobile app control:
Do not switch on the heater before the app is installed on your smartphone/tablet. The reason is that the heater is set to link-up mode for 3 minutes at first time use. The Wi-Fi symbol will pulsate onto the floor for 3 minutes searching for router connection.
Creating app control account:
To control the heaters by using the mobile app a wireless network must be available on your premises. This enables online control of your heaters.
The first time you connect, your device must be connected to the same wireless network as the heater.
Network 2,4 GHz has to be used (not 5GHz).
Download the app «BEHA SmartHeater» from App Store (iPhone) or Google Play (Android). QR code at page 6.

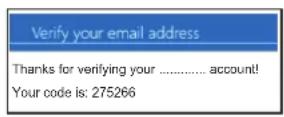
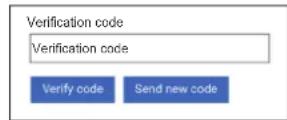
Open the app. Create an account with password or log in with your Facebook account. If you are logging in with facebook there may only be one user.
Create your account by typing in your e-mail address. Tap on Send verify code. A code will be sent to your e-mail address. This code you key in to the field Verification code. Tap on Verify code.
Then create your personal password in the field New Password.
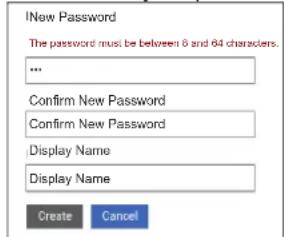
Password:
The password must include 8 or more characters.
If you are multiple users, you need to log in with the same e-mail address and password.
Display Name: Every single user enter his name.
Further information is available at: http://beha.no/Service/FDV-Bruks-og-monteringsanvisning/Elvarme
TECHNICAL INFORMATION
Factory setting is 22°C.
The thermostat can be adjusted downwards to 5° C - Frost guard level.
When the thermostat is connected, a small, red dot is shown on the floor.
By power outage:
Without app:
The heater returns to chosen temperature.
Cold draft/Open window function:
When opening a window and the temperature drops more than 5°C within 40 sec the cold draft function is activated. The heater changes between chosen temperature for 10 seconds, and 5 degrees for 30 seconds. The function is active for max. 15 minutes.
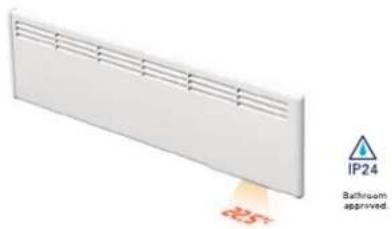
BEHA heaters PV Wi-Fi and LV Wi-Fi are IP24 tested and approved for installation in bathrooms and utility rooms.
This apparatus is in compliance with the following EU directive:
2014/30/EU (EMC) electromagnetic noise
2014/35/EU (LVD)
2011/65/EU (ROHS) use of dangerous substances
The product must be treated in compliance with EU directive 2012/19/EU. The apparatus must not be disposed of together with regular house waste but be handled to an approved waste dump for separation and recovery station. A defect product must be treated correctly, in order to prevent health or environment risks.
Information about energy consumption:
The product complies with the EU regulations on the Ecodesign Directive (2009/125/EC) for energy-related products (ErP).
The symbol 📄 on the product or on the documents accompanying the product, indicates that this product may not be treated as household waste. Handing it over to a authorized for the recycling of electrical and electronic equipment. Pick must be in accordance. The local waste regulations. For further information treatment, recovery and recycling of this product, contact your local council, waste disposal service or the shop where you purchased it.
Einfache Reinigung
Passwort:
Nettoyage facile:
Retirer le support mural:
Mot de passe:

Wachtwoord:
Kolay temizlik:
Sifre:
Εύκολος καθαρισμός:

Κωδικός πρόσβασης:
- Ne koristite uređaj ukoliko je kabel ili utikač oštečen. Kabel ne smije doči u kontakt s vručim djelovima uređaja za vrijeme rada.
- Ne pokrivajte kabel tepihom. Ne stojite na kablu.
- Osigurajte da nema stranih objekata na izlazu zraka radijatora zbog opasnosti od električnog udara ili požara.
- Uređaj nikada ne otvarajte, popravljajte ili modificirajte!
Electrical connection and use
Lagano čišćenje:
Radijator se naginje naprijed na zidnom nosaču da bi se lagano moglo očistiti zadnju stranu.
Skidanje zidnog nosača:
Skinite zidni nosač sa radijatora tako da pritisnete ušicu 1 I lagano stisnite prema dolje ušicu 2. Povucite nježno nosač.

Zaštitni poklopac:
- Uklonite zaštitni poklopac tako da ga primite s obje strane I povucite.
- Kada vračate poklopac znak na poklopcu treba pokazivati prema prednjoj strani radijatora.

Montiranje zidnog nosača:
Umetnite vijak u donju rupu na cca. 13 cm iznad poda. Izravnajte nosač I umetnite ostala 3 vijka. Kada hje radijator montiran na nosač do poda će biti cca. 10 cm.


Zaporka:
Zaporka mora imati 8 ili više znakova.
Enostavno čiščenje:

Geslo:

Jelszó:
- Ne koristiti radijatore sa oštećenim kablom ili utikačem. Kabl ne sme da dođe u kontakt sa vrućim površinama radijatora.
- Ne prekrivati kabl prostirkama bilo kog tipa. Ne gaziti kabl.
- Proveriti da nema nikakvih stranih predmeta u izlaznoj rešetki radijatora, jer oni mogu da prouzrokuju električni kvar ili požar.
- Radijator se ne sme samostalno popravljati, demontirati ili prepravljati.
Povezivanje na elektro mrežu i upotreba
Lako čišćenje:
Radijator se nagne ka napred na zidnom nosaču i onda se može lako očistiti iza njega.
Skidanje zidnog nosača:
Skinite zidni nosač sa radijatora pritiskom na klips 1, a zatim pritisnite blago nadole klips 2. Nežno izvucite nosač.
Na dnu radijatora sa zadnje strane nalaze se simboli dva mala trougla. Radijator treba spustiti na zidni nosač tako da se kuke na donjem delu nosača poklapaju sa simbolima trouglova na radijatoru. Zatim gornji deo radijatora treba gurati ka zidu sve dok klipsevi na gornjem delu zidnog nosača ne upadnu u odgovarajuća ležišta na radijatoru.
Veličine radijatora
| Type | Watt | A mm | B1/B2 mm | C mm |
| PV | 400 | 431 | 147/73 | 210 |
| 600 | 555 | 172 | 210 | |
| 800 | 679 | 184 | 310 | |
| 1000 | 803 | 246 | 310 | |
| 1250 | 927 | 158 | 610 | |
| 1500 | 1175 | 282 | 610 | |
| 2000 | 1423 | 406 | 610 | |
| LV | 500 | 803 | 246 | 310 |
| 750 | 1051 | 220 | 610 | |
| 1000 | 1299 | 344 | 610 | |
| 1250 | 1671 | 380 | 910 |
| Type | Watt | A mm | B1/B2 mm |
| PGV | 400 | 440 | 152/78 |
| 600 | 564 | 177 | |
| 800 | 688 | 189 | |
| 1000 | 812 | 251 | |
| 1250 | 936 | 163 | |
| LGV | 750 | 1060 | 225 |
| 1000 | 1308 | 349 |
PV * Wi-Fi
PGV * Wi-Fi

LV * Wi-Fi
LGV * Wi-Fi

UPOTREBA RADIJATORA
Uključite radijator. Radijator je fabrički podešen na 22 °C. Temperatura se podešava okretanjem točkića na termostatu. Kada se podešena temperatura prikazuje prvi put, biće vidljiva na podu 3 minuta. Kasnije podešavanje temperature prikazuje se na podu u trajanju od 10 sekundi.
Nakon nestanka struje ili kada se radijator isključi, pa ponovo uključi, na podu će se pored temperature prikazati i Wi-Fi simbol u trajanju od 3 minuta. Nakon nestanka struje, radijator će nastaviti da radi na temperaturi podešenoj pre nestanka struje.
Upotreba radijatora sa mobilnom aplikacijom:
Ne uključujte radijator pre nego što instalirate mobilnu aplikaciju na vašem smartphone/tablet-u i otvorite korisnički nalog. Razlog je u tome što je prilikom prvog uključivanja radijator u režimu povezivanja u trajanju od 3 minuta. Wi-Fi simbol će treptati na podu u trajanju od 3 minuta, što znači da radijator traži vezu sa ruterom.
Kreiranje korisničkog naloga:
Za upravljanje radom radijatora pomoću mobilne aplikacije potrebno je da u objektu imate bežičnu mrežu. This enables online control of your heaters.
Password:
Password mora da sadrži najmanje 8 karaktera.
Ukoliko postoji više korisnika, potrebno je da se svi korisnici loguju sa istim email-om i password-om.



- FOR RENGJØRING
- PASSORD
- USE OF HEATERS VIA APP CONTROL
- SAFETY
- IMPORTANT
- SAFETY INFORMATION
- CAUTION! PARTS OF THIS PRODUCT WILL BECOME HOT AND MAY CAUSE BURNS. PAY ESPECIALLY ATTENTION WHERE CHILDREN AND VULNERABLE PEOPLE ARE PRESENT
- ELECTRICAL CONNECTION AND USE
- DISTANCE
- CARE AND MAINTENANCE
- EASY CLEANING
- REMOVING WALL BRACKET
- PROTECTION AND SAFETY LID
- FIXING THE WALL BRACKET
- HEATER SIZES
- PV * WI-FI
- LV * WI-FI
- USE OF THE HEATER
- USING THE HEATER WITH MOBILE APP CONTROL
- CREATING APP CONTROL ACCOUNT
- PASSWORD
- TECHNICAL INFORMATION
- BY POWER OUTAGE
- WITHOUT APP
- COLD DRAFT/OPEN WINDOW FUNCTION
- EINFACHE REINIGUNG
- PASSWORT
- NETTOYAGE FACILE
- RETIRER LE SUPPORT MURAL
- MOT DE PASSE
- WACHTWOORD
- KOLAY TEMIZLIK
- SIFRE
- ΕΎΚΟΛΟΣ ΚΑΘΑΡΙΣΜΌΣ
- ΚΩΔΙΚΌΣ ΠΡΌΣΒΑΣΗΣ
- LAGANO ČIŠĆENJE
- SKIDANJE ZIDNOG NOSAČA
- ZAŠTITNI POKLOPAC
- MONTIRANJE ZIDNOG NOSAČA
- ZAPORKA
- ENOSTAVNO ČIŠČENJE
- GESLO
- JELSZÓ
- POVEZIVANJE NA ELEKTRO MREŽU I UPOTREBA
- LAKO ČIŠĆENJE
- VELIČINE RADIJATORA
- UPOTREBA RADIJATORA
- UPOTREBA RADIJATORA SA MOBILNOM APLIKACIJOM
- KREIRANJE KORISNIČKOG NALOGA
Brand : Beha
Model : PV 6 Wifi
Category : Heating