CF612T - Ventilateur domestique Khind - Free user manual and instructions
Find the device manual for free CF612T Khind in PDF.


| Product Type | Domestic Fan |
| Brand | Khind |
| Model | CF612T |
| Height | Approx. 130 cm (51.2 inches) |
| Base Diameter | Approx. 35 cm (13.8 inches) |
| Net Weight | Approx. 4.5 kg (9.9 lbs) |
| Power Supply | AC 220-240 V, 50 Hz |
| Power Consumption | 55 W (typical) |
| Speed Settings | 3 speeds (Low, Medium, High) |
| Oscillation | Yes, wide-angle oscillation |
| Tilt Adjustment | Yes, adjustable head tilt |
| Fan Blade Diameter | Approx. 40 cm (16 inches) |
| Material | ABS plastic body, metal grille |
| Safety Guard | Finger-safe grille spacing |
| Noise Level | Approx. 50 dB (maximum speed) |
| Control Type | Manual push buttons on base |
| Airflow | Approx. 70 m³/min (max speed) |
| Cord Length | Approx. 1.5 m (4.9 ft) |
| Certification | CE, RoHS |
| Maintenance | Clean with damp cloth; do not immerse |
| Spare Parts Availability | Replacement blades and guards available |
Frequently Asked Questions - CF612T Khind
User questions about CF612T Khind
0 question about this device. Answer the ones you know or ask your own.
Ask a new question about this device
Download the instructions for your Ventilateur domestique in PDF format for free! Find your manual CF612T - Khind and take your electronic device back in hand. On this page are published all the documents necessary for the use of your device. CF612T by Khind.
USER MANUAL CF612T Khind
Please read this manual carefully before operating this product. Keep this manual handy for further reference. 请在使用此产品前,详读此说明书,并将之收藏以作日后参考。
This manual is also available online
Caution / 注意 / Perhatian
(a) This appliance must be earthed. Peralatan ini mesti dibumikan. 此电器必须接驳地线.
(b) Do not use any other down rod except provided by KHIND. This is to ensure good performance and extra protection. Jangan gunakan besi peniyambung lain selain daripada yang dibekalkan oleh KHIND. Ini untuk memastikan prestas yang baik dan perlindungan tambahan.
(j) The wires in this main leads are coloured in accordance with the following code: Green/Yellow-Earth, Blue-Neutral, Brown-Live. Warna wayar pada 'main lead' seperti berikut: Hijau/Kuning-Earth, Biru-Neutral, Coklat-Live.
To ensure safety, kindly check the following.
Measure the distance using a measuring tape.
Please adjust all the Blades to get the equal distance from ceiling to the Blade Tip, L (within 1 mm tolerance).
After installation make sure the Ceiling Fan does not wobble extremely.
Can cause injury if Ceiling Fan drops.
To avoid the possibility of causing injury to users or damage to properties, please follow all the explanations written below.
Untuk mengelakkan kemungkinan berlaku kecederaan kepada pengguna atau kerosakan harta benda, sila patuhi semua penerangan yang dinyatakan di bawah.
(b) Ensure Down Rod has been fully tighten to Motor Shaft.
(Bolt tightening torque is 800\~1000 N·cm) Can cause injury if ceiling fan drops.
(c) Snap Pin must fix into Bolt as shown.
make sure the underlay is also fitted between the blade and the motor unit and tighten the bolt.
natural_image
Pure technical line drawing of a mechanical bracket or support structure without any text, numbers, or symbols| Do not fix at this position.Jangan pasang pada kedudukan ini切勿安装在该位置。 | |
| Lock the screw tightly.Kunci skru dengan ketat.将螺丝紧锁。 | |
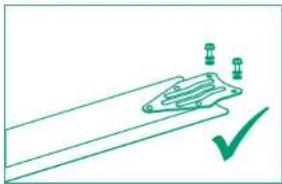
natural_image
Simple line drawing of a guitar blade with a checkmark indicating selection (no text or symbols)⑦
Parts identification / 零件名称 / Pengenalan bahagian
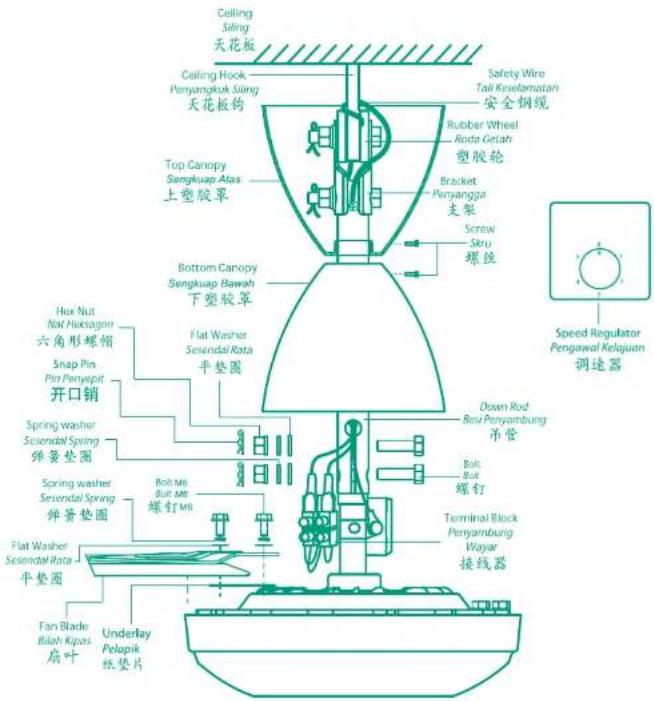
Specifications / 规格 / Spesifikasi
| Blade Size尾叶尺寸Seiz Dilch | Voltage电压Voltae | Power功率Kappa | Max Speed(rpm)速度Kolajuan | Net Weight净重量Berat Bersih |
| 60" | 220-240V~50Hz | 80W | 265 | 6.7kg |
Specification subject to change without prior notice.
(a) Connect brown and blue wires from downrod to the terminal block marked 'L' and 'N' respectively. Assemble fan blade (3 pcs) to motor with the provided screws.
Install fan unit with rubber wheel to ceiling hook and tighten with bolt & nut and snap pin.
Connect fan wires to the power supply point.
(b) Take out the Bolt & Hex Nut assembly from the part set and attach assembled ceiling fan to the Ceiling Hook and adjust the bolt parallel to the Bracket hole and lock tightly.
Note: The mounting of the suspension system shall be performed by the manufacturer, its service agent or suitably qualified persons
(d) Loop the safety wire across the ceiling hook, then tighten the screw at down rod and make sure the screw is securely fixed.
(e) Push up the top canopy to cover ceiling hook, then tighten canopy screw as shown.
(f) Make sure the distance of the lower canopy must be installed with a spacing of 5mm from the motor as show below.
Brand : Khind
Model : CF612T
Category : Ventilateur domestique