
KNF55X17 - Freezer KENWOOD - Free user manual and instructions
Find the device manual for free KNF55X17 KENWOOD in PDF.


| Brand | Kenwood |
| Model | KNF55X17 |
| Product Type | Upright Freezer |
| Total Capacity | 277 Litres |
| Freezer Capacity | 277 Litres |
| Annual Energy Consumption | 279 kWh/year |
| Climate Class | SN-ST |
| Noise Level | 42 dB(A) |
| Freezing Capacity | 14 kg/24h |
| Energy Rating | F |
| Defrost Type | Manual |
| Door Hinge | Right |
| Fast Freeze Function | Yes |
| Temperature Control | Mechanical Dial |
| Interior Light | Yes |
| Adjustable Shelves | Yes (3 shelves) |
| Product Dimensions (H x W x D) | 176 x 60 x 67 cm |
| Net Weight | 65 kg |
| Refrigerant | R600a |
| Voltage / Frequency | 220-240V / 50Hz |
| Safety Lock | Yes |
| Cleaning Advice | Clean interior with mild detergent, avoid abrasive cleaners. Defrost regularly. |
Frequently Asked Questions - KNF55X17 KENWOOD
User questions about KNF55X17 KENWOOD
0 question about this device. Answer the ones you know or ask your own.
Ask a new question about this device
Download the instructions for your Freezer in PDF format for free! Find your manual KNF55X17 - KENWOOD and take your electronic device back in hand. On this page are published all the documents necessary for the use of your device. KNF55X17 by KENWOOD.
USER MANUAL KNF55X17 KENWOOD
KNF55B17 / KNF55W17 /
KNF55X17
installation / instructions manual
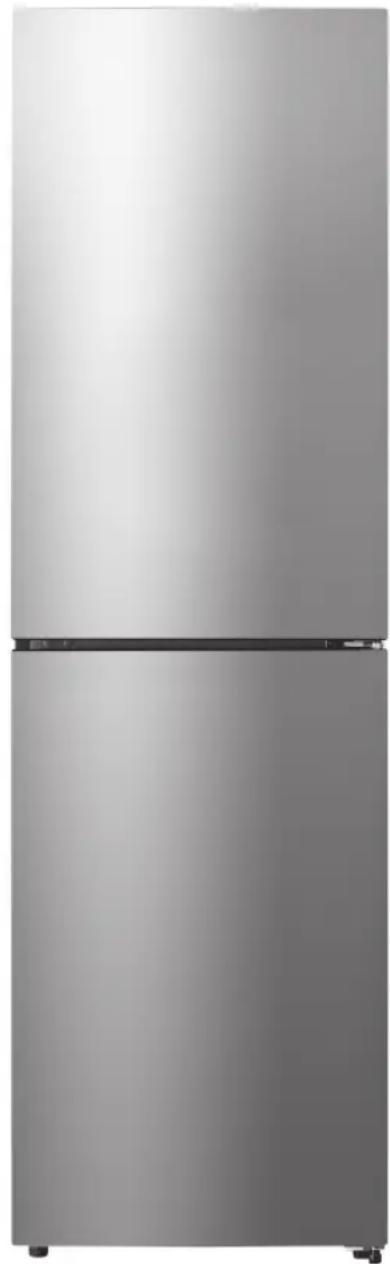
natural_image
Exterior view of a modern stainless steel refrigerator (no visible text or symbols)Contents
safety warnings 4
unpacking....6
installation....7
location....7
levelling the unit....7
free space requirements....7
reversing the door swing 8
cleaning before use....11
before using your unit....11
product overview....12
main unit....12
operation 13
switching on your unit.... 13
super freeze mode 13
holiday mode 13
noises inside the unit! 14
tips for keeping food in the unit 14
preparations for freezing 14
defrosting frozen food.... 15
cleaning the interior and the exterior of the unit.... 15
maintenance.... 16
changing the internal LED light 16
care when handling / moving your unit.... 16
servicing 16
switching off for long periods of time 16
condensation....16
disposal....16
specifications.... 17
safety warnings
For your continued safety and to reduce the risk of injury or electric shock, please follow all the safety precautions listed below.
- Read all instructions carefully before using the unit and keep them for future reference.
- Retain the manual. If you pass the unit onto a third party, make sure to include this manual.
- This appliance is intended for indoor household use and similar applications such as:
– farm houses and by clients in hotels, motels and other residential type environment;
- bed and breakfast type environment;
– staff kitchen areas in shops, offices and other working environment;
– catering and similar non-retail applications.
- Ensure that the plug is easily accessible to enable disconnection from the mains supply.
- If the mains cable is damaged, it must be replaced by the manufacturer, its service agent or a qualified technician in order to avoid a hazard.
- Choose a location for your unit away from heat sources such as radiators or fires as refrigerant and vesicant are burnable.
- The unit must be manoeuvred by a minimum of 2 persons.
- This appliance can be used by children aged from 8 years and above and persons with reduced physical, sensory or mental capabilities or lack of experience and knowledge if they have been given supervision or instruction concerning use of the appliance in a safe way and understand the hazards involved. Children shall not play with the appliance. Cleaning and user maintenance shall not be made by children without supervision.
- Children should be supervised to ensure that they do not play with the unit.
- If your unit is fitted with a lock to prevent children being trapped inside, keep the key out of reach and not in the vicinity of the unit.
- Do not store explosive substances such as aerosol cans with a flammable propellant in this appliance.
- Do not store bottles or glass containers in the freezer compartment. Contents can expand when frozen (fizzy drinks) which may break the bottle and damage your freezer compartment. (If applicable)

WARNING
- Keep ventilation openings in the unit enclosure or in the built-in structure clear of obstructions.
- Do not use mechanical devices or other means to accelerate the defrosting process, other than those recommended by the manufacturer.
- Do not use electrical appliances inside the food storage compartments of the unit, unless they are of the type recommended by the manufacturer.
- Do not damage the refrigerant circuit (The refrigerant is a very environmental-friendly gas but is also combustible. Take care when transporting or moving the unit to ensure that the refrigeration circuit is not damaged. In the event of damage avoid naked flames or ignition sources and ventilate the room in which the unit is placed for a few minutes.)
WARNING

IT IS HAZARDOUS FOR ANYONE OTHER THAN AUTHORISED SERVICE PERSONNEL TO CARRY OUT SERVICING OF REPAIRS WHICH INVOLVE THE REMOVAL OF COVERS.

TO AVOID THE RISK OF AN ELECTRICAL SHOCK DO NOT ATTEMPT REPAIRS YOURSELF.
Thank you for purchasing your new Kenwood Fridge Freezer.
These operating instructions will help you use it properly and safely.
We recommend that you spend some time reading this installation/instruction manual in order that you fully understand all the operational features it offers.
Read all the safety instructions carefully before use and keep this installation/instruction manual for future reference.
unpacking
Remove all items from the packaging. Retain the packaging. If you dispose of it please do so according to local regulations.
The following items are included:

Fridge Glass Shelf x 2

Salad Bin Cover Shelf

Freezer Glass Shelf x 3

natural_image
Simple line drawing of a two-segment refrigerator with no text or symbolsMain Unit

Upper Fridge Door Shelf x 2

Lower Fridge Door Shelf

Bottle Stopper

Salad Bin

Small Freezer Drawer x 2

Large Freezer Drawer x 2
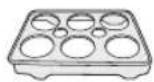
Egg Tray x 2

Ice Tray

Wine Rack

Door Stopper x 2 (left side)
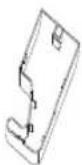
Upper Hinge
Cover (left side)

Instruction Manual

If items are missing or damaged please contact Partmaster (UK only). Tel: 0344 800 3456 for assistance.
location
When selecting a position for your unit you should make sure the floor is flat and firm, and the room is well ventilated with an average room temperature of between 10^ C and 43^ C. Avoid locating your unit near a heat source, e.g. cooker, boiler or radiator. Also avoid direct sunlight as it may increase the electrical consumption. Extreme cold ambient temperatures may also cause the unit not to perform properly. This unit is not designed for use in a garage or outdoor installation. Do not drape the unit with any covering.
levelling the unit
To do this adjust the two levelling feet at the front of the unit. If the unit is not level, the doors and magnetic seal alignments will not be covered properly.

free space requirements
When installing the unit, ensure that 25 mm of free space is left at both sides, 50 mm at the rear of the unit and 25 mm at the top of the unit. The door can be opened to the right or the left, depending on which best suits the location.
Please ensure there is more than twice the width and depth distance space of the unit to fully open the door to a maximum angle of 130^ .

installation
reversing the door swing
tools required: Philips style screwdriver / Flat bladed screwdriver / Hexagonal spanner

- Ensure the unit is unplugged and empty.
- To take the door off it is necessary to tilt the unit backwards. You should rest the unit on something solid, e.g. a chair just below the top panel.
• All parts removed must be saved to do the reinstallation of the door. - Do not lay the unit flat as this may damage the coolant system.
• We recommend that 2 people handle the unit during assembly. -
If you want to have the door swing reversed, we recommend that you contact a qualified technician. You should only try to reverse the door yourself if you believe that you are qualified to do so.
-
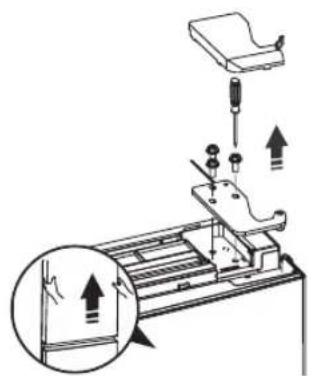
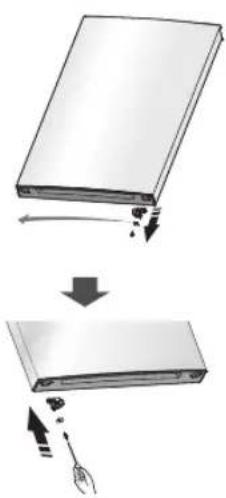
Remove the upper hinge cover, screws and upper hinge. Lift the upper door and place it on a padded surface to prevent from being scratched. Remove the screw hole cover from the opposite side and move to cover the hole here.

Upper hinge cover has left and right side. The upper hinge cover packed as an accessory is for the left side.
- Remove the screw and stop block from the bottom of the upper door and move it to the opposite side. Remove also the door stopper and keep it for future use. For the opposite side, use the door stopper for left side. Screw tightly.

Door stopper has left and right side. The door stopper packed as an accessory is for the left side.
natural_image
Diagram showing a book being folded or removed, with arrows indicating the process (no text or symbols present)installation
-
Loosen the hinge pin, reverse it and put it back to the hole, tighten into position. Take down the gasket and change its position.
-
Remove the middle hinge. Lift the lower door and place it on a padded surface to prevent from being scratched.
-
Remove the screw and stop block from the bottom of the lower door and move it to the opposite side. Remove also the door stopper and keep it for future use. For the opposite side, use the door stopper for left side. Screw tightly.

Door stopper has left and right side. The door stopper packed as an accessory is for the left side.

flowchart
graph TD
    A["Assembly: Panel with bolts and pins"] --> B["Exploring part: Board with screws and screw holes"]
    B --> C["Cut into component via valve"]
    C --> D["Final Assembly: Panel with battery and switch"]
    D --> E["Reassembly to final package"]
installation
- Lay down the unit. Remove both levelling feet, levelling feet fix board and bottom hinge. Swap the position of the levelling feet fix board with the bottom hinge.
- On the bottom hinge, move the position of the bottom hinge pin to the other hole. Tighten the pin securely.
- Screw the levelling feet fix board, bottom hinge and levelling feet tightly on their new position.
- Stand the unit. Remove the middle hinge hole covers and swap their position with the middle hinge. Reverse the middle hinge.

natural_image
Diagram of a door frame with arrows indicating motion or movement, showing wheel changes and directional arrows (no text or symbols)
natural_image
Mechanical assembly diagram showing two stages of a mechanical component with arrows indicating direction (no text or symbols)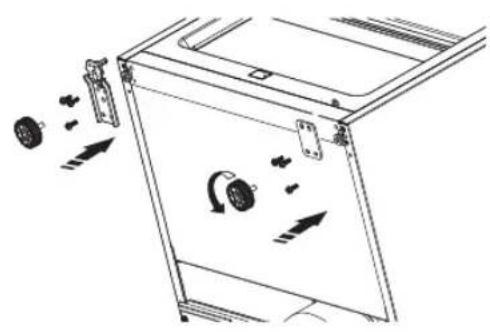
natural_image
Line drawing of a door frame with internal components and directional arrows indicating movement (no text or symbols)
natural_image
Mechanical assembly diagram showing a bracket being lifted by an arrow (no text or symbols present)installation
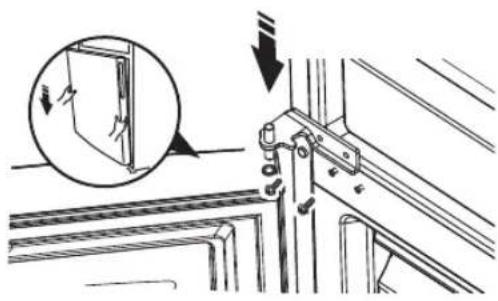
- Place the bottom hole of the lower door onto the bottom hinge pin. Insert the middle hinge pin into the upper hole of the lower door. Tighten the pin securely. Screw the middle hinge tightly. Cover the remaining holes with the hole covers.

- Ensure the lower door is aligned horizontally and vertically, so that the seals are closed on all sides before finally tightening the pin.
- Place the bottom hole of the upper door onto the middle hinge pin. Reverse the upper hinge. Insert the upper hinge pin into the upper hole of the upper door. Tighten the pin securely. Screw the upper hinge tightly. Cover the upper hinge with the upper hinge cover for left side.

- Ensure the upper door is aligned horizontally and vertically, so that the seals are closed on all sides before finally tightening the pin.
natural_image
Technical line drawing of a mechanical assembly with an inset showing a close-up of a component (no text or symbols present)
natural_image
Technical diagram showing mechanical assembly with arrows indicating force or movement (no text or symbols present)cleaning before use
Wipe the inside of the unit with a weak solution of bicarbonate soda. Then rinse with warm water using a sponge or cloth. Wipe completely dry before replacing the drawers. Clean the exterior of the unit with a damp cloth.
If you require more information refer to the Cleaning section.

• Before Plugging in YOU MUST
Check that you have a socket which is compatible with the plug supplied with the unit.
• Before Turning On!
Do not turn on until two hours after moving the unit. The coolant fluid needs time to settle.
before using your unit
Before placing any food in your unit, turn it on and wait for 24 hours, to make sure it is working properly and to allow it time to fall to the correct temperature. Your unit should not be overfilled.
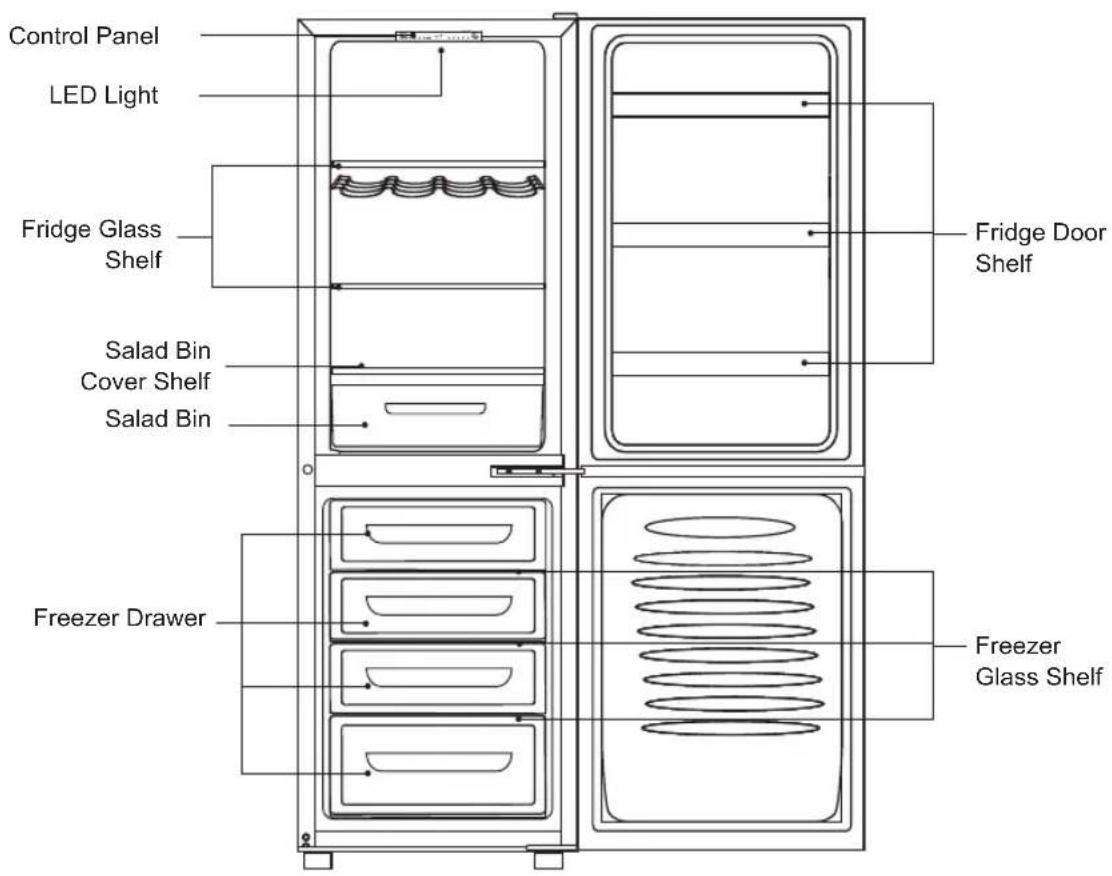
product overview
main unit

operation
switching on your unit
- Connect the mains cable to the mains socket. The internal temperature of your unit is controlled by an electronic control panel.
- Press Fridge button repeatedly to set temperature for the fridge compartment (2 to 8°C) and press Freezer button repeatedly to set temperature for the freezer compartment (-16 to -24°C).

-
The unit may not operate at the correct temperature if it is in a particularly hot or a particularly cold room, or if you open the doors often.
-
To ensure that the unit is cool enough to sufficiently chill your food, wait 24 hours before filling it with food.
-
If you are concerned that your unit is not being kept cold enough and wish to check the temperature, you will need a special fridge/freezer thermometer. These are available from most supermarkets and hardware shops. Place the thermometer in either the fridge or freezer compartment and leave overnight. The correct temperature for the fridge compartment should be at the recommended 0-8°C. The correct temperature for the freezer compartment should be -18°C or lower.

super freeze mode
- Press and hold Freezer button for 3 seconds to activate the super freeze mode. ✉ will light up. Temperature in the freezer compartment will be quickly lowered.
- To switch off, press and hold Freezer button for 3 seconds, and the freezer temperature will resume to the previous setting. Otherwise, super freeze mode will also automatically deactivate after 26 hours, and the freezer temperature will resume to the previous setting. ✉ light will extinguish.
holiday mode
- If you will be away for a period of time, you can set the fridge to holiday mode. Press and hold Fridge button for 3 seconds to activate the holiday mode. 📋 will light up. Temperature in the
fridge will automatically set to 15^ C. Do not store any food in the fridge during holiday mode. - To switch off, press and hold Fridge button for 3 seconds, and the fridge temperature will resume to the previous setting. 🚗 light will extinguish.
noises inside the unit!
You may notice that your unit makes some unusual noises. Most of these are perfectly normal, but you should be aware of them!
These noises are caused by the circulation of the refrigerant liquid in the cooling system. It has become more pronounced since the introduction of CFC free gases. This is not a fault and will not affect the performance of your unit. This is the compressor motor working, as it pumps the refrigerant around the system.
tips for keeping food in the unit
- Cooked meats/fishes should always be stored on a shelf above raw meats/fishes to avoid bacterial transfer. Keep raw meats/fishes in a container which is large enough to collect juices and cover it properly. Place the container on the lowest shelf.
- Leave space around your food, to allow air to circulate inside the compartments. Ensure all parts of the unit are kept cool.
- To prevent transfer of flavours and drying out, pack or cover the food separately. Fruit and vegetables do not need to be wrapped.
• Always let pre-cooked food cool down before you put in the unit. This will help to maintain the internal temperature of the unit.
• To prevent cold air escaping from the unit, try to limit the number of times you open the doors. We recommend that you only open the doors when you need to put food in or take food out.
preparations for freezing
- Use quality food and handle it as little as possible. Freeze food in small quantities as it freezes faster, takes less time to defrost and enables you to control the quantity you need better.
- Leave cooked food to cool completely. Chill food before freezing if possible.
- Consider how you will want to cook the food before freezing it.
- Don't freeze food in metal containers if you may want to microwave it straight from the freezer.
- Use special freezer bags, freezer film, polythene bags, plastic containers, and aluminium foil (heavy duty grade only). If in doubt, double wrap your food. Don't use aluminium foil for acidic foods, e.g. citrus fruits. Don't use thin cling film, glass, or used food containers without cleaning.
- Exclude as much air from the container as possible. You could buy a special vacuum pump which sucks excessive air out of the packaging.
- Leave a small amount of air space when freezing liquids to allow expansion.
- You can use the space in the freezer most efficiently if you freeze liquids (or solids with liquids, e.g. stew) in square blocks. This is known as "Preforming". Pour the liquid into a polythene bag which is inside a square sided container. Freeze it, and then remove it from the container and seal the bag.
- Label your frozen foods as they will look the same when in frozen state. Use special freezer tapes, labels and pens with different colours. This allows you to easily organise and to effectively use the freezer. Write the contents and date; otherwise the frozen food might exceed the storage time and this could cause food poisoning. Please refer to your food packaging for the recommended storage time.
- You may also add the weight and cooking notes, e.g. “defrost first”, “cook from frozen” and keep a separate log of what is in each drawer. This will save opening the door and searching around unnecessarily.

natural_image
Line drawing of a hand pouring liquid from a container into a container with a spoon (no text or symbols)defrosting frozen food
- Take the frozen food out from the freezer compartment and uncover the frozen food. Let it defrost at room temperature. Don't forget that defrosting in a warm area encourages the growth of bacteria and low temperature cooking may not destroy dangerous bacteria.
- Drain off and throw away any liquid lost during defrosting.
- Always make sure there are no ice-crystals in the food before cooking, particularly with meat. These crystals indicate that the food has not fully defrosted.
- Cook food as soon as possible after defrosting.
- Many microwaves and ovens have a defrost setting. To avoid bacterial build up, only use these if you intend to cook the food immediately afterwards.

Never re-freeze anything that has been defrosted unless you cook it again, to kill off harmful bacteria. Never re-freeze defrosted shellfish. Re-seal packs properly after removing items. This prevents drying or freezer-burn and a build up of frost on any remaining food.
cleaning the interior and the exterior of the unit
- Remove all the shelves and drawers.
- Wipe the inside of the unit with a weak solution of bicarbonate soda and then rinse with warm water using a sponge or cloth. Wipe completely dry before replacing the shelves, drawers and salad bin.
- Use a damp cloth to clean the exterior, and then wipe with a standard furniture polish. Make sure that the doors are closed to avoid the polish getting on the magnetic door seals or inside the unit.
- The grille of the condenser at the back of the unit and the adjacent components can be vacuumed using a soft brush attachment.
maintenance
changing the internal LED light
The internal light is an LED panel that cannot be changed by the user. Please contact a qualified service agent.
care when handling / moving your unit
Hold the unit around its sides or base when moving it. Under no circumstances should it be lifted by holding the edges of the top surface.
servicing
The unit should be serviced by an authorised engineer and only genuine spare parts should be used. Under no circumstances should you attempt to repair the unit yourself. Repairs carried out by inexperienced persons may cause injury or serious malfunction. Contact a qualified technician.
switching off for long periods of time
When the unit is not in use for a long period of time, disconnect it from the mains supply, empty all food and clean the appliance, leaving the door ajar to prevent unpleasant smells.
condensation
Condensation may appear on the outside of the unit. This may be due to a change in room temperature. Wipe off any moisture residue. If the problem continues, please contact a qualified technician for assistance.
disposal
Old units still have some residual value. An environmentally friendly method of disposal will ensure that valuable raw materials can be recovered and used again. The refrigerant used in your unit and insulation materials require special disposal procedures. Ensure that none of the pipes on the back of the unit are damaged prior to disposal.
Up to date information concerning options of disposing of your old unit and packaging from the new one can be obtained from your local council office.
When disposing of an old unit break off any old locks or latches and remove the door as a safeguard.
specifications
| Model | KNF55B17 / KNF55W17 / KNF55X17 |
| Appliance Category | Category 7 (Refrigerator – Freezer) |
| Overall Dimension (H x W x D) | 1788 x 550 x 605 mm |
| Fresh Food Storage Volume | 156 L |
| Frozen Food Storage Volume | 90 L |
| Defrosting Type | Total frost free |
| Climate Class | SN, N, ST, T |
| This appliance is intended to be used at an ambient temperature between 10°C and 43°C. | |
| Storage Temperature | Freezer: ≤-18°CFridge: 0-8°C, average ≤4°C |
| Energy Consumption | 0.764 kWh / 24 hours |
| Energy consumption 279 kWh per year, based on standard test results for 24 hours.Actual energy consumption will depend on how the appliance is used and where it is located. | |
| Airborne Acoustical Noise | 41 dB |
| Energy Grading | A+ |
| Temperature Rise Time | 13 hours |
| Freezing Capacity | 12 kg / 24 hours |
| Rated Voltage | 220-240 V~ |
| Rated Current | 0.6 A |
Features and specifications are subject to change without prior notice.
Need Help with your product?
Your product is supported by Knowhow
under a Trademark Licence from Fisher & Paykel Appliances Italy SpA.
For help or spare parts please call us on:
0344 561 1234
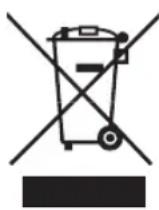
The symbol on the product or its packaging indicates that this product must not be disposed of with your other household waste. Instead, it is your responsibility to dispose of your waste equipment by handing it over to a designated collection point for the recycling of waste electrical and electronic equipment. The separate collection and recycling of your waste equipment at the time of disposal will help conserve natural resources and ensure that it is recycled in a manner that protects human health and the environment.
For more information about where you can drop off your waste for recycling, please contact your local authority, or where you purchased your product.
DSG Retail Ltd. (co. no. 504877)
1 Portal Way, London, W3 6RS, UK
Manufactured for DSG Retail Limited under Licence from Fisher & Paykel Appliances Italy SpA.
DSG Retail Limited is responsible for after sales service.
- Contents
- safety warnings 4
- unpacking....6
- installation....7
- product overview....12
- operation 13
- cleaning the interior and the exterior of the unit.... 15
- maintenance.... 16
- disposal....16
- specifications.... 17
- safety warnings
- WARNING
- Thank you for purchasing your new Kenwood Fridge Freezer.
- unpacking
- location
- levelling the unit
- free space requirements
- installation
- reversing the door swing
- cleaning before use
- before using your unit
- product overview
- main unit
- operation
- switching on your unit
- super freeze mode
- holiday mode
- noises inside the unit!
- tips for keeping food in the unit
- preparations for freezing
- defrosting frozen food
- cleaning the interior and the exterior of the unit
- maintenance
- changing the internal LED light
- care when handling / moving your unit
- servicing
- switching off for long periods of time
- condensation
- disposal
- specifications
- Need Help with your product?
Brand : KENWOOD
Model : KNF55X17
Category : Freezer