GY6000 - Motorcycle McGregor - Free user manual and instructions
Find the device manual for free GY6000 McGregor in PDF.


| Product Type | Motorcycle |
| Brand | McGregor |
| Model | GY6000 |
| Engine Type | Four-stroke, single cylinder |
| Displacement | 600 cc |
| Maximum Power | Approximately 30 hp |
| Fuel System | Carburetor |
| Transmission | 5-speed manual |
| Final Drive | Chain |
| Front Brake | Disc brake |
| Rear Brake | Drum brake |
| Front Tire | 3.25-18 |
| Rear Tire | 4.00-18 |
| Dimensions (L x W x H) | 2100 x 800 x 1100 mm |
| Wheelbase | 1350 mm |
| Seat Height | 780 mm |
| Fuel Tank Capacity | 15 L |
| Dry Weight | 150 kg |
| Ignition | CDI |
| Starting System | Electric and kick start |
| Lighting | 12V halogen headlight |
Frequently Asked Questions - GY6000 McGregor
User questions about GY6000 McGregor
0 question about this device. Answer the ones you know or ask your own.
Ask a new question about this device
Download the instructions for your Motorcycle in PDF format for free! Find your manual GY6000 - McGregor and take your electronic device back in hand. On this page are published all the documents necessary for the use of your device. GY6000 by McGregor.
USER MANUAL GY6000 McGregor
natural_image
Green Megregor industrial power plant with a wheeled cart and handle (no visible text or symbols)McGregor 25OOW Shredder
7645963 (Model: GY6000)
Important - Please read these instructions fully before starting assembly
These instructions contain important information that will help you get the best from your shredder, ensuring it is assembled correctly and safely. If you need help or have damaged or missing parts, call the Customer Helpline on 0345 605 2063
AFTER SALES SUPPORT
0345 605 2063
Contents
Safety Information .... 3
Warning Symbols....3
General Safety 5
Personal Safety 6
Operational Safety 7
Maintenance and Storage Safety 10
Intended Use....10
Service 10
In the Box....11
Parts....11
Assemble 12
Prepare....13
Operate....14
Step 1.On/Off Operation 14
Step 2. Shred the Branch .... 14
Step 3. Empty the Collection Box ...... 14
Overload Protection 15
Maintenance 16
Replace the Blade....16
Cleaning 17
Storage....17
Technical Data....18
Technical Data Table 18
Part list 18
Recycling and Disposal....18
Troubleshooting....19
General Troubleshooting 19
Getting Help 19
Guarantee 20

Safety Information
Important - Please read these instructions fully before starting assembly
Warning Symbols
The following warning symbolis appear through this manual and indicate the appropriate safety measures you should take when operating and maintaining the pressure washer.

Warning!

Read the manual.

Wear ear and eye protection.

Do not use as a stepping device.

Do not expose the unit to rain.

Caution! Switch off the motor and disconnect from the mains before adjustment or cleaning work, or if the cable is caught or has been damaged.

Warning! Risk of injury by rotating blade!

Danger-Rotating blades. Keep hands and feet out of openings while machine is running.

Warning! Danger from thrown objects.
Keep your distance from the feeder and ejection area, and keep others away from the danger area.

Safety Information
Important - Please read these instructions fully before starting assembly
Warning Symbols

Caution!
Moving blade.

Warning! Electric shock hazard.

Always unplug the shredder before working on it.

Noise level specification Lwa in dB.

Do not dispose of electrical equipment in the domestic waste.

Protection Class II

Do not use as a step.
IPX4 Degree of protection against liquids.
P40 Machine operated intermittently, each cycle comprising a period of operation of 40s at rated power input and a period of 60s with the machine at no load.
CE The product complies with the applicable European directives and an evaluation method of conformity for these directives was done.

Safety Information
Important - Please read these instructions fully before starting assembly
General Safety

IMPORTANT! Read carefully before use and keep for future reference.
- This appliance can be used by children aged from 8 years and above and persons with reduced physical, sensory or mental capabilities or lack of experience and knowledge if they have been given supervision or instruction concerning use of the appliance in a safe way and understand the hazards involved. Children shall not play with the appliance. Cleaning and user maintenance shall not be made by children without supervision.
- Keep children and pets at a safe distance away from the device. Children must be supervised in order to ensure that they do not play with the equipment.
- Never allow children or other persons unfamiliar with the user manual to use the shredder. Local regulations or bylaws may determine the minimum age for using the shredder.

CAUTION! The following states how to avoid accidents and injuries due to electric shock:
- Damaged cables, coupling and plugs or connecting leads not corresponding to specifications, must not be employed. Remove the plug immediately from the plug socket in case of damage to the mains cable.
Do not touch the mains power supply cable under any circumstances until you have pulled the plug out of the mains socket.
- If the power cable for this equipment is damaged, it must be replaced by the manufacturer, a qualified customer service agent or a similarly qualified person in order to prevent hazards.
- Do not use the appliance if the on/off switch does not

Safety Information
Important - Please read these instructions fully before starting assembly
General Safety (continued)
work properly. Always have a damaged switch repaired by our a qualified technician.
- Only use extension cables that have been approved for outdoor use and are resistant to splash water. The core diameter for extension cables measuring up to 25 m must be at least 1.5 mm ^2 , and 2.5 mm ^2 for cables longer than 25m. Always roll the whole cable off the reel before use. Check the cable for damage.
- Do not unplug the shredder pulling on the cable, only pull the plug itself. Keep the cable away from heat, oil and sharp edges.
Personal Safety
Become familiar with the instruction manual before attempting to operate this equipment.
- Never use the shredder with other persons or animals nearby.
- Wear hearing and eye protection at all times when using the shredder.
- Wear appropriate protective clothing such as protective gloves, firm footwear and long trousers. Do not wear loosely fitting clothes or clothes with dangling cords or belts.
- Only use the shredder in the open (that is, away from walls or other rigid structures) on a firm, level surface.
- Do not use the machine on a paved, gravelled area, which could be damaged by ejected material.
- Before you start up the shredder, check that all of the nuts, bolts and other fastenings are tight. Covers and shields must be fastened properly and in good working

Safety Information
Important - Please read these instructions fully before starting assembly
Personal Safety (continued)
order. Replace any damaged or illegible stickers.
- Only use replacement parts and accessories supplied and recommended by the manufacturer. Using thirdparty parts will immediately invalidate the guarantee.
- Do not leave the shredder working unattended and keep it in a dry place out of children’s reach.
- While being used in the open, connect the shredder to a residual current (RC) circuit breaker with a trip current of not more than 30 mA.
- When servicing the cutting means be aware that, even though the power source will not start due to the interlock feature of the guard, the cutting means can still be moved by a manual starting mechanism.
- Shut-off the power unit before attaching or removing the box.
- Keep all guards and deflectors in place and in good working condition.
Operational Safety
- Make sure that the funnel feeder is empty before you start the shredder.
- Keep your head, hair and body away from the intake opening.
- Do not reach into the funnel feeder during operation. The shredder will continue to run for a short period after you switch it off.
- Always make sure you are standing in a firm, balanced position. Do not lean forwards, and never lean over the shredder when inserting materials.

Safety Information
Important - Please read these instructions fully before starting assembly
Operational Safety (continued)
- Make sure that the material inserted into the shredder does not contain hard objects made of metal, stone, glass or similar.
- Do not use the shredder in the rain and in bad weather. Work in daylight or under good lighting conditions.
- Do not operate the shredder when you are tired or distracted, or under the influence of alcohol or medication. Always take a break when you need one and be sensible about how you work.
- Switch the shredder off and pull the plug under the following circumstances:
When you are not using the device, transporting it or leaving it unattended. New Line. Capitalize B.
When you are checking the device, cleaning it or removing blockages.
When you are carrying out cleaning or maintenance work or replacing accessories.
Before moving or lifting the shredder.
If foreign objects should enter the shredder, if the shredder is making unfamiliar noises or vibrations (check the shredder for damage before starting it up again)
- Do not allow shredded material to accumulate near the ejection area. This may otherwise hinder proper ejection and force the material back up through the feeder.
- Do not transport or tip the shredder with the motor running.
- Keep hands, other body parts and clothing out of the filling chamber and ejection channel and away from

Safety Information
Important - Please read these instructions fully before starting assembly
Operational Safety
other moving parts.
- In the event of blockages in the machine intake or ejection, switch off the motor and disconnect the machine from the mains before removing leftover material in the intake opening or ejection channel. Ensure that the motor is free of rubbish and other accumulations in order to safeguard the motor from damage or possible fire.
- Remember that the cutting tool is also activated when the starting mechanism is started on a motor operated machine.

CAUTION! The following states how damage to the shredder and possible injury to people can be avoided:
- Handle the unit with care. Clean the ventilation slits regularly; keep to the maintenance instructions.
- Do not overload your device. Work only within the indicated range of performance. Do not employ any low power machines for heavy work. Do not use your device for purposes for which it has not been designed.
- Only switch the shredder off once the funnel feeder is completely empty since the shredder may otherwise clog up and not be able to start afterwards.
- Do not attempt to repair the shredder yourself unless you are qualified to do so. Any work not specified in this manual may only be carried out by a qualified service centre.

Safety Information
Important - Please read these instructions fully before starting assembly
Maintenance and Storage Safety

WARNING!
- To ensure the appliance safety, use only original spare parts from the manufacturer or approved by the manufacturer.
- Retrofitting or making any unauthorized changes to the machine, as well as the use of unapproved parts will invalidated your warranty.
- Do not attempt to repair the appliance yourself. All work not indicated in these instructions is to be carried out only by service stations authorized by us.
- Store the appliance in a dry location and out of reach of children.
- Handle the appliance with care. Keep the appliance clean for save and more efficient working. Follow the maintenance directions.
Intended Use
The shredder has a powerful electric motor with overload protection. The cutting is performed by a fast moving blade.
Refer to the following descriptions for the functional use of the various components and controls.
Service
Have your tool repaired by an authorized service agent. This tool is manufactured in accordance with the relevant safety regulations. To avoid danger, electrical appliances must only be repaired by qualified technicians. Call our customer helpline at 0345 605 2063 for advice.
In the Box
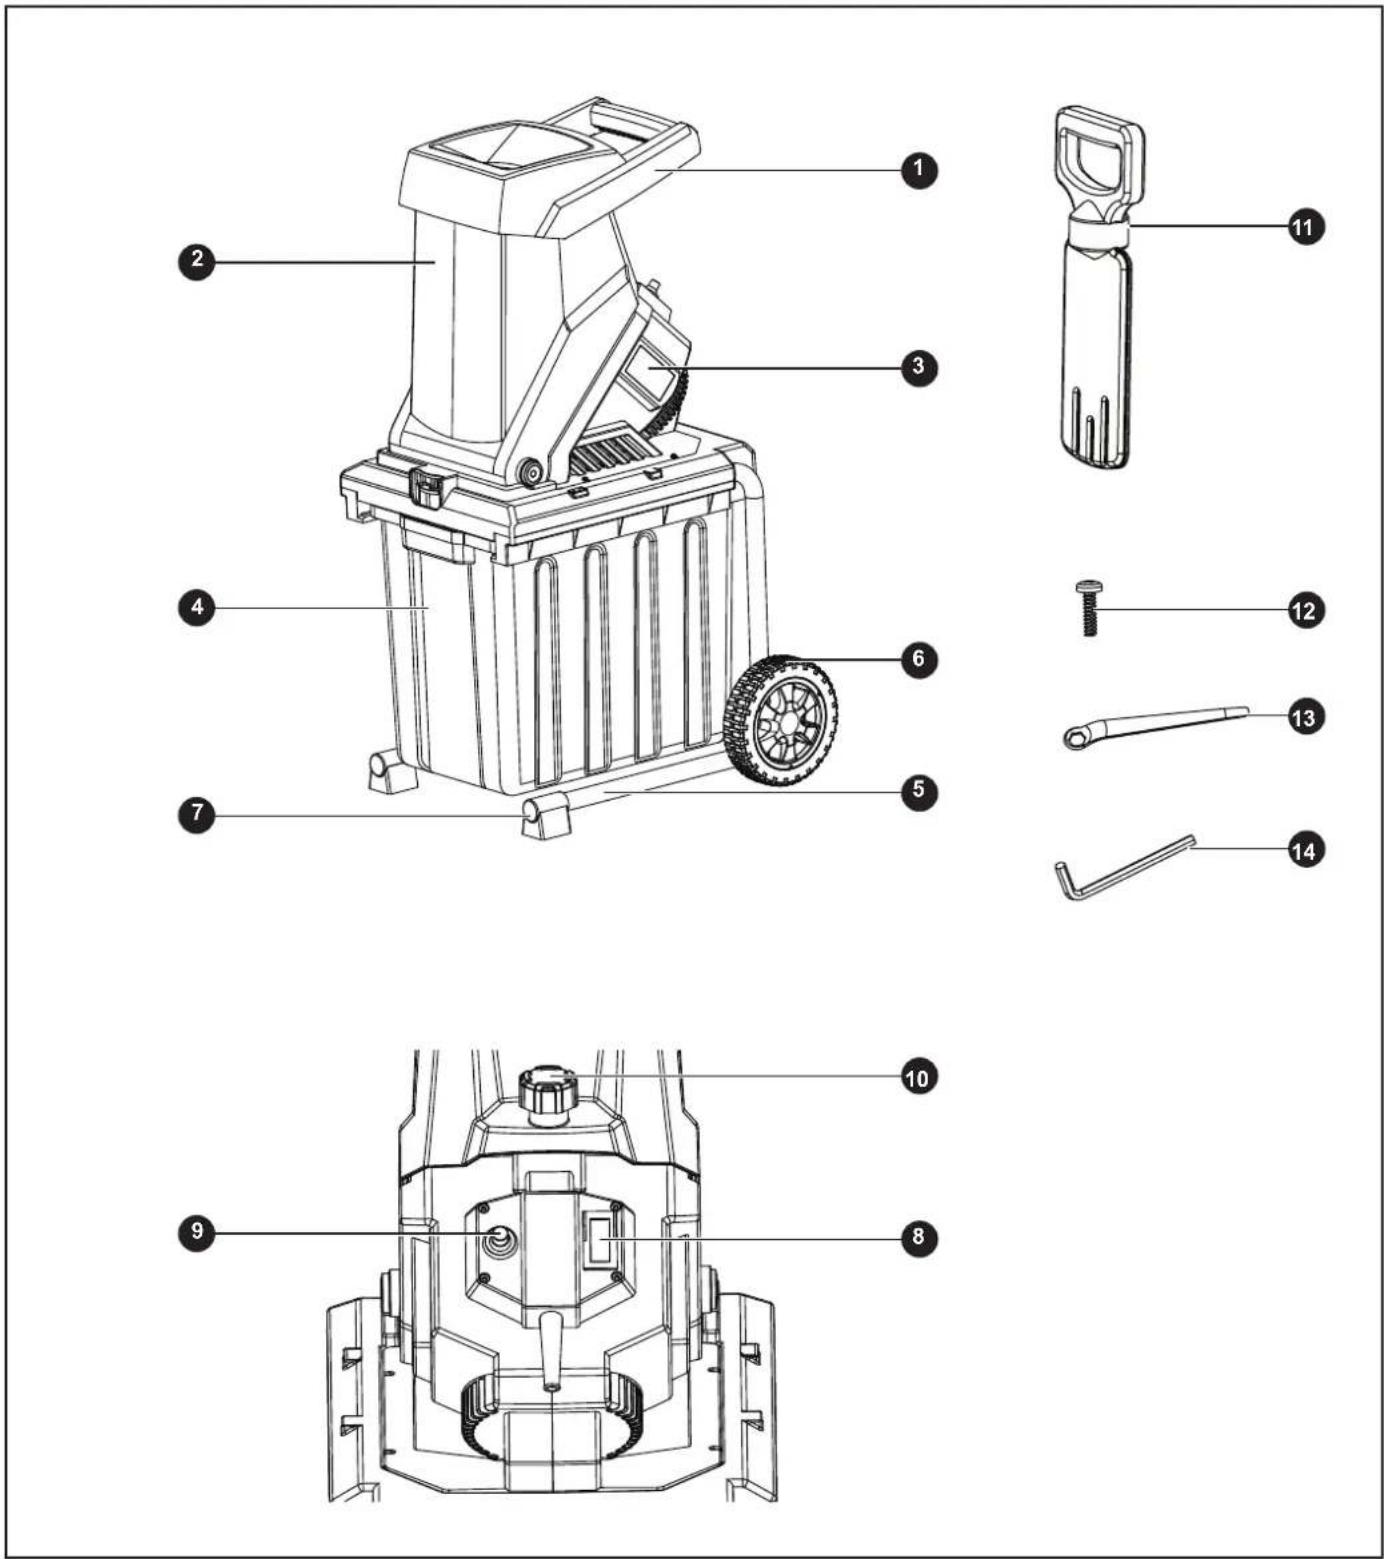
Parts
1 Handle
2 Housing
3 Motor cover
4 Collection box
5 Frame
6 Wheel
7 Feet
8 Main switch
9 Overload reset switch
10 Cover knob
11 Push stick
12 Screw x 4
13 Spanner
14 Allen key
Assemble

natural_image
Line drawing of a mechanical device with two vertical supports and a central tray, showing rotational arrows (no text or symbols)Step1. Turn on Foots to the appropriate location, then upside down the frame.
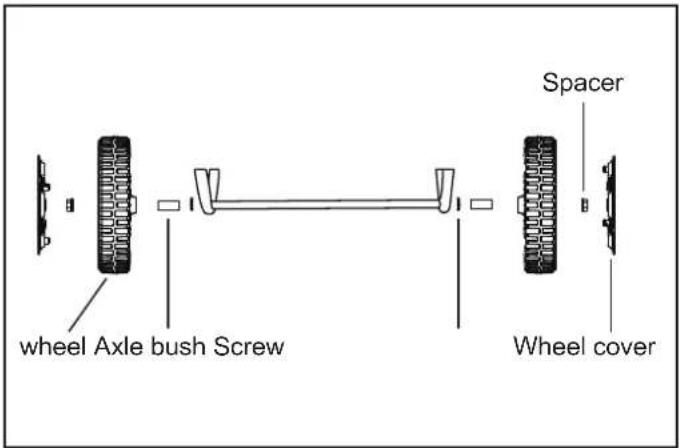
Step2. Mount the wheel in the same order illustrated, fasten nut by the provided spanner ensure the nut is not too tight.

natural_image
Technical diagram of a mechanical device with downward arrows indicating assembly or component (no text or symbols present)Step3. Place the motor unit on the chassis, Secure the unit with 4 screws.
Assemble

natural_image
Technical line drawings of two different waste sorting machines, one with a handle and labeled component 1, the other with a handle and labeled component 2 (no text or symbols present)Step 4 Lift up the button, push the collection box to end of the track, and make sure the box has been locked.
Perpare
Connect Socket

natural_image
Line drawing of a hand holding a tool with a spring-like component inserted (no text or symbols)Connect the plug to the main socket.
Operate
Step 1. On/Off Operation

natural_image
Technical line drawing of a mechanical component with a magnified inset showing a button (no text or symbols present)Press the switch marked "1" to start and marked "0" to stop the motor.
Step 2. Shred the Branch
natural_image
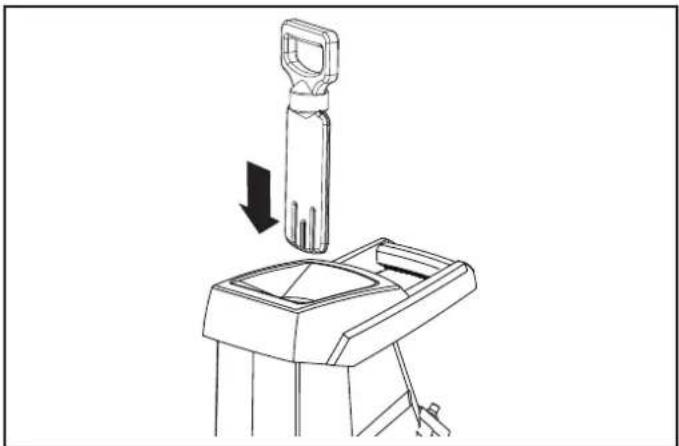
Line drawing of a mechanical device with a handle and arrow indicating downward motion (no text or symbols)Put branches into hopper, use push stick to push when branches short.
Step 3. Empty the Collection Box
natural_image
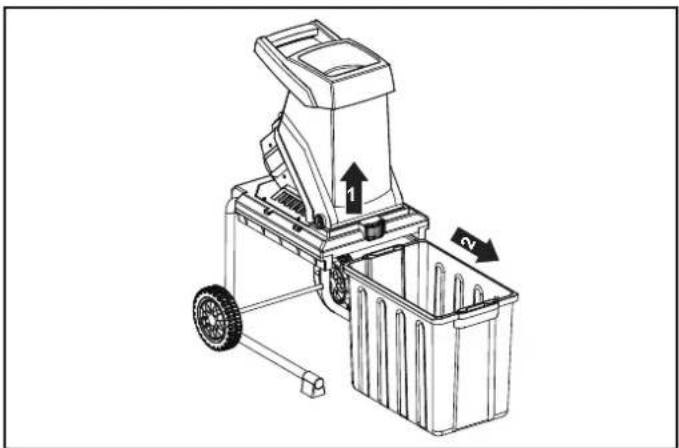
Line drawing of a waste bin with labeled components (no text or symbols)Turn off the unit, remove and empty the collection box.
Operate
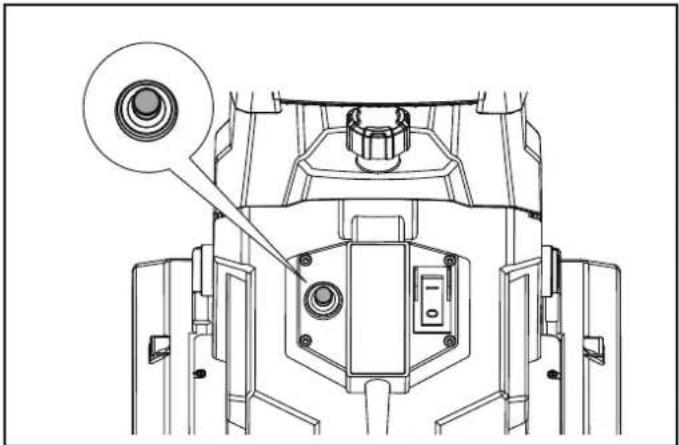
Overload Protection
natural_image
Technical line drawing of a mechanical component with a circular inset detail (no text or symbols)Overload protection will be activate in following issue.
a. A build up of shredded material around the cutting disc.
b. the material bring shredded is greater then the motor capacity.
c. Where there is too much resistance against the cutting blade.
When Overload protection be activate, press the overload reset switch, press the on/off switch to "off" then press back to "on".
Maintenance
Replace the Blade
Ensure that the shredder is switched off and disconnected from the mains supply. work gloves be used when replacing the blades.
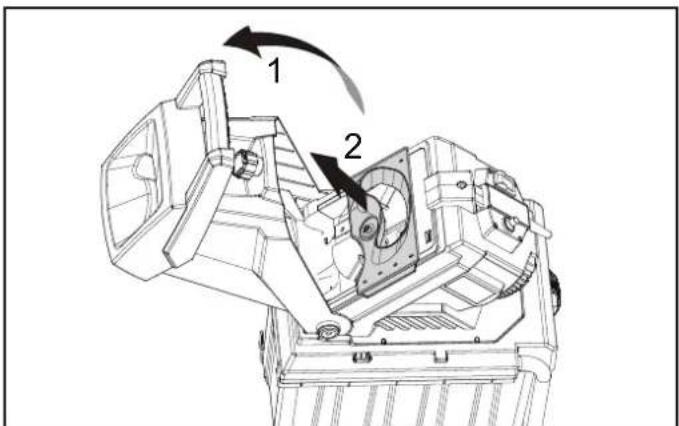
- Open the top feed assemble by unscrewing the cover knob, and then remove the metal frame.

- Since the blade is two side sharp for cutting, so could use both sides; Lock the blade disc using screwdriver or similar tools. Remove the blade by Allen key and rotate it through 180 degrees then fit the blade to the blade disc ensuring that the ground cutting edge is facing downwards; Fix the metal frame back with screws.

natural_image
Technical line drawing of a mechanical component with no visible text or symbols- Close top feed, make sure knob fasten in proper position.
Note: The box must be locked firmly, otherwise the shredder cannot power on.
Maintenance
Cleaning
Make sure the product is switched off, cooled down and disconnected from power supply.
- Clean the product with a dry cloth. Use a brush for areas that are hard to reach.
- In particular clean after every use with a cloth and brush.
- Remove stubborn dust with compressed air (max. 3 bar).
- Check for any damage and wear. Repair damages in accordance with this instruction manual or bring it to an authorized service centre before using the product again.
Storage
Store the product and its accessories in a dry, frost-free place.
- Always store the product in a place that is inaccessible to children. The ideal storage temperature is between 10 and 30°C.
- Cover the product with a dust sheet to protect it against dust.
Technical Data
Technical Data Table
| Model No GY6000 | |
| Nominal power intake | 2500W (P40) |
| Voltage 230-240V~, 50Hz | |
| Insulation protection class | ☐ II |
| Degree of protection IPX4 | |
| Branch thickness max. 40 mm | |
| Volume of collection bag ca. 50 l | |
| Weight 14.1 kg | |
| Sound pressure level (LpA) 95.7 dB(A) K=3 | dB(A) |
| Sound performance level (guaranteed) 111 d | B(A) |
Part List
| PART NUMBER ACCESSORIES | |
| 8132-600001 | Blade |
Recycling and Disposal
Recycle unwanted materials instead of disposing of them as waste. All tools, hoses and packaging should be sorted, taken to the local recycling centre and disposed of in an environmentally safe way.
Recycle rather than dispose of unwanted material in landfill whenever possible. The machine must be delivered in rigid packaging to avoid damage during transportation. The packaging and the machine itself are manufactured from recyclable materials and should be disposed of accordingly.
Only dispose of electrical/electronic/battery terms in separate collection schemes, which cater for the recovery and recycling of materials contained within. Your cooperation is vital to ensure the success of these schemes and for the protection of the environment.
Recycle packaging where facilities exist.
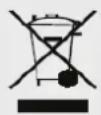
This symbol is known as the Crossed out Wheelie Bin Symbol. When this symbol is marked on a product or battery, it means that it should not be disposed of with your general household waste. Some chemicals contained within electrical/electronic products or batteries can be harmful to health.
Troubleshooting
General Troubleshooting

WARNING!
- Only perform the steps described within these instructions!
All further inspection, maintenance and repair work must be performed by an authorised service centre or a similarly qualified specialist if you cannot solve the problem yourself!
- Always turn off the machine and remove the plug before making any adjustment.
| Fault Possible Cause Solution | ||
| Motor will not start No mains | power supply Check the socket, cable, lead and plug for damage, and if necessary, have any damage repaired by qualified repair personnel | |
| Overload protection tripped | Wait until the motor has cooled down, then press the Reset button and restart the unit | |
| Lid of housing not closed properly | Tightly screw in the cover knob | |
| Garden waste is not drawn in | Shredding material is too soft | Use the pusher or add dry twigs/ branches |
| Unit blocked See section “Clearing a Blockage” | ||
| Shredding material in discharge duct | Remove shredding material from discharge duct | |
| Unit won’t shred properly Blades are blunt Check and turn, sharpen or replace blades as necessary (see section “Sharpening, reversing, replacing the blades”) | ||
Getting Help
Customer Helpline 0345 605 2063
Dear Customer,
In the unlikely event that your device develops a fault, please contact our Customer service department on the telephone number shown below.
- These guarantee terms cover additional guarantee rights and do not affect your statutory warranty rights. Claims must be accompanied by Proof of Purchase. This must be in the form of a Sales receipt or Bank statement and must show that the product has been purchased within 2 years prior to the claim, from the retailer that it was originally sold to.
- Our guarantee covers problems caused by material or manufacturing defects, and will result in the repair of these defects or replacement of the device with a like for like or similar article. Please note that our devices have not been designed for use in commercial, trade or industrial applications. Consequently, the guarantee is invalidated if the equipment is used in commercial, trade or industrial applications or for other equivalent activities.
- The following are also excluded from our guarantee:
A. Faults due to accidents, customer misuse or unauthorized repairs.
B. Blade
C. Failure due to lack of routine maintenance.
D. Failure as a result of not using the equipment in accordance with the manual and safety instructions.
-
The guarantee is valid for a period of 2 years starting from the purchase date of the device. Guarantee claims should be submitted before the end of the guarantee period within two weeks of the defect being noticed. No guarantee claims will be accepted after the end of the guarantee period. The original guarantee period remains applicable to the device even if repairs are carried out or parts are replaced. In such cases, the work performed or parts fitted will not result in an extension of the guarantee period, and no new guarantee will become active for the work performed or parts fitted. This also applies when an on-site Service is used.
-
Please keep your sales receipt in a safe place.

- McGregor 25OOW Shredder
- Important - Please read these instructions fully before starting assembly
- Contents
- Safety Information .... 3
- In the Box....11
- Assemble 12
- Prepare....13
- Operate....14
- Maintenance 16
- Technical Data....18
- Troubleshooting....19
- Guarantee 20
- Safety Information
- Warning!
- Caution!
- General Safety (continued)
- Personal Safety
- Personal Safety (continued)
- Operational Safety
- Operational Safety (continued)
- Intended Use
- Service
- In the Box
- Parts
- Assemble
- Perpare
- Connect Socket
- Operate
- Step 1. On/Off Operation
- Step 2. Shred the Branch
- Step 3. Empty the Collection Box
- Overload Protection
- Maintenance
- Replace the Blade
- Cleaning
- Storage
- Technical Data
- Technical Data Table
- Part List
- Recycling and Disposal
- Troubleshooting
- General Troubleshooting
- Getting Help
Brand : McGregor
Model : GY6000
Category : Motorcycle