MEH1533M - Lawn mower McGregor - Free user manual and instructions
Find the device manual for free MEH1533M McGregor in PDF.


| Product Type | Petrol Lawn Mower |
| Model | MEH1533M |
| Engine Type | 4-Stroke Petrol Engine |
| Engine Displacement | 33 cc |
| Cutting Width | 38 cm (15 inches) |
| Cutting Height Adjustment | Central lever, 6 positions (25-75 mm) |
| Grass Collection Bag Capacity | 40 liters |
| Mulching Function | Yes, with included mulching plug |
| Side Discharge | Yes, with included deflector |
| Drive Type | Manual push (self-propelled not available) |
| Deck Material | Steel |
| Overall Dimensions (L x W x H) | 120 x 50 x 90 cm |
| Weight | 25 kg |
| Fuel Type | Unleaded petrol |
| Oil Capacity | 0.5 liters (SAE 30) |
| Safety Features | Operator presence control brake lever; blade brake |
| Maintenance | Regular air filter cleaning, oil change every 25 hours |
| Spare Parts Availability | Replacement blades, air filters, spark plugs available |
| Warranty | 2 years limited warranty |
| Recommended Lawn Area | Up to 500 m² |
| Noise Level (guaranteed) | 96 dB(A) (LwA) |
| Vibration Level | 6.5 m/s² |
Frequently Asked Questions - MEH1533M McGregor
User questions about MEH1533M McGregor
0 question about this device. Answer the ones you know or ask your own.
Ask a new question about this device
Download the instructions for your Lawn mower in PDF format for free! Find your manual MEH1533M - McGregor and take your electronic device back in hand. On this page are published all the documents necessary for the use of your device. MEH1533M by McGregor.
USER MANUAL MEH1533M McGregor
natural_image
Black and teal cleaning brush holder with adjustable arm and base (no visible text or symbols)McGregor 150OW
Electric Hover Mower
7395134 (Model: MEHI533M)
Important - Please read these instructions fully before starting assembly
These instructions contain important information that will help you get the best from your hover, ensuring it is assembled correctly and safely. If you need help or have damaged or missing parts, call the Customer Helpline on 0345 605 2063
AFTER SALES SUPPORT
0345 605 2063
Contents
Safety Information....3
Warning Symbols 3
General Safety....5
Personal safety....6
Operating safety 9
Maintenance and storage safety 14
Intended use.... 15
Service.... 15
In the Box 16
Parts 16
Assemble....17
Step 1 - Fix the lower handle .... 17
Step 2 - Fix the upper and middle handle .... 17
Step 3 - Fix the cable.... 18
Prepare 19
Step 1 - Connection to the power supply ...... 19
Step 2 - Connect the plug to the main socket .... 19
Step 3 - Mowing tips ...... 20
Step 4 - Setting the cutting height ...... 20
Operate 23
Step 1 - Switching on....23
Step 2 - Switching off .... 23
Step 3 - Mowing direction ...... 24
Maintenance & Repair 25
Maintenance 25
Repair 25
Mowing advice....25
Storage 26
Transportation....26
Technical Data 27
Technical Date Table....27
Part List ...... 27
Recycling and disposal 28
Troubleshooting 29
General Troubleshooting 29
Getting Help 30
Customer Helpline 30
Guarantee 30

Safety Information
Important - Please read these instructions fully before starting assembly
Warnings Symbols

Before any use, refer to the corresponding paragraph in the present manual.

This symbol, before a safety comment, indicates a precaution, a warning or a danger. Ignoring this warning can lead to an accident for yourself or for others. To limit the risk of injury, fire, or electrocution always apply the recommendations indicated.

Wear hearing protection

Wear eye protection

Wear protective gloves

Do not expose and operate the product to rain or wet conditions.

Remove the plug from the mains immediately if cable is damaged or cut.

Keep bystanders away.

Beware of sharp blades. Blades continue to rotate after the motor is switch off. Remove plug from mains before maintenance or if cord is damaged.

Double insulation.
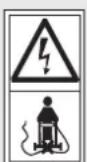
Keep supply flexible cord away form cutting means.

Safety Information
Important - Please read these instructions fully before starting assembly
Warnings Symbols (continued)

Guaranteed sound power level value in 96 dB.

The product complies with the applicable European directives and an evaluation method of conformity for these directives was done. Waste electrical products should not be disposed of with household waste.
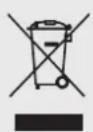
Please recycle where facilities exist.

Safety Information
Important - Please read these instructions fully before starting assembly
General Safety

Important!
- Keep this instruction manual in a safe place for future reference.
- Read the instructions carefully. Be familiar with the controls and the proper use of the equipment.
- Never allow children or people unfamiliar with these instructions to use this hover. Local regulations can restrict the age of the operator.
- Never use the machine while people, especially children, or pets are nearby. Keep in mind that the operator or user is responsible for accidents or hazards occurring to other people or their property.
- This appliance is not intended for use by persons (including children) with reduced physical, sensory or mental capabilities, or lack of experience and knowledge, unless they have been given supervision or instruction concerning use of the appliance by a person responsible for their safety. Children should be supervised to ensure that they do not play with the appliance.
- Don’t use the appliance without reading the instruction sheet.
- Children should be supervised to ensure that they do not play with the appliance.
WORK AREA SAFETY
- Inspect the area where the machine is to be used and remove all objects which can be thrown by the machine. If objects are hidden while operating stop the motor and remove them.

Safety Information
Important - Please read these instructions fully before starting assembly
Personal Safety
- Do not operate the machine in explosive atmospheres, such as in the presence of flammable liquids, gases or dust. Power tools create sparks which may ignite the dust or fumes.
- Keep children and bystanders away while operating a power tool. Distractions can cause you to lose control.
ELECTRICAL SAFETY
- The plug must match the outlet. Never modify the plug in any way. Do not use any adapter plugs with earthed (grounded) power tools. Unmodified plugs and matching outlets will reduce the risk of electric shock.
- Avoid body contact with earthed or grounded surfaces, such as pipes, radiators, ranges and refrigerators. There is an increased risk of electric shock if your body is earthed or grounded.
- Do not expose power tools to rain or wet conditions. Water entering a power tool will increase the risk of electric shock.
- Do not abuse the cord. Never use the cord for carrying, pulling or unplugging the power tool. Keep the cord away from heat, oil, sharp edges or moving parts. Damaged or entangled cords increase the risk of electric shock.
- When operating a power tool outdoors, use an extension cord suitable for outdoor use. Use of a cord suitable for outdoor use reduces the risk of electric shock.
- If operating a power tool in a damp location is unavoidable, use a residual current device (RCD) protected supply. Use of an RCD reduces the risk of

Safety Information
Important - Please read these instructions fully before starting assembly
Personal Safety (continued)
electric shock. The maximum operating current of the RCD must be less than 30mA.
- The voltage indicated on the rating plate must correspond to the voltage of the power source.
- Only use or replace power supply cables for this unit which correspond to the types indicated by the manufacturer. See the operating instructions for the order no. and types.
- Never touch the mains plug with wet hands.
- Do not run over, crush or pull the power supply cable or extension lead, otherwise it may be damaged. Protect the cable from heat, oil and sharp edges.
- The extension lead must have a cross section in accordance with the operating instructions and be protected against splashed water. The connection must not be in water.
POWER TOOL USE AND CARE
- Do not force the power tool. Use the correct power tool for your application. The correct power tool will do the job better and more safely when operated at the rate for which it was designed.
- Do not use the power tool if the switch does not turn it on and off. Any power tool that cannot be controlled with the switch is dangerous and must be repaired.
- Disconnect the plug from the power source and/ or the battery pack from the power tool before making any adjustments, changing accessories, or storing power tools. Such preventive safety measures reduce the risk of starting the power tool accidentally.

Safety Information
Important - Please read these instructions fully before starting assembly
Personal Safety (continued)
- Store idle power tools out of the reach of children and do not allow persons unfamiliar with the power tool or these instructions to operate the power tool. Power tools are dangerous in the hands of untrained users.
- Maintain power tools. Check for misalignment or binding of moving parts, breakage of parts and any other condition that may affect the power tool's operation. If damaged, have the power tool repaired before use. Many accidents are caused by poorly maintained power tools.
- Keep cutting tools sharp and clean. Properly maintained cutting tools with sharp cutting edges are less likely to bind and are easier to control.
- Use the power tool, accessories and tool bits etc. in accordance with these instructions, taking into account the working conditions and the work to be performed. Use of the power tool for operations different from those intended could result in a hazardous situation.
TRAINING
- Read the instructions carefully. Be familiar with the controls and the proper use of the machine.
- Never allow people unfamiliar with these instructions or children to use the product. Local regulations can restrict the age of the operator.
- Never use the machine while people, especially children, or pets are nearby. Keep in mind that the operator or user is responsible for accidents or hazards occurring to other people or their property.
PREPARATION
- While operating the machine always wear substantial footwear and long trousers. Do not operate the machine when barefoot or wearing open sandals. Avoid wearing clothing that is loose fitting or that has hanging cords or ties.
- Thoroughly inspect the area where the machine is to be used and remove all objects which can be thrown by the machine.
- Before using, always visually inspect to see that the blade, blade bolt and the blade assembly are not worn or damaged. Replace worn or damaged components in sets to preserve balance. Replace damaged or unreadable labels.
- Before use check the supply and extension cord for signs of damage or aging. If the cord becomes damaged during use, disconnect the cord from the supply immediately.
OPERATION
- Operate the machine only in daylight or in good artificial light. Do not expose the product to rain or wet conditions. Avoid using the product in bad weather conditions especially when there is a risk of lightning.
- Do not put hands or feet near or under rotating parts. Keep clear of the discharge opening at all times.
- Before use check the controls and correct operation of the product.
- Before using the product or after any impact, check for signs of wear or damage and repair as necessary.
• Always disconnect the product from the power supply (i.e. remove the plug from the power supply or the battery pack)
– Whenever leaving the product unattended;
– Before clearing a blockage;
– Before checking, cleaning or working on the product
– After striking a foreign object;
- Whenever the product starts vibrating abnormally.
• Always ensure that the air vents are kept clear of debris.
- Never use replacement parts or accessories not provided or recommended by the manufacturer.
- Position the cord so that it will not be caught by the cutting attachment during operation.
- Disconnect from the power supply when the cord becomes damaged or tangled.
- Do not use the product if the cord is damaged or worn.
- Warning! The cutting blade may continue to move after the product is switched off.

Safety Information
Important - Please read these instructions fully before starting assembly
Operating Safety (continued)
- Keep the extension cord away from the blades at all times.
• Always be sure of your footing on slopes. - Walk, never run.
• Exercise extreme caution when changing direction on slopes. - Do not mow excessively steep slopes.
- Use extreme caution when reversing or pulling the machine towards you.
- Stop the blade(s) if the machine has to be tilted for transportation when crossing surfaces other than grass, and when transporting the machine to and from the area to be used.
- Switch on the motor carefully according to instructions and with feet well away from the blade(s).
- Do not tilt the machine when switching on the motor, except if the machine has to be tilted for starting. In this case, do not tilt it more than absolutely necessary and lift only the part, which is away from the operator.
- Do not transport the machine while the cutting blade is running. Make sure that all moving parts have come to a complete stop.
- Switch off the motor and disconnect the mains lead; Whenever you leave the machine,
- Before clearing blockages or unclogging chute,
- Before checking, cleaning or working on the machine,
• After striking a foreign object.
Inspect the machine for damage and make repairs before restarting and operating the machine.
- If the machine starts to vibrate abnormally immediately switch off the motor, disconnect the mains lead and inspect for damage. Replace or repair any damaged parts. Also check for and tighten any loose parts.
EMERGENCY

- WARNING! Familiarize yourself with the use of this machine by means of this instruction manual. Memorise the safety directions and follow them to the letter. This will help to prevent risks and hazards.
• Always be alert when using the machine, so that you can recognize and handle risks early. Fast intervention can prevent serious injury and damage to property. - Switch off and disconnect from the power supply if there is any malfunction. Have the machine checked by a qualified specialist and repaired, if necessary before you put it into operation again.
RESIDUAL RISKS

- WARNING! Even if you are operating the machine in accordance with all safety requirements, potential risks of injury and damage remain. The following dangers can arise in connection with the structure and design of this machine:
- Health defects resulting from vibration emission if the machine is being used over long periods of time or not adequately managed and properly maintained.
- Injuries and damage to property due to broken application tools or sudden impact of hidden objects during use.

- WARNING! This machine produces an electromagnetic field during operation! This field may under some circumstances interfere with active or passive medical implants! To reduce the risk of serious or fatal injury, we recommend persons with medical implants to consult their doctor and medical implant manufacturer before operating this product!
Important - Please read these instructions fully before starting assembly
Maintenance and storage safety
- Keep all nuts, bolts and screws tight to be sure the machine is in safe working condition.
- On machines with multi blades, take care as rotating one blade can cause other blades to rotate.
- Be careful during adjustment of the machine to prevent entrapment of the fingers between moving blades and fixed parts of the machine.
• Always allow the machine to cool down before storing. - When servicing the blades be aware that, even though the power source is switched off, the blades can still be moved.
- Replace worn or damaged parts for safety. Use only genuine replacement parts and accessories.

Safety Information
Important - Please read these instructions fully before starting assembly
Intended use
This hover is designed for domestic use only:
- This electric hover is intended for mowing lawns in domestic and hobby gardens.
- This product is not to be used in wet weather conditions and may not be used to mow wet or unusually high grass, e. g. pasture grass or for shredding leaves.
- This product is intended for private domestic use only, not for any commercial trade use.
It must not be used for any purposes other than those described.
Any use of the machine that deviates from its intended use and is not Included in these instructions is considered unauthorized use and relieves the manufacturer from his or her legal liability.
Service
This tool is manufactured in accordance with the relevant safety regulations. To avoid danger, electrical appliances must only be repaired by qualified technicians. Call our customer helpline at 0345 605 2063 for advice.
In the Box
Parts
1 Switch box
2 On/Off switch lever
3 Upper handle
4 Wing Knob
5 Middle handle
6 Lower handle
7 Safety lock-off button
8 Cable strain relief
9 Cable clamp
10 Spanner
11 Deck
12 Screw*2
13 Spacer*3 (one piece is pre-assembled)
14 Wheel

Assemble
Step 1 - Fix the lower handle

natural_image
Diagram showing two views of a mechanical device with arrows indicating motion or change, no text or symbols present.- Fully insert the lower handle into the slot on the hover deck.
- Fasten in position with the 2 screws provided.
Step 2 - Fix the upper an middle handle
natural_image
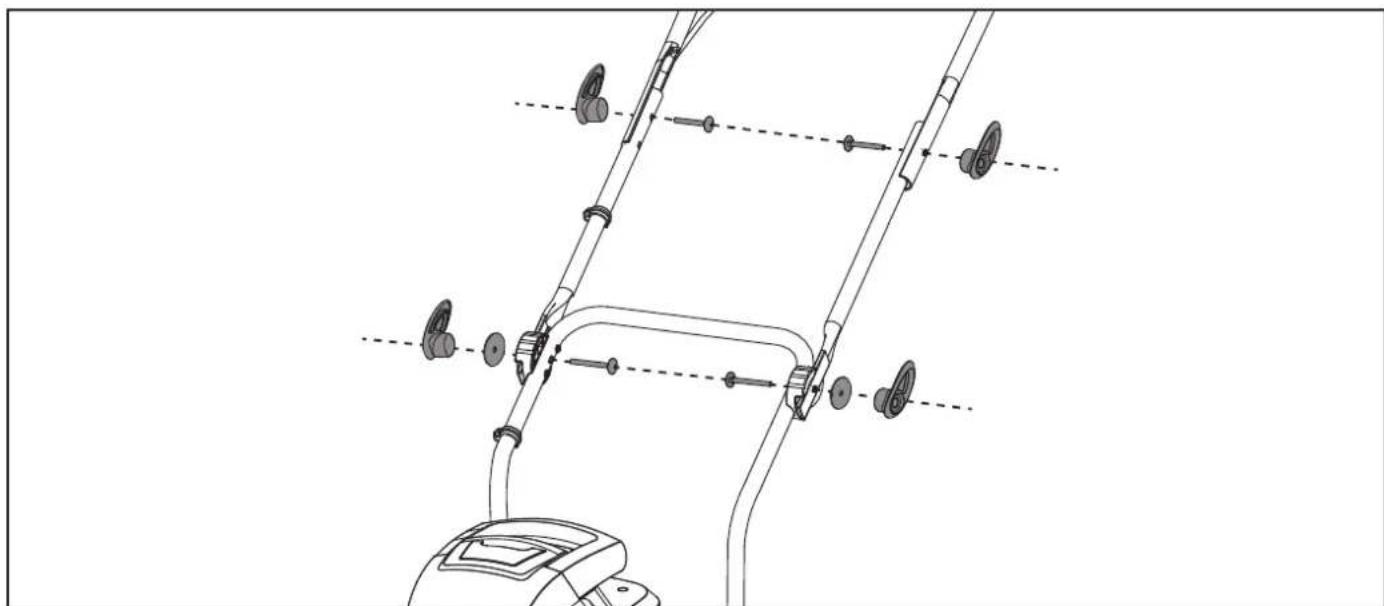
Technical line drawing of a lawn mower mechanism with attached sensors and guide rails (no text or symbols)- Attach the upper handle to the lower handle tubes using bolts and wingknobs.
- Once fitted correctly the upper handles should still move up and down. this freedom of movement allows the hover mower to float correctly on the uneven surfaces of a lawn. Do not over tighten these wingknobs.
Assemble
Step 3 - Fix the cable
natural_image
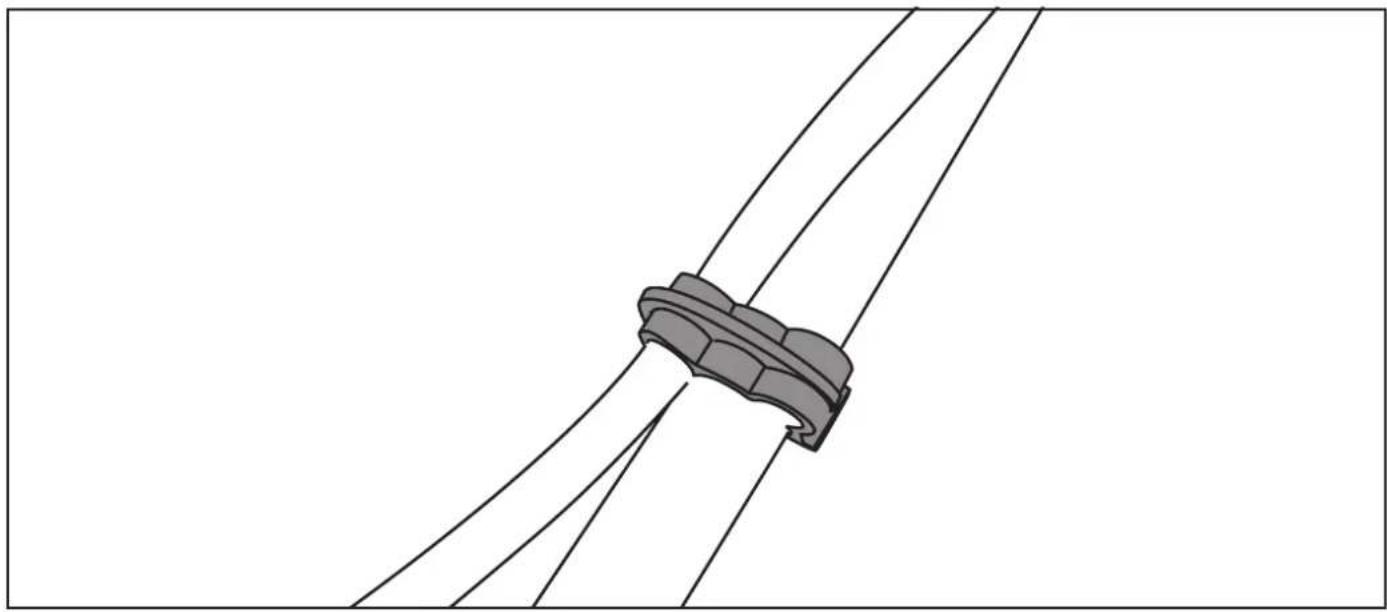
Diagram of a mechanical clamp or bracket assembly with multiple rods and a central clamping element (no text or symbols)- Ensure that the cables clamps are used to fix the cable to the handle.
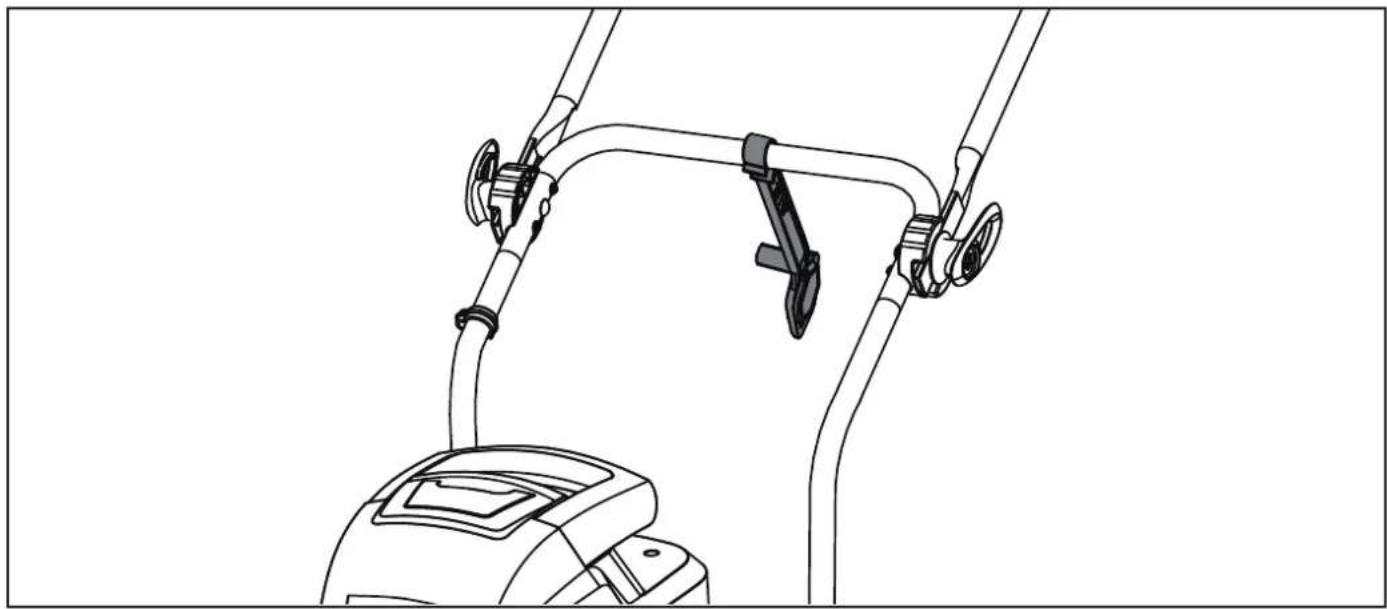
natural_image
Line drawing of a lawn mower with attached lever mechanism (no text or symbols)- The spanner could be easily fixed on the machine like below way.
Prepare
Step 1 - Connection to the power supply
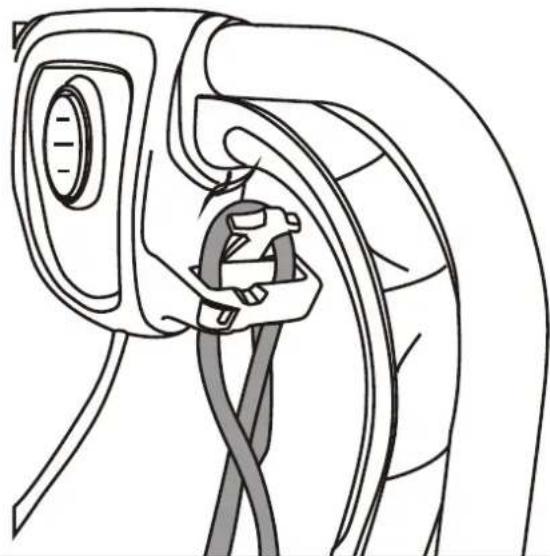
natural_image
Line drawing of a plug inserted into a cable, showing electrical connections (no text or symbols)- Hook the mains cable through the cable strain-relief.
Step 2 - Connect the plug to the main socket

natural_image
Illustration of a hand holding a plug inserted into a socket (no text or symbols)Prepare
Step 3 - Mowing tips

line
| Segment | Value (mm) | | ------- | ---------- | | Top Left | 33 | | Middle Right | 26 | | Bottom Right | 19 | | Bottom Left | 12 |- Verify that the lawn is free of stones, sticks, wires, and other objects that could damage the hover mower.
- When cutting thick grass, reduce walking speed in order to maintain a high blade speed for a more effective cut and better hover lift.
- Never cut off more than half of the total length of the grass for a healthy lawn. If it is roughly 6cm long, the grass should not be shorter than 3cm once mowed.
- Do not cut wet grass because it tends to stick to the underbody of the hover mower, preventing the proper discharge of grass clippings.
Step 4 - Setting the cutting height

natural_image
Technical line drawing of a washing machine interior with internal components and assembly (no text or labels)- Remove the blade bolt by spanner provided, add a spacer between the blade and the impeller to reduce the cutting height 7mm.
| Cutting position Cutting height | |
| 1 (Non-spacer) 33mm | |
| 2 (1 spacer, pre-assemble) 26mm | |
| 3 (2 Spacers) 19mm | |
| 4 (3 spacers) 12mm |
Step 4 - Setting the cutting height (continued)
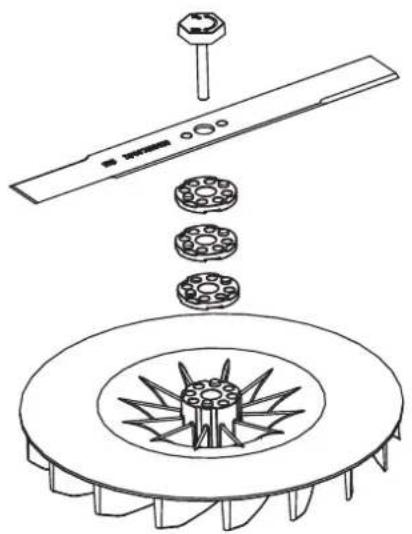
natural_image
Technical line drawing of a mechanical assembly with exploded view of components (no text or symbols)Always switch the product off, disconnect it from power supply and let the product cool down before performing inspection, maintenance and cleaning work!
Removing the blade and fan. USE GLOVES.
- To remove the blade bolt, hold the blade firmly and with the spanner provided loosen the blade bolt.
- Remove the blade bolt, blade, spacer and impeller.
- Inspect for damage and clean as necessary.
Renew your metal blade after 50 hours mowing or 2 years whichever is the sooner-regardless of condition. If the blade is cracked or damaged replace it with a new one. Never use a blade bolt if the insulated head is damaged cracked or missing.
Fitting the blade and impeller. USE GLOVES.
- Ensure the impeller is located correctly.
- Place the spacers onto the fan ensuring the pegs have located into the holes
- Ensure the pegs have located into the holes on the blade and that the blade is positioned as illustrated in figure 6.
- Place the blade bolt through the centre hole of the blade.
- Tighten down clockwise by hand.
- Hold the blade firmly and tighten the blade bolt with the spanner provided.
Prepare
Step 4 - Setting the cutting height (continued)

natural_image
Technical illustration of a mechanical gear assembly with a central shaft and flanged base (no text or symbols)

natural_image
Technical line drawing of a mechanical gear assembly with a central hub and concentric rings (no text or symbols)

IMPORTANT! Ensure the power cord is disconnected from the mains supply and wait until the cutting head has stopped rotating before adjusting the cutting height.
- There are 4 different cutting heights. Figure 7 shows the lowest cutting height, 3 spacers. Figure 8 shows the highest cutting height, no spacers. Adding spacers reduces the cutting height, removing spacers increases cutting height
- Disconnect from the main electricity supply and wait until impeller and the blade bolt have stopped rotating.
- Turn your product upside down.
- To remove the blade and adjust the number of spacers, use the spanner to remove blade bolt. The spacers and blade can now be removed and the number of spacers adjusted.
- Spacers that are not being used can be stored on the spanner to prevent loss.
- Refit the blade as described in Blade Maintenance.

natural_image
Technical line drawing of a mechanical wrench handle with two screw holes and a hook (no text or symbols)When removing a spacer from its storage location on the spanner, gently twist it as you remove it. When you replace a spacer back to this location just push it firmly into position.
Operate
Step 1 - Switching on

- Press and hold the button (1).
- Pull either switch lever (2) towards the handle and hold in position.
Step 2 - Switching off

- Release the switch lever (2).
Operate
Step 3 - Mowing direction
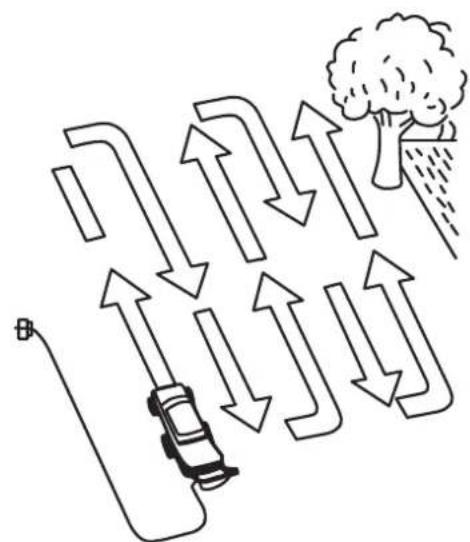
flowchart
graph TD
    A["Car"] --> B["Traffic Flow"]
    B --> C["Tree"]
    C --> D["Light Wind"]
    D --> E["Downward Arrow"]
    E --> F["Upward Arrow"]
    F --> G["Downward Arrow"]
    G --> H["Upward Arrow"]
    H --> I["Downward Arrow"]
- To avoid cutting the mains cable and to collect grass clippings correctly please mow away from the plug socket following the arrows and avoid twisting the power cord.
Maintenance & Repair
Maintenance

WARNING!
Always switch the product off, disconnect it from the power supply and let the product cool down before performing inspection, maintenance and cleaning work!
- Keep the underbody and cutting blade clean and free of debris. Remove clippings from the discharge chute.
- Check all nuts and bolts periodically for tightness before operation. After prolonged use, especially in sandy soil conditions, the cutting blade will become worn and lose some of its original shape. The cutting efficiency will be reduced and the cutting blade should be replaced.
- Lubricate the cutting blade after each use to prolong the life span of the cutting blade and product. Apply light machine oil along the edge of the cutting blade.
Repair
This product does not contain any parts that can be repaired by the consumer. Contact an authorised service centre or a similarly qualified person to have it checked and repaired.
Mowing advice
We recommend that you mow in overlapping lines. Only mow with a sharp blade so that the blades of grass do not fray. This can cause grass to turn yellow. To achieve a good cut, guide the hover in lines that are as straight as possible. These lines should always overlap by a few centimeters so that you do not leave any uncut strips.
How often you need to mow your lawn depends on how fast the grass is growing. During the main growth period mow more frequently. If the grass is longer than usual, cut it in 2 or more stages. This will cause less stress to both the hover and the grass. Never cut the grass by more than half its height.
Keep the under side of the hover casing clean and remove all grass deposits from it. Regularly check to ensure there are no deposits blocking airflow or stopping rotation of the front wheel. Deposits make it more difficult to start the hover and also adversely affect the mowing quality and the grass collection. Switch off the motor before you carry out any inspections of the blade. Remember that the blade will continue to turn for a few seconds after the motor has been switched off. Never attempt to stop the blade.
Check regularly that the blade is correctly secured, in good condition and sharp. If not, sharpen or replace the blade.
If the moving blade strikes an object, stop the hover and wait until the blade has come to a complete standstill. Then check the condition of the blade and the blade mounting. If they are damaged, they must be replaced.
Place the mains lead in loops on the ground near the wall socket. Mow away from the socket and cable and ensure that the mains lead is always on the section of lawn that you have already mowed so that you do not run over the mains lead with the hover.
Maintenance & Repair
Storage

natural_image
Line drawing of a mechanical excavator arm assembly (no text or symbols)- Switch the product off and disconnect from power supply.
- Clean the product as described above.
- To reduce storage space, the upper handle can be folded down, unscrew the wing nuts by approximately 6 revolutions.
Transportation
- Switch the product off and disconnect from power supply.
- Protect the product from any heavy impact or strong vibrations which may occur during transportation in vehicles.
- Secure the product to prevent it from slipping or falling over.
Technical Data Table
| Model 7395134 (MEH1533M) | |
| Voltage 220-240V~ 50Hz | |
| Power input 1500W | |
| Motor speed | 4200/min |
| Cutting width 33cm | |
| Cutting height adjustment | 12 mm, 19 mm, 26 mm, 33 mm, 4 levels |
| Wheel size 38mm | |
| L_PA sound pressure level | 76dB(A), K=3dB(A) |
| L_WA sound power level | 96dB(A) |
| Vibration at the handlebars ahv | ≤ 2.5m/s2 |
| Protection class | □ II |
The sound values have been determined according to noise test code given in EN 60335-2-77, using the basic standards EN ISO 11201 and EN ISO 3744. The sound intensity level for the operator may exceed 80 dB(A) and ear protection measures are necessary.
The declared vibration value has been measured in accordance with a standard test method (according to EN 60335-2-77) and may be used for comparing one product with another. The declared vibration value may also be used in a preliminary assessment of exposure.

WARNING! Depending on the actual use of the product the vibration values can differ from the declared total! Adopt proper measures to protect yourself against vibration exposures! Take the whole work process including times the product is running under no load or switched off into consideration!
Proper measures include among others regular maintenance and care of the product and cutting attachments, keeping hands warm, periodical breaks and proper planning of work processes!
Part List
| Part number Accessories | |
| 111231110 | Blade |
| 111231111 | Upper Handle Wing knob |
| 111231102 | Blade Spacer |
| 111231108 Lower Handle Wing knob |
Technical Data
Recycling and disposal
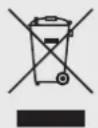
- The product comes in a package that protects it against damage during shipping. Keep the packaging until you are sure that all parts have been delivered and the product is functioning properly. Recycle the packaging afterwards.
- Old products are potentially recyclable and do not, therefore, belong in your household rubbish. You are requested to assist us and our contribution to saving resources and protecting the environment by handing in this product at an equipped collection centre (if there is one available).
Troubleshooting
General Troubleshooting
Suspected malfunctions are often due to causes that the user can fix themselves.
Therefore, check the product using this section. In most cases the problem can be solved quickly.

WARNING! Only perform the steps described within these instructions! All further inspection, maintenance and repair work must be performed by an authorised service centre or a similarly qualified specialist if you cannot solve the problem yourself!
Gloves and appropriate protective clothing must be worn when performing these instructions.
The following table provides solutions to common problems encountered with the hover.
| Fault Possible Cause Solution | ||
| Hover does not start No power | at mains socket. Check the fuse | switch,socket, cable, wire and have any repairs carried out by a qualified electrician. |
| Defective on/off switch. Repair | by a qualified technician required. | |
| Defective motor. | ||
| Motor starts and stops immediately | Airflow to the impeller is blocked by grass. | Disconnect from mains.and clean the deck and the impeller. |
| Excessive vibration | Blade damaged. Replace blade. | |
| Blade fitted incorrectly. Fit the blade | de correctly. | |
| Impeller damaged. Replace Impeller. | iller. |
Getting Help
Customer Helpline
Our dedicated UK based customer helpline can assist you with assembly, parts queries and technical support.
Our experts are here to get you back enjoying your garden in no time.
Calling our service does not affect your statutory rights.
Customer Helpline 0345 605 2063
Guarantee
Dear Customer,
In the unlikely event that your device develops a fault, please contact our customer helpline on the telephone number shown below.
- These guarantee terms cover additional guarantee rights and do not affect your statutory warranty rights. Claims must be accompanied by proof of purchase. This must be in the form of a sales receipt or bank statement and must show that the product has been purchased within 2 years prior to the claim, from the retailer that it was originally sold to.
- Our guarantee covers problems caused by material or manufacturing defects, and will result in the repair of these defects or replacement of the device with a like for like or similar article. Please note that our devices have not been designed for use in commercial, trade or industrial applications. Consequently, the guarantee is invalidated if the equipment is used in commercial, trade or industrial applications or for other equivalent activities.
- The following are also excluded from our guarantee :
A. Faults due to accidents, customer misuse or unauthorized repairs.
B. Failure due to lack of routine maintenance.
C. Failure as a result of not using the equipment in accordance with the manual and safety instructions.
D. Accidental damage or wear to any cables, the drive belt, the impeller or the blade.
-
The guarantee is valid for a period of 2 years starting from the purchase date of the device. Guarantee claims should be submitted before the end of the guarantee period within two weeks of the defect being noticed. No guarantee claims will be accepted after the end of the guarantee period. The original guarantee period remains applicable to the device even if repairs are carried out or parts are replaced. In such cases, the work performed or parts fitted will not result in an extension of the guarantee period, and no new guarantee will become active for the work performed or parts fitted. This also applies when an on-site Service is used.
-
Please keep your sales receipt in a safe place.


- Contents
- Safety Information....3
- In the Box 16
- Assemble....17
- Prepare 19
- Operate 23
- Maintenance & Repair 25
- Technical Data 27
- Troubleshooting 29
- Getting Help 30
- Safety Information
- Important!
- WORK AREA SAFETY
- Important - Please read these instructions fully before starting assembly
- Personal Safety
- ELECTRICAL SAFETY
- Personal Safety (continued)
- POWER TOOL USE AND CARE
- TRAINING
- PREPARATION
- OPERATION
- Operating Safety (continued)
- EMERGENCY
- RESIDUAL RISKS
- Maintenance and storage safety
- Intended use
- Service
- In the Box
- Parts
- Assemble
- Step 1 - Fix the lower handle
- Step 2 - Fix the upper an middle handle
- Step 3 - Fix the cable
- Prepare
- Step 1 - Connection to the power supply
- Step 2 - Connect the plug to the main socket
- Step 3 - Mowing tips
- Step 4 - Setting the cutting height
- Step 4 - Setting the cutting height (continued)
- Operate
- Step 1 - Switching on
- Step 2 - Switching off
- Step 3 - Mowing direction
- Maintenance & Repair
- Maintenance
- WARNING!
- Repair
- Mowing advice
- Storage
- Transportation
- Technical Data Table
- Part List
- Technical Data
- Recycling and disposal
- Troubleshooting
- General Troubleshooting
- Getting Help
- Customer Helpline
- Guarantee
Brand : McGregor
Model : MEH1533M
Category : Lawn mower