CLM2432A - Lawn mower McGregor - Free user manual and instructions
Find the device manual for free CLM2432A McGregor in PDF.


| Product Type | Cordless Lawn Mower |
| Model | CLM2432A / MCR2132 |
| Voltage | 21.6 V |
| Cutting Width | 32 cm |
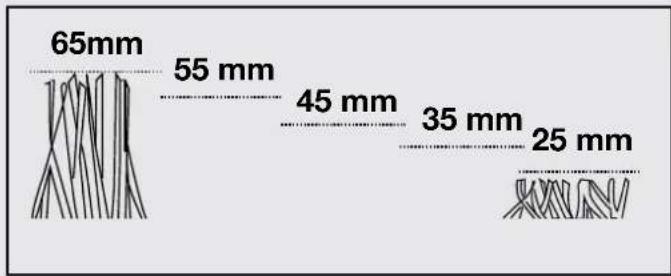
| Cutting Heights | 25 / 35 / 45 / 55 / 65 mm (5 positions) |
| Grass Collector Capacity | 30 L |
| Net Weight | 8.56 kg |
| No Load Speed | 3700 /min |
| Battery Type | Lithium-Ion, 21.6 V, 4.0 Ah |
| Battery Model | 24LB4005 |
| Charger Model | 24LFC12 |
| Charger Input | 220-240 V ~ 50/60 Hz, 110 W |
| Charging Time (full discharge) | 60 min |
| Sound Pressure Level (LPA) | 84 dB(A) K=3 dB(A) |
| Sound Power Level (LWA) Guaranteed | 96 dB(A) |
| Vibration Level (ah) | 2.5 m/s² K=1.5 m/s² |
| Safety Features | Safety lock-off button, blade brake, grass box full indicator, isolator key |
| Construction | Folding handle, grass collection box with indicator |
| Recommended Storage Temperature | 0 °C to 25 °C |
| Warranty | 2 years (domestic use) |
Frequently Asked Questions - CLM2432A McGregor
User questions about CLM2432A McGregor
0 question about this device. Answer the ones you know or ask your own.
Ask a new question about this device
Download the instructions for your Lawn mower in PDF format for free! Find your manual CLM2432A - McGregor and take your electronic device back in hand. On this page are published all the documents necessary for the use of your device. CLM2432A by McGregor.
USER MANUAL CLM2432A McGregor
natural_image
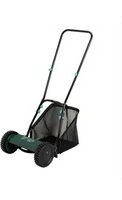
Green lawn mower with adjustable arm and wheels (no visible text or symbols)McGregor 21.6V
32cm Cordless Lawn Mower
MCR2132
Important - Please read these instructions fully before starting assembly
These instructions contain important information that will help you get the best from your mower, ensuring it is assembled correctly and safely. If you need help or have damaged or missing parts, call the After Sales Support on 0345 605 2063
AFTER SALES SUPPORT
0345 605 2063
Table Of Contents
Symbols...... 3
Safety Information
General Safety....5
Battery Safety Information....11
Charger Safety Information 13
In the Box 15
Parts 15
Assembly....17
Step 1 - Assembling Handles ...... 17
Step 2 - Assembling the Grass Collection Box.... 18
Step 3 - Fitting/Removing the Grass Collection Box 19
Preparation 20
Step 1 - Check Battery Capacity .... 20
Step 2 - Battery Charging.... 21
Step 3 - Fitting/Removing the Battery....22
Step 4 - Setting the Cutting Heights ...... 23
Operation 24
Step 1 - On/Off Operation....24
Step 2 - Grass Box Full Indicator.... 24
Step 3 - Mowing Advice....25
Step 4 - After Mowing/Storage.... 25
Maintenance....26
General Maintenance 26
Battery Maintenance....26
Blade Maintenance....27
Technical Data 28
Technical Data Table....28
Part List 29
Recycling and Disposal 29
Troubleshooting 30
General Troubleshooting 30
Getting Help 32
After Sales Support 32
Guarantee 32
Symbols
Important - Please read these instructions fully before starting assembly
Warnings Symbols
The following warning symbols appear throughout this manual and indicate the appropriate safety measures you should take when operating and maintaining the appliance. Take extra care, beware of hazards.

Caution

Read instruction manual.
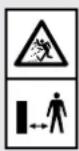
Keep bystanders away.

Beware of sharp blades. Blades may continue to rotate after the motor is switched off. Beware of injury to toes or fingers.

Switch off and remove the isolator key before adjusting, cleaning or before leaving the product unattended for any period.

Cutting width

Protection class II (Double insulation for charger)

The product complies with the applicable European directives and an evaluation method of conformity for these directives was followed.

Only recharge battery packs with the supplied charger indoors.
Symbols
Important - Please read these instructions fully before starting assembly
Warnings Symbols (continued)

Fuse
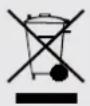
Electrical appliances must not be disposed of with the domestic waste.

Batteries contain Lithium-ion. Do not dispose of batteries in household waste.

Do not dispose of battery packs in rivers or immerse in water.

Do not dispose of battery packs in fire.

Do not subject the battery to direct sunlight over long periods and do not leave it on or near a heat source (max. 60^ C).

Recycle electrical waste products in an environmentally safe way where facilities exist.

WARNING
To avoid serious personal injury, do not attempt to use this product until you read thoroughly and understand completely the instruction manual.
If you do not understand the warnings and instructions in the instruction manual, do not use this product.

Safety Information
Important - Please read these instructions fully before starting assembly
General Safety

IMPORTANT!
When using equipment, the following safety precautions must be followed to avoid injuries and damage:
- Read all operating instructions carefully and comply with them. It is important to understand these instructions and to acquaint yourself with the machine, its correct usage and all safety requirements.
- Keep this manual in a safe place so that the information is available to the operator at all times.
- If you give the equipment to any other person, give them these operating instructions as well.
- We accept no liability for damage or accidents which result from non-compliance with these instructions.
The device must not be used by people (including children) with limited physical, sensory or mental capabilities or who lack the necessary experience and/or knowledge - other than they are supervised by a person responsible for safety or are being instructed to operate the appliance by such a person. Children should be supervised to ensure that they do not play with the appliance.
General Safety
- Read the instructions carefully. Be familiar with the controls and the correct use of the lawn mower.
- Never allow children or people unfamiliar with these instructions to use the mower. Local regulations may restrict the age of the operator.
- When not in use, store the mower out of reach of children and remove the battery pack and isolator key.
Important - Please read these instructions fully before starting assembly
General Safety (continued)
- Never operate the machine while people, especially children, or pets are nearby.
- Use extreme care when approaching blind corners, doorways, shrubs, trees, or other objects that may obscure your view of a child or animal that may run into the path of the mower.
- Keep in mind that the operator or user is responsible for accidents or hazards occurring to other people or their property.
- While operating the mower always wear substantial footwear and long trousers. Do not operate the mower when barefoot or wearing open toed sandals. Avoid wearing clothing that is loose fitting or that has hanging cords or ties.
- Thoroughly inspect the area where the mower is to be used. Remove all stones, sticks, and other objects that could be tripped over or thrown by the blade. Thrown objects can cause serious personal injury.
- Before using, always visually inspect to see that the blade, blade bolt and the blade assembly are not worn or damaged. Replace worn or damaged components in sets to preserve balance. Replace damaged or unreadable labels.
- Operate the mower only in daylight or in good artificial light.
- Do not use the lawn mower in damp or wet conditions or operate in the rain.
- Working on sloping areas can be dangerous. Do not mow on excessively steep slopes. Always be sure of your footing on slopes or wet grass.

Safety Information
Important - Please read these instructions fully before starting assembly
General Safety (continued)
- Walk, never run.
- Mow across the face of slopes, never up and down.
- Exercise extreme caution when changing direction on slopes.
- Use extreme caution when reversing or pulling the mower towards you.
- Stay Alert: Do not operate the mower when you are tired. Pay attention to what you are doing.
- Do not operate the mower while under the influence of alcohol or drugs.
- Stop the blade(s) if the machine has to be tilted for transportation when crossing surfaces other than grass, and when transporting the machine to and from areas to be mowed.
- Never operate the mower with defective guards or shields, or without safety devices, for example deflectors and/or grass collection box, in place.
- Switch on the motor carefully according to instructions and with feet well away from the blade(s).
- Do not tilt the machine when starting or switching the motor on, except if the machine must be tilted for starting in long grass. In this case, do not tilt it more than absolutely necessary and tilt only the part which is furthest away from the operator. Always ensure that both hands are in the operating position on the handle before returning the machine to the ground.
- Do not start the mower when standing in front of the discharge opening.
- Do not put hands or feet near or under rotating parts. Keep clear of the discharge opening at all times.
Important - Please read these instructions fully before starting assembly
General Safety (continued)
- Never pick up or carry the machine while the motor is running.
- Do not carry the machine with your finger on the switch.
- Do not overreach. Keep proper footing and balance at all times.
- Do not use a machine if the switch does not turn it on and off. Any machine that cannot be controlled with the switch is dangerous and must be repaired.
-
In case any of the following situations occur, stop the mower and remove the battery pack and isolator key. Make sure that all moving parts have come to a complete stop:
-
Whenever you leave the mower,
– Before clearing blockages or unclogging discharge chute,
– Before checking, cleaning or working on the mower, - After striking a foreign object. Inspect the mower for damage and make repairs before restarting and operating the mower.
- If the mower starts to vibrate abnormally (check immediately)
- Inspect for damage,
- Replace or repair any damaged parts,
- Check for and tighten any loose parts.
- In order to avoid contact with the blade or injury caused by a thrown object, ensure you maintain a safe operating distance, and keep children and bystanders at least 15m away from the mower while it is in operation. Stop the motor immediately if someone enters the mowing area.

Safety Information
Important - Please read these instructions fully before starting assembly
General Safety (continued)
- Always wear proper eye protection in order to protect your eyes while operating or performing any adjustment or repair. Thrown objects that ricochet can cause serious eye injury.
- Do not hold on to the mower if you are falling. Release the handle immediately.
- Do not use the mower for any job except that for which it is intended. Do not force the mower.
- Do not attempt to adjust the wheels or the cutting height while the motor is running.
- Avoid dangerous environments. Do not operate the mower in the rain or in enclosed or poorly-ventilated environments, or if there are flammable or explosive fluids, vapours or gases nearby.
- Stop the blade when crossing gravel driveways, walkways, or roads.
- Ensure all nuts, bolts and screws are tight and that the mower is in a safe condition for use.
- Check the grass collection box frequently for wear or deterioration.
- Be careful during adjustment of the mower to prevent entrapment of the fingers between moving blades and fixed parts of the machine.
• Always allow the mower to cool down before storing. - Stop the mower, remove the safety key and battery, and wait until the blade comes to a complete stop before removing the collection bag or carrying out maintenance. The cutting blade will continue to rotate for a few seconds after the motor is shut off. Do not place any part of your body in the blade area until you are sure that the blade has stopped rotating.
Important - Please read these instructions fully before starting assembly
General Safety (continued)
- Never operate mower without correct safety devices in place and in working order. Do not operate the mower with damaged safety devices. Doing so can result in injury.
- Ensure that the safety key is not installed when the mower is not in use. This prevents accidental starting of the machine.
- Replace worn or damaged parts for safety. Use only genuine replacement parts and accessories.
- Always be alert when using the machine, so that you can recognise and handle risks early. Fast intervention can prevent serious injury and damage to property.
- Switch off and remove the battery and isolator key if there is any malfunction. If necessary have the machine checked by a qualified specialist and repaired before you operate it again.
- WARNING! Even if you are operating the machine in accordance with all safety requirements, potential risks of injury and damage remain. The following dangers can arise in connection with the structure and design of this machine:
- Health defects resulting from vibration emission if the machine is being used over long periods of time or not adequately managed and properly maintained.
- Injuries and damage to property due to broken application tools or sudden impact of hidden objects during use.

Safety Information
Important - Please read these instructions fully before starting assembly
General Safety (continued)
- WARNING! This machine produces an electromagnetic field during operation! This field may under some circumstances interfere with active or passive medical implants! To reduce the risk of serious or fatal injury, we recommend persons with medical implants to consult their doctor and medical implant manufacturer before operating this product!
- Store the mower, the charger and the battery at a temperature between 0°C and 25°C.
Battery Safety Information
- Recharge only with the charger specified by the manufacturer. A charger that is suitable for one type of battery pack may create a risk of fire when used with another battery pack. Incorrect use may result in electric shock, overheating or leakage of corrosive liquid from the battery.
- Do not place appliances or their batteries near fire or heat sources. Continuous intense sunlight, fire or other heat sources may cause an increased danger of explosion.
- Do not crush, drop or damage the battery pack. Do not use a battery pack or charger that has been dropped or received a sharp blow. A damaged battery is subject to explosion. Properly dispose of a dropped or damaged battery immediately.
- Batteries can explode in the presence of a source of ignition, such as a pilot light.
- To reduce the risk of serious personal injury, never use any cordless product in the presence of an open flame. An exploded battery can propel debris and chemicals. If exposed, flush with water immediately.
Important - Please read these instructions fully before starting assembly
Battery Safety Information (continued)
- Do not charge battery in a damp or wet location. Following this rule will reduce the risk of electric shock.
- For best results, your battery tool should be charged in a location where the temperature is more than 4^ C but less than 40^ C.
- Under extreme usage or temperature conditions, battery leakage may occur. If liquid comes in contact with your skin, wash immediately with soap and water. If liquid gets into your eyes, flush them with clean water for at least 10 minutes, then seek immediate medical attention.
- When the battery pack is not in use, keep it away from other metal objects like: paper clips, coins, keys, nails, screws, or other small metal objects that can make a connection from one terminal to another. Shorting the battery terminals together may cause sparks, burns, or a fire.
- Do not open up the battery and avoid mechanical damage to the battery. Risk of short circuit and fumes may be emitted. Ensure fresh air and seek medical assistance in the event of discomfort.
- Always remove battery pack before storing the device. When battery becomes fully charged, unplug the charger from the power supply and remove the battery pack from the charger.
- Keep battery pack dry, clean, and free from oil and grease. Always use a dry cloth when cleaning. Never use brake fluids, gasoline, petroleum-based products, or any solvents to clean battery pack.

Safety Information
Important - Please read these instructions fully before starting assembly
Charger Safety Information
- Ensure the battery pack is charged indoors only, in a dry, cool and well-ventilated environment.
- Do not use non-rechargeable batteries!
- Do not operate the charger with a damaged cord or plug, which could cause shorting and electric shock. If damaged, immediately discontinue use. Replace the charger with the identical unit as listed in the Product Specifications in this manual. If the power cord for this equipment is damaged, it must be replaced by the manufacturer, a customer service agent of the same or a fully qualified person in order to prevent hazards.
- The plug of the charger must match the outlet. Never modify the plug in any way. Unmodified plugs and matching outlets will reduce the risk of electric shock.
- Allow a hot battery to cool before charging.
- Before each use, check the charger, cable and plug. Do not use a defective charger and do not disassemble the charger. Incorrect reassembly may result in the risk of fire, electric shock or electrocution.
- Protect the charger against moisture and wet conditions. There is a danger of electric shock.
- Operate the charger only with the appropriate original batteries. Charging other batteries may result in injuries and risk of fire.
- Keep the cord away from heat, oil, sharp edges or moving parts. Damaged or entangled cords increase the risk of electric shock.
- Do not use a charger that has been dropped or received a sharp blow.
- The voltage indicated on the charger rating plate must correspond to the voltage of the power source.
- Never touch the mains plug with wet hands.
Important - Please read these instructions fully before starting assembly
Intended Use
This lawnmower is designed for domestic use only:
- This cordless lawnmower is intended for mowing lawns in domestic and hobby gardens.
- This product is not to be used in wet weather conditions and may not be used to mow wet or unusually high grass.
- This product is intended for private domestic use only, not for any commercial trade use. It must not be used for any purposes other than those described. Any use of the machine that deviates from its intended use will invalidate the warranty.
In the Box
Parts
1 Top Handle
2 Switch Lever
3 Left Lower Handle
4 Deflector Guard
5 Grass Collection Box
6 Cutting Height Adjustment Lever
7 Rear Wheel
8 Deck
9 Front Wheel
10 Battery Compartment Cover
11 Isolator Key
12 Grass Box Full Indicator
13 Right Lower Handle
14 Safety Button
15 Cable Clip (x2)
16 Wing Nut (x2)
17 Bolt (x2)
18 Grass Collection Box Handle
19 Top Half of the Grass Collection Box
20 Bottom Half of the Grass Collection Box
21 Tongue
22 Battery Release Button
23 Battery
24 Charger
25 Charger Mains Plug

In the Box
Parts (continued)

Assembly
Step 1 - Assembling Handles
natural_image
Two black-and-white photos of a lawn mower, showing front and side views with no visible text or symbols.
natural_image
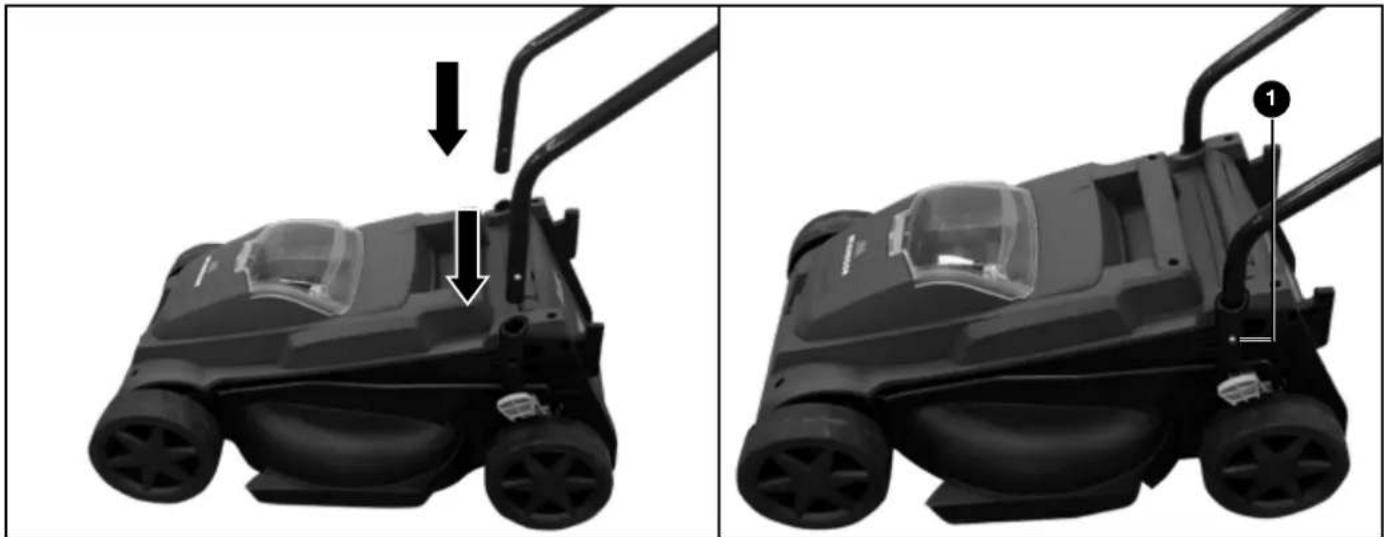
Three-panel image showing a vacuum cleaner with attached wires, mounted on a chair, and a close-up of its body (no text or symbols visible)- Insert the left and right lower handles into the slots of the housing. Ensure the locking pin button (①) is secured into place.
NOTE! After assembly of the left and right lower handles, check that they are secure and cannot be pulled out of the mower deck.
- Fix the top curved handle section to the lower handle bars. Use the bolts and wing nuts provided. There are two possible height positions. Choose the one most suitable to the operator's height.
- Clip the cable to the handle bar with the cable clip provided.
When the two wing nuts are loosened, the handle can be folded for easy storage. Ensure the power cable is not caught between the folding sections.
Assembly
Step 2 - Assembling the Grass Collection Box
natural_image
Two views of a car body panel showing internal components and a downward arrow indicating a change (no text or symbols present)
natural_image
Two views of a mechanical component with directional arrows indicating movement or flow (no text or symbols present)
natural_image
Two black plastic automotive enclosures with heat sinks, one being handled and the other assembled (no text or symbols visible)Assembly
Step 2 - Assembling the Grass Collection Box (continued)
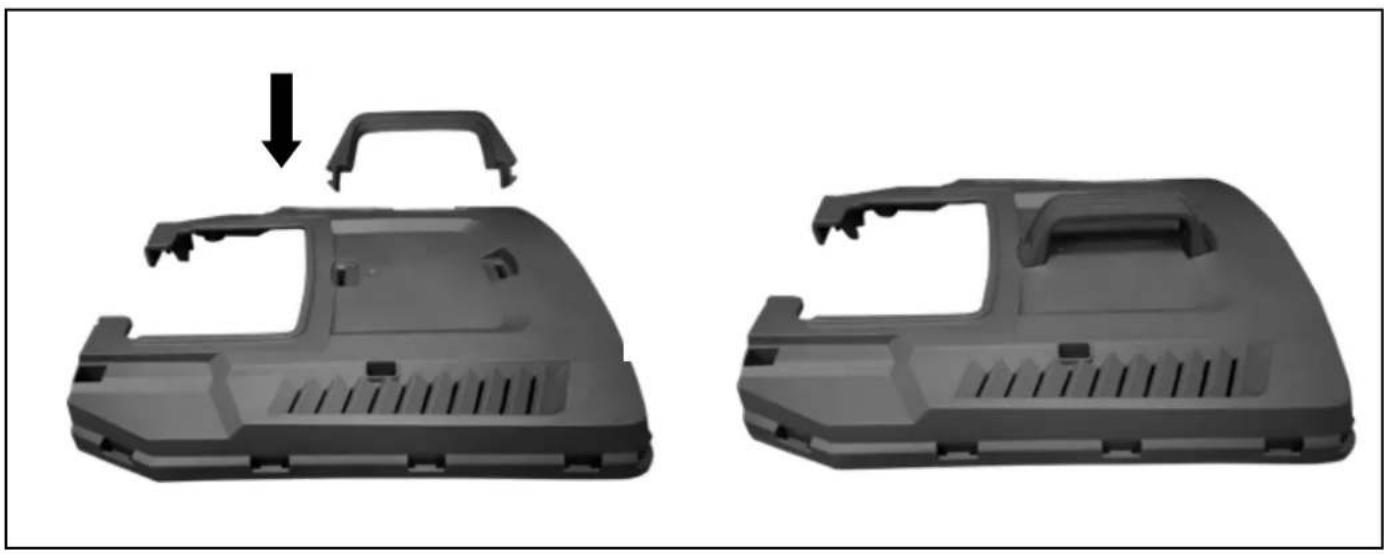
- Clip the grass collection box handle into the top half of the grass collection box.
- Align the front ends of the top and bottom pieces of the grass collection box. Clip the two pieces together starting at the front.
- Once the front clips are secure, work back on either side to secure each clip. This method will help to keep the two pieces of the box aligned.
- Slide the tongue into the front section of the grass collection box and ensure it is securely located.

ATTENTION! Never operate the mower unless the deflector guard and grass collection box are fully installed. Risk of injury!
Step 3 - Fitting/Removing the Grass Collection Box
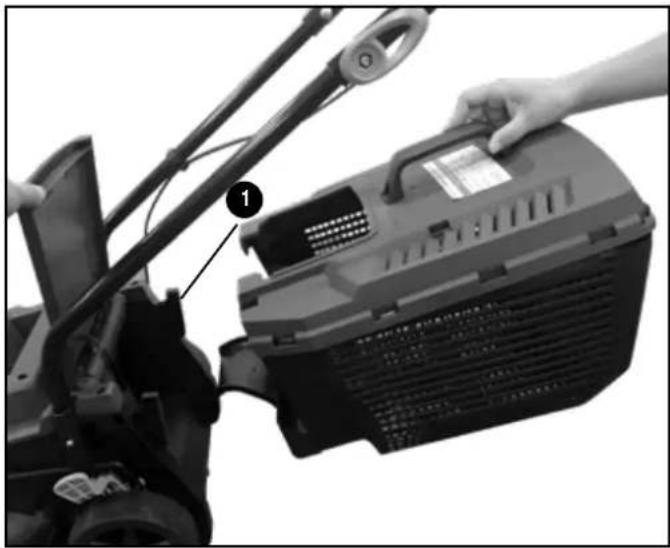
natural_image
Close-up of a lawn mower being adjusted with a hand, showing blade and casing components (no text or symbols visible)- Lift the deflector guard.
- Place the grass collection box on the mounting bracket (1) at the back of the lawn mower. Ensure the grass collection box fits snugly against the mower deck.
- Lower the deflector guard onto the grass collection box - a spring tensioner holds it in place.
- To remove the grass collection box, lift the deflector guard and unhook the grass collection box from the mounting bracket. Ensure the deflector returns down to its original position.
Preparation
Step 1 - Check Battery Capacity
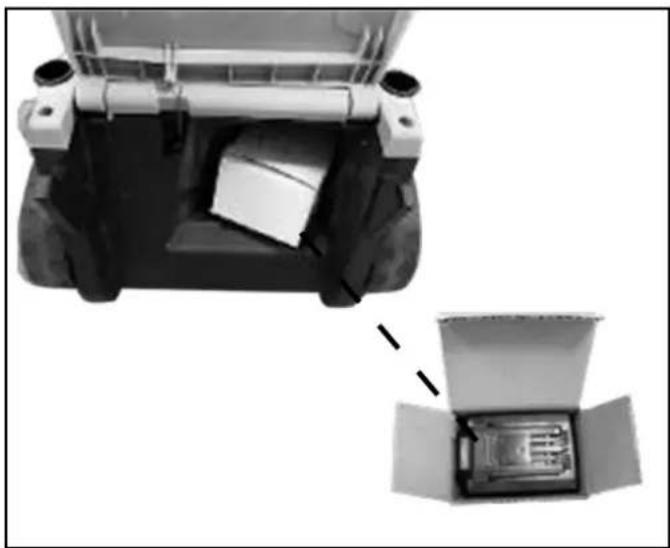
natural_image
Two views of a mechanical device with an open box showing internal components; no text or symbols visible.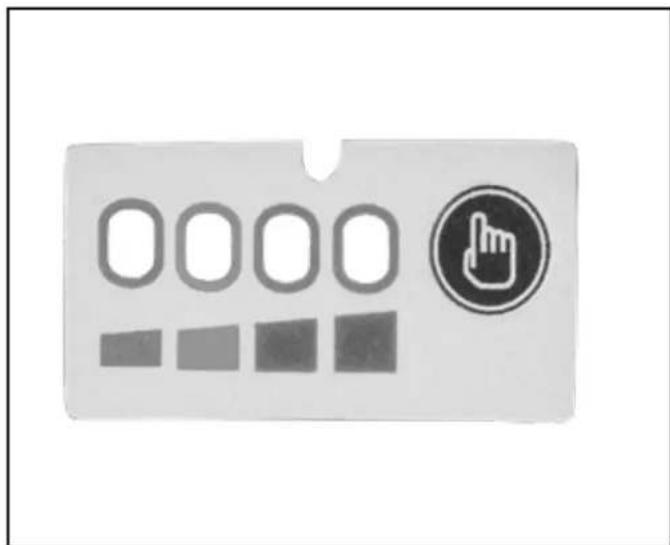
NOTE! The battery is stored under the safety flap during delivery. Take out the battery before fitting it.
Push the power indicator to show the remaining battery capacity. The battery is equipped with a charge-level indicator panel which indicates its charge condition. This charge-level indicator panel consists of 4 LEDs on the battery. Press and hold the charge indicator button on the battery to view the charge level indicator. The charge level indicator LEDs go out when the button is released. The battery charge level can be checked either when the battery is fitted on the machine or removed from the machine.
Battery LED Panel
| LED indicators on Battery Battery Capacity | |
| Continuous lighting of 4 LEDs (inc 2 green) Fully charged | |
| Continuous lighting of 3 LEDs (inc 1 green) ≥ 50% | |
| Continuous lighting of 2 LEDs (orange & red) ≥ 25% | |
| Continuous lighting of 1 LED (red only) ≤ 25%. Recharge required. | |
Preparation
Step 2 - Battery Charging
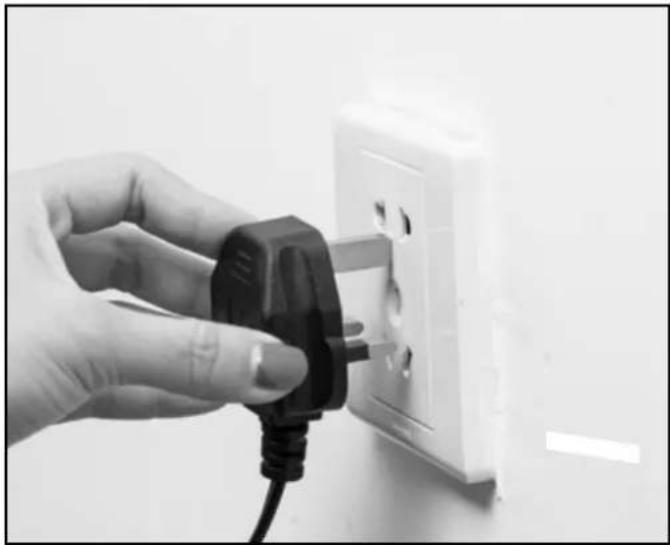
natural_image
Hand inserting a black plastic plug into an open white electrical outlet (no text or symbols visible)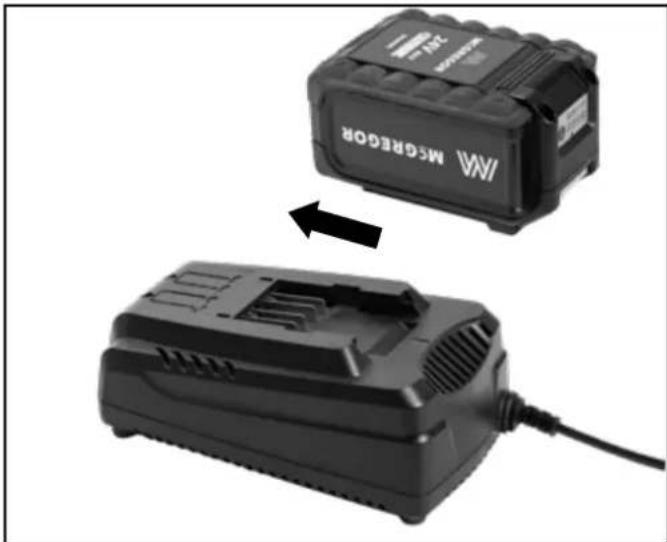
natural_image
Two black battery units, one labeled 'MAGRECOR' and the other a plug with cable (no text beyond labels)- Plug the charger into an appropriate AC power outlet.
- Insert the battery pack along the support rails of the charger.
The indicator lights on the charger show the charging status:
| Symbol Indicator | lights Status | ||
 | 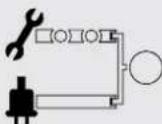 .. .. | red, flashing | charging paused, see instructions below. |
 | red, continuous | connected to power supply | |
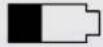 |  | green, flashing | charging |
 | green, continuous | fully charged | |
The intelligent charger measures the charge level of the battery pack and charges the battery accordingly with the required current and voltage, based on battery temperature and voltage, this ensures maximum battery life. Charge the battery fully before storage.
A flashing red LED light on the charger indicates that the battery temperature is not within the charging temperature range of 4^ C - 40^ C or the charging current is too high. As soon as the permitted temperature and the charging current ranges are reached, the battery charger will automatically switch to charging.
After continuous or repeated charging cycles without interruption, the charger may warm up. This is normal and does not indicate a technical defect of the battery charger.
Rapidly flashing green LED's indicates that the battery voltage is low, the battery will receive an extended charge cycle, approximately 30 minutes longer. This does not indicate a defect with the battery.
Preparation
Step 3 - Fitting/Removing the Battery
natural_image
Close-up of a device casing with open lid and internal components, showing no visible text or symbolsFitting the battery
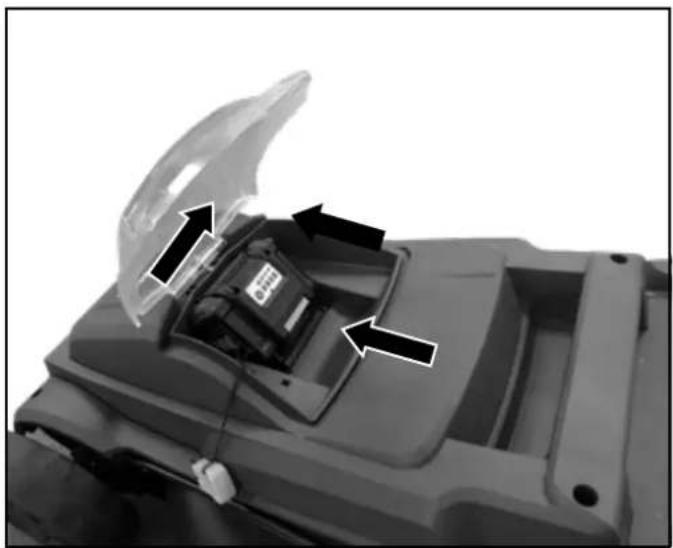
Lift the battery compartment cover and slide the battery into the battery chamber. Ensure it slides smoothly along the support rails and locks into position. Close the battery cover.
Removing the battery
Stop the machine. Pull out the isolator key. Lift the battery compartment cover, activate the release button on the battery and slide the battery out. Close the battery cover.
Preparation
Step 4 - Setting the Cutting Heights
natural_image
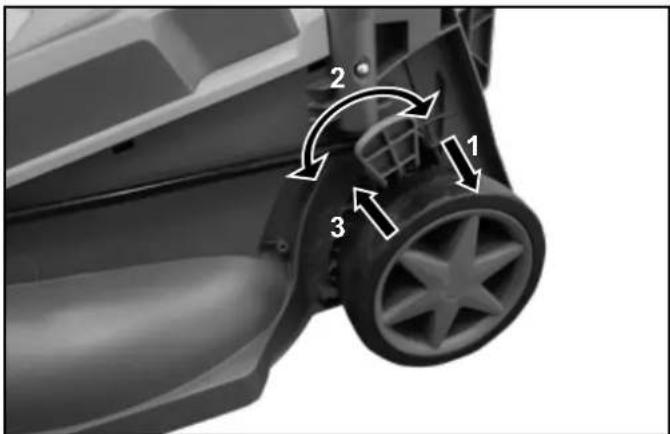
Close-up of a mechanical component with numbered arrows indicating motion or assembly (no text or symbols present)
IMPORTANT! Set the cutting height only when the motor is switched off and the isolator key has been removed.

WARNING! Stop the machine, release the switch lever and wait until the blade stops before adjusting the cutting height. Remember, the blade may continue to rotate after the machine is switched off. A rotating blade can cause injury.

CAUTION! Do not touch rotating blades.
To adjust the cutting height, gently pull the height adjustment lever towards you to disengage it from its existing position and move it to the desired cutting height position. Ensure it clicks back firmly into position.
other
| Dimension | Value (mm) | | --------- | ---------- | | Length | 65 | | Width | 55 | | Height | 45 | | Thickness | 35 | | Thickness | 25 || Position Cutting Height | |
| 1 25 mm | |
| 2 35 mm | |
| 3 45 mm | |
| 4 55 mm | |
| 5 65 mm |
For the first cut each season, a higher cutting setting should be selected.
Using a cutting height that is too low in longer grass will use more power and reduce battery run time. It is recommended to cut longer grass in 2 passes or more. This method will also cause less stress to your grass for a healthier lawn.
Before you begin to mow, check to ensure that the blade is not blunt and that none of the fasteners are damaged. To prevent any imbalance, replace blunt and/or damaged blades. To carry out this check, first switch off the motor and pull out the isolator key and remove the battery.
Operation
Step 1 - On/Off Operation
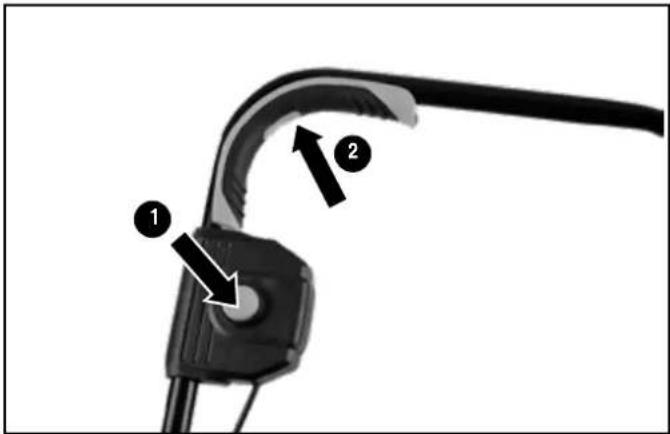
- To switch on, press the safety lock-off button on the handle, then activate the start/stop switch lever. Release the lock-off button.
- To switch off, release the start/stop switch lever.

WARNING! After switching off the mower, the blade may continue to turn for several seconds. Do not touch the moving blade. There is a risk of serious injury.
Step 2 - Grass Collector Box Full Indicator
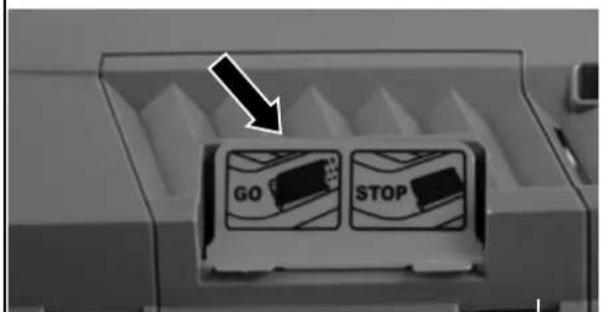

- Your mower may be fitted with a grass box full indicator. This is a small yellow flap on the top side of the grass collection box.
- When this flap remains open as you work, it means that the grass collection box is not full (air flowing freely through the grass collection box).
- When this flap remains closed it means that the grass collection box is full and needs to be emptied (no airflow through the grass collection box).
Operation
Step 3 - Mowing Advice

WARNING! When mowing, do not allow the motor to labour, particularly in heavy conditions. When the motor labours, the speed of the motor drops and you will hear a change in the motor sound. If the problem persists, set the cutting height to a higher setting.
Protect the battery from heat, from continuous exposure to sun and keep away from radiation or other heat sources. Do not leave the battery in the mower in direct sunlight over long periods.
The mower will not function if air temperature is below -5^ or above 40^ !

WARNING! The Electronic Cell Protection (ECP) protects the Lithium-ion battery against deep discharging. When the battery is run down or discharged, a protective circuit shuts power off to the motor. The motor will not run and the blade will not rotate until the battery is recharged.
Step 4 - Mowing/Storage

natural_image
Top-down view of a black lawn mower with dual levers (no text or symbols visible)
Safety warnings
Always wear gloves when handling or working near sharp blades.
Switch off and remove the isolator key, battery and grass collection box before adjusting or cleaning.
For safety of other users remove the isolator key before storage.
It is recommended that you remove the battery from the product and store it at room temperature when it is not in use. As a guide the ideal storage temperature for maximum battery longevity is 0^ C \~ 25^ C. Storing the battery in an environment below 0^ C or above 25^ C will affect the longevity of the battery.
Clean the exterior of the machine thoroughly using a soft brush and cloth. Do not use water, solvents or polishes. Remove all grass and debris, especially from the ventilation slots.
Turn the machine on its side and clean the blade area. If grass cuttings are compacted in the blade area, remove with a wooden or plastic implement.
Store the machine in a dry place. Do not place other objects on top of the machine.
To aid storage, loosen the handle wing nuts and fold the handles.
Ensure cables are not trapped when folding/unfolding top handles, carefully fold down the handles onto the mower body.
Maintenance
General Maintenance

Always wear safety gloves when handling or working near sharp blades.

WARNING! Switch off, and remove the isolator key, battery and grass collection box before adjusting or cleaning.
NOTE! To ensure long and reliable product life, carry out the following maintenance regularly:
- Check for obvious defects such as loose, dislodged or damaged blade, loose fixings, and worn or damaged components.
- Check that covers and guards are undamaged and correctly fitted.
- Carry out necessary maintenance or repairs before using. Repairs should only be carried out by a qualified service agent.
Battery Maintenance
The following maintenance will ensure a long battery life:
- Protect the battery against moisture and water. Store in a cool dry environment.
- Store the battery only within a temperature range between 0^ C and 25^ C. For example, do not leave the battery in a car in summer.
- Do not leave the battery in the product in direct sunlight.
- The ideal storage condition for the battery is 0^ 25^ .
- Occasionally clean the venting slots of the battery using a soft, clean and dry brush.
- A significantly reduced battery working time after a full charge indicates that the battery is worn and should be replaced.
Maintenance
Blade Maintenance

natural_image
Top-down view of a car's internal components including wheels, tire, and dashboard (no text or symbols visible)Turn the machine carefully onto its right side and inspect the blade. If blunt or damaged, replace it.
Use the following procedure to remove and replace the blade:
Wear thick gardening gloves. Hold the blade and using a spanner (not provided) loosen the blade bolt (1) and remove the blade (2). Fit the new blade and the blade bolt. Ensure that the blade is the correct way up (so that the blade number can be seen) and tighten the bolt securely.
If the blade is difficult to remove or fit, insert a screwdriver into the hole to help prevent blade rotation. Ensure the screwdriver is removed before attempting to turn the machine on.

WARNING! Do not lubricate blade or blade bolt during refitting.
Technical Data
Technical Data Table
| Model MCR2132 | |
| Voltage 21.6V | --- |
| No load speed 3700/min | |
| Cutting width 32cm | |
| Height of cut 25/35/45/55/65/mm | |
| Net weight 8.56kg | |
| Grass collector capacity 30L |
| Sound Pressure Level (LPA) | 84 dB(A) K= 3 dB(A) |
| Sound Power Level (LWA) Guaranteed | 96 dB(A) |
| Sound Power Level (LWA) Measured | 86.8 dB(A) K= 1.8 dB(A) |
| Vibration (ah) | 2.5 m/s2 K= 1.5 m/s2 |
| Charger | |
| Model no. 24LFC12 | |
| Charger input 220-240V~50/60Hz 110W | |
| Charger output 24V 4A | --- |
| Charging period (battery fully discharged) | 60min |
| Permitted charging temperature range (for charger) | 4°C~40°C |
| Weight of charger | 0.58kg |
| Insulation protection of charger | □|| |
| Battery | |
| Model no. | 24LB4005 |
| Battery type | Lithium-Ion |
| Rated voltage of battery | 21.6V --- |
| Capacity of battery | 4.0Ah |
Technical Data
Part List
| Part number Accessories | |
| 211056107 Blade | |
| 211002134 Battery | |
| 211002121 Charger | |
| 211034113 Isolator Key | |
| 211059107 Grass Collection Bag | |
| 111227107 Wing Nuts |
Recycling and Disposal

This marking indicates that this product should not be disposed with other household wastes throughout the EU. The machine must be delivered in rigid packaging to avoid damage during transportation. The packaging and the machine itself are manufactured from recyclable materials and should be disposed of accordingly.

Li-Ion batteries:
Please observe the instructions in section "Transport".
Do not dispose of with household waste.
Dispose of safely according to local legal requirements.
Due to a program of continuous product improvement features and instructions are liable to change without notice.
Troubleshooting
General Troubleshooting
The following table provides solutions to common problems encountered with the mower.
| Problem Possible Cause Solution | ||
| Mower fails to operate. Possible c | ogging. Check underneath the | mower and clear as necessary (always wear gardening gloves). |
| The battery is not fully charged. Ch | harge the battery. | |
| The battery is not inserted (properly). | Ensure the battery is correctly inserted. | |
| The grass is too long. Increase the | cutting height and tilt garden product to reduce starting load. | |
| The battery is too hot/cold. Allow to cool/warm. | ||
| The isolator key is not inserted correctly/fully. | Fit the key correctly. | |
| There is a short delay in the motor starting after engaging the On/Off switch. | This is normal. Hold the On/Off switch for 1-3 secs to start the motor. | |
| Motor starts and stops immediately. | The battery is not fully charged. Ch | harge the battery. |
| The isolator key is not inserted correctly/fully. | Fit the key correctly. | |
| The battery is not inserted (properly). | Ensure the battery is correctly inserted. | |
| The battery is too hot/cold. Allow to cool/warm. | ||
| Mower functions intermittently. Motor protector has activated. Allow m | motor to cool and increase height of cut. | |
| Lawnmower leaves ragged cut. | Height of cut is too low Increase height of cut. | |
| Cutting blade is blunt. Replace the blade. | ||
| Poor cutting or motor labours. | Possible clogging. Check undereath the mower and clear as necessary (always wear gardening gloves). | |
| The blade is fitted upside down. | Refit the blade correctly. | |
| Area of cut (battery duration) is not large enough. | Height of cut is too low. | Increase height of cut and walk slower. |
| The grass is too high. Increase height of cut and walk slower. | ||
| The grass is wet or damp. | Wait until grass is dry and walk slower. | |
| The grass is dense. | Increase height of cut, walk slower and cut more frequently. | |
Troubleshooting
General Troubleshooting (continued)
The following table provides solutions to common problems encountered with the mower.
| Problem Possible Cause Solution | ||
| The cutting blade is not rotating while the garden product is switched on. | The cutting blade is obstructed. Switch off the mower and clear obstruction (always wear gardening gloves). | |
| The blade nut/bolt is loose. Tighten the blade nut/ bolt (17 Nm). | ||
| Excessive vibrations/noise The blade | nut/bolt is loose. Tighten the blade nut/ bolt (17 Nm). | |
| Cutting blade is damaged. Replace the blade. | ||
| No charging procedure possible The | battery contacts are contaminated. | Clean the battery contacts (e.g. by inserting and removing the battery several times) or replace the battery. |
| The battery is defective, due to a disconnection in the battery (individual cells). | Replace the battery. | |
| The charge control LEDs do not light up after inserting the mains plug into the socket. | Mains plug of the battery charger is not plugged in (properly). | Insert mains plug (fully) into the socket outlet. |
| Socket outlet, mains cable or battery charger are defective. | Check the mains voltage and if necessary, have the battery charger checked by a qualified service agent. | |
Getting Help
After Sales Support
Our dedicated UK based customer helpline can assist you with assembly, parts queries and technical support.
Our experts are here to get you back enjoying your garden in no time.
Calling our service does not affect your statutory rights.
After sales helpline number: 0345 605 2063
Guarantee
Dear Customer,
In the unlikely event that your device develops a fault, please contact our Customer service department on the telephone number shown below.
- These guarantee terms cover additional guarantee rights and do not affect your statutory warranty rights. Claims must be accompanied by Proof of Purchase. This must be in the form of a Sales receipt or Bank statement and must show that the product has been purchased within 2 years prior to the claim, from the retailer that it was originally sold to.
- Our guarantee covers problems caused by material or manufacturing defects, and will result in the repair of these defects or replacement of the device with a like for like or similar article. Please note that our devices have not been designed for use in commercial, trade or industrial applications. Consequently, the guarantee is invalidated if the equipment is used in commercial, trade or industrial applications or for other equivalent activities.
- The following are also excluded from our guarantee :
A. Faults due to accidents, customer misuse or unauthorized repairs
B. Failure due to lack of routine maintenance.
C. Failure as a result of not using the equipment in accordance with the manual and safety instructions.
D. Accidental damage or wear to any cables or the blade.
E. Accidental damage to the charger or any batteries supplied.
-
The guarantee is valid for a period of 2 years starting from the purchase date of the device. Guarantee claims should be submitted before the end of the guarantee period within two weeks of the defect being noticed. No guarantee claims will be accepted after the end of the guarantee period. The original guarantee period remains applicable to the device even if repairs are carried out or parts are replaced. In such cases, the work performed or parts fitted will not result in an extension of the guarantee period, and no new guarantee will become active for the work performed or parts fitted. This also applies when an on-site Service is used.
-
Please keep your sales receipt in a safe place.


- Table Of Contents
- Symbols...... 3
- Safety Information
- In the Box 15
- Assembly....17
- Preparation 20
- Operation 24
- Maintenance....26
- Technical Data 28
- Troubleshooting 30
- Getting Help 32
- Symbols
- WARNING
- IMPORTANT!
- General Safety
- Important - Please read these instructions fully before starting assembly
- General Safety (continued)
- Battery Safety Information
- Battery Safety Information (continued)
- Charger Safety Information
- Intended Use
- In the Box
- Parts
- Parts (continued)
- Assembly
- Step 1 - Assembling Handles
- Step 2 - Assembling the Grass Collection Box (continued)
- Step 3 - Fitting/Removing the Grass Collection Box
- Preparation
- Step 1 - Check Battery Capacity
- Step 2 - Battery Charging
- Step 3 - Fitting/Removing the Battery
- Fitting the battery
- Removing the battery
- Step 4 - Setting the Cutting Heights
- Operation
- Step 1 - On/Off Operation
- Step 2 - Grass Collector Box Full Indicator
- Step 3 - Mowing Advice
- Step 4 - Mowing/Storage
- Safety warnings
- Maintenance
- General Maintenance
- Battery Maintenance
- Blade Maintenance
- Technical Data
- Recycling and Disposal
- Li-Ion batteries:
- Troubleshooting
- General Troubleshooting
- General Troubleshooting (continued)
- Getting Help
- After Sales Support
- Guarantee
Brand : McGregor
Model : CLM2432A
Category : Lawn mower