
PSO 60W-SS-E - Oven PROLINE - Free user manual and instructions
Find the device manual for free PSO 60W-SS-E PROLINE in PDF.


| Product type | Built-in oven |
| Brand | Proline |
| Model | PSO 60W-SS-E |
| Dimensions (W x H x D) | 59.5 x 59.5 x 55 cm |
| Net weight | 30 kg |
| Power supply | 230 V ~ 50/60 Hz, 3 kW |
| Capacity | 60 liters |
| Heating type | Convection, top heat, bottom heat, grill |
| Main functions | Convection, natural convection, grill, defrost, interior light |
| Cleaning | Catalytic wall, easy-clean enamel |
| Safety | Child lock, double glazing, automatic shut-off |
| Energy class | A |
| Maximum temperature | 250 °C |
| Timer | Electronic programmer with display |
| Door | Cool door with removable hinges |
| Maintenance | Clean with a damp cloth and mild detergent; do not use abrasive cleaners |
| Spare parts | Available on the manufacturer's website or from authorized dealers |
| Repairability | Repairability index: 7.5/10 |
Frequently Asked Questions - PSO 60W-SS-E PROLINE
User questions about PSO 60W-SS-E PROLINE
0 question about this device. Answer the ones you know or ask your own.
Ask a new question about this device
Download the instructions for your Oven in PDF format for free! Find your manual PSO 60W-SS-E - PROLINE and take your electronic device back in hand. On this page are published all the documents necessary for the use of your device. PSO 60W-SS-E by PROLINE.
USER MANUAL PSO 60W-SS-E PROLINE
natural_image
Line drawing of a simple kitchen oven with three handles and top panel (no text or symbols)Chère cliente, cher client,
LISTE DES PARTIES DU FOUR :
4.3. UTILISATION DU BOUTON DE CONTRÔLE DE LA FONCTION DU FOUR
Tableau 1
natural_image
Mechanical linkage diagram labeled Figure 6, showing a symmetrical mechanical assembly with no text or symbols on the structure itself.natural_image
Technical line drawing of a grid-patterned panel with a separate 3D schematic view (no text or symbols)natural_image
Diagram of a device interior showing front and back views with no visible text or symbolsPARTIE 5 : NETTOYAGE ET ENTRETIEN DU FOUR
5.1. NETTOYAGE
BUILT IN OVEN OPERATING AND INSTALLATION INSTRUCTIONS
natural_image
Line drawing of a simple kitchen oven with three handles and a front panel (no text or symbols)Dear Customer,
Thank you for purchasing a Proline Gas Cooker.
The safety precautions and recommendations in these instructions are for your own safety and that of others.
They will also provide a means by which to make full use of the features offered by your appliance.
Please keep this booklet in a safe place. It may be useful in future, either to yourself or to others in the event that doubts should arise relating to its operation.
This appliance must be used only for its intended purpose, that is for the domestic cooking of foodstuffs. Any other form of usage is to be considered as inappropriate and therefore dangerous.
The manufacturer declines all responsibility in the event of damage caused by improper or incorrect use of the appliance.
Contents
1- Presentation and size of product
2-Warnings
3- Preparation for installation and use
4- Using the oven
5- Cleaning and maintenance of your product
6- Service and Transport
PART 1: PRESENTATION AND SIZE OF PRODUCT
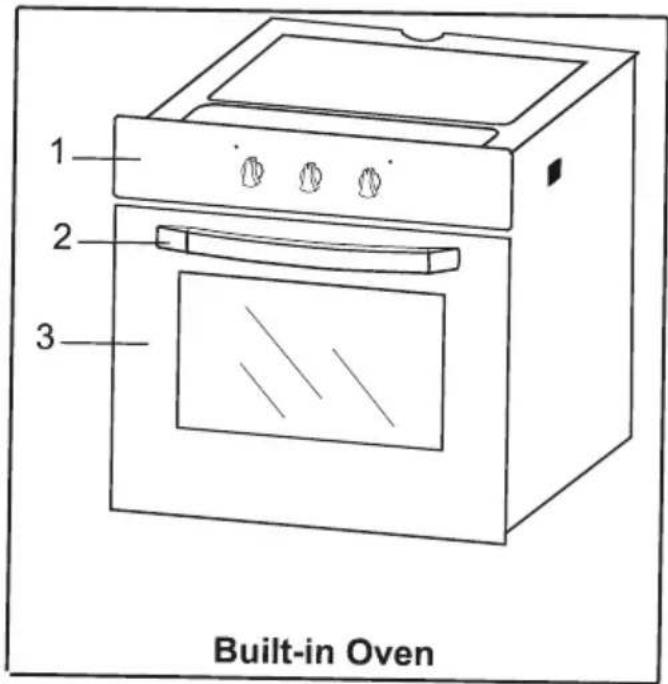
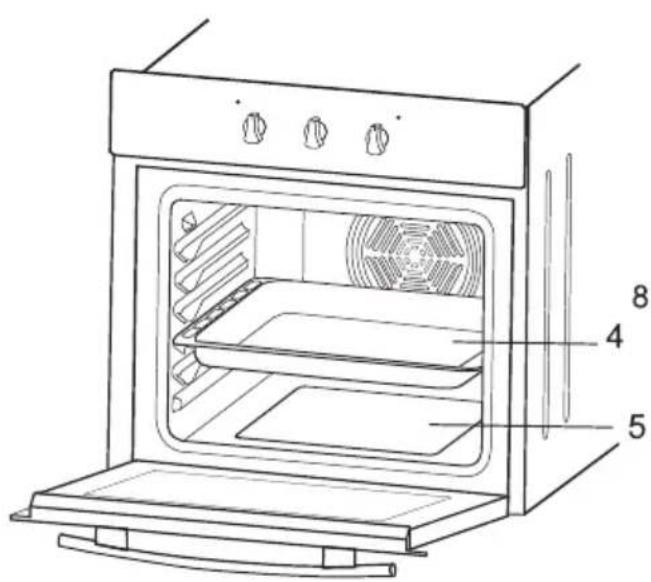
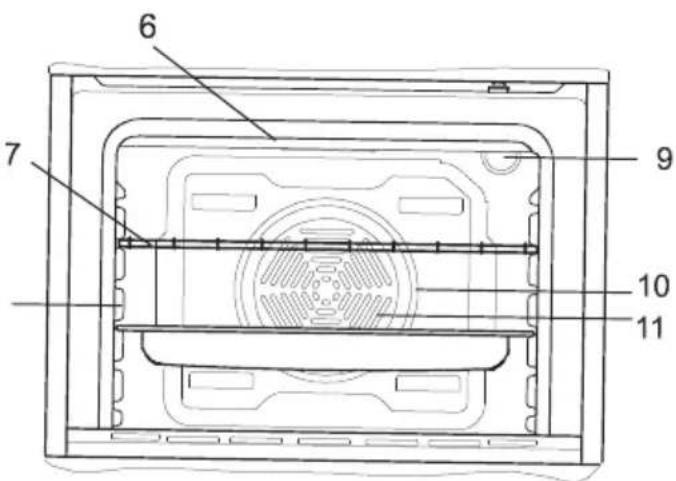
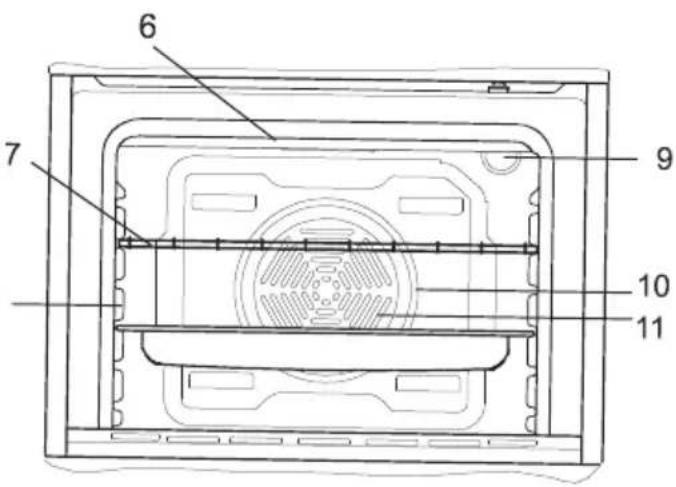
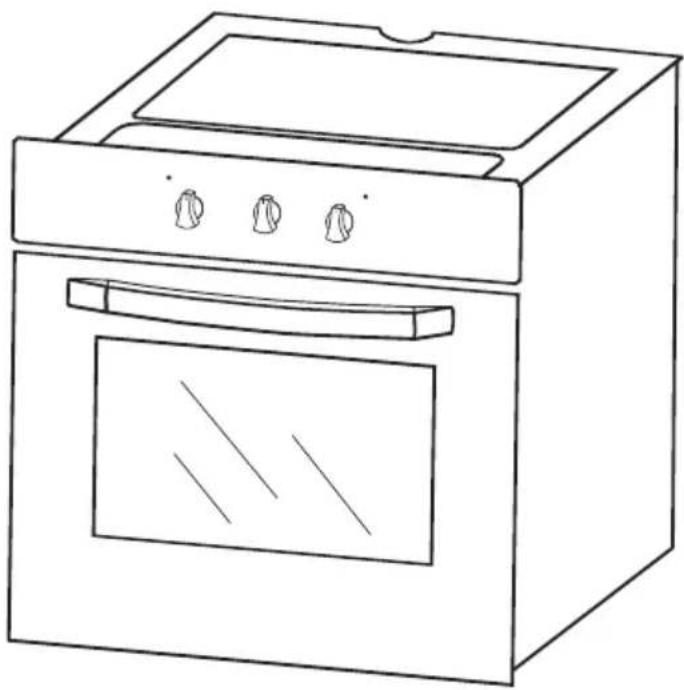
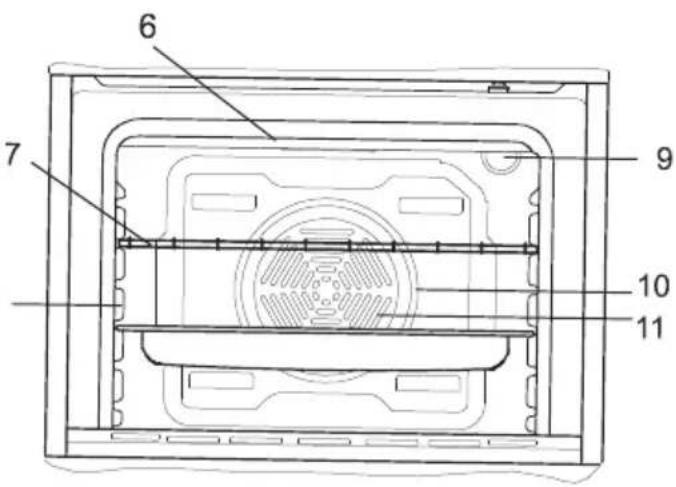
LIST OF COMPONENTS :
1- Control panel
2- Handle
3- Oven Door
4- Deep Tray
5- Lower Heating Element (behind the plate)
6- Upper Heating Element (behind the plate)
7- Wire Grid
8- Racks
9- Oven Light
10- Turbo Heating Element(behind the plate)
11- Fan (behind the plate)
BEFORE STARTING TO USE THE APPLIANCE, PLEASE NOTE ALL ESSENTIAL SAFETY MEASURES AND THROUGHLY READ THE USER MANUAL
This appliance has been designed for domestic use as built-in furniture.
After removing the packaging, make sure to check if there is any damage to the appliance. If there is any damage, never attempt to use the appliance and immediately contact your Authorized Service. As packaging materials need to be collected immediately and put out of reach.
Important safety Instructions
The appliance should be installed by a QUALIFIED INSTALLATION ELECTRICIAN. Failure to comply with this condition will render the guarantee invalid.
If the mains lead is damaged, it must be replaced by the manufacturer, its service agent or similarly qualified person with a specially prepared lead to avoid a hazard.
Do not use the appliance if the mains lead is damaged in any way.
The appliance must not be installed outdoors, even in covered areas. It is extremely dangerous to leave the appliance exposed to rain and storms.
When handling the appliance, always use the handles provided on the sides of the oven.
Always grip the oven door handle in the centre: the ends may be hot.
The appliance must be used to cook food by adults only and according to the instructions in this manual.
Accessible surfaces may get hot when in operation, use handles and knobs at all times.
The openings used for ventilation and dispersion of heat must never be covered.
Always use oven gloves to place cook ware in the oven and when removing it.
Cable replacement must be carried out by properly qualified technicians.
Do not use the appliance if the mains cord is damaged in any way.
Do not touch the appliance with bare feet or with wet or moist hands and feet.
Do not use aluminium foil to line the bottom of the oven.
Do not place flammable materials in the oven: if the oven is switched on by mistake, it may catch fire.
Do not allow children or infirm people to use the oven unless they are carefully supervised.
Do not allow young children to go near the oven when it is operating, especially when the grill is on.
Always make sure the knobs are in the OFF position when the appliance is not in use.
When unplugging the appliance always pull on the plug, do not pull on the cable to remove the plug.
Never carry out any cleaning or maintenance work without having unplugged the plug from the mains.
In the case of a malfunction, under no circumstances should you attempt to repair the appliance yourself. Repairs must only be carried out by experienced and qualified personnel. Contact your Service department
Do not let children sit or stand on the open oven door or rest heavy objects on it as the oven may tip forwards.
CAUTION
Ensure that the power supply cable of other electrical appliances does not come into contact with the hot parts of the oven.
WARNINGS:
This appliance was designed for domestic use only, Commercial or any other use may invalidate the warranty and might be dangerous.
When the appliance is in use, the heating elements and some parts of the oven door become extremely hot. Make sure you don't touch them and keep children well away.
All adhesives and laminates incorporated in the adjacent furniture should be capable of withstanding temperatures exceeding 150^ C; the walls of the housing should withstand 75^ C to avoid risk of fire.
This appliance has been designed for domestic use only. The appliance is not suitable for use within a semi-commercial, commercial or communal environment.
When the appliance is not in use, make sure that the controls are in "0" (off) position.
Your appliance needs sufficient air circulation while it is operating. Carefully read the part of this manual, where installation procedures are explained, and make sure the relevant conditions are satisfied.
Pay attention to the explanations with illustrations while reading the manual.
During use the appliance becomes hot. Care should be taken to avoid touching heating elements inside the oven.
WARNING: Accessible parts may become hot during use. Young children should be kept away
This appliance is not intended for use by persons (including children) with reduced physical, sensory or mental capabilities, or lack of experience and knowledge, unless they have been given supervision or instruction concerning use of the appliance by a person responsible for their safety.
Children should be supervised to ensure that they do not play with the appliance.
FOR THE EFFICIENCY AND SAFETY OF THE APPLIANCE, WE RECOMMEND THAT YOU ALWAYS USE ORIGINAL SPARE PARTS AND CALL ONLY AUTHORISED SERVICE PERSONNEL SHOULD YOU NEED HELP.
Pay attention to the following when using your appliance.
Be careful to connect your appliance to an earthed power outlet or line.
Do not place the power cord of your appliance near any heated spot. Do not pass it near the hob. Contact the nearest Authorised Service in the event any damage occurs to the power cord.
When you first run your oven a certain smell will be emanated arising from the insulation materials and the heater elements. For this reason, before using your oven, run it empty at maximum temperature for 45 minutes. At the same time you need to properly ventilate the environment in which the oven is installed.
Do not touch the interior and the element when using the oven part of the appliance as it will be hot. After extinguishing off the burner, do not touch it with your hand before it is completely cool.
Do not put flammable and combustible materials into the oven including any pressured container, paper, plastic and fabric.
Be careful when using the oven as the oven surface may get hot. Keep children away from the oven.
While the front door is open. Do not let children climb on the door or sit on it as it may tip forward.
Do not use harsh abrasive cleaners or sharp metal scrapers to clean the oven door glass since they can scratch the surface, which may result in shaterring of the glass.
Do not use steam cleaners for cleaning the oven.
WARNING: Ensure that the appliance is switched off before replacing the lamp to avoid the possibility of electric shock.
PART 3: PREPARATION FOR INSTALLATION AND USE
Manufactured with best quality parts and materials, this modern, functional and practical oven will meet your needs in all respects. Make sure to read the manual to obtain successful results and not to experience any problems in the future. The information given below contain rules that are necessary for correct positioning and service operations. They should be read without fail especially by the technician who will position the appliance.
CONTACT THE AUTHORISED SERVICE FOR INSTALLATION OF YOUR OVEN!
3.2. INSTALLATION OF BUILT\_IN OVEN
Cabinet cut-out sizes
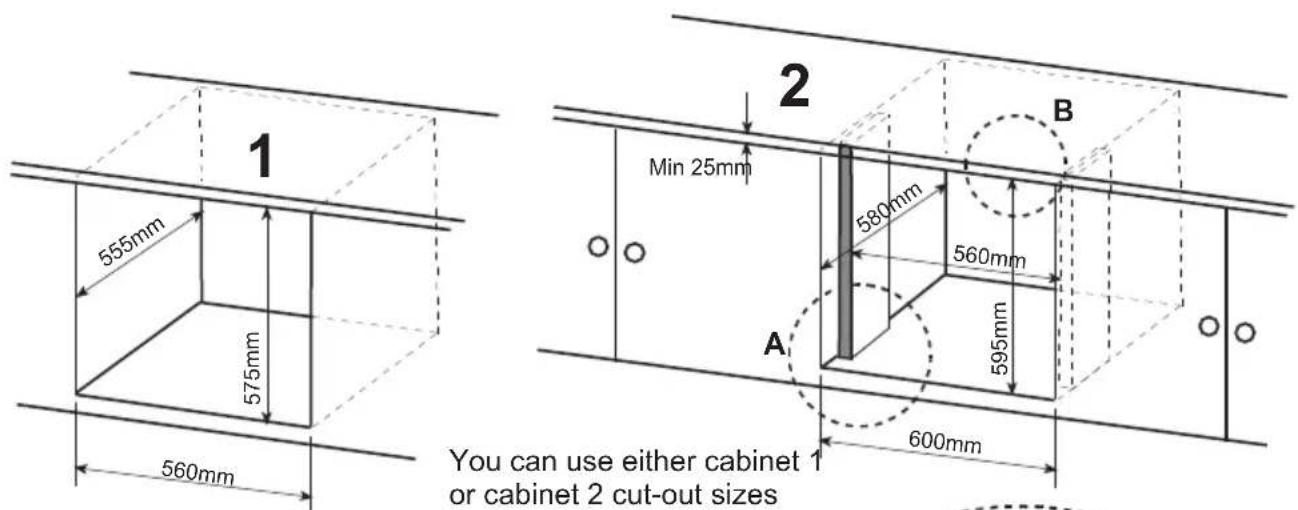
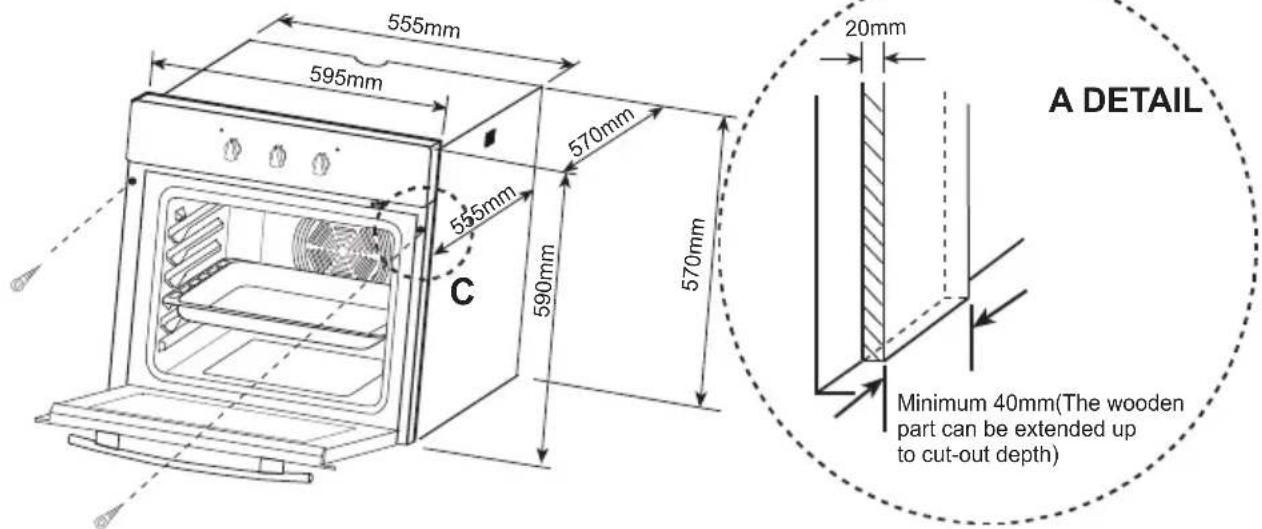
Product sizes
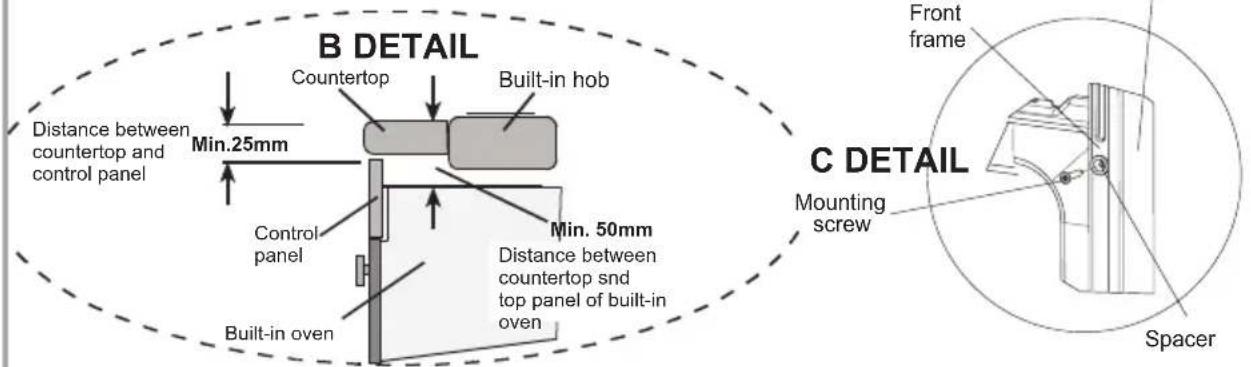
Insert the oven into the cabinet by pushing it forward. Open the oven door and insert 2 screws in the holes located on the oven frame. While the product frame touches the wooden surface of the cabinet, tighten the screws.
The dimensions and material of the cabinet in which the oven will be installed must be correct and resistant to increases in temperature. In a correct installation, contact with electrical or insulated parts must be prevented. Insulating parts need to be fitted in a way to ensure that they cannot be removed by using any kind of tool. Installing the appliance in the close vicinity of a refrigerator or a deep-freezer is not recommended. Otherwise, the performance of the above-mentioned appliances will be negatively affected due to emanating heat. After removing your oven from its packaging, be sure that the oven is not harmed. In case, you suspect of any damage to the appliance, do not use it; immediately contact Authorized Service.
3.3. WIRING AND SAFETY
The instructions given below must be followed without fail during wiring :
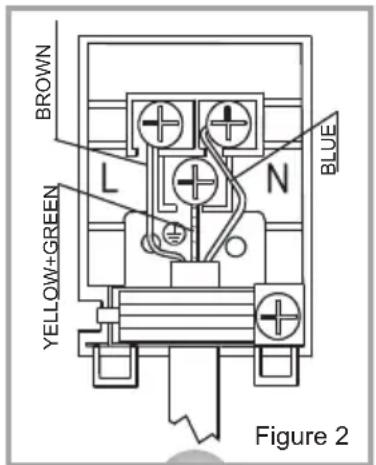
The earthing cable must be connected via the screw with the earthing mark. Feeder cable connection must be as shown in Figure 2. If there is no earthed outlet conforming to regulations in the installation environment, call a qualified electrician to have one installed.
The earthed outlet must be in close vicinity of the appliance. Never use an extension cord.
The mains cable should not contact the product's hot surface.
In case of any damage to the mains cable, make sure to call an authorised Service. The cable must be replaced by a qualified electrician.
Wiring of the appliance must be performed by a qualified electrician using. H05VV-F type mains cable.
- Faulty wiring may damage the appliance. Such damage will not be covered under the warranty.
The appliance is designed to connect to 220-240V mains supply, check that the voltage on the rating plate located inside the oven door on the right matches your local supply before plugging in for the first time.
The Manucaturer accepts no responsibility whatsoever for any kind of damage or injury arising from not complying with safety instructions or using the wrong mains voltage.
3.4. GENERAL WARNING AND PRECAUTIONS
- Your appliance is produced in conformity with the relevant safety instructions relating to electrical appliances. Maintenance and repair works must be performed only by authorised Service technicians trained by the manufacturer firm. Installation and repair works, performed without observing the rules may be dangerous.
The outer surfaces is heated while your appliance is operating. The elements heating the inner surface of the oven and the steam out are extremely hot. These sections will continue to preserve their heat for certain while even if the appliance is switched off. Never touch the hot surfaces. Keep children away.
In order to cook in your oven, the oven function and temperature setting controls need to be adjusted. Otherwise, the oven will not operate.
While the oven door is open, do not place anything on it. You may disturb the balance of the appliance or break the door.
■ Unplug your appliance when it is not in use. - Protect your appliance from atmospheric effects. Do not expose to sun, rain, snow, dust etc.
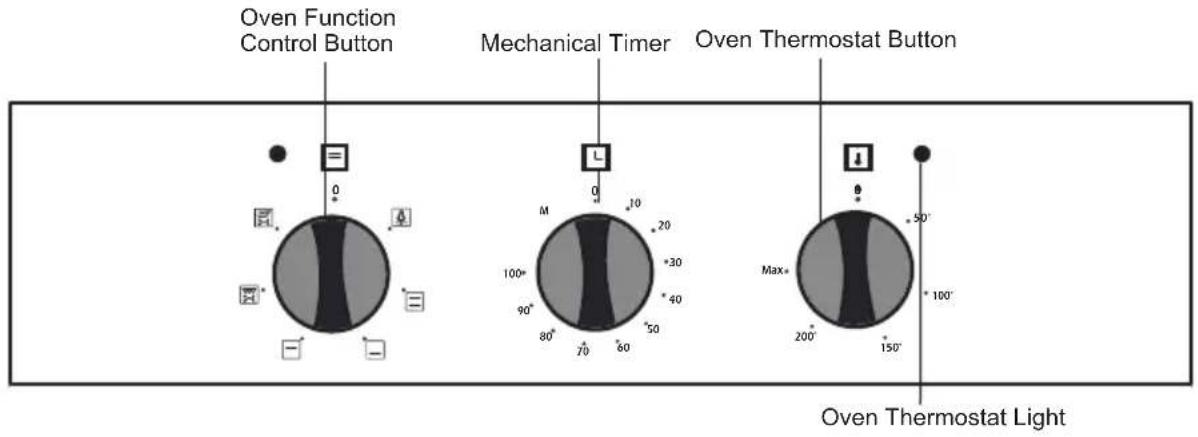
4.1 CONTROL PANEL
Built_in Oven
4.2. USING THE OVEN PART OF THE APPLIANCE
Oven Function Control Knob:
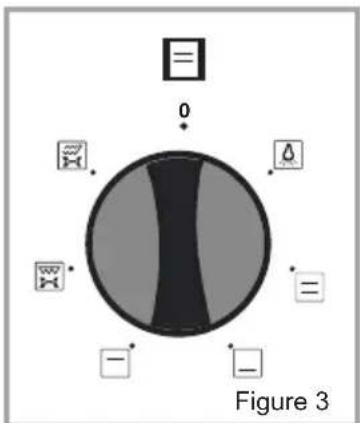
This control is to select the oven functions (Figure 3). Explained in the next part and in Table 1. You need to adjust the function selection control and the oven temperature control to a temperature value. Otherwise, the oven function you selected will not operate.
Oven Thermostat Knob:
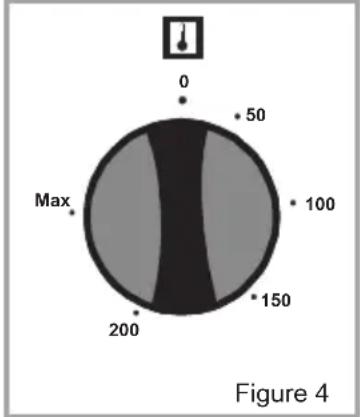
This control is to set the temperature (Figure 4). When the temperature inside your oven reaches the value you set, the thermostat will cut the circuit and the thermostat light will go off. When the temperature falls below the set value, the thermostat will be turned on and the thermostat light will come on.
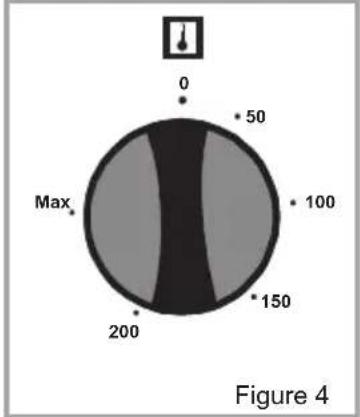
pie
| Value | |---| | 50 | | 100 | | 150 | | 200 | | Max |4.3. USING THE OVEN FUNCTION CONTROL BUTTON
Table 1
 | The oven light will be turned on. |
 | The oven's thermostat and warning lights and the lower and upper heating elements will be switched on. |
 | The oven's thermostat and warning lights and the lower heating element will be switched on. |
 | The oven's thermostat and warning lights and the upper heating element will be switched on. |
 | The oven's thermostat and warning lights, the grill heater and the roast chicken function will be switched on. |
 | The oven's thermostat and warning lights, the upper heating element, the grill heater and the roast chicken function will be switched on. |

Lower-Upper Heating Element Function (Static Coking) :
In this type of cooking which is described as the traditional method, the heat emanating evenly from the lower and upper elements into the oven ensures even cooking of the lower and upper side of the food that you are cooking. Adjust the thermostat control to a temperature recommended for the cooking operation you will perform. A preheating of the oven for about 10 minutes is recommended. Leave the food to cook, which is placed in a suitable container, for the recommended duration. This position is the preferred function for making cakes, sponge cakes, pastry, baked pasta, lasagne, pizza.
After a cooking/baking, turn off the oven function control and the thermostat control and cancel the timer program if available. Take the cooked/bake food out of the oven, place it in a safe place and ensure that the oven copmletely cools off by keepig the oven door open.
As the oven will be hot, keep children away.

Lower Heating Element Function :
As the heat rises from the bottom of the oven, it warms food up, rather than cooking the foods. Adjust the thermostat control to a temperature recommended on the cooking table for the cooking operation you will perform. Pre-heating the oven for about 10 minutes is recommended.

Upper Heating Element Function :
Upper heating function is appropriate for heating already cooked food. Adjust the thermostat control of your oven to a temperature recommended on the cooking table for the cooking operation you will perform. Pre-heating the oven for about 10 minutes is recommended.

Grill and Roast Chicken Function :
natural_image
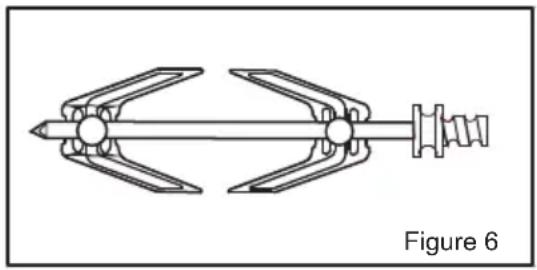
Mechanical linkage diagram labeled Figure 6, showing a symmetrical mechanical assembly with no text or symbols on the diagram itself.This function is used for roast chicken or roast on a skewer. For roasting, use the roast skewer (Figure 6). For grills; put the foods on the grill, and the grill on the highest rack. After placing the oven tray on the 3. Rack, You can start the grill operation. The tray placed on the third rack will ensure that the oil dropping from he foods will be collected. When grilling, the oven door must be closed and the oven temperature should be adjusted to 200^ C.
Turn your oven's thermostat control to 200^ . After a preheating period of 5 minutes, put your food into the oven.
After the cooking, turn off the oven function and temperature controls and cancel the timer program. Take the cooked food out of the oven, place it on a safe surface and ensure that the oven completely cools off by keeping the oven door open. As the oven will be hot, keep children away.

Upper Heating Element, Grill and Roast Chicken Function :
This function is used for faster grills and for grills on a larger surface, roast chicken and roast on skewer. For roasting, use the roast skewer (Figure 6). For grills; put the foods on the grill, and the grill on the highest rack. After placing the oven tray on rack 3. Now, you can start the grill operation. The tray placed on the 3rd rack will ensure that the oil dropping from the foods will be collected. When grilling, the oven door must be closed and the oven temperatures should be adjusted to 200°C.
Turn your oven's thermostat control to the 200^ setting. After a preheating period of 5 minutes, put your food into the oven.
After the cooking, turn off the oven function and temperature controls and cancel the timer program if applicable. Take the cooked food out of the oven, place it on a safe surface and ensure that the oven completely cools off by keeping the oven door open.
As the oven will be hot, stay away from the oven and keep your children away as well.

Grill, Roast Chicken and Fan Function :
The function uses the fan, the grill and the upper heating element. It is also used for faster grills and for grills on a larger surface, roast chicken and roast on skewer. For roasting, use the roast skewer (Figure 6). For grills; put the food on the grill, and the grill on the highest rack. After placing the oven tray on the third rack, you can start the grill operation. The tray placed on the third rack will ensure that the oil dropping from the foods will be collected. When grilling, the oven door must be closed and the oven temperature should be adjusted to 200^ .
Turn your oven's thermostat control so it will point to 200^ . After a preheating period of 5 minutes, put your food into the oven.
After cooking, turn off the oven function control and the thermostat control and cancel the timer program. Take the cooked food out of the oven, place it on a safe place and ensure that the oven completely cools off by keeping the oven door open. As the oven will be hot, keep children away.

Turbo Fan and Lower Heating Element Function :
Turbo Fan and the Lower Heating Element Function is ideal for baking pizza. While the turbo fan evenly disperses the heat of the oven, the lower heating element ensures baking of pizza dough. Adjust your oven's function control so it points to the symbol above. After a preheating period of 10 minutes, put your food into the oven. After cooking, turn off the oven function control and the thermostat control and cancel the timer program. Take the cooked food out of the oven, place it in a safe place and ensure that the oven completely cools down by keeping the oven door open. The oven will be hot, keep your children away from the oven during cooking.
Turbo Fan and the Lower Heating Element Function is ideal for baking pizza. While the turbo fan evenly disperses the heat of the oven, the lower heating element ensures the baking of the pizza dough.
The oven door should not be opened often during cooking period.
4.4. USING THE MECHANICAL TIMER
L
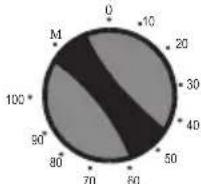
Figure 7
L
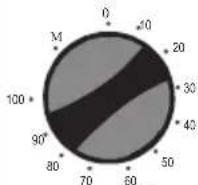
Figure 8
Manual Operation :
When you set the Timer control to the M position as shown on the picture, you can continuously run your oven. When the timer button is in 0 position the oven will not operate(Figure 7).
Operating by adjusting the time :
Rotate the timer control clockwise to a setting between 0 - 100 minutes, as shown on the picture. The oven will stop when the set time range is completed, and the timer will give an audible warning once the set time has ellapsed (Figure 8).
| DISHES | LOWER-UPPER | GRILL | ||||
| Thermostat pos.(°C) | Rack pos. | Cooking period(min) | Thermostat pos.(°C) | Rack pos. | Cooking period(min) | |
| Layered pastry | 170 - 190 | 2 - 3 | 35 - 45 | |||
| Cake | 170 - 190 | 2 - 3 | 30 - 40 | |||
| Cookie | 170 - 190 | 2 - 3 | 30 - 40 | |||
| Grilled meatballs | 200 | 5 | 10 - 15 | |||
| Watery food | 175 - 200 | 3 | 40 - 50 | |||
| Chicken | 200 | 2 - 3 | 45 - 60 | 200 | * | 50 - 60 |
| Chop | 200 | 4 - 5 | 15 - 25 | |||
| Beefstake | 200 | 5 | 15 - 25 | |||
| Two-tray cake | ||||||
| Two-tray pastry | ||||||
| * Cook with roast chicken skewer.... | ||||||
4.6. ACCESSORIES USED IN THE OVEN
If the food to be cooked does not completely cover the oven tray, if the food is taken out of the deep-freezer or if the tray is used to collect dripping juices of foods during the grilling deformation of the tray may occur due to high temperatures during cooking/frying. This is normal. Do not leave a glass tray or container in a cold environment immediately after cooking in them. Do not place them on cold and wet surfaces. Ensure that they slowly cool off placing them on a dry piece of cloth. Otherwise, the glass tray or container might break. If you are going to perform a grill operation in your oven, we recommend that you use the grill tray, supplied with your product. This way, splattering and dripping oils will not make the oven interior dirty. If you are going to use the large wire grill, insert a tray into one of the lower racks to avoid accumulation of the oils. To make cleaning easier, add some water into it. In a grilling operation, use rack 4 or 5 and oil the grill to prevent the food from sticking to the grill tray.
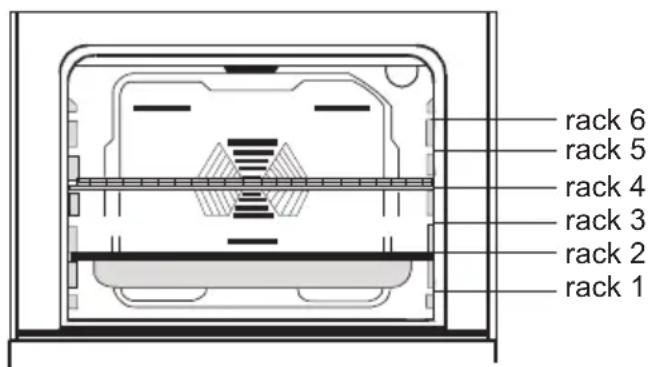
Wire grid: Used for grills or placing different containers other than the cooking tray on it.
Grill tray: Used for baking stews.
Figure 9
Rotisserie
Pull out the clamps on the spit by loosening their screws and stick the spit into chicken. Then, mount the clamps by sliding them on the spit and stick the clamps into chicken. Tighten their screws. Before roasting make sure the oven and rotisserie functions are turned OFF. Put the tray on second shelf and locate the rotisserie bearing bracket for spit in the holes on the tray as shown in the picture. Some products may have rotisserie bearing grid accessory instead of the rotisserie bearing bracket.
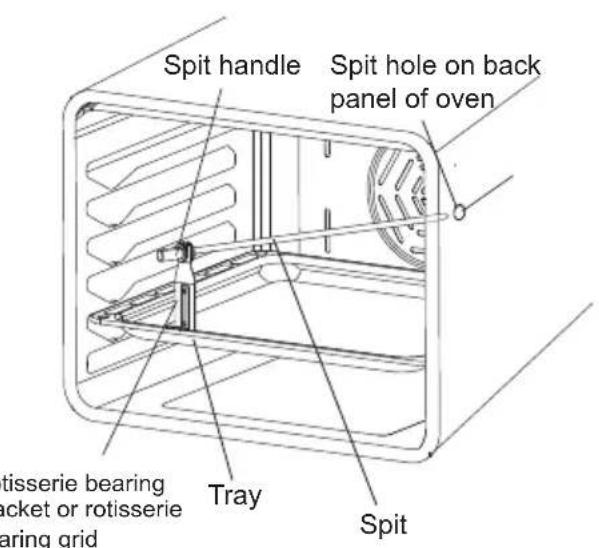
Placed on first shelf. In this case, you only need to place the bearing grid on third shelf. Place the point tip of spit into hole at back panel of oven and the bearing of the spit on the rotisserie bearing bracket or rotisserie bearing grid. Also, be sure that the tip of the spit is placed into the hole correctly. During rotisserie, the spit handle must never be mounted and the oven door must be closed.
NOTE: The maximum weight the spit will withstand is 4.0Kg.
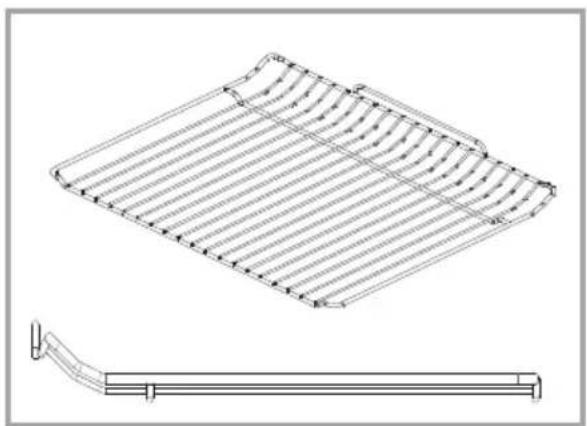
Pan anti-tilting wire
natural_image
Technical line drawing of a grid-patterned panel with a separate 3D schematic view (no text or symbols)- To locate grid correctly in the cavity, put it to any rack and push the grid fully home.
- The pan anti-tilting wire must be placed inside of the cavity.
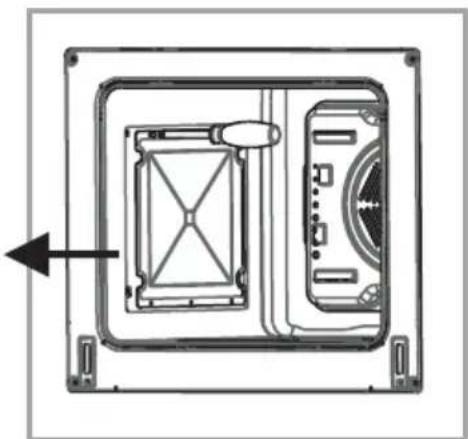
Removal of catalitic panel
Remove G screws on the each catalitic enamel coated panel.
natural_image
Diagram of a device interior showing internal components and a directional arrow (no text or symbols)PART 5: CLEANING AND MAINTENANCE OF YOUR OVEN
5.1. CLEANING
Before starting to clean your oven, be sure that all the controls are off and your appliance is cool. Disconnect from the mains.
Do not use cleaning materials containing particles that might scratch the enamelled and painted parts of your oven. Use cream cleaners or liquid cleaners, which do not contain particles. As they might harm the surfaces, do not use caustic creams, abrasive cleaning powders, rough wire wool or hard tools. In the event the excess liquids spilling over your oven should burn, it may cause damage to the enamel. Immediately clean up the split liquids. Do not use steam cleaners for cleaning the oven.
Cleaning the interior of the oven
Make sure to unplug the oven before starting to clean it. You will obtain best results if you clean the oven interior while the oven is slightly warm. Wipe your oven with a soft piece of cloth dampened with soap water after each use. Then wipe it again, this time with a wetted cloth, and wipe it dry. For product with catalytic enamel frames, the rear and side walls of the inner frame do not require cleaning. If your oven has stainless steel surfaces, we recommend using a cleaner specifically designed for stainless steel surfaces.
5.2. MAINTENANCE
Replacing the Oven Light
It is recommended that you leave this operation to a qualified electrician. Unplug the oven first and make sure that is cold. After removing the lid in front of the light, take also the bulb of its place. Insert the new bulb resistant to 300^ C (25Watt E14 Base), into the place of the bulb you have removed. Then fit the light protecting glass back into its place. After that, your oven will be ready for use.
PART 6: SERVICE AND TRANSPORT
6.1. REQUIREMENTS BEFORE CONTAINING TO SERVICE
If the oven does not operate :
The oven may be plugged off, there has been a black out. On models fitted with a timer, time may not be regulated.
If the oven does not heat :
The heat may be not adjusted with oven's heater control switch.
If the interior lighting lamp does not light :
The electricity must be controlled. It must be controlled whether the lamps are defective. If they are defective, you can change them as following the guide.
Cooking (if lower-upper part does not cook equally):
Control the shelf locations, cooking period and heat values according to the manual.
Except these, if you still have any problem with your product, please call "Authorised Service".
PSO60W-SS-E Product Specifications
| Dimensions | ||
| Product Dimensions (H*W*D) mm 595 * 595 * 570 | ||
| Oven Features | ||
| Oven Volume It 61 | ||
| Cavity Dimensions mm 430 x 330 x 430 | ||
| Oven Light W 25 | ||
| Top Heating Element W 1200 | ||
| Bottom Heating Element W 1100 | ||
| Grill (Thermostatic) W 2000 | ||
| Double Grill (Thermostatic) | W 3200 | |
| Timer | Mechanical Timer | |
| Roasting Tray (Deep Tray) | 1 | |
| Chromed Grid with Stoper | 1 | |
| Others | ||
| Total Power (Maximum) | kW | 3,2 |
| Tangential Cooling Fan (in case of built-in oven with cooling fan) | W | 11,5 |
| Voltage | V | 230 |
| Energy consumption according to the EN50304 Standards | kWh | 0.79 |
| Electric Cooker Energy Rating | A | |
| Shrink Packed Product Dimensions (Width / Depth / Height) | mm | 680 x 630 x 640 |
If something doesn't seem to work
If there is something about your appliance which you do not understand and you live in the UK you can phone our help line during normal office hours on: 0844 8009595 If you need a service engineer please phone the number on your sales receipt.
Calls are charged at standard rates.
We apologise for any inconvenience caused by minor inconsistencies in these instructions, which may occur as a result of product improvement and development.
Kesa Electricals U.K HU1 3AU 26 / 05 / 2010
PROLINE
PSO 60W-SS-E
INGEBOUWDE OVEN GEBRUIKSHANDLEIDING EN INSTALLATIE INSTRUCTIES
natural_image
Line drawing of a simple kitchen oven with three handles and top panel (no text or symbols)Beste klant,
LIJST VAN ONDERDELEN:
natural_image
Mechanical linkage diagram labeled Figure 6, showing a symmetrical mechanical assembly with no text or symbols on the diagram itself.natural_image
Technical line drawing of a grid-patterned structure with a separate curved bracket (no text or symbols)natural_image
Technical line drawing of a device rear panel with internal components and a directional arrow (no text or symbols)DEEL 5: SCHOONMAKEN EN ONDERHOUD VAN UW OVEN
5.1. SCHOONMAKEN
PSO60W-SS-E productspecifications
- Chère cliente, cher client,
- LISTE DES PARTIES DU FOUR :
- UTILISATION DU BOUTON DE CONTRÔLE DE LA FONCTION DU FOUR
- PARTIE 5 : NETTOYAGE ET ENTRETIEN DU FOUR
- NETTOYAGE
- BUILT IN OVEN OPERATING AND INSTALLATION INSTRUCTIONS
- Dear Customer,
- Contents
- PART 1: PRESENTATION AND SIZE OF PRODUCT
- LIST OF COMPONENTS :
- BEFORE STARTING TO USE THE APPLIANCE, PLEASE NOTE ALL ESSENTIAL SAFETY MEASURES AND THROUGHLY READ THE USER MANUAL
- Important safety Instructions
- CAUTION
- WARNINGS:
- FOR THE EFFICIENCY AND SAFETY OF THE APPLIANCE, WE RECOMMEND THAT YOU ALWAYS USE ORIGINAL SPARE PARTS AND CALL ONLY AUTHORISED SERVICE PERSONNEL SHOULD YOU NEED HELP.
- PART 3: PREPARATION FOR INSTALLATION AND USE
- INSTALLATION OF BUILT\_IN OVEN
- WIRING AND SAFETY
- The instructions given below must be followed without fail during wiring :
- GENERAL WARNING AND PRECAUTIONS
- CONTROL PANEL
- USING THE OVEN PART OF THE APPLIANCE
- Oven Function Control Knob:
- Oven Thermostat Knob:
- USING THE OVEN FUNCTION CONTROL BUTTON
- Lower-Upper Heating Element Function (Static Coking) :
- Lower Heating Element Function :
- Upper Heating Element Function :
- Grill and Roast Chicken Function :
- Upper Heating Element, Grill and Roast Chicken Function :
- Grill, Roast Chicken and Fan Function :
- Turbo Fan and Lower Heating Element Function :
- USING THE MECHANICAL TIMER
- ACCESSORIES USED IN THE OVEN
- Rotisserie
- Pan anti-tilting wire
- PART 5: CLEANING AND MAINTENANCE OF YOUR OVEN
- CLEANING
- Cleaning the interior of the oven
- MAINTENANCE
- Replacing the Oven Light
- PART 6: SERVICE AND TRANSPORT
- REQUIREMENTS BEFORE CONTAINING TO SERVICE
- If the oven does not operate :
- If the oven does not heat :
- If the interior lighting lamp does not light :
- Cooking (if lower-upper part does not cook equally):
- If something doesn't seem to work
- PROLINE
- PSO 60W-SS-E
- INGEBOUWDE OVEN GEBRUIKSHANDLEIDING EN INSTALLATIE INSTRUCTIES
- Beste klant,
- LIJST VAN ONDERDELEN:
- DEEL 5: SCHOONMAKEN EN ONDERHOUD VAN UW OVEN
- SCHOONMAKEN
Brand : PROLINE
Model : PSO 60W-SS-E
Category : Oven