
Quick Start BT7100 - Oven SUNBEAM - Free user manual and instructions
Find the device manual for free Quick Start BT7100 SUNBEAM in PDF.


| Product Type | Countertop Oven |
| Brand | Sunbeam |
| Model | Quick Start BT7100 |
| Power Supply | 220-240V AC |
| Functions | Toast, Crumpet, Pizza, Bake, Grill, Cookies, Roast, Warm, Defrost, Reheat/Preheat |
| Maximum Temperature | 230°C |
| Maximum Timer | 60 minutes |
| Turbo Convection | Yes, with fan for faster and even cooking (can be toggled on/off) |
| Display | LCD with function indicator, shade setting (1-7), time, temperature, turbo icon |
| Shade Settings | 7 levels for Toast and Crumpet functions |
| Interior Material | Easy-clean coated walls |
| Rack | Removable wire rack with 3 positions (upper, middle, lower) |
| Door | Tempered glass for viewing |
| Included Accessories | Aluminium pizza tray (30cm), enamel baking pan, enamel drip tray insert |
| Cleaning Instructions | Hand wash only; do not immerse oven. Wipe interior/exterior with mild detergent and damp cloth |
| Safety Features | Automatic shut-off after cycle completion, cool-touch exterior (caution: surfaces may be hot) |
| Warranty | 12-month replacement or repair guarantee (Australia/New Zealand) |
| Country of Origin | Made in China |
| Recommended Use | Household and similar applications (kitchens, offices, farm houses, etc.) |
Frequently Asked Questions - Quick Start BT7100 SUNBEAM
User questions about Quick Start BT7100 SUNBEAM
0 question about this device. Answer the ones you know or ask your own.
Ask a new question about this device
Download the instructions for your Oven in PDF format for free! Find your manual Quick Start BT7100 - SUNBEAM and take your electronic device back in hand. On this page are published all the documents necessary for the use of your device. Quick Start BT7100 by SUNBEAM.
USER MANUAL Quick Start BT7100 SUNBEAM
natural_image
Exterior view of a Sunbeam 30-inch microwave oven with digital display and control knobs (no text or symbols on main body)Contents
Sunbeam's Safety Precautions 2
Features of your Quick Start Oven 3
Using your Quick Start Oven 7
| Toast | Function | 8 |
| Crumpet | Function | 9 |
| Pizza | Function | 10 |
| Bake | Function | 11 |
| Grill | Function | 12 |
| Cookies | Function | 13 |
| Roast | Function | 14 |
| Warm | Function | 15 |
| Defrost | Function | 16 |
| Reheat / Preheat Function | 17 |
Rack Positioning Guide 18
Care and Cleaning 19
Recipes 20
Important instructions – retain for future use.
Sunbeam's Safety Precautions
SAFETY PRECAUTIONS FOR YOUR SUNBEAM QUICK START OVEN.
- Always operate on a flat surface.
- Avoid contact with oven surfaces, including oven door, during and after use, as they will be hot.
- Use well away from walls and curtains.
- Do not place items on top of the oven whilst in use.
- Do not block or cover the air vents on the top, back or side of the oven.
- Do not use in confined spaces.
- Do not immerse the unit in water.
Sunbeam is very safety conscious when designing and manufacturing consumer products, but it is essential that the product user also exercise care when using an electrical appliance. Listed below are precautions which are essential for the safe use of an electrical appliance:
- Read carefully and save all the instructions provided with an appliance.
- Always turn the power off at the power outlet before you insert or remove a plug. Remove by grasping the plug - do not pull on the cord.
- Turn the power off and remove the plug when the appliance is not in use and before cleaning.
- Do not use your appliance with an extension cord unless this cord has been checked and tested by a qualified technician or service person.
- Always use your appliance from a power outlet of the voltage (A.C. only) marked on the appliance.
-
This appliance is not intended for use by persons (including children) with reduced physical, sensory or mental capabilities, or lack of experience and knowledge, unless they have been given supervision or instruction concerning use of the appliance by a person responsible for their safety.
-
Children should be supervised to ensure that they do not play with the appliance.
- The temperature of accessible surfaces may be high when the appliance is operating.
- Never leave an appliance unattended while in use.
- Do not use an appliance for any purpose other than its intended use.
- Do not place an appliance on or near a hot gas flame, electric element or on a heated oven.
- Do not place on top of any other appliance.
- Do not let the power cord of an appliance hang over the edge of a table or bench top or touch any hot surface.
- Do not operate any electrical appliance with a damaged cord or after the appliance has been damaged in any manner. If damage is suspected, return the appliance to the nearest Sunbeam Appointed Service Centre for examination, repair or adjustment.
- For additional protection, Sunbeam recommend the use of a residual current device (RCD) with a tripping current not exceeding 30mA in the electrical circuit supplying power to your appliances.
- Do not immerse the appliance in water or any other liquid unless recommended.
- Appliances are not intended to be operated by means of an external timer or separate remote control system.
- This appliance is intended to be used in household and similar applications such as: staff kitchen areas in shops, offices and other working environments; farm houses; by clients in hotels, motels and other residential type environments; bed and breakfast type environments.
If you have any concerns regarding the performance and use of your appliance, please visit www.sunbeam.com.au or contact the Sunbeam Consumer Service Line.
Ensure the above safety precautions are understood.
Features of your Sunbeam Quick Start Oven
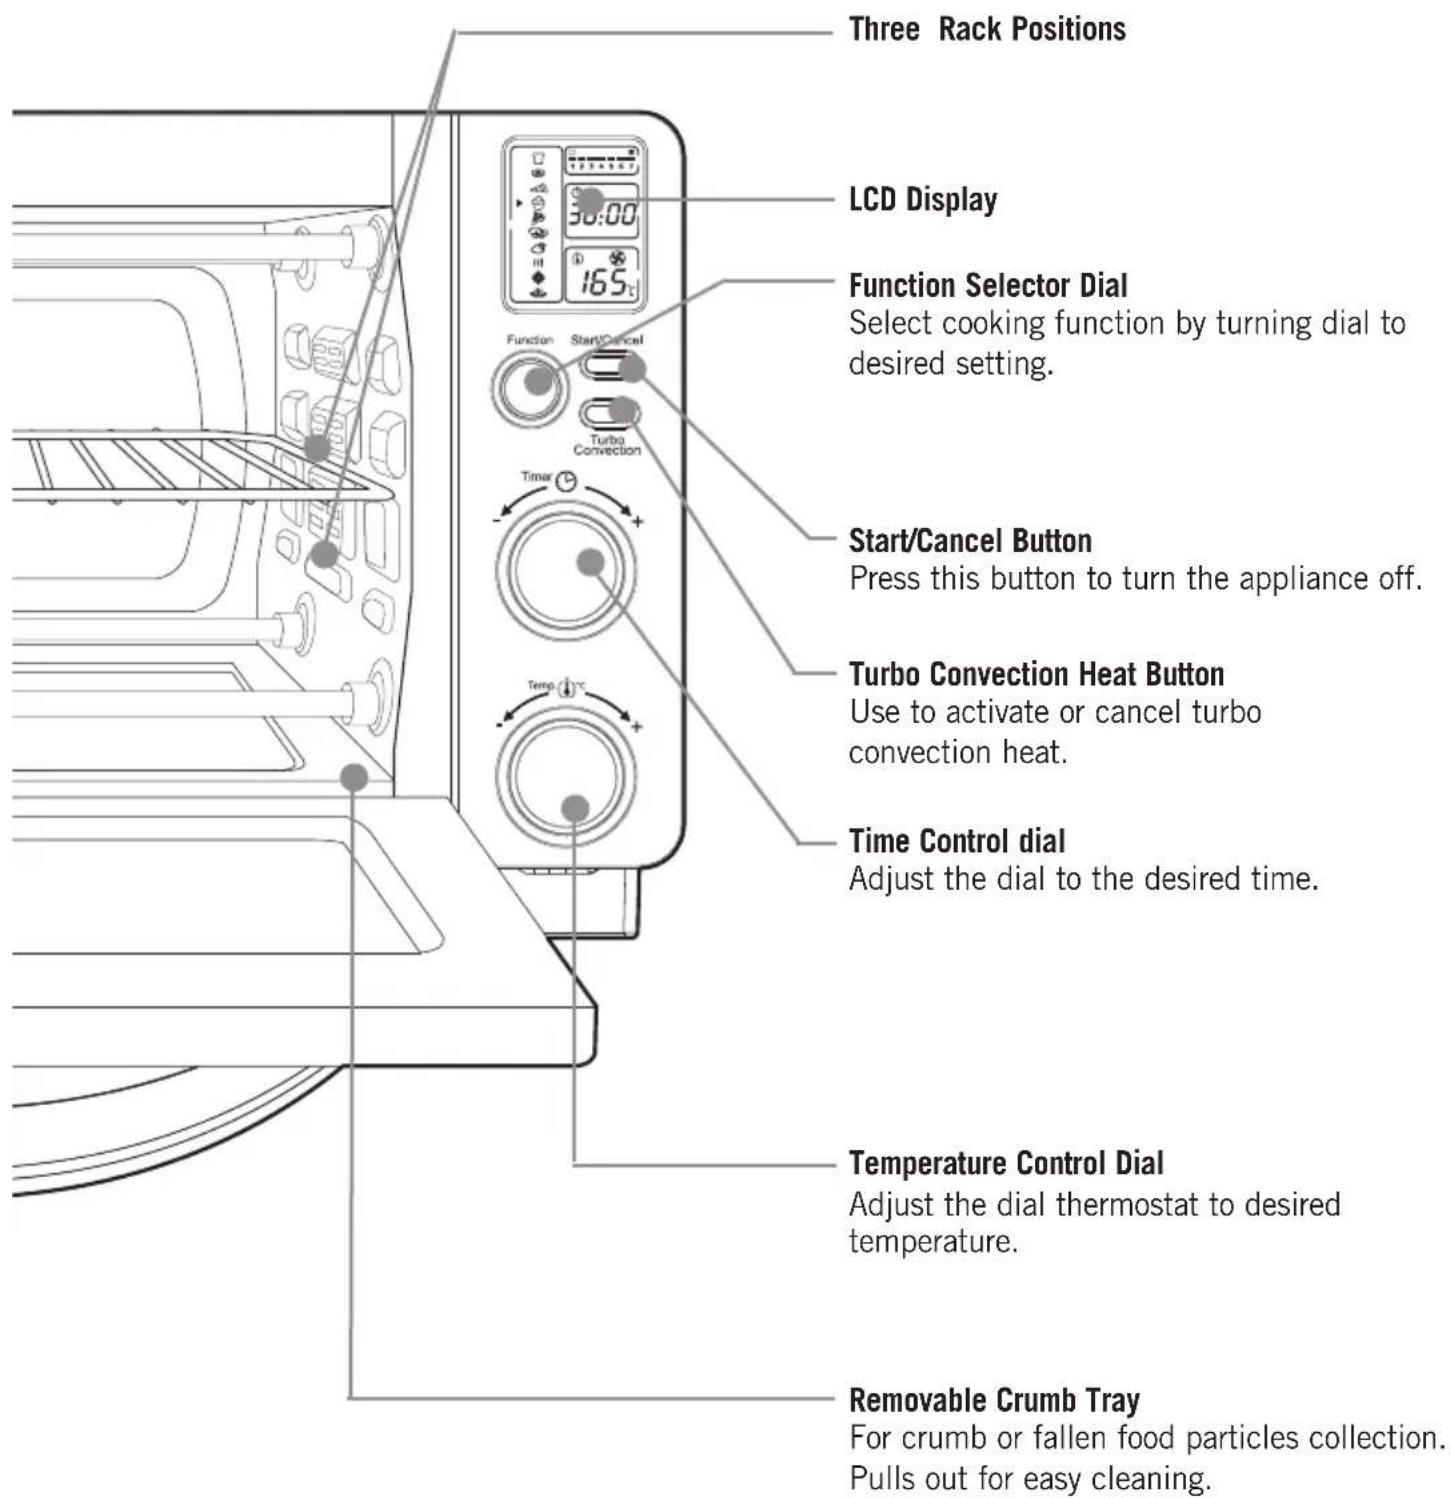
Easy Clean Interior Walls
Allows fast clean up.
Removable Wire Rack
See Rack Positioning Guide on page 18.
Tempered Glass Door
For front viewing of food.

Hot Surfaces
Do Not Touch
This symbol indicates, temperature of accessible surfaces may be high when the appliance is operating and for some time after use.
Features of your Sunbeam Quick Start Oven
Features of your Sunbeam Quick Start Oven (continued)
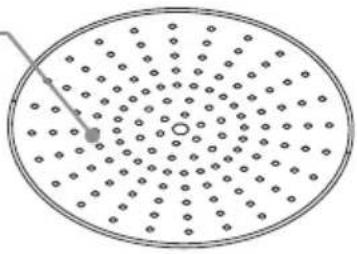
Aluminium pizza tray
Cooks up to a 30cm pizza to perfection
natural_image
Circular diagram with evenly spaced dots and a pointer, no text or symbols presentEnamel baking pan
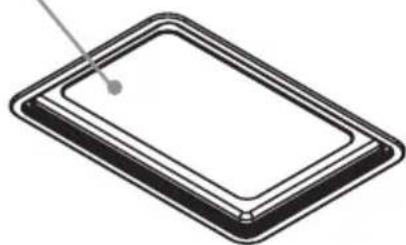
Enamel baking pan can be used on its own or with the drip tray insert.
natural_image
Simple line drawing of a rectangular frame with a small dot and arrow pointing to the top edge (no text or symbols)Enamel drip tray insert
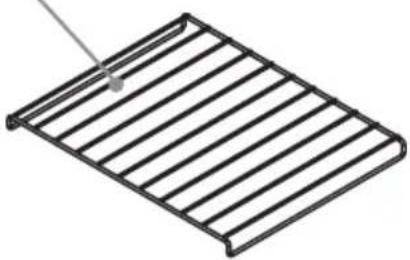
The drip tray insert sits inside the baking pan and allows fats to drain away for fat-free cooking. The drip tray also helps to prevent splattering.
natural_image
Simple line drawing of a metal grate with horizontal slats and a pointer (no text or symbols)Features of your Sunbeam Quick Start Oven (continued)
LCD Display
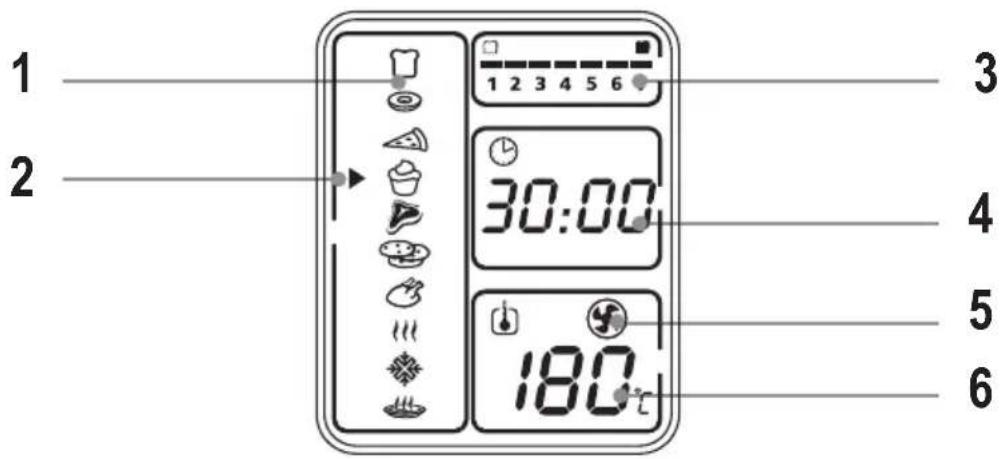
- Function Indicator – Toast, Crumpet, Pizza, Bake, Grill, Cookies, Roast, Warm, Defrost, Reheat/Preheat
- Function Indicator Arrow
- 1-7 colour shade setting indicator
- Time Indicator
- Turbo Convection Heat Icon
- Temperature Indicator
| Function | Default Temperature | DefaultTime | Default Turbo |
| [YCCC] Toast Fixed 7 browning settings N/A | |||
 Crumpet Fixed 7 browning settings N/A Crumpet Fixed 7 browning settings N/A | |||
 Pizza Pizza | 200°C 20 minutes On | ||
 Bake Bake | 170°C 20 minutes On | ||
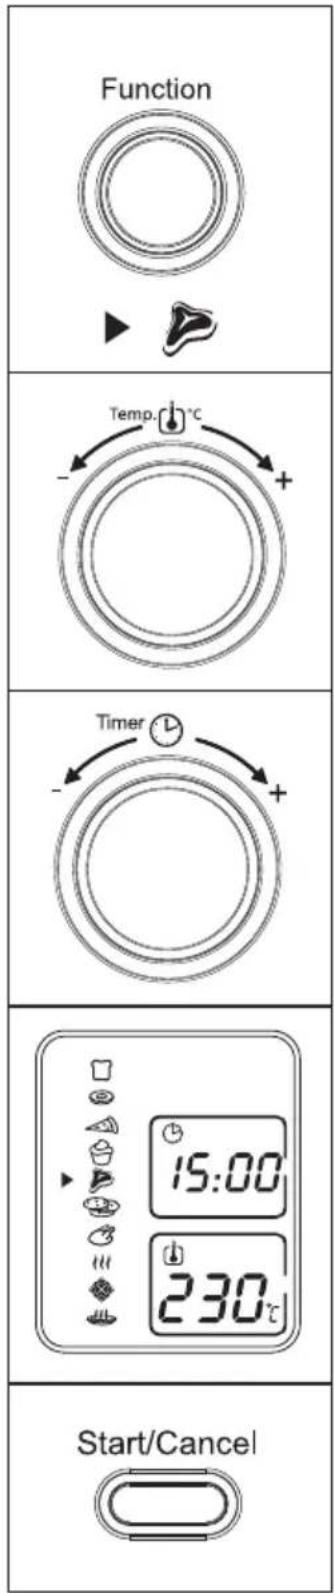
| [2KB6] Grill | 230°C 15 minutes Off | ||
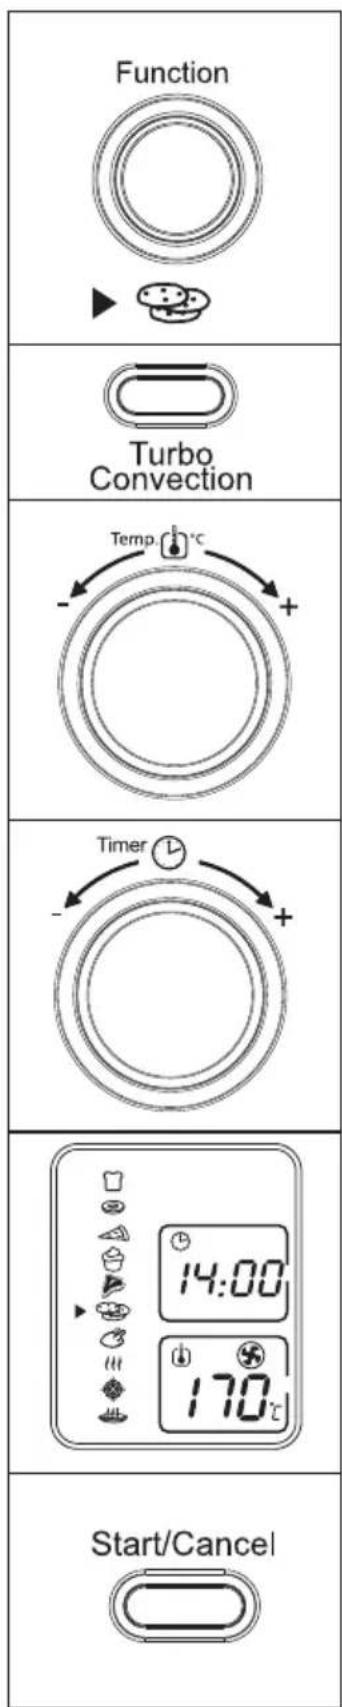
| [2BKT] Cookies 170°C 14 minutes On | |||
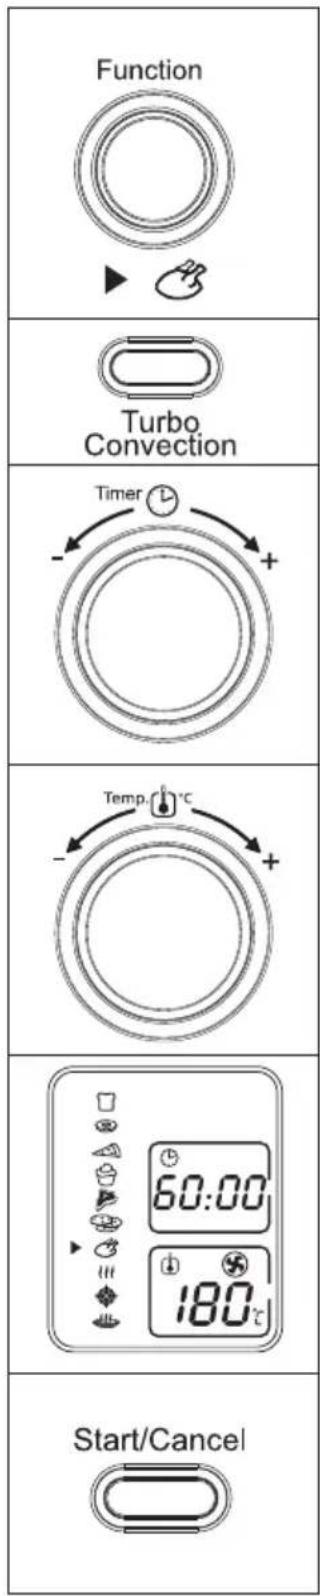
| [TYWIT] Roast | 180°C 60 minutes On | ||
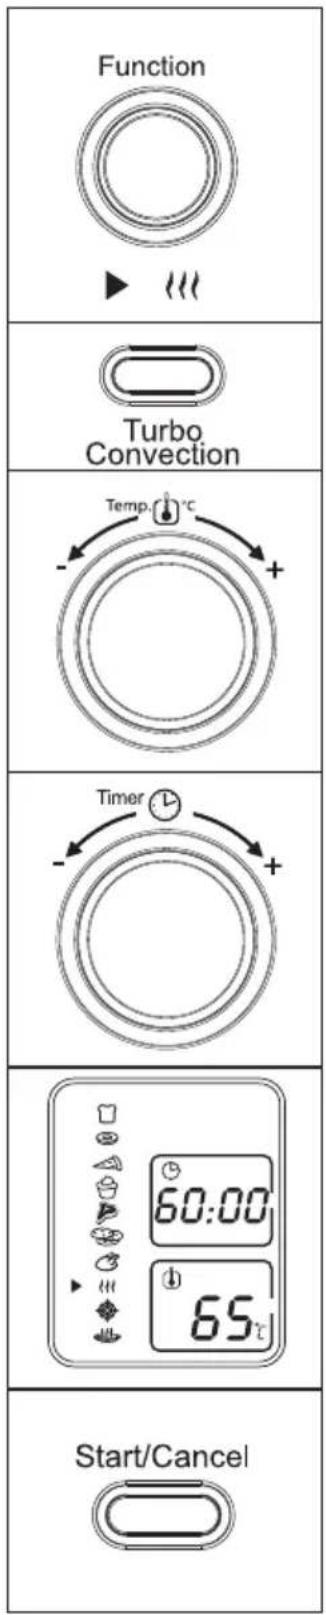
| [XTGS] Warm 65°C 60 minutes Off | |||
 Defrost Defrost | 230°C 16 minutes Off | ||
| [YDOZ] Reheat/Preheat | 165°C | 5 minutes | Off |
Using your Quick Start Oven
Position the oven on a dry, level surface, ensuring that the ventilation slots on the side and top of the appliance are not obstructed.
Plug the power cord into a 220-240 volt power outlet and turn the power on. The oven will emit 2 long ‘beeps’ and the LCD screen will illuminate.
Note: When turned on for the first time, your Quick Start Oven may give off vapours for up to 10 minutes. This is due to the initial heating of the materials used. It is safe, not detrimental to the performance of the oven and will not reoccur.
Important: Do not force open the oven door beyond its limit or let the door drop open as this will distort the doors ability to maintain a proper seal.
The LCD screen will be illuminated for 30 seconds and then go out if no other buttons or knobs are pressed or moved.
Note: Once the blue LCD display goes out – you can press or move any button or knob to 'wake up' the display and operate as normal.
Step 1. Select Function:
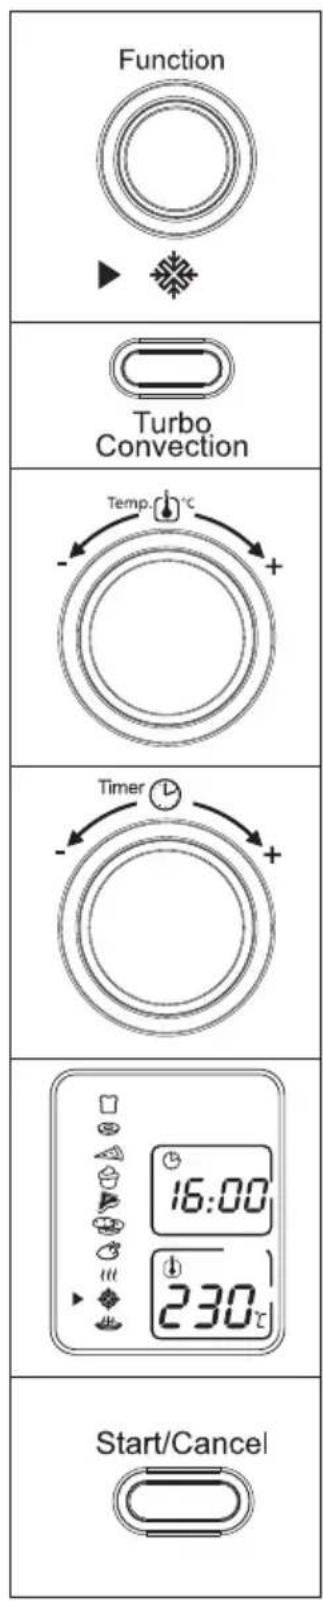
Turn the 'Function' dial to choose one of the following 10 options from the menu: Toast, Crumpet, Pizza, Bake, Grill, Cookies, Roast, Warm, Defrost and Reheat/Preheat. The indicator arrow will move from function to function as the dial is turned.
Note: If the cooking process is not started or no further buttons or dials are pressed within 30 seconds the blue backlight will turn off.
Step 2. Time:
Turn the time 📊 dial to increase or decrease the cooking time. The maximum time setting is 60 minutes.
Step 3. Temperature:
Turn the temperature dial to increase or decrease the temperature setting.
Using the Toast Function
Step 1. Turn the Function Dial to the Toast function. When you select the Toast function, the 1-7 colour shade setting indicator will become visible on the LCD. Both upper and lower heating elements will heat.
Default Colour Shade Setting is 4. This will be the default every time the oven is unplugged and plugged back in. If the oven remains plugged in since the last time you have selected a different shade for the Toast ☐ function (even if not activated), the oven will remember the last shade setting you selected.
NOTE: The middle rack position is recommended for toasting.
The temperature is not adjustable for the Toast function. The time adjusts automatically with shade adjustment. The temperature or time is not adjustable during the Toast function.
Step 2. To adjust the shade colour:
Turn the Time Dial to adjust the shade colour. The colour shade-setting indicator will show your selection as you turn the dial.
Step 3. To Start:
Press the Start/Cancel Button to start the toasting process. The red Start/Cancel Button light will illuminate. The LCD Display will show the Toast Function, the shade colour selection and the countdown time. The oven will begin to operate and the timer will start counting down.
When the Toasting is complete, the oven will emit 3 'beeps'. The LCD and the Start/Cancel Button Light will turn off after 30 seconds.
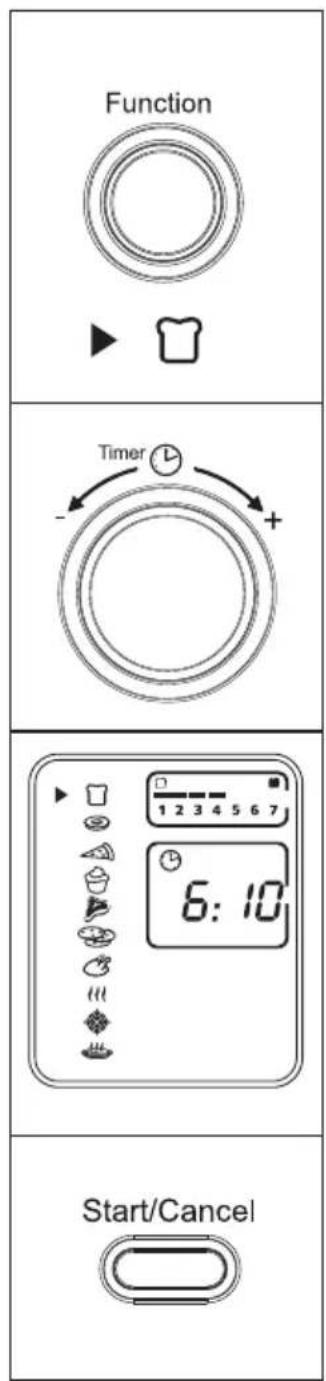
NOTE: You can cancel the toasting cycle at any time by pressing the Start/Cancel Button once. The red Start/Cancel Button light will turn off whenever a function has been completed or a function is manually cancelled.
Using the Crumpet Function
Step 1. Turn the Function Dial to the Crumpet function. When you select the Crumpet function, the 1-7 colour shade setting indicator will become visible on the LCD. The upper and lower heating elements will heat. Default Colour Shade Setting is 4. This will be the default every time the oven is unplugged and plugged back on. If the oven remains plugged-in since the last time you have selected a different shade for the Crumpet function (even if not activated), the oven will remember the last shade setting you selected.
NOTE: The middle rack position is recommended for crumpet toasting. The temperature is not adjustable for the Crumpet function. The time adjusts automatically with shade adjustment. The temperature or time is not adjustable during the Crumpet function.
Step 2. To adjust the shade colour:
Turn the Time Dial to adjust the shade colour. The colour shade-setting indicator will show your selection as you turn the knob.
Step 3. To Start:
Press the Start/Cancel Button to start the crumpet toasting process. The red Start/Cancel Button light will illuminate. The LCD Display will show the Crumpet Function, the shade colour selection and the countdown time. The oven will begin to work and the timer will start counting down. When the Crumpet toasting is complete, the oven will emit 3 'beeps'. The LCD and the Start/Cancel Button Light will turn off after 30 seconds.
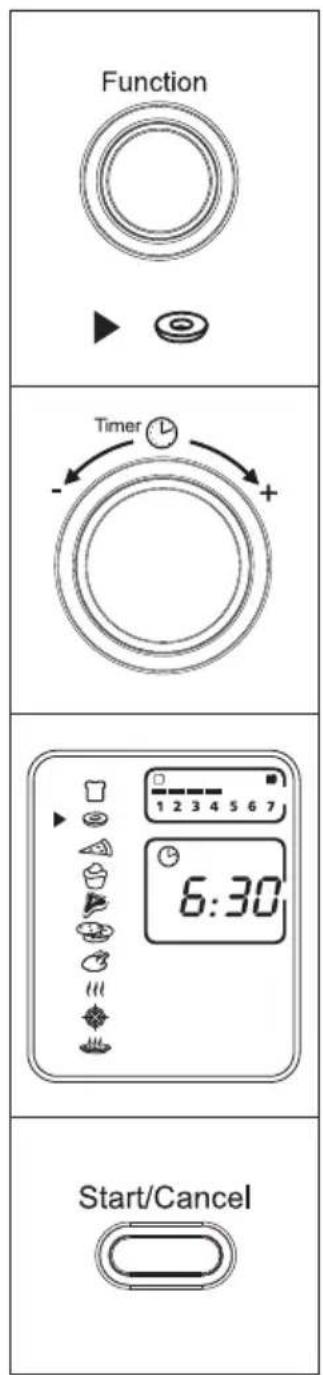
NOTE: You can cancel the crumpet toasting cycle at any time by pressing the Start/Cancel Button once. The red Start/Cancel Button light will turn off whenever a function has been completed or a function is manually cancelled.
Using the Pizza Function
It is advised to use the Preheat function to heat the oven before using the Pizza function. See page 17.
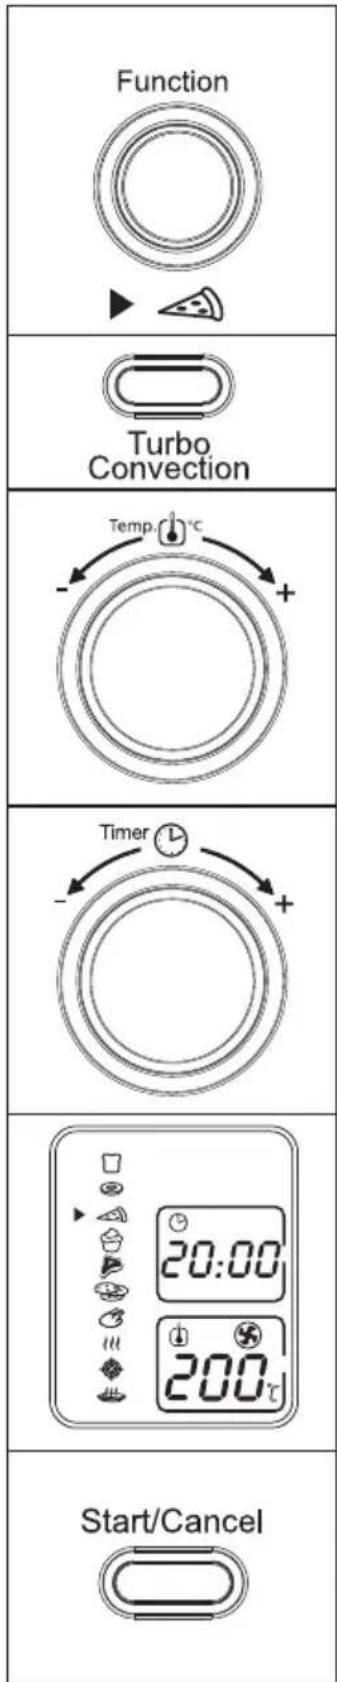
Step 1. Turn the Function Dial to the Pizza function. When you select the Pizza function, the Turbo Convection Heat will automatically activate.
Step 2. If you wish to switch to the regular Pizza function, press the Turbo button once to turn off the Turbo Convection Heat default selection. The blue light of the Turbo Convection Heat button will turn off. The Turbo Convection Heat Function turns on a built-in fan that circulates hot air in the oven chamber, cooking your food faster and more evenly.
Default Temperature: 200°C.
Default Time: 20 minutes.
Step 3. To set the temperature:
Turn the Temperature Dial is you wish to increase or decrease the temperature setting. For the Pizza Function, the temperature can be set from 170^ C to 230^ C in 15-degree increments.
Step 4. To set the time:
Turn the Time Dial if you wish to increase or decrease the cooking time. The maximum time setting for Pizza is 60 minutes (1 hour). Once you have selected the desired cooking time, press the Start button to initiate the cooking process.
Step 5. To Start:
Press the Start/Cancel Button to start the cooking process. The red Start/Cancel button light will illuminate. The LCD Display will show the Pizza Function, the countdown time and the selected temperature. The oven will begin to heat and the timer will start counting down. When the Pizza function cycle is complete, the oven will emit 3 'beeps'. The LCD and the Start/Cancel Button Light will turn off after 30 seconds.
NOTE: You can cancel the cooking cycle at any time by pressing the Start/Cancel Button once. The red Start/Cancel Button light will turn off whenever a function has been completed or a function is manually cancelled.
Using the Bake Function
It is advised to use the Preheat function to heat the oven before using the Bake function. See page 17.
Step 1. Turn the Function Dial to the Bake function. When you select the Bake function, the Turbo Convection Heat will automatically activate.
Step 2. If you wish to switch to the regular Bake function, press the Turbo Button once to turn off the Turbo Convection Heat default selection. The blue light of the Turbo Convection Heat button will turn off. The Turbo Convection Heat Function turns on a built-in fan that circulates hot air in the oven chamber, cooking your food faster and more evenly.
Default Temperature: 170°C.
Default Time: 20 minutes.
Step 3. To set the temperature:
Turn the Temperature Dial i you wish to increase or decrease the temperature setting. For the Bake Function, the temperature can be set from 65°C to 230°C in 1-degree increments.
Step 4. To set the time:
Turn the Time Dial if you wish to increase or decrease the cooking time. The maximum time setting for Bake is 60 minutes (1 hour). Once you have selected the desired cooking time, press the Start button to initiate the pre-heating process.
Step 5. To Start:
Press the Start/Cancel Button to start the cooking process. The red Start/Cancel button light will illuminate. The LCD Display will show the Bake Function, the countdown time and the selected temperature. The oven will begin to heat and the timer will start counting down. When the Bake function cycle is complete, the oven will emit 3 'beeps'. The LCD and the Start/Cancel Button Light will turn off after 30 seconds.
NOTE: You can cancel the cooking cycle at any time by pressing the Start/Cancel Button once. The red Start/Cancel Button light will turn off whenever a function has been completed or a function is manually cancelled.

Using the Grill Function
It is advised to use the Preheat function to heat the oven before using the Bake function. See page 17.
Step 1. Turn the Function Dial to the Grill function. When you select the Grill function, the upper heating elements will heat. Place the rack on the highest setting and place food onto the enamel drip tray with rack insert for best results.
Default Temperature: 230°C.
Default Time: 15 minutes.
Step 2. To set the temperature:
Turn the Temperature Dial if you wish to increase or decrease the temperature setting. For the Grill Function, the temperature can be set from 200°C to 230°C in 15-degree increments.
Step 3. To set the time:
Turn the Time Dial if you wish to increase or decrease the cooking time. The maximum time setting for Grill is 60 minutes (1 hour). Once you have selected the desired cooking time, press the Start button to initiate the pre-heating process.
Step 4. To start:
Press the Start/Cancel Button to start the grilling process. The red Start/Cancel button light will illuminate. The LCD Display will show the Grill Function, the countdown time and the selected temperature. The oven will begin to heat and the timer will start counting down. When the Grill function cycle is complete, the oven will emit 3 'beeps'. The LCD and the Start/Cancel Button Light will turn off after 30 seconds.
NOTE: You can cancel the cooking cycle at any time by pressing the Start/Cancel Button once. The red Start/Cancel Button light will turn off whenever a function has been completed or a function is manually cancelled.
Using the Cookies Function
It is advised to use the Preheat function to heat the oven before using the Cookies function. See page 17.
Step 1. Turn the Function Dial to the Cookies function. When you select the Cookies function, the Turbo Convection Heat will automatically activate.
Step 2. If you wish to switch to the regular Cookies function, press the Turbo Button once to turn off the Turbo Convection Heat default selection. The blue light of the Turbo Convection Heat button will turn off. The Turbo Convection Heat Function turns on a built-in fan that circulates hot air in the oven chamber, cooking your food faster and more evenly.
Default Temperature: 170°C.
Default Time: 14 minutes.
Step 3. To set the temperature:
Turn the Temperature Dial is you wish to increase or decrease the temperature setting. For the Cookies Function, the temperature can be set from 65^ C to 230^ C in 1-degree increments.
Step 4. To set the time:
Turn the Time Dial if you wish to increase or decrease the cooking time. The maximum time setting for Cookies is 60 minutes (1 hour). Once you have selected the desired cooking time, press the Start button to initiate the pre-heating process.
Step 5. To Start:
Press the Start/Cancel Button to start the cooking process. The red Start/Cancel button light will illuminate. The LCD Display will show the Cookies Function, the countdown time and the selected temperature. The oven will begin to heat and the timer will start counting down. When the Cookies function cycle is complete, the oven will emit 3 'beeps'. The LCD and the Start/Cancel Button Light will turn off after 30 seconds.
NOTE: You can cancel the cooking cycle at any time by pressing the Start/Cancel Button once. The red Start/Cancel Button light will turn off whenever a function has been completed or a function is manually cancelled.
Using the Roast Function
Step 1. Turn the Function Dial to the Roast function. When you select the Roast function, the Turbo Convection Heat will automatically activate.
Step 2. If you wish to switch to the regular Roast function, press the Turbo Button once to turn off the Turbo Convection Heat default selection. The blue light of the Turbo Convection Heat button will turn off. The Turbo Convection Heat Function turns on a built-in fan that circulates hot air in the oven chamber, cooking your food faster and more evenly.
Default Temperature: 180°C.
Default Time: 60 minutes.
Step 3. To set the temperature:
Turn the Temperature Dial id you wish to increase or decrease the temperature setting. For the Roast Function, the temperature can be set from 65°C to 230°C in 1-degree increments.
Step 4. To set the time:
Turn the Time Dial if you wish to increase or decrease the cooking time. The maximum time setting for Roast is 60 minutes (1 hour). Once you have selected the desired cooking time, press the Start button to initiate the pre-heating process.
Step 5. To Start:
Press the Start/Cancel Button to start the cooking process. The red Start/Cancel button light will illuminate. The LCD Display will show the Roast Function, the countdown time and the selected temperature. The oven will begin to heat and the timer will start counting down. When the Roast function cycle is complete, the oven will emit 3 'beeps'. The LCD and the Start/Cancel Button Light will turn off after 30 seconds.
NOTE: You can cancel the cooking cycle at any time by pressing the Start/Cancel Button once. The red Start/Cancel Button light will turn off whenever a function has been completed or a function is manually cancelled.
Using the Warm Function
Step 1. Turn the Function Dial to the Warm function. When you select the Warm function, the lower heating elements will heat.
Default Temperature: 65°C.
Default Time: 60 minutes.
You may manually activate the Turbo Convection Heat by pressing the Turbo "button once to turn it on. The blue light of the Turbo button will turn on.
Step 2. To set the temperature:
Turn the Temperature Dial if you wish to increase or decrease the temperature setting. For the Warm Function, the temperature can be set from 65°C to 95°C in 15-degree increments.
Step 3. To set the time:
Turn the Time Dial if you wish to increase or decrease the cooking time. The maximum time setting for Warm is 60 minutes (1 hour). Once you have selected the desired cooking time, press the Start button to initiate the pre-heating process.
Step 4. To Start:
Press the Start/Cancel Button to start the warming process. The red Start/Cancel button light will illuminate. The LCD Display will show the Warm Function, the countdown time and the selected temperature. The oven will begin to heat and the timer will start counting down. When the Warm function cycle is complete, the oven will emit 3 'beeps'. The LCD and the Start/Cancel Button Light will turn off after 30 seconds.
NOTE: You can cancel the warming cycle at any time by pressing the Start/Cancel Button once. The red Start/Cancel Button light will turn off whenever a function has been completed or a function is manually cancelled.
Using the Defrost Function
Step 1. Turn the Function Dial to the Defrost function.
Default Temperature: 230°C.
Default Time: 16 minutes.
You may manually activate the Turbo Convection Heat by pressing the Turbo button once to turn it on. The blue light of the Turbo button will turn on.
Step 2. To set the temperature:
Turn the Temperature Dial you wish to increase or decrease the temperature setting. For the Defrost Function, the temperature can be set from 65°C to 230°C in 1-degree increments.
Step 3. To set the time:
Turn the Time Dial if you wish to increase or decrease the cooking time. The maximum time setting for Defrost is 60 minutes (1 hour). Once you have selected the desired cooking time, press the Start button to initiate the pre-heating process.
Step 4. To Start:
Press the Start/Cancel Button to start the defrosting process. The red Start/Cancel button light will illuminate. The LCD Display will show the Defrost Function, the countdown time and the selected temperature. The oven will begin to heat and the timer will start counting down. When the Defrost function cycle is complete, the oven will emit 3 'beeps'. The LCD and the Start/Cancel Button Light will turn off after 30 seconds.
NOTE: You can cancel the Defrost cycle at any time by pressing the Start/Cancel Button once. The red Start/Cancel Button light will turn off whenever a function has been completed or a function is manually cancelled.
Using the Reheat /Preheat Function
This function can be used to reheat food or to preheat the oven before using one of the other function. Preheating the oven is advised before using the Pizza, Bake and Cookies functions.
Step 1. Turn the Function Dial to the Reheat/Preheat function.
Default Temperature: 165°C.
Default Time: 5 minutes.
You may manually activate the Turbo Convection Heat by pressing the Turbo "button once to turn it on. The blue light of the Turbo button will turn on.
Step 2. To set the temperature:
Turn the Temperature Dial in you wish to increase or decrease the temperature setting. For the Reheat/Preheat Function, the temperature can be set from 65°C to 230°C in 1-degree increments.
Step 3. To set the time:
Turn the Time Dial if you wish to increase or decrease the cooking time. The maximum time setting for Reheat/Preheat is 60 minutes (1 hour). Once you have selected the desired cooking time, press the Start button to initiate the pre-heating process.
Step 4. To Start:
Press the Start/Cancel Button to start the cooking process. The red Start/Cancel button light will illuminate. The LCD Display will show the Reheat/Preheat Function, the countdown time and the selected temperature. The oven will begin to heat and the timer will start counting down. When the Reheat function cycle is complete, the oven will emit 3 'beeps'. The LCD and the Start/Cancel Button Light will turn off after 30 seconds.
NOTE: You can cancel the Reheat/Preheat cycle at any time by pressing the Start/Cancel Button once. The red Start/Cancel Button light will turn off whenever a function has been completed or a function is manually cancelled.

Rack Positioning Guide
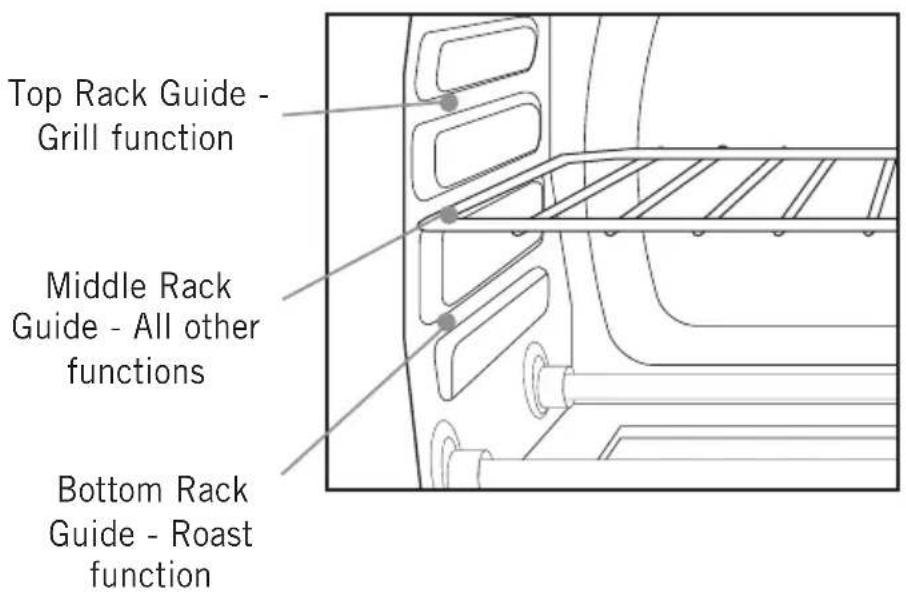
- To accommodate a wide variety of foods the oven has three rack positions. The rack can be inserted in the oven in the upper or lower rack guides. (See diagram below)
- Before removing the rack allow the unit to cool.
- To remove the rack, open the oven door and pull the rack towards the front of the oven. The rack will slide on the rack guides on the inside of the oven.
NOTE: the oven rack may tilt downward causing food to shift when the rack is pulled out, proceed with caution.
- Positioning of the oven rack will depend on the size of the food and desired browning. Move the rack to the lower rack position to prevent top browning and move the rack to the upper rack position to prevent bottom browning.
Care and Cleaning
- Always turn the power off and remove the plug from power outlet after use and before cleaning. Allow the oven to cool before cleaning.
- It is recommended that you clean the oven after each use to prevent a build up of grease and to avoid unpleasant odours.
NOTE: Do not clean any part of the oven in the dishwasher.
- The wire rack, baking pan and pizza tray, may be washed in warm soapy water and rinsed.
NOTE: Never immerse the oven in water.
- The interior walls and ceiling of the oven can be wiped with a mild detergent and a damp cloth.
- To clean the exterior of the oven, wipe the walls with a cloth dampened with mild detergent. Polish with a soft dry cloth.
- To clean the glass door, wipe with a damp sponge and dry.
Recipes
PIZZA FUNCTION
Pizza Dough
Makes: 2 small or 1 large
2 teaspoons (7g) dry yeast
1 teaspoon caster sugar
^3/_4 cup warm water
2 cups plain flour
12 teaspoon salt
2 tablespoons olive oil
-
Combine the yeast, sugar and water in a bowl. Stir to combine. Cover mixture with cling wrap and place in a warm area until the mixture starts to bubble.
-
Combine the yeast mixture, flour, salt and oil in a large bowl and mix until combined.
-
Turn dough onto a floured surface and knead for about 10 minutes or until the dough is firm and elastic. Place dough in a bowl and allow to rest in a warm place until the dough has doubled in size.
-
Using your fist, punch the dough down. Fold sides to centre and turn dough over. Place dough onto a floured surface and lightly knead. Cut dough in half. Roll dough out to fit a pizza tray. Dress pizza dough as required.
Pumpkin, Caramelized Onion and Goats Cheese Pizza
Makes: 2 Pizzas
1kg pumpkin, peeled, deseeded, cubed
3 onions, sliced
1 clove garlic, crushed
1 teaspoon fresh thyme cup olive oil
1 quantity basic pizza dough, rolled out into two 26cm circles
1 cup pizza sauce
150g goats cheese, crumbled
-
Select the PREHEAT setting and place wire rack in the middle shelf.
-
Toss pumpkin, onions, garlic and thyme in oil. Place onto a lined baking tray.
-
Select the ROAST function and adjust time to 30 minutes or cook until pumpkin and onions are tender and golden.
-
Spread pizza sauce evenly over pizza bases. Scatter pumpkin mixture and goats cheese over the bases.
-
Select the PIZZA function and then press START, place pizzas in oven.
Meat Lovers Pizza
Makes: 2 pizzas
1 quantity basic pizza dough, rolled out into two 26cm circles
1 cup tomato puree
1 red onion, finely sliced
100g pepperoni, sliced
100g prosciutto, roughly chopped
100g salami, sliced
100g mozzarella, grated
^1/_4 cup barbeque sauce
- Select the PREHEAT function. Place wire rack in the middle shelf position.
- Spread tomato puree over pizza bases.
- Scatter onion, pepperoni, prosciutto and salami over the bases. Top with mozzarella and barbeque sauce.
- Select the PIZZA function and then press START, place pizza in oven.
ROAST FUNCTIONPIZZA FUNCI
Roast Leg of Lamb
Serves: 6-8
5 sprigs fresh rosemary
2kg leg of lamb
4 cloves garlic, quartered
14 cup olive oil
- Select the PREHEAT function. Place wire rack on the bottom position.
- Cut the rosemary sprigs into 16 2-3cm pieces.
- With a sharp thin knife, make 16 small incisions into the flesh of the lamb. Push a piece of rosemary and garlic into each incision. Rub lamb with oil and season generously with salt and pepper. Place lamb on roasting tray.
- Select the ROAST function, adjust the TIME to 60 minutes and press START. When timer finishes roast for a further 30 minutes. Allow to rest in dish for 5-10 minutes before serving.
BAKE FUNCTION
Potato Gratin
Serves: 6-8
1kg Sebago potatoes, peeled, thinly sliced
3 cloves garlic, crushed
1 tablespoon olive oil
1 teaspoon dried chilli flakes
1 cup cream
12 cup grated parmesan cheese
-
Select the PREHEAT function. Place wire rack in the middle shelf position.
-
In a large bowl toss all ingredients until combined. Season with salt and pepper.
-
Lightly oil a 20cm x 20cm baking dish. Spread out slices of potato evenly, making sure most pieces are lying flat. Pour over remaining liquid. Cover with tinfoil.
-
Select the BAKE function on the oven and change the TIME to 60 minutes, press START. Place Potato Gratin in oven and bake until the potato is tender. Remove tinfoil and sprinkle with parmesan cheese.
-
Change to GRILL setting. Change TIME to 4 minutes or until cheese is melted and golden.
Sticky Maple Pork Ribs
Serves: 3-4
12 pork spare ribs
4 cloves garlic, crushed
12 cup maple syrup
14 cup apple juice
2 tablespoons vegetable oil
^1/_2 teaspoon cinnamon
-
Mix all ingredients except ribs in a large bowl. Stir through ribs. Cover and refrigerate for 1 hour.
-
Select the PREHEAT function. Place wire rack on the middle shelf position.
-
Select the BAKE function, adjust the TIME to 1- 12 hours and press START. Place ribs into a roasting dish and cook until golden brown.
TIP: This is delicious served with coleslaw.
BAKE FUNCTION
Easy Carrot Cake
4 eggs
1 ½ cups caster sugar
^3/_4 cup vegetable oil
12 cup buttermilk
2 teaspoons vanilla essence
2 cups grated carrots
2 cups plain flour, sifted
1 cup crushed pineapple, drained
1 cup walnuts, roughly chopped
12 cup shredded coconut
^1/_2 cup raisins
2 teaspoons baking powder
2 teaspoons baking soda
2 teaspoons ground cinnamon
1 teaspoon mixed spice
12 teaspoon nutmeg
-
Select the PREHEAT function. Place wire rack on the middle shelf. Line a 20cm round cake pan with baking paper.
-
In a large bowl whisk together eggs, sugar, oil, buttermilk and vanilla.
-
Add remaining ingredients to the bowl and stir until well combined. Pour the mixture into the prepared pan and place in oven.
-
Select the BAKE function, adjust the TIME to 40 minutes and press START. Test for doneness by inserting a skewer and it comes out clean from the centre of the cake. Allow cake to cool in pan for 10 minutes before turning out onto a wire rack to cool completely.
TIP: This cake is great with cream cheese icing.
White Chocolate Raspberry Muffins
Makes: 12
2 cups plain flour
1 12 teaspoons baking powder
1 cup caster sugar
2 eggs
1 cup milk
100g butter, melted
150g frozen raspberries
100g white chocolate, roughly chopped
-
Select the PREHEAT function. Place wire rack in the middle shelf. Place wire rack on the bottom shelf. Line a muffin tray with muffin cases.
-
Sift flour and baking powder into a large bowl. Add sugar.
-
Combine eggs, milk and butter in a separate bowl. Pour the liquid ingredients into the dry ingredients and stir until just combined. Fold through the raspberries and white chocolate.
-
Fill muffin cases with 2 heaped tablespoons of mixture.
-
Select the BAKE function and press START. Place the muffins into the oven. Place on wire rack to cool.
COOKIE FUNCTION
Chocolate Chip Cookies
125g butter, softened
12 cup firmly packed brown sugar
12 cup caster sugar
1 teaspoon vanilla extract
1 egg
1^3/4 cup self-raising flour
1 cup chocolate chips
-
Select the PREHEAT function. Place wire rack in the middle shelf. Lightly grease baking tray.
-
Beat butter, sugars and vanilla with an electric mixer until light and creamy. Add egg and flour, mix well. Fold through chocolate chips.
-
Roll mixture into tablespoon sized balls and place onto baking trays press lightly with the back of a fork. Ensure that the cookies are well spaced to allow for spreading.
-
Select the COOKIE function and press START. Place the cookies in the oven.
-
Cool on wire racks.
Afghan Biscuits
1 cup sugar
350g butter
2^1/2 cups plain flour
12 cup Dutch cocoa (or best you can get)
6 VitaBrits
-
Select the PREHEAT function. Place wire rack in the middle shelf. Lightly grease baking tray.
-
Cream butter and sugar until light and fluffy.
-
Sift flour and cocoa and stir into creamed mix.
-
Crush VitaBrits until size of cornflakes and stir into mixture.
-
Spoon moulds of mixture onto greased oven tray.
-
Select the COOKIE function and press START. Place cookies into oven.
-
When cool ice with melted dark chocolate (70% cocoa is best) and top with a walnut.
Notes
12
Month
Replacement Guarantee
This Sunbeam product is covered by a 12 month replacement or repair warranty, which is in addition to your rights under the Australian Consumer Law (if your product was purchased in Australia) or New Zealand Consumer Guarantees Act (if your product was purchased in New Zealand).
Should you experience any difficulties with your product during the warranty period, please contact our customer service line for advice on 1300 881 861 in Australia, or 0800 786 232 in New Zealand.
Australia
www.sunbeam.com.au 1300 881 861 Units 5 & 6, 13 Lord Street, Botany NSW 2019 Australia
New Zealand
www.sunbeam.co.nz 0800 786 232 Level 6, Building 5, Central Park, 660-670 Great South Road, Greenlane, Auckland New Zealand
Upon receipt of your claim, Sunbeam will seek to resolve your difficulties or, if the product is defective, advise you on how to obtain a replacement or refund.
To assist us in managing warranty claims, we recommend you register your product as soon as practicable after purchase by creating a MySunbeam account on our website and uploading a copy of your original receipt.
In order to make a claim under our warranty, you must have the original proof of purchase documentation for the product and present it when requested (if not already uploaded to our website).
Should your product develop any defect within 12 months of purchase because of faulty materials or workmanship, we will replace or repair it, at our discretion, free of charge. A product presented for repair may be replaced by a refurbished product of the same type rather than being repaired. Refurbished parts may be used to repair the product.
Our replacement or repair warranty only applies where a defect arises as a result of faulty material or workmanship during the warranty period. Your warranty does not cover misuse or negligent handling (including damage caused by failing to use the product in accordance with this instruction booklet), accidental damage, or normal wear and tear.
Your warranty does not:
• cover freight or any other costs incurred in making a claim, consumable items, accessories that by their nature and limited lifespan require periodic renewal (such as filters and seals) or any consequential loss or damage; or
• cover damage caused by:
- power surges, power dips, voltage supply problems, or use of the product on incorrect voltage;
- servicing or modification of the product other than by Sunbeam or an authorised Sunbeam service centre;
- use of the product with other accessories, attachments, product supplies, parts or devices that do not conform to Sunbeam specifications; or
- exposure of the product to abnormally corrosive conditions; or
- extend beyond 3 months if the product is used in commercial, industrial, educational or rental applications.
The benefits given to you by our warranty are in addition to other rights and remedies under law in relation to the product.
In Australia our goods come with guarantees that cannot be excluded under the Australian Consumer Law. You are entitled to a replacement or refund for a major failure and for compensation for any other foreseeable loss or damage. You are also entitled to have the goods repaired or replaced if the goods fail to be of acceptable quality and the failure does not amount to a major failure.
Our goods also come with guarantees that cannot be excluded under the New Zealand Consumer Guarantees Act.
If your warranty claim is not accepted, we will inform you and if requested to do so by you, repair the product provided you pay the usual charges for such repair. You will also be responsible for all freight and other costs.
Should your product require repair or service after the warranty period, contact your nearest Sunbeam service centre. For a complete list of Sunbeam's service centres, visit our website or call our customer service line for advice on 1300 881 861 in Australia, or 0800 786 232 in New Zealand.
Need help with your appliance?
Contact our customer service team or visit our website for information and tips on getting the most from your appliance.
Australia | visit www.sunbeam.com.au
phone 1300 881 861
mail Units 5 & 6, 13 Lord Street,
Botany NSW 2019 Australia.
New Zealand | visit www.sunbeam.co.nz
phone 0800 786 232
mail Level 6, Building 5,
Central Park,
660–670 Great South Road,
Greenlane, Auckland.
Sunbeam Corporation Limited | ABN 45 000 006 771
Sunbeam is a registered trade mark.
Made in China to Sunbeam's specification.
Due to minor changes in design or otherwise,
the product you buy may differ slightly from the one shown here.
Approved by the appropriate electrical regulatory authorities.
©Sunbeam Corporation Limited 2017.
3/17
BT7100_17EM2
GCDS-SUN51610-SL
- Contents
- Important instructions – retain for future use.
- Sunbeam's Safety Precautions
- SAFETY PRECAUTIONS FOR YOUR SUNBEAM QUICK START OVEN.
- Sunbeam is very safety conscious when designing and manufacturing consumer products, but it is essential that the product user also exercise care when using an electrical appliance. Listed below are precautions which are essential for the safe use of an electrical appliance:
- Features of your Sunbeam Quick Start Oven
- Features of your Sunbeam Quick Start Oven (continued)
- Aluminium pizza tray
- Enamel baking pan
- Enamel drip tray insert
- Using your Quick Start Oven
- Step 1. Select Function:
- Step 2. Time:
- Step 3. Temperature:
- Using the Toast Function
- Step 2. To adjust the shade colour:
- Step 3. To Start:
- Using the Crumpet Function
- Using the Pizza Function
- Step 3. To set the temperature:
- Step 4. To set the time:
- Step 5. To Start:
- Using the Bake Function
- It is advised to use the Preheat function to heat the oven before using the Bake function. See page 17.
- Using the Grill Function
- Step 2. To set the temperature:
- Step 3. To set the time:
- Step 4. To start:
- Using the Cookies Function
- Using the Roast Function
- Using the Warm Function
- Using the Defrost Function
- Using the Reheat /Preheat Function
- Rack Positioning Guide
- Care and Cleaning
- Recipes
- PIZZA FUNCTION
- Pizza Dough
- Pumpkin, Caramelized Onion and Goats Cheese Pizza
- Meat Lovers Pizza
- ROAST FUNCTIONPIZZA FUNCI
- Roast Leg of Lamb
- BAKE FUNCTION
- Potato Gratin
- Sticky Maple Pork Ribs
- Easy Carrot Cake
- White Chocolate Raspberry Muffins
- COOKIE FUNCTION
- Chocolate Chip Cookies
- Afghan Biscuits
- Notes
- 12
- Month
- Replacement Guarantee
- Australia
- New Zealand
- Your warranty does not:
- • cover damage caused by:
- Need help with your appliance?
Brand : SUNBEAM
Model : Quick Start BT7100
Category : Oven