
ES-HFA9143W3-EE - Washing machine SHARP - Free user manual and instructions
Find the device manual for free ES-HFA9143W3-EE SHARP in PDF.


| Product Type | Washing Machine |
| Brand | Sharp |
| Model | ES-HFA9143W3-EE |
| Dimensions (H x W x D) | 845 x 597 x 582 mm |
| Maximum Dry Laundry Capacity | 9 kg |
| Spin Speed | 1400 rpm |
| Operating Voltage / Frequency | 220-240 V / 50 Hz |
| Total Power | 2200 W |
| Water Pressure (min-max) | 0.1 - 1 MPa |
| Number of Programmes | 15 |
| Control Panel Type | Electronic display with programme knob |
| Delay Timer | Yes (3h, 6h, 9h, 12h) |
| Temperature Selection | Yes (adjustable from cold to 90°C) |
| Additional Functions | Anti-Allergic, Easy Ironing |
| Child Lock | Yes (press two buttons simultaneously for 3 seconds) |
| Water Inlet | Single cold water inlet (or dual optional) |
| Pump Filter Cleaning | Recommended every 2 months |
| Detergent Drawer Cleaning | Recommended every 2 months |
| Energy Class | Not specified in manual |
Frequently Asked Questions - ES-HFA9143W3-EE SHARP
User questions about ES-HFA9143W3-EE SHARP
0 question about this device. Answer the ones you know or ask your own.
Ask a new question about this device
Download the instructions for your Washing machine in PDF format for free! Find your manual ES-HFA9143W3-EE - SHARP and take your electronic device back in hand. On this page are published all the documents necessary for the use of your device. ES-HFA9143W3-EE by SHARP.
USER MANUAL ES-HFA9143W3-EE SHARP
Technical Specifications....8
General Appearance
CHAPTER-3: INSTALLATION 9
Removing transportation safety screws
Adjusting Adjustable Stays
Electrical connection.
Water inlet hose connection.
Water discharge connection
CHAPTER-4: INTRODUCTION OF CONTROL PANEL ..... 11
Detergent drawer
Programme knob 11
Electronic display
CHAPTER-5: PRELIMINARY PREPARATION FOR LAUNDERING....12
Separating laundries 12
Adding detergent into machine
Auxiliary functions.
Start/Pause
Child lock.
Cancelling programme
Finishing programme 14
CHAPTER 7: PROGRAM TABLE
CHAPTER 8: MAINTENANCE AND CLEANING OF YOUR MACHINE 16
Warning 16
Water inlet filters 16
Pump filter 16
Detergent drawer 16
Liquid Detergent Apparatus
CHAPTER 9: FLUSH STOPPER / BODY / DRUM 17
Flush stopper
Body 17
Drum 17
CHAPTER-10: TROUBLESHOOTING 18
CHAPTER-11: AUTOMATIC FAULT WARNINGS AND WHAT TO BE DONE....20
Disposal of your old machine 20
Dear Customer,
Our goal is to offer you high quality products that exceed your expectations. Your appliance is produced in modern facilities and is carefully, particularly tested for quality.
This manual is prepared in order to help you use your appliance, which has been manufactured using the most recent technology with confidence and maximum efficiency.
Before using your appliance, carefully read this guide which includes basic information to safe installation, maintenance and use. Please contact your nearest Authorized Service centre for the installation of your product.
The operating instructions apply to several models. Differences may therefore occur.
CHAPTER -1: BEFORE USING THE APPLIANCE
SAFETY WARNINGS
| Operating voltage / frequency: |
| (V/Hz) (220-240) V~/50Hz; |
| Total current (A): 10 |
| Water pressure (Mpa) |
| Maximum: 1 Mpa / Minimum : 0.1 Mpa |
| Total power (W) : 2200 |
| Maximum dry laundry capacity (kg): 9 |
Do not install your machine on a carpet or such grounds that would prevent the ventilation of its base.
The appliance is not intended for use by people (including children) with reduced physical, sensory or mental capabilities, or lack of experience and knowledge unless they have been given supervision or instruction concerning use of the appliance by a person responsible for their safety.
Children should be supervised to ensure that they do not play with the appliance.
Call the nearest authorized service for a replacement if the power cord malfunctions.
Use only the new water inlet hose that comes with your machine when making water inlet connections. Never use old, used, or damaged water inlet hoses.
This appliance can be used by children aged 8 years and above, and by persons with reduced physical, sensory, or mental capabilities, or lack of experience and knowledge, if they have been given supervision or instruction concerning use of the appliance in a safe way and understand the hazards involved.
Children shall not play with the appliance.
Cleaning and user maintenance shall not be performed by children without supervision.
Note: For a softcopy of this user manual, please contact the following address: "washingmachine@standardtest.info". In your e-mail, please provide the model name and serial number (20 digits), which you can find on the appliance door.
You must read these warnings. You can thus protect yourself and your loved ones against fatal injuries and risks.
CHAPTER 1: BEFORE USING THE APPLIANCE
Danger of getting burnt!

Do not touch the discharge hose or water during discharging, as the appliance may reach high temperatures when running.
DEATH RISK DUE TO ELECTRICAL CURRENT!
- Do not use multiple receptacles or extension cords.
- Do not plug into damaged plug sockets.
- Never pull the cable when unplugging – always grip the plug itself.
- Do not plug in or unplug the plug from the receptacle with wet hands to prevent electrocution!
- Never touch the machine with wet hands or feet.
- Call the nearest authorized service for a replacement if the power cord malfunctions.

Flooding risk!
- Check whether the water runs fast or not before placing the discharge hose on the sink. • Take necessary measures to prevent the slipping of your hose.
- The backfiring force of a hose that is not placed appropriately can displace the hose. Prevent the stopper inside your sink from blocking the sink hole.

Danger of Fire!
- Do not keep inflammable liquids near your machine.
- The sulphure content of paint removers might cause corrosion. For this reason, never use paint-removing materials in your machine.
- Never use products that contain solvent material (like washing gas) in your machine.
- Remove all the objects in the pockets of your laundries (needle, paperclip, lighter, matches etc.) when placing them your machine.
Fire and Explosion risk may occur.

Fall and injury hazard!
- Do not climb on your machine. The upper table of your machine may break and you might get injured.
- Tidy the hose, cable and packaging of your machine during installation. You might trip over and fall.
- Do not turn your machine upside down, or on its side.
- Do not lift your machine by holding it from extruding parts (detergent
CHAPTER -1: BEFORE USING THE APPLIANCE
These parts might break and cause injury.
There is a risk of tripping and injury if materials such as hoses and cables are not properly stored after installation.

The machine must be carried by 2 or more people.
Child safety!
- Do not leave children unattended near the machine. Children might lock themselves inside the machine, which could result in death.
- The door glass and surface may become extremely hot while the machine is operating. Touching the machine, especially, may harm children's skin.
- Keep packaging material away from children.
- Poisoning may occur if detergent and maintenance materials are consumed, and eyes or skin may be irritated if they come into contact with them. Keep cleaning materials out of reach of children.
GENERAL WARNINGS
- The ambient temperature required for your machine's ideal operation is 15-25°C.
- Frozen hoses can tear and burst. In regions where the temperature drops below zero, the ambient temperature may endanger the safe operation of the electronic card.
- Please ensure that the clothes you place in your machine do not contain any foreign substances (nails, needles, coins, lighters, matches, clips, etc.) in their pockets. These foreign substances can damage your machine.
- Before starting to use your machine, you may call the nearest authorized service and request free-of-charge assistance for installation, operation, and use.
- It is recommended to perform the first washing cycle using the 90°C Cotton programme without laundry, adding 1/2 scale of detergent to the 2nd compartment of the detergent drawer.
- As detergent or softener exposed to air for a long time may cause residues, put your detergent or softener in the detergent drawer at the beginning of every washing.
- It is advised that you unplug your machine and close the water inlet tap if you will not use your machine for a long time. Also, leaving the door of your machine open will prevent the formation of bad odors due to humidity.
- Some water might be left in your machine after the trials and tests
CHAPTER -1: BEFORE USING THE APPLIANCE
conducted due to Quality Control procedures. This will not damage your machine.
- Remember that packaging materials of your machine may be dangerous for children.
- Keep the packaging materials in a place where children cannot reach or dispose of them appropriately.
- Use pre-wash programs only for very dirty laundry.
- Never open the detergent drawer when the appliance is running.
- In case of any breakdown, unplug the appliance first and then turn the tap off. Do not attempt to repair by yourself, always contact for authorized service advice.
- The amount of laundry you put in your washing machine should not exceed the maximum amount indicated.
- Never force the door to open when the machine is running.
- Washing floury clothes in your machine damages the machine. Do not wash floury clothes in your machine.
- Please adhere to detergent/fabric conditioner manufacturers’ instructions for the use of fabric conditioner or similar products in your machine.
- Set up your machine in a place where its door can be completely opened. (Do not set up your machine in places where its door cannot be fully opened.)
- Set up your machine at locations that can be fully ventilated and could have constant air circulation.
- Definitely read the user's manual.
- Your machine is designed to be used domestically. Commercial use will cause your warranty to be cancelled.
- Keep your pets away from your machine.
- Please check the packaging of your machine before installation, and the outer surface after the package is opened. Do not operate damaged machines or machines with opened package.
- Have your machine installed only by authorized service. Any interference to your machine by anyone other than authorized services shall cause your warranty to be void.
- The appliance is not intended for use by people (including children) with reduced physical, sensory or mental capabilities, or lack of experience and knowledge unless they have been given supervision or instruction concerning use of the appliance by a person responsible for their safety.
CHAPTER -1: BEFORE USING THE APPLIANCE
- Use your machine only for laundries that have been specified as suitable for washing by the manufacturer.
- Before operating the washing machine, remove the 4 transportation screws and rubber spacers from the back of the machine. If the screws are not removed, it may cause heavy vibration, noise and product malfunction, (voiding the guarantee).
- Your machine is not covered under warranty for faults caused by any kind of external factors (pesticides, fire, etc.).
- Please do not throw away this user manual; keep it for future reference. You or somebody else might need it in the future.
Note: Machinery specifications may vary depending on the product purchased.
REMOVAL OF PACKAGING MATERIALS
Packaging materials protect your machine from any damage that might occur during transportation. Packaging materials are environment friendly as they are recyclable.
Recycling material provides both raw material savings and decreases waste production.
CHAPTER 2: OVERVIEW OF YOUR DEVICE TECHNICAL SPECIFICATIONS
| Operating voltage / frequency (V/Hz) (220-240) V~/50Hz | |
| Total current (A) 10 | |
| Water pressure (Mpa) Maximum: 1 Mpa / | Minimum : 0.1 Mpa |
| Total power (W) 2200 | |
| Maximum dry laundry capacity (kg) 9 | |
| Spinning revolution (rev / min) 1400 | |
| Programme number 15 | |
| Dimensions (Height x Width x Depth) (mm) 845 x 597 x 582 | |
CHAPTER 2: OVERVIEW OF YOUR DEVICE GENERAL APPEARANCE

CHAPTER 3: INSTALLATION
REMOVING TRANSPORTATION SAFETY SCREWS
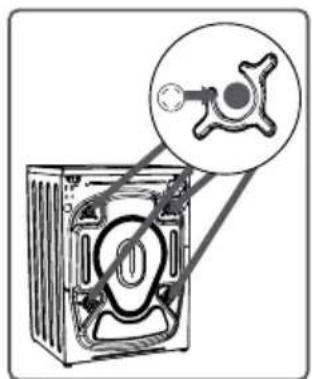
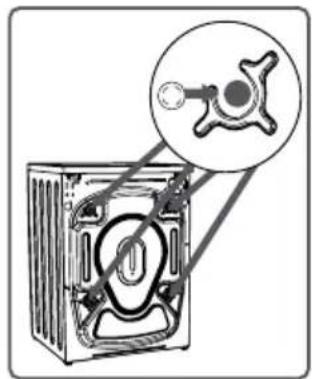
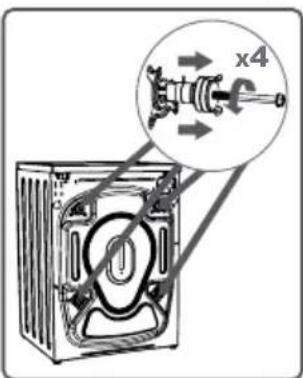
Before operating the washing machine, remove the 4 transportation screws and rubber spacers from the back of the machine. If the screws are not removed, it may cause heavy vibration, noise and product malfunction, (voiding the guarantee). For this reason, transportation safety screws shall be loosened by being rotated in counterclockwise using an appropriate wrench.


Before operating the washing machine, remove the 4 transportation screws and rubber spacers from the back of the machine. If the screws are not removed, it may cause heavy vibration, noise and product malfunction, (voiding the guarantee). For this reason, transportation safety screws shall be loosened by being rotated in counterclockwise using an appropriate wrench. Transportation screws shall be removed by pulling out. Fit the plastic transportation screw taps delivered in accessories bag to the places where transportation screws have been removed. The transportation safety screws should be stored to be used in case of transportation.
NOTE: You should absolutely remove the transportation screws of your machine before the first usage. Faults occurring in the machines operated with transportation screw fitted shall be out of scope of warranty.
- Do not install your machine on a carpet or such grounds that would prevent the ventilation of its base.
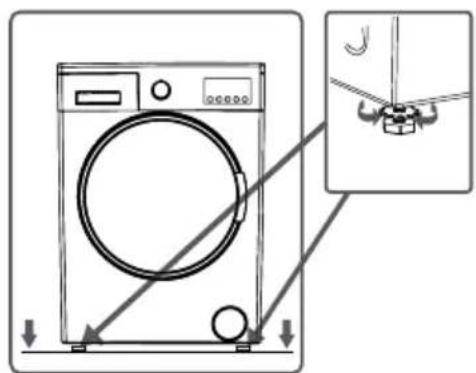
- To ensure silent and vibration-free operation of your machine, it should be deployed on a non-sliding and firm ground. • You can adjust the balance of your machine through the stays.
- Loosen the plastic adjustment nut.
CHAPTER 3: INSTALLATION
- Adjust the stays upward and downward by rotating them. • After maintaining the balance, compress the plastic adjustment nut upward again.
- Never put cardboard, wood or suchlike materials under your machine if you are intending to stabilize the distortions on the ground.
- When cleaning the ground, on which your machine rests, be careful not to disorder stays stabilization.


ELECTRICAL CONNECTION
- Your washing machine is set to 220-240V and 50Hz.
- The mains cord of your washing machine is equipped with a specific earthed plug. This plug should always be inserted into an earthed socket of 10 amps. The current value of the fuse should be 10 amps. The fuse current value of the power line connected to this plug should also be 10 amperes. If you don't have such a receptacle and fuse conforming to this, please have it done by a qualified electrician.
- We do not take responsibility for damages that occur due to ungrounded usage. NOTE: Operating your machine under low voltage will cause the life cycle of your machine to be reduced and its performance to be restricted.

WATER INLET HOSE / WATER DISCHARGE CONNECTION
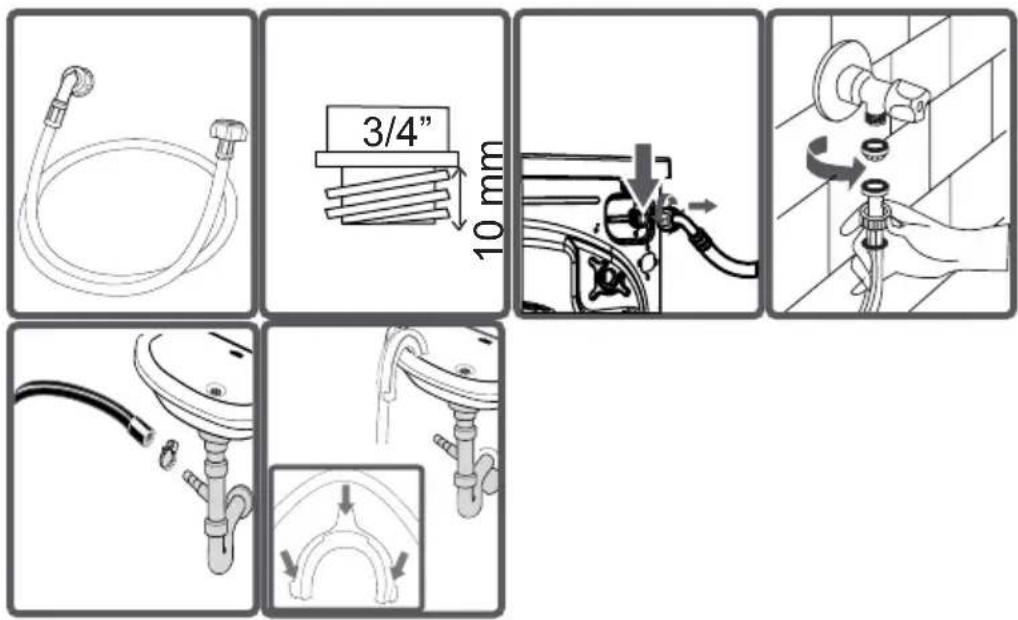
- Your machine may have either a single inlet (cold) or double water inlets (cold/hot) based on its specifications. White-capped hose should be connected to cold water inlet and red-capped hose to hot water inlet (applicable for machines with double water inlets). To eliminate water leakages at points of contact, 1 or 2 nuts are provided in the hose package (applicable for machines with double water inlets). Fit these nuts to the ends of new water inlet hoses on the side of the faucet.
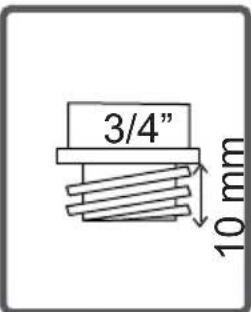
- Mount new water inlet hoses to a 3/4" threaded faucet.
- Connect the white-elbow end of the water inlet hoses to the white-filtered water inlet valve on the rear side of the machine and the red-elbow end to the red-filtered one (applicable for machines with double water inlets).
- Tighten plastic parts of the junctions using your hand. In uncertain conditions, have the connection work done by a qualified plumber.
- Flow of water with pressure of 0.1-1 MPa will allow your machine to operate more efficiently. (0.1 MPa pressure means that more than 8 litres of water will flow through a fully-tapped faucet per one minute.)
- Ensure that points of contact do not leak by tapping the faucet completely after making the connections.
- Ensure that the new water inlet hoses are not bent, broken, crushed, or resized.
- If your machine has double hot water inlets, the temperature of hot water inlet should be maximum 70°C. Note: Use only the new water inlet hose coming with your machine while making water inlet hose connections. Never use old, used, or damaged water inlet hoses.
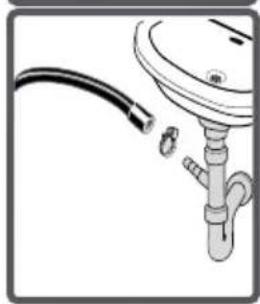
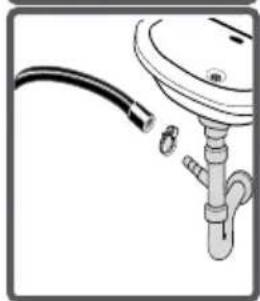
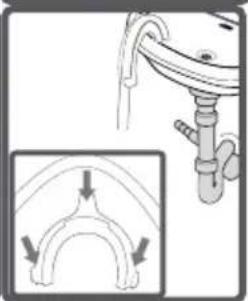
- The end of the water discharge hose can be fitted to a specific apparatus directly attached to the dirty water discharge hole or outlet joint of the basin elbow.
- Never attempt to extend the water discharge hose by jointing.
- Do not put the discharging hose of your machine in a vessel, bucket, or sink. • Make sure that the water discharge hose does not bend, buckle, get crushed, or be extended. Please note: • The water drain hose should be mounted at a height of minimum 60 cm, maximum 100 cm from the ground.
CHAPTER -4: INTRODUCTION OF CONTROL PANEL SECTIONS

1-Detergent drawer
2-Programme knob
3-Display Panel
DETERGENT DRAWER


Main wash detergent compartment: "In this compartment, only materials like detergent (liquid or powder), lime preventer, and such can be used. You can find the liquid detergent apparatus inside your machine at first installation. (*)"
Fabric conditioner, starch, detergent compartment: You can use softener for your laundry; the recommended amount and type by the producer is recommended. Sometimes the fabric conditioners you use for your laundry may remain in this compartment. The reason for this is that the conditioner is not viscous. To prevent this situation, more viscous liquid softeners are recommended to be used, or the softener could be thinned and then used.
Pre-wash detergent compartment: This compartment must only be used when the pre-wash feature is selected. Pre-wash feature is recommended for very dirty laundry. (*) Machinery specifications may vary depending on the product purchased.
PROGRAM KNOB
- You can select the programme you want to wash your laundry in through the programme knob.
- You may set the programme selection operation by rotating the programme knob in both directions.
- Ensure that the programme knob is exactly on the programme you want to select.
ELECTRONIC DISPLAY
- Display Panel
- Washing
- Rinsing
- Spinning
- Finished
- Delayed start auxiliary function
- Temperature selection adjustment
- Auxiliary function button 1
- Auxiliary function button 2
- Start/Pause button
- Additional Function LEDs

On the display panel, you can see the washing delay timer of your machine, temperature selection of your machine, the auxiliary functions you have selected, and the stage of the programme you are running on your machine (pre-wash/wash state, rinsing stage, spinning stage).
Furthermore, the electronic display will warn you by means of LED combinations that will turn on its display when a fault occurs on your machine, and notify you of the completion of the washing programme by revealing the expression "Finished" on the display as soon as the washing programme you have selected has finished as well.
CHAPTER -5: PRELIMINARY PREPARATION FOR LAUNDERING
SEPARATING LAUNDRIES
- Your laundry has product labels on them that specify their specifications. Wash or dry your laundry according to the specifications on the product label.
- Separate your laundry according to their types (cotton, synthetic, sensitive, wool, etc.), their temperatures (cold, 30°C, 40°C, 60°C, 90°C), and degree of contamination (slightly stained, stained, highly stained).
- Never wash colored and white laundry together.
- Wash colored laundry separately in the first wash, as they may bleed.
- Ensure that there are no metallic materials on your laundry or in the pockets; if so, remove them. WARNING: Faults that occur due to penetration of foreign substances into your machine are not covered by the warranty.
- Zip up and button up your laundry.
- Remove the metallic or plastic hooks from tulle curtains or curtains, or place them in a washing net or bag and then close it.
- Turn inside out textiles such as pants, knitwear, t-shirts, and sweatsuits.
- Wash socks, handkerchiefs, and similar small items in a washing net.
- Open the door of your machine.
- Place your laundry in the machine.


NOTE: Maximum loading capacity may vary depending on the type of laundry, degree of contamination, and the selected program. Do not exceed the maximum dry loading capacity indicated in the program table for washing programs. Use the following weight table as a guide. Place each item of laundry separately.
- Ensure that no laundry is stuck between the door and the bellow seal when closing the door. Push the door until you hear the locking sound to close it.
- Close the door of your machine properly; otherwise, the machine will not start the washing operation.
| LAUNDRY TYPE WEIGHT (gr) | |
| Towel | 200 |
| Linen | 500 |
| Bathrobe | 1200 |
| Quilt cover | 700 |
| Pillow slip | 200 |
| Underwear | 100 |
| Tablecloth | 250 |
ADDING DETERGENT TO THE MACHINE
The amount of detergent you use will depend on the following criteria:
- Your detergent utilization will be based on the degree of contamination of your laundries. Do not prewash your less stained laundries and put a slight amount of detergent in the 2nd compartment of the detergent drawer.
- For your much stained laundries, select a programme including prewashing, and put 1/4 of the detergent you will put in the detergent drawer in the 1st compartment of the detergent drawer while putting the remaining 3/4 of it into the 2nd compartment.
- Use detergents produced for automatic washing machines in your machine. The amount of detergent you will use for your laundries is printed on the detergent package.
- The higher the degree of hardness of the water, the more detergent you will use. The amount of detergent you will use will increase as the amount of your laundries increases.
- Put the softener in the softener compartment in the detergent drawer. Do not exceed the MAX level. Otherwise, softener will flow into washing water through flushing.
- Softeners with high density are required to be thinned to a degree before being put in the drawer. Because high-density softener will clog the flush and avoid the flow of the softener.
- You can use your liquid detergents in all programs without prewashing. For this, fit the liquid detergent level plate in the accessories bag or the liquid detergent apparatus (*) into the 2nd compartment of the detergent drawer and set the amount of liquid detergent according to the levels on this plate. Remember to detach the liquid detergent plate.
(*) Machinery specifications may vary depending on the product purchased.
- Plug your machine in.
- Open the water faucet.
- Open the machine door.
- Spread your laundries in your machine.
- Push the door of your machine until hearing the locking sound to close it.
- Selecting programme
- Select the convenient programme for your laundries on the programme table.


AUXILIARY FUNCTIONS
Before starting the programme, you can optionally select an auxiliary function.
- Press the button of the auxiliary function you would like to select.
- If the auxiliary function symbol on the electronic display flashes continuously, the auxiliary function you have selected will be activated.
- If the auxiliary function symbol on the electronic display blinks, the auxiliary function you have selected will not be activated.
Reason for non-activation:
• The auxiliary function you want to use in the washing programme you have selected is not applicable. - Your machine has passed over the stage during which the auxiliary function you would like to select would be implemented. - It is not compatible with an auxiliary function you have selected previously.

1- Delay timer
By using this auxiliary function, you can make your machine start the washing operation with delays between "3h, 6h, 9h, 12h".
To use the auxiliary function of delayed start:
- Press the delayed start button once.
- The "3 h" LED shall appear.
- Press the delayed start button until the time at which you want the washing operation to be started.
- To activate the time delay you have selected in the programme, you may press any auxiliary function button you like except the "Start/Standby" button.
If you have skipped the time delay you want to set, you can go back to the desired time by keeping the time delay button pressed.
If you want to cancel the time delay, press the time delay button once. The symbol will no longer flash on the electronic display.
2 - Temperature selection
You can select the washing water temperature with the washing water temperature adjustment button. When you select a new programme, there won't be any display on the temperature adjustment LEDs on the display panel. When you press the temperature adjustment button, the maximum temperature value of the programme you have selected shall appear on the LED display panel.
You can gradually decrease the washing water temperature between the maximum washing water temperature of the selected programme and cold washing selections by pressing the temperature adjustment button.
If you have missed the washing water temperature you wanted, you can return to the intended temperature by continuously pressing the washing water temperature adjustment button.
NOTE: When the 90° programme is selected, the maximum temperature value of the selected programme is not displayed on the display panel. When the temperature value is decreased to 60°, 40°, 30°, or *(cold washing) temperature levels by pressing the temperature adjustment button, the decreased temperature value is displayed on the display panel.
3 - Easy ironing
You can enable your laundries to be taken out less wrinkled as the washing operation is completed by employing this auxiliary function. You may make the programme active by pressing the easy ironing auxiliary function button when the LED light of the symbol turns on.
4 - Anti-Allergic
In the programmes where this auxiliary function is active, you may have your machine perform an extra rinsing operation on your laundries prior to the latest rinsing operation. You may make the programme active by pressing the anti-allergic button on the display panel when the LED light of the symbol turns on.
Start/Pause button
By pressing the Start/Pause button, you may start the programme you have selected or suspend a running programme. If you switch your machine to the standby mode, the Start/Pause LED on the electronic display will blink.
Child Lock
To avoid the programme flow from being affected if programme buttons are pressed or the programme button is turned when performing a washing operation in your machine, child lock is available.
Child lock will be activated if both auxiliary functions 3 and 4 are pressed at the same time for more than 3 seconds. You can see the auxiliary function LEDs on the display when activated.
If any button is pressed while the child lock is active, the Additional Function LEDs will blink on the display.
If the child lock is engaged and a programme is running, and the programme knob is switched to the CANCEL position and another programme is selected, the previously selected programme continues from where it left off. To deactivate the child lock, press the same buttons for more than 3 seconds. When the child lock is deactivated, the Additional Function LEDs will blink on the display.
Cancelling a programme
To cancel any running programme:
- Turn the programme knob to the "OFF" position.
- The machine will stop the washing operation and the programme will be cancelled.
- To drain the water accumulated in the machine, turn the programme knob to any programme.
- The machine will perform the necessary drain operation and cancel the programme.
- You can then run the machine by selecting a new programme.
Finishing a programme
The machine will stop automatically when the selected programme finishes. The End LED will blink on the display panel. You can open the door and remove the laundry. Leave the door open to allow the inside of the machine to dry after removing the laundry. Turn the programme knob to the CANCEL position. Unplug the machine. Turn off the water faucet.
CHAPTER 7: PROGRAM TABLE
| Program name | Washing temperature (°C) | Maximum dry laundry amount (kg) | Detergent compartment | Prog. duration (Min.) | Laundry type / Descriptions |
| COTTON 90° 90° 9,0 2 193 | Very dirty, cotton and flax textiles. (Underwear, linen, tablecloth, towel (maximum 4,5 kg), bedclothes, etc.) | ||||
| Pre-Wash Cotton | 60° 9,0 1+2 164 | Dirty cotton and flax textiles. (Underwear, linen, tablecloth, towel (maximum 4,5 kg), bedclothes, etc.) | |||
| COTTON ECO 60°C | 60° 9,0 2 230 | Dirty cotton and flax textiles. (Underwears, linen, tablecloth, towel (maximum 4,5 kg), bedclothes, etc. | |||
| COTTON 40°C | 40° 9,0 2 222 | Dirty cotton and flax textiles. (Underwears, linen, tablecloth, towel (maximum 2,5 kg), bedclothes, etc. | |||
| ECO 20° 20° 4,5 2 96 | Less dirty, cotton and linen textiles. (Underwear, bedsheet, tablecloth, towel (max. 2 kg) bedcloth, etc. | ||||
| EASY CARE 40° 3,5 2 110 | Very dirty or synthetic-mixed textiles. (Nylon socks, shirts, blouses, synthetic-including trousers etc.) | ||||
| WOOL | 30° 2,5 2 43 | Woollen laundries with machine wash labels. | |||
| RINSING - 9,0 - 45 | If you want to additionally rinse your laundries upon completion of washing operation, you may use this programme for any kind of laundries. |
CHAPTER 7: PROGRAM TABLE
| SPINNING - 9,0 | - 17 | If you want to additionally Spinning your laundries upon completion of washing operation, you may use this programme for any kind of laundries. | |||
| SENSITIVE/HAND WASH | 30° 2,5 2 90 | Laundry recommended for hand wash or sensitive laundry. | |||
| SPORTS WEAR | 30° 3,5 2 80 | Sportswear. | |||
| MIXED 30° 3,5 | 2 82 | Dirty cotton, synthetics, colour and flax textiles can be washed together. | |||
| BLOUSES / SHIRTS | 60° 4,0 2 114 | Dirty cotton, synthetic and synthetic-mixed shirts and blouses can be washed together. | |||
| DAILY 60 min. | 60° 4,0 2 60 | You can wash your dirty cotton, colour and flax textiles at 60°C in 60 minutes. | |||
| RAPID 15 min. 30° 2,0 2 15 | You can wash your slightly stained, cotton, coloured and flax textile within only 15 minutes. |
NOTE: As the washing period is short, use less detergent compared to other programmes. The programme duration will increase if the machine detects unstable loading. You can open the door 2 minutes after the washing operation is complete. (The 2 minutes required to open the door are not included in the washing period.) NOTE: PROGRAM DURATION MAY VARY DEPENDING ON THE AMOUNT OF LAUNDRY, TAP WATER, AMBIENT TEMPERATURE, AND SELECTED ADDITIONAL FUNCTIONS.
CHAPTER 8: MAINTENANCE AND CLEANING OF YOUR MACHINE
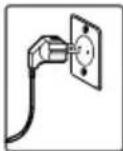
Unplug your machine before starting the maintenance and cleaning of your machine. Turn the tap water off before starting the maintenance and cleaning of your machine.

CAUTION: Your machine's parts might be damaged if cleaners with solvent agents are used. Do not use cleaning materials with solvent agents.

WATER INLET FILTERS

Filters to avoid dirt and foreign substances in the water from penetrating into the machine are available both on the side of faucet and on the ends of water valves along the water inlet hose of your machine. If your machine cannot intake sufficient amount of water despite water faucet being open, these filters should be cleaned. (It is recommended that you clean your pump filter once in 2 months.)
- Detach the water inlet hoses.
- Remove the filters on water inlet valves using pliers and then clean it with a brush in water.
- Disassemble the filters on the side of faucet side of water inlet hoses manually and clean it.
- Having the filters cleaned, you can fit them in the same way reversely.
CAUTION:
Filters of water inlet valves may be clogged due to contaminated water faucet or lack of necessary maintenance or valves may be broken down, causing water leaking into your machine continuously. The breakdowns that may arise due to these reasons are out of the scope of warranty.
PUMP FILTER
A filter system which avoids threads remaining from your laundries and tiny materials from entering into the pump during water discharging operation carried out by your machine after completing washing so prolonging the lifecycle of your pump is available. It is recommended that you clean your pump filter once in 2 months. To clean pump filter:
- To open the pump cover, you can use the powder detergent spade (*) or liquid detergent level plate coming out of your machine.
- Fit the end point of the plastic part to the gap of the pump cover and push it back. This will open the cover.
- Before opening the filter cover, settle a vessel in front of the filter cover to prevent the water remained in the machine from flowing on the ground.
Loosen the filter cover counter-clockwise and then empty the water.
Note: You may have to empty the water collection vessel several times depending on the amount of water in the machine.
- Clean the foreign materials in the filter with a brush. After cleaning the filter, fit the filter cover and tighten it by rotating it clockwise.
- While closing the pump cover, ensure that the parts on the inner side of the cover match the holes on the front panel side.
- You can reattach the pump cover in the reverse order that you removed it.
WARNING!

As the water in the pump may be hot, wait until it cools down.
(*) Machinery specifications may vary depending on the product purchased.
DETERGENT DRAWER


Your detergents may deposit residue in the detergent drawer and its housing over time. To clean the residue formed, disassemble the detergent drawer at regular intervals. It is recommended that you clean your detergent drawer every 2 months. To eject the detergent drawer:
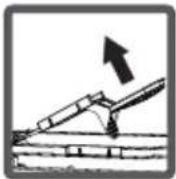
Pull the detergent drawer up to the end.


CHAPTER -9: FLUSH STOPPER / BODY / DRUM
Keep pulling by depressing on the section shown below in the detergent drawer and keep pulling, and then
unsettle the detergent drawer.
- Flush it using a brush.
- Collect residues in the housing of the detergent drawer without dropping them inside the machine. • Assemble the detergent drawer after drying it using a towel or dry cloth.
- Do not wash your detergent drawer in dishwasher.
FLUSH STOPPER
Flush stopper
Disassemble the detergent drawer. Disassemble the flush stopper and clean the softener residues completely. Refit the flush stopper after cleaning it. Check whether it has settled properly.


Body
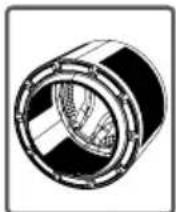
Clean the outer body of your machine with warm water and a non-inflammable cleaning agent that will not abrade the body of your machine. After rinsing with some water, dry it using a soft and dry cloth.

Drum
Do not leave metallic objects such as needles, paper clips, coins etc. in your machine. This objects lead to formation of rust stains in the drum. To clean such rust stains, use a non-chlorine cleaning agent and follow the instructions of manufacturers of the cleaning agent. Never use wire wool or similar hard objects for cleaning rust stains.
CHAPTER -10: TROUBLESHOOTING
All repairing operations required for your machine should be carried out by our authorised service. If your machine requires a repair or if you cannot remove the fault by the help of the information provided as follows:
•Unplug your machine. - Turn the water faucet off.
| FAULT POSSIBLE CAUSE TROUBLESHOOTING | ||
| Your machine does not start. | It is not plugged. Plug it. | |
| Fuse blown. Replace the fuses. | ||
| Electricity cut-off. Check mains power. | ||
| Start/pause button not pressed. Press on Start/Pause button | ||
| Programme dial ‘stop’ position. Switch the programme button to the desired position. | ||
| The machine door is not completely closed. | Close the machine door. | |
| Your machine does not intake water. | Water tap is turned off. Turn your faucet on. | |
| Turn your faucet Check water inlet hose and untwist. | ||
| Water inlet hose clogged. Clean water inlet hose filters. (*) | ||
| Valve inlet filter clogged. Clean the valve inlet filters. (*) | ||
| The machine door not completely closed. | Close the machine door. | |
(*) See the chapter regarding maintenance and cleaning of your machine.
| FAULT POSSIBLE CAUSE TROUBLESHOOTING | ||
| Your machine does not discharge water. | Discharging hose clogged or twisted. | Check the discharging hose, then either clean or untwist. |
| Pump filter clogged. Clean the pump filter. (*) | filter. (*) | |
| Laundry settled in the machine unevenly. | Spread your laundry in the machine evenly. | |
| Your machine vibrates. | The feet of your machine have not been adjusted. | Adjust the feet on your machine. (**) |
| Safety stays fitted for transportation not disassembled. | Disassemble the safety stays of your machine. (**) | |
| Less amount of laundry in the appliance. | This will not block operation of your machine. | |
| Your machine is overloaded with laundry or laundry settled unevenly. | Do not put in laundry more than the amount recommended and settle the laundry in the machine evenly. | |
| Your machine rests on a hard surface. | Prevent your machine from resting on hard surfaces. | |
(*) See the chapter regarding maintenance and cleaning of your machine. (**) See the chapter regarding installation of your machine.
CHAPTER -10: TROUBLESHOOTING
| FAULT POSSIBLE CAUSE TROUBLESHOOTING | ||
| Excessive foam is formed in the detergent drawer. | Excessive amount of detergent used. | Press on Start/Pause button To eliminate foam formation, mix a spoon of softener with half litres of water, and pour the mixture in the detergent drawer. After 5-10 minutes, press on Start/Pause button again. In your next washing operation, Adjust the detergent dose accordingly. |
| Wrong detergent used. | Use detergents produced only for automatic washing machines in your machine. | |
| Unsatisfactory washing result. | The contamination degree of your laundries does not match the programme you have chosen. | Select the programme appropriate for the contamination degree of your laundries. (See programme table) |
| Amount of detergent used insufficient. | Adjust the amount of detergent based on the amount and contamination degree of your laundries. | |
| Laundries in excess of maximum capacity put in your machine. | Load your machine with laundries, amount of which will not exceed maximum laundry capacity. | |
| Water being hard. (Contaminated, lime water etc.) | Adjust the amount of detergent based on the instruction of detergent manufacturer. | |
| Laundries distributed in your machine non-homogenously. | Spread your laundries in the machine properly and homogeneously. | |
| As soon as the machine is loaded with water, water discharges. | The end of water discharging hose is too low for the machine. | Set the water discharging hose on appropriate height. (**) |
| No water appears in the drum during washing. | No fault. Water is in the unseen part of the drum. | - |
| Laundries have detergent residues on them. | Non-dissolving particles of some detergents may stick to your laundries as white spots. | Perform an extra rinsing by setting your machine to “Rinsing” programme, or clean the spots using a brush after your laundries dry. |
| Grey spots appear on the laundries. | The reason for such spots may be oil, cream or ointment. | Apply the maximum amount of detergent instructed by the detergent manufacturer in the next washing operation. |
| Spinning operation is not performed or runs late. | No fault. Unbalanced load control system has been activated. | Unbalanced load control system will try to spread your laundries homogeneously. Wringling operation will begin after your laundry is spread. Place the laundry in the machine in a balanced fashion the next time. |
(**) See the chapter regarding installation of your machine.
CHAPTER -11: AUTOMATIC FAULT WARNINGS AND WHAT TO BE DONE
| TROUBLE CODE POSSIBLE FAULT WHAT TO DO | ||
E | The door of your machine is left open. | Close the machine door. If your machine persists to indicate fault, turn off your machine, unplug it and contact the nearest authorised service immediately. |
E | The water pressure or the water level inside the machine is low. | Turn on the faucet. Mains water may be cut-off. If the problem still continues, your machine will stop after a while automatically. Unplug the machine, turn off your faucet and contact the nearest authorised service. |
E | The pump is faulty or pump filter is clogged or electrical connection of the pump is faulty. | Clean the pump filter. If the problem persists, contact the nearest authorised service. (*) |
E | Your machine has excessive amount of water. | Your machine will discharge water by itself. Pursuant to discharging operation, turn off your machine and unplug it. Turn off your faucet and contact the nearest authorised service. |
DISPOSAL OF YOUR OLD MACHINE
This symbol on the product or package implies that the product should not be treated as domestic waste. Instead, it should be delivered to applicable waste collection places recycling electrical and electronic equipment. You will contribute to avoid potential negative results regarding environment and human health, which will arise due to wrong waste procedure for the product by ensuring that this product is annihilated properly. Recycling materials will help natural resources be preserved. For more detailed information regarding recycling of this product, please contact local municipality, domestic waste annihilation service or the shop you have purchased the product.

TABLE OF CONTENTS
- CHAPTER: BEFORE USING THE APPLIANCE ..... 21
SAFETY WARNINGS 21

CONNECTING THE WATER INLET HOSE



4. CHAPTER: DESCRIPTION OF THE CONTROL PANEL


6. CHAPTER: PREPARATION BEFORE WASHING
CANCELLING A PROGRAM
(**) See the chapter regarding installation of your machine.
11. CHAPTER: AUTOMATIC FAULT MESSAGES AND HOW TO HANDLE THEM
3. CHAPTER: INSTALLATION
REMOVING THE TRANSPORT BOLTS
CHAPTER 3: INSTALLATION
• Adjust the feet by turning them.
- Once the balance is established, press the plastic adjustment nut upward again.

ELECTRICAL CONNECTIONS
• Your washing machine operates at 220-240 V and 50 Hz.

CHAPTER 4: INTRODUCTION TO THE CONTROL PANEL


NOTE: The maximum laundry capacity depends on the type of laundry, the degree of soiling, and the selected program. The dry laundry capacity must not exceed that specified in the program table for the washing programs.
• In the following table you can find examples. - Insert each piece of laundry separately. - Ensure that no laundry is stuck between the cover and bellow seal when closing the door of your machine. Push the door of your machine until you hear the locking sound to close it. - Close the door of your machine properly, otherwise your machine will not start the washing operation.
| VRSTA PERILA TEŽA (gr) | |
| Brisača | 200 |
| Laneno platno | 500 |
| Kopalni plašč | 1200 |
| Prešita odeja | 700 |
| Blazina | 200 |
| Spodnje perilo | 100 |
| Namizni prt | 250 |
2-Temperature selection


unsettle the detergent drawer.
- Adjust the stays upward and downward by rotating them. • After maintaining the balance, compress the plastic adjustment nut upward again.
- Never put cardboard, wood or suchlike materials under your machine if you are intending to stabilize the distortions on the ground.
- When cleaning the ground on which your machine rests, be careful not to disorder stays stabilization.


Water connection / Water connection
Detergent drawer

(*)Machinery specifications may vary depending on the product purchased.
1- Delay timer
CHAPTER -3: INSTALLATION
REMOVING THE TRANSPORT BOLTS
Before operating the washing machine, remove the 4 transport bolts and rubber spacers from the rear of the washing machine. If the bolts are not removed, excessive vibration, noise, and product malfunction may occur (which voids the warranty for the washing machine). The transport bolts are removed by turning them counterclockwise with an appropriate wrench.


CHAPTER -3: INSTALLATION
- Adjust the foot by turning it.
- After balancing the washing machine, retighten the plastic adjustment nut.
- Do not place cardboard, wooden boards, or similar materials under the feet to level the washing machine.
- When cleaning the surface on which your washing machine is placed, be careful not to disturb its balance.
ELECTRICAL CONNECTION


- Your washing machine is set to operate at 220-240V and 50Hz.
- The washing machine is connected to the electrical installation via a plug and a properly installed wall socket with grounding and a 10 A fuse. The electrical installation must be designed to withstand the required current.
- If you do not have such an outlet and a fuse that matches this description, have a qualified electrician install one.
- The manufacturer disclaims all liability for injuries and damages caused by using the appliance without grounding or by not following these instructions for use.
NOTE: Operating your washing machine at a lower voltage may reduce the machine's performance and shorten its service life.

WATER INLET HOSE CONNECTION / DRAIN HOSE CONNECTION
- If your machine has double hot water inlets, the temperature of hot water inlet should be maximum 70°C
Note: When installing the water inlet connection to your washing machine, use only the new water inlet hose supplied with your washing machine. Never use old, used, or damaged water inlet hoses.
- The end of the drain hose can be connected directly to a wall drain outlet or to the drain connection on the sink trap.
- Do not extend the drain hose with additional hoses.
- Do not place the drain hose in a container, bucket, or sink.
- Make sure the drain hose is not bent, tangled, damaged, or stretched. Please remember:
- The drain hose must be installed at a height of at least 60 cm and at most 100 cm from the floor.


1-Detergent dispenser drawer
2-Program selector knob
3-Display panel
DETERGENT DISPENSER DRAWER

NOTE: The maximum amount of laundry that corresponds to the washing machine's capacity depends on the type of laundry you wash, the level of soiling, and the program you select. Do not exceed the recommended maximum dry laundry capacity for the desired program.
To use the delayed start auxiliary function:
- Press the delayed start button.


SECTION 3: INSTALLING THE APPLIANCE


DETERGENT DISPENSER
1-Detergent dispenser
1- Delay timer
- CHAPTER-3: INSTALLATION
- CHAPTER-4: INTRODUCTION OF CONTROL PANEL
- CHAPTER-5: PRELIMINARY PREPARATION FOR LAUNDERING
- CHAPTER 7: PROGRAM TABLE
- CHAPTER 8: MAINTENANCE AND CLEANING OF YOUR MACHINE
- CHAPTER 9: FLUSH STOPPER / BODY / DRUM
- CHAPTER-10: TROUBLESHOOTING
- CHAPTER-11: AUTOMATIC FAULT WARNINGS AND WHAT TO BE DONE
- CHAPTER -1: BEFORE USING THE APPLIANCE
- SAFETY WARNINGS
- CHAPTER 1: BEFORE USING THE APPLIANCE
- DANGER OF GETTING BURNT
- DEATH RISK DUE TO ELECTRICAL CURRENT
- FLOODING RISK
- DANGER OF FIRE
- FALL AND INJURY HAZARD
- CHILD SAFETY
- GENERAL WARNINGS
- REMOVAL OF PACKAGING MATERIALS
- CHAPTER 2: OVERVIEW OF YOUR DEVICE GENERAL APPEARANCE
- CHAPTER 3: INSTALLATION
- REMOVING TRANSPORTATION SAFETY SCREWS
- ELECTRICAL CONNECTION
- WATER INLET HOSE / WATER DISCHARGE CONNECTION
- CHAPTER -4: INTRODUCTION OF CONTROL PANEL SECTIONS
- DETERGENT DRAWER
- PROGRAM KNOB
- ELECTRONIC DISPLAY
- CHAPTER -5: PRELIMINARY PREPARATION FOR LAUNDERING
- SEPARATING LAUNDRIES
- ADDING DETERGENT TO THE MACHINE
- AUXILIARY FUNCTIONS
- DELAY TIMER
- TO USE THE AUXILIARY FUNCTION OF DELAYED START
- TEMPERATURE SELECTION
- EASY IRONING
- ANTI-ALLERGIC
- START/PAUSE BUTTON
- CHILD LOCK
- CANCELLING A PROGRAMME
- FINISHING A PROGRAMME
- WATER INLET FILTERS
- CAUTION
- PUMP FILTER
- WARNING
- CHAPTER -9: FLUSH STOPPER / BODY / DRUM
- FLUSH STOPPER
- BODY
- DRUM
- CHAPTER -10: TROUBLESHOOTING
- DISPOSAL OF YOUR OLD MACHINE
- TABLE OF CONTENTS
- CONNECTING THE WATER INLET HOSE
- CHAPTER: DESCRIPTION OF THE CONTROL PANEL
- CHAPTER: PREPARATION BEFORE WASHING
- CANCELLING A PROGRAM
- CHAPTER: AUTOMATIC FAULT MESSAGES AND HOW TO HANDLE THEM
- CHAPTER: INSTALLATION
- REMOVING THE TRANSPORT BOLTS
- ELECTRICAL CONNECTIONS
- CHAPTER 4: INTRODUCTION TO THE CONTROL PANEL
- WATER CONNECTION / WATER CONNECTION
- CHAPTER -3: INSTALLATION
- WATER INLET HOSE CONNECTION / DRAIN HOSE CONNECTION
- TO USE THE DELAYED START AUXILIARY FUNCTION
- SECTION 3: INSTALLING THE APPLIANCE
Brand : SHARP
Model : ES-HFA9143W3-EE
Category : Washing machine