
ProLite LH5542UHS - Screen IIYAMA - Free user manual and instructions
Find the device manual for free ProLite LH5542UHS IIYAMA in PDF.


| Product Type | Professional UHD 4K Display |
| Display Diagonal | 55 Inches (139.7 cm) |
| Panel Technology | IPS |
| Resolution | 3840 x 2160 (UHD 4K) |
| Brightness | 700 cd/m² (typical) |
| Contrast Ratio | 1200:1 |
| Response Time | 8 ms (GtG) |
| Viewing Angle | 178° / 178° |
| Inputs | HDMI 2.0 x2, DisplayPort 1.2 x1, VGA (D-Sub) x1 |
| USB Ports | USB 3.0 x2 (downstream), USB 2.0 x1 (upstream) |
| Audio | 3.5 mm in/out, 2x 10W speakers |
| VESA Mount | 400x400 mm |
| Power Consumption | 190 W (typical), 0.5 W (standby) |
| Dimensions (W x H x D) without stand | 1236 x 713 x 62 mm |
| Weight without stand | 24.5 kg |
| Operating Temperature | 0°C to 40°C |
| Humidity Range | 10% to 80% (non-condensing) |
| Safety Features | Over-voltage protection, Kensington lock slot |
| Cleaning Instructions | Use a soft, dry cloth; avoid alcohol or ammonia-based cleaners |
| Repairability | Serviceable by qualified technicians; spare parts available through authorized service centers |
| General Information | Professional-grade LCD display suitable for signage, control rooms, and collaborative workspaces |
Frequently Asked Questions - ProLite LH5542UHS IIYAMA
User questions about ProLite LH5542UHS IIYAMA
0 question about this device. Answer the ones you know or ask your own.
Ask a new question about this device
Download the instructions for your Screen in PDF format for free! Find your manual ProLite LH5542UHS - IIYAMA and take your electronic device back in hand. On this page are published all the documents necessary for the use of your device. ProLite LH5542UHS by IIYAMA.
USER MANUAL ProLite LH5542UHS IIYAMA
Thank you very much for choosing the iiyama LCD monitor for signage.
We recommend that you take a few minutes to read this comprehensive manual carefully before installing and switching on the monitor.
Please keep this manual in a safe place for your future reference.
natural_image
Two geometric shapes: a blue dotted square and a white square, with no text or symbols.Dear user, we congratulate you on the purchase of your iiyama LCD.
For details on warranty and locally used pixel policies that apply directly after installation of your product please check the iiyama website.
To report a fault, please contact your local support centre found at www.iiyama.com/service
Things to check before you call the iiyama information line
| if the power cable is connected securely and turned on?
| if the display has been turned on?
| if the signal cable is connected securely and the correct input selected?
| if the computer has been restarted with the display connected?
| if the graphics card is correctly installed with the latest drivers possible?
| if the correct native resolution has been selected via 'Display Properties'?
| If the R/G/B signal configuration is correct?
| if the displays On Screen Menu is shown?
| if the correct brightness and contrast settings have been set?
| if given display tolerances and compatibility have been considered?
| if via the On Screen Menu you have performed a Factory Reset/Recall?
Before reporting the screen defect, please prepare the following information/evidence:
| model number *
| purchase receipt and serial number *
| name and address for collection
| telephone/fax number, for availability during the day
| convenient collection date (date, time)
| short description of the defect
Important Note:
If there is no fault found in the collected equipment after inspection, the transferring party shall incur charges for transport and administration.
If you have checked all of the above and there is still no picture, call our information line for assistance in your country.
CE MARKING DECLARATION OF CONFORMITY
This LCD monitor complies with the requirements of the EC/EU Directive 2014/30/EU “EMC Directive”, 2014/35/EU “Low Voltage Directive”, 2009/125/EC “ErP Directive” and 2011/65/EU “RoHS Directive”.
Warning
This is a class A product. In a domestic environment this product may cause radio interference in which case the user may be required to take adequate measures.
We recommend recycling of used product. Please contact your dealer or iiyama service center. Recycle information is obtained via the Internet, using the address: http://www.iiyama.com
You can access the Web page of different countries from there.
■ We reserve the right to change specifications without notice.
■ All trademarks used in this user manual are the property of their respective owners.
■ Eprel registration number LH4342UHS-B3 : 438129, LH5042UHS-B3 : 442784, LH5542UHS-B3 : 438699
TABLE OF CONTENTS
FOR YOUR SAFETY....1
SAFETY PRECAUTIONS....1
SPECIAL NOTES ON LCD MONITORS....3
CUSTOMER SERVICE 5
CLEANING 5
ADJUSTMENT MENU CONTENTS....24
SCREEN ADJUSTMENTS....42
STANDBY FEATURE 45
TROUBLE SHOOTING 46
RECYCLING INFORMATION....47
APPENDIX 48
SPECIFICATIONS: ProLite LH4342UHS-B3 48
SPECIFICATIONS: ProLite LH5042UHS-B3 49
SPECIFICATIONS: ProLite LH5542UHS-B3 50
DIMENSIONS : ProLite LH4342UHS....51
DIMENSIONS : ProLite LH5042UHS 51
DIMENSIONS : ProLite LH5542UHS 52
COMPLIANT TIMING 52
SAFETY PRECAUTIONS
WARNING
STOP OPERATING THE MONITOR WHEN YOU SENSE TROUBLE
If you notice any abnormal phenomena such as smoke, strange sounds or fumes, unplug the monitor and contact your dealer or iiyama service center immediately. Further use may be dangerous and can cause fire or electric shock.
NEVER REMOVE THE CABINET
High voltage circuits are inside the monitor. Removing the cabinet may expose you to the danger of fire or electric shock.
DO NOT PUT ANY OBJECT INTO THE MONITOR
Do not put any solid objects or liquids such as water into the monitor. In case of an accident, unplug your monitor immediately and contact your dealer or iiyama service center. Using the monitor with any object inside may cause fire, electric shock or damage.
INSTALL THE MONITOR ON A FLAT, STABLE SURFACE
The monitor may cause an injury if it falls or is dropped.
DO NOT USE THE MONITOR NEAR WATER
Do not use where water may be splashed or spilt onto the monitor as it may cause fire or electric shock.
OPERATE UNDER THE SPECIFIED POWER SUPPLY
Be sure to operate the monitor only with the specified power supply. Use of an incorrect voltage will cause malfunction and may cause fire or electric shock.
PROTECT THE CABLES
Do not pull or bend the power cable and signal cable. Do not place the monitor or any other heavy objects on the cables. If damaged, the cables may cause fire or electric shock.
ADVERSE WEATHER CONDITIONS
It is advisable not to operate the monitor during a heavy thunder storm as the continual breaks in power may cause malfunction. It is also advised not to touch the plug in these circumstances as it may cause electric shock.
CAUTION
INSTALLATION LOCATION
Do not install the monitor where sudden temperature changes may occur, or in humid, dusty or smoky areas as it may cause fire, electric shock or damage. You should also avoid areas where the sun shines directly on the monitor.
DO NOT PLACE THE MONITOR IN A HAZARDOUS POSITION
The monitor may topple and cause injury if not suitably located. Please also ensure that you do not place any heavy objects on the monitor, and that all cables are routed such that children may not pull the cables and possibly cause injury.
MAINTAIN GOOD VENTILATION
Ventilation slots are provided to keep the monitor from overheating. Covering the slots may cause fire. To allow adequate air circulation, place the monitor at least 10 cm (or 4 inches) from any walls. Operating the monitor on its back, side, upside down or on a carpet or any other soft material may also cause damage.
DISCONNECT THE CABLES WHEN YOU MOVE THE MONITOR
When you move the monitor, turn off the power switch, unplug the monitor and be sure cable is disconnected. If you do not disconnect them, it may cause fire or electric shock.
UNPLUG THE MONITOR
If the monitor is not in use for a long period of time it is recommended that it is left unplugged to avoid accidents.
HOLD THE PLUG WHEN DISCONNECTING
To disconnect the power cable or signal cable, always pull it by the plug. Never pull on the cable itself as this may cause fire or electric shock.
DO NOT TOUCH THE PLUG WITH WET HANDS
Pulling or inserting the plug with wet hands may cause electric shock.
WHEN YOU INSTALL THE MONITOR ON YOUR COMPUTER
Be sure the computer is strong enough to hold the weight of the monitor, otherwise, you may damage your computer.
REMARK FOR 24/7 USAGE
This product is not specifically designed for 24/7 usage.
OTHERS
ERGONOMIC RECOMMENDATIONS
To eliminate eye fatigue, do not operate the monitor against a bright background or in a dark room. For optimal viewing comfort, the monitor should be just below eye level and 40-60 cm (16-24 inches) away from your eyes. When using the monitor over a prolonged time, a ten minute break every hour is recommended as looking at the screen continuously can cause eye strain.
SPECIAL NOTES ON LCD MONITORS
■ The following symptoms are normal with LCD monitors and do not indicate a problem.
NOTE
- When you first turn on the LCD monitor, the picture may not fit in the display area because of the type of computer that is used. In this case, adjust the picture position to the correct position.
- You may find slightly uneven brightness on the screen depending on the desktop pattern you use.
- Due to the nature of the LCD screen, an afterimage of the previous screen may remain after switching the image, when the same image is displayed for hours. In this case, the screen is recovered slowly by changing the image or turning off the Power Switch for hours.
■ This LCD cannot be used outdoors.
■ This LCD cannot be used with the screen facing upwards.
■ If you use a cable longer than the supplied one, the picture quality is not guaranteed.
USAGE CONFIRMATION
This product is designed for optimum usage at 18 hours per day.
The monitor is compatible for usage in Landscape/Portrait applications.
IMAGE PERSISTENCE / IMAGE STICKING
Please be aware that all LCD screens can experience Image Persistence or Image Sticking. This occurs when a residual image remains visible on a screen when static images are displayed for long periods of time. LCD Image Persistence is not permanent but constant images being displayed for a long period of time should be avoided.
To counteract Image Persistence, turn off the monitor for as long as the previous image was displayed, so if an image was on the monitor for 1 hour and there is evidence of a residual or “ghost” image, you should turn off the monitor for 1 hour in order to clear the residual image.
For all LFD products, iiyama recommends displaying moving images and utilising a moving screen saver at regular intervals whenever the screen is idle. You could also turn off the monitor when not in use to assist the prevention.
Other ways to reduce the risk of Image Persistence will be to utilise the FAN-on function (if available), Low Backlight and Low Brightness settings.
FOR EXTENDED USE AS A PUBLIC MONITOR
■ Image Sticking on LCD Panel
When a static image is displayed for hours, an electric charge trace remains near the electrode inside the LCD producing a “ghost” image. (Image Persistence).
Image Persistence is not a permanent feature.
■ Recommendations
To prevent Image Sticking and promote longer life expectancy of monitor, we recommend the following:
- Avoid static images displayed for long periods – change static images on continuous loop.
- Turn off monitor when not in use, either by remote control or use Standby or Schedule functions.
- Check the Monitor Menu Settings for "Pixel Shift" etc. and activate it when available. This will reduce the Image Sticking Effect.
- When monitor is installed in high ambient temperature environment(s) or in an enclosed position, utilise the Cooling Fan, Screen Saver and Low Brightness functions.
- Suitable ventilation for any monitor is an expectation of any installation – climate control systems may need to be employed.
- We strongly recommend utilisation of active cooling with fans for long operation times or high ambient temperature environments.
CUSTOMER SERVICE
NOTE
If you have to return your unit for service and the original packaging has been discarded, please contact your dealer or iiyama service center for advice or replacement packaging.
CLEANING
WARNING
If you drop any materials or liquids such as water into the monitor when cleaning, unplug the power cable immediately and contact your dealer or iiyama service center.
CAUTION
■ For safety reasons, turn off the power switch and unplug the monitor before you clean it.
NOTE
■ To protect the LCD panel, do not scratch or rub the screen with a hard object.
■ Never use any of the following strong solvents. These will damage the cabinet and the LCD screen.
Thinner Benzine Abrasive cleaner
Spray-type cleaner Wax Acid or Alkaline solvent
■ Touching the cabinet with any product made from rubber or plastic for a long time may cause degeneration or loss of paint on the cabinet.
CABINET
Stains can be removed with a cloth lightly moistened with a mild detergent solvent. Then wipe the cabinet with a soft dry cloth.
LCD
Periodic cleaning with a soft dry cloth is recommended.
SCREEN
Don't use tissue paper etc. because these will damage the LCD screen.
The following accessories are included in your package. Check to see if they are enclosed with the monitor. If anything is missing or damaged, please contact your local iiyama dealer or regional iiyama office.
■ Power Cable*
■ HDMI Cable
■ RS-232C Cable
■ Remote Control
■ Battery (2pcs)
■ Stickers for screw holes 1 sheet (Stickers: 10pcs)
■ EU Energy Label
■ Safety Guide
■ Quick Start Guide
CAUTION
* The rating of the Power Cable enclosed in 120V area is 10A/125V. If you are using a power supply higher than this rating, then a power cable with a rating of 10A/250V must be used. However, all guarantees and warranties are void for any problems or damage caused by a power cable not supplied by iiyama.
An approved power cable greater or equal to H05VVF, 3G, 0.75mm ^2 must be used.
UNPACKING
CAUTION
Moving the monitor requires at least two people. If not, it may drop and could result in a serious injury.
CONTROLS AND CONNECTORS : MONITOR
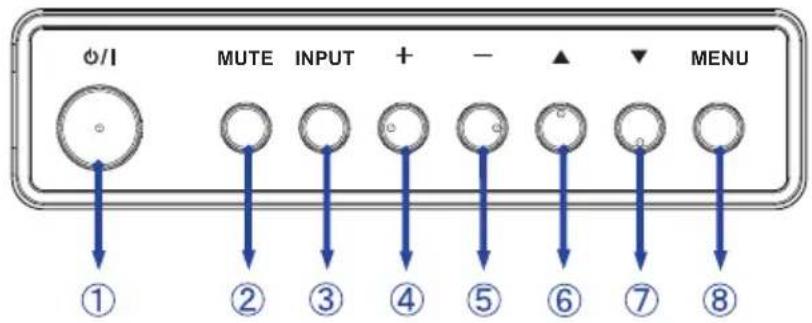
| 1 | ∅/I | Power Button |
| 2 | MUTE Mute Button | |
| 3 | INPUT | Input Select Button |
| 4 | ++ Button | |
| 5 | -- Button | |
| 6 | ▲ | Up Button |
| 7 | ▼ | Down Button |
| 8 | MENU Menu | Button |
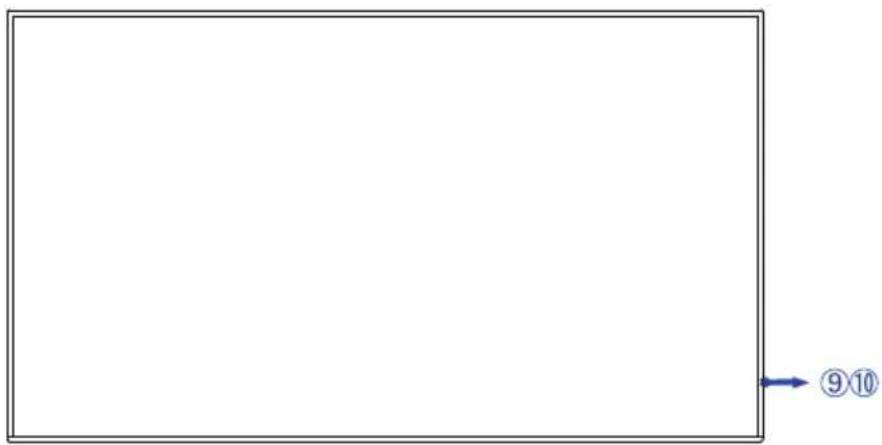
| 9 | Power Indicator | Green | Lighting : Normal OperationFlash : When SCHEDULE is enabled. |
| Red | If turn off the Power Button on the Remote Control and the Back Controller. Standby Mode | ||
| Off Power Off | |||
| 10 | Remote Sensor R | Remote Sensor | |
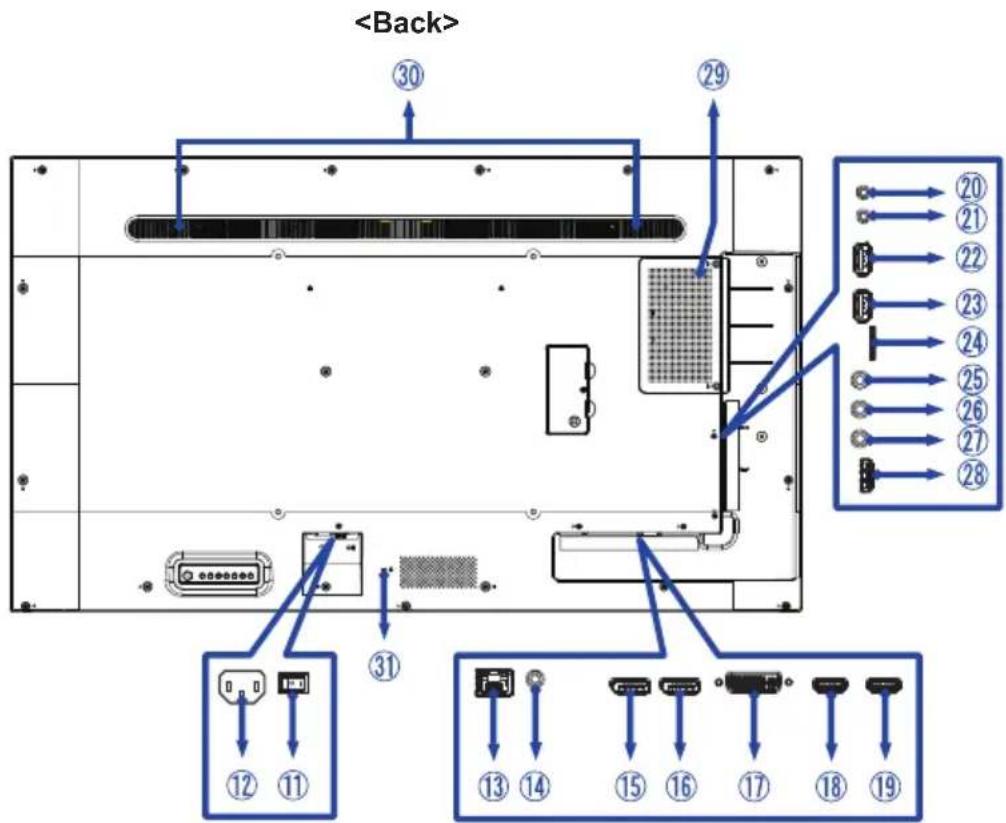
| 11 | AC SWITCH I(ON) / ○ (OFF) | MAIN POWER Main Power Switch | |
| 12 | AC IN AC-INLET AC Connector( : Alternating current) (AC-IN) | ||
| 13 | LAN RJ45 RJ45 Connector | ||
| 14 | AUDIO OUT Mini Jack Headphone Connector | ||
| 15 | DisplayPort IN DisplayPort DisplayPort Connector | ||
| 16 | DisplayPort OUT DisplayPort DisplayPort Connector | ||
| 17 | DVI IN DVI-I DVI-I Connector | ||
| 18 | HDMI1 IN | HDMI | HDMI Connector |
| 19 | HDMI2 IN | HDMI | HDMI Connector |
| 20 | RS232C OUT | Mini Jack RS232C Connector | |
| 21 | RS232C IN | Mini Jack RS232C Connector | |
| 22 | USB2 USB2.0 (5V, 500mA) USB Connector | ||
| 23 | USB1 USB2.0 (5V, 500mA) USB Connector | ||
| 24 | MICRO SD | Micro SD slot | |
| 25 | IR OUT | IR | IR Connector |
| 26 | IR IN | IR | IR Connector |
| 27 | AUDIO IN | Mini Jack Audio Connector | |
| 28 | HDMI3 IN | HDMI | HDMI Connector |
| 29 | Option Slot (SDM-S: ProLite LH4342UHS, SDM-L: ProLite LH5042UHS / ProLite LH5542UHS) | ||
| 30 | Speakers | ||
| 31 | Keyhole for Security Lock | ||
INSTALLATION
CAUTION
■ Follow the manual instructions for the type of mount you have selected. Refer all servicing to qualified service personnel.
■ Moving the monitor requires at least two people.
■ Before installing, please make sure the wall is strong enough to hold the necessary weight of the monitor and the mount.
[WALL MOUNTING]
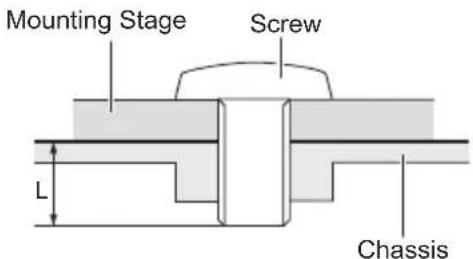
CAUTION
When using the wall mounting, consideration of thickness of the mounting stage needs to be taken. Tighten the M6 Screws (4pcs) with washer which "L" length is 15mm to fasten the monitor. Using a screw longer than this may cause electric shock or damage because it may contact with the electrical parts inside the monitor.
[ROTATING THE MONITOR]
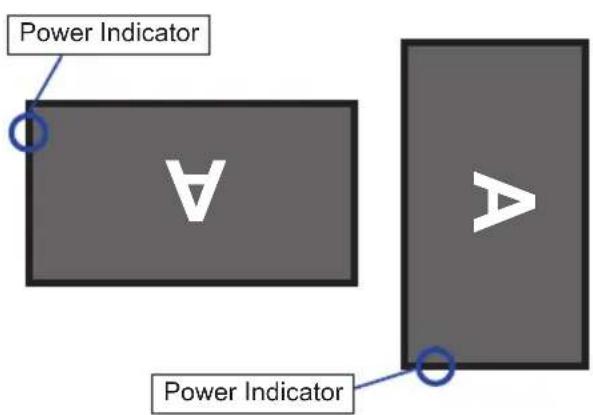
This monitor is designed to be compatible in both landscape and portrait modes.
Available
![IIYAMA ProLite LH5542UHS - [ROTATING THE MONITOR] - 1](/content/2026/05/968188/images/33bf19ede82f3a39e8e932c87ef560892435220ceeec1958ddb719aba5b8f223.jpg)
flowchart
graph TD
    A["Portrait"] --> B["Landscape"]
    B --> C["Power Indicator"]
    style A fill:#999
    style B fill:#ccc
    style C fill:#fff
    %% Diagrammatic nodes: A (Portrait), B (Landscape), C (Power Indicator)
    %% Arrows indicate direction of interaction
Not Available
[PLACING THE STICKERS]
If you feel the screw holes are too visible in portrait mode, please use the stickers to cover them.
■ ProLite LH4342UHS
Screw holes : 7
■ ProLite LH5042UHS
Screw holes : 7
■ ProLite LH5542UHS
Screw holes : 7
![IIYAMA ProLite LH5542UHS - [PLACING THE STICKERS] - 1](/content/2026/05/968188/images/67a6322303750a80254f97982534f4ae90d3fc010f4d21c05b96bdd085d7c4c3.jpg)
natural_image
Pure technical line drawing of a vertical panel or connector with mounting holes and control buttons (no text or symbols)![IIYAMA ProLite LH5542UHS - [PLACING THE STICKERS] - 2](/content/2026/05/968188/images/1a6d6020fc1e766cda965b56a39eada4c69a47ffc6e2e11c26240612ac9d467b.jpg)
natural_image
Pure mechanical component diagram without any text, numbers, or symbols![IIYAMA ProLite LH5542UHS - [PLACING THE STICKERS] - 3](/content/2026/05/968188/images/c77a7f617fdbc2aceb18f9e336d349c2e59bd79f6bb7c775ef6ccabd7ffa124e.jpg)
natural_image
Pure electrical circuit lines without any symbolsCONTROLS AND CONNECTORS : REMOTE CONTROL
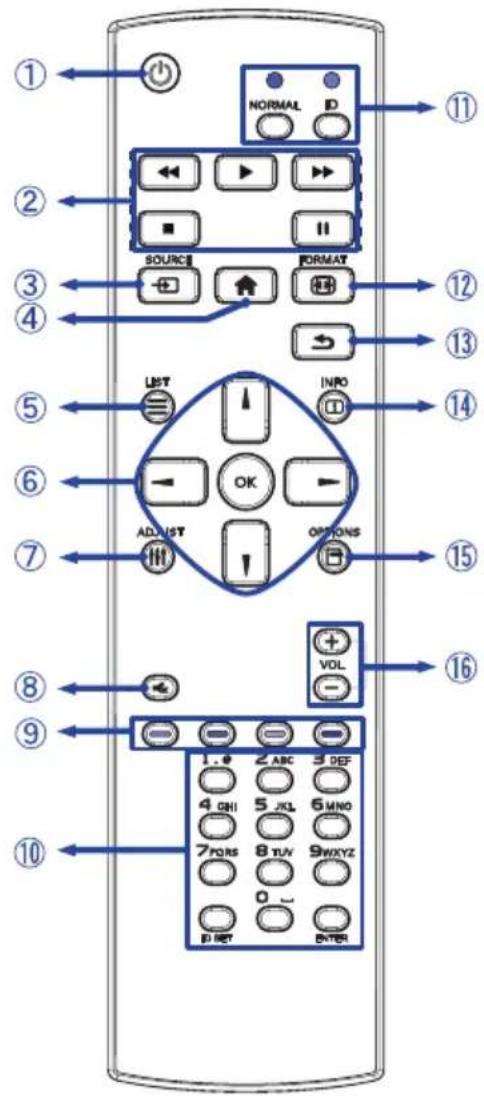
| 1 |  | Turns the monitor ON and OFF. |
| 2 |  | Control playback of media files.►: Play■:Stop■:Pause◄◄: Quick-Return►►: Fast-Forward |
| 3 | SOURCE | Selects the source.Press ↓ or ↓ button to select from HDMI1, HDMI2, HDMI3, DVI-I, DisplayPort, VGA, SDM, Media Player, Browser, iiSignage, PDF Player or Custom. Press [OK] button to confirm and exit. |
| 4 | [XXXG] HOME | Opens the display's on-screen menu systems. |
| 5 | ≡ LIST Not available on this model. | |
| 6 | [DYZS] | Navigates through submenus and settings.↑: Up Button↓: Down Button←: Left Button→: Right Button |
| OK | Confirms your selection or save changes. | |
| 7 | [WST4] ADJUST | Auto Adjust function only available when VGA input is selected. |
| 8 | [STT4] ; MUTE | Turns on or off the mute function when the Menu is not displayed. |
| 9 | [HKG] [HSYK] | Select tasks or options.Blue: Zoom in (PDF Player)Yellow: Zoom out (PDF Player) |
| 10 | 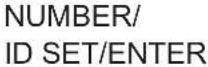 | Enter text for network setting. |
| 11 | 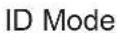 | ID: To enter ID ModeNORMAL: To leave ID Mode |
| 12 | [3WTO] FORMAT Change picture format. | |
| 13 |  BACK BACK | Returns to a previous menu or closes the OSD Menu. |
| 14 | [CS3T] INFO | Provides source and resolution information. |
| 15 | [WYTK] OPTIONS Not available on this model. | |
| 16 | [HBKT] | VOLUME-: Decreases the sound volume.VOLUME+: Increases the sound volume. |
PREPARING THE REMOTE CONTROL
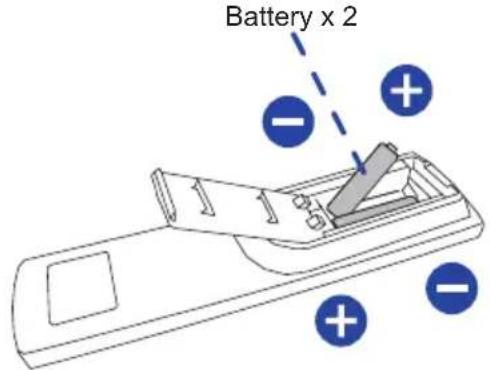
To use the remote control, insert the two dry batteries.
CAUTION
■ Do not use any other batteries other than those specified in this manual for the Remote Control.
■ Do not insert old and new batteries together in the Remote Control.
■ Make sure that the terminals match the "+" and "-" indications in the battery compartment.
■ Remove the dead batteries immediately to prevent them from liquid leaking into the battery compartment.
■ Burst batteries or the electrolyte from these batteries may cause stains, fire or injury.
① Press and then slide the battery cover to open it.
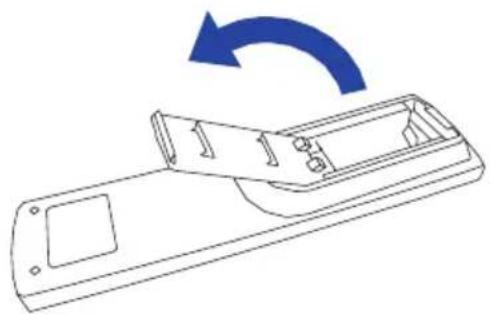
natural_image
Line drawing of a remote control casing with a blue curved arrow indicating rotation (no text or symbols)② Align and insert two AAA batteries according to their plus and minus ports (as indicate remote control).
③ Replace the battery cover.
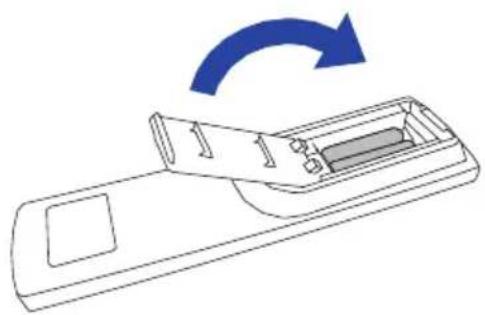
natural_image
Line drawing of a remote control device with a blue arrow indicating clockwise rotation (no text or symbols)NOTE
■ Refer to the above instructions when taking out the batteries.
■ Replace with new batteries when the Remote Control does not work close to the monitor. Use AAA dry batteries. Risk of explosion if battery is replaced by an incorrect type.
■ Operate the Remote Control by pointing it toward the Remote Sensor on the monitor.
■ Other manufacturers remote control will not work with this monitor. Use the provided Remote Control ONLY.
■ Used batteries needed to follow the city rule to be discarded. (suggestion: to dispose of used batteries please follow correct policy as per your council regulations)
■ Batteries shall not be exposed to excessive heat such as sunshine, fire or the like.
■ If you do not intend to use the remote control for a long period, remove the batteries.
ID REMOTE CONTROL
You can set the remote control ID when you want to use the remote control on specific monitors.
ID Mode (To enter ID Mode): Press and hold the ID button until the red LED blinks twice.
Normal Mode (To leave ID Mode): Press and hold the Normal button until the green LED blinks twice.
■ Programming ID Mode
To assign an ID to a remote control.
- Enter ID Mode.
- Press and hold the ID SET button until the red LED turned on.
- Using the number button, input the desired ID. (01 - 255)
- Press the ENTER button to confirm ID.
- The red LED will blink twice when ID has been confirmed.
- Press the ID SET button will exit the ID Mode. The green LED turned on.
NOTE
- Not pressing any button within 10 seconds will exit the ID Mode.
- If an error pressing of buttons other than the digits occurred, wait 1 second after the red LED lights off and then lights up again, then press the correct digits again.
- To cancel or stop programming an ID, press the ID SET button.
- It is necessary to set up the ID number for each monitor before selecting its ID number.
■ Use ID Mode
- Enter ID Mode.
- Input the ID of the monitor which would like to control by number button.
- Press the ENTER button.
BASIC OPERATION
■ Turning the monitor ON
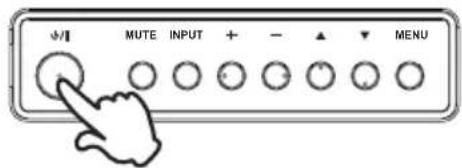
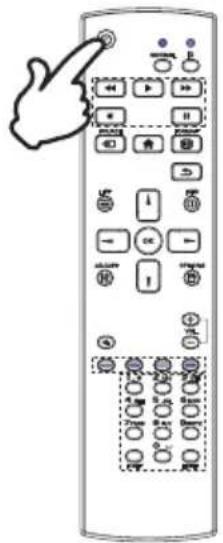
The monitor is turned On and the Power Indicator turns to Green when you press the POWER button on the monitor or the Remote Control. The monitor is turned Off and the Power Indicator turns to Red when you press the POWER button on the monitor or the Remote Control. Press again to turn On the monitor.
NOTE
Even when using the standby mode or turning OFF the Power Switch, the monitor will consume a small amount of electricity. Disconnect the Power Cable from the power supply whenever the monitor is not in use or during the night, to avoid unnecessary power consumption.
[Monitor]
[Remote Control]
■ Display the adjustment menu page
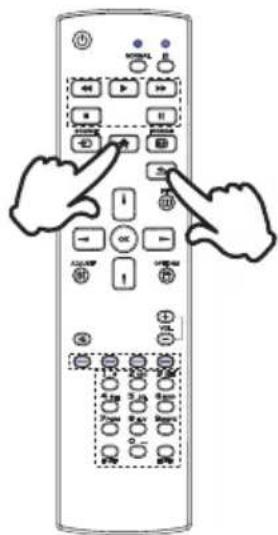
The menu page appears on the screen when you press the MENU button on the monitor or the ⏻ HOME button on the Remote Control.
The menu page disappears when you press the ➕ BACK button on the Remote Control again.
[Monitor]
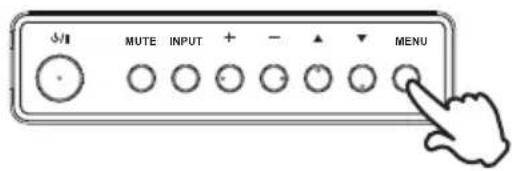
[Remote Control]
■ Move the cursor vertically
Select adjustment by pressing the ▲/▼ button on the monitor or the ▲/▼ button on the remote control while the menu page is displayed on the screen.
[Monitor]
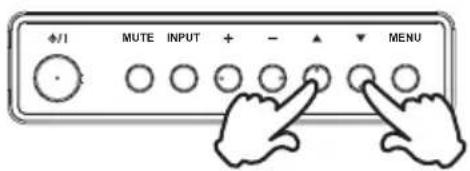
[Remote Control]
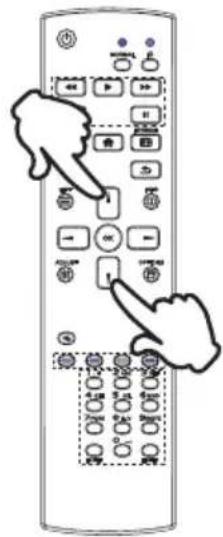
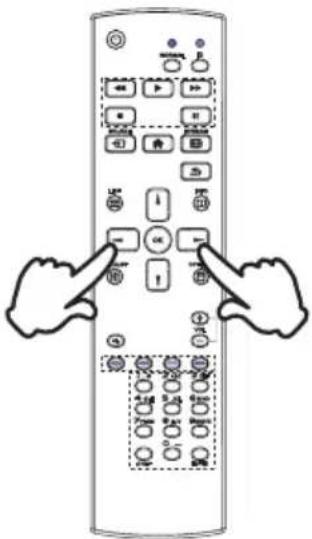
■ Move the cursor horizontally
Select menu or setting, or perform the adjustment by pressing the + / - button on the monitor or the ▶ / ▶ button on the remote control while the menu page is displayed on the screen.
[Monitor]
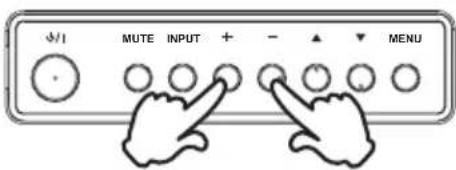
[Remote Control]
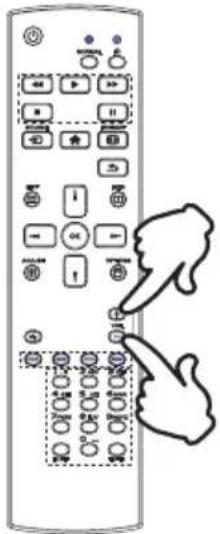
■ Adjust the volume of sound
Press the + / - button on the monitor or the remote control to adjust the volume of sound when the menu page is not displayed on the screen.
[Monitor]
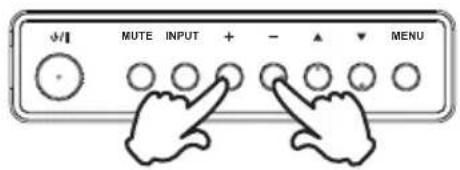
[Remote Control]
■ Switch the input signal
This is activated when you successively press the INPUT button on the monitor or the SOURCE button on the remote control.
[Monitor]
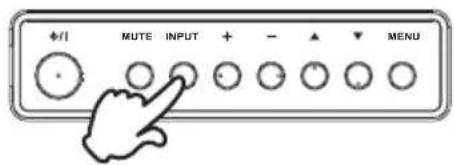
[Remote Control]
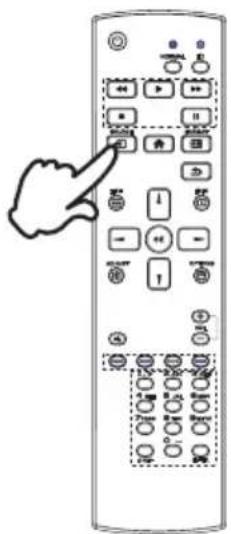
CONNECTING YOUR THE MONITOR
① Ensure that both the computer and the monitor are switched off.
② Connect the computer to the monitor with the signal cable.
③ Connect the computer with the RS-232C Cable from the monitor.
④ Connect the Power Cable to the monitor first and then to the power source.
⑤ Turn on your monitor (Main Power Switch and Power Switch) and computer.
NOTE
■ Make sure that the building installation has a circuit breaker of 120/240V, 20A (maximum).
■ The signal cables used for connecting the computer and monitor may vary with the type of computer used. An incorrect connection may cause serious damage to both the monitor and the computer. The cable supplied with the monitor is for a standard connector. If a special cable is required please contact your local iiyama dealer or regional iiyama office.
■ Make sure you tighten the finger screws at each end of the Signal Cable.
■ The Class I pluggable equipment Type A must be connected to protective earth.
■ The socket-outlet shall be installed near the equipment and shall be easily accessible.
■ Excessive sound pressure from ear-/headphones can cause hearing damage/hearing loss.
[Example of Connection]
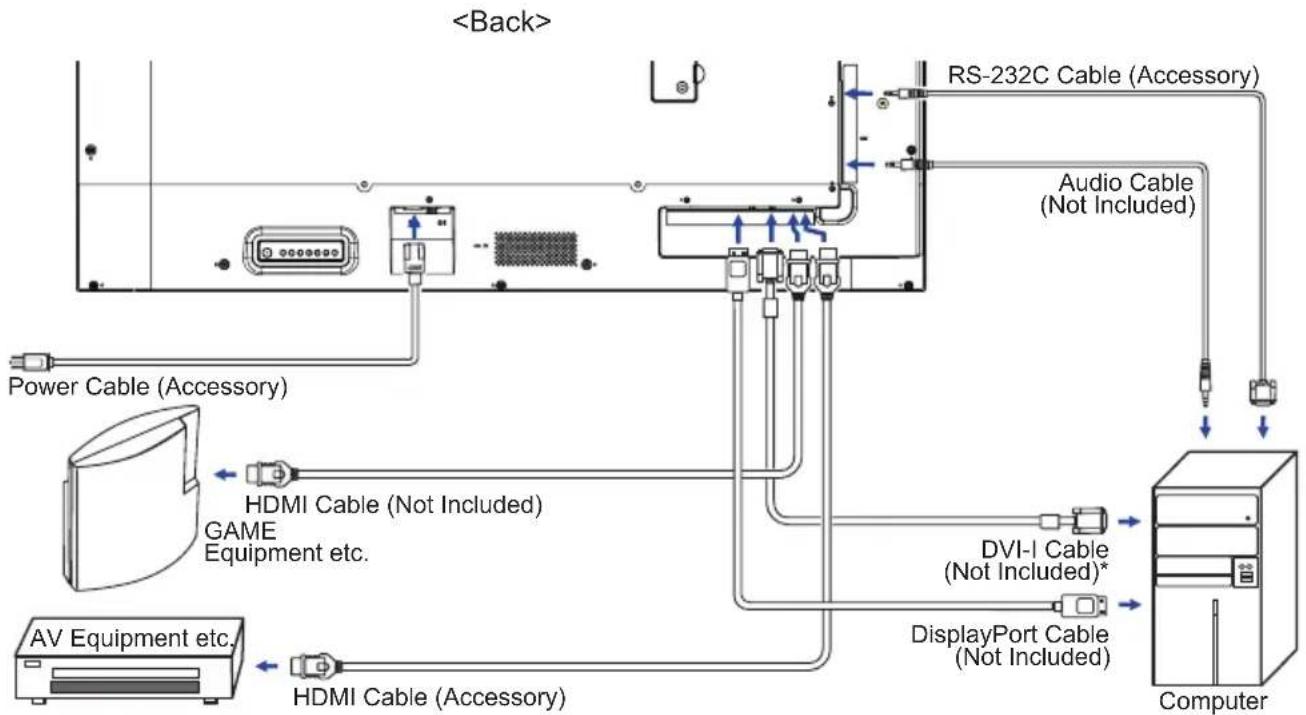
flowchart
graph TD
    A["Power Cable (Accessory)"] --> B["HDMI Cable (Not Included)"]
    B --> C["Computer"]
    D["AV Equipment etc."] --> E["HDMI Cable (Accessory)"]
    E --> F["DisplayPort Cable (Not Included)"]
    F --> G["DVI-I Cable (Not Included)*"]
    G --> H["Audio Cable (Not Included)"]
    H --> I["RS-232C Cable (Accessory)"]
    I --> J["Computer"]
    style A fill:#f9f,stroke:#333
    style D fill:#f9f,stroke:#333
    style E fill:#f9f,stroke:#333
    style F fill:#ccf,stroke:#333
    style G fill:#ccf,stroke:#333
    style H fill:#ccf,stroke:#333
    style I fill:#cfc,stroke:#333
    style J fill:#fcc,stroke:#333
* DVI-I cable is not supplied with the monitor. If you use low quality DVI-I cable, it may cause a result of electro-magnetic interference. Please contact the iiyama Support Centre in your country if you wish to connect the monitor via the DVI input.
[ Connection example with the peripheral device ]
CAUTION
Turn off the power switch and unplug the monitor and peripherals before connection to avoid electric shock or damage.
NOTE
■ Refer to the user manual of peripherals at the same time.
■ Ensure you have the necessary cables as required.
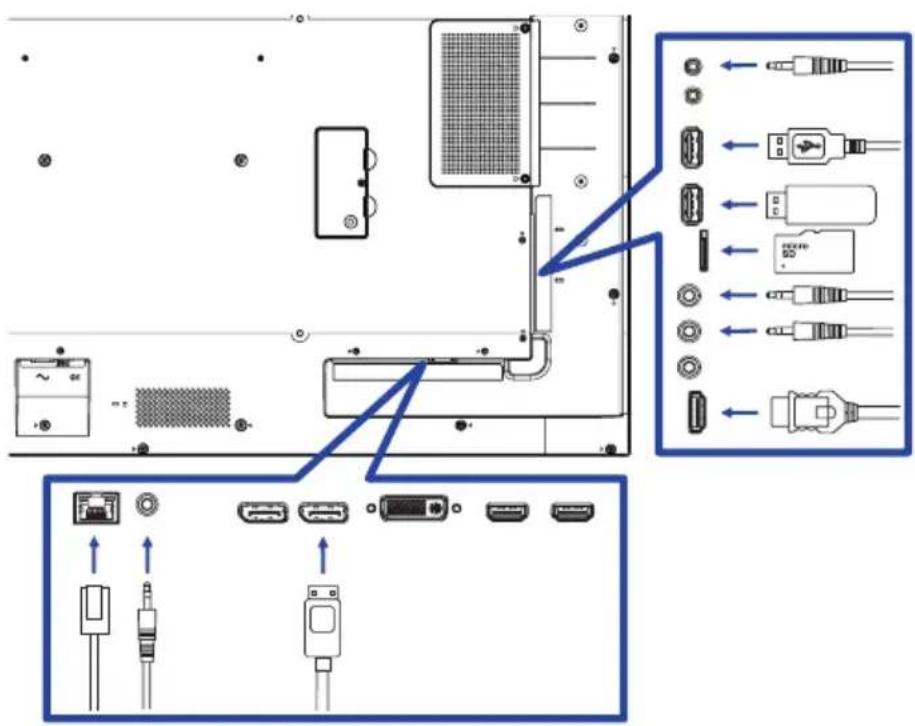
[ About the daisy chain ]
■ Monitor control connection
RS-232C
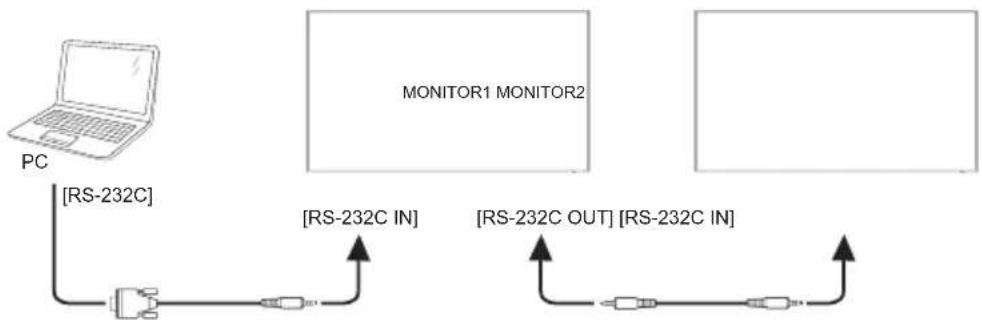
flowchart
graph TD
    PC["PC"] -->|[RS-232C]| A["Switch"]
    A -->|[RS-232C IN]| B["Monitor1 MONITOR2"]
    B -->|[RS-232C OUT] | C["Switch"]
    C -->|[RS-232C IN]| D["Monitor1 MONITOR2"]
■ Digital video connection
DisplayPort
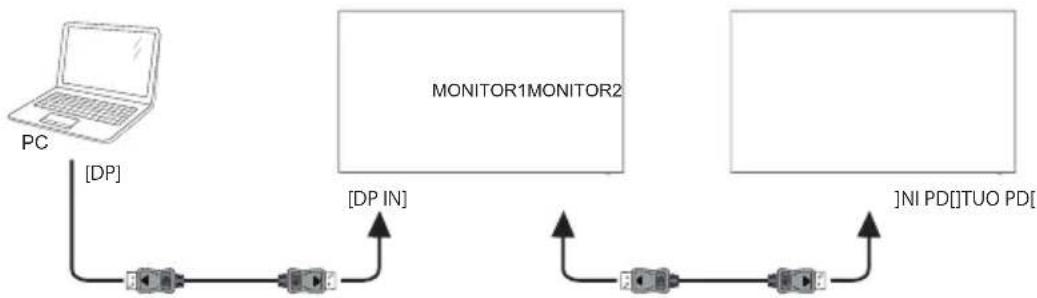
flowchart
graph TD
    PC["PC"] -->|DP| A["Monitor1"]
    A -->|DP IN| B["Monitor2"]
    B -->|NI_PD["TUO PD"]| C["Monitor1"]
    style PC fill:#f9f,stroke:#333
    style Monitor1 fill:#ccf,stroke:#333
    style Monitor2 fill:#ccf,stroke:#333
[ To setup the network ]
- Switch on the router and switch on its DHCP setting.
- Connect the router to this monitor with an Ethernet cable.
- Press ⬆ HOME button on the remote control, then select Setup.
- Select "Connect to network", then press OK button.
- Follow the on-screen instructions to install the network.
- Wait for this monitor to find the network connection.
- If you are prompted, agree to the "End User Licence Agreement".
NOTE Connecting with a shielded CAT-5 Ethernet cable to comply with the EMC directive.
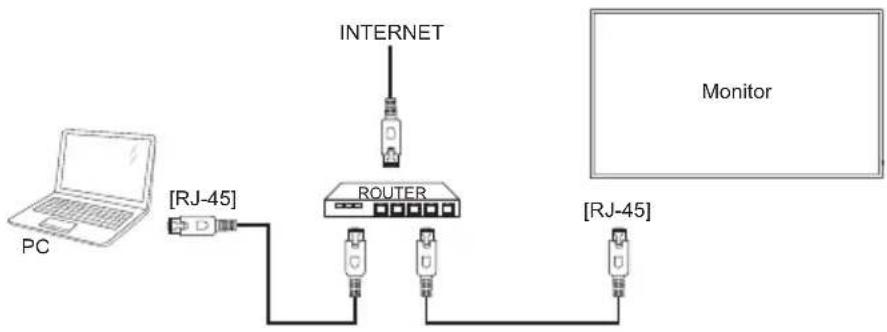
flowchart
graph TD
    PC["PC"] -->|[RJ-45]| Router["Router"]
    Router -->|INTERNET| Internet["Internet"]
    Router -->|INTERNET| Monitor["Monitor"]
COMPUTER SETTING
■ Signal Timing
Change to the desired signal timing listed on page 52: COMPLIANT TIMING.
■ Windows XP/Vista/7/8/8.1/10 Plug & Play
The iiyama LCD monitor complies with DDC2B of VESA standard. The Plug & Play function runs on Windows XP/Vista/7/8/8.1/10 by connecting the monitor to DDC2B compliant computer with the Signal Cable supplied.
For installation on Windows XP: The monitor Information File for iiyama monitors may be necessary for your computer and obtained via the Internet, using the address:
http://www.iiyama.com
NOTE
■ Monitor Drivers are not required in most cases for Macintosh or Unix operating systems. For further information, please contact your computer dealer first for advice.
■ Procedure for turning ON the Power Switch
Turn ON the monitor first, and then the computer.
To create the best picture, your iiyama LCD monitor has been preset at the factory with the COMPLIANT TIMING shown on page 52. You are also able to adjust the picture by following the button operation shown below. For more detailed adjustments, see page 42 for SCREEN ADJUSTMENTS.
① Press the ⬆ HOME button on the remote control or the MENU button on the monitor to start the On Screen Display feature. There are additional Menu items which can be switched by using the ⬆ // buttons on the remote control or the ⬆ buttons on the monitor.
| Picture | Brightness | 90 |
| Screen | Contrast | 50 |
| Audio | Sharpness | 20 |
| Configuration1 | Black level | 50 |
| Configuration2 | Tint | 50 |
| Advanced option | Color | 55 |
| Noise reduction | Medium | |
| Gamma selection | Native | |
| Color temperature | Native | |
| Color control | Action | |
| Smart power | Off | |
| Overscan | Off |
② Select the Menu item of the adjustment you want to make. Press the OK button on the remote control or the + button on the monitor and enter the menu page. Then, use the ▲/▼ buttons on the remote control or the ▲▼ buttons on the monitor to highlight the desired adjustment item.
③ Press the OK button on the remote control or the + button on the monitor again. Use the ← / → buttons on the remote control or the + / - buttons on the monitor to make the appropriate adjustment or setting.
④ Press the ➕ BACK button on the remote control or the MENU button on the monitor to leave the menu, and the settings you just made would be automatically saved.
For example, to correct for vertical position, select Menu item of "Screen". Press the OK button on the remote control or the + button on the monitor. Then, select "V. Position" by using the ▲ / ▼ buttons on the remote control or the ▲ / ▼ buttons on the monitor.
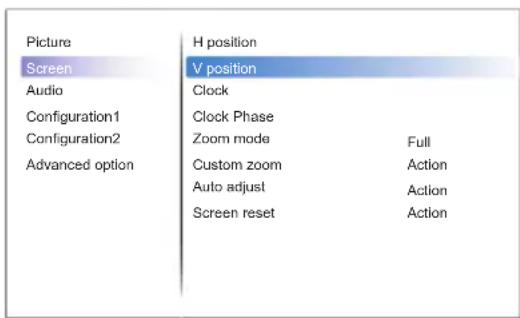
Use the ▶ / ▶ buttons on the remote control or the + / - buttons on the monitor to change the vertical position settings. The vertical position of the overall monitor should be changing accordingly while you are doing this.

Press the ➕ BACK button on the remote control or the MENU button on the monitor lastly, it ends, all changes are saved in the memory.
NOTE
■ The ➕ BACK button on the remote control or the + button on the monitor can be used to return previous menu item.
■ Any changes are automatically saved in the memory when the On Screen Display disappears. Turning off the power should be avoided while using the Menu.
■ Adjustments for H./V. Position, Clock and Phase are saved for each signal timing. Except for these adjustments, all other adjustments have only one setting which applies to all signal timings.
Direct
* Available for Remote Control only.
You can skip the Menu items and directly display an option setting screen by using the following button operations.
■ Auto Adjust:
Press the ADJUST Button when the Menu is not displayed.
■ Zoom mode:
Press the FORMAT Button when the Menu is not displayed.
ADJUSTMENT MENU CONTENTS
| Picture | |||
| PictureScreenAudioConfiguration1Configuration2Advanced option | BrightnessContrastSharpnessBlack levelTintColorNoise reductionGamma selectionColor temperatureColor controlActionSmart powerOverscan | 905020505055MediumNativeNativeActionOffOff | |
| Adjustment Item | Problem / Option Button to Press | ||
| Brightness*1 | Too darkToo bright | ||
| Contrast*4 | Too dullToo intense | ||
| Sharpness*2,4 | Too softToo sharp | ||
| Black level*4 | Black is too darkBlack is too bright | ||
| Tint*4 | PurplishGreenish | ||
| Color*4 | Too weekToo strong | ||
| Noise reduction*4 | Off | Noise Reduction is turned off. | |
| Low | Electronic image noise caused by different media players is reduced. | ||
| Medium | Electronic image noise caused by different media players is reduced more than Low. | ||
| High | Electronic image noise caused by different media players is reduced more than Medium. | ||
| Auto | Electronic image noise caused by different media players is reduced by selecting the Auto-setting. | ||
| Gamma selection*3,4 | You can set the Gamma.Native / 2.2 / 2.4 / s gamma / D-image | ||
| Color temperature*4 | 3000°K | 9300°K | |
| 4000°K | 10000°K | ||
| 5000°K | Native | Original color temperature | |
| 6500°K | User 1 | User preset 1 | |
| 7500°K | User 2 | User preset 2 | |
| Picture | Contrast 50 | ||
| Screen | Sharpness 20 | ||
| Audio | Black level 50 | ||
| Configuration1 | Tint 50 | ||
| Configuration2 | Color 55 | ||
| Advanced option | Noise reduction Medium | ||
| Gamma selection Native | |||
| Color temperature Native | |||
| Color control Action | |||
| Smart power Off | |||
| Overscan Off | |||
| Picture reset Action | |||
| Adjustment Item Problem / Option Button to Press | |||
| Color control | Set user color. | ||
| User-R | Too weak Too strong | ||
| User-G | |||
| User-B | |||
| Smart power | Off Normal | ||
| Medium | Brightness of back-light is reduced. (80%) | ||
| High | Brightness of back-light is reduced more than Medium. (65%) | ||
| Overscan^*4 | Off Over scan is turned off. | ||
| On | Display area about 95%. | ||
| Picture reset | Cancel | Return to Menu. | |
| Reset | Picture setting will be restored to factory-preset data. | ||
*1 Adjust the Brightness when you are using the monitor in a dark room and feel the screen is too bright. Brightness adjustment is disabled when Brightness of Panel saving is on.
*2 Not available for VGA(Video) input.
*3 Press ▼to display the options.
*4 Not available for Media Player, Browser, iiSignage, PDF Player and Custom inputs.
| Screen | ||
| PictureScreenAudioConfiguration1Configuration2Advanced option | H positionV positionClockClock PhaseZoom mode FullCustom zoom ActionAuto adjust ActionScreen reset Action | |
| Adjustment Item Problem Button to Press | ||
| H Position*1 | Too leftToo right | |
| V Position*1 | Too lowToo high | |
| Clock*1,4 | Too narrowToo wide | |
| Clock Phase*1,4 | To correct flickering text or lines | |
| Zoom mode | Full*2,3 | Enlarge the picture horizontally to fill the screen if the picture source is 4:3 (standard definition). When the picture source is 16:9 (high definition), it is not scaled. |
| 4:3*2,3 | Display all pictures in 4:3 aspect ratio. | |
| Real*2,3 | Display the picture dot by dot. | |
| 16:9*2,3 | Display all pictures in 16:9 aspect ratio. | |
| 21:9*2,3 | Display all pictures in 21:9 aspect ratio. | |
| Custom zoom*2 | Zoom | Zoom the horizontal and vertical size of the image simultaneously. |
| H zoom | Zoom the horizontal size of the image. | |
| V zoom | Zoom the vertical size of the image. | |
| Auto adjust*1,5 | Adjust Position, Clock and Clock Phase automatically. | |
| Screen reset | Cancel | Return to Menu. |
| Reset | Screen setting will be restored to factory-preset data. | |
^1 Only VGA input.
^2 Only VGA and HDMI inputs.
^*3 Only Mediaplayer input.
*4 See page 42 for SCREEN ADJUSTMENTS.
*5 For best results, use the Auto Adjust in conjunction with the adjustment pattern. See page 42 for SCREEN ADJUSTMENTS.
| Audio | ||
| Picture Screen Audio Configuration1 Configuration2 Advanced option | Balance 50Treble 50Bass 50Volume 20Audio out (line out) 20Maximum volume 100Minimum volume 0Mute OffAudio source DigitalAudio reset ActionAudio Out Sync OffSpeaker Setting Off | |
| Adjustment Item Problem / Option Button to Press | ||
| Balance | Left side speaker is louder.Right side speaker is louder. | |
| Treble | Too weakToo strong | |
| Bass | Too weakToo strong | |
| Volume | Too softToo loud | |
| Audio out (line out) | Adjust audio output volume.Too softToo loud | |
| Maximum volume | Set the maximum volume. | |
| Minimum volume | Set the minimum volume. | |
| Mute | Off | Return the sound volume to the previous level. |
| On | Turn off the sound temporarily. | |
| Audio Source | Analog | Select the VGA input. |
| Digital | Select the HDMI/DisplayPort input. | |
| Audio reset | Cancel | Return to Menu. |
| Reset | Audio setting will be restored to factory-preset data. | |
| Audio out sync | Off | Disable audio out (line out) volume. |
| On | Enable audio out (line out) volume. | |
| Speaker Setting | Off | Disable the built-in speaker. |
| On | Enable the built-in speaker. | |
| Configuration1 | |||
| Picture | Switch on state | Force on | |
| Screen | Panel saving | Action | |
| Audio | RS232 routing | RS232 | |
| Configuration1 | Boot on source | Action | |
| Configuration2 | WOL | Action | |
| Advanced option | Configuration1 reset | Action | |
| Factory reset | Action | ||
| Adjustment Item Problem / Option Button to Press | |||
| Switch on state | Power off | The monitor will remain off when the power cord is connected to a wall outlet. | |
| Forced on | The dmonitor will turn on when the power cord is connected to a wall outlet. | ||
| Last status | The monitor will return to the previous power status (on/off/standby) when removing and replacing the power cord. | ||
| Panel saving | Brightness | Off | Brightness is turned off. |
| On | The image brightness will be reduced to an appropriate level. | ||
| Pixel shift*1 | For the monitor to slightly expand the image size and shift the position of pixels in four directions (up, down, left or right). | ||
| Off | Pixel shift is turned off. | ||
| Auto | Move the position of the image automatically. | ||
| 10-900 | Move the position of the image at set intervals. | ||
| RS232-routing | Select the network control port.RS232 / LAN→RS232 | ||
| Boot on source*2,3 | Last input | When the power is turned on, it starts with the same setting as when the power was last turned off.Disable / Enable | |
| Input | Select input source when boot up.HDMI1 / HDMI2 / HDMI3 / DVI-I / DisplayPort / VGA / SDM*4/ Media Player / Browser / iiSignage / PDF Player / Custom | ||
| Playlist | Select playlist index for Mediaplayer, Browser and PDF player. | ||
| WOL | Off | Disable wake on LAN function. | |
| On | Enable wake on LAN function. | ||
| Configuration1 reset | Cancel | Return to Menu. | |
| Reset | Configuration1 setting will be restored to factory-preset data. | ||
| Factory reset | Cancel | Return to Menu. | |
| Reset | Factory-preset data is restored. | ||
*1 Only VGA and HDMI input.
*2 No failover function, system will keep source even the source is no signal input.
*3 Press ▼to display the options.
*4 It can be used only when SDM-S/SDM-L is installed.
| Configuration2 | ||
| PictureScreenAudioConfiguration1ConfigurationAdvanced option | OSD turn off 115OSD H position 50OSD V position 50System Rotation ActionInformation OSD 10Logo OnMonitor ID ActionHeat statusMonitor information ActionDP VersionHDMI VersionConfiguration2 reset Action | |
| Adjustment Item Problem Button to Press | ||
| OSD turn off | You can set the OSD display duration time between 5 and 120 seconds.Off / 5 - 120 seconds | |
| OSD H position | OSD is too leftOSD is too right | |
| OSD V position | OSD is too lowOSD is too high | |
| System Rotation | Landscape | Display the OSD in Landscape mode. |
| Portrait | Display the OSD in Portrait mode. | |
| Information OSD | Set the period of time the information OSD is displayed on the upper right corner of the screen.Off / 1 - 60 seconds | |
| Logo | Off | iiyama Logo does not display when the monitor is turned on. |
| On | iiyama Logo displayed when the monitor is turned on. | |
| User*1 | Custom logo option in android is set, there will be only custom logo when the monitor is turned on. | |
| Monitor ID | Set ID to the monitor.1 - 254 | |
| Heat status | This function allows you to check the thermal status of the display at any time. | |
| Monitor information | Shows information about your monitor, including Model name, Serial No., Operation hours and SW version. | |
| DP Version*2 | Set the version of the DisplayPort.1.1 / 1.2 | |
| HDMI Version*3 | Set the version of the HDMI.1.4 / 2.0 | |
| Configuration2 reset | Cancel | Return to Menu. |
| Reset | Configuration2 setting will be restored to factory-preset data. | |
*1 When you would like to use a Custom Boot Logo, go to Settings - Signage Display General settings and set Boot Logo.
*2 Suitable for DisplayPort input only.
*3 Suitable for HDMI input only.
| Advanced option | ||
| Picture Screen Audio Configuration1 Configuration2 Advanced option | IR control Unlock Power LED Light On Keyboard control Unlock Tiling Action Off timer Off Schedule Action HDMI with One Wire Off HDMI with One Wire Power Off Off Auto signal detection Action Language English OSD transparency Off Power Save Mode1 | |
| Adjustment Item Problem Button to Press | ||
| IR control | Select the operation mode of the remote control when multiple monitors are connected via an RS232C connection. | |
| Unlock^*1 | Unlock the remote control. | |
| Lock All | Lock all of the remote control. | |
| Lock all but Volume | Lock all except the volume of the remote control. | |
| Lock all but Power | Lock all except the power of the remote control. | |
| Lock all except PWR & VOL | Lock all except the volume and power of the remote control. | |
| Primary | Set the monitor as the primary monitor for remote control operation. | |
| Secondary | Set the monitor as the secondary monitor. This monitor can not be operated by the remote control, and will only receive the control signal from the primary monitor via the RS232C connection. | |
| Power LED light | Off | The Power Indicator is turned Off. |
| On | The Power Indicator is turned On. | |
| Keyboard control | Lock the keyboard function. (Control buttons) | |
| Unlock^*2 | Unlock the keyboard. | |
| Lock All | Lock all of the keyboard. | |
| Lock all but Volume | Lock all except the volume of the keyboard. | |
| Lock all but Power | Lock all except the power of the keyboard. | |
| Lock all except PWR & VOL | Lock all except the volume and power of the keyboard. | |
*1 To unlock, press and hold the INFO button on the remote control for 6 seconds.
*2 To unlock, hold the + button and ▲button on the monitor for more than 3 seconds, it will lock/unlock the control button function.
| Advanced option | |||
| Picture | IR control | Unlock | |
| Screen | Power LED Light | On | |
| Audio | Keyboard control | Unlock | |
| Configuration1 | Tiling | Action | |
| Configuration2 | Off timer | Off | |
| Advanced option | Schedule | Action | |
| HDMI with One Wire | Off | ||
| HDMI with One Wire Power Off | Off | ||
| Auto signal detection | Action | ||
| Language | English | ||
| OSD transparency | Off | ||
| Power Save | Mode1 | ||
| Adjustment Item Problem / Option Button to Press | |||
| Tiling *3 | H monitors | Sets the number of monitors used in the horizontal position. | |
| V monitors | Sets the number of monitors used in the vertical position. | ||
| Position | Sets the position of the screen matrix.*4 | ||
| Frame comp. | Off | Frame comp. is turned off. | |
| On | The monitor will adjust the image to compensate for the width of the monitor bezels in order to accurately display the image. | ||
| Enable | Off Enable is turned off. | ||
| On | The monitor will apply the settings in "H monitors", "V monitors", "Position" and "Frame comp.". | ||
| Switch on delay | Adjust the power-on delaying time (in seconds) allows a sequential powering-on for each monitor by their ID number when multiple monitors are connected. Off(0) / Auto(1 - 255) seconds | ||
*3 With this function you can create a single large-screen matrix (video wall) that to 100 sets of this monitor (up to 10-sets on the vertical and 10-sets on 1). However, the image quality may be degraded, display speed may be slowed down, or noise may occur and pictures may not be displayed correctly. It is recommended that the screen matrix be set to a maximum of 5 × 5 screen configurations (25 monitors).
*4 Screen Matrix
Example: 2 x 2 screen matrix (4 monitors)
H monitors = 2 monitors
V monitors = 2 monitors
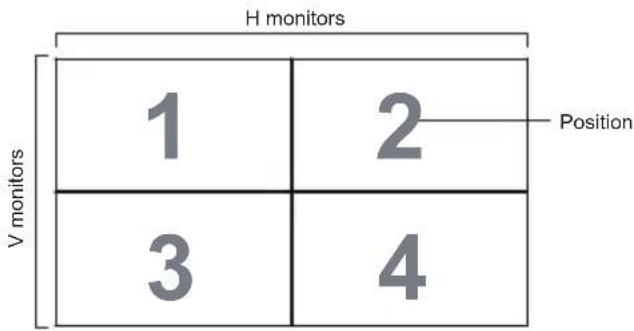
Example: 5 x 5 screen matrix (25 monitors)
H monitors = 5 monitors
V monitors = 5 monitors
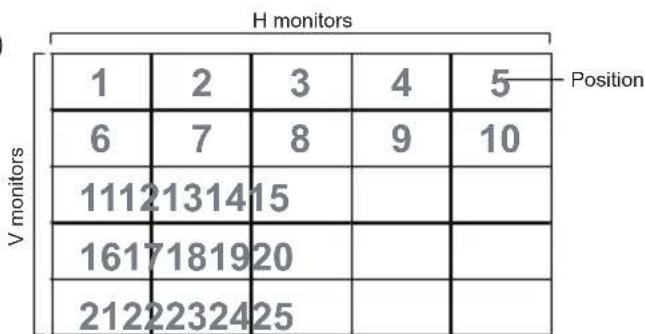
heatmap
H monitors | Position | 1 | 2 | 3 | 4 | 5 | |---|---|---|---|---|---| | V monitors | 6 | 7 | 8 | 9 | 10 | | H monitors | 111 | 121 | 131 | 141 | 15 | | V monitors | 161 | 171 | 181 | 191 | 20 | | V monitors | 212 | 222 | 232 | 242 | 25 | Position: The heatmap displays the frequency distribution of monitor counts across both monitor groups. Values are explicitly labeled on the axes.| Picture Screen Audio Configuration1 Configuration2 Advanced option IR control Unlock Power LED Light On Keyboard control Unlock Tiling Action Off Timer Off Schedule Action HDMI with One Wire Off HDMI with One Wire Power Off Off Auto signal detection Action Language English OSD transparency Off Power Save Mode1 | |||
| Adjustment Item Problem Button to Press | |||
| Off Timer | Set when turn off the monitor. Off / 1 - 24 hours | ||
| Schedule | Schedule list | Up to 7 schedules can be set. | |
| Schedule 1/2/3/4/5/6/7 | Enable | Enable / disable schedule. NOTE If set with other schedule list conflict, you can not enable schedule. | |
| Start time | Set start time. | ||
| End time | Set end time. | ||
| Input | Select default input source to use when the monitor is automatically turned on next time. HDMI1 / HDMI2 / HDMI3 / DVI-I / DisplayPort / VGA / SDM*5 / Media Player / Browser / iiSignage / PDF Player / Custom | ||
| Playlist 1/2/3/4/5/6/7 | Choose playlist (1 - 7) for the mediaplayer, PDF player and browser. | ||
| Days of the week | Set the day of the week. Sun / Mon / Tue / Wed / Thu / Fri / Sat | ||
| Every week | Set whether to repeat every week. | ||
| Back | Does not change schedule data. | ||
| Save | Save schedule data. | ||
| HDMI with One Wire | Off | HDMI with One Wire is turned off. | |
| On | Control all devices connected by HDMI cable with one remote control. | ||
| HDMI with One Wire Power Off | Off | HDMI with One Wire Power Off is turned off. | |
| On | Use the power button on the device connected with the HDMI cable to switch to standby mode. | ||
| Auto signal detection *6 | Off | Disable the Auto signal detection. | |
| All *7 | Detects all sources automatically if there is no signal on the default input and selects the available signal automatically. | ||
| Failover | Detects sources automatically with user-defined order if there is no signal on the default input and selects the available signal automatically. | ||
^*5 It can be used only when SDM-S/SDM-L is installed.
*6 The display detects and select available signal source automatically.
^*7 Order of detection: HDMI1 → HDMI2 → HDMI3 → DP → OPS → Media Player → Browser → iiSignage → PDF Player Custom
| Picture | Tiling | Action |
| Screen | Off timer | Off |
| Audio | Schedule | Action |
| Configuration1 | HDMI with One Wire | Off |
| Configuration2 | HDMI with One Wire Power Off | Off |
| Advanced option | Auto signal detection | Action |
| Language | English | |
| QSD transparency | Off | |
| Power Save | Mode1 | |
| SDM settings | Auto | |
| Advanced option reset | Action |
| Adjustment Item Problem / Option Button to Press | ||||||
| Language | English | English | 繁體中文 | Traditional Chinese | ||
| Deutsch | German | 日本語 | Japanese | |||
| 简体中文 | Simplified Chinese | PortuguesePortuguês | ||||
| Français French | اللغة العربية | Arabic | ||||
| Italian Italiano | DanishDansk | |||||
| SpanishEspañol | SwedishSvenska | |||||
| Русский | Russian | FinnishSuomalainen | ||||
| Polski Polish | NorwegianNorsk | |||||
| Turkish Türkçe | Dutch Nederlands | |||||
| OSD Transparency | The background of OSD is made transparent.Off / 1 - 100 | |||||
| Power Save | Power button off | No signal WOL Android | ||||
| Mode1 | DC off | DC off | On | |||
| Mode2 | Not available on this model. | |||||
| Mode3 | Backlight off | Backlight off | Off | |||
| Mode4 | Backlight off | Backlight on, show "no signal" | Off | |||
| SDM settings*8 | Auto | When turning on the display power and switching input source to SDM, SDM power is automatically turned on. | ||||
| Always off | SDM is always turned Off. | |||||
| Always on | SDM is always turned On. | |||||
| Advanced option reset | Cancel | Return to Menu. | ||||
| Reset | Advanced option setting will be restored except "Date and Time" in the Advanced option menu to factory-preset data. | |||||
*8 When "Power save" is set to Mode 3 or Mode 4, the backlight turns off but SDM keeps on state.
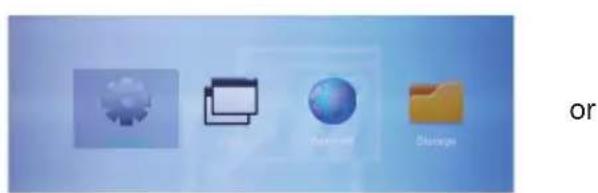
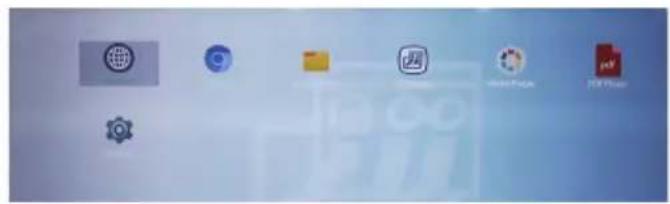
APPLICATION
Press the ⬆ HOME button and number 1668 on the remote control.
| Adjustment Item Problem / Option | |||
| Network | Ethernet | Set the wired network. Disable / Enable (Connection Type: DHCP/Static IP/IP Address/Netmask/DNS Address/Gateway, MAC Address) | |
| Signage Display | General settings | Signage Display name | Set the monitor name Ethernet Mac Address. |
| Boot Logo*1 | Select Boot Animation*2 | ||
| Screenshot | Disable / Enable(Interval, Start time, End time, Repeat, Save to, Purge Screenshots, Send screenshots via email) | ||
| Server settings | Email Notification | Disable / Enable(SMTP, Manager Email, Test) | |
| FTP | Disable / Enable(Account, Password, Storage Path, Port) | ||
| Source settings | Media Player | Edit Media Player playlist and effect settings. | |
| Browser | Edit Bookmark configuration. | ||
| iiSignage*3 | Set the iiSignage. | ||
| PDF Player | Edit PDF Player playlist and effect settings. | ||
| Custom app | Edit the Custom app. | ||
| Network application | Proxy | Set the proxy server. Disable / Enable (Hostname: Proxy server IP Adress, Port: Proxy server port number, Type: Proxy server type) | |
| Platform Web API | Disable / Enable(Platform Web API) | ||
| OTSP Network Port | Change the OTSP Network Port. | ||
*1 The Boot Logo is only available when you select "User" of Logo function in the OSD menu "Configuration2".
*2 For details, refer to download the Custom Boot Animation manual on the IIYAMA web site.
*3 For details, refer to download the iiSignage manual on the IIYAMA web site.
| Adjustment Item | Problem / Option | |||
| Signage Display | System Tools | Clear Storage | Clear all data in signage folders.All / Internal storage / USB storage / SD card | |
| Factory Reset | Cancel | Return to Menu. | ||
| OK | Factory-preset data is restored. | |||
| Export signageDisplay settings | Export to signage folder under USB/SD.USB storage / SD card | |||
| Import signageDisplay settings | Import from signage folder under USB/SD.USB storage / SD card | |||
| Clone Media File | Copy the media file from internal, USB or SD folder. | |||
| External Storage | Disable | SD card / USB External Storage unlock. | ||
| Enable | SD card / USB External Storage lock. | |||
| System updates | Local update | Firmware update. | ||
| Apps | Display applications information. | |||
| Display | Set the font size. | |||
| Security | Display credential storage information. | |||
| System | Date & Time | Display Date & Time information. | ||
| Developer options | When you change the system settings, a problem like system instability may occur. In that case, contact your dealer or iiyama service center for assistance. | |||
| About | Main info in About: System updates / Android version / Kernel version / Build numberAutomatically search update .zip from USB or SD card.When you select the updated .zip file, the monitor will restart and the update will start. | |||
Save: Save
Discard: Discard
Forget: Delete
Cancel: Close without saving
■ Quick Info
Press the Info button and number 77 on the remote control.
Display the Network and Monitor etc. information.
- Settings : Go to settings app.
- Apps : Show all apps. (Browser/Chromium/iiSignage/File Manager/Media Player/PDF player/Settings)
• Network : Set Ethernet. - Storage : Display current Android storage information.
● Preparation for using Media Player and PDF Player
In order to use the Media Player you need to save the file in an specific file folder on your USB or SD card.
- Create a folder called "signage" on your USB or SD card, create a subfolders (video / photo / music / pdf) in that folder.
-videos in /signage/video/
-photos in /signage/photo/
-music in /signage/music/
-pdfs in /signage/pdf/
- Save the Video / Photo / Music / PDF files in the subfolders of your USB or SD card.
- Insert your USB or SD card into an USB port or SD card slot of the monitor.
- When using internal storage, save the necessary files of your USB or SD card to an appropriate signage folder and subfolders in the internal storage of the monitor.
-videos in /signage/video/
-photos in /signage/photo/
-music in /signage/music/
-pdfs in /signage/pdf/
NOTE
Make sure you select the right folder.
If you save the file in the wrong folder, you may not find it.
■ Slide bar
- Open: Open folder (USB/SD card)
- Delete: Delete files.
- Copy: Copy files.
- Move: Move files.
- Select: Select files.
- Select All: Select all files.
■ Supported file system:
FAT32
■ Supported file format:
• Music: MP3, WMA, WMA pro, M4A, AAC, LPCM
• Video: AVI, MP4, 3GPP, MKV, ASF, VRO VOB, PS, TS
• Photo: JPEG, BMP, PNG, GIF
[Media Player]
· Play: Select playlist to play
- Compose: Edit playlist
- Settings: Setting play properties
- Compose
- Select "Compose" on the page. First you select one playlist to play between FILE1 and FILE7.
- Select the file and select edit or delete.
-
Save the edited file.
-videos in /signage/video/
-photos in /signage/photo/
-music in /signage/music/ -
When you create photo list you will be asked if you want to play back ground music during slideshow playback. Set as required.
■ Slide bar
• Source: Select storage (USB/SD card)
• Playlist: Show playlist (Internal)
- Select all: Select all storage files.
- Delete all: Delete playlist files.
- Add/Remove: Update playlist from the source.
- Sort: Sort playlist.
• Save/Abort: Save or abort playlist.
- Back: Return.
■ Remote control
• Option key: Display slidebar
• ▶ Play key: Play media file
- II Pause key: Pause
• i Info key: Show media info
• OK OK key: Select / deselect file
- Play
Select "Play" on the page. First you select one playlist to play between FILE1 and FILE7.
■ Media Hotkey
▶ Play: To play the media file.
- Pause: To pause the media file.
▶ Fast forward: To skip forward 20 seconds.
- Rewind: To skip backward 20 seconds.
- Stop: To stop the media file. If it is a gif file, it will pause.
- Settings
Select "Settings" on the page.
- Repeat mode: Play mode.
Repeat once: All files are repeated once.
Repeat all: All files in the same folder play repeatedly.
- Slideshow Effect: Photo slideshow effect.
Right to left: Change from right to left sliding.
Fold: Change by rotating horizontally in the center.
Corner: Change by enlarging from the upper left corner to the lower right corner.
None: Normal
• Effect Duration: Photo effect duration. 5s/10s/15s/20s
[Browser]
- Settings
Select "Settings" on the page.
- Set frequently used URL.
- Select 1 - 7.
- Enter URL and press OK.
- Press 'Option' to display the slide bar.
Import: Import URL list file
Export: Export URL list file
Delete all: Delete all URL record
Back: Slide bar will be closed
[PDF Player]
- Compose
-
Select "Compose" on the page. First you select one playlist to play between FILE1 and FILE7.
-
Select the file and select edit or delete.
- Save the edited file.
-pdfs in /signage/pdf/
■ Slide bar
• Source: Select storage (USB/SD card)
• Playlist: Show playlist (Internal)
- Select all: Select all storage files.
- Delete all: Delete playlist files.
- Add/Remove: Update playlist from source.
- Sort: Sort playlist.
• Save/Abort: Save or abort playlist.
- Back: Return.
■ Remote control
- Option key: Display slidebar
• ▶ Play key: Play media file
• i Info key: Show media info - OK OK key: Select / deselect file
- Play
Select "Play" on the page. First you select one playlist to play between FILE1 and FILE7.
■ Media Hotkey
▶ Play: To play the PDF file.
- Pause: To pause the PDF file.
▶ Fast forward: Go to the next page, if the page is end of the file, it will go to next file.
Rewind: Back to previous page, if the page is first of the file, it will back to previous file.
- Stop: Return to first page of file.
■ Color Hotkey
• Blue key: Zoom in (+10%)
• Yellow key: Zoom out (-10%)
- OK OK key: Restore zoom
■ Arrow key
•/!/* :Adjust page (When the page has zoomed in/out)
•: Previous page (When the page has not zoomed in/out)
• : Next page (When tha page has not zoomed in/out)
- Settings
Select "Settings" on the page.
- Repeat mode: Play mode.
Repeat once: All files are repeated once.
Repeat all: All files in the same folder play repeatedly.
• Effect Duration: PDF effect duration. 5s/10s/15s/20s
[iiSignage]
Set the Server/Account/PIN code/Version(Ver.2/Ver.3)*/Content(Internal storage/USB storage/SD card).
* When Ver.2, Server/Account/PIN code will turn to gray to indicate it is not available on this model. When Ver.3, Server/Account/PIN code is available.
To be able to use the functionality, please download the iiSignage Software and User Manual from our Website https://iiyama.com/iisignage
iiSignage software is using the network Port: 9989, future information are available in the iiSignage User Manual
[Chromium]
Connect the network, and browse the web.
[File Manager]
Browse the files stored in the internal storage, USB and SD card.
[Settings]
See page 35,36 for Settings.
[Custom]
Set up the application for Customer Source.
NOTE
- Only display user installed app.
- Will not appear in the system pre-install app.
SCREEN ADJUSTMENTS
Adjust the image by following the procedure below to get the desired picture when selecting Analog input.
■ The screen adjustments described in this manual are designed to set image position and minimize flicker or blur for the particular computer in use.
■ The monitor is designed to provide the best performance at resolution of 3840 × 2160 , but can not provide the best at resolutions of less than 3840 × 2160 because the picture is automatically stretched to fit the full screen. It is recommended to operate at resolution of 3840 × 2160 in normal use.
■ Displayed text or lines will be blurred or irregular in thickness when the picture is stretched due to the screen enlargement process.
It is preferable to adjust the image position and frequency with the monitor controls, rather than the computer software or utilities.
■ Perform adjustments after a warm-up period of at least thirty minutes.
■ Additional adjustments may be required after the Auto Adjust depending on the resolution or signal timing.
■ The Auto Adjust may not work correctly when displaying the picture other than the screen adjustment pattern. In this case, manual adjustments are required.
There are two ways to adjust the screen. One way is automatic adjustment for Position, Clock and Phase. The other way is performing each adjustment manually.
Perform the Auto Adjust first when the monitor is connected to a new computer, or changed. If the screen has a flicker or blur, or the picture does not fit in the display area after performing the Auto Adjust, manual adjustments are required. Both adjustments should be made by using the screen adjustment pattern (Test.bmp) obtained via the IIYAMA web site (http://www.iiyama.com).
Adjust the image by following the procedure below to get the desired picture.
This manual explains adjustment under Windows ^® OS.
① Display the picture at the optimum resolution.
② Enter the Test.bmp (screen adjustment pattern) to wallpaper.
NOTE
■ Consult the appropriate documentation for doing this.
■ Set the display position to center in the wallpaper setting dialogue box.
[Adjustment pattern]
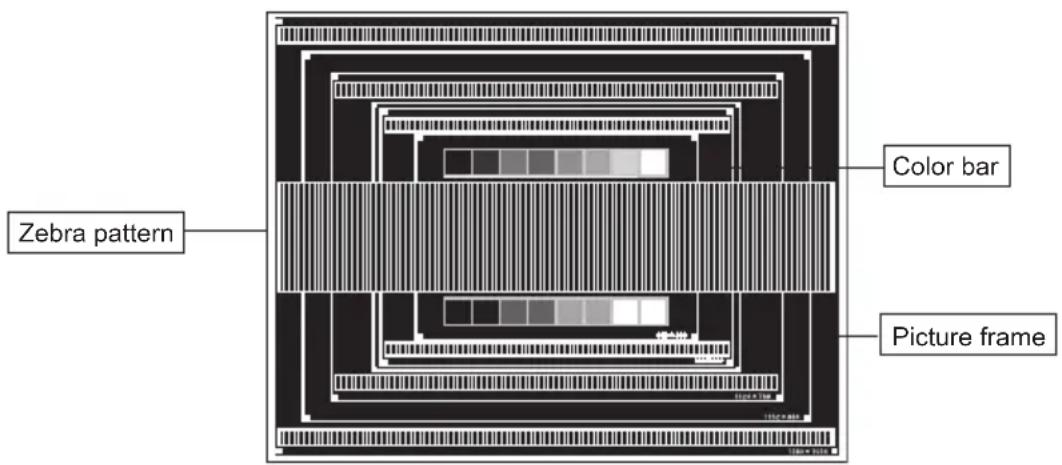
③ Adjust the Auto Adjustment. (Auto Adjust)
④ Adjust the image manually by following procedure below when the screen has a flicker or blur, or the picture does not fit in the display area after performing the Auto Adjust.
⑤ Adjust the V.Position so that the top and bottom of the picture frame will fit to the display area.
![IIYAMA ProLite LH5542UHS - [Adjustment pattern] - 2](/content/2026/05/968188/images/36c3a1a0b06e47b294bce2331c1d16aae45875ed979716614b0f5249c94aa698.jpg)
flowchart
graph TD
    A["Layer 1: Top Layer"] --> B["Layer 2: Middle Layer"]
    B --> C["Layer 3: Bottom Layer"]
    C --> D["Layer 4: Left Layer"]
    D --> E["Layer 5: Right Layer"]
    E --> F["Final Structure"]

    subgraph Component
    G["Component 1: Top Layer"]
    H["Component 2: Middle Layer"]
    I["Component 3: Bottom Layer"]
    J["Component 4: Left Layer"]
    K["Component 5: Right Layer"]
    end

    style A fill:#f9f,stroke:#333
    style B fill:#ccf,stroke:#333
    style C fill:#cfc,stroke:#333
    style D fill:#fcc,stroke:#333
    style E fill:#cff,stroke:#333
    style F fill:#ffc,stroke:#333
    style G fill:#fff,stroke:#000
    style H fill:#fff,stroke:#000
    style I fill:#fff,stroke:#000
    style J fill:#fff,stroke:#000
    style K fill:#fff,stroke:#000
    style L fill:#fff,stroke:#000
⑥ 1) Adjust the H.Position so that the left side of the picture frame will move to the left edge of the display area.
![IIYAMA ProLite LH5542UHS - [Adjustment pattern] - 3](/content/2026/05/968188/images/633fccfc2f6d516e0aa214614f84f854a01d4175b5af86be155546fb43e06e65.jpg)
flowchart
graph TD
    A["Grid Structure"] --> B["Arrow"]
    B --> C["Abstract Layout"]
    style A fill:#f9f,stroke:#333
    style C fill:#bbf,stroke:#333
2) Stretch the right side of the picture frame to the right edge of the display area by adjusting the Clock.
![IIYAMA ProLite LH5542UHS - [Adjustment pattern] - 4](/content/2026/05/968188/images/fa88716bcba15bdc7ab09606e8432c976caa4bf23508af4e0ead2d55976797b7.jpg)
flowchart
graph TD
    A["Multi-layered Grid Structure"] --> B["Transformation Arrow"]
    B --> C["Multi-layered Layout"]
    style A fill:#f9f,stroke:#333
    style C fill:#bbf,stroke:#333
NOTE
■ When the left side of the picture frame moves apart from the left edge of the display area during the Clock adjustment, adjust steps 1) and 2).
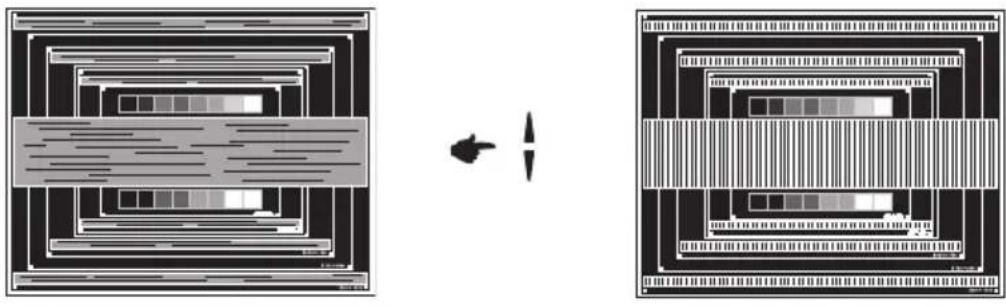
■ Another way to make the Clock adjustment is to correct the vertical wavy lines in the zebra pattern.
■ The picture may flicker during the Clock, H.Position and V.Position adjustment.
In case the picture frame is bigger or smaller than the data display area after the Pixel Clock adjustment, repeat steps from ③.
⑦ Adjust the Phase to correct horizontal wavy noise, flicker or blur in the zebra pattern.
natural_image
Diagram showing a transformation from a layered structure to a multi-layered structure with directional arrows (no text or symbols)NOTE
In case the strong flicker or blurs remain on a part of the screen, repeat steps ⑥ and ⑦ because the Clock may not be adjusted correctly.
■ Adjust the H.Position after the Phase adjustment if the horizontal position moves during the adjustment.
⑧ Adjust the Brightness and Color to get the desired picture after you complete the Clock and Phase adjustments.
Put back your favorite wallpaper.
STANDBY FEATURE
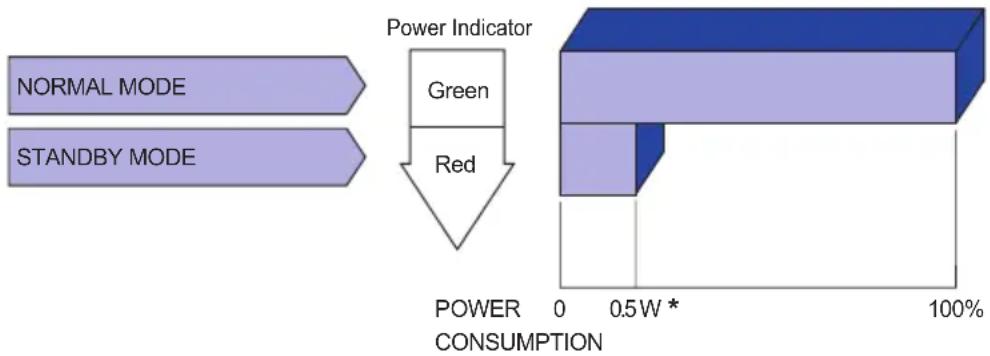
The standby feature of this product complies with power saving requirement of VESA DPMS. When activated, it automatically reduces unnecessary power consumption of the monitor when your computer is not in use.
To use the feature, the monitor needs to be connected to a VESA DPMS compliant computer. There is a standby step the monitor takes as described below. The standby function, including any timer settings is configured by the operating system. Check your operating system manual for information on how this can be configured.
■ Standby Mode
When the video signal from the computer is off, the monitor enters into reduces the power consumption to less than 0.5W^* . The screen becomes dark, and the power indicator turns to red. From Standby Mode, the image reappears in several seconds when either the keyboard or the mouse are touched again.
flowchart
graph TD
    A["NORMAL MODE"] --> C["Power Indicator"]
    B["STANDBY MODE"] --> C
    C --> D["Green"]
    C --> E["Red"]
    D --> F["POWER CONSUMPTION"]
    E --> F
    F --> G["100%"]
* USB peripherals and audio equipment are not connected.
NOTE
Even when using the standby mode, the monitor consumes electricity. Turn off the Power Switch whenever the monitor is not in use, during the night and weekends, to avoid unnecessary power consumption.
TROUBLE SHOOTING
If the monitor fails to operate correctly, please follow the steps below for a possible solution.
- Perform the adjustments described in OPERATING THE MONITOR, depending on the problem you have. If the monitor does not get a picture, skip to 2.
- Consult the following items if you cannot find an appropriate adjustment item in OPERATING THE MONITOR or if the problem persists.
- If you are experiencing a problem which is not described below or you cannot correct the problem, discontinue using the monitor and contact your dealer or iiyama service center for further assistance.
Problem Check
① The picture does not appear.
(Power indicator does not light up.)
☐ The Power Cable is firmly seated in the socket.
☐ The Power Switch is turned ON.
☐ The AC socket is live. Please check with another piece of equipment.
(Power indicator is green.)
☐ If the blank screen saver is in active mode, touch the keyboard or the mouse.
☐ Increase the Contrast and/or Brightness.
□ The computer is ON.
☐ The Signal Cable is properly connected.
☐ The signal timing of the computer is within the specification of the monitor.
(Power indicator is red.)
☐ If the monitor is in standby mode, touch the keyboard or the mouse.
□ The computer is ON.
☐ The Signal Cable is properly connected.
☐ The signal timing of the computer is within the specification of the monitor.
② The screen is not synchronized.
☐ The Signal Cable is properly connected.
☐ The signal timing of the computer is within the specification of the monitor.
③ The screen position is not in the center.
☐ The signal timing of the computer is within the specification of the monitor.
④ The screen is too bright or too dark.
☐ The video output level of the computer is within the specification monitor.
⑤ The screen is shaking.
☐ The power voltage is within the specification of the monitor.
☐ The signal timing of the computer is within the specification of the monitor.
⑥ No sound.
☐ The audio equipment (computer etc.) is ON.
☐ The Audio Cable is properly connected.
□ The Volume is turned up.
□ The Mute is OFF.
☐ The audio output level of the audio equipment is within the specification of the monitor.
⑦ The sound is too loud or too quiet.
☐ The audio output level of the audio equipment is within the specification of the monitor.
⑧ A strange noise is heard.
□ The Audio Cable is properly connected.
RECYCLING INFORMATION
For better environment protection please don't dispose your monitor.
Please visit our web site: www.iiyama.com for monitor recycling.
APPENDIX
Design and specifications are subject to change without prior notice.
SPECIFICATIONS : ProLite LH4342UHS-B3
| Size Category 43" | ||
| LCD Panel | Panel technology | IPS |
| Size Diagonal: 42.5" (108cm) | ||
| Pixel pitch 0.245mm H × 0.245mm V | ||
| Brightness 500cd/m ^2 (Typical) | ||
| Contrast ratio 1300 : 1 (Typical) | ||
| Viewable angle Horizontal : 178 degrees, Vertical: 178 degrees (Typical) | ||
| Response time 9ms (Typical, Gray to Gray) | ||
| Display Colors Approx.1.07 Billion | ||
| Sync Frequency | DVI: Horizontal: 30.0-80.0kHz, Vertical: 50-75HzHDMI/DisplayPort: Horizontal: 30.0-135.0kHz, Vertical: 50-75Hz | |
| Native Resolution 3840 × 2160, 8.3 MegaPixels | ||
| Support Max. Resolution | DVI: 1920 × 1080 60HzHDMI/DisplayPort: 3840 × 2160 60Hz | |
| Input Connector DVI-I, HDMI × 3, DisplayPort | ||
| Input Audio Connector ø 3.5mm mini jack (Stereo) | ||
| LAN RJ45 | ||
| Serial Port RS-232C In/Outø 2.5mm sub-mini jack | ||
| Plug & Play | VESA DDC2BTM | |
| Input Video Signal | Digital: DVI (Digital Visual Interface Standard Rev.1.0) complianceDigital: HDMI, DisplayPort | |
| Input Audio Signal | 0.5Vrms maximum | |
| IR Extender Connector | IR In/Out | |
| USB Connector | USB2.0(DC5V, 500mA) (USB Media Player) × 2 | |
| Micro SD card slot | Micro SD | |
| Output Connector | DisplayPort | |
| Speakers | Internal: 10W×2 (Stereo speakers) | |
| Maximum Screen Size | 941.18mm W × 529.42mm H / 37.1" W × 20.8" H | |
| Power Source 100-240VAC, 50/60Hz, 2.4A | ||
| Power Consumption* | 116W typical, Standby mode: 0.5W maximum | |
| Dimensions / Net Weight | 973.0 × 561.0 × 63.5mm / 38.3 × 22.1 × 2.5" (W×H×D)10.7kg / 23.6lbs | |
| Environmental Considerations | Operating: Temperature 0 to 40°C / 32 to 104°FHumidity 20 to 80% (No condensation)Storage: Temperature -20 to 60°C / 4 to 140°FHumidity 5 to 95% (No condensation) | |
| Approvals | CE, UKCA, EAC, TÜV-Bauart | |
NOTE
* USB peripherals and audio equipment are not connected.
SPECIFICATIONS : ProLite LH5042UHS-B3
| Size Category 50" | ||
| LCD Panel | Panel technology | VA |
| Size Diagonal: 49.5" (125.7cm) | ||
| Pixel pitch 0.2854mm H × 0.2854mm V | ||
| Brightness 500cd/m ^2 (Typical) | ||
| Contrast ratio 4000 : 1 (Typical) | ||
| Viewable angle Horizontal : 178 degrees, Vertical: 178 degrees (Typical) | ||
| Response time 8ms (Typical, Gray to Gray) | ||
| Display Colors Approx.1.07 Billion | ||
| Sync Frequency | DVI: Horizontal: 30.0-80.0kHz, Vertical: 50-75HzHDMI/DisplayPort: Horizontal: 30.0-135.0kHz, Vertical: 50-75Hz | |
| Native Resolution 3840 × 2160, 8.3 MegaPixels | ||
| Support Max. Resolution | DVI: 1920 × 1080 60HzHDMI/DisplayPort: 3840 × 2160 60Hz | |
| Input Connector DVI-I, HDMI × 3, DisplayPort | ||
| Input Audio Connector ø 3.5mm mini jack (Stereo) | ||
| LAN RJ45 | ||
| Serial Port | RS-232C In/Out ø 2.5mm sub-mini jack | |
| Plug & Play | VESA DDC2BTM | |
| Input Video Signal | Digital: DVI (Digital Visual Interface Standard Rev.1.0) complianceDigital: HDMI, DisplayPort | |
| Input Audio Signal | 0.5Vrms maximum | |
| IR Extender Connector | IR In/Out | |
| USB Connector | USB2.0(DC5V, 500mA) (USB Media Player) × 2 | |
| Micro SD card slot | Micro SD | |
| Output Connector | DisplayPort | |
| Speakers | Internal: 10W×2 (Stereo speakers) | |
| Maximum Screen Size | 1095.84mm W × 616.41mm H / 43.1" W × 24.3" H | |
| Power Source 100-240VAC, 50/60Hz, 2.8A | ||
| Power Consumption* | 147W typical, Standby mode: 0.5W maximum | |
| Dimensions / Net Weight | 1128.5 × 649.0 × 63.5mm / 44.4 × 25.6 × 2.5" (W×H×D)14.7kg / 32.4lbs | |
| Environmental Considerations | Operating: Temperature 0 to 40°C / 32 to 104°FHumidity 20 to 80% (No condensation)Storage: Temperature -20 to 60°C / 4 to 140°FHumidity 5 to 95% (No condensation) | |
| Approvals | CE, UKCA, EAC, TÜV-Bauart | |
NOTE
* USB peripherals and audio equipment are not connected.
SPECIFICATIONS : ProLite LH5542UHS-B3
| Size Category 55" | ||
| LCD Panel | Panel technology | IPS |
| Size Diagonal: 54.6" (138.8cm) | ||
| Pixel pitch 0.315mm H × 0.315mm V | ||
| Brightness 500cd/m ^2 (Typical) | ||
| Contrast ratio 1300 : 1 (Typical) | ||
| Viewable angle Horizontal : 178 degrees, Vertical: 178 degrees (Typical) | ||
| Response time 9ms (Typical, Gray to Gray) | ||
| Display Colors Approx.1.07 | Billion | |
| Sync Frequency | DVI: Horizontal: 30.0-80.0kHz, Vertical: 50-75HzHDMI/DisplayPort: Horizontal: 30.0-135.0kHz, Vertical: 50-75Hz | |
| Native Resolution 3840 × 21 | 60, 8.3 MegaPixels | |
| Support Max. Resolution | DVI: 1920 × 1080 60HzHDMI/DisplayPort: 3840 × 2160 60Hz | |
| Input Connector DVI-I, HDMI × 3, DisplayPort | ||
| Input Audio Connector ø 3.5mm mini jack (Stereo) | ||
| LAN RJ45 | ||
| Serial Port | RS-232C In/Out ø 2.5mm sub-mini jack | |
| Plug & Play | VESA DDC2BTM | |
| Input Video Signal | Digital: DVI (Digital Visual Interface Standard Rev.1.0) complianceDigital: HDMI, DisplayPort | |
| Input Audio Signal | 0.5Vrms maximum | |
| IR Extender Connector | IR In/Out | |
| USB Connector | USB2.0(DC5V, 500mA) (USB Media Player) × 2 | |
| Micro SD card slot | Micro SD | |
| Output Connector | DisplayPort | |
| Speakers | Internal: 10W×2 (Stereo speakers) | |
| Maximum Screen Size | 1209.6mm W × 680.4mm H / 47.6" W × 26.8" H | |
| Power Source 100-240VAC, 50/60Hz, 3.0A | ||
| Power Consumption* | 133W typical, Standby mode: 0.5W maximum | |
| Dimensions / Net Weight | 1242.0 × 712.5 × 63.5mm / 48.9 × 28.1 × 2.5" (W×H×D)16.7kg / 36.8lbs | |
| Environmental Considerations | Operating: Temperature 0 to 40°C / 32 to 104°FHumidity 20 to 80% (No condensation)Storage: Temperature -20 to 60°C / 4 to 140°FHumidity 5 to 95% (No condensation) | |
| Approvals | CE, UKCA, EAC, TÜV-Bauart | |
* USB peripherals and audio equipment are not connected.
DIMENSIONS : ProLite LH4342UHS
DIMENSIONS : ProLite LH5042UHS
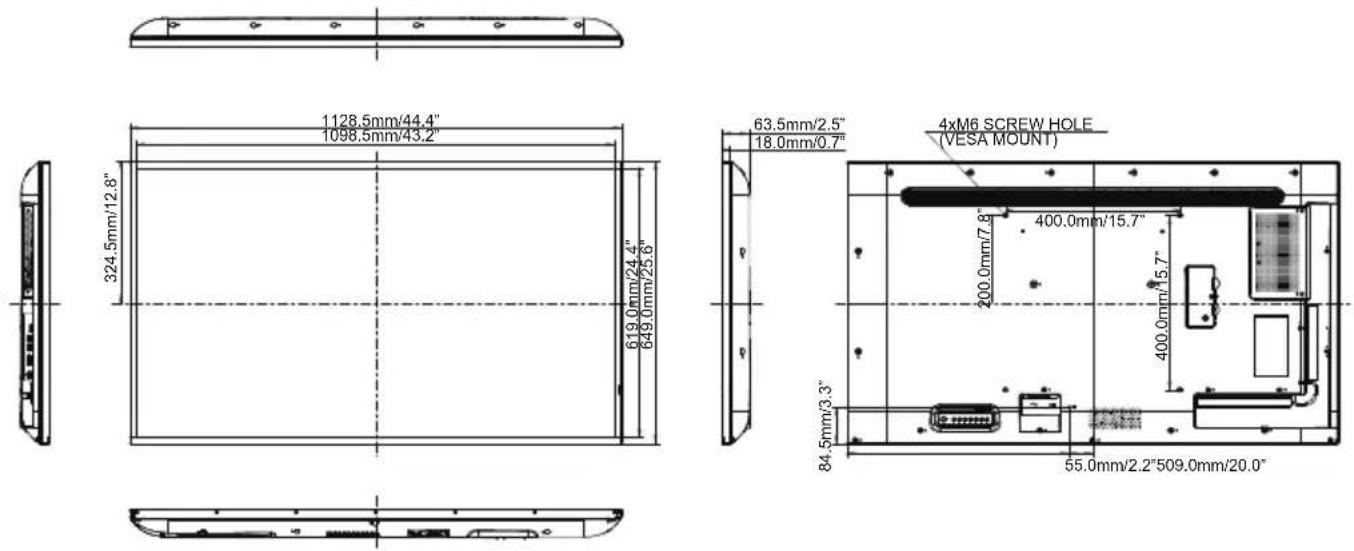
ENGLISH
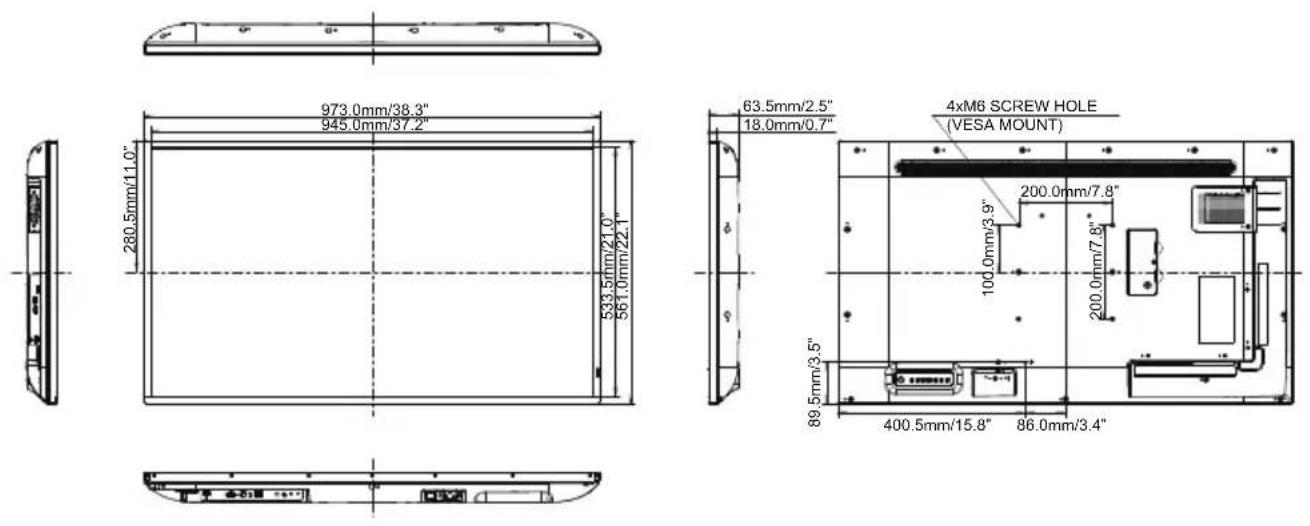
DIMENSIONS : ProLite LH5542UHS
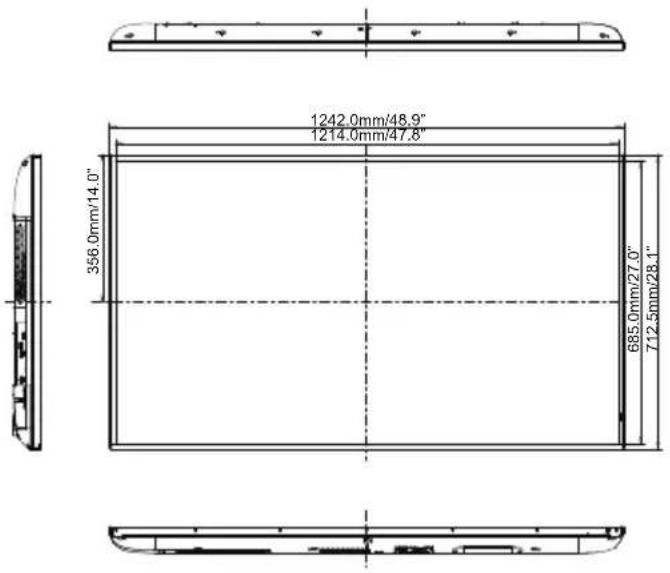
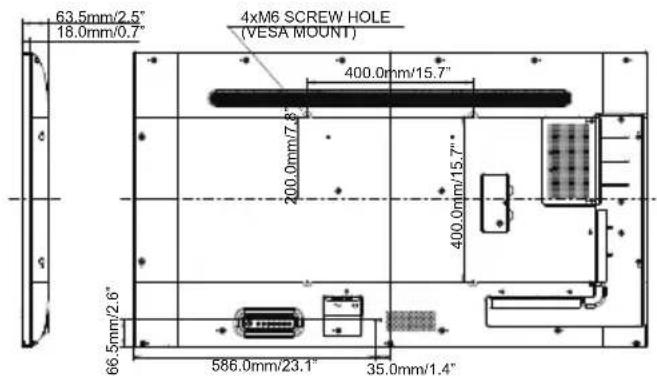
COMPLIANT TIMING
* means supported the timing.
- Dear user, we congratulate you on the purchase of your iiyama LCD.
- To report a fault, please contact your local support centre found at www.iiyama.com/service
- Things to check before you call the iiyama information line
- Before reporting the screen defect, please prepare the following information/evidence:
- Important Note:
- CE MARKING DECLARATION OF CONFORMITY
- Warning
- TABLE OF CONTENTS
- SAFETY PRECAUTIONS
- STOP OPERATING THE MONITOR WHEN YOU SENSE TROUBLE
- NEVER REMOVE THE CABINET
- DO NOT PUT ANY OBJECT INTO THE MONITOR
- INSTALL THE MONITOR ON A FLAT, STABLE SURFACE
- DO NOT USE THE MONITOR NEAR WATER
- OPERATE UNDER THE SPECIFIED POWER SUPPLY
- PROTECT THE CABLES
- ADVERSE WEATHER CONDITIONS
- CAUTION
- INSTALLATION LOCATION
- DO NOT PLACE THE MONITOR IN A HAZARDOUS POSITION
- MAINTAIN GOOD VENTILATION
- DISCONNECT THE CABLES WHEN YOU MOVE THE MONITOR
- UNPLUG THE MONITOR
- HOLD THE PLUG WHEN DISCONNECTING
- DO NOT TOUCH THE PLUG WITH WET HANDS
- WHEN YOU INSTALL THE MONITOR ON YOUR COMPUTER
- REMARK FOR 24/7 USAGE
- OTHERS
- ERGONOMIC RECOMMENDATIONS
- SPECIAL NOTES ON LCD MONITORS
- NOTE
- USAGE CONFIRMATION
- IMAGE PERSISTENCE / IMAGE STICKING
- FOR EXTENDED USE AS A PUBLIC MONITOR
- CUSTOMER SERVICE
- CLEANING
- CABINET
- LCD
- SCREEN
- UNPACKING
- CONTROLS AND CONNECTORS : MONITOR
- INSTALLATION
- [WALL MOUNTING]
- [ROTATING THE MONITOR]
- [PLACING THE STICKERS]
- CONTROLS AND CONNECTORS : REMOTE CONTROL
- PREPARING THE REMOTE CONTROL
- ID REMOTE CONTROL
- ■ Programming ID Mode
- ■ Use ID Mode
- BASIC OPERATION
- ■ Turning the monitor ON
- ■ Display the adjustment menu page
- ■ Move the cursor vertically
- ■ Move the cursor horizontally
- ■ Adjust the volume of sound
- ■ Switch the input signal
- CONNECTING YOUR THE MONITOR
- [ Connection example with the peripheral device ]
- [ About the daisy chain ]
- ■ Monitor control connection
- ■ Digital video connection
- [ To setup the network ]
- NOTE Connecting with a shielded CAT-5 Ethernet cable to comply with the EMC directive.
- COMPUTER SETTING
- Direct
- ADJUSTMENT MENU CONTENTS
- APPLICATION
- [Media Player]
- - Compose
- ■ Slide bar
- ■ Remote control
- - Play
- ■ Media Hotkey
- - Settings
- [Browser]
- [PDF Player]
- ■ Color Hotkey
- ■ Arrow key
- [iiSignage]
- [Chromium]
- [File Manager]
- [Settings]
- [Custom]
- SCREEN ADJUSTMENTS
- [Adjustment pattern]
- STANDBY FEATURE
- ■ Standby Mode
- TROUBLE SHOOTING
- Problem Check
- RECYCLING INFORMATION
- APPENDIX
- SPECIFICATIONS : ProLite LH5042UHS-B3
- SPECIFICATIONS : ProLite LH5542UHS-B3
Brand : IIYAMA
Model : ProLite LH5542UHS
Category : Screen