
ProLite B1780SD - Screen IIYAMA - Free user manual and instructions
Find the device manual for free ProLite B1780SD IIYAMA in PDF.


| Product Type | LCD Monitor |
| Brand | Iiyama |
| Model | ProLite B1780SD |
| Diagonal Size | 17 inches (43 cm) |
| Resolution | 1280 x 1024 (SXGA) |
| Aspect Ratio | 5:4 |
| Panel Technology | TN (Twisted Nematic) |
| Brightness | 250 cd/m² |
| Contrast Ratio | 700:1 |
| Response Time | 5 ms |
| Viewing Angles (H/V) | 160° / 150° |
| Input Connectors | VGA (D-Sub), DVI-D |
| Power Supply | 100-240 V AC, 50/60 Hz |
| Power Consumption (Typical) | < 25 W |
| Dimensions with Stand (WxHxD) | 387 x 406 x 225 mm |
| Dimensions without Stand (WxHxD) | 387 x 326 x 60 mm |
| Weight with Stand | 4.2 kg |
| Weight without Stand | 3.0 kg |
| VESA Mount | 100 x 100 mm |
| Adjustments | Height, tilt, swivel, pivot |
| Security | Kensington lock slot |
| Cleaning | Use a soft dry cloth; avoid solvents |
| Spare Parts | Contact Iiyama support for availability |
| Repairability | Repairs should be done by qualified technicians |
| General Information | User manual included |
Frequently Asked Questions - ProLite B1780SD IIYAMA
User questions about ProLite B1780SD IIYAMA
0 question about this device. Answer the ones you know or ask your own.
Ask a new question about this device
Download the instructions for your Screen in PDF format for free! Find your manual ProLite B1780SD - IIYAMA and take your electronic device back in hand. On this page are published all the documents necessary for the use of your device. ProLite B1780SD by IIYAMA.
USER MANUAL ProLite B1780SD IIYAMA
Thank you very much for choosing the iiyama LCD monitor.
We recommend that you take a few minutes to read this comprehensive manual carefully before installing and switching on the monitor.
Please keep this manual in a safe place for your future reference.

Dear user, we congratulate you on the purchase of your iiyama LCD.
For details on warranty and locally used pixel policies that apply directly after installation of your product please check the iiyama website.
To report a fault, please contact your local support centre found at www.iiyama.com/service
Things to check before you call the iiyama information line
| if the power cable is connected securely and turned on?
| if the display has been turned on?
| if the signal cable is connected securely and the correct input selected?
| if the computer has been restarted with the display connected?
| if the graphics card is correctly installed with the latest drivers possible?
| if the correct native resolution has been selected via 'Display Properties'?
| If the R/G/B signal configuration is correct?
| if the displays On Screen Menu is shown?
| if the correct brightness and contrast settings have been set?
| if given display tolerances and compatibility have been considered?
| if via the On Screen Menu you have performed a Factory Reset/Recall?
Before reporting the screen defect, please prepare the following information/evidence:
| model number *
| purchase receipt and serial number *
| name and address for collection
| telephone/fax number, for availability during the day
| convenient collection date (date, time)
| short description of the defect
Important Note:
If there is no fault found in the collected equipment after inspection, the transferring party shall incur charges for transport and administration.
If you have checked all of the above and there is still no picture, call our information line for assistance in your country.
Congratulations!
This product is TCO Certified – for Sustainable IT

TCO Certified is an international third party sustainability certification for IT products. TCO Certified ensures that the manufacture, use and recycling of IT products reflect environmental, social and economic responsibility. Every TCO Certified product model is verified by an accredited independent test laboratory.
This product has been verified to meet all the criteria in TCO Certified, including:
Corporate Social Responsibility
Socially responsible production - working conditions and labor law in manufacturing country
Energy Efficiency
Energy efficiency of product and power supply. Energy Star compliant, where applicable
Environmental Management System
Manufacturer must be certified according to either ISO 14001 or EMAS
Minimization of Hazardous Substances
Limits on cadmium, mercury, lead & hexavalent chromium including requirements for mercury-free products, halogenated substances and hazardous flame retardants
Design for Recycling
Coding of plastics for easy recycling. Limit on the number of different plastics used.
Product Lifetime, Product Take Back
Minimum one-year product warranty. Minimum three-year availability of spare parts. Product takeback
Packaging
Limits on hazardous substances in product packaging. Packaging prepared for recycling
Ergonomic, User-centered design
Visual ergonomics in products with a display. Adjustability for user comfort (displays, headsets)
Acoustic performance – protection against sound spikes (headsets) and fan noise (projectors, computers) Ergonomically designed keyboard (notebooks)
Electrical Safety, minimal electro-magnetic Emissions
Third Party Testing
All certified product models have been tested in an independent, accredited laboratory.
A detailed criteria set is available for download at www.tcodevelopment.com, where you can also find a searchable database of all TCO Certified IT products.
TCO Development, the organization behind TCO Certified, has been an international driver in the field of Sustainable IT for 20 years. Criteria in TCO Certified are developed in collaboration with scientists, experts, users and manufacturers. Organizations around the world rely on TCO Certified as a tool to help them reach their sustainable IT goals. We are owned by TCO, a non-profit organization representing office workers. TCO Development is headquartered in Stockholm, Sweden, with regional presence in North America and Asia.
For more information, please visit
www.tcodevelopment.com
CE MARKING DECLARATION OF CONFORMITY
This LCD monitor complies with the requirements of the EC/EU Directive 2004/108/EC “EMC Directive”, 2006/95/EC “Low Voltage Directive”, 2009/125/EC “ErP Directive” and 2011/65/EU “RoHS Directive”.
The electro-magnetic susceptibility has been chosen at a level that gives correct operation in residential areas, business and light industrial premises and small-scale enterprises, inside as well as outside of the buildings. All places of operation are characterised by their connection to the public low voltage power supply system.
We recommend recycling of used product. Please contact your dealer or iiyama service center. Recycle information is obtained via the Internet, using the address: http://www.iiyama.com You can access the Web page of different countries from there.
■ We reserve the right to change specifications without notice.
■ All trademarks used in this user manual are the property of their respective owners.
As an ENERGY STAR® Partner, iiyama has determined that this product meets the ENERGY STAR® guidelines for energy efficiency.
TABLE OF CONTENTS
FOR YOUR SAFETY ....1
SAFETY PRECAUTIONS....1
SPECIAL NOTES ON LCD MONITORS 3
CUSTOMER SERVICE ....3
CLEANING....3
FITTING AND REMOVAL OF BASE : ProLite B1780SD ......6
FITTING AND REMOVAL OF BASE : ProLite E1780SD ......7
CONTROLS AND CONNECTORS : ProLite B1780SD ......8
CONTROLS AND CONNECTORS : ProLite E1780SD ......9
CONNECTING YOUR MONITOR : ProLite B1780SD ......10
CONNECTING YOUR MONITOR : ProLite E1780SD ...... 11
COMPUTER SETTING 12
ADJUSTING THE VIEWING ANGLE : ProLite E1780SD ......12
ADJUSTING THE HEIGHT AND THE VIEWING ANGLE :
ProLite B1780SD 13
PANEL ROTATION : ProLite B1780SD ......13
RECYCLING INFORMATION 26
APPENDIX 27
SPECIFICATIONS: ProLite B1780SD 27
SPECIFICATIONS: ProLite E1780SD 28
DIMENSIONS: ProLite B1780SD 29
DIMENSIONS: ProLite E1780SD 29
COMPLIANT TIMING 30
FOR YOUR SAFETY
SAFETY PRECAUTIONS
WARNING
STOP OPERATING THE MONITOR WHEN YOU SENSE TROUBLE
If you notice any abnormal phenomena such as smoke, strange sounds or fumes, unplug the monitor and contact your dealer or iiyama service center immediately. Further use may be dangerous and can cause fire or electric shock.
NEVER REMOVE THE CABINET
High voltage circuits are inside the monitor. Removing the cabinet may expose you to the danger of fire or electric shock.
DO NOT PUT ANY OBJECT INTO THE MONITOR
Do not put any solid objects or liquids such as water into the monitor. In case of an accident, unplug your monitor immediately and contact your dealer or iiyama service center. Using the monitor with any object inside may cause fi re, electric shock or damage.
INSTALL THE MONITOR ON A FLAT, STABLE SURFACE
The monitor may cause an injury if it falls or is dropped.
DO NOT USE THE MONITOR NEAR WATER
Do not use where water may be splashed or spilt onto the monitor as it may cause fire or electric shock.
OPERATE UNDER THE SPECIFIED POWER SUPPLY
Be sure to operate the monitor only with the specified power supply. Use of an incorrect voltage will cause malfunction and may cause fire or electric shock.
PROTECT THE CABLES
Do not pull or bend the power cable and signal cable. Do not place the monitor or any other heavy objects on the cables. If damaged, the cables may cause fire or electric shock.
ADVERSE WEATHER CONDITIONS
It is advisable not to operate the monitor during a heavy thunder storm as the continual breaks in power may cause malfunction. It is also advised not to touch the plug in these circumstances as it may cause electric shock.
CAUTION
INSTALLATION LOCATION
Do not install the monitor where sudden temperature changes may occur, or in humid, dusty or smoky areas as it may cause fire, electric shock or damage. You should also avoid areas where the sun shines directly on the monitor.
DO NOT PLACE THE MONITOR IN A HAZARDOUS POSITION
The monitor may topple and cause injury if not suitably located. Please also ensure that you do not place any heavy objects on the monitor, and that all cables are routed such that children may not pull the cables and possibly cause injury.
MAINTAIN GOOD VENTILATION
Ventilation slots are provided to keep the monitor from overheating. Covering the slots may cause fire. To allow adequate air circulation, place the monitor at least 10 cm (or 4 inches) from any walls. Do not remove the tilt stand when operating the monitor. Ventilation slots on the back of the cabinet will be blocked and the monitor may overheat if the stand is removed. This may cause fire or damage. Operating the monitor on its back, side, upside down or on a carpet or any other soft material may also cause damage.
DISCONNECT THE CABLES WHEN YOU MOVE THE MONITOR
When you move the monitor, turn off the power switch, unplug the monitor and be sure the signal cable is disconnected. If you do not disconnect them, it may cause fire or electric shock.
UNPLUG THE MONITOR
If the monitor is not in use for a long period of time it is recommended that it is left unplugged to avoid accidents.
HOLD THE PLUG WHEN DISCONNECTING
To disconnect the power cable or signal cable, always pull it by the plug. Never pull on the cable itself as this may cause fi re or electric shock.
DO NOT TOUCH THE PLUG WITH WET HANDS
Pulling or inserting the plug with wet hands may cause electric shock.
WHEN YOU INSTALL THE MONITOR ON YOUR COMPUTER
Be sure the computer is strong enough to hold the weight of the monitor, otherwise, you may damage your computer.
DO NOT USE THE MONITOR FOR 24-HOURS CONTINUOUSLY
The monitor is not designed to work for 24-hours continuously, do not use the monitor for 24-hours continuously.
OTHERS
ERGONOMIC RECOMMENDATIONS
To eliminate eye fatigue, do not operate the monitor against a bright background or in a dark room. For optimal viewing comfort, the monitor should be just below eye level and 40-60 cm (16-24 inches) away from your eyes. When using the monitor over a prolonged time, a ten minute break every hour is recommended as looking at the screen continuously can cause eye strain.
SPECIAL NOTES ON LCD MONITORS
The following symptoms are normal with LCD monitors and do not indicate a problem.
NOTE
■ When you first turn on the LCD monitor, the picture may not fit in the display area because of the type of computer that is used. In this case, adjust the picture position to the correct position.
■ Due to the nature of the backlight, the screen may flicker during initial use. Turn off the Power Switch and then turn it on again to make sure the flicker disappears.
You may find slightly uneven brightness on the screen depending on the desktop pattern you use.
■ Due to the nature of the LCD screen, an afterimage of the previous screen may remain after switching the image, when the same image is displayed for hours. In this case, the screen can be recovered slowly by changing the image or turning off the Power Switch for some hours.
■ Contact your dealer or iiyama service center for the backlight replacement when the screen is dark, flickering or not lighting up. Never attempt to replace it by yourself.
CUSTOMER SERVICE
NOTE
If you have to return your unit for service and the original packaging has been discarded, please contact your dealer or iiyama service center for advice or replacement packaging.
CLEANING
WARNING
■ If you drop any materials or liquids such as water into the monitor when cleaning, unplug the power cable immediately and contact your dealer or iiyama service center.
CAUTION
■ For safety reasons, turn off the power switch and unplug the monitor before you clean it.
NOTE
■ To protect the LCD panel, do not scratch or rub the screen with a hard object.
■ Never use any of the following strong solvents. These will damage the cabinet and the LCD screen.
| Thinner | Spray-type cleaner |
| Benzine | Wax |
| Abrasive cleaner | Acid or Alkaline solvent |
■ Touching the cabinet with any product made from rubber or plastic for a long time may cause degeneration or loss of paint on the cabinet.
CABINET
Stains can be removed with a cloth lightly moistened with a mild detergent solvent. Then wipe the cabinet with a soft dry cloth.
LCD
Periodic cleaning with a soft dry cloth is recommended.
SCREEN
Don't use tissue paper etc. because these will damage the LCD screen.
◆ Supports Resolutions up to 1280 × 1024
◆ High Contrast 1000:1 (Typical), Adv. Contrast Function Available / Brightness 250cd/m² (Typical)
◆ Quick Response Time 5ms (Typical)
◆ Digital Character Smoothing
◆ Automatic Set-up
Stereo Speakers
2 × 1W Stereo Speakers
◆ Plug & Play VESA DDC2B Compliant Windows® XP/Vista/7/8 Compliant
Power Management (ENERGY STAR® VESA DPMS Compliant)
◆ VESA Mounting Standard (100mm×100mm) Compliant
Keyhole for Security Lock
CHECKING THE CONTENTS OF THE PACKAGE
The following accessories are included in your package. Check to see if they are enclosed with the monitor. If anything is missing or damaged, please contact your local iiyama dealer or regional iiyama office.
■ Power Cable ^*1
■ VGA(D-sub) Signal Cable
■ DVI-D Cable
■ Audio Cable
■ Stand-Base
■ Screw for stand fi xing (3pcs) ^4
■ Cable Holder*3
■ Safety Guide
■ Quick Start Guide
CAUTION
*1 The rating of the Power Cable enclosed in 120V area is 10A/125V. If you are using a power supply higher than this rating, then a power cable with a rating of 10A/250V must be used. However, all guarantees and warranties are void for any problems or damage caused by a power cable not supplied by iiyama.
^*2 Accessory for ProLite B1780SD.
^*3 Accessory for ProLite E1780SD.
WALL MOUNTING
WARNING
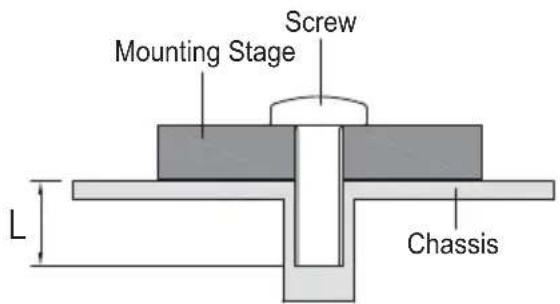
- When you use with the wall mounting, in consideration of thickness of the mounting stage, tighten the M4 Screw with washer which "L" length is 7mm to fasten the monitor. Using the screw longer than this may cause electric shock or damage because it may contact with the electrical parts inside the monitor.
■ Please check if the wall or ceiling can support the weight of the monitor before mounting it.
FITTING AND REMOVAL OF BASE : ProLite B1780SD
CAUTION
■ Put the monitor on a stable surface. The monitor may cause injury or damage if it falls or is dropped.
■ Do not give a strong impact to the monitor. It may cause damage.
■ Unplug the monitor before removal or installation to avoid electric shock or damage.
① Put a piece of soft cloth on the table beforehand to prevent the monitor from being scratched. Lay the monitor fl at on a table with front face down.
② Hold the monitor and push the Stand-Base.
③ Use 'thumb screw' provided to secure base to monitor column.
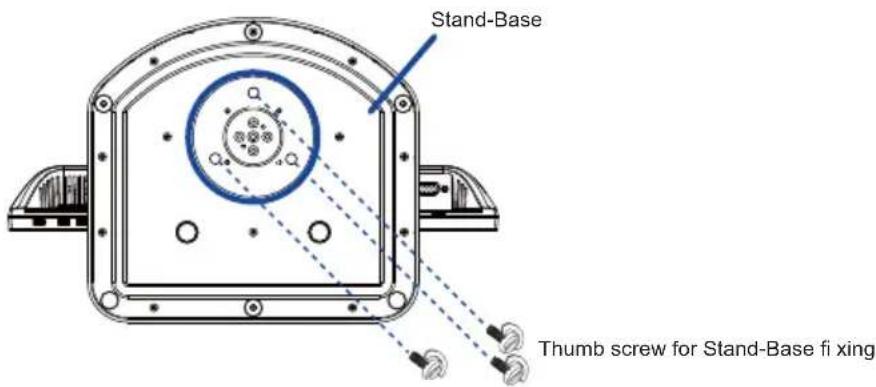
① Put a piece of soft cloth on the table beforehand to prevent the monitor from being scratched. Lay the monitor fl at on a table with front face down.
② Remove 'thumb screw' to remove base from monitor column.
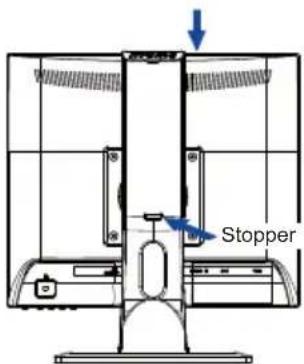
Put the monitor on a fl at surface. Press the stopper at the back of the stand while pushing the monitor from the top. Careful attention is required as the monitor is sprung loaded and the stand may expand quickly.
FITTING AND REMOVAL OF BASE : ProLite E1780SD
CAUTION
Put the monitor on a stable surface. The monitor may cause injury or damage if it falls or is dropped.
Do not give a strong impact to the monitor. It may cause damage.
Unplug the monitor before removal or installation to avoid electric shock or damage.
① Put a piece of soft cloth on the table beforehand to prevent the monitor from being scratched. Lay the monitor flat on a table with front face down.
② Hold the monitor and push the Stand-Base until it clicks and is secure.
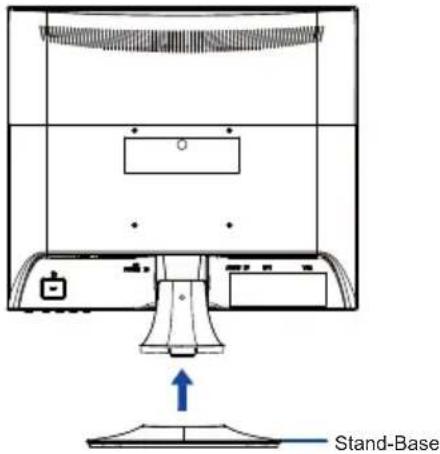
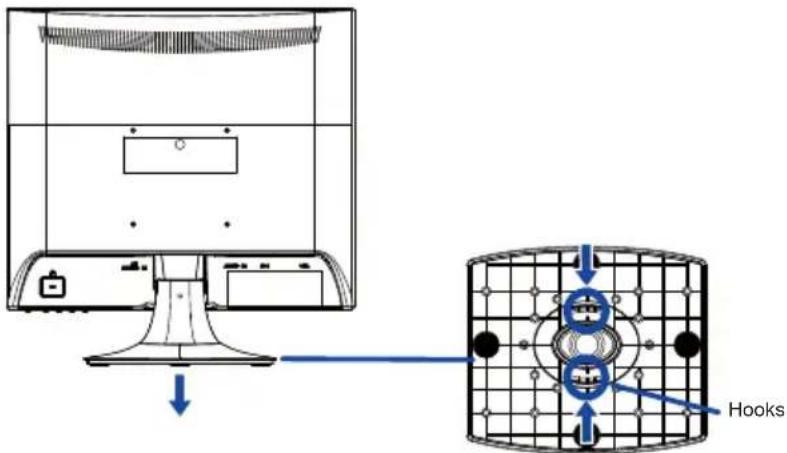
① Put a piece of soft cloth on the table beforehand to prevent the monitor from being scratched. Lay the monitor flat on a table with front face down.
② Press and hold the hooks inside, and pull the Stand-Base.
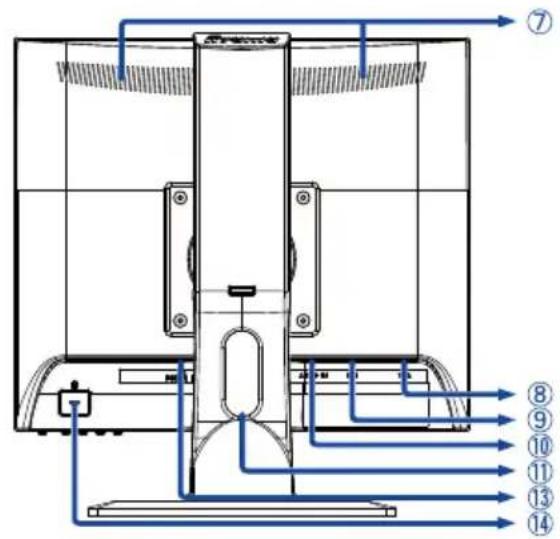
CONTROLS AND CONNECTORS : ProLite B1780SD
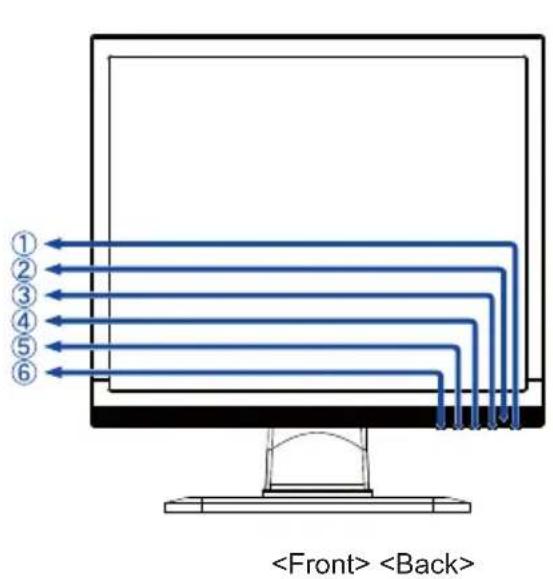
① Power Switch ( ⏻POWER)
② Power Indicator
NOTEue: Normal operation
Orange: Power Management
③ Select / Input Button (2)
④ Scroll Up / Audio Adjust Button (▲)
⑤ Scroll Down / i-Style Color Button (▼)
⑥ Menu Button (1)
⑦ Speakers
⑧ VGA(D-sub) mini 15pin Connector (D-SUB)
⑨ DVI-D 24pin Connector (DVI-D)
⑩ Audio Connector (AUDIO IN)
⑪ Cable Holes
⑬ AC Connector (AC IN)
⑭ Keyhole for Security Lock
NOTE fasten a security lock and cable to prevent the monitor from being removed without your permission.
CONTROLS AND CONNECTORS : ProLite E1780SD
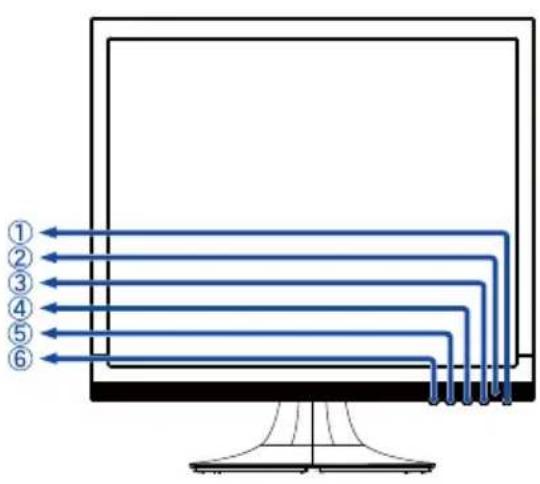
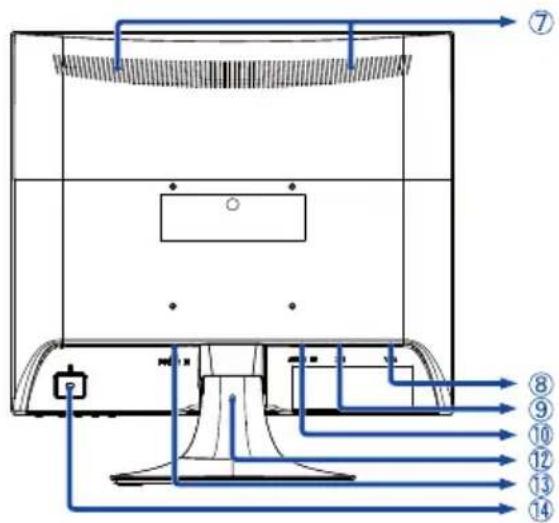
① Power Switch ( ⏻POWER)
② Power Indicator
NOTEue: Normal operation Orange: Power Management
③ Select / Input Button (②)
④ Scroll Up / Audio Adjust Button (▲)
⑤ Scroll Down / i-Style Color Button (▼)
⑥ Menu Button (1)
⑦ Speakers
⑧ VGA(D-sub) mini 15pin Connector (D-SUB)
⑨ DVI-D 24pin Connector (DVI-D)
⑩ Audio Connector (AUDIO IN)
⑫ Installation hole of Cable Holder
⑬ AC Connector (AC IN)
⑭ Keyhole for Security Lock
NOTE fasten a security lock and cable to prevent the monitor from being removed without your permission.
CONNECTING YOUR MONITOR : ProLite B1780SD
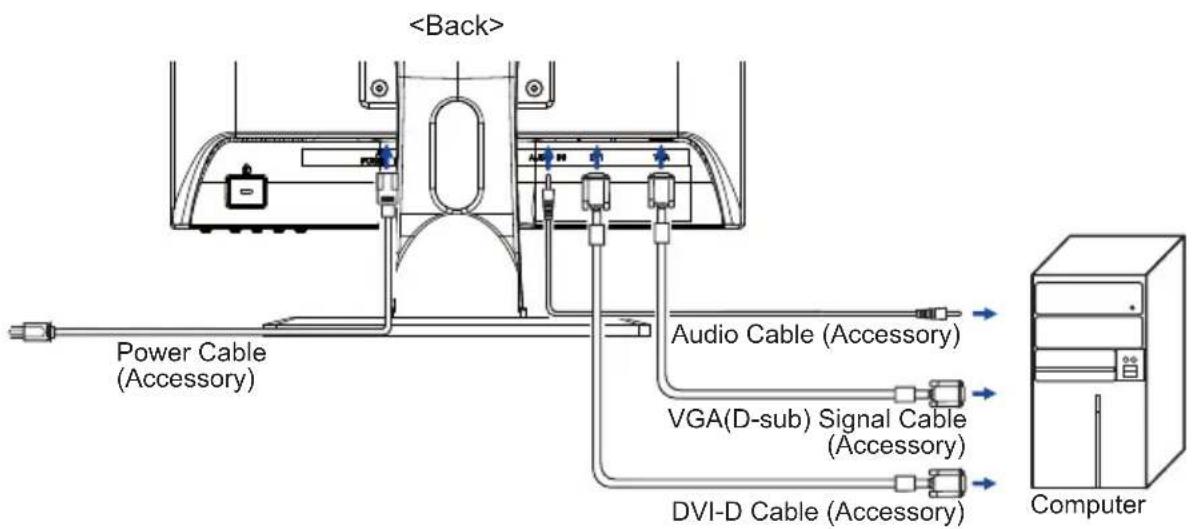
① Ensure that both the computer and the monitor are switched off.
② Connect the computer to the monitor with the signal cable.
③ Connect the monitor to the audio equipment with the Audio Cable for computer when using the audio features.
④ Connect the Power Cable to the monitor first and then to the power supply.
⑤ Turn on your monitor and computer.
NOTE
■ The signal cables used for connecting the computer and monitor may vary with the type of computer used. An incorrect connection may cause serious damage to both the monitor and the computer. The cable supplied with the monitor is for a standard connector. If a special cable is required please contact your local iiyama dealer or regional iiyama offi ce.
■ For connection to Macintosh computers, contact your local iiyama dealer or regional iiyama offi ce for a suitable adaptor.
■ Make sure you tighten the finger screws at each end of the signal cable.
[Example of Connection]
[Collect Cables]
① Put the cables through the cable hole.
②Collect cables at the back of the stand.
![IIYAMA ProLite B1780SD - [Collect Cables] - 1](/content/2026/06/1147021/images/6b95ee058731ebad5e0acef3ade18235393a2d7284a2b9e24bcc4e5890a849fb.jpg)
natural_image
Technical line drawing of a mechanical assembly with hoses and connectors (no text or symbols)CONNECTING YOUR MONITOR : ProLite E1780SD
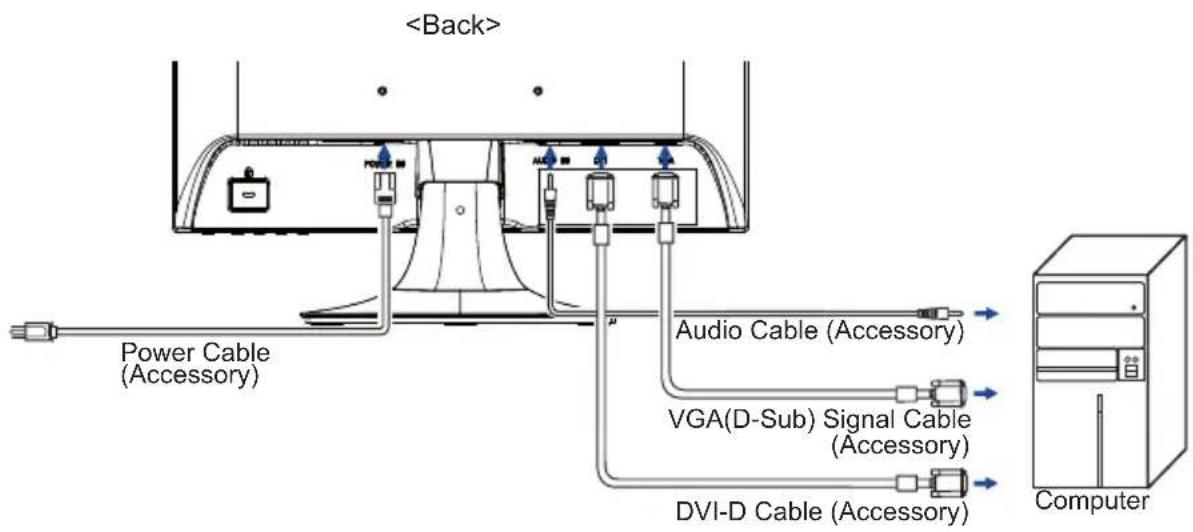
① Ensure that both the computer and the monitor are switched off.
② Connect the computer to the monitor with the signal cable.
③ Connect the monitor to the audio equipment with the Audio Cable for computer when using the audio features.
④ Connect the Power Cable to the monitor first and then to the power supply.
⑤ Turn on your monitor and computer.
NOTE
■ The signal cables used for connecting the computer and monitor may vary with the type of computer used. An incorrect connection may cause serious damage to both the monitor and the computer. The cable supplied with the monitor is for a standard connector. If a special cable is required please contact your local iiyama dealer or regional iiyama offi ce.
■ For connection to Macintosh computers, contact your local iiyama dealer or regional iiyama offi ce for a suitable adaptor.
■ Make sure you tighten the finger screws at each end of the signal cable.
[Example of Connection]
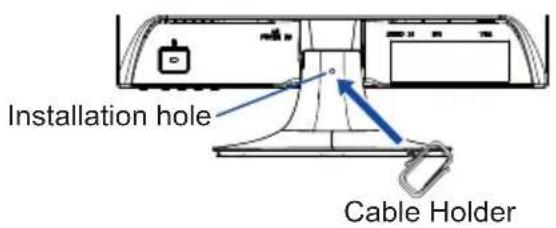
[Collect Cables]
① Insert the Cable-Holder into Hole.
② Put the cables through the cable holder.
③ Collect cables at the back of the stand.
![IIYAMA ProLite B1780SD - [Collect Cables] - 2](/content/2026/06/1147021/images/1d0973711ee59e1084093bb46d1d93d5ff270fdbbc796f3f2c64d26ea78087c2.jpg)
natural_image
Pure technical diagram of a mechanical or electrical component with no visible text, numbers, or symbolsCOMPUTER SETTING
■ Signal Timing
Change to the desired signal timing listed on page 30: COMPLIANT TIMING.
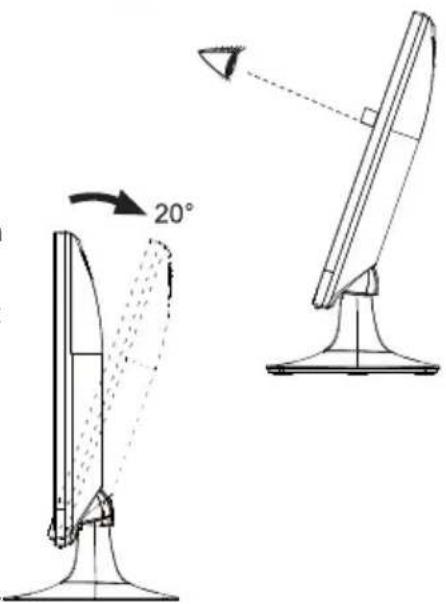
ADJUSTING THE VIEWING ANGLE : ProLite E1780SD
■ For optimal viewing it is recommended to look at the full face of the monitor.
■ Hold the stand so that the monitor does not topple when you change the monitor's angle.
■ You are able to adjust the monitor's angle up to 20^ upward.
In order to ensure a healthy and relaxed body position when using the monitor at visual display workstations, it is recommended that the adjusted tilt angle should not exceed 10 degrees. Adjust the monitor's angle to your own preference.
NOTE
■ Do not touch the LCD screen when you change the angle. It may cause damage or break the LCD screen.
■ Careful attention is required not to catch your fingers or hands when you change the angle.
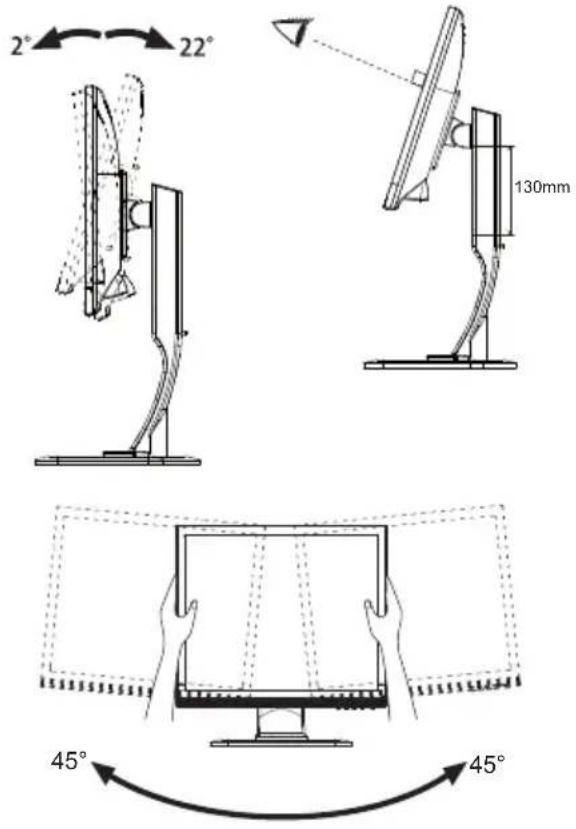
ADJUSTING THE HEIGHT AND THE VIEWING ANGLE : ProLite B1780SD
■ For optimal viewing it is recommended to position yourself directly opposite to the full face of the monitor, then adjust the monitor's height and angle to your own preference.
■ Hold the panel so that the monitor does not topple when you change the monitor's height or angle.
■ You are able to adjust the monitor's height up to 130mm, angle up to 45 degrees right and left, 22 degrees upward and 2 degrees downward.
NOTE
■ Do not touch the LCD screen when you change the height or the angle. It may cause damage or break the LCD screen.
■ Careful attention is required not to catch your fingers or hands when you change the height or the angle.
■ Injury can occur if care is not taken to avoid fi nger contact with the displays base when adjusting the height.
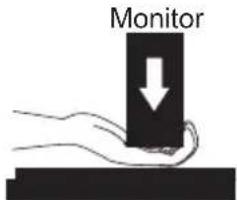
Stand
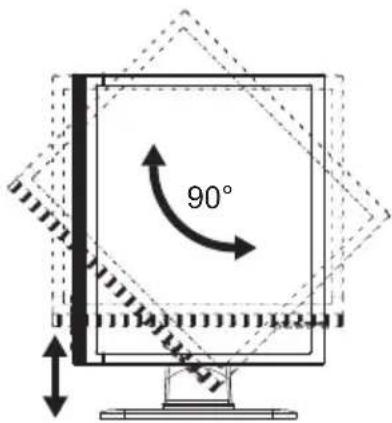
PANEL ROTATION : ProLite B1780SD
① Adjust the mother's height.
② Rotate the panel 90 degrees.
Portrait: Turn clockwise.
Landscape: Turn counter clockwise.
NOTE
■ Attempting to rotate without fully extending upward may cause damage to stand.
■ Video card for portrait display will be required for rotating the image on the screen.
③ Adjust the monitor's angle to your preference.
To create the best picture, your iiyama LCD monitor has been preset at the factory with the COMPLIANT TIMING shown on page 30. You are also able to adjust the picture by following the button operation shown below. For more detailed adjustments, see page 21 for SCREEN ADJUSTMENTS.
Press the① Button to start the On Screen Display (OSD) feature. There are additional Menu items which can be switched by using the ▲ /▼Buttons.
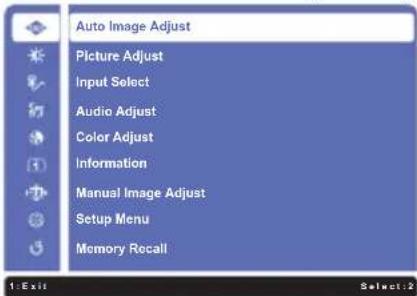
② Select the Menu item which contains the adjustment icon relating to the adjustment you want to make. Press the ② Button. Then, use the ▲ Buttons to highlight the desired adjustment icon.
③ Press the② Button again. Use the ▲/▼Buttons to make the appropriate adjustment or setting.
④ Press the① Button to leave the menu, and the settings you just made would be automatically saved.
For example, to correct for vertical position, select Menu item of Manual Image Adjust and then press the ② Button. Then, select H./V.Position by using the ▲ Buttons.
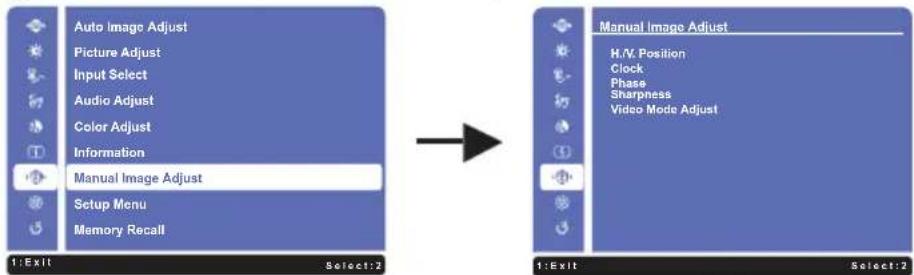
An adjustment page appears after you press the ② Button. Then, select V. Position by using the ▲ / ▼ Buttons. Press the Button again. Then, use the / ▲ Buttons to change the vertical position settings. The vertical position of the overall display should be changing accordingly
while you are doing this.
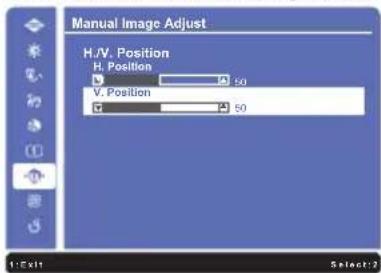
Press the ① Button lastly, it ends, all changes are saved in the memory.
NOTE
■ When button operations are aborted during adjustment, On-Screen Display disappears when the time set for the OSD Time Out has passed. Also, the 1 button can be used to return previous menu and turn off the On-Screen Display.
■ Any changes are automatically saved in the memory when the On Screen Display disappears. Turning off the power should be avoided while using the Menu.
■ Adjustments for H./V. Position, Clock and Phase are saved for each signal timing. Except for these adjustments, all other adjustments have only one setting which applies to all signal timings.
ADJUSTMENT MENU CONTENTS
| Auto Image Adjust Only Analog Input | (W4HZ) | Auto Image Adjust | |
| Adjustment Item Problem | / Option | Button to Press | |
| Auto Image Adjust * Direct | Adjust H. / V. Position, Clock and Phase automatically. | ||
* For best results, use the Auto Image Adjust in conjunction with the adjustment pattern. See page 21 for SCREEN ADJUSTMENTS.
Direct
You can skip the Menu items and display an adjustment scale directly by using the following button operations.
● Auto Image Adjust: Pressing and holding of the ▼ Button for about 2 seconds when the Menu is not displayed.
| Picture Adjust Picture Adjust | ||
| Adjustment Item Problem / Option Button to Press | ||
| Contrast *3 | Too dull  Too intense Too intense | |
| Brightness *1,2,3 | Too dark  Too bright Too bright | |
| Adv. Contrast *2,3,4 | Off | Typical Contrast Ratio |
| Increased Contrast RatioOn | ||
| ECO Mode *3 | Off Normal | |
| 1 | Brightness of back-light is reduced. | |
| Brightness of back-light is reduced more than 1.2 | ||
| Brightness of back-light is reduced more than 2.3 | ||
*1 Adjust the Brightness when you are using the monitor in a dark room and feel the screen is too bright. Can not select when Adv. Contrast is On.
^2 Brightness and Adv. Contrast can not enable the same time when ECO Mode is on.
^3 Contrast, Brightness, Adv. Contrast and ECO Mode adjustments are disabled when i-Style Color is activated.
*4 To activate the option, mark it in the setup menu. To deactivate it, remove the marking.
| Input Select Direct Input Select | ||
| Adjustment Item Problem / Option Button to Press | ||
| Input Select | VGA | Select the VGA input. |
| DVI | Select the DVI input. | |
| Auto | Search for an available input source and select automatically. | |
| NOTE Input source is fixed, not selected automatically when VGA and DVI which are selected. | ||
Direct
You can skip the Menu items and display an adjustment scale directly by using the following button operations.
- Input Select: Press the ② Button when the Menu is not displayed.
| Audio Adjust Direct Audio Adjust | ||
| Adjustment Item Problem / Option Button to Press | ||
| Volume | Too soft Too loud | |
| Mute * Direct | On | Return the sound volume to the previous level. |
| Off | Turn off the sound temporarily. | |
* To activate the option, mark it in the setup menu. To deactivate it, remove the marking.
Direct
You can skip the Menu items and display an adjustment scale directly by using the following button operations.
- Audio Adjust: Press the ▲ Button when the Menu is not displayed.
- Mute: Pressing and holding of the displayed.
- Button for about 2 seconds when the Menu is not displayed.
Mute and Unmute are switched as follows by pressing the
▲ Button successively.
| Color Adjust | Color Adjust | ||
| Adjustment Item Problem | / Option | Button to Press | |
| Cool | Bluish white | ||
| Reddish white Normal | |||
| Greenish white Warm | |||
| User Color | Red | Too weak Too strong  | |
| Green | |||
| Blue | |||
| i-Style Color | Direct | Off | Return to a state set by color adjustment except i-Style Color. |
| Standard | For general windows environment and monitor default setting. | ||
| Game | For PC game environment. | ||
| Cinema | For movie and video environment. | ||
| Scenery For displaying outdoor scenery images | |||
| Text | For text editing and viewing in a word processing environment. | ||
Direct
You can skip the Menu items and display an adjustment scale directly by using the following button operations.
- i-Style Color: Press the ▼ Button when the Menu is not displayed.
| Information | Information |
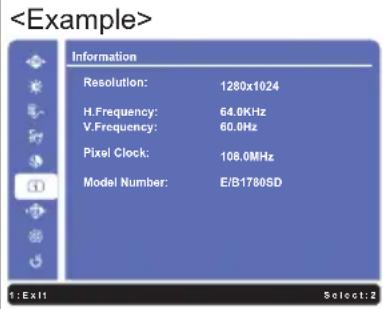 | Displays information regarding the current input signal coming from the graphic card in your computer.NOTE See your graphic card user guide for more information about changing the resolution and refresh. |
Manual Image Adjust  Manual Image Adjust Manual Image Adjust | ||
| Adjustment Item Problem / Option Button to Press | ||
| H./V. Position *1,2 | H. Position | Too left Too right |
| V. Position | Too low Too high | |
| Clock *1 | Too narrow Too wide | |
| Phase *1 | To correct flickering text or lines | |
| Sharpness | 0 1 2 3 You can change the picture quality from 0 to 3 (soft to sharp). Press the▲Button to change the picture quality in numerical order. Press the▼Button to change the picture quality in reverse numerical order. Adjust the picture quality at resolutions of less 1280 x 1024. You can change the picture quality (4 steps). | |
*1 Only Analog Input.
*2 See page 21 for SCREEN ADJUSTMENTS.
| Setup Menu Setup Menu | ||||
| Adjustment Item | Problem / Option Button to Press | |||
| Language Select | English | English | Русский | Russian |
| Français | French | 日本語 | Japanese | |
| Deutsch | German | 简体中文 | Simplifi ed Chinese | |
| Nederlands | Dutch | 繁體中文 | Traditional Chinese | |
| Polski | Polish | |||
| OSD Position | H.Position | OSD is too left OSD is too right | ||
| V.Position | OSD is too low OSD is too high | |||
| OSD Time Out | You can set the OSD display duration time. 5 / 15 / 30 / 60 seconds | |||
| OSD Background* | On | The background of OSD is mode transparent. | ||
| Off Retune the background of OSD. | ||||
| Opening Logo* | On | iiyama Logo displayed when the monitor is turned on. | ||
| Off | iiyama Logo does not display when the monitor is turned on. | |||
| LED* | On | The Power Indicator is turned On. | ||
| Off | The Power Indicator is turned Off. | |||
| NOTE Turn Off the Power Indicator when you are bothered by the light. | ||||
* To activate the option, mark it in the setup menu. To deactivate it, remove the marking.
| Memory Recall | Memory Recall | |
| Adjustment Item Problem | / Option | Button to Press |
| Memory Recall | Factory-preset data is restored. | |
- Lock Mode
- The OSD lock will be activated by pressing the front buttons ① and ▲ or about 10 seconds. If you try to access the OSD by pressing any of the buttons ①, ▼ and ▲, message "OSD Locked" will appear on the screen.
- The OSD lock will be deactivated by pressing the front buttons ① and ▲ again for 10 seconds.
- The power switch lock will be activated by pressing the front buttons 1 and 2 or 10 seconds. Locking the power switch means that won't be able to turn off the Monitor while the power switch is locked. If presses the power switch message "Power Button Locked" will appear on the screen.
- The power switch lock will be deactivated by pressing the front buttons ① and ▼ again for about 10 seconds.
SCREEN ADJUSTMENTS
Adjust the image by following the procedure below to get the desired picture when selecting Analog input.
■ The screen adjustments described in this manual are designed to set image position and minimize flicker or blur for the particular computer in use.
■ The monitor is designed to provide the best performance at resolution of 1280 × 1024 , but can not provide the best at resolutions of less than 1280 × 1024 because the picture is automatically stretched to fit the full screen. It is recommended to operate at resolution of 1280 × 1024 in normal use.
■ Displayed text or lines will be blurred or irregular in thickness when the picture is stretched due to the screen enlargement process.
■ It is preferable to adjust the image position and frequency with the monitor controls, rather than the computer software or utilities.
■ Perform adjustments after a warm-up period of at least thirty minutes.
■ Additional adjustments may be required after the Auto Adjust depending on the resolution or signal timing.
■ The Auto Adjust may not work correctly when displaying the picture other than the screen adjustment pattern. In this case, manual adjustments are required.
There are two ways to adjust the screen. One way is automatic adjustment for Position, Pixel Clock and Phase. The other way is performing each adjustment manually.
Perform the Auto Adjust first when the monitor is connected to a new computer, or resolution is changed. If the screen has a flicker or blur, or the picture does not fit in the display area after performing the Auto Adjust, manual adjustments are required. Both adjustments should be made by using the screen adjustment pattern (Test.bmp) obtained via the IIYAMA web site (http://www.iiyama.com).
Adjust the image by following the procedure below to get the desired picture. This manual explains adjustment under Windows® OS.
① Display the picture at the optimum resolution.
② Enter the Test.bmp (screen adjustment pattern) to wallpaper.
NOTE
■ Consult the appropriate documentation for doing this.
■ Test.bmp is made at resolution of 1280 × 1024 . Set the display position to center in the wallpaper setting dialogue box.
[Adjustment pattern]
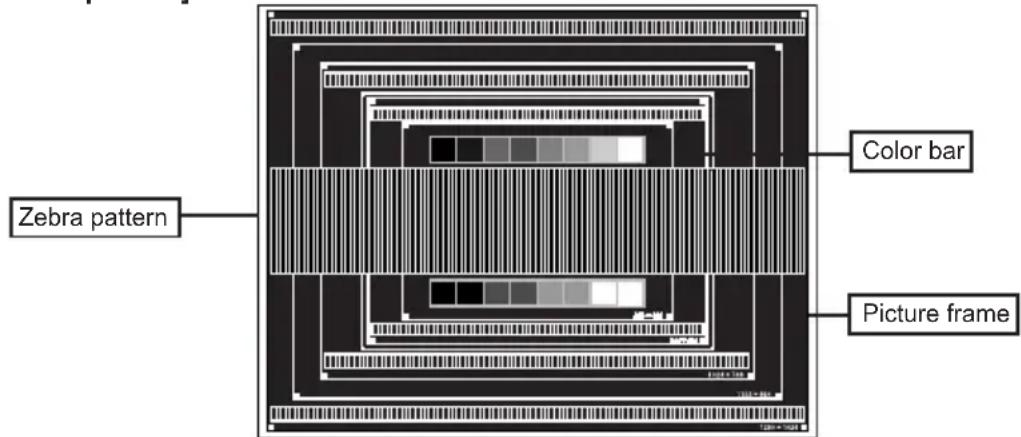
③ Press the AUTO Button. (Auto Adjust)
④ Adjust the image manually by following procedure below when the screen has a flicker or blur, or the picture does not fit in the display area after performing the Auto Adjust.
⑤ Adjust the V.Position so that the top and bottom of the picture frame will fit to the display area.
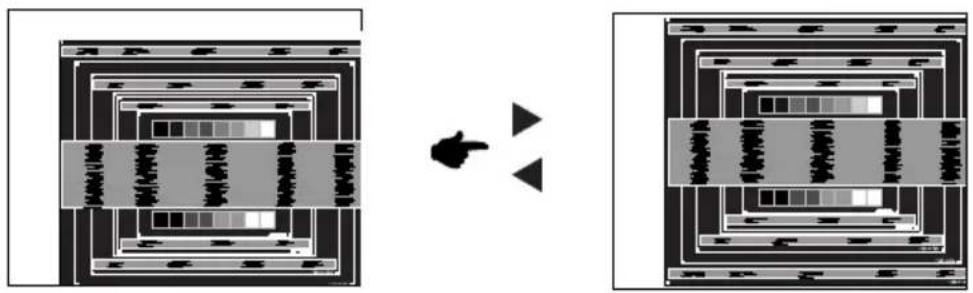
flowchart
graph TD
    A["Multi-layered Grid Structure"] --> B["Transformation Arrow"]
    B --> C["Structured Layer Structure"]
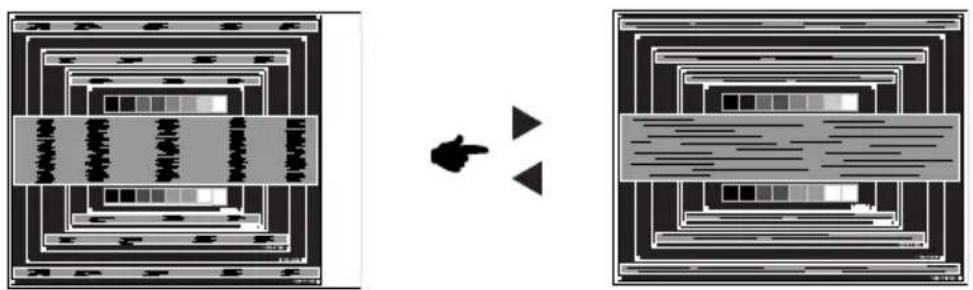
⑥ 1) Adjust the H.Position so that the left side of the picture frame will move to the left edge of the display area.
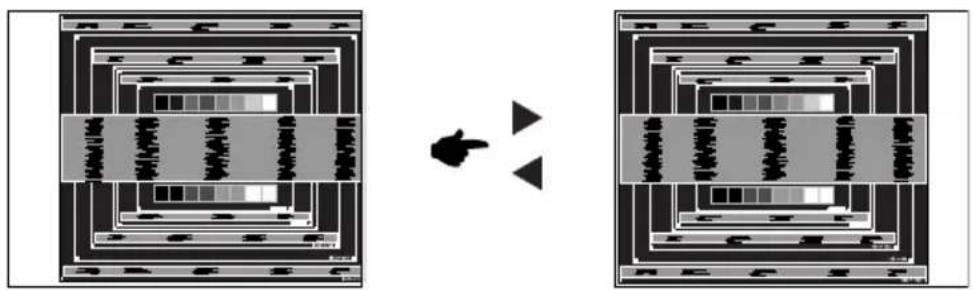
flowchart
graph TD
    A["Layered Structure"] --> B["Transformation"]
    B --> C["Final Layout"]
    style A fill:#f9f,stroke:#333
    style C fill:#bbf,stroke:#333
2) Stretch the right side of the picture frame to the right edge of the display area by adjusting the Pixel Clock.
flowchart
graph TD
    A["Layered Structure"] --> B["Arrow Left"]
    B --> C["Arrow Right"]
    C --> D["Layout"]
    style A fill:#f9f,stroke:#333
    style D fill:#bbf,stroke:#333
NOTE
■ When the left side of the picture frame moves apart from the left edge of the display area during the Pixel Clock adjustment, adjust steps 1) and 2).
■ Another way to make the Pixel Clock adjustment is to correct the vertical wavy lines in the zebra pattern.
■ The picture may flicker during the Pixel Clock, H.Position and V.Position adjustment.
In case the picture frame is bigger or smaller than the data display area after the Pixel Clock adjustment, repeat steps from ③.
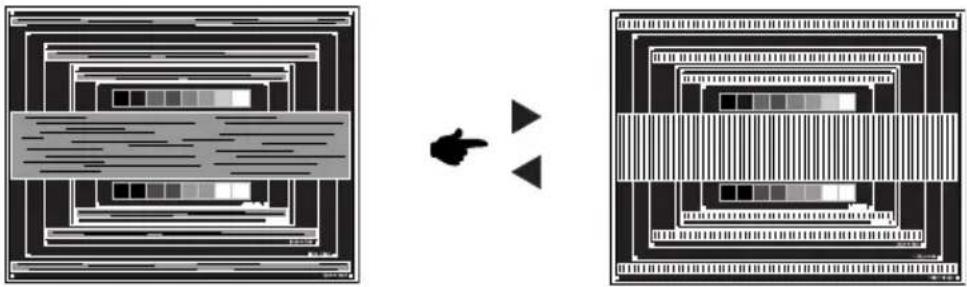
⑦ Adjust the Phase to correct horizontal wavy noise, flicker or blur in the zebra pattern.
natural_image
Two abstract geometric diagrams showing layered structures with arrows pointing to a central figure (no text or symbols)NOTE
In case the strong flicker or blurs remain on a part of the screen, repeat steps ⑥ and ⑦ because the Pixel Clock may not be adjusted correctly.
■ Adjust the H.Position after the Phase adjustment if the horizontal position moves during the adjustment.
⑧ Adjust the Brightness and Color to get the desired picture after you complete the Pixel Clock and Phase adjustments.
Put back your favorite wallpaper.
POWER MANAGEMENT FEATURE
The power management feature of this product complies with power saving requirement of ENERGY STAR ^® and VESA DPMS. When activated, it automatically reduces unnecessary power consumption of the monitor when your computer is not in use.
To use the feature, the monitor needs to be connected to a VESA DPMS compliant computer. There is a power management step the monitor takes as described below. The power management function, including any timer settings is configured by the operating system. Check your operating system manual for information on how this can be configured.
■ Power Management Mode
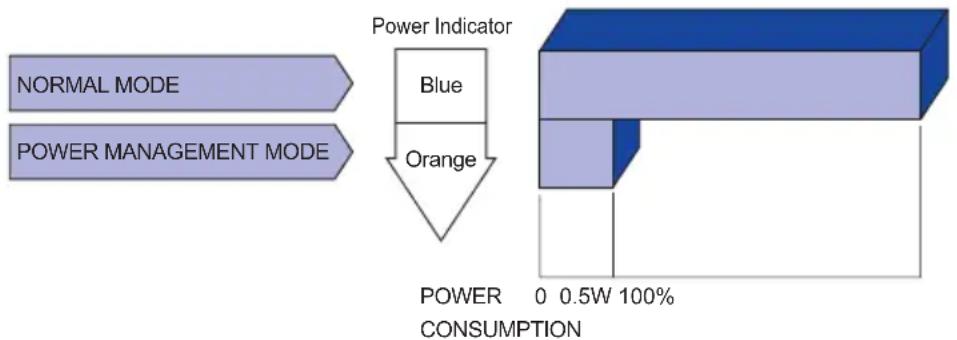
When the H-sync signal / V-sync signal / H and V sync signals from the computer are off, the monitor enters into Power Management Mode which reduces the power consumption to less than 0.5W. The screen becomes dark, and the power indicator turns to orange. From Power Management Mode, the image reappears in several seconds when either the keyboard or the mouse are touched again.
flowchart
graph TD
    A["NORMAL MODE"] --> C["Power Indicator"]
    B["POWER MANAGEMENT MODE"] --> C
    C --> D["Blue"]
    C --> E["Orange"]
    D --> F["POWER CONSUMPTION"]
    E --> F
    F --> G["0 0.5W 100%"]
NOTE
■ Even when using the power management mode, the monitor consumes electricity. Turn off the Power Switch whenever the monitor is not in use, during the night and weekends, to avoid unnecessary power consumption.
It is possible that the video signal from the computer may be on while the H or V sync signal is missing. In this instance, the POWER MANAGEMENT feature may not work properly.
TROUBLE SHOOTING
If the monitor fails to operate correctly, please follow the steps below for a possible solution.
- Perform the adjustments described in OPERATING THE MONITOR, depending on the problem you have. If the monitor does not get a picture, skip to 2.
- Consult the following items if you cannot find an appropriate adjustment item in OPERATING THE MONITOR or if the problem persists.
- If you are experiencing a problem which is not described below or you cannot correct the problem, discontinue using the monitor and contact your dealer or iiyama service center for further assistance.
Problem Check
① The picture does not appear.
(Power indicator does not light up.)
☐ The Power Cable is firmly seated in the socket.
☐ The Power Switch is turned ON.
☐ The AC socket is live. Please check with another piece of equipment.
(Power indicator is blue.)
☐ If the blank screen saver is in active mode, touch the keyboard or the mouse.
☐ Increase the Contrast and/or Brightness.
□ The computer is ON.
☐ The Signal Cable is properly connected.
☐ The signal timing of the computer is within the specification of the monitor.
(Power indicator is orange.)
☐ If the monitor is in power management mode, touch the keyboard or the mouse.
□ The computer is ON.
☐ The Signal Cable is properly connected.
☐ The signal timing of the computer is within the specification of the monitor.
② The screen is not synchronized.
☐ The Signal Cable is properly connected.
☐ The signal timing of the computer is within the specification of the monitor.
☐ The video output level of the computer is within the specification of the monitor.
☐ The signal timing of the computer is within the specification of the monitor.
☐ The signal timing of the computer is within the specification of the monitor.
③ The screen position is not in the center.
④ The screen is too bright or too dark.
☐ The video output level of the computer is within the specification of the monitor.
Problem Check
⑤ The screen is shaking.
- The power voltage is within the specification of the monitor.
- The signal timing of the computer is within the specification of the monitor.
⑥ No sound.
- The audio equipment (computer etc.) is ON.
- The Audio Cable is properly connected.
- The Volume is turned up.
- The Mute is OFF.
- The audio output level of the audio equipment is within the specification of the monitor.
⑦ The sound is too loud or too quiet.
☐The audio output level of the audio equipment is within the specification of the monitor.
⑧ A strange noise is □The Audio Cable is properly connected. heard.
RECYCLING INFORMATION
For better environment protection please don't dispose your monitor. Please visit our web site: www.iiyama.com/recycle for monitor recycling.
APPENDIX
Design and specifications are subject to change without prior notice.
SPECIFICATIONS : ProLite B1780SD
| Size Category 17" | ||
| LCD Panel | Panel Technology | TN |
| Diagonal: 17" (43cm)Size | ||
| Pixel pitch | 0.264mm H × 0.264mm V | |
| Brightness | 250cd/m2 (Typical) | |
| Contrast ratio | 1000 : 1 (Typical), Adv. Contrast Function Available | |
| Viewable angle | Right / Left : 85 degrees each, Up / Down : 80 degrees each (Typical) | |
| Response time | 5ms (Typical) | |
| Display Colours | Approx. 16.7M | |
| Sync Frequency | Analog: Horizontal: 24.0-80.0kHz, Vertical: 55-75HzDigital: Horizontal: 30.0-80.0kHz, Vertical: 55-75Hz | |
| Maximum Resolution | 1280 × 1024, 1.3 MegaPixels | |
| Input Connector | D-Sub mini 15 pin, DVI-D 24 pin | |
| Plug & Play VESA DDC2B | TM | |
| Input Sync Signal Separate sync: TTL, Positive or Negative | ||
| Input Video Signal | Analog: 0.7Vp-p (Standard), 75Ω, PositiveDigital: DVI (Digital Visual Interface Standard Rev.1.0) compliance | |
| Input Audio Connector ø 3.5mm mini jack (Stereo) | ||
| Input Audio Signal 1.0Vrms maximum | ||
| Speakers 1W × 2 (Stereo speakers) | ||
| Maximum Screen Size | 337.9mm W × 270.3mm H / 13.3" W × 10.6" H | |
| Power Source | 100-240VAC, 50/60Hz, 0.5A | |
| 14W typical, Power management mode: 0.5W maximumPower Cons | ||
| Dimensions / Net Weight | 370.0 × 399.5 - 529.5 × 230.0mm / 14.6 × 15.7 - 20.8 × 9.1" (W×H×D)4.4kg / 9.7lbs | |
| Tilt Angle | Upward: 22 degrees Downward: 2 degrees, Left/Right: 45 degrees each | |
| Environmental Considerations | Operating: Temperature 5 to 35°C / 41 to 95°FHumidity 10 to 80% (No condensation)Storage: Temperature -20 to 60°C / -4 to 140°FHumidity 5 to 85% (No condensation) | |
| Approvals | TCO Certifi ed, CE, TÜV-Bauart, VCCI-B, GOST-R, ENERGY STAR | |
NOTE
* Audio equipment is not connected.
nption*
| Size Category 17" | ||
| LCD Panel | Panel Technology | TN |
| Diagonal: 17" (43cm)Size | ||
| Pixel pitch | 0.264mm H × 0.264mm V | |
| Brightness | 250cd/m2(Typical) | |
| Contrast ratio | 1000 : 1 (Typical), Adv. Contrast Function Available | |
| Viewable angle | Right / Left : 85 degrees each, Up / Down : 80 degrees each (Typical) | |
| Response time | 5ms (Typical) | |
| Display Colours | Approx. 16.7M | |
| Sync Frequency | Analog: Horizontal: 24.0-80.0kHz, Vertical: 55-75HzDigital: Horizontal: 30.0-80.0kHz, Vertical: 55-75Hz | |
| Maximum Resolution | 1280 × 1024, 1.3 MegaPixels | |
| Input Connector | D-Sub mini 15 pin, DVI-D 24 pin | |
| Plug & Play VESA DDC2B | TM | |
| Input Sync Signal Separate sync: TTL, Positive or Negative | ||
| Input Video Signal | Analog: 0.7Vp-p (Standard), 75Ω, PositiveDigital: DVI (Digital Visual Interface Standard Rev.1.0) compliance | |
| Input Audio Connector ø 3.5mm mini jack (Stereo) | ||
| Input Audio Signal 1.0Vrms maximum | ||
| Speakers 1W × 2 (Stereo speakers) | ||
| Maximum Screen Size | 337.9mm W × 270.3mm H / 13.3" W × 10.6" H | |
| Power Source | 100-240VAC, 50/60Hz, 0.5A | |
| 14W typical, Power management mode: 0.5W maximumPower Cons | ||
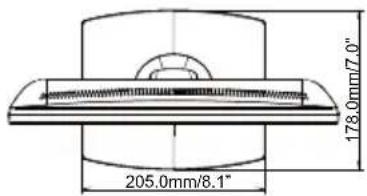
| Dimensions / Net Weight | 370.0 × 379.5 × 178.0mm / 14.6 × 14.9 × 7.0" (W×H×D)2.6kg / 5.7lbs | |
| Tilt Angle | Upward: 20 degrees | |
| Environmental Considerations | Operating: Temperature 5 to 35°C / 41 to 95°FHumidity 10 to 80% (No condensation)Storage: Temperature -20 to 60°C / -4 to 140°FHumidity 5 to 85% (No condensation) | |
| Approvals | TCO Certifi ed, CE, TÜV-Bauart, VCCI-B, GOST-R, ENERGY STAR® | |
NOTE
* Audio equipment is not connected.
DIMENSIONS : ProLite B1780SD
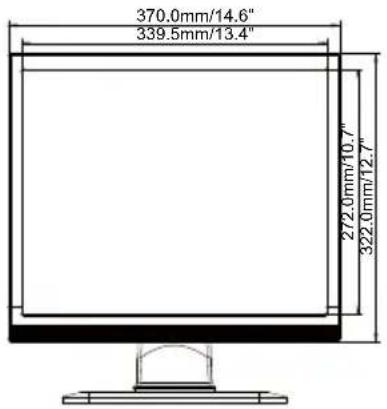
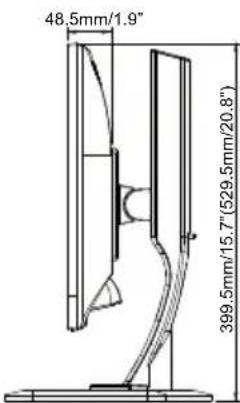
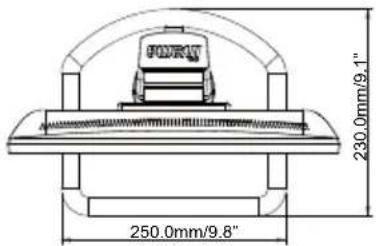
( ) : Maximum adjustment range
DIMENSIONS : ProLite E1780SD
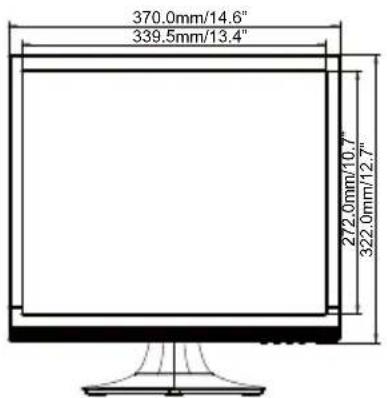
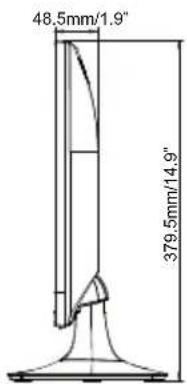
COMPLIANT TIMING
| Video Mode | Horizontal Frequency | Vertical Frequency | Dot Clock | |
| VESA | VGA 640 × 480 | 31.469kHz | 59.940Hz | 25.175MHz |
| 37.500kHz | 75.000Hz | 31.500MHz | ||
| 37.861kHz | 72.809Hz | 31.500MHz | ||
| SVGA 800 × 600 | 35.156kHz | 56.250Hz | 36.000MHz | |
| 37.879kHz | 60.317Hz | 40.000MHz | ||
| 46.875kHz | 75.000Hz | 49.500MHz | ||
| XGA 1024 × 768 | 48.363kHz | 60.004Hz | 65.000MHz | |
| 56.476kHz | 70.069Hz | 75.000MHz | ||
| 60.023kHz | 75.029Hz | 78.750MHz | ||
| SXGA 1280 × 1024 | 63.981kHz | 60.020Hz | 108.000MHz | |
| 79.976kHz | 75.025Hz | 135.000MHz | ||
| PC9801 | 640 × 400 | 24.827kHz | 56.424Hz | 21.053MHz |
NOTE * Digital input is not compliant.
- Dear user, we congratulate you on the purchase of your iiyama LCD.
- To report a fault, please contact your local support centre found at www.iiyama.com/service
- Things to check before you call the iiyama information line
- Before reporting the screen defect, please prepare the following information/evidence:
- Important Note:
- Congratulations!
- Corporate Social Responsibility
- Energy Efficiency
- Environmental Management System
- Minimization of Hazardous Substances
- Design for Recycling
- Product Lifetime, Product Take Back
- Packaging
- Ergonomic, User-centered design
- Electrical Safety, minimal electro-magnetic Emissions
- Third Party Testing
- CE MARKING DECLARATION OF CONFORMITY
- TABLE OF CONTENTS
- FOR YOUR SAFETY
- SAFETY PRECAUTIONS
- WARNING
- STOP OPERATING THE MONITOR WHEN YOU SENSE TROUBLE
- NEVER REMOVE THE CABINET
- DO NOT PUT ANY OBJECT INTO THE MONITOR
- INSTALL THE MONITOR ON A FLAT, STABLE SURFACE
- DO NOT USE THE MONITOR NEAR WATER
- OPERATE UNDER THE SPECIFIED POWER SUPPLY
- PROTECT THE CABLES
- ADVERSE WEATHER CONDITIONS
- CAUTION
- INSTALLATION LOCATION
- DO NOT PLACE THE MONITOR IN A HAZARDOUS POSITION
- MAINTAIN GOOD VENTILATION
- DISCONNECT THE CABLES WHEN YOU MOVE THE MONITOR
- UNPLUG THE MONITOR
- HOLD THE PLUG WHEN DISCONNECTING
- DO NOT TOUCH THE PLUG WITH WET HANDS
- WHEN YOU INSTALL THE MONITOR ON YOUR COMPUTER
- DO NOT USE THE MONITOR FOR 24-HOURS CONTINUOUSLY
- OTHERS
- ERGONOMIC RECOMMENDATIONS
- SPECIAL NOTES ON LCD MONITORS
- NOTE
- CUSTOMER SERVICE
- CLEANING
- CABINET
- LCD
- SCREEN
- CHECKING THE CONTENTS OF THE PACKAGE
- WALL MOUNTING
- FITTING AND REMOVAL OF BASE : ProLite B1780SD
- FITTING AND REMOVAL OF BASE : ProLite E1780SD
- CONTROLS AND CONNECTORS : ProLite B1780SD
- CONTROLS AND CONNECTORS : ProLite E1780SD
- CONNECTING YOUR MONITOR : ProLite B1780SD
- [Collect Cables]
- CONNECTING YOUR MONITOR : ProLite E1780SD
- COMPUTER SETTING
- ■ Signal Timing
- ADJUSTING THE VIEWING ANGLE : ProLite E1780SD
- ADJUSTING THE HEIGHT AND THE VIEWING ANGLE : ProLite B1780SD
- PANEL ROTATION : ProLite B1780SD
- ADJUSTMENT MENU CONTENTS
- Direct
- - Lock Mode
- SCREEN ADJUSTMENTS
- POWER MANAGEMENT FEATURE
- ■ Power Management Mode
- TROUBLE SHOOTING
- Problem Check
- RECYCLING INFORMATION
- APPENDIX
- SPECIFICATIONS : ProLite B1780SD
- DIMENSIONS : ProLite B1780SD
- DIMENSIONS : ProLite E1780SD
- COMPLIANT TIMING
Brand : IIYAMA
Model : ProLite B1780SD
Category : Screen