VC-S - DJ Equipment PRO-JECT - Free user manual and instructions
Find the device manual for free VC-S PRO-JECT in PDF.


| Product Type | Vinyl Record Cleaning Machine |
| Brand | Pro-Ject |
| Model | VC-S |
| Category | DJ Equipment / Turntable Accessories |
| Dimensions (W x D x H) | Approx. 430 x 200 x 300 mm |
| Weight | Approx. 5.5 kg |
| Power Supply | 100-240 V AC, 50/60 Hz |
| Power Consumption | 60 W |
| Cleaning Method | Vacuum-assisted wet cleaning with rotating brush |
| Record Size Compatibility | 7", 10", 12" vinyl records |
| Fluid Application | Manual application of cleaning fluid |
| Vacuum Function | Automatic vacuum suction to remove dirt and fluid |
| Drying Time | Approx. 15-30 seconds per side |
| Noise Level | Low (vacuum motor) |
| Materials | Aluminum, ABS plastic, rubber feet |
| Accessories Included | Cleaning fluid (100 ml), brush, record clamp, power adapter |
| Safety Features | Overheating protection, non-slip base, automatic shut-off when lid is opened |
| Maintenance | Clean brush and replace fluid as needed; vacuum filter cleaning recommended every 20-30 uses |
| Spare Parts Availability | Replacement brushes, filters, and fluid available from Pro-Ject or authorized dealers |
| Repairability | Modular design; user-replaceable parts (brush, filter); professional service for motor/electronics |
| Certifications | CE, RoHS, WEEE compliant |
| Color | Black (standard) |
| Warranty | 2 years (depending on region) |
| Ideal Use | Home audiophile, DJ, record collectors |
Frequently Asked Questions - VC-S PRO-JECT
User questions about VC-S PRO-JECT
0 question about this device. Answer the ones you know or ask your own.
Ask a new question about this device
Download the instructions for your DJ Equipment in PDF format for free! Find your manual VC-S - PRO-JECT and take your electronic device back in hand. On this page are published all the documents necessary for the use of your device. VC-S by PRO-JECT.
USER MANUAL VC-S PRO-JECT
Controls, features and connections
1 Vacuum arm* (adhesive velvet strips attached)
2 Clamp ^* (base plate)
3 Fixing screw for base part of clamp*
4 Ventilation outlet and drain hole
5 Main switch with mains power cord socket
6 Vacuum on/off switch
7 Motor on/off direction switch
8 Vinyl record (not included)
9 Screwable clamp - top plate* with self-adhesive record label seal* (earlier versions: top plate of clamp + screwable ball knob, groove with rubber for sealing record label)
10 Hexagon screw for motor flange height adjustment (see page 6)
11 Spindle with motor flange
12 Vacuum arm flange (black plastic)
13 Self-adhesive record label seal*
Accessories (included, but not shown above)
1 Wash it vinyl cleaning concentrate (100ml bottle, mixing ratio 1:10 - 1:20)*
2 Goat hair brush*
3 Replacement adhesive strips for vacuum arm*
4 Drain insert (spout)*
5 AC power cord*
Optional accessories (available on request)
Wash it cleaning concentrate, mixing ratio 1:10 - 1:20 bottle sizes: 100ml/250ml/500ml/1l (100ml ≦ 135 records / both sides, this average quantity depends on dilution ratio and the amount of ready-to-use cleaning fluid used per application)
Goat hair brush
➢ Adhesive strips for vacuum arm
➢ Cover it VC-S (dust cover with hinges and mounting screws)
Dear music lover,
Thank you for purchasing a Pro-Ject Audio Systems record cleaning machine.
In order to achieve maximum performance and reliability, please study these instructions carefully.
This product is only for non-commercial use.

Warning of a hazard for the user, the unit or possible misuse

Important notice

This product is only for non-commercial use.
During assembly and adjustment small parts can be easily lost if they are not carefully placed in a suitable receptacle. Before beginning assembly, please familiarize yourself with the parts listed above which are correspondingly numbered in the technical diagram. Separately packed items are marked with an asterisk*.
Safety instructions
This appliance is not to be used by persons (including children) with reduced physical, sensory or mental capabilities, or lack of experience and knowledge, unless they have been given supervision or instruction.
AC outlet voltages vary from country to country. Before connecting to your wall outlet, make sure that the voltage in your area meets the voltage requirements printed on the device.
Hold the end of the plug when unplugging the power cord. Never handle the power cord while your hands are wet or damp.
Never place any open flame sources, like burning candles, on or near the device. Do not operate in damp or wet locations, such as near to a bathtub, sink, swimming pool or any other similar locations.
Keep plastic bags away from children to prevent any risk of suffocation.
Do not cover any ventilation holes (one is located on the left side and others are on bottom).
During operation this unit will generate loud noises, so we recommend the use of hearing protectors during longer cleaning sessions. Check the unit after transportation for signs of damage, if a damage is found, do not operate the unit and contact your dealer!
The unit is capable of long time running however in such case platter spindle may get hot and whole platter/clamp area as well as air coming out from the unit may get warm. The temperature of the platter can't damage vinyl records. In order to keep the temperature as low as possible do not expose the unit to direct sunlight.
The VC-S motor should not be turned on when not cleaning your records. Extended running time outside of the guideline process can cause over-heating.

Setting up the unit
The unit is supplied assembled with the exception of the platter and vacuum arm which are packed separately. Remove all parts from the transport packaging carefully. Please see the diagram above for assembly instructions. Base part of the clamp (2) should be attached by using the screw (3), a Phillips head screwdriver is required but not included. Then apply the self-adhesive label seal (13) on top.
Using the unit
Please ensure that all assembly and set up steps have been followed as outlined in this manual. All 3 rocker switches ("main switch", "motor" and "vacuum" should be in position "0"). Connect the power cord to the socket on the rear side of VC-S and turn the main switch to the "1" position.
Place a record on the bottom plate. Using moderate force, thread the top clamp plate on the threaded tip of the centre spindle. Do not over-tighten. If the top plate and screw clamp are too loose, the record will not turn even if the motor is running.
While the record is turning apply a generous amount of ready-to-use cleaning fluid (6 - 8ml) to the record while holding the brush horizontally and gently pressing against the record, spread the fluid across the surface of the record. Use only the necessary amount of fluid (6 - 8ml), enough to cover the record, not the machine!
Do not apply Wash it in less than a 1:10 mix of fluid and water directly to the record! Do not use cleaning fluids from other suppliers. Too aggressive fluids may damage the MDF surface of the unit.
Use only so little fluid that it is not regularly getting on the MDF surface of the machine. If this happens immediately remove the excess fluid with a tissue. The surface of the unit can be softened up and damaged by excessive fluid.
Cleaning efficiency can be significantly improved by applying appropriate force on the cleaning brush. Even more cleaning improvement can be achieved by using warmed-up Wash It cleaning fluid. Wash It can be warmed in a microwave oven up to 40 degrees Celsius, please check temperature to avoid record damage. Dilution ratio of warmed-up Wash it should be 1:20. Wash It is non-flammable and non-toxic. Please note that you are doing all this at your own risk.
The motor can turn both directions or can be stopped during the application of the fluid, depending on your personal preference. To change direction, choose the "II" position for clockwise rotation or to the "II" position for counter-clockwise rotation.
It is recommended that you use the brush to clean the record in both directions before vacuuming. For better dissolving of impurities, wait a few seconds (longer in the case of heavily soiled records) before starting the vacuuming process.
Once the record has been thoroughly cleaned in both directions, place the vacuum arm above the record pointing at the spindle until it reaches its lock position. Turn the Vacuum motor to the "I" position. After the cleaning fluid has been thoroughly vacuumed, switch off the vacuum, followed by the motor. Return the vacuum arm into its rest position and wait a few seconds for the record to dry thoroughly. Unscrew the top clamp plate, turn the record over and repeat steps for the opposite side of the record.
The VC-S is equipped with automatic overheating protection, which switches the motor off in case of excessive usage. After a cool-down period, the VC-S will return to its fully operational status.
Preparation of Wash it concentrate to get ready-to-use cleaning fluid
The cleaning concentrate is usable for vinyl and shellac records and should be diluted before application:
Mix 1 part of Wash it concentrate with 10-20 parts of distilled / demineralized water! 1:10 is better for old and dirty records. For common cleaning or cleaning with warmed-up cleaning fluid a dilution ratio of 1:20 is sufficient.
Caution! Earlier Wash it fluid (or concentrate) containing alcohol is only suitable for 12" and 7" vinyl records. Most 78rpm records are made of shellac which is sensitive to some cleaning agents. Please only use Wash it without alcohol when cleaning 78rpm shellac records!
Maintenance and cleaning
Your record cleaning machine requires little to no regular maintenance.
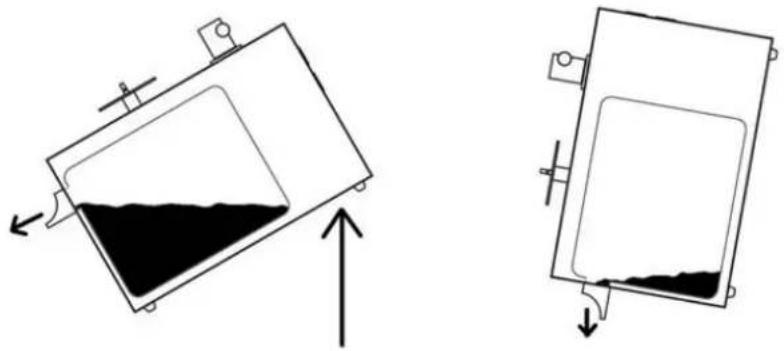
A water level gauge is located on the left side of the unit, below the air outlet hole. The internal tank has a substantial capacity and subsequently takes a long time to reach full capacity. Once the water level reaches the point marked "←MAX", the tank should be emptied:
- Remove the plastic grill from the ventilation outlet and draining hole (4)
- Place the drain insert spout into the hole (drain insert is included in the accessory box)
- Lift the opposite side of the VC-S up to drain the unit reservoir
natural_image
Two technical diagrams showing a container with liquid inside, with arrows indicating flow direction (no text or symbols)Regularly check the velvet strips on the arm. Make sure they are clean, no dirt or debris is present.

Prior to maintenance, always disconnect the record cleaning machine from the power outlet!
Installing the dust cover (Cover it VC-S is an optional accessory)
The holes for lid hinges are pre-drilled on the back side of the unit. Each hinge is attached with 2 screws (supplied with the lid).
Fit the lid carefully over the hinge prongs and adjust the screws until the lid stays open at the angle of your preference without being too stiff to open or close.
Technical specifications Vinyl Cleaner VC-S
Nominal speed
30 r.p.m.
Power consumption
230V/800W, 120V/650W
Dimensions (W x D x H)
435 x 335 x 280 mm (fully assembled)
Weight
10,5kg (netto)
Fuse 230V/120V
T5A/T6A
Potential incorrect use and fault conditions
Pro-Ject products are manufactured to the highest standards and undergo strict quality controls before leaving the factory. Faults that may possibly occur are not necessarily due to material or production faults but can sometimes be caused by incorrect use. Some of these faults are as follows:
The platter doesn't turn although the unit is switched on:
The power cord is not connected to the unit.
The power cord is not plugged in to the AC wall outlet.
Broken fuse in the main switch.
Overheating protection is active.
Top clamp plate is not tightened properly.
How to adjust the height of VC-S' record clamp
The VC-S is pre-adjusted to spec for normal standard 80 – 180 g records. There is enough headroom, so that the arm is optimally pressed against the record and the cleaning fluid can be completely removed. The vacuum arm works best when it is parallel to the record when operating and the adhesive strips is pressed gently on the surface of record. If the vacuum suction arm is not in the correct distance from the record it may not be able to completely vacuum the cleaning fluid. In this case it may be necessary to adjust the height of the clamp. Only adjust the following settings, if the arm is not parallel to the records anymore: Disassemble the clamp (2) by unscrewing the set screw (3) from the motor flange spindle (11)
- Insert the 2.5mm hexagon key into the hole on the side of motor flange (11)
- Loosen the hexagon screw; until the flange can be moved up or down
- When the correct height position is found, fasten the hexagon screw and mount the clamp (2)

You do not need to fully disassemble the flange from the motor!
Service
Should you encounter a problem which the above information does not able to alleviate or identify, please contact your dealer for assistance.
Guarantee repairs will only be affected if the unit is returned correctly packaged. For this reason we recommend keeping the original packaging.
Never return a record cleaning machine without making sure that is it safely disassembled and correctly packaged in the original packaging.
Warranty

The manufacturer accepts no responsibility for damage caused by not adhering to these instructions for use and/or by transportation without the original packaging. Modification or change to any part of the product by unauthorized persons will void the manufacturer's warranty. Faults caused due to using domestic products in commercial environments or on commercial scales are not covered by warranty. Most Pro-Ject products – unless expressly advertised otherwise – are intended for domestic use only. Using them for business applications are done so at your own risk.
Pro-Ject Audio Systems is a Registered Trademark of H. Lichtenegger.
This guide was produced by: Pro-Ject Audio Systems Copyright © 2019. All rights reserved.
The information was correct at the time of printing. The manufacturer reserves the right to make changes to the technical specification without prior notice as deemed necessary to uphold the ongoing process of technical development.
- Controls, features and connections
- Accessories (included, but not shown above)
- Optional accessories (available on request)
- Safety instructions
- Setting up the unit
- Using the unit
- Preparation of Wash it concentrate to get ready-to-use cleaning fluid
- Maintenance and cleaning
- Installing the dust cover (Cover it VC-S is an optional accessory)
- Technical specifications Vinyl Cleaner VC-S
- Potential incorrect use and fault conditions
- The platter doesn't turn although the unit is switched on:
- How to adjust the height of VC-S' record clamp
- Service
- Warranty
Brand : PRO-JECT
Model : VC-S
Category : DJ Equipment