
CW8 - Subwoofer MONITOR AUDIO - Free user manual and instructions
Find the device manual for free CW8 MONITOR AUDIO in PDF.


| Brand | Monitor Audio |
| Model | CW8 |
| Product Type | In-Wall Subwoofer |
| Driver Size | 8 inches (200mm) |
| Power Output (RMS) | 150 Watts |
| Peak Power | 300 Watts |
| Frequency Response | 30 Hz - 120 Hz |
| Impedance | 4 Ohms |
| Sensitivity | 86 dB (2.83V @ 1m) |
| Dimensions (H x W x D) | 15.7 x 11.9 x 3.2 inches (398 x 302 x 82 mm) |
| Cutout Dimensions | 14.2 x 10.4 inches (361 x 265 mm) |
| Mounting Depth | 3.0 inches (77 mm) |
| Weight | 11.5 lbs (5.2 kg) |
| Enclosure Type | Sealed, In-Wall |
| Finish | Brushed Black / White (Painable Grille) |
| Amplification | Built-in Class D Amplifier |
| Phase Control | 0/180 Degrees |
| Low Pass Filter | 40 Hz - 120 Hz (Variable) |
| Auto On/Off | Yes |
| Inputs | RCA (LFE), Speaker Level |
| Protection | Overload, Thermal |
Frequently Asked Questions - CW8 MONITOR AUDIO
User questions about CW8 MONITOR AUDIO
0 question about this device. Answer the ones you know or ask your own.
Ask a new question about this device
Download the instructions for your Subwoofer in PDF format for free! Find your manual CW8 - MONITOR AUDIO and take your electronic device back in hand. On this page are published all the documents necessary for the use of your device. CW8 by MONITOR AUDIO.
USER MANUAL CW8 MONITOR AUDIO
CUSTOM SUBWOOFER SERIES
Owners Manual
Contents
Introduction 1
Unpacking 1
SubConnect 1
Amp Panel 2
Positioning/Initial Set Up 4
Set Up 4
RS232 5
RS232 Wiring Configuration 5
RS232 Communication Set-Up Parameters 5
Command Protocol 5
Command List 5
EQ Profiles 6
Infra Red Remote Codes 6
Update Firmware on Sub 6
Bootloader Mode 6
Automatic Update.____7
Manual Update 7
Factory Reset 8
Guarantee 8
Specifications 9
Trouble Shooting 10
Owner Information 10
Introduction
Thank you for your purchase of the CW8 or CW10, which have been designed and constructed using quality systems and materials to provide years of enjoyment, reliability and pride of ownership.
The subwoofers both use our own, proprietary in-house developed DSP and EQ profiles to provide you with the all encompassing Monitor Audio experience. With technology used in the flagship range, the Platinum II Series, these subwoofers will fill the room with ground shaking bass.
Please read through this manual to familiarise yourself with any safety advice and how to set up your subwoofer to achieve the very best listening experience.
Please retain this manual for future reference.
Unpacking

Care must be taken at all times when handling the subwoofer due to the weight and the construction of the product. We recommend a two-person lift wherever appropriate.
The mains power cord(s) and 12 volt trigger cable are contained separately in the packaging and should be removed prior to unpacking the product.
To remove the subwoofer from its carton place some protective material on the floor and having removed any loose items (mains lead(s) and 12 volt trigger lead) from the top of the packaging, carefully invert the carton. Also refer to the icons printed on the carton. Gradually pull the carton upwards to expose the subwoofer, which will be presented with its base uppermost. Remove fixing tape from bag and expose the base/cabinet.
SubConnect
The Monitor Audio SubConnect application is a Windows only application that enables the end user to fully customise and control the advanced features of the subwoofer. The application is downloadable from the Monitor Audio website (www.monitoraudio.co.uk). Here you will find full instructions on how to install and use it.
The application will be required should a firmware update be needed for the CW8 or CW10.
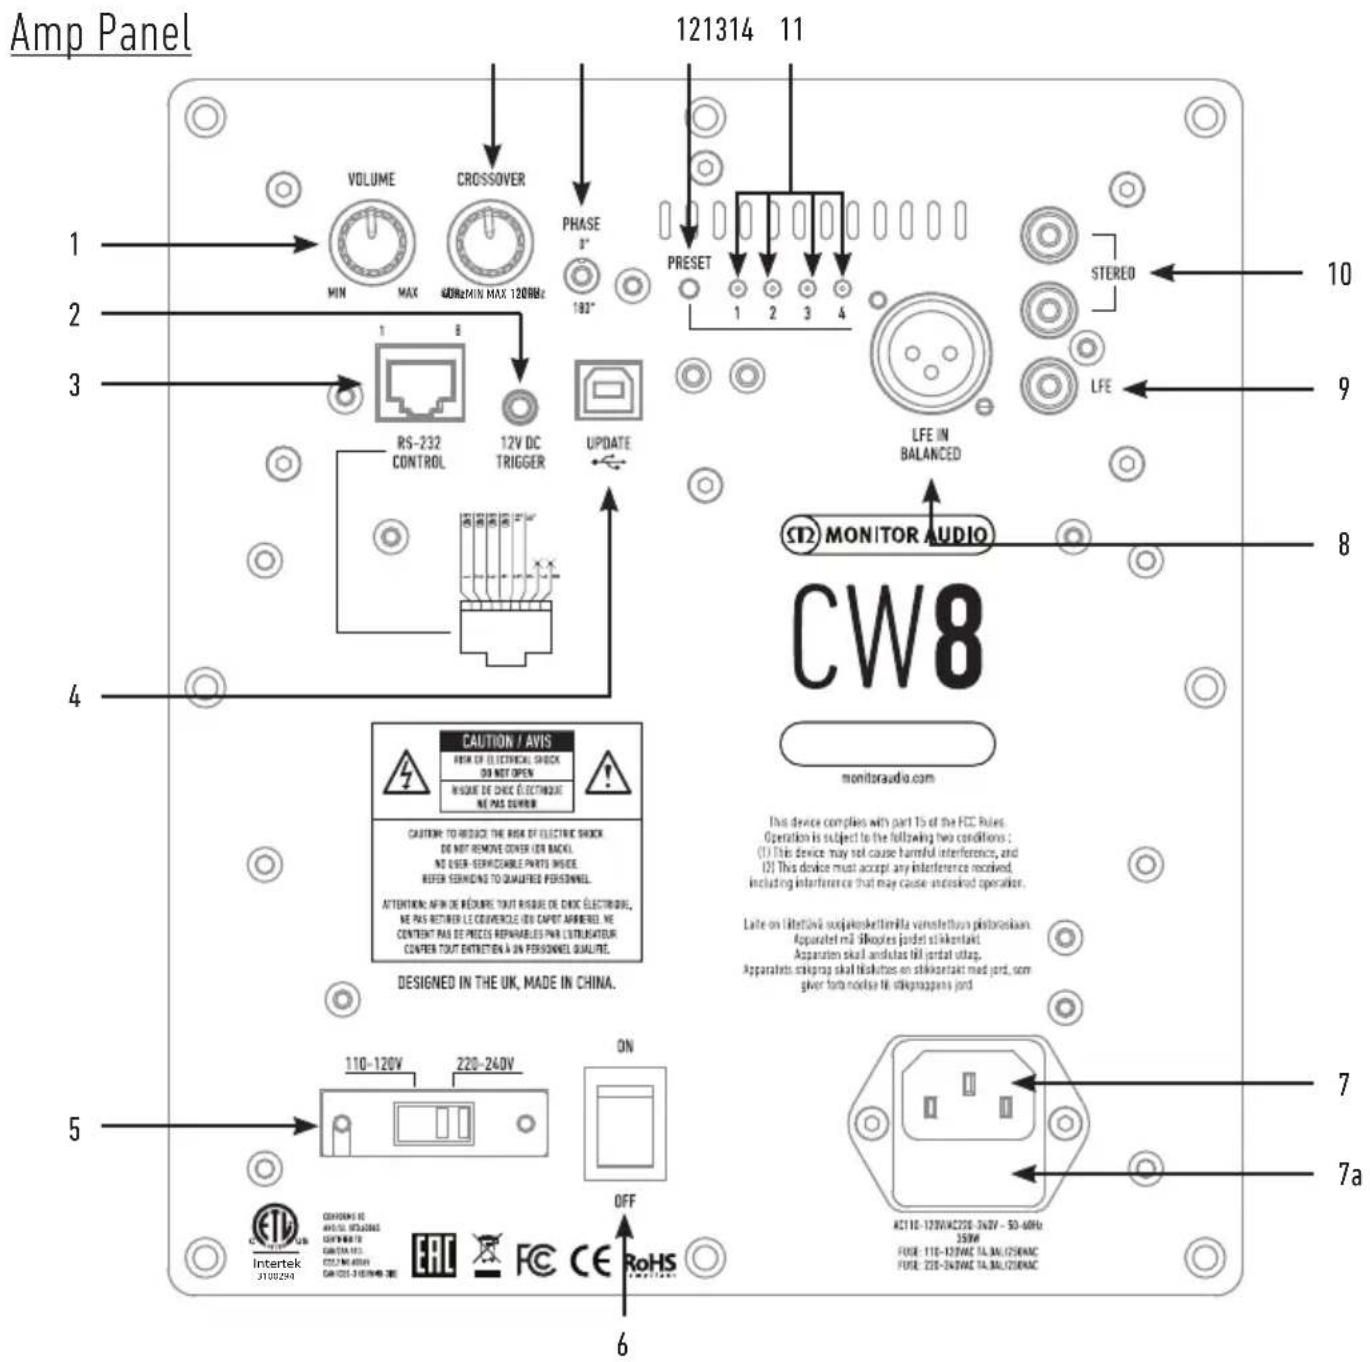
1. Volume Control
This controls the master volume of the subwoofer. Further fine trimming can be achieved via the SubConnect application.
2. 12v Trigger - Centre Pin = +12v
For external power control from AV amplifier/ receiver to the subwoofer (cable supplied), and to toggle between different presets depending on how it is set up in the SubConnect application. The default setting is to control the power.
This 12 volt signal comes from the source amplifier and supplies the subwoofer with a signal to perform a predetermined action. This is either to turn it on or to switch presets. When used to turn the subwoofer on and off, it is a very energy efficient method of power control. The auto off timer and signal sense features will not operate when the 12v trigger is connected.
3. RS232 Control
For use with home automation systems and uses a conventional RJ45 connector, refer to page 5 for the wiring configuration and set up protocol.
4. USB-B Socket
This is provided to update the firmware and settings of the subwoofer in conjunction with the SubConnect application. The application must be downloaded from the Monitor Audio website. A USB cable is not included, please use the appropriate USB A - USB B cable.
5. Mains Voltage Selector
Factory preset to suit the voltage of the country of origin. This should not be adjusted.
6. Mains Power Switch
Mains 'rocker switch' providing overall power off and on/auto. In the on/auto mode, the unit will turn on when an input signal is sensed or RS232 command and will turn off after 20 minutes (default setting) when the signal is removed (source turned off). Alternatively, using the 12v trigger (see above) to control the power by turning the source on or off.
7. IEC Mains Input Socket & Fuse Location
The subwoofer is supplied with a three-pin mains input socket for connection to the mains supply. Use ONLY the appropriate IEC mains lead provided with the product. Also fitted is an external mains fuse. If a fuse blows during operation a spare fuse is provided within the fuse holder for replacement. If you wish to change the fuse, you can do this by removing the IEC mains lead and carefully levering out the original fuse from its holder below the IEC mains input socket (7a, opposite). If the fuse blows again it is advisable to seek help from an authorised service agent. DO NOT attempt to re-fit a further fuse as this could result in serious damage to the amplifier unit.
8. Balanced LFE Input
To be used when connecting to the balanced output on the amplifier. This is the best method of connection when using long runs of cables (over 10m up to 100m). A balanced connection provides a much better, almost noise free method of connection over analogue audio type connectors.
9. RCA LFE Input
This input is to be used when connecting the subwoofer to an AV amplifier/ receiver. When using the LFE input, the crossover function in the menu/ set-up is not used. This is due to the crossover function being controlled by the source to which it is connected. Input between LFE and Stereo input is switched automatically.
10. RCA Stereo Input
For connection to a 2 channel/ stereo amplifier system. Connection should be provided by a pair of high-quality signal cables from the pre-out section of an amplifier. Note:- cable lengths should not exceed 10 metres to avoid interference from other electrical appliances.
11. Preset LED's
These indicate the selected preset.
- Music: Maximum low frequency extension to pick out the fundamental frequencies of every musical instrument.
- Movie: The same flat response with good sensitivity, but a little more extension to create a balance between the explosive and atmospheric moments of a good film.
- Flat: This is the sweet spot between a flat extended response and minimal use of DSP enhancement. A good starting point to create your own custom EQ profiles from.
- Impact: Uses the maximum natural efficiency of the drivers for explosive impact.
12. Preset Select Button
This button scrolls through the 4 preset EQ profiles. Refer to page 6. It also wakes the subwoofer from standby without a signal waking it.
13. Phase Control
This is used to synchronise any delay between the Subwoofer and main speakers. When the subwoofer is in phase with the main speakers the sound should be full bodied. Sit in a normal listening position whilst adjusting the phase settings. When set correctly the location of the subwoofer should be almost undetectable. Experimentation is advisable, however it should be noted that in most cases the phase control should be set to 0 degrees, especially when using a digital AV processor or AV receiver amplifier. The phase can also be adjusted on the Subwoofer itself.
14. Crossover Frequency
Adjust the crossover frequency of the subwoofer between 50 - 150Hz in accordance with the main speakers when using the stereo input (refer to page 4). When using the LFE input the low pass filter is not active as this is set by the AVR.
There is also a LED and infra red receiver on the front of the cabinet. The LED will indicate when it is operational. It will be red when in standby and green when operational. The infra red receiver is there for use with a programmable remote control.
Positioning/Initial Set Up

Leave the subwoofer unplugged from the mains until the installation procedure is completed.
The subwoofer should be sited in the most suitable position, preferably not directly in the corner of a room as this may cause excessive bass boom. The optimum position is next to either of the front left or right speakers. Once a desirable position is achieved it is important to check if the cables are long enough to reach comfortably without being under tension. The optimal control settings will depend entirely on system configuration, room environment and personal tastes. However, for initial trials set the controls as follows:
Volume Control Should be set to approximately 12 o'clock.
Crossover Control Should be set to the approximate frequency depending on main speakers when using the L & R Line Level Inputs.
Preset Should be set to number 1 (Flat).
Phase Control Should be set to zero degrees.
EQ Preset Should be set to '3' (flat).
12v Trigger (optional) Do not connect at this stage.
Input Connections from the amplifier can be made at this stage
before the power is connected to the subwoofer. Refer to page 2.

Never connect or disconnect the RCA input/ output leads with the subwoofer switched on.
Set Up
With the input cable(s) connected and controls are set in accordance with the initial set-up procedure above, the subwoofer can be connected to the mains power supply and switched on at the mains power switch.
Do not play any music or movies at this stage as the auto set up of the AV amp (if using one) will need to be run. If your amp has an auto set up procedure, run this now. If you do not have an auto set up or are using a stereo amp connected to the left and right inputs, set the crossover in accordance with your main speakers.
When the auto set up is complete, check that the subwoofer settings on the AV amp are correct. The level should be no more/ less than +/- 3dB and the crossover frequency for the LFE to be around 60-80hz and roughly in accordance with the table below for the other speakers as well. If not we would suggest adjusting accordingly.
| Type of Main Speaker | Crossover Control Setting |
| Floor-standing speaker | 50 - 70 Hz |
| Large stand-mount/ bookshelf speaker | 50 - 80 Hz |
| Small stand-mount/ bookshelf speaker | 60 - 90 Hz |
| Small satellite speaker | 80 - 120 Hz |
Now play a variety of familiar music/film excerpts and adjust the level of the subwoofer until you are happy it integrates with the rest of the system. The volume of the amp can then be adjusted to an average listening level. Once sure everything is working correctly, double check the subwoofer level settings.
NOTE: It might be necessary to adjust the speaker/ subwoofer settings manually if they are not to your tastes or recommendations in the speaker/ subwoofer manuals.
RS232
The subwoofer can be controlled via the RS232 port on the amplifier panel. The subwoofer can be controlled by sending a string of characters to the RS232 connector.
RS232 Wiring Configuration
The RS232 communication socket uses a standard RJ45 connector. This should be wired as illustrated on the amp panel and below.
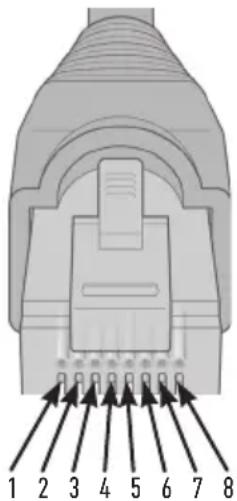
- Ground
- Ground
- Ground
- Ground
- Rx
- Tx
- Not used
- Not Used.
RS232 Communication Set-Up Parameters
Baud Rate: 57600
Data Size: 8
Parity: None
Stop Bits: 1
Handshaking/ Flow Control: None
Command Protocol
Each string of commands sent to the Subwoofer must follow the same structural protocol. These commands are detailed in the Command List opposite. To control the Subwoofer using RS232 commands, specific strings of characters (forming a command string) must be sent via a RS232 terminal. Each command string should be terminated by both:
These are generally found in the RS232 terminal settings. The Subwoofer replies to a valid command with the updated information changed by a SET command, or the information that was requested by a GET command. If the Subwoofer receives an invalid command it will reply with ERROR
Note: any SET command other than SET_0 during Standby is deemed invalid.
Command List
The following SET commands control the operation of the Subwoofer
| Command Description Reply from Subwoofer | ||
| SET_0:1 Go to Power On POWER_ON:1 | ||
| SET_0:0 Go to Standby POWER_ON:0 | ||
| SET_M:1 Mute output MUTE_ON:1 | ||
| SET_M:0 Unmute output MUTE_ON:0 | ||
| SET_S:X | Select the PresetWhere X is in the range1 - 4 | PRESET:XWhere X is in the range1 - 4 |
| SET_T:X | Set the Volume Trim LevelWhere X is in the range-12 - 12 | TRIM_LEVEL:XWhere X is in the range-12 - 12 |
| SET_N:1 Turn Night Mode on NIGHT_MODE:1 | ||
| SET_N:0 Turn Night Mode off NIGHT_MODE:0 | ||
EQ Profiles
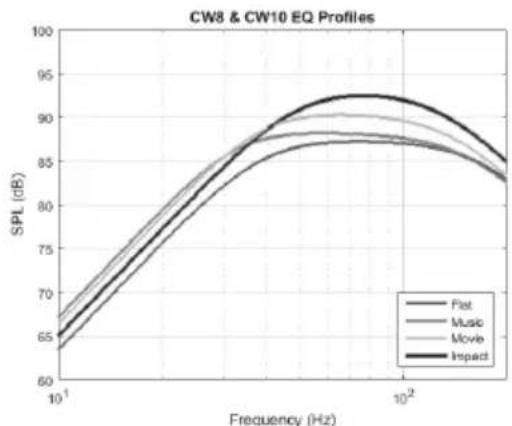
line
| Frequency (Hz) | Flat | Music | Movie | Impact | | -------------- | ----- | ----- | ----- | ------ | | 10 | 65 | 67 | 68 | 66 | | 100 | 92 | 90 | 88 | 93 | | 1000 | 85 | 84 | 83 | 86 |Flat: This is the sweet spot between a flat extended response and minimal use of DSP enhancement. A good starting point to create your own custom EQ profiles from.
Music: Maximum low frequency extension to pick out the fundamental frequencies of every musical instrument.
Movie: The same flat response with good sensitivity, but a little more extension to create a balance between the explosive and atmospheric moments of a good film.
Impact: Uses the maximum natural efficiency of the drivers for explosive impact.
Infra Red Remote Codes
The Subwoofer has discreet remote control commands for use with universal remote controls. The commands follow the standard NEC protocol.
Device Address: 0x7D
| POWER 0x48 |
| ON 0xd1 |
| OFF 0xf1 |
| MUTE 0x78 |
| PRESET_1 0x28 |
| PRESET_2 0x58 |
| PRESET_3 0x88 |
| PRESET_4 0xB8 |
| PRESET_SELECT 0xB8 |
| TOGGLE_NIGHTMODE 0xA8 |
| NIGHTMODE_ON 0xd2 |
| NIGHTMODE_OFF 0xf2 |
Update Firmware on Sub
To update the firmware on the Custom Subwoofer, you will need the SubConnect application. This is downloadable from the Monitor Audio Website. Please follow the installation and setup instructions with the application.
Once the SubConnect app has loaded and established connection with the subwoofer, either by automatic detection or by you manually pressing CONNECT, it will always check for a firmware update. If it finds one, you will see the below image.
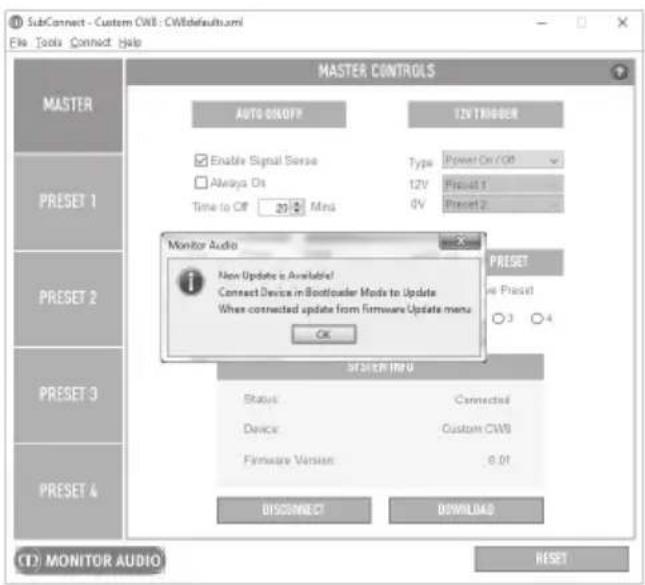
Bootloader Mode
To get the Subwoofer into bootloader mode, you must first turn the subwoofer off by the mains switch. When it has shut down, (LED on the front has gone off) press and hold the PRESET button while simultaneously turning the subwoofer back on.
All 4 preset LED's will be illuminated when it is in Bootloader mode.
Now click on OK on the application. The "Status" will show that it is disconnected. Click on CONNECT and then when reconnected, the pop up showing there is an update available will reappear. Proceed to Automatic Update.
Automatic Update.
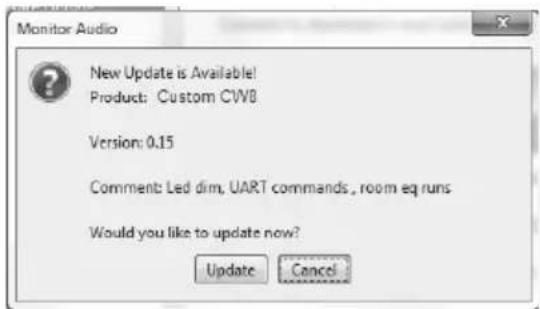
- To carry out the update, click on OK. You will then see another pop up showing the product, version number and a brief summary of the changes.
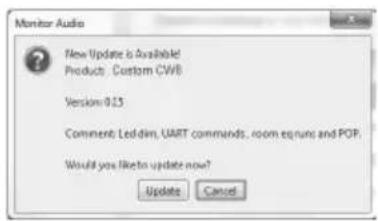
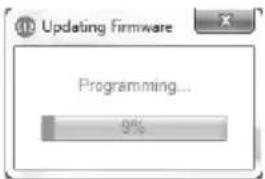
- Click on Update and you will then see a progress bar showing the status of the update.
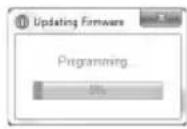
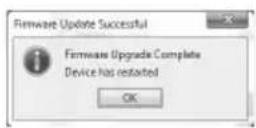
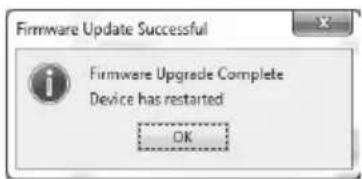
- When it is complete you will get confirmation and the subwoofer will reboot (when you click on OK). If there is a signal going into the subwoofer, it will automatically start up. If there is no signal, the subwoofer will need to be woken up by applying a signal or by pressing the Preset button.
Manual Update
If the automatic update doesn't work, or you wish to manually check for an update, open the app and with the Subwoofer on and connected, click on Tools > Firmware Update.
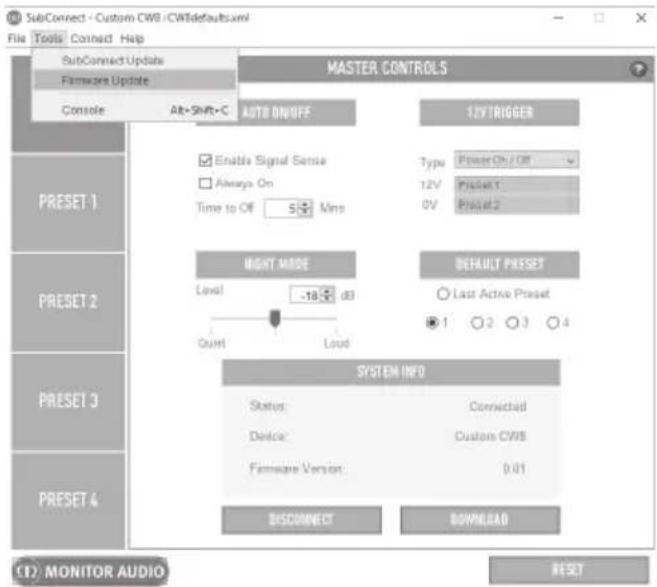
- Click check for update. If the Subwoofer is up to date, you will be informed, likewise, if there is an update available for it you will also be informed.
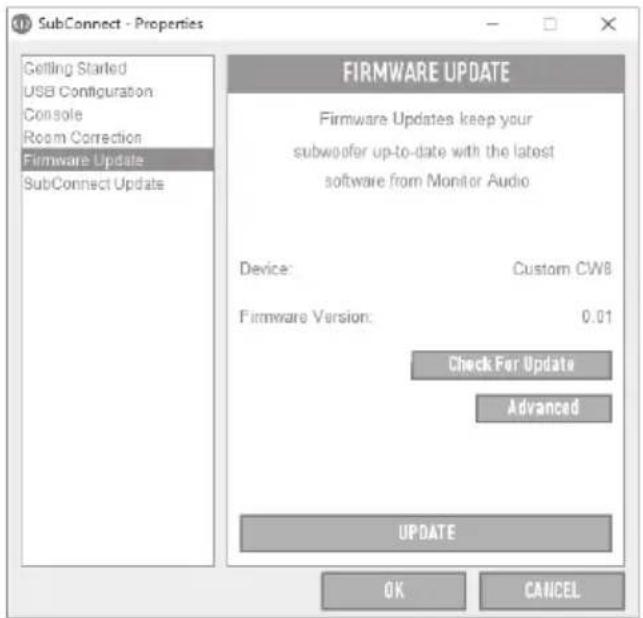
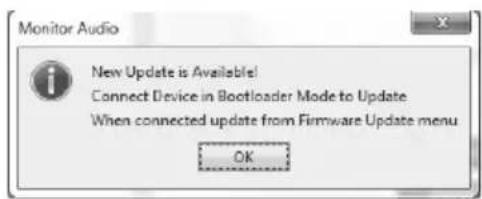
- If it isn't already, you will receive a prompt asking for the Subwoofer to be put into Bootloader mode. For information on how to do this refer to page 6. Follow these steps and when you have re-established connection to the Subwoofer click on Tools > Firmware Update again and you will see a new prompt. Click on Update.
- A progress bar will now be displayed showing the status of the update.
- When it is complete you will receive confirmation and the subwoofer will reboot (when you click on OK). If there is a signal going into the subwoofer, it will automatically start up. If there is no signal, the subwoofer will need to be woken up by pressing the Preset button.
Factory Reset
Sometimes it may be necessary to carry out a factory reset. By carrying out the factory reset, all adjustable parameters on the sub will return to their default values. It is recommended where possible to save your settings within the application before doing the reset.
Where necessary, to perform a factory reset:
- Enter Bootloader mode (refer to page 6)
- When in Bootloader mode (illustrated by all preset LED's being illuminated), press and hold the Preset button again.
- As you are holding the button down, the LEDs will go out one by one. When the last one has gone out, the button can be released.
- After being reset, the subwoofer will go into standby mode.
Guarantee
Both the craftsmanship and the performance of this product is guaranteed against manufacturing defects for a period of five years for speakers from the date of purchase (see conditions in the Important Safety Instructions booklet), provided that the product was supplied by an authorised Monitor Audio retailer under the consumer sale agreement.
To help us find your warranty details within our customer database, should the need arise, please take a few minutes to register your product(s) online at: monitoraudio.com.
Specifications
| CW8 CW10 | ||
| System Format | Active sub-woofer system - twin ABR.18mm MDF cabinet (CARB2 approved) | |
| Low Frequency Limit 35Hz (-6dB) 32Hz (-6dB) | ||
| Amplifier Power Output 350W RMS @ < 1% THD+N 400W RMS @ < 1% THD+N | ||
| Amplifier Classification Class D amplifier with Switch mode power supply (SMPSU) | ||
| Inputs | Stereo RCALFE (RCA)LFE Balanced (XLR) | |
| EQ Profiles Flat/ Music/ Movie/ Impact | ||
| Phase Control 0 & 180 degrees | ||
| Auto Sensing | LFE Input <2mVAuto wireless audio input signal detection | |
| Auto Standby | After approximately 15 minutes if no signal sensedWireless audio source turned off | |
| Driver Compliment | 1 x 8" (200mm) C-CAM* long throw driver.2 x 8" (200mm) ABR | 1 x 10" (250mm) C-CAM* long throw driver.2 x 10" (250mm) ABR |
| Input Impedance > 20K Ohms | ||
| Mains Input Voltage | 110 - 120 Vac / 220 - 240 Vac 50/60Hz(Manual Switch selection) | |
| Dimensions (H x W x D)(Inc fitted feet) | 270 x 260 x 276mm10 5/8 x 10 1/4 x 10 7/8" | 315 x 305 x 320mm12 3/8 x 12 x 12 5/8" |
| 12v Trigger Input 5 - 12v via 3.5mm mono mini-jack socket | ||
| Power Consumption | Standby: < 0.5W (ErP approved)Typical Idle: < 10WMax Rated: 400W | |
| Weight (unpacked) | 9.52Kg21lb | 12.64Kg27lb 12oz |
Monitor Audio reserves the right to alter specifications without notice.
Trouble Shooting
Should you experience any technical, or set-up problems with your subwoofer please check the Trouble Shooting guide below:
My subwoofer will not turn on/ no power.
- Is the LED illuminated on the front of the unit? If not, check your mains lead is properly connected both at the subwoofer and at the mains outlet. Also check the fuse of the amplifier and mains plug (where fitted).
- Is the LED red? If so, you have power going to the unit. It could be that there is no signal, or the 12v trigger is connected and the source not turned on (see below).
• Have you got the 12v trigger connected? If so, the subwoofer will not power up until the source is turned on. - Is the unit receiving a signal (12v trigger not being used)? Is the signal source turned on and playing something? Try adjusting the volume level of the source.
If it still does not turn on/ power up, please contact your local dealer/ distributor or Monitor Audio immediately.
No sound from subwoofer.
- Is the LED on the front red or green? If it is red, then the unit hasn't actually turned on. See previous suggestions. If it is green, then your unit is powered up and turned on. Check further suggestions below.
• Are the input cable(s) connected correctly? Check these. If possible, check by replacing with a second, working set. - Is the volume level just very low? Try turning the volume on the source up a bit more.
- Have you tried switching input's? If changing from LFE to Stereo (or vice versa), you need to power down the subwoofer first. It will stay "locked" onto the input that activates it.
If it still does not output a signal, please contact your local dealer/ distributor or Monitor Audio immediately.
Owner Information
Product Details
Model: CW8 / CW10.
Product Serial No: ....
Amp Serial Number: ....
Date of Purchase: ....
Dealer Details
Dealer Name ....
Address ....
e-mail address ....
Phone Number ....
10 CUSTOM SUBWOOFER

Monitor Audio Ltd.
24 Brook Road
Rayleigh, Essex
SS6 7XJ
England
Tel: +44 (0)1268 740580
Fax: +44 (0)1268 740589
Email: info@monitoraudio.co.uk
Web: www.monitoraudio.com
Designed & Engineered in the United Kingdom Made In China
Version 3. 2016
WARNING
- TO PREVENT FIRE OR SHOCK HAZARD, DO NOT USE THIS PLUG WITH AN EXTENSION CORD, RECEPTACLE OR OTHER OUTLET UNLESS THE BLADES CAN BE FULLY INSERTED TO PREVENT BLADE EXPOSURE
• TO PREVENT FIRE OR SHOCK HAZARD, DO NOT EXPOSE THIS APPLIANCE TO RAIN OR MOISTURE
• TO PREVENT ELECTRIC SHOCK, MATCH WIDE BLADE PLUG TO WIDE SLOT AND FULLY INSERT.

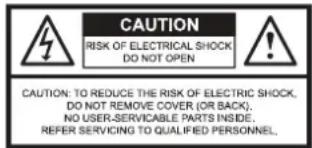
This lightning flash with an arrow head symbol, within an equilateral triangle, is intended to alert the user to the presence of un-insulated “dangerous voltage” within the product’s enclosure that may be of sufficient magnitude to constitute a risk of electric shock to the persons.
Warning: To reduce the risk of electric shock, do not remove cover (or back), no user-serviceable parts inside. Refer servicing to qualified service personnel.


This exclamation point within an equilateral triangle is intended to alert the user to presence of important maintenance (servicing) instructions in the literature accompanying the appliance.
This is a "Class II", "double insulated apparatus". This apparatus must NOT have a safety connection to Earth.
Important Safety Instructions
- Read these instructions.
- Keep these instructions.
- Heed all warnings.
- Follow all instructions.
- Do not use this apparatus with water.
- Clean only with a dry cloth. Great care and attention has gone into the materials chosen to produce the product. A gentle wipe with a dry, clean cloth is all that is required to remove any dust. Treat it as you would a fine piece of furniture because that is how they have been designed.
- Do not block any ventilation openings. Install in accordance with Monitor Audio's instructions.
- Do not install near any heat source, such as radiators, heat registers, stoves, or other apparatus (including amplifiers) that produce heat.
- Do not defeat the purpose of the polarised or grounding type plug. A polarised plug has two blades with one wider than the other. A grounding type plug has two blades and a third grounding prong. The wider blade or the third prong are provided for your safety. If the provided plug does not fit your outlet, consult an electrician for replacement of the obsolete outlet.
- Protect the power cord from being walked on or pinched particularly at plugs, convenience receptacles, and the point where they exit from the apparatus.
- Only use attachments/ accessories specified by Monitor Audio.
-
Use only with the cart, stand, tripod, bracket, or table specified by the manufacturer or sold with the apparatus. When a cart is used, use caution when moving the cart/ apparatus combination to avoid injury from tip-over.
-
Unplug this apparatus during lightening storms, or when unused for long periods of time.
- Refer all servicing to qualified service personnel. Servicing is required when the apparatus has been damaged in any way, such as power supply cord or plug is damaged, liquid has been spilled or objects have fallen onto the apparatus, the apparatus has been exposed to rain or moisture, does not operate normally or has been dropped.
- This apparatus shall not be exposed to dripping or splashing water and that no object filled with liquids such as vases shall be placed on the apparatus.
- The appliance coupler is used as the disconnect device, the disconnect device shall remain readily operable.
- This exclamation point within an equilateral triangle is intended to alert the user to the presence of important maintenance (servicing) instructions in the literature accompanying the appliance.
- No naked flame sources, such as lighted candles, should be placed on the apparatus.
- Monitor Audio would discourage using its products in high humidity, extreme hot or cold or outdoor environments unless the product specifically advises suitability for such environments, for clarification of suitable products within the Monitor Audio range please contact a Monitor Audio representative.


Re-cycling
Correct Disposal of Waste Electrical and Electronic Equipment (WEEE) by User in Private Households in the EU.
This symbol on the product or accessories indicates that they must not be disposed of with your household wastes throughout the EU. To prevent possible harm to the environment or human health from uncontrolled waste disposal, recycle it responsibly to promote the sustainable reuse of material resources. Instead it is your responsibility to dispose of your waste equipment by handing it over to a designated WEEE collection point for recycling. The separate collection and recycling of your waste equipment will help conserve natural resources and ensure that it is recycled in a manner that protects human health and the environment.

For more specific information about where you can take your equipment for recycling please contact your local city/council office, your local waste disposal service or the outlet where you purchased your product.
RoHS Declaration of Conformity
Directive 2011/65/EU of the European Parliament and of the Council on the reduction of the use of certain hazardous substances in electrical and electronic equipment, June 2011.

Background
The RoHS directive restricts the use of Lead (Pb), Cadmium (Cd), Mercury (Hg), hexavalent Chromium (CrVI), polybrominated biphenyl (PBB) compounds, and polybrominated diphenyl ether (PBDE) compounds in electrical and electronic equipment sold in the European Union.
Guarantee and Service
To help us find your warranty details within our customer database, should the need arise, please take a few minutes to register your product(s) online at: monitoraudio.com.
This equipment has been fully tested prior to dispatch from the factory. Both the craftsmanship and the performance of this product is guaranteed against manufacturing defects for the period of five years from the date of purchase (see conditions below), provided that the product was supplied by an authorised Monitor Audio retailer under the consumer sale agreement. (The words 'consumer sale' shall be construed in accordance with section 15 of the supply of goods act 1973). Monitor Audio accepts no responsibility for defects arising from accident, misuse, abuse, wear and tear, modification or operation outside of that specified within this instruction manual. Neither will responsibility be accepted for damage or loss occurring during transit to or from the parties claiming under this guarantee.
This guarantee covers both labour and parts. The liability of Monitor Audio is limited to the cost of repair or replacement of the defective parts (at the discretion of Monitor Audio) and under no circumstances extends to consequential losses or damage.
Claims under this Guarantee
The equipment should be returned in its original packaging to the original supplier where possible, or to any other authorised Monitor Audio dealer. If it is not possible to return the equipment by hand, then it should be sent carriage prepaid via a reputable carrier. If the original packing is not available replacement packaging can be purchased from Monitor Audio.
If you have any difficulties complying with these requirements please contact us at the following address:
Customer Service Tel: +44 (0)1268 740580
Monitor Audio Ltd. Fax: +44 (0)1268 740589
24 Brook Road Internet: www.monitoraudio.com
Rayleigh Email: info@monitoraudio.co.uk
Essex, SS6 7XJ
England
This guarantee does not affect the statutory rights of the consumer under UK law.
Data Protection
We at Monitor Audio are committed to respecting the wishes and privacy of our customers. Any information you provide will be held in the strictest confidence and only used within the Monitor Audio organisation for the provision of services such as warranty claims or spare parts.
We may wish to contact you in the future to ensure you are happy with the products and standards of service we provide and to keep you up-to-date with the latest products and promotions we have to offer.
Should you wish not to be contacted by us either by post, e-mail or phone, please tick the box on the warranty form on the web site. Alternatively you can request not to be contacted in future by writing to Customer Service, at the address above.
EC Declaration of Conformity
We, Monitor Audio Ltd. (Manufacturer and Importer)
24 Brook Road
Rayleigh
Essex
SS6 7XJ
England

Declare in own responsibility, that the Monitor Audio products described in this manual is in compliance with Technical Standards/Council Directives:
(LVD) 2014/35/EU Low Voltage Directive (effective from 20 April, 2016)
EN60065: 2002+A1: 2006 Safety requirements for mains operated electronic and related apparatus for household and similar use.
(EMC) 2014/30/EU Electro Magnetic Compatibility (effective from 20 April, 2016)
EN55013: 08.90+A12:08.94+A13:12.96 Limits and methods of measurement of radio disturbance characteristics of broadcast receivers and associated equipment.
EN55020: 12.94+A11:12.96 Electro magnetic immunity of broadcast receivers and associated equipment.
EN61000-3-2: 04.95+A1:1998+A2:1998 Electro magnetic compatibility (EMC)
- Part 3: Limits - Section 2: Limits for harmonic current emissions (equipment input current up to and including 16 Ampere per phase).
EN6100-3-3: 01.95 Electro magnetic compatibility (EMC) – Part 3: Limits – Section 3: Limits of voltage fluctuations and flicker in low-voltage supply systems for equipment with rated current up and including 16 Ampere per phase.

Signed by:
Name: D.S. Hartley
Position: Technical Director
Company: Monitor Audio Ltd
MONITOR AUDIO
EN Guarantee
Both the craftsmanship and the performance of this product is guaranteed against manufacturing defects for a period of five years from the date of purchase (see conditions in the Important Safety Instructions booklet), provided that the product was supplied by an authorised Monitor Audio retailer under the consumer sale agreement.
To help us find your warranty details within our customer database, should the need arise, please take a few minutes to register your product(s) online at: www.monitoraudio.com.
FR Garantie
Email: info@monitoraudio.co.uk
Web: www.monitoraudio.com
Rev1. Nov 2016
- CUSTOM SUBWOOFER SERIES
- Contents
- Introduction
- Unpacking
- SubConnect
- Volume Control
- 12v Trigger - Centre Pin = +12v
- RS232 Control
- USB-B Socket
- Mains Voltage Selector
- Mains Power Switch
- IEC Mains Input Socket & Fuse Location
- Balanced LFE Input
- RCA LFE Input
- RCA Stereo Input
- Preset LED's
- Preset Select Button
- Phase Control
- Crossover Frequency
- Positioning/Initial Set Up
- Leave the subwoofer unplugged from the mains until the installation procedure is completed.
- Never connect or disconnect the RCA input/ output leads with the subwoofer switched on.
- Set Up
- RS232
- RS232 Wiring Configuration
- RS232 Communication Set-Up Parameters
- Command Protocol
- Command List
- EQ Profiles
- Infra Red Remote Codes
- Update Firmware on Sub
- Bootloader Mode
- Automatic Update.
- Manual Update
- Factory Reset
- Guarantee
- Trouble Shooting
- My subwoofer will not turn on/ no power.
- No sound from subwoofer.
- Owner Information
- Product Details
- Dealer Details
- CUSTOM SUBWOOFER
- WARNING
- Important Safety Instructions
- Re-cycling
- RoHS Declaration of Conformity
- Background
- Guarantee and Service
- Claims under this Guarantee
- Data Protection
- EC Declaration of Conformity
- MONITOR AUDIO
- EN Guarantee
- FR Garantie
Brand : MONITOR AUDIO
Model : CW8
Category : Subwoofer