
MCT2X1825 - Lawn mower McGregor - Free user manual and instructions
Find the device manual for free MCT2X1825 McGregor in PDF.


| Product Type | Lawn Mower |
| Brand | McGregor |
| Model | MCT2X1825 |
| Power Source | Battery (36V Li-ion) |
| Cutting Width | 46 cm (18 inches) |
| Cutting Height Adjustment | 6 positions (25-75 mm) |
| Grass Bag Capacity | 50 L |
| Mulching Function | Yes (mulching plug included) |
| Side Discharge | Yes (optional chute) |
| Handle Type | Foldable, ergonomic with soft grip |
| Start Mechanism | Key start with safety button |
| Motor Power | 1200 W brushless |
| Battery Voltage / Capacity | 36 V / 5.0 Ah |
| Charging Time | 2-3 hours |
| Runtime (approx.) | 45 minutes per charge |
| Weight | 22 kg |
| Dimensions (LxWxH) | 143 x 46 x 105 cm (folded) |
| Wheel Size | 180 mm front / 200 mm rear |
| Safety Features | Blade brake, key lock, handle presence sensor |
| Maintenance | Clean after use; sharpen blade annually; oil moving parts |
| Warranty | 2 years |
| Spare Parts Availability | Blades, batteries, grass bag, wheels available |
Frequently Asked Questions - MCT2X1825 McGregor
User questions about MCT2X1825 McGregor
0 question about this device. Answer the ones you know or ask your own.
Ask a new question about this device
Download the instructions for your Lawn mower in PDF format for free! Find your manual MCT2X1825 - McGregor and take your electronic device back in hand. On this page are published all the documents necessary for the use of your device. MCT2X1825 by McGregor.
USER MANUAL MCT2X1825 McGregor
natural_image
Green Megregor handheld metal tool with adjustable handle and base (no visible text or symbols)McGregor 18V Cordless Grass Trimmer
7606713/7589892 (Model: MCT1825/MCT2X1825)
Important - Please read these
instructions fully before starting assembly
These instructions contain important information that will help
you get the best from your grass trimmer, ensuring it is assembled
correctly and safely. If you need help or have damaged or
missing parts, call the Customer Helpline on 0345 605 2065
AFTER SALES SUPPORT
0345 605 2065
Contents
Safety information....3
In the box....11
Assemble....12
Prepare....14
Operate....16
Maintenance and storage....20
Technical data....20
Accessories....21
Troubleshooting....22
Environmental protection....22
Getting help....23
Guarantee....23

Safety information
Important - Please read these instructions fully before starting assembly
Warning symbols
The following warning symbols appear throughout this assembly manual and indicate the appropriate safety measures you should take when assembling and operating the grass trimmer.

This symbol indicates there is a danger of serious personal injury or death if you do not observe the warning.

Read operator's manual

Do not expose to rain
General safety

WARNING!
Keep this assembly manual in a safe place following assembly for reference at a later date.
Always ensure anyone intending to operate this grass trimmer is fully conversant with the contents of this assembly manual prior to assembling, maintaining or operating the grass trimmer.
Perform assembly operations as described in this manual.
Failure to observe this warning may lead to serious injury, death, or damage to the grass trimmer.
Always take care when removing the packaging to prevent damage to you or to the grass trimmer.

IMPORTANT! Before assembling the grass trimmer, check all the parts indicated in the manual are in the box. Inspect all the parts for signs of damage. Do not assemble the grass trimmer if you observe any damaged components.

Safety information
Important - Please read these instructions fully before starting assembly
Personal safety

WARNING!
Only operate the grass trimmer if you are wearing the correct Personal Protective Equipment (PPE) as described in the following warnings.
Warning symbols
The following warning symbols appear throughout this assembly manual and indicate the appropriate safety measures you should take when assembling and operating the grass trimmer.

Read operator's manual

Keep bystanders away

Wear eye and ear protection

Do not expose to rain

For indoor use only

Fuse

Positive terminal

Negative terminal

Safety information
Important - Please read these instructions fully before starting assembly
Warning symbols

Double insulation

Li-Ion battery. Do not dispose of batteries, Return exhausted batteries to your local collection or recycling point.


Do not expose to rain or water

Do not burn

Waste electrical products must not be disposed of with household waste. Please recycle where facilities exist. Check with your local authorities or retailer for recycling advice.

Safety information
Important - Please read these instructions fully before starting assembly
General safety

WARNING!
Read all safety warnings and all instructions. Failure to follow the warnings and instructions may result in electric shock, fire and/or serious injury.
Save all warnings and instructions for future reference.
If the supply cord is damaged, it must be replaced by the manufacturer, its service agent or similarly qualified persons in order to avoid a hazard.
IMPORTANT
READ CAREFULLY BEFORE USE KEEP FOR FUTURE REFERENCE
Safe operating practices
1. Training
a) Read the instructions carefully. Be familiar with the controls and the correct use of the machine.
b) Never allow children, persons with reduced physical, sensory or mental capabilities or lack of experience and knowledge or people unfamiliar with these instructions to use the machine, local regulations may restrict the age of the operator.
c) Keep in mind that the operator or user is responsible for accidents or hazards occurring to other people or their property.
2. Preparation
a) Before use check the supply and extension cord for signs of damage or aging. If the cord becomes damaged during use, disconnect the cord from the supply immediately. DO NOT TOUCH THE CORD BEFORE DISCONNECTING THE SUPPLY. Do not use the machine if the cord is damaged or worn. b) keep extension cords away from moving hazardous parts
⚠️ Safety information
Important - Please read these instructions fully before starting assembly
General safety
to avoid damages to the cords which can lead to contact with live parts.
c) Before use, always visually inspect the machine for damaged, missing or misplaced guards or shields.
d) Never operate the machine while people, especially children, or pets are nearby.
3. Operation
a) Keep supply and extension cords away from cutting means.
b) Wear eye protection, long trousers and stout shoes at all times while operating the machine.
c) Avoid using the machine in bad weather conditions especially when there is a risk of lightning.
d) Use the machine only in daylight or good artificial light.
e) Never operate the machine with damaged guards or shields or without guards or shields in place.
f) Switch on the motor only when the hands and feet are away from the cutting means.
g) Always disconnect the machine from the power supply (e.g. remove the plug from the mains)
1) whenever the machine is left unattended;
2) before clearing a blockage;
3) before checking, cleaning or working on the machine;
4) after striking a foreign object;
5) whenever the machine starts vibrating abnormally.
h) Take care against injury to feet and hands from the cutting means.
i) Always ensure that the ventilation openings are kept clear of debris.
j) Never fit metal cutting elements.
k) Always be sure of your footing on slopes.
I) Walk, never run.
m) Not overreach and keep the balance at all times.
n) Not to touch moving hazardous parts before the machine is

Safety information
Important - Please read these instructions fully before starting assembly
General safety
disconnected from the mains and the moving hazardous parts have come to a complete stop.
4. Maintenance and storage
a) Disconnect the machine from the power supply (e.g. remove the plug from the mains) before carrying out maintenance or cleaning work.
b) Use only the manufacturer's recommended replacement parts and accessories.
c) Inspect and maintain the machine regularly. Have the machine repaired only by an authorized repairer.
d) When not in use, store the machine out of the reach of children.
Additional safety instructions for your battery charger
- Before charging, read the instructions.
- Do not charge a leaking battery.
- Do not use chargers for works other than those for which they are designed.
- Before charging, ensure your charger is matching the local AC supply.
- For indoor use, or do not expose to rain.
- The charging device must be protected from moisture.
- Do not use the charging device in the open.
- Do not short out the contacts of battery or charger.
- Respect the polarity “+/-” when charging.
- Do not open the unit and keep out of the reach of children.
- Do not charge the batteries of other manufactures or ill-suited models.
- Ensure that the connection between the battery charger and battery is correctly positioned and is not obstructed by foreign bodies.

Safety information
Important - Please read these instructions fully before starting assembly
Additional safety instructions for your battery charger
- Keep battery charger's slots are free of foreign objects and protect against dirt and humidity. Store in a dry and frost-free place.
- When charging batteries, ensure that the battery charger is in a well-ventilated area and away from inflammable materials. Batteries can get hot during charging. Do not overcharge any batteries. Ensure that batteries and chargers are not left unsupervised during charging.
- Do not recharge non-rechargeable batteries, as they can overheat and break.
- Longer life and better performance can be obtained if the battery pack is charged when the air temperature is between 18^ C and 24^ C. Do not charge the battery pack in air temperatures below 4.5^ C, or above 40.5^ C. This is important as it can prevent serious damage to the battery pack.
- Charge only battery pack of the same model provided by manufacturer and of models recommended by manufacturer.
Safety warnings for battery pack
a) Do not dismantle, open or shred cells or battery pack.
b) Do not short-circuit a battery pack. Do not store battery packs haphazardly in a box or drawer where they may short-circuit each other or be short-circuited by conductive materials.
When battery pack is not in use, keep it away from other metal objects, like paper clips, coins, keys, nails, screws or other small metal objects, that can make a connection from one terminal to another. Shorting the battery terminals together may cause burns or a fire.
c) Do not expose battery pack to heat or fire. Avoid storage in direct sunlight.
d) Do not subject battery pack to mechanical shock.
⚠️ Safety information
Important - Please read these instructions fully before starting assembly
Safety warnings for battery pack
e) In the event of battery leaking, do not allow the liquid to come into contact with the skin or eyes. If contact has been made, wash the affected area with copious amounts of water and seek medical advice.
f) Seek medical advice immediately if a cell or battery pack has been swallowed.
g) Keep battery pack clean and dry.
h) Wipe the battery pack terminals with a clean dry cloth if they become dirty.
i) Battery pack needs to be charged before use. Always refer to this instruction and use the correct charging procedure.
j) Do not maintain battery pack on charge when not in use.
k) After extended periods of storage, it may be necessary to charge and discharge the battery pack several times to obtain maximum performance.
I) Battery pack gives its best performance when it is operated at normal room temperature (20 °C ± 5 °C).
m) When disposing of battery packs, keep battery packs of different electrochemical systems separate from each other.
n) Recharge only with the charger specified by manufacture. Do not use any charger other than that specifically provided for use with the equipment. A charger that is suitable for one type of battery pack may create a risk of fire when used with another battery pack.
o) Do not use any battery pack which is not designed for use with the equipment.
p) Keep battery pack out of the reach of children.
q) Retain the original product literature for future reference.
r) Remove the battery from the equipment when not in use.
s) Dispose of properly.
In the box
Parts
1 Front handle
2 Front handle locking knob
3 Lock-off button
4 On/Off switch
5 Battery pack release button
6 Battery pack
7 Handle rotation locking button
8 Height adjustment locking collar
9 Safety guard
10 Spool head
11 Flower guard
12 Spool head cover
13 Line cutter
14 Cutting line
15 Cap release latch (on both sides)
16 Line feed button
17 Battery charger
18 Instruction manual

Assemble
Assembling instructions

Always take care when removing the packaging to prevent damage to you or to the grass trimmer.

IMPORTANT! Before assembling the grass trimmer, check all the parts indicated in the manual are in the box. Inspect all the parts for signs of damage. Do not assemble the grass trimmer if you observe any damaged components.

NOTE: Before using the tool, read the instruction book carefully.
INTENDED USE
The machine is intended for the cutting of grass and weeds under bushes, as well as on slopes and edges that can not be reached with the lawn mower.
1. FITTING THE GUARD (See Fig. A1, A2, A3)
1) Remove the pre-assembled mounting screw from safety guard, see fig A1.
2) Attach the safety guard to the trimmer head, align the guard so it slides into the slots located on the trimmer head, see fig A2.
3) Secure the safety guard onto the trimmer head with the screw provided, see A3.


natural_image
Technical diagram of a mechanical assembly with curved components and a cross-section view (no text or labels)
natural_image
Technical line drawing of a mechanical component with a downward arrow indicating a feature (no text or symbols present)
WARNING! Take great care when doing this as the guard has a very sharp cutting
Never operate the tool without the guard properly in place. Use of the unit without having installed the guard will cause the motor to overheat, and void the warranty.
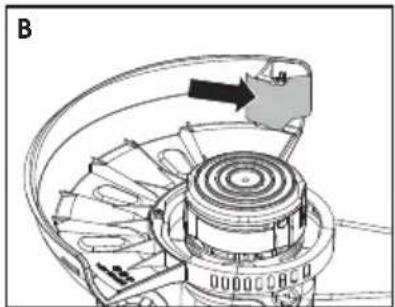
2. REMOVING THE BLADE PROTECT LABEL (SEE FIG. B)
The blade is covered with a protect label. Please remove it before operation.
natural_image
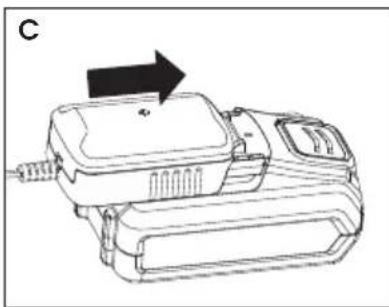
Technical diagram of a mechanical assembly with no visible text or symbols3. TO CHARGE THE BATTERY (See Fig. C)
Chargers and batteries are specifically designed to work together. Do not attempt to use batteries with any other charger than that specified in these instructions.
Important notes for charging the battery:
In a warm environment or after heavy use, the battery pack may become too hot to permit charging. Allow time for the battery to cool down before recharging.
BEFORE USING YOUR CORDLESS GRASS TRIMMER, YOU MUST FULLY CHARGE THE BATTERY
Your battery pack is UNCHARGED and you must fully charge before use.
HOW TO CHARGE THE BATTERY:
A discharged battery at normal ambient temperature will take approximately 3-5 hours to reach full charge.
CHARGING INDICATOR
| Light Status | |
| Red on Charging | |
| Green on Fully Charged | |
natural_image
Line drawing of a mechanical device with an arrow indicating direction (no text or symbols)
WARNING:
When battery charge runs out after continuously use or exposure to low time for the battery pack to cool down before
direct sunlight or heat, allow time for the battery pack to cool down before
re-charging to achieve the full charge.
4. TO REMOVE OR INSTALL BATTERY PACK (See Fig. D)
1) Depress the battery pack release button to release battery pack from your grass trimmer.
2) After recharging, insert the battery pack into grass trimmer's battery port. A simple push and slight pressure will be sufficient.

WARNING!
The guard must always be on the tool to protect the user.

Prepare
Preparing instructions
1) Unscrew the height adjustment locking collar in the direction indicated to unlock, turn it counterclockwise.
2) Adjust the length of the Aluminum tube to the most comfortable length.
3) Tighten the locking collar in the direction indicated to lock, turn it clockwise.

natural_image
Mechanical assembly diagram showing a lever mechanism with a rotating component (no text or symbols)
natural_image
Mechanical linkage diagram showing two articulated arms with a central rotating arrow (no text or symbols)2. ADJUSTING THE FRONT HANDLE (See fig. F)
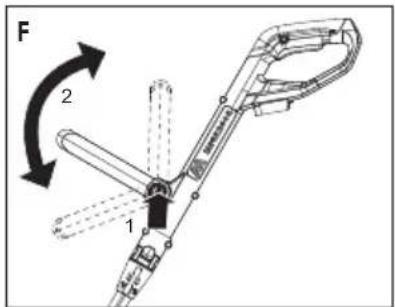
1) Press the front handle locking knob.
2) Rotate the front handle to the most comfortable and balanced position.
3) Release the front handle locking knob.
3. ADJUSTING THE CUTTING ANGLE

WARNING: Always disconnect the trimmer before making adjustments!
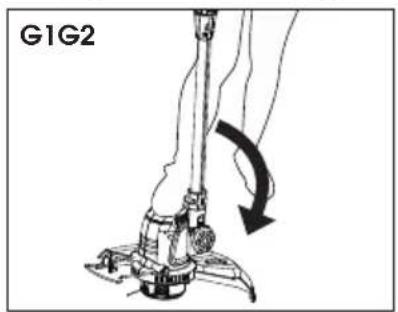
1) Put one foot on the motor housing portion of the trimmer head, then grip the main handle and apply adequate force on the main handle pushing it downwards, as shown in Fig. G1.
2) Adjust the main handle angle upwards, put one foot on the safety guard area of the trimmer head, then grip the main handle, apply adequate force to adjust, as shown in Fig.G2.

natural_image
Diagram of a robotic arm with a curved arrow indicating motion (no text or symbols)Preparing instructions
4. FLOWER GUARD (See Fig. H)
Lift the flower guard up when edging and put it down before trimming, as shown in Figure G. Before trimming or edging make sure the flower guard is locked firmly in position.

natural_image
Diagram of a lawn mower with directional arrow indicating motion (no text or symbols)5. SAFETY ON/OFF SWITCH (See Fig. I)
The safety switch is locked off to prevent accidental starting.
1) Depress the Lock off button then depress the On/Off switch and release lock off button. Your trimmer is now on.
2) To switch off, just release the on/off switch.

WARNING!
The cutting head continues to rotate after the trimmer has been switched off;
wait until it has completely stopped then lay down the tool.

Operating instructions

WARNING: Always wear eye protection. Never lean over the trimmer head. Rocks or debris can ricochet or be thrown into eyes and face and cause blindness or other serious injury. When operating unit, check for the following:
Wear eye protection and heavy clothing. Hold front handle with one hand and auxiliary handle with the other hand. Keep unit below waist level. Work only from your right to your left to ensure debris is thrown away from you. Without bending over, keep line near and parallel to the ground (perpendicular when edging). Do not switch the machine on with the cutting head on or near material to be cut. Ensure the cutting line is at full speed before contacting material to be cut.

WARNING: MAKE SURE THAT LINE IS FED OUT BEFORE OPERATION. MAKE SURE MOTOR IS UP TO FULL SPEED BEFORE TRIMMING.

WARNING: Use only 1.65mm diameter cutting line. Other sizes of line will not feed properly and will result in improper cutting head function or can cause serious injury. Do not use other material such as wire, string, rope, etc. Wire can break off during cutting and become a dangerous missile that can cause serious injury.
1. TRIMMING
1) Keep the trimmer head at an angle of about 30^ to the ground when trimming (Fig J1).
2) Do not cut wet grass because it tends to stick to the trimmer head and guard, prevents proper discharge of grass clippings, and could cause you to slip and fall.
3) Regularly remove clippings and dirt around the trimmer head with a switched off trimmer.
4) Work rhythmically, stand firmly with your feet apart. Cut from right to left so the trimmings will be thrown away from the work area (Fig. J2).
5) When cutting longer /high grass, please make sure that you cut this down in 2 to 3 stages (Fig. J3, J4).
6) Do not move the trimmer too fast as this will result in ineffective cutting and possible damage.
If you find that the nylon line is too short follow the instruction as in "Automatic line feed system" or "To manually feed the line".


natural_image
Technical line drawing of a mechanical device with lever and base mount (no text or symbols)

natural_image
Simple line drawing of a grassy slope with a mechanical tool and a checkmark (no text or symbols)Operate
Operating instructions
2. EDGING
Change the tool from trimming to edging mode 01:
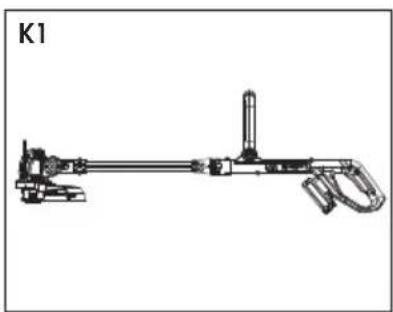
1) Adjust the cutting angle to be in the lowest horizontal setting as shown in Fig. K1.
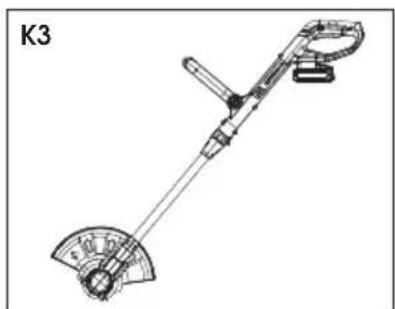
2) Push the handle rotation locking button downward and rotate the main handle clockwise at 90 degree(Fig. K2, K3).
natural_image
Technical line drawing of a mechanical device labeled K1, showing components like a lever, shaft, and handle (no text or symbols beyond label)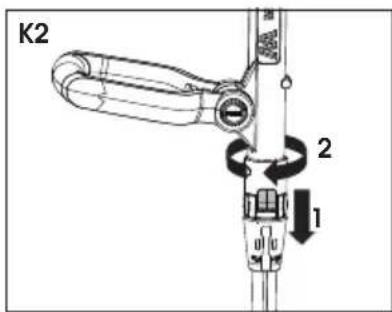
natural_image
Technical line drawing of a mechanical device labeled K3, showing a lever and two curved components (no text or symbols present)Change the tool from trimming to edging mode 02:
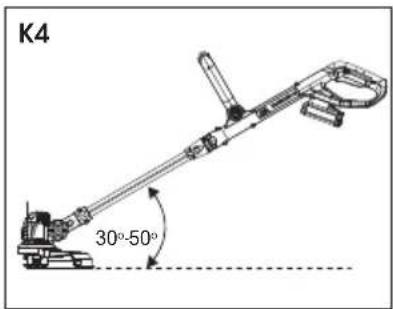
1) Adjust the cutting angle to 30 degree to 50 degree as shown in Fig. K4.
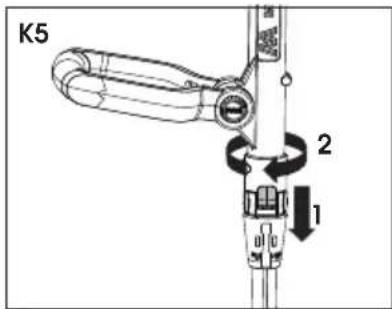
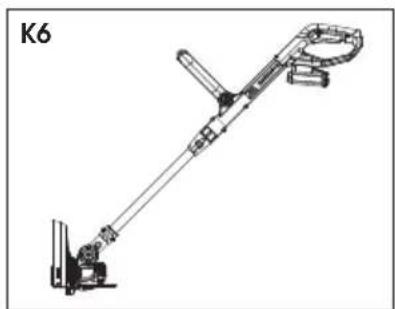
2) Push the handle rotation locking button downward and rotate the main handle clockwise at 180 degree(Fig. K5, K6).
While edging, only allow the tip of the line to make contact with area being worked. Do not force the line. Take extra caution while edging as objects can be thrown from the trimmer line.
natural_image
Technical line drawing of a mechanical linkage or support system (no text or symbols)Operate
Operating instructions
3. AUTOMATIC LINE FEED SYSTEM
When initially switching on the trimmer, a small length of line is fed out.
A 'clattering' noise will be heard when the lines hit the line cutter. DO NOT BE ALARMED, this is quite normal. After about 5 seconds the line will be cut to the correct length and the noise will reduce as the motor receives full speed.
If the noise of the line being cut can't be heard, more line will be fed out.
To feed more line, it is first necessary to allow the trimmer to stop completely, then restart, allowing the motor to reach full speed.
Repeat above steps until you hear the lines hitting against the line cutter. (Do not repeat this procedure more than 6 times)
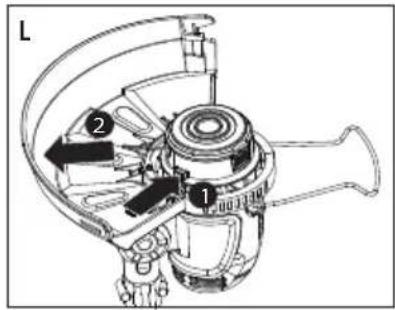
4. TO MANUALLY FEED THE LINE (SEE FIG. L)
If required, line can be fed out manually.
To operate, press and release manual line feed button, whilst gently pull out the lines until the lines reach the line cutter.
When the required amount of line is fed out, gently pull on the second line (there is no need to press the manual line feed button again)
If the line extends past the line cutter, too much line has been fed out.
If too much line is fed out, remove the spool cap and click spool anti-clockwise until the line is at the desired length.
5. TO REMOVE THE CAP
Press and hold in the two cap release latches. (See Fig. M) Pull cap away from the spool holder.

Operating instructions
6. WHEN REFITTING THE SPOOL CAP.
Keep all areas of the cap and spool holder clean.
Refit the cap, pressing firmly down towards the spool holder to ensure cap is fully located.
Check that the cap is correctly fitted by trying to remove it without depressing the two latches.
7. TO REPLACE CUT LINE.
For your convenience it is recommended you buy spool and line complete.
-- TO FIT SPOOL AND LINE COMPLETE:
1) Remove old spool.
2) Place new spool into cutting head. Release one line from cleat and feed line through eyelet.
3) Repeat for second line.
4) Refit the cap.
-- TO FIT NYLON LINE ONLY:

WARNING! Your trimmer is designed to use only line with a maximum diameter of 1.65 mm.
IMPORTANT - ALWAYS WIND THE LINE ONTO THE UPPER SECTION OF THE SPOOL FIRST.
1) Take a line of approximately 3m. (Fig. N1)
2) Insert 15mm of line into hole in the spool and wind line in the direction of the arrows on the top of the spool (Fig. N2).
3) Leave approximately 100mm of line unwound and place into cleat (Fig. N3).
4) Then fit spool as described in "TO FIT SPOOL AND LINE COMPLETE".
Care should be taken to ensure that the line is neatly coiled on the spool. Failure to do so will impair the efficiency of the automatic line feed.


natural_image
Technical line drawing of a mechanical flange assembly with a handle and mounting base (no text or symbols)
natural_image
Diagram of a circular mechanical component with internal spiral and directional arrows, labeled N3 (no text or symbols beyond label)Maintenance and storage
Maintenance
Important note:
Always remove battery before cleaning, repair and storage.
- Always remove the battery pack whenever you carrying out any cleaning or repair.
- Keep the motor ventilation slots clean.
- Your tool requires no additional lubrication or maintenance. There are no user serviceable parts in your tool.
- Never use water or chemical cleaners to clean your power tool. Wipe clean with a dry cloth.
- Always check the cutting head and guard before each use.
- Always store your power tool in a dry place.
- Have the unit professionally repaired should any damage occurs.
Storage
- Disconnect the battery from the grass trimmer before carrying out maintenance or cleaning work.
- Use only the manufacturer's recommended replacement parts and accessories.
- Inspect and maintain the machine regularly. Have the machine repaired only by an authorized repairer.
- When not in use, store the machine out of the reach of children.
Technical data
Technical data table
| Grass trimmer MCT1825 MCT2X1825 | |
| Rated voltage 18V | --- Max. |
| No load speed 8500/min | |
| Cutting width 250mm | |
| Diameter of line 1.65mm | |
| Line length 1*3m | |
| Machine weight 2.0kg |
| Charger ACG318G2 | |
| Charger input 100-240V ~ 50/60Hz | |
| Charger output 20V | == 0.5A |
| Charging time 3-5 hrs |
| Battery pack ABP118W2 | |
| Battery type Lithium-Ion | |
| Battery capacity | 18V--- 2.0Ah, 36Wh |
Technical data
Noise and technical date
A weighted sound pressure L
$$ K _ {p A} = 3 \mathrm{dB(A)} $$
A weighted sound power L
Wear ear protection.
$$ _ {\mathrm{pA}} = 6 8 \mathrm{dB(A)} $$
$$ _ {w A} = 8 4 \mathrm{dB(A)} $$

VIBRATION INFORMATION
Typical weighted vibration a_h=1.8m/s^2 , uncertainty K=1.5m/s^2

WARNING: The vibration emission value during actual use of the power tool can differ from the
declared value depending on the ways in which the tool is used dependant on the following examples and other variations on how the tool is used:
How the tool is used and the materials being cut or drilled.
The tool being in good condition and well maintained
Using the correct accessory for the tool and ensuring it is sharp and in good condition.
The tightness of the grip on the handles and if any anti vibration accessories are used.
And the tool is being used as intended by its design and these instructions.
This tool may cause hand-arm vibration syndrome if its use is not adequately managed

WARNING: To be accurate, an estimation of exposure level in the actual conditions of use should also
take account of all parts of the operating cycle such as the times when the tool is switched off and when it is running idle but not actually doing the job. This may significantly reduce the exposure level over the total working period.
Helping to minimise your vibration exposure risk.
ALWAYS use sharp chisels, drills and blades
Maintain this tool in accordance with these instructions and keep well lubricated (where appropriate)
If the tool is to be used regularly then invest in anti vibration accessories.
Plan your work schedule to spread any high vibration tool use across a number of days.
Accessories
| MCT1825 MCT2X1825 | ||
| Safety guard 1 1 | ||
| Flower guard 1 1 | ||
| Battery charger | 1 1 | |
| Battery pack 1 2 | ||
Troubleshooting
General troubleshooting
The following chart lists problem symptoms, possible causes and corrective action, if your electric grass trimmer does not operate properly. If these do not identify and correct the problem, contact your helpline.

WARNING: Always switch the product off, disconnect it from power supply and let the act cool down before performing inspection, maintenance and cleaning work!
| Problem Possible cause | Cause Solution | |
| Grass trimmer does not operate | 1.1 No power1.2 Replace with DC possible cause & corrective action | 1.1 Check power1.2 Check other socket, replace |
| Grass trimmer operates intermittently | 2.1 Extension cord damaged2.2 Internal wiring damaged | 2.1 Check cord, replace2.2 Contact Service Agent |
| Grass trimmer labours | 3. Grass too high 3. Cut in stages | |
| Grass trimmer is not cutting | 4 Line too short/broken off 4 | Feed the line manually/automatically |
| Line will not feed from spool | 5.1 Spool empty5.2 Line inside the spool entangled | 5.1 Replace the spool5.2 Inspect the spool, rewind if necessary |
| Line keeps breaking | 6.1 Line inside the spool entangled6.2 Trimmer used incorrectly | 6.1 Inspect the spool, rewind if necessary6.2 Only trim with the tip of the line, avoid stones, walls and other hard objects.Feed the line regularly to maintain full cutting width. |
Environmental protection

This product has been marked with a symbol relating to removing electric and electronic waste. This means that this product shall not be discarded with household waste but that it shall be returned to a collection system which conforms to the European Directive 2002/96/CE. It will then be recycled
or dismantled in order to reduce the impact on the environment. Electric and electronic equipment can be hazardous for the environment and for human health since they contain hazardous substances.
Guarantee
Dear Customer,
In the unlikely event that your device develops a fault, please contact our Customer service department on the telephone number shown below.
- These guarantee terms cover additional guarantee rights and do not affect your statutory warranty rights. Claims must be accompanied by Proof of Purchase. This must be in the form of a Sales receipt or Bank statement and must show that the product has been purchased within 2 years prior to the claim, from the retailer that it was originally sold to.
- Our guarantee covers problems caused by material or manufacturing defects, and will result in the repair of these defects or replacement of the device with a like for like or similar article. Please note that our devices have not been designed for use in commercial, trade or industrial applications. Consequently, the guarantee is invalidated if the equipment is used in commercial, trade or industrial applications or for other equivalent activities.
- The following are also excluded from our guarantee :
A. Faults due to accidents, customer misuse or unauthorized repairs
B. Consumable Parts such as detergent bottle, patio cleaner, jet lance, fix brush and nozzle pin.
C. Failure due to lack of routine maintenance.
D. Failure as a result of not using the equipment in accordance with the manual and safety instructions
E. The adjustment of cables, drives belts or recoil starters.
-
The guarantee is valid for a period of 2 years starting from the purchase date of the device. Guarantee claims should be submitted before the end of the guarantee period within two weeks of the defect being noticed. No guarantee claims will be accepted after the end of the guarantee period. The original guarantee period remains applicable to the device even if repairs are carried out or parts are replaced. In such cases, the work performed or parts fitted will not result in an extension of the guarantee period, and no new guarantee will become active for the work performed or parts fitted. This also applies when an on-site Service is used.
-
Please keep your sales receipt in a safe place. If is covered by our guarantee your device will either be repaired under the terms of guarantee or we will send you a replacement device. This device may be re-conditioned or like for like replacement.


- McGregor 18V Cordless Grass Trimmer
- Contents
- Safety information
- Important - Please read these instructions fully before starting assembly
- Warning symbols
- General safety
- WARNING!
- Double insulation
- Save all warnings and instructions for future reference.
- IMPORTANT
- READ CAREFULLY BEFORE USE KEEP FOR FUTURE REFERENCE
- Safe operating practices
- Training
- Preparation
- ⚠️ Safety information
- Operation
- Maintenance and storage
- Additional safety instructions for your battery charger
- Safety warnings for battery pack
- In the box
- Parts
- Assemble
- Assembling instructions
- INTENDED USE
- FITTING THE GUARD (See Fig. A1, A2, A3)
- REMOVING THE BLADE PROTECT LABEL (SEE FIG. B)
- TO CHARGE THE BATTERY (See Fig. C)
- HOW TO CHARGE THE BATTERY:
- WARNING:
- TO REMOVE OR INSTALL BATTERY PACK (See Fig. D)
- Prepare
- Preparing instructions
- ADJUSTING THE FRONT HANDLE (See fig. F)
- ADJUSTING THE CUTTING ANGLE
- WARNING: Always disconnect the trimmer before making adjustments!
- FLOWER GUARD (See Fig. H)
- SAFETY ON/OFF SWITCH (See Fig. I)
- Operating instructions
- TRIMMING
- Operate
- EDGING
- AUTOMATIC LINE FEED SYSTEM
- TO MANUALLY FEED THE LINE (SEE FIG. L)
- TO REMOVE THE CAP
- WHEN REFITTING THE SPOOL CAP.
- TO REPLACE CUT LINE.
- -- TO FIT SPOOL AND LINE COMPLETE:
- -- TO FIT NYLON LINE ONLY:
- IMPORTANT - ALWAYS WIND THE LINE ONTO THE UPPER SECTION OF THE SPOOL FIRST.
- Maintenance and storage
- Maintenance
- Important note:
- Storage
- Technical data
- Noise and technical date
- VIBRATION INFORMATION
- WARNING: The vibration emission value during actual use of the power tool can differ from the
- This tool may cause hand-arm vibration syndrome if its use is not adequately managed
- WARNING: To be accurate, an estimation of exposure level in the actual conditions of use should also
- Accessories
- Troubleshooting
- General troubleshooting
- Environmental protection
- Guarantee
Brand : McGregor
Model : MCT2X1825
Category : Lawn mower