
MJ-E16SX-A1 - Humidifier MITSUBISHI - Free user manual and instructions
Find the device manual for free MJ-E16SX-A1 MITSUBISHI in PDF.


| Product Type | Dehumidifier |
| Brand | Mitsubishi |
| Model | MJ-E16SX-A1 |
| Dimensions (W x D x H) | 38 x 27 x 60 cm |
| Weight | 14.5 kg |
| Power Supply | 220-240 V, 50-60 Hz |
| Power Consumption | 295 W |
| Dehumidification Capacity | 16 L/day (at 30°C, 80% RH) |
| Tank Capacity | 4.7 L |
| Air Flow Rate | 180 m³/h |
| Refrigerant | R134a |
| Main Functions | Auto defrost, continuous drainage, ionizer, timer |
| Fan Speeds | 2 (Low/High) |
| Operating Humidity Range | 40% - 80% RH |
| Noise Level | 45 dB (low speed) |
| Maintenance | Clean air filter every 2 weeks; drain tank regularly |
| Safety Features | Auto shut-off when tank full, tip-over protection |
| Spare Parts | Replacement filter (part no. MJ-FS16) |
| Warranty | 1 year |
Frequently Asked Questions - MJ-E16SX-A1 MITSUBISHI
User questions about MJ-E16SX-A1 MITSUBISHI
0 question about this device. Answer the ones you know or ask your own.
Ask a new question about this device
Download the instructions for your Humidifier in PDF format for free! Find your manual MJ-E16SX-A1 - MITSUBISHI and take your electronic device back in hand. On this page are published all the documents necessary for the use of your device. MJ-E16SX-A1 by MITSUBISHI.
USER MANUAL MJ-E16SX-A1 MITSUBISHI
natural_image
Line drawing of a white portable air purifier with control panel and display (no text or symbols)Table of Contents page
- Getting the most out of your dehumidifier....2
- Precautions....3
- Warning....5
- Names and functions of parts ......6
- Things to be aware of......8
-
Before using your dehumidifier......8
-
Turning the Unit ON and OFF ....9 Turning the unit on/off
- Switching operating modes ....10 Full Auto - Laundry - Low - Mildew Guard - Low Temp - Auto
- Swing louvre function ....12 How to read the swing monitor
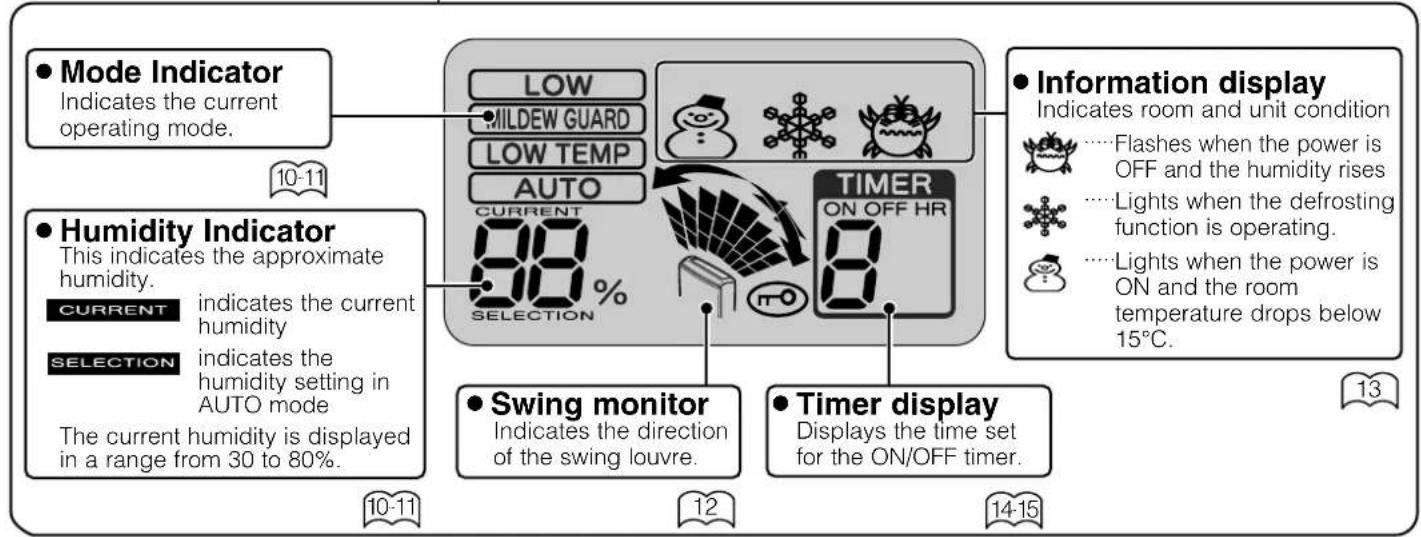
- Information display ....13 High humidity warning - Defrosting indicator - Low temperature indicator - Water full lamp
- Using the Timer ....14 ON/OFF Timer
- Using the Child lock ....16
- Moving the unit ....16
- Removing water from the tank .....17
-
Continuous drainage ....18
-
Maintenance ....19
- Replacing the Air purifying filter......21
- Storage....21
- Troubleshooting ....22
-
Specifications....24
-
In order to ensure correct usage, please read this instruction manual carefully and retain it for future reference.
- Before accepting the Warranty at the time of purchase, please make sure that the date of purchase, place of purchase and other items are correctly filled in the form.
Getting the most out of your dehumidifier
Combine operating mode and swing louvre function to get optimum results.
| Objective | Recommended mode and louvre setting | Page | |
| Drying laundry | When you don’t want to hang the clothes outside or it is raining... | Selection LaundryLouvre setting Up | Selection |
| Lowering room humidity | When you don’t know what humidity level to set the unit to... | Selection Full Auto | page10Mode |
| When you want to set the humidity level... | Mode Automatic | ||
| Preventing mould/condensation | When condensation occurs  indoors... indoors... | Mode Low Temp | page10&11Swing louvre |
To prevent mildew...  | Mode Mildew guard | ||
| To keep the inside of closets and shoeboxes dry... | Mode Low  Louvre setting Reardirect the air flow Louvre setting Reardirect the air flow | ||
Operating tips
Drain the water tank before use Refrain from opening doors/windows during operation
Drying laundry indoors
- Use the dehumidifier in a small, enclosed room.
- Direct the louvres at the laundry.
• Space laundry to improve airflow -
Maintain room temperature above 16°C with an air conditioner
-
In low temperatures, drying takes about twice as long as normal. (Drying times will vary depending on the nature of the laundry and the room temperature.)
- The airflow is strongest to the top right of the unit.

natural_image
Line drawing of a kitchen appliance interior with hanging fixtures and a refrigerator (no text or symbols)Installing your dehumidifier
Make sure to leave some space around the unit.
Stop the louvre in the vertical position. Blowing air at the wall may cause staining.
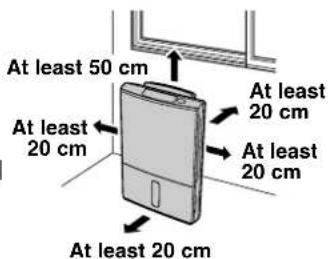
Operating noise
Place the unit on top of a mat. This reduces vibration and noise. It also prevents leaving depressions on carpets.
Precautions
The following diagrams indicate circumstances where danger can result from mishandling the unit.
Meanings of the graphic symbols used in this manual and on the unit are explained below.

WARNING
Mishandling may result in fatal or serious injuries.

CAUTION
Mishandling may result in injuries or damage to your home or property, etc.
| Alwaysfollow theinstructions |

WARNING
Do not start/stop the unit by plugging/unplugging the power cord.

This may result in fire and/or electric shock.
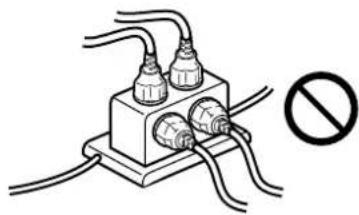
Do not use extension cords or multiple head adapters.
natural_image
Electrical circuit diagram showing three connected components with wires and a prohibition symbol (no text labels)This may result in fire, electric shock or malfunctions.
Do not damage or modify the power cord or plug.
Do not modify, bundle, twist, bend or heat the power cord. Do not place under objects or use with the end close to the plug bent.
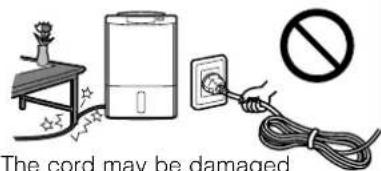
The cord may be damaged resulting in fire or electric shock. (Keep pets from biting the cord.)
Do not put your fingers or any long object, into the air intake/outlet. Do not touch the swing louvre.
natural_image
Illustration of a person using a refrigerant device with a prohibition symbol (no text or labels)The internal fan rotates at high speeds, and such actions may result in injury or malfunctions.
Do not attempt to repair, disassemble, or modify the unit.
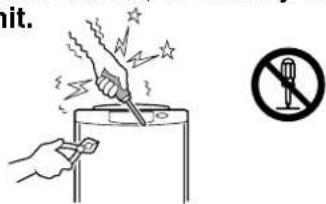
This may result in fire and/or electric shock.
Refer servicing to your dealer or Mitsubishi Electric Service Centre.
Do not put the unit near heat-generating devices (such as stoves, fan heaters, etc.).
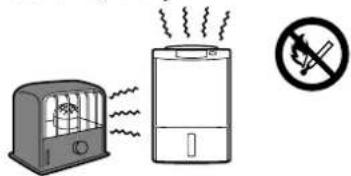
natural_image
Illustration of a fire extinguisher emitting smoke next to a device emitting exhaust, with a no-smoking symbol nearby (no text or labels)The plastic parts may melt causing fire.
Wipe dust off the power plug and insert the plug firmly.

natural_image
Simple line drawing of an electric plug with a cable, accompanied by a warning symbol (no text or labels)If the plug is not fully inserted into the socket, dust may gather on the connectors which may cause fire and/or electric shock.
Use 220-240V AC power sockets that can withstand more than 15A current.
Connecting to power sockets other than 220-240V AC may result in fire and/or electric shock.

Remove water that has collected in the tank.
Accidentally drinking the water or using it for other purposes may cause illness and/or unforeseen accidents.
Should abnormal symptoms occur (a burning smell, etc.), switch off the unit and unplug it from the socket.
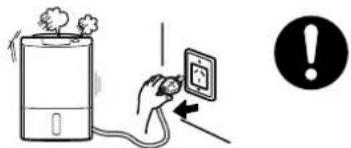
Continuing to operate the unit may result in fire, electric shock, or malfunctions. Contact your dealer or Mitsubishi Electric Service Centre for consultation.

CAUTION
Do not cover the side air intakes or the air outlet with cloth, curtain, etc.


This results in poor ventilation and may cause heat generation/fire.
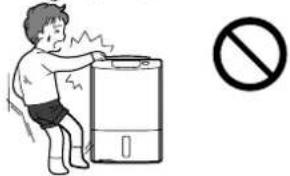
Do not stand on, sit on or lean against the unit.

natural_image
Cartoon illustration of a person falling off from a giant smartphone (no text or symbols)
The unit may tip over causing injury.
Do not put vases or any other objects filled with water on the unit.


Water may leak into the unit adversely affecting electric insulation and cause electric shock and/or fire by short-circuiting.
Do not use the unit where it may be exposed to direct sunlight or other weather conditions. (This unit is for indoor use only.)

natural_image
Simple line drawing of a battery under a sun, with no text or symbols present.
This may cause overheating, electric shock and/or fire caused by an electric leak.
Do not use the unit in narrow, enclosed places such as inside closets, between pieces of furniture, etc.
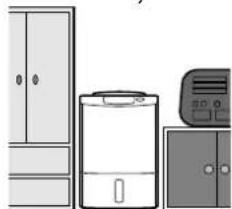
natural_image
Illustration of household appliances including a refrigerator, washing machine, and door (no text or symbols)
This results in poor ventilation and may cause heat generation and/or fire.
Do not use combustion appliances in the path of the air outlet.

natural_image
Illustration of a portable air conditioner unit and its adjacent door, showing airflow direction (no text or symbols)
This may cause incomplete combustion in the appliance.
Do not use the unit in places where chemicals are used (such as hospitals, factories, laboratories or beauty salons).


Chemicals and solvents evaporated in the air may harm the unit and cause water in the tank to leak, resulting in damage to property.
Do not use the unit for special purposes, such as preservation of food, art or scientific works.


This may negatively affect the quality of the items stored.
Do not drain water continuously if there is a possibility that temperature around the hose could drop to freezing point.


Water inside the hose may freeze and prevent the water in the tank from flowing out. The water may leak from the unit and damage surrounding objects.
Do not use the unit in places that may be subject to oil or flammable gas leakage.

natural_image
Illustration of a battery cell connected to a gas bag with water droplets and a valve (no text or symbols)
Such a leak around the unit may cause combustion and fire.
Do not remove the Styrofoam from the floating element.


The floating element will not be able to detect a full tank resulting in water leakage, which may damage surrounding objects or cause electric shock and/or an electric leak
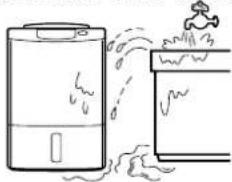
Do not wash the unit with water. Do not use the unit where it is likely to come in contact with water.
natural_image
Simple line drawing of a washing machine and a sink with steam rising (no text or symbols)
Exposure to water may result in fire or electric shock caused by an electric leak.

CAUTION
Do not point air-flow from the unit directly at the body.

If air-flow is directed at the body for long periods, it may harm one's physical condition and lead to dehydration.
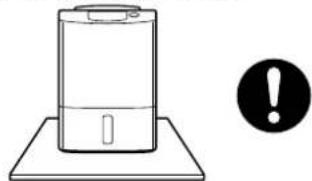
Install the unit in a location where the floor is flat and stable.
natural_image
Simple line drawing of a battery with an exclamation mark symbol (no text or labels)If the unit falls over, the water collected in the water tank may leak damaging surrounding objects and in turn result in fire or electric shock caused by an electrical leak.
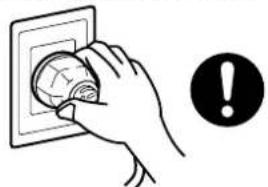
Grasp the plug and remove from the power socket.
natural_image
Hand placing a circular component into a wall socket with an exclamation mark (no text or symbols on the diagram itself)When removing the plug from the power socket, do not pull on it diagonally or by the cord as this may cause the projections/wiring to be damaged resulting in a short circuit, electric shock or fire.
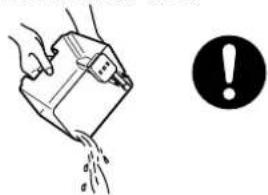
Before moving the unit always switch it off, unplug it and remove water from the water tank.
natural_image
Illustration of a hand pouring liquid into a container with a warning symbol (no text or labels)Moving the unit with water in its tank may cause the water to leak and damage the surrounding objects and in turn result in electric shock and/or an electric leak.
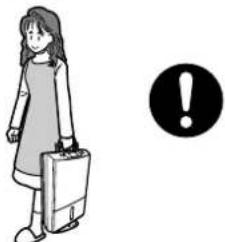
After emptying the tank, transport the unit by grasping the handle firmly.
natural_image
Illustration of a girl holding a briefcase and an exclamation mark (no text or symbols present)Losing your footing while carrying the unit may cause personal injury or damage to the floor.
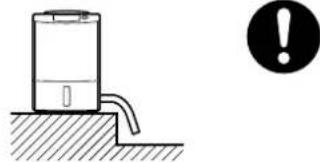
When using the continuous drainage outlet, make sure to position the hose so that the water drains without obstruction.
natural_image
Simple line drawing of a water dispenser with a warning symbol (no text or labels)The water in the tank may leak and damage surrounding objects.
Do not allow debris to clog the filter/hose as this may cause over-heating/leakage.
When draining water continuously or left unattended for long periods, inspect the unit every two weeks.

Use the unit with caution in rooms where the walls, furniture and art work is vulnerable to dry air, as it may cause cracks and warping.
Switch the unit off and unplug from the power source when cleaning it.

When the unit is on, the internal fan rotates at high speeds and may cause injury.
Unplug the unit from the power source when not using the unit for an extended period of time.

natural_image
Illustration of a portable water heater with a power outlet and plug, accompanied by an exclamation mark (no text or symbols on the device itself)Otherwise it may cause fire and/or electric shock caused by an electric leak.
The appliance is not intended for use by young children or infirm persons without supervision;
Young children should be supervised to ensure that they do not play with appliance.
Warning
- Keep the unit always in an upright position.
Inclining the unit may cause water in the tank to leak into the unit, resulting in malfunction. Should you incline the unit accidentally, contact the place of purchase for advice.
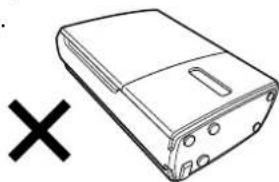
●Do not carry the unit horizontally. This may result in malfunctions.
natural_image
Simple line drawing of a device casing with a cross mark symbol below (no text or labels)Names and Functions of Parts
Front Control Panel

Back


flowchart
graph TD
    A["MODE"] --> B["Low"]
    A --> C["MILDEW GUARD"]
    A --> D["LOW TEMP"]
    A --> E["AUTO"]
    F["HUMIDITY SELECTION"] --> G["Low"]
    F --> H["MILDEW GUARD"]
    F --> I["LOW TEMP"]
    F --> J["AUTO"]
    K["Selection"] --> L["Child lock (3 sec)"]
    M["Mode"] --> N["Low"]
    M --> O["MILDEW GUARD"]
    M --> P["LOW TEMP"]
    M --> Q["AUTO"]
    R["Selection"] --> S["Low"]
    R --> T["MILDEW GUARD"]
    R --> U["LOW TEMP"]
    R --> V["AUTO"]
    W["Selection"] --> X["Low"]
    W --> Y["MILDEW GUARD"]
    W --> Z["LOW TEMP"]
    W --> AA["AUTO"]
    AB["Selection"] --> AC["Low"]
    AB --> AD["MILDEW GUARD"]
    AB --> AE["LOW TEMP"]
    AB --> AF["AUTO"]
    AG["Selection"] --> AH["Low"]
    AG --> AI["MILDEW GUARD"]
    AG --> AJ["LOW TEMP"]
    AG --> AK["AUTO"]
    AL["Selection"] --> AM["Low"]
    AL --> AN["MILDEW GUARD"]
    AL --> AO["LOW TEMP"]
    AL --> AP["AUTO"]
    AQ["Selection"] --> AR["Low"]
    AQ --> AS["MILDEW GUARD"]
    AQ --> AT["LOW TEMP"]
    AQ --> AU["AUTO"]
    AV["Selection"] --> AW["Low"]
    AV --> AX["MILDEW GUARD"]
    AV --> AY["LOW TEMP"]
    AV --> AZ["AUTO"]
    BA["Selection"] --> BB["Low"]
    BB --> BC["MILDEW GUARD"]
    BB --> BD["LOW TEMP"]
    BB --> BE["AUTO"]
    BF["Selection"] --> BG["Low"]
    BG --> BH["MILDEW GUARD"]
    BF --> BI["LOW TEMP"]
    BF --> BJ["AUTO"]
        BK["Selection"] --> BL["Low"]
    BL --> BM["MILDEW GUARD"]
    BK --> BN["LOW TEMP"]
    BK --> BO["AUTO"]
        BP["Selection"] --> BQ["Low"]
    BQ --> BR["MILDEW GUARD"]
        BP --> BS["LOW TEMP"]
        BP --> BT["AUTO"]
        BU["Selection"] --> BV["Low"]
    BV --> BW["MILDEW GUARD"]
        BU --> BX["LOW TEMP"]
        BU --> BY["AUTO"]
        BZ["Selection"] --> CA["Low"]
    CA --> CB["MILDEW GUARD"]
        BZ --> CC["LOW TEMP"]
        BZ --> CD["AUTO"]
        CE["Selection"] --> CF["Low"]
    CF --> CG["MILDEW GUARD"]
        CE --> CH["LOW TEMP"]
        CE --> CI["AUTO"]
        CJ["Selection"] --> CJB["Low"]
    CJB --> CK["MILDEW GUARD"]
        CJB --> CL["LOW TEMP"]
        CJB --> CM["AUTO"]
        CN["Selection"] --> CO["Low"]
    CO --> COB["MILDEW GUARD"]
        CN --> CX["LOW TEMP"]
        CN --> CY["AUTO"]
        CZ["Selection"] --> CZB["Low"]
    CZB --> CZC["MILDEW GUARD"]
        CZB --> CZD["LOW TEMP"]
        CZB --> CZE["AUTO"]
        CFQ["Selection"] --> CRB["Low"]
    CRB --> CS["MILDEW GUARD"]
        CFQ --> CSB["LOW TEMP"]
        CSQ["Selection"] --> CTB["Low"]
    CTB --> CU["MILDEW GUARD"]
        CTB --> CUb["LOW TEMP"]
        CU --> CUc["AUTO"]
        DU["Selection"] --> DVB["Low"]
    DVB --> DVBc["MILDEW GUARD"]
        DVB --> DVBd["LOW TEMP"]
        DVBd --> DVBD[VOUTcomes: 10-11, 16, 12, 9, 14-15, 13, 13-15-13-13-13-13-13-13-13-13-13-13-13-13-13-13-13-13-13-13-13-13-13-13-13-13-13-13-13-13-13-13-13-13-13-13 - 13-13-13-13-13-13-13-13-13-13-13-13-13-13-13-13-13-13-13-13-13-13-13-13 - 13-13-13 - 13-13 - 13 - 13 - 13 - 13 - 13 - 13 - 13 - 13 - 13 - 13 - 13 - 13 - 13 - 13 - 13 - 13 - 13 - 13 - 13 - 13 - 13 - 13 - 13 - 13 - 13 -<nl>
Before using the
un
Room temperature may rise 2-4°C during operation
The dehumidifier does not have a cooler function. Due to heat produced during operation, the room temperature may rise 2-4°C. As a result, the unit may blow warm air, but this is not due to a malfunction.
The humidity reading on the unit may differ from a hygrometer in the same room
Even in the same room, temperature and humidity levels may differ from place to place. If the hygrometer and the unit are in different parts of the room, the humidity levels are prone to differ.
Moreover, humidity levels differ between places that have good and no airflow.
Use the reading on the unit as an estimate.
Low temperature/humidity decreases dehumidifying effects
In winter, the temperature is low and the air is dry, therefore making dehumidifying impossible.
* If temperatures are low, but humidity is high due to snow or rain, operating the unit in Low Temp mode will yield better results than Low mode.
Values for HIGH dehumidifying operation

line
| Room temperature (°C) | in case of 80% humidity | in case of 60% humidity | | --------------------- | ------------------------ | ------------------------ | | 5 | 2.0 | 2.0 | | 1 | 6.0 | 4.0 | | 30 | 16.0 | 10.0 |- The dehumidification values shown on the graph were measured at constant temperature and humidity and do not reflect actual usage conditions.
How does the dehumidifier work?
If you pour cold water into a cup, the air around it becomes cold, causing water droplets to form on the surface of the cup.
The dehumidifier takes advantage of this phenomenon to remove moisture from the air.

①The unit draws air from the room, cools it with its cooling coil, causing the moisture to transform into water droplets.
②The water droplets fall into the water tank.
③The dehumidified air is reheated by the heating coil, and then discharged. The humidity of the room is thus reduced by repeating steps ①, ②, and ③.
How is mildew growth suppressed?
Mildew is unable to produce new spores if dried as mycelia. The Mildew Guard feature applies this principle. (However, the spores themselves are resilient to dry conditions.)

"Identification of Aspergillus and Penicillium"
Before using your dehumidifier
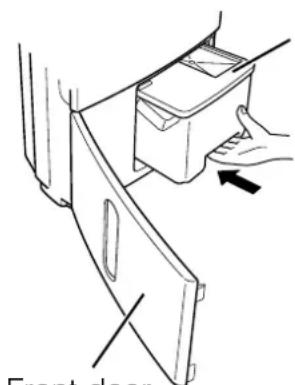
Inserting the water tank correctly
natural_image
Line drawing of a hand placing a device into a front door (no text or symbols)Tank lid
Open the front door. Confirm that the lid is securely attached to the water tank. Push the tank in.
Plug the power cord into the power socket

Use a 220-240V AC power socket only.
- The current humidity level is indicated.
If the louvre is open, it closes automatically.
Turning the Unit ON and OFF
To turn ON
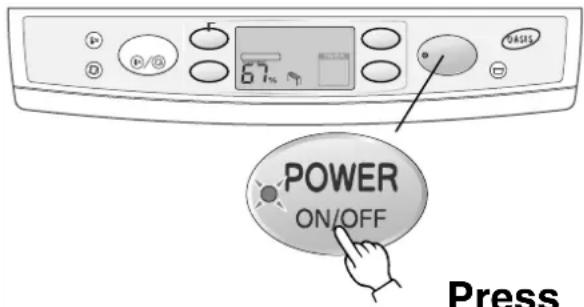
Press
- Power lamp lights
- The mode is displayed.
- The louvre opens automatically.
To start dehumidifying, select either one-touch operation or mode.
The dehumidifier does not activate for 3 minutes when the unit is turned ON immediately after turning it OFF or plugging it into the power socket. (In order to protect the compressor.) When dehumidifying begins, the operational noise increases.
The dehumidifier remembers the operating mode. Even if the plug is disconnected or the power turned off, the unit restarts at the previous setting.
To turn OFF

Press
● Power lamp turns off.
- The Mode Indicator goes out.
• The louvre closes automatically
Information
If the room temperature falls below 15^ C, defrosting mode is activated once every 40 minutes (for about 5 minutes) causing water to drain to the tank.
The unit can operate in a room temperature range of 1-35°C.
If the room temperature exceeds 35°C, the inside of the unit heats triggering the protection mechanism, stopping operation. When using the louvre, point UP.
- If the temperature is below 1^ C, the extracted water is close to freezing disabling the dehumidifier, and only the blower is operational.
Air purifying function. While the air purifying filter is installed and the unit is running, the air purifying function operates all the time.
Switching operating modes
You can choose between six operating modes.
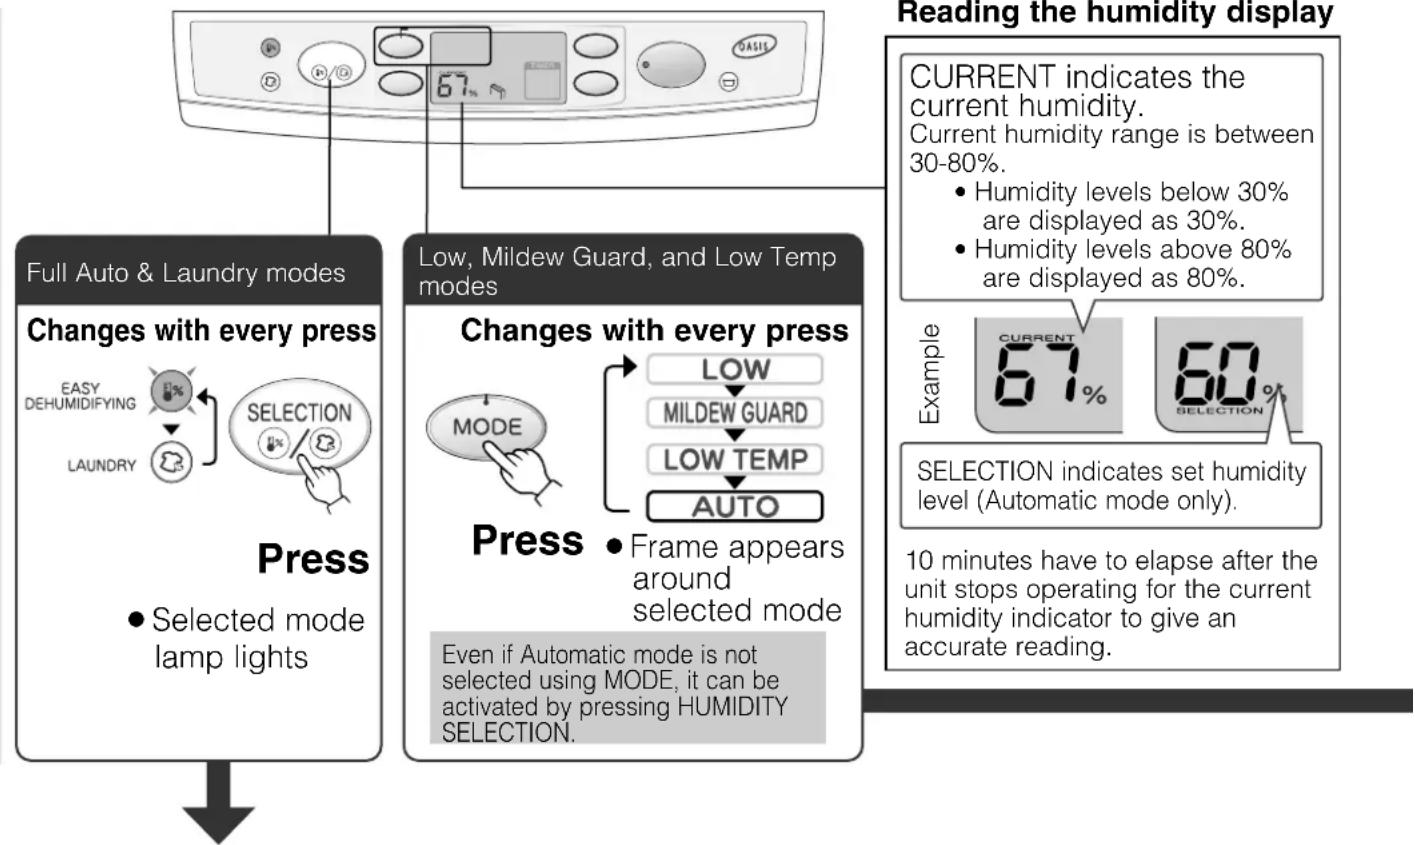
flowchart
graph TD
    A["Full Auto & Laundry modes"] --> B["Changes with every press"]
    B --> C["Press"]
    C --> D["Selected mode lamp lights"]
    E["Low, Mildew Guard, and Low Temp modes"] --> F["Press"]
    F --> G["Changes with every press"]
    G --> H["MODE"]
    H --> I["LOW"]
    I --> J["MILDEW GUARD"]
    J --> K["LOW TEMP"]
    K --> L["AUTO"]
    L --> M["Frame appears around selected mode"]
    M --> N["Even if Automatic mode is not selected using MODE, it can be activated by pressing HUMIDITY SELECTION."]
    O["Reading the humidity display"] --> P["CURRENT indicates the current humidity. Current humidity range is between 30-80%"]
    P --> Q["Humidity levels below 30% are displayed as 30%"]
    Q --> R["Humidity levels above 80% are displayed as 80%"]
    S["Current humidity"] --> T["CURRENT indicates the current humidity. Current humidity range is between 30-80%"]
    T --> U["Humidity levels below 30% are displayed as 30%"]
    U --> V["Humidity levels above 80% are displayed as 80%"]
    W["Example"] --> X["CURRENT 67% SELECTION indicates set humidity level (Automatic mode only)."]
    X --> Y["10 minutes have to elapse after the unit stops operating for the current humidity indicator to give an accurate reading."]
When you want to dehumidify easily (without the hassles of setting humidity levels)
- Full Auto

line
| Room temperature (°C) | Humidity level (%) | | --------------------- | ------------------ | | 0 | 60 | | 2 | 50 | | 0 | 60 |The unit automatically controls airflow to counter excessive room temperature/humidity. It activates the blower at high temperatures.
- Room temperature is below 27^ C - the unit automatically sets the humidity level according to the temperature.
- Room temperature is above 27^ C - the unit lowers the humidity level to 50%, then activates the blower. The dehumidifier is reactivated when humidity rises to 60%.
When you want to dry clothes quickly
(without the hassles of calculating humidity levels and timer settings for the amount of laundry)
- Laundry
The unit operates for 12 hours and automatically switches off.
Information
Empty the water tank before operating the unit. The unit may stop before the clothes are dry due to a full tank.
Do not use in conjunction with OFF Timer mode. The unit may stop before the clothes are dry.
The following conditions prevent clothes from drying well:
Room temperature below 15^ C, large volume of laundry; laundry not spaced well; clothes of thick fabric and spacious room.
When the room temperature is below 5^ C, less water evaporates from the clothes, decreasing the amount of temperature change. Therefore the unit is unable to detect the state of the laundry and may turn off after 1 hour.
Restart the unit if it turns off before the laundry dries (except when the temperature is below 5°C).
Information
Pressing HUMIDITY SELECTION while in FULL AUTO or LAUNDRY modes changes the mode to AUTO.
* The humidity level cannot be set in Low, Mildew Guard, and Low Temp modes.
When you want to leave the dehumidifier on
- Low
The unit continually operates the dehumidifier regardless of current humidity.
When you want to suppress mildew growth
- Mildew Guard
The unit lowers room humidity levels once a day (for approximately 2-4 hours), suppressing mildew growth.
- Once every 24 hours the dehumidifier runs for 2 hours if the humidity is 40% , or 4 hours if at 50% . The unit operates intermittently, automatically turning on and off according to the humidity level of the room.
- The unit continues operation if the humidity level does not decrease.
- Refrain from turning on ventilation fans or opening windows or doors as this lowers performance. - Mildew growth may still occur due to the fungus type and conditions of the room. E.g. Rooms that contain excessive condensation, bathrooms, and places with bad airflow (insides of closets and behind furniture). - This mode does not remove existing mildew. - Do not use in conjunction with OFF Timer mode.

flowchart
graph LR
    A["ON"] --> B["Standby"]
    B --> C["Standby"]
    C --> D["...."]
    style A fill:#f9f,stroke:#333
    style B fill:#ccf,stroke:#333
    style C fill:#cfc,stroke:#333
    style D fill:#fcc,stroke:#333
    note1["24 hours 24 hours"] --> A
    note2["Dehumidifies Dehumidifies"] --> B
Information
When you want to prevent condensation inside the room or when the temperature is low
- Low Temp
The unit operates continuously automatically controlling airflow according to room temperature. The air flow is strongest below 15^ C. The use of Low Temp mode is recommended when the Low temperature indicator is lit.
Information
When the temperature is low, condensation may still form on windows exposed to the outside air even when Low Temp mode is operating
When you want to set the humidity level
- Automatic
The unit maintains the humidity level by automatically controlling airflow and operating intermittently as necessary. All you have to do is set the humidity level.
- The unit turns off when current humidity decreases past the set humidity level, and restarts when the level is exceeded.
- The unit operates for 6 minutes continuously regardless of the humidity level immediately after turning the power on.

Frequent use of exits and room size/conditions may cause the humidity to not reach the set level.

Press
- Pressing the button once displays the set humidity level with the SELECTION indicator. After 3 seconds, the display returns to the current humidity display.
- Pressing HUMIDITY SELECTION while SELECTION is displayed sets the humidity level. Each time the button is pressed, the humidity setting changes.

Swing louvre function (how to read the Swing monitor)
The louvre can be made to swing. Select from the 4 possible settings to suit the purpose.
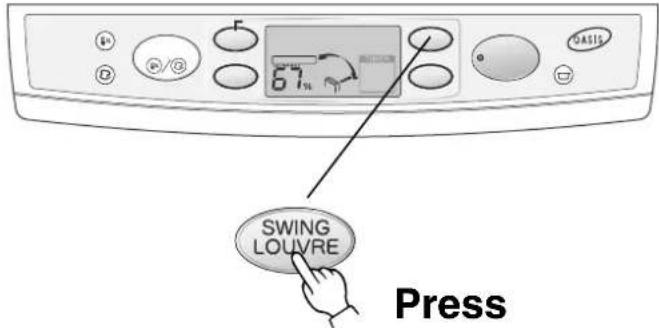
- Starts swing operation.
- The swing monitor is displayed.
The swing operation stops when the power cord is unplugged.
Viewing the Swing Monitor
This indicates the range of louvre swing. (The louvre and monitor do not move in synchronization.)
With each press of the button

- Stop swing operation
- The louvre stops in a vertical position.
• The swing monitor turns off.
To change the louvre to a desired angle, wait until the louvre stops, then adjust by hand.

• WIDE
To cover the entire room.
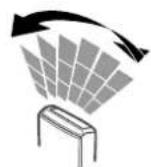
- UPWARD
For drying clothes, etc.
Swing speed is automatically controlled to send air to all corners of the room.
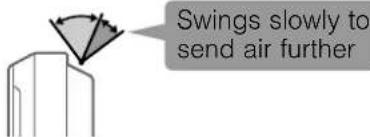

- REAR
For directing air into a closet.
Information
The level of noise emitted from the unit varies according to the angle of the air-flow.
The louvre may stop up to a maximum of 8 seconds to correct its position, after which it will start moving again.
Do not place your fingers or other objects in the louvre to change the swing angle. Set the swing direction according to the procedures in the section "Changing the swing direction".
Note
Stop the louvre in the vertical position when using the unit against a wall. Blowing air at the wall may cause staining.
Information Display
Displays room and dehumidifier conditions.
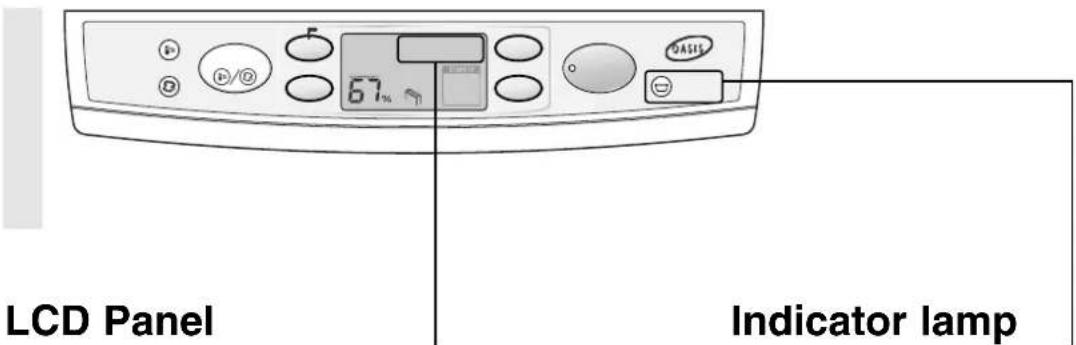
LCD Panel

High humidity warning
The indicator flashes when the humidity in the room exceeds 75%. Activating the dehumidifier is recommended when the indicator is flashing.
If the High humidity warning is not used, remove the power plug from the power socket.

Defrosting indicator
* is displayed when the unit is melting the frost accumulated inside, and draining it to the tank. The air flow (dehumidifier) is stopped. After defrosting is complete, the unit restarts with the previous mode.
- appears
• Air flow stops (louvre stops) - The operation noise changes
The unit performs this operation if the room temperature falls below 15^ C (once every 40 minutes for five minutes at a time during peak periods).

Low temperature indicator
The indicator comes on if the room temperature drops below 15^ C. Activating Low Temp mode is recommended.
Indicator lamp

FULL
Tank full lamp
The unit automatically shuts down and indicates with the lamp and sound that the water tank is full. Empty the water tank. 16
- Tank full lamp lights
The unit beeps continuously.
• Air flows stops (louvre stops) - Monitor turns off
• After removing the water and replacing the tank, the Tank full lamp will go off, and the unit will automatically return to operation mode.
- When the Tank Full lights up, no operation but ON/OFF is possible.
OFF timer operation The OFF timer can be set for 1 to 9 hours. Set the timer when the power is switched on.

To set
1 Switch the power on. 9
2 Select operating mode.

Select desired operating mode.
3 Change the louvre swing direction. 12
Select the desired setting.
4 Set the operating time.

Press
- When pressed once the figure [ ] and [OFF] appear.
- Each subsequent press changes the display in order from 1 to 9 hours. (Hold the button to run automatically through the numbers.)

→The OFF timer is set.
The following is an example of a display indicating AUTO dehumidifying (set to 60%), swing set to WIDE and the OFF timer set for 2 hours.

- The time remaining until the unit switches itself off is indicated in increments of one hour with a flashing numeral.
- When the set time is reached, the unit switches itself off and the louvre closes automatically.
To cancel
Press the Power button. (Power off)

Press
• The OFF Timer is cancelled.
Keep pressed until the remaining time display disappears. The unit returns to Low mode.

Press
- The OFF Timer is cancelled.
Information
The OFF timer and ON timer cannot be set at the same time.
Do not use the timer OFF mode in conjunction with Laundry or Midew guard.
Empty the water tank before operating. The unit stops and the Tank full lamp lights if the tank becomes full during operation.
ON timer operation
The ON timer can be set for 1 to 9 hours. Set the timer when the power is switched off.

To set
1 Switch the power off.

2 Set the time you wish the unit to turn on.
Press
- Press once. The Power lamp, Mode indicator, and a [i] on the digital display flash. The [ON] indicator lights.
- Each subsequent press changes the display in order from 1 to 9 hours. (Hold the button to run automatically through the numbers.)
$$ \boxed {\begin{array}{l}\text {No Display}\(\text {operation}\\text {is off})\end{array}\rightarrow 1 \rightarrow 2 \dots \rightarrow 8 \rightarrow 9} $$
3 Select operating mode.
Select desired operating mode.

4 Change the louvre swing direction. 12
Select the desired setting.
5 Confirm the operating start time.

Press
● Power lamp and Time display light. →The ON timer is set.
The unit informs you if you forget to press the Power button by making the Time display and Mode indicator blink and sounding an alarm for 1 minute.
The following is an example of a display indicating AUTO dehumidifying (set to 60%), swing set to WIDE and the ON timer set for 5 hours.

- The time remaining until the unit switches itself on is indicated in increments of one hour with a flashing numeral.
- When the set time is reached, the unit switches itself on.
To cancel
Press the Power button. (Power off)

Press
- The timer is cancelled.

The ON timer function is not operable using a commercially-available timer plug outlet.
Using the Child Lock
To Lock
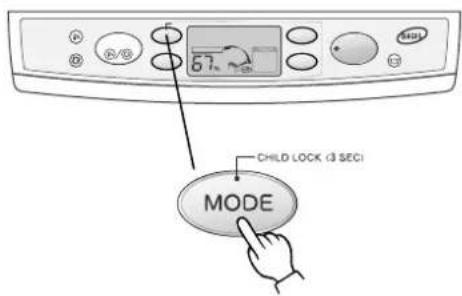
Press for 3 or more seconds.
• The child lock indicator
The child lock is switched off when the power cord is unplugged.
When the child lock is activated the unit cannot be switched off or on. The other switches are also inoperable until the child lock has been released.
If you lock the unit when the POWER is OFF.
The unit will not turn on, even if you press the POWER switch to turn it on. Only the CHILD LOCK lamp will blink. (Press the POWER button once again so that the lamp lights.)
If you lock the unit when the POWER switch is ON.
The unit will not turn off, even if you press the POWER switch to turn it off. Only the CHILD LOCK lamp will blink. (Press the POWER button once again so that the lamp lights.)
Releasing the child lock

Press for 3 or more seconds.
- The child lock lamp goes out.
Carrying the Unit
Pull the handle out, and grasp with a firm grip

natural_image
Line drawing of a woman holding a briefcase (no text or symbols)Before moving the unit, first make sure to remove water from the water tank and close the louvre.

Do not carry the unit on its side as this may cause malfunctions.
Removing Water from the Tank
The unit automatically shuts down and lights the Tank full lamp when the tank (approximately 4L) is full. Empty the tank.

1 Remove the water tank.

natural_image
Line drawing of a hand opening a folder with a downward arrow indicating direction (no text or symbols)Open the front door
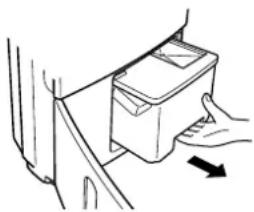
natural_image
Line drawing of a hand pressing down on a mechanical component (no text or symbols)Grasp handle and slide out

natural_image
Line drawing of two hands holding a rectangular device with internal components (no text or symbols)2 Remove the tank lid, and empty.

Floating element
Do not remove or dismantle the float.
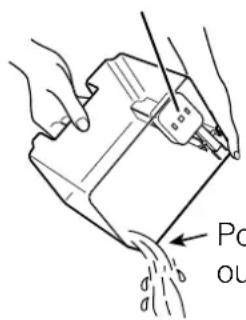
Pour the water out as shown.
3 Reattach the tank lid and replace the water tank.

natural_image
Line drawing of a hand pressing down on a mechanical component with an arrow indicating force (no text or symbols)Confirm that the lid is securely attached to the water tank, and push the tank in. Close the front door.
- If the lid is not properly closed, you may have problems removing the tank.
- If the tank is not installed correctly, the tank full light will come on, and the unit will not operate.
Note
Do not remove or dismantle the floating element in the tank. If it is removed, the unit cannot detect when the tank is full, and this could result in leakage.
Continuous Drainage
If a drain is available, the unit can continuously drain excess water by attaching a commercially available hose (internal diameter 15mm).
The unit can be operated for extensive periods without the need to empty the water tank.


Do not drain water continuously if there is a possibility that temperatures around the hose could drop below freezing point.
Water inside the hose may freeze and water may leak from the unit and damage surrounding objects.

When draining water continuously or left unattended for long periods, inspect the unit once a fortnight.
Foreign objects, etc. could clog the hose resulting in overheating and/or leakage.
1 Remove the water tank.

natural_image
Illustration showing two steps of installing a door panel, with arrows indicating direction (no text or symbols present)Open the front door Grasp handle and pull out
2 Open the drainage outlet

natural_image
Illustration of a hand holding a tool near a computer monitor with cables (no text or symbols)Use cutters to cut the three fixing ribs of the continuous drainage port on the back of the main unit, then remove it carefully making sure that it does not fall inside the unit.
3 Press drain stopper.
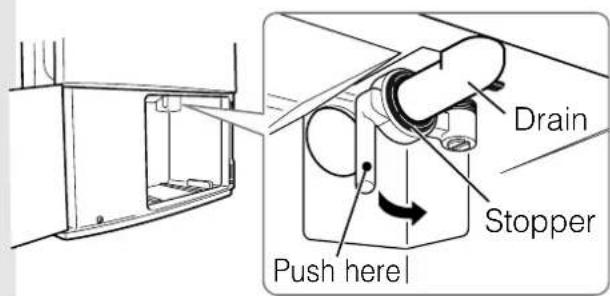
Note
Leave a minimum space of 20 cm behind the unit for attaching the hose.
Confirm that the hose does not show signs of deterioration such as cracks and clogging.
Inspect the hose every 2 weeks.
Insects or dirt blocking the hose may cause leakage resulting in malfunctions.
4 Insert the hose into the drainage outlet on the back

natural_image
Simple line drawing of a door with a cable and a small object on top (no text or symbols)Feed the commercially available hose (ID 15 mm) into the drainage outlet while keeping the stopper pressed

natural_image
Technical line drawing of a mechanical bracket or enclosure with a pointed tip, no text or symbols presentConfirm that the hose is securely attached and does not leak.


natural_image
Mechanical assembly diagram showing a cylindrical component mounted on a base with a rod inserted (no text or symbols visible)5 Replace the tank.
The unit cannot operate without returning the tank.
How to set up the drainage hose

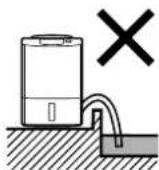
- hose immersed in water - hose raised to a level higher than the drainage outlet
Once every two weeks
Air filter
Debris clogging the air filter reduces the effectiveness of the dehumidifier. Clean once every 2 weeks.
1 Remove front panel and air filter

①Remove holding the bottom

If the metal fin inside the main unit is slightly bent, the unit's performance is not affected.
2 Remove the air-purifying filter

The air purifying filter cannot be washed in water. Replace the air purifying filter when it becomes dirty.
3 Clean the air filter

natural_image
Illustration of a hand using a pen to apply a grid-based instruction on a flat panel (no text or symbols present)Run a vacuum cleaner lightly over the air filter surface to remove the dirt.
Hose with lukewarm water when excessively soiled. Dry well.
4 Set the air-purifying filter

natural_image
Diagram showing a magnified view of a grid structure with a sphere and tool, no text or symbols presentHoneycomb side
Set the air-purifying filter into the air filter with the honeycomb side up.
5 Attach the air filter and front panel

natural_image
Illustration of hands installing or adjusting a door panel with a handle (no text or symbols visible)①Attach holding the tabs.

natural_image
Line drawing of hands inserting a card into a device (no text or symbols)②Hook the top edge to the top part of the unit and push the bottom in.
Maintenance
Do not use detergents, cleaning agents for heat exchange equipment, abrasive powders, chemically treated dusters, gasoline, benzene, thinners or other solvents, as they can damage the unit or the water tank, which may result in leakage.
Cleaning
Water tank
Wipe with a soft cloth.
Floating element
Do not remove or dismantle.

natural_image
Illustration of a hand cleaning a rectangular object with a cloth (no text or symbols)The unit draws in dust present in the air, and this may cause the tank to gradually become dirty. If the dirt does not come off easily, wash with cold or warm water, then wipe with a soft, dry cloth.
Main unit
Wipe with a soft cloth.

natural_image
Line drawing of a hand cleaning a refrigerator with a cloth (no text or symbols)Do not remove louvre or front door.
Replacing the Air Purifying Filter
The air purifying filter is disposable.
Make sure to replace the filter when it becomes dirty. (The filter cannot be washed or reused.)
When to replace it
Replace the filter when it becomes dirty (brownish) with cigarette smoke, dust, etc.
Generally, one filter should last about 6 months.
(This will depend on usage conditions.)
Replacing air purifying filter
For maintenance procedures see p.

1 Remove front panel and air filter
2 Replace air-purifying filter
3 Attach air filter and front panel
Parts sold separately
Air purifying filter for replacement
Type: MJPR-SXFT
Type code: 5C5 813
For these items contact your nearest Mitsubishi Electric dealer.
Storage
After switching the unit off, leave for about one day until any water inside has had time to settle. Then carry out the following steps.
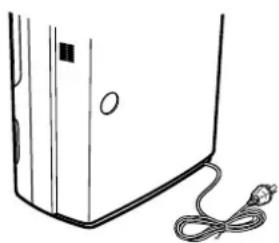
1 Bundle power cord
natural_image
Simple line drawing of a device with a cable and a circular component (no text or symbols)2 Remove the drainage water. 17

natural_image
Line drawing of hands holding a device with a tool, no text or symbols presentEmpty the water tank and wipe away any remaining drops of water.
3 Clean air filter 19

Remove grit with vacuum cleaner
4 Store the unit.
- When you are sure that all parts of the unit are dry, cover it with a cloth to keep it from dust.
- Store the unit in an upright position in a place not exposed to direct sunlight.
Troubleshooting
- For the symptoms listed below, refer to the remedies listed right.
| Symptom Cause/Remedy | |
| The unit blows warm air | ● Dehumidified air passes through heating coils causing it to warm (this unit is not a cooler). This is not a malfunction. [8] |
| Water does not collect in the water tank (minimal dehumidifying results) | ● Check to see if the temperature/humidity is low.Low room temperature/humidity reduces dehumidifying effectiveness. Confirm the current humidity reading (in winter, the air is dry reducing dehumidifying effects to zero). This is not a malfunction. [8] |
| The unit does not turn on (no air comes out)The unit keeps turning off | ● Check to see if the power cord is correctly plugged.→Plug the power cord properly into the power socket.  ● Check to see if anything is blocking the air intake or outlet.→Remove the obstruction. ● Check to see if anything is blocking the air intake or outlet.→Remove the obstruction.  |
● Check to see if the air filter is clogged.→Clean according to the maintenance procedures.  | |
| Louvre does not swing | ● Check to see if the unit is in FULL AUTO, MILDEW GUARD, or AUTO.The unit is automatically controlling the dehumidifier, fan, and standby times.  |
| [Hcok] FULL Lights | ● Check to see if the water tank is full.→Empty the water tank and return it to its original position. [TAKS]● Check to see if the water tank is inserted properly.→Adjust the position of the water tank.  |
| [TBXG] Lights | ● Check to see if the unit is in defrosting mode.The unit activates defrosting mode when the room temperature drops below 15°C. The dehumidifier and blower functions stop during defrosting.  |
| The humidity level does not reach the level set | ● Check to see if the room is not too large.→Use within effective boundaries (floor space).  |
| The hygrometer reading on the unit differs from other hygrometers in the room | ● Check to see if the exits to the room are open.→Refrain from opening doors/windows during operation.● Check to see if steam producing appliances such as kerosene heaters are on in the vicinity.  |
| The louvre does not move as set | ● Press the Swing louvre switch again.  |
| The water tank contains liquid or white water residue | ● The residue is from final product testing at the factory. It is not a result of a malfunction. |
| There is black residue on the inside of the water tank and lid. | ● The residue is from debris in the air.→Clean according to the maintenance procedures.  |
Symptom Cause/Remedy
| The unit makes noises | The operating noise is loud/reverberates | Check to see if the unit is on a slope or uneven surface.→Move to a sturdy even surface. Check to see if the air filter is clogged.→Clean according to the maintenance procedures Check to see if the air filter is clogged.→Clean according to the maintenance procedures Operating the unit in small rooms or in tight spaces sometimes causes the sound to reverberate.→Place a mat underneath the unit. Operating the unit in small rooms or in tight spaces sometimes causes the sound to reverberate.→Place a mat underneath the unit. |
| The operating sound suddenly increases in volume | The sound increases when the compressor activates (3 minutes after turning on the unit or during One-touch dehumidifier and Automatic modes). | |
| The wind sound changes in volume | The volume of the sound differs depending on the angle of the louver. | |
| The unit produces a simmering sound | This is the sound of the refrigerant.The sound can be heard while the refrigerant stabilizes after the unit turns on, changes modes, or stops. | |
| The unit produces a buzz that sounds intermittently (or the compressor does not activate) | This is the sound of the compressor.In modes that monitor the humidity level, the compressor operates intermittently causing the sound to be heard occasionally. The compressor does not activate after turning the unit off, or for 3 minutes after plugging the unit into a power socket. (This is to protect the compressor from damage.) The compressor does not activate after turning the unit off, or for 3 minutes after plugging the unit into a power socket. (This is to protect the compressor from damage.) | |
| The unit produces an odour | The heat converter heats rapidly causing an odor. This is not a malfunction. | |
- Error message (Humidity indicator)
Digital display Cause/Remedy
R2 appears
- Check to see if the power cord is plugged into the power socket properly.
→Plug the power cord into the power socket properly.

P4 appears
- Check to see if anything is blocking the air outlet. →Remove the obstruction, and plug the power cord into the power socket again.
- Check to see if the air filter is clogged. →Clean according to the maintenance procedures.


A1 A6 E0\~E8 appears
- Malfunction →Unplug the power cord, take note of the error message, and contact the place of purchase.
If the symptoms persist even after following the prescribed remedies, or the error message does not disappear, unplug the power cord, and contact the place of purchase.
Specifications
| Model | MJ-E16SX-A1 |
| Power supply | Single phase 230-240V 50Hz |
| Dehumidifying capacity | 16 L/day |
| Power consumption | 275W |
| Water tank capacity | stops automatically at approx. 4.0L |
| Weight | 11.7kg |
| Dimensions (h × w × d) | 570mm × 384mm × 183mm |
The dehumidifying capacity is a value obtained when the dehumidifier is continuously run at a room temperature of 30^ C and humidity of 80%. It indicates the amount of dehumidification per day (24 hours).
Standby power approximately 2W.

natural_image
Line drawing of a portable air conditioner unit with ventilation grilles and a handle (no text or symbols)NOTE
It is impossible to remove the back panel because the two spots shown are fastened with two special screws. If the unit malfunctions, contact your Mitsubishi dealer:
Distributed and guaranteed throughout New Zealand by:
Black Diamond Technologies Ltd.
Auckland Wellington Christchurch
Unit 1, 4 Walls Rd. 1 Parliament St. 37 Mandeville St.
PO Box 12726 Penrose PO Box 30772 PO Box 1604
Auckland Lower Hutt Wellington Phone 03 3417052
Phone 09 5269340 Phone 04 5609100 Fax 03 3417054
Fax 09 5253116 Fax 04 5609131
Fill in the following for your future reference.
| Place of purchase: | Telephone number: | ||
| Date of purchase: | Day | Month | Year |

- Table of Contents page
- Getting the most out of your dehumidifier
- Operating tips
- Drying laundry indoors
- Installing your dehumidifier
- Operating noise
- Precautions
- WARNING
- CAUTION
- - Keep the unit always in an upright position.
- Names and Functions of Parts
- Room temperature may rise 2-4°C during operation
- The humidity reading on the unit may differ from a hygrometer in the same room
- Low temperature/humidity decreases dehumidifying effects
- How does the dehumidifier work?
- How is mildew growth suppressed?
- Before using your dehumidifier
- Inserting the water tank correctly
- Plug the power cord into the power socket
- Turning the Unit ON and OFF
- To turn ON
- To turn OFF
- Information
- Switching operating modes
- - Laundry
- - Low
- - Mildew Guard
- - Low Temp
- - Automatic
- Swing louvre function (how to read the Swing monitor)
- Viewing the Swing Monitor
- With each press of the button
- Note
- Information Display
- LCD Panel
- High humidity warning
- Defrosting indicator
- Low temperature indicator
- Indicator lamp
- Tank full lamp
- OFF timer operation The OFF timer can be set for 1 to 9 hours. Set the timer when the power is switched on.
- To set
- Press
- To cancel
- ON timer operation
- Using the Child Lock
- To Lock
- • The child lock indicator
- If you lock the unit when the POWER is OFF.
- If you lock the unit when the POWER switch is ON.
- Releasing the child lock
- Carrying the Unit
- Pull the handle out, and grasp with a firm grip
- Removing Water from the Tank
- Remove the water tank.
- Remove the tank lid, and empty.
- Reattach the tank lid and replace the water tank.
- Continuous Drainage
- Open the drainage outlet
- Press drain stopper.
- Insert the hose into the drainage outlet on the back
- Replace the tank.
- How to set up the drainage hose
- Once every two weeks
- Air filter
- Remove front panel and air filter
- Remove the air-purifying filter
- Clean the air filter
- Set the air-purifying filter
- Attach the air filter and front panel
- Maintenance
- Cleaning
- Water tank
- Replacing the Air Purifying Filter
- Replacing air purifying filter
- Parts sold separately
- Storage
- Troubleshooting
- Symptom Cause/Remedy
- - Error message (Humidity indicator)
- Digital display Cause/Remedy
- Specifications
- Auckland Wellington Christchurch
Brand : MITSUBISHI
Model : MJ-E16SX-A1
Category : Humidifier