
MJ-EV38HR - Humidifier MITSUBISHI - Free user manual and instructions
Find the device manual for free MJ-EV38HR MITSUBISHI in PDF.


| Product Type | Dehumidifier with Air Purifier |
| Brand | Mitsubishi |
| Model | MJ-EV38HR |
| Dehumidifying Capacity | 38 L/day (at 30°C, 80% RH) |
| Power Consumption | 500 W |
| Power Supply | 230-240 V, 50 Hz |
| Water Tank Capacity | 5.5 L (auto stop) |
| Dimensions (H × W × D) | 630 × 410 × 299 mm |
| Weight | 18.1 kg |
| Operating Temperature Range | 5°C – 35°C |
| Inverter Technology | Yes (variable compressor speed for energy saving) |
| Air Purification | PM2.5 filter (pre-filter + deodorizing filter) |
| Operation Modes | Intelligent Laundry, Eco Auto, Easy, High, Low, Mildew Guard, Air Purifier |
| Laundry Drying | Yes (Intelligent Laundry mode with auto stop after 1-12 hours) |
| Continuous Drainage | Yes (via hose, 15 mm ID) |
| Child Lock | Yes |
| Timer | OFF Timer (1-12 h) and ON Timer (1-12 h) |
| Louvre Swing | Rear, Upward, Wide, or manual stop |
| Drying Inside Operation | Yes (anti-mildew after use, approx. 1 hour) |
| Mildew Guard | Yes (operates 4-12 hours, auto stop) |
| Defrosting | Automatic when room temperature below approx. 15°C |
| Auto Restart After Power Failure | Yes (resumes previous mode) |
| Casters | Yes (for easy movement) |
| Humidity Display | 30% – 80% (approximate) |
Frequently Asked Questions - MJ-EV38HR MITSUBISHI
User questions about MJ-EV38HR MITSUBISHI
0 question about this device. Answer the ones you know or ask your own.
Ask a new question about this device
Download the instructions for your Humidifier in PDF format for free! Find your manual MJ-EV38HR - MITSUBISHI and take your electronic device back in hand. On this page are published all the documents necessary for the use of your device. MJ-EV38HR by MITSUBISHI.
USER MANUAL MJ-EV38HR MITSUBISHI
- Compact and powerful
● Inverter technology, energy saving
● Air purifying function with
PM2.5 filter
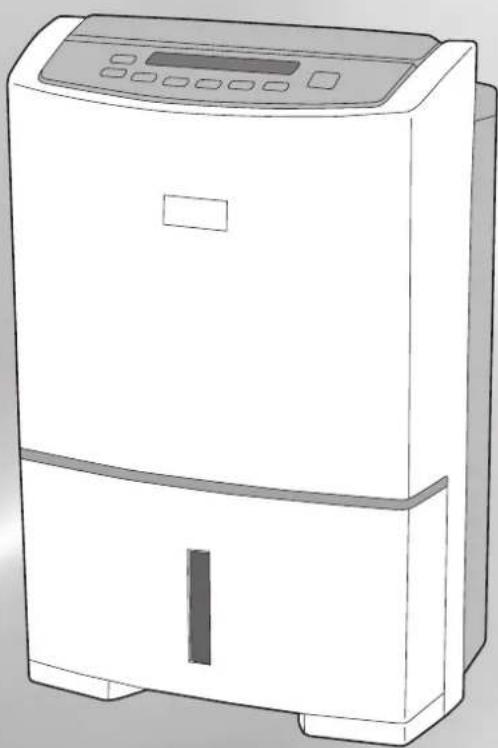
natural_image
Line drawing of a white industrial air purifier with control panel and door (no text or symbols)Table of Contents page
| Recommended Ways of Using the Unit 2 |
| Precautions |
| Warning |
| Tips on Dehumidification 5 |
| Features of This Dehumidifier 6 |
| Names and Functions of Parts |
| Front/Back | 7 |
| Control Panel/Inverter Indicator/LCD Display | 8 |
● Before Using Your Dehumidifier 9
| ● Carrying the Unit | 9 |
| ● Drying LaundryINTELLIGENT LAUNDRY | 10 |
| ● Dehumidifying | 12 |
| EASY/ECO AUTO/HIGH/LOW/MILDEW GUARD |
| ● | Cleaning the Air (AIR PURIFIER) | 15 |
| ● Replacement Parts | 15 |
| ● Using Child Lock | 15 |
| ● Using Louvre | 16 |
| ● Using Timer | 17 |
OFF TIMER/ON TIMER
| ● Drying Inside Operation | 18 |
| ● Draining | 19 |
| ● Continuous Drainage | 20 |
| ● Maintenance | 2# |
| ● Storage | 2# |
| ● Troubleshooting | 2# |
| ● Specifications | Back cover |
| ● Disposal | Back cover |
- In order to ensure correct usage, please read this instruction manual carefully and retain it for future reference.
-
Before accepting the Warranty at the time of purchase, please make sure that the date of purchase, place of purchase and other items are correctly filled in the form.
-
This appliance is not intended for users (including children) with insufficient physiological, sensory or mental capabilities or the lack of experience or knowledge, unless it is used under the supervision or instruction of a qualified safety personnel.
● Children should be supervised to ensure that they do not play with the appliance. - If the power cord is damaged, it must be replaced by the manufacturer, its services agent or any suitably qualified electrical person in order to avoid a hazard.
Recommended Ways of Using the Unit
When you want to dry laundry
When you want to perform automatic operation
●INTELLIGENT LAUNDRY

P.10
When you want to perform continuous operation
●HIGH

P.12-13
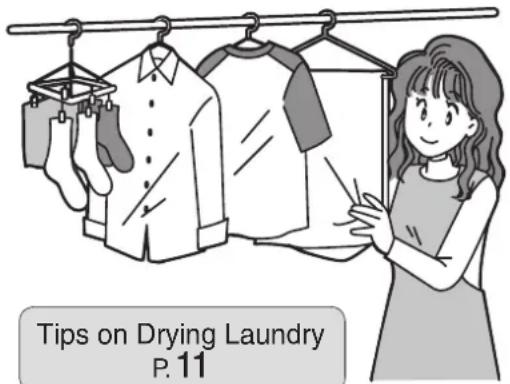
When you want to dehumidify

P.12-13
When you want to perform continuous operation When you want to set
●HIGH●ECOAUTO
When you want to perform automatic operation
Reducing blowing sound and performing continuous operation
●EASY●LOW
When you are worried about mildew in the bathroom
- MILDEW GUARD

P.12·14
When you want to clean the air
●AIRPURIFIER

P.15
Frequently Asked Questions

Why is there still condensation on the windows in the morning?
A. The dehumidifier can take a few weeks to reduce the moisture in your home to an acceptable level. This is best done by setting the unit to High and leaving it on 24 hours a day. We also recommend the unit be moved from room to room. After this initial few weeks the unit can then be set to one of the auto modes 50\~70 and this will maintain the Humidity to your desired level. On cold mornings there may still be a small amount of condensation on the windows.

Can I leave my Dehumidifier turned on 24 hours a day?
A. No problem. The unit can to be left running unattended. It will switch off automatically when the tank gets full or the required humidity is reached.
Precautions
The following diagrams indicate circumstances where danger can result from mishandling the unit.

WARNING
Mishandling may result in fatal or serious injuries.

CAUTION
Mishandling may result in minor injuries or damage to your home or property, etc.
Meanings of the graphic symbols used in this manual and on the unit are explained below.
WARNING
Do not damage or modify the power cord or plug. Do not use power sockets in which the plug fits loosely.
Do not modify, bundle, twist, bend or heat the power cord. Do not place under objects or use with the end close to the plug bent. (Keep pets from biting the cord.)


The cord may be damaged resulting in fire, electric shock or heat generation.
Do not use extension cords or multiple head adapters.
This may result in fire or electric shock

Do not start/stop the unit by plugging/unplugging the power cord.

This may result in fire and/or electric shock.
Do not put the unit near heat-generating devices (such as stoves, fan heaters, etc.).
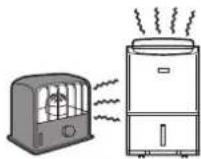

The plastic parts may melt and cause fire.
Do not put your fingers or any long object, into the air intake/outlet. Do not touch the swing louvre.


The internal fan rotates at high speeds, and such actions may result in injury.
Do not attempt to repair, disassemble, or modify the unit.
This may result in fire and/or electric shock. See the last page for service contact details.

Exclusively use 230-240 V AC power sockets for the power supply.
Failing to do so may result in a fire and/or electric shock.
* Use an extension cord by itself.

Wipe dust off the power plug and insert the plug firmly.
If the plug is not fully inserted into the socket, dust may gather on the connectors which may cause fire and/or electric shock.

Should abnormal symptoms occur (a burning smell, etc.), switch off the unit and unplug it from the socket.

Continuing to operate the unit may result in fire or electric shock.
See the last page for service contact details.
Remove water that has collected in the tank.
Accidentally drinking the water or using it for other purposes may cause illness and/or unforeseen accidents.

CAUTION
Do not cover an air outlet or air intake with laundry, cloth, curtain, etc.
This results in poor ventilation and may cause heat generation/fire.


Do not put vases or any other objects filled with water on the unit.
Water may leak into the unit adversely affecting electric insulation and cause electric shock and/or fire by short-circuiting.

Do not use the unit in a bathroom or other location where it is likely to come into contact with water, or w water.


Exposure to water may result in fire or electric shock caused by an electric leak.
Do not use the unit where it may be exposed to direct sunlight or other weather conditions.

(This unit is for indoor use only.)
This may cause overheating, electric shock and/or fire caused by an electric leak.
Do not use the unit in narrow, enclosed places such as inside closets, between pieces of furniture, etc.

This results in poor ventilation and may cause heat generation and/or fire.
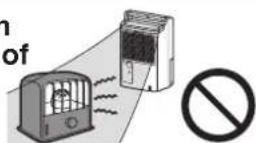
Do not use combustion appliances in the path of the air outlet.
This may cause incomplete combustion in the appliance.
Do not use the unit in places that may be subject to oil or flammable gas leakage.
Such a leak around the unit may cause combustion and fire.
In addition, chemicals and solvents evaporated in the air may deteriorate the unit (crack the main body) and cause water in the tank to leak, resulting in damage to property.

Do not use the unit in places where chemicals are used (such as hospitals, factories, laboratories or beauty salons).
Chemicals and solvents evaporated in the air may harm the unit and cause water in the tank to leak, resulting in damage to property.

Do not use the unit for special purposes, such as preservation of food, art or scientific works.

This may negatively affect the quality of the items stored.
Do not point airflow from the unit directly at the body for a prolonged period of time.
Be especially careful when using the unit where there
is someone who is unable to adjust the humidity (infant, child, or elderly person).
If air-flow is directed at the body for long periods, it may harm one's physical condition and lead to dehydration.
Do not stand on, sit on or lean against the unit.
As the unit is on casters, it may move, tip over, or fall causing personal injury.

Do not remove the Styrofoam from the floating element.
The floating element will not be able to detect a full tank resulting in water leakage, which may damage surround objects or cause electric s an electric leak.

Do not drain water continuously if there is a possibility that temperature around the hose could drop to freezing point.
Water inside the hose may freeze and prevent the water in the tank from flowing out. The water may leak from the unit and damage surrounding objects.

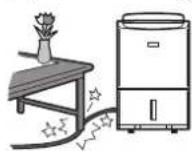
Install the unit in a location where the floor is flat and stable.
If the unit falls over, the water collected in the water tank may leak damaging surrounding objects and in turn result in fire or electric shock caused by an electrical leak.

Before moving the unit always switch it off, unplug it and remove water from the water tank.
Moving the unit with water in its tank may cause the water to leak and damage the surrounding objects and in turn result in electric shock and/or an electric leak.

After emptying the tank, transport the unit by grasping the handle firmly.

Losing your footing while carrying the unit may cause personal injury or damage to the floor.
CAUTION
Grasp the plug and remove from the power socket.
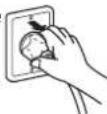

When removing the plug from the power socket, do not pull on it diagonally or by the cord as this may cause the projections/wiring to be damaged resulting in a short circuit, electric shock or fire.
Switch the unit off and unplug from the power source when cleaning it.
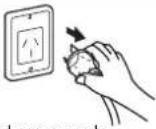

When the unit is on, the internal fan rotates at high speeds and may cause injury.
Unplug the unit from the power source when not using the unit for an extended period of time.

Otherwise it may cause fire and/or electric shock caused by an electric leak.
When draining water continuously or left unattended for long periods, inspect the unit every two weeks.

When the filter or hose is clogged with foreign materials or dirt, the dehumidification operation is disabled and may cause leakage.
When using the continuous drainage outlet, make sure to position the hose so that the water drains without obstruction.

The water in the tank may leak and damage surrounding objects.
Use the unit with caution in rooms where the walls, furniture and art work are vulnerable to dry air, as it may cause cracks and warping.

Warning
- Keep the unit always in an upright position.
Inclining the unit may cause water in the tank to leak into the unit, resulting in malfunction. Should you incline the unit accidentally, contact service number on the last page for advice.
- Do not carry or store the unit horizontally.
This may result in malfunctions. Such malfunctions are NOT covered under warranty.
Tips on Dehumidification
Drain the water tank before use.
Close the door and windows during operation.
Drying laundry
- Remove water from the laundry.
- Pull to remove any wrinkles on the laundry.
- Use swinging louvre to blow air to the laundry.
- Keep enough space between the laundry to allow air to pass through.

In winter, drying becomes easier if you also use a heater to raise the room temperature to approximately 16^ C or more.
- Drying times will vary depending on the type of the laundry and the room temperature. The low temperature may double the drying time of normal temperature. (Low temperature means approx. 10°C while normal temperature means above 20°C.)
- The strong airflow is blown from the top right point of the unit.
Installing your dehumidifier
Make sure to leave some space around the unit to ensure good results.

At least 20 cm
Operating noise
Place the unit on top of a mat. This reduces vibration and noise. It also prevents leaving depressions on carpets.
Features of This Dehumidifier
● Room temperature may rise 2–6°C during operation.
The dehumidifier does not have a cooler function. Due to heat produced during operation, the room temperature may rise 2–6°C. As a result, the unit may blow warm air, but this is not due to a malfunction. (During winter, the air may not feel warm as the temperature is below body temperature.)
How does the dehumidifier work?
If you pour cold water into a cup, the air around it becomes cold, causing water droplets to form on the surface of the cup.
The dehumidifier takes advantage of this phenomenon to remove moisture from the air.
① The unit draws air from the room, cools it with its cooling coil, causing the moisture to transform into water droplets.
② The water droplets fall into the water tank.
③ Dehumidified air is heated by the re-heating coil, and then blown out.
The humidity of the room is thus reduced by repeating the above steps.

- Inverter
The inverter is a device that controls the rotational speed of the compressor motor. When an operation starts immediately or in other situations, strong dehumidification is performed at a high motor speed. When the humidity becomes stable, the motor speed is decreased to continue the operation economically.
● The unit can operate in a room temperature range of 5–35°C.
If the room temperature exceeds 35^ C, the unit may operate in blower mode or increase the airflow. This is because the temperature within the unit rises causing the protection mechanism to operate. In order to lower the internal temperature of the unit, use the unit with the swing stopped and louvre vertical.
- If the temperature is below 5°C, only the blower is operational to prevent the extracted water freeze.
● The humidity reading on the unit may differ from a hygrometer in the same room.
Even in the same room, temperature and humidity levels may differ from place to place. If the hygrometer and the unit are in different parts of the room, the humidity levels are prone to differ. Moreover, humidity levels differ between places that have good and no airflow.
Use the reading on the unit as an estimate.

● The amount of dehumidifying becomes less in winter.
When the temperature and humidity are low, the amount of water collected is decreased.
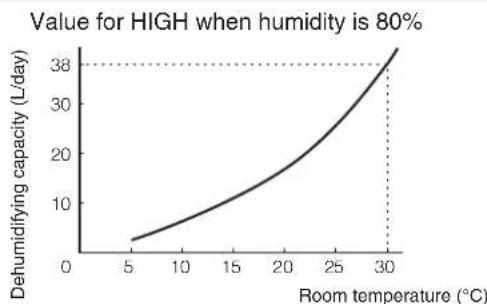
In winter, because the temperature is lower than in summer, the effect of the dehumidifier is greatly reduced as shown in the graph on the right. Although only a little water collects in the tank, this is not a malfunction.

natural_image
Two identical indoor water treatment setups with drying pots and household appliances, no text or symbols present.Summer (humidity) Winter (dampness)
line
| Room temperature (°C) | Dehumidifying capacity (L/day) | | --------------------- | ------------------------------ | | 5 | 5 | | 10 | 10 | | 15 | 15 | | 20 | 20 | | 25 | 25 | | 30 | 38 |- The values shown on the graph were measured at constant temperature and humidity and do not reflect values obtained in actual usage conditions.
● The amount of dehumidifying varies depending on the operation mode.
● Defrosting operation
When the room temperature drops to about 15°C, defrosting operation starts.
The operation runs every 70 minutes. Compressor stops, airflow is delivered and the melted frost then drips into the water tank.
Names and Functions of Parts
Front
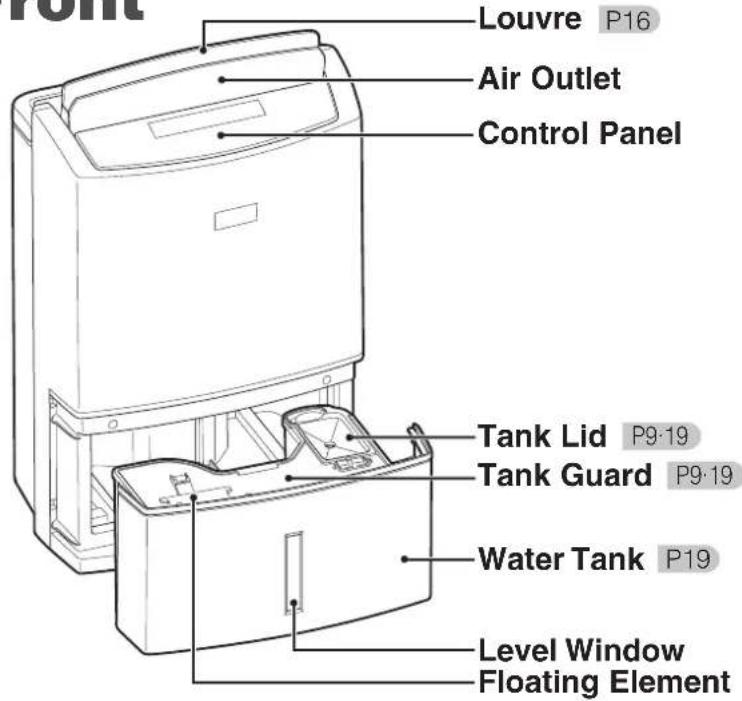
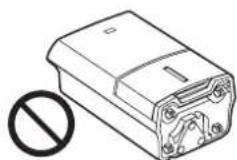
NOTE
It is impossible to remove the back panel because the four places shown are tightened with four special screws. If the unit has any malfunctions, contact your Mitsubishi dealer.

natural_image
Line drawing of a rectangular container with four wheels, no text or symbols presentThe water tank may contain water residue at time of purchase. This is from final product testing at the factory and is not due to a defect.
Back
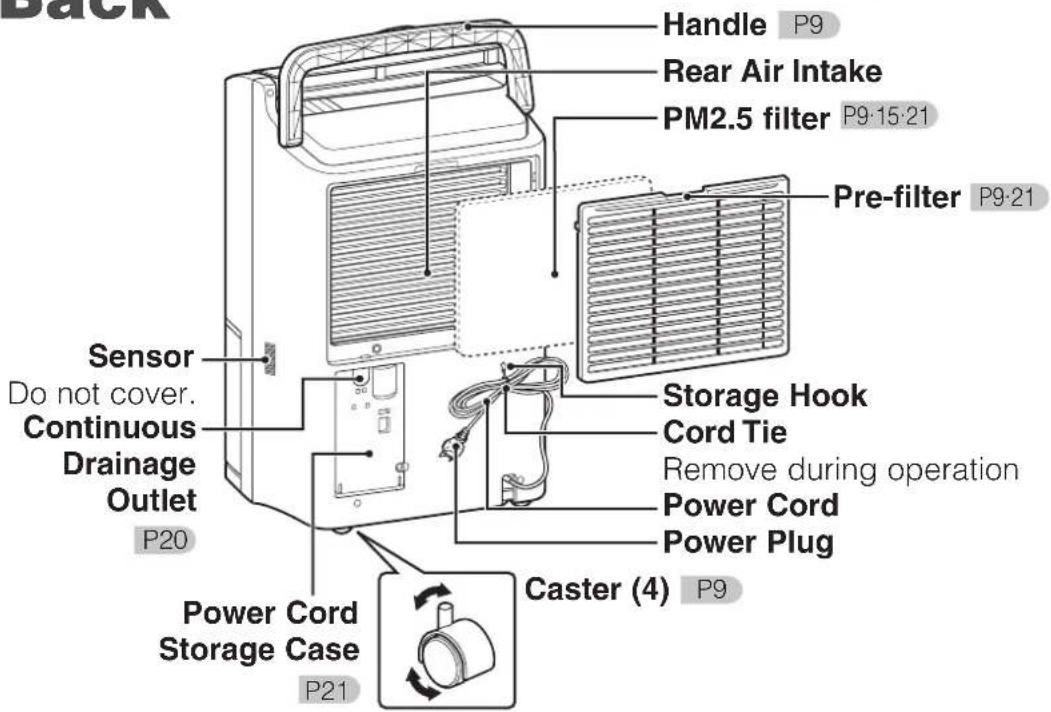
What is the PM2.5 filter?
The PM2.5 filter has a two-layer structure consisting of a white dust filter and a blue deodorizing filter.
The fine mesh filter can catch PM2.5 and dust.
The fibres contain a special deodorant and anti-bacterial agent (antiallergen, anti bacterial and degerming).
This filter cannot remove cigarette smoke and poisonous gases in smoke (e.g. carbon monoxide).
Accessory
● PM2.5 filter
PM2.5 filter is supplied with the appliance at the time of purchase.
Please install it before using the appliance. P9

PM2.5 filter for replacement P15
Control Panel
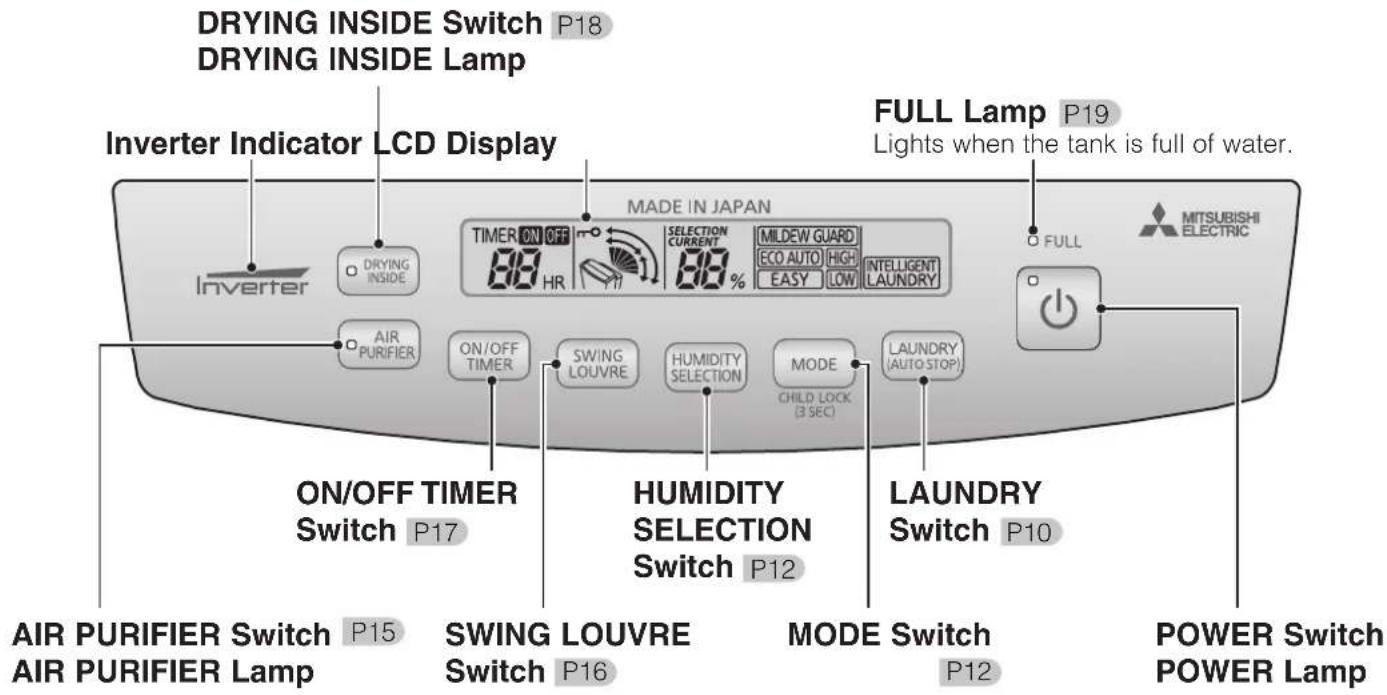
- The dehumidifier remembers the operation mode. Even if the power plug is disconnected or the power is turned off, the unit restarts at the previous setting.
- In the case of a power outage during operation, the dehumidifier will restart operation upon restoration in the operation mode before the power outage.
Inverter Indicator
Indicates the operation level of the selected operation mode.

- This indicator does not light during AIR PURIFIER operation and DRYING INSIDE operation, when the water tank becomes full, and when an error occurs.
LCD Display
● All of the indicators on the LCD display are shown for explanation purposes.
When any switch is pressed, the LCD backlight will turn on for approximately 10 seconds.

Humidity Indicator
- Indicates the approximate humidity.
- Insert the power plug into the power socket to display the current humidity.
● CURRENT ...Current humidity is displayed.
The humidity is displayed in a range from 30 to 80% - When the humidity is less than 30%: "30%" is displayed.
- When the humidity is more than 80%: "80%" is displayed.
- SELECTION ...Humidity Setting is displayed. (Only in ECO AUTO mode)
Before Using Your Dehumidifier
Setting the PM2.5 filter
The PM2.5 filter is supplied with the unit at time of purchase. Please install it before using the unit.
1 Remove the PM2.5 filter from the polyethylene bag.
2 Remove the pre-filter.

natural_image
Illustration of hands installing or adjusting a mechanical component (no text or symbols visible)Pull the pre-filter toward you, and then remove it.
Performance is unaffected even if the metal fin inside the unit are slightly bent.
3 Set the PM2.5 filter.
With the strips facing up, set the filter inside the tabs on the prefilter.

4 Set the pre-filter.

Insert the bottom tabs into the unit until they click.
Note
● Make sure the PM2.5 filter is attached on the unit. If it is not, fine dust will enter inside the unit and cause a malfunction.
Inserting the water tank correctly
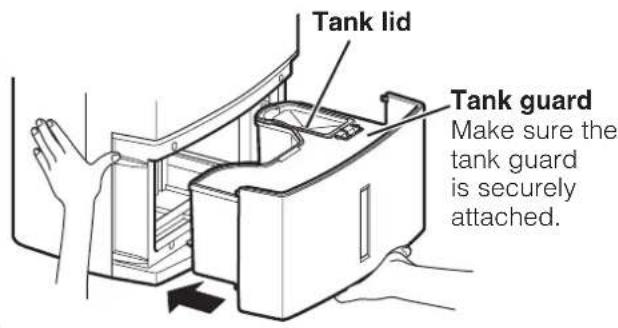
Plugging the power cord into the power socket

Use a 230-240 V AC power socket only.
● The current humidity is indicated.
If the louvre is open, it closes automatically.
Carrying the Unit
Hold the handle and move it.
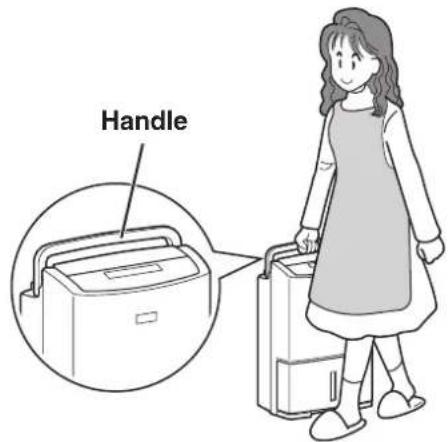
Casters can be used to move the unit.
First make sure to remove water from the water tank and close the louvre before carrying the unit.
- If casters are unable to roll smoothly, do not use excessive force to move this unit so as to prevent overturning.
- Do not carry the unit by holding the louvre.
- Do not put the unit in horizontal position during carrying as this may cause malfunctions.
- Use casters to move the unit steadily in one direction.
- lift the unit up to go over the doorsill or stairs and do not use casters to move the unit over the shaggy carpet as this may damage the carpet.
- Do not allow the power cord to be pulled into the casters, as this may damage the cord.
Note
Drying Laundry
When in the operation of INTELLIGENT LAUNDRY, the unit will estimate the laundry drying time and stop automatically.

1
Press
- POWER lamp lights.
● The operation mode is displayed. - Inverter indicator lights.
- Louvre opens, and blows air.

2
Press

INTELLIGENT LAUNDRY.
● A border is displayed around INTELLIGENT LAUNDRY

Information
- It is impossible to preset humidity when in INTELLIGENT LAUNDRY mode. In INTELLIGENT LAUNDRY mode, press HUMIDITY SELECTION switch to change into ECO AUTO mode. P12
3
Press and select the swing direction. P16
Press

● POWER lamp goes out.
● The operation mode indicator goes out.
- Inverter indicator goes out.
Information
- If the DRYING INSIDE (auto) operation has been activated, the DRYING INSIDE operation will start after the unit stops. P18
Information
● After the unit stops or the power plug is inserted, the compressor will not be activated (for compressor protection). The dehumidifier will begin to work in 3 minutes after pressing the POWER switch. The noise emitted from the unit will become louder when the unit begins to dehumidify.
- The dehumidifier remembers the operation mode. Even if the power plug is disconnected or the power is turned off, the unit restarts at the previous setting.
• INTELLIGENT LAUNDRY
The unit controls the airflow rate while monitoring the humidity in the room, and then estimates the laundry drying time and stops automatically. Operation time is approximately 1 hour and can be up to approximately 12 hours.
Operating each operation mode
Operation mode Automatic stop
INTELLIGENT LAUNDRY | O (Operates for 1 to 12 hours)
Information
- Remove the water from the tank before operating the unit.
The unit may stop operating when the tank is full before the laundry is dry. - When it is used with the OFF TIMER operation mode, the unit may stop operating before the laundry is dry. P17
- If the room temperature is approximately 5°C or less, it becomes difficult for water to evaporate from the laundry, and the operation will stop in around 1 hour.
At this time, please use the HIGH operation mode.
Tips on Drying Laundry
Make full use of the laundry drying operation to shorten the laundry drying time.
How to Hang Clothes
- Pull to remove any wrinkles on the laundry.
● Properly space the laundry for better ventilation (approximately 5 cm between the laundry). - Hang out the laundry which is difficult to dry to the place with good ventilation.
The drying time for the thicker parts of the laundry is probably longer.
● The laundry is of a large volume.
- The room temperature is lower ^P5
When the temperature is low (approximately 10^ C), the drying time is twice as long as that at normal temperature (approximately 20^ C).
- The room is big.

Placing the Dehumidifier
- Place the dehumidifier so that its back faces the laundry.
Air blows from the top of the dehumidifier towards the back.
How to Blow Air at Clothes
- Use swinging louvre to send air all over the laundry.
The drying time of the part where the air cannot reach is longer.
● The laundry is of a large volume.
Shift the position of the laundry during drying so that each part can get the blowing air.
About the Room for Hanging Clothes
- In a small room, it is recommended that the door and window be closed before dehumidifying.
It is effective not only to dehumidify, but also to dry the laundry as soon as possible.
- When the room temperature is low such as in winter
Use a heater in combination with the dehumidifier in order to raise the room temperature to approximately 16^ C or more, so that it is easy to dry the laundry.

natural_image
Interior view of a kitchen with hanging clothes, refrigerator, and storage unit (no text or symbols)Using the unit to dry clothes hung in a room is recommended on days such as the following.
●Cloudy and rainy days

natural_image
Illustration of a person looking through a window with heart graphs (no text or symbols)During the days of high humidity weather, the laundry will take a long time to dry.
● Days with a lot of pollen and dust in the air

natural_image
Illustration of a girl looking through a window with curtains and scattered objects (no text or symbols)Drying the laundry indoor can prevent pollen particles and other dirt from attaching to the laundry.
● Days you are unable to bring in the laundry during daylight hours
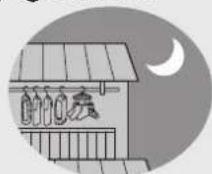
After sunset, as the outdoor air becomes cool, the dried laundry will absorb moisture.
The operation mode can be selected accordingly to the situation.

1
Press
Blip
to begin operation.
- POWER lamp lights.
● The operation mode is displayed. - Inverter indicator lights.
- Louvre opens, and blows air.
2
Select the operation mode.
● To select the dehumidifying mode and operate
Press
MODE
P13-14
● The operation mode switches each time the button is pressed.

flowchart
graph LR
    A["EASY"] --> B["ECO AUTO"]
    B --> C["MILDEW GUARD"]
    C --> D["HIGH"]
    D --> E["LOW"]
    style A fill:#f9f,stroke:#333
    style B fill:#f9f,stroke:#333
    style C fill:#f9f,stroke:#333
    style D fill:#f9f,stroke:#333
    style E fill:#f9f,stroke:#333
● To set the humidity and operate
Press
HUMIDITY SELECTION
P13
● The set humidity changes each time the button is pressed.

3
Press and select the swing direction.
P16
Press

- POWER lamp goes out.
● The operation mode indicator goes out. - Inverter indicator goes out.
Information
- The dehumidifier remembers the operation mode. Even if the power plug is disconnected or the power is turned off, the unit restarts at the previous setting.
● The humidity cannot be set in modes other than "ECO AUTO". - Operation stops when the tank is full. To restart operation, remove water from the tank. If a continuous drainage hose is set, the dehumidifier will operate continuously. P20
- In the case of a power outage during operation, the dehumidifier will restart operation upon restoration in the operation mode before the power outage.
- If the DRYING INSIDE (auto) operation has been activated, the DRYING INSIDE operation will start after the unit stops. P18
Note
When drying your shoes, put them in a position slightly higher from the floor so that the air from the dehumidifier is directed to them.
EASY
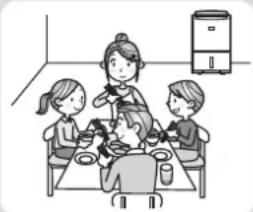
To relieve the discomfort from dampness, the unit operates intermittently after the automatic switching of airflow rate. Blowing air is used to control the room temperature rise if the room temperature is high. It is recommended when you want to maintain the comfortable level of humidity.
- If the set humidity level is reached, sometimes the blower/louvre will stop operating.
Installing the dehumidifier
Place the dehumidifier in the room to use it.
(Make sure the back of the dehumidifier is not too close to any walls) P5
natural_image
Illustration of a family dining together at a table with a refrigerator in the background (no text or symbols)
line
| Room temperature (°C) | Humidity setting (%) | | --------------------- | -------------------- | | 20 | 60 | | 27 | 50 | | 30 | 50 |If the room temperature is below 27^ C, the unit will dehumidify according to the room temperature.
If the room temperature is above 27^ C, the unit will stop dehumidification when the humidity level is below 50%, but the blower will work. Dehumidification restarts when humidity rises above 50%.
ECO AUTO
In order to maintain the humidity level, the unit operates intermittently after automatic switching of air flow rate.
- When the current humidity is lower than the set value, the unit will stop (both the blower/louvre will stop). It will restart if the humidity level is higher than the set value.
- For 6 minutes after the power is on, the unit will begin operating regardless of the room humidity.
- Sometimes it would take a long time to bring down the humidity depending on opening and closing frequency of the room door or the size or shape of the room.
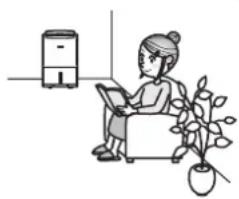
Installing the dehumidifier
Place the dehumidifier in the room to use it.
(Make sure the back of the dehumidifier is not too close to any walls) P5
natural_image
Illustration of a person sitting at a desk using a tablet, with a refrigerator and potted plant nearby (no text or symbols)• After displaying SELECTION the current humidity setting is displayed.

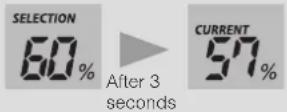
After approximately 3 seconds, the display returns to the current humidity display.
HIGH
The blower operates continuously in HIGH airflow mode.
The rotation speed of the compressor motor is increased. It is recommended for strong dehumidification.
LOW
The blower operates continuously in LOW airflow mode. The rotation speed of the compressor motor is decreased.
It is recommended when you want to dehumidify with lower blower sounds.
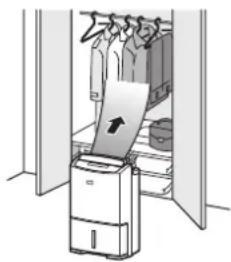
Installing the dehumidifier
Place the back of the dehumidifier towards a closet or wardrobe to use it.
natural_image
Illustration of a printer emitting a paper into a door, with clothes hanging from the window (no text or symbols visible)MILDEW GUARD
In this mode, the unit can dehumidify the bathroom to remove residual moisture and water drops, thus suppressing the mildew growth as a means of mildew prevention.
To install the unit

CAUTION

Do not use the unit in a bathroom or other location where it is likely to come into contact with water, or wash it with water.
Exposure to water may result in fire or electric shock caused by an electric leak.
Information
- For better results, do not turn on the room ventilation fan or open the window or door when the unit is operating.
● The results may vary depending on the size, floor and wall materials of the bathroom.
● There may be some residual water drops in the places that can collect water. - Mildew growth may still occur due to the fungus type and conditions of the room.
Under the containers of the bathroom, deeper inside of closets and behind furniture and places with bad air flow. - Places such as inside of the bathtub, under containers or where the blowing air cannot reach, cannot be dried.
- This mode does not remove existing mildew, scales and sticky liquids around the sinkhole.
- When it is used with the OFF TIMER mode, the unit may stop operating before completing the drying operation.
About MILDEW GUARD mode
The unit continues to operate for about another 4 hours after the humidity decreases to 50% and then stops automatically.
The operation time varies depending on temperature and humidity and ranges from approximately 4 hours (approximately 6 hours if the room temperature is below 20^ C) to approximately 12 hours.
How is mildew growth suppressed?
Mildew is unable to produce new spores if it is dried as mycelia.
This principle is applied to the MILDEW GUARD function.
(However, the spores have high resistance to dryness.)
"Research of Black Mold"
Experimental data from General Incorporated
Association Mold Prediction Laboratory
Operating each operation mode
| Operation mode | Automatic stop | Continuous operation |
| EASY — | ^* | |
| ECO AUTO — | ^* | |
| HIGH — | ○ | |
| LOW — | ○ | |
| MILDEW GUARD | ○ (Operates for 4 to 12 hours) | — |
Information
Operation stops when the tank is full. To restart operation, remove water from the tank.
* Operates continuously according to the room temperature and humidity. (Operates while turning the blower and compressor ON and OFF)
Cleaning the Air (AIR PURIFIER)
To operate the air purifier only.

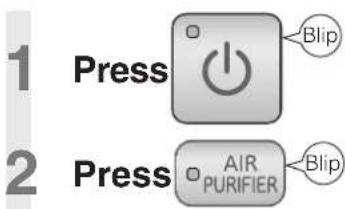
● AIR PURIFIER lamp lights.
To return to the previous mode, press the AIR PURIFIER switch again.
AIR PURIFIER
The unit cleans the air by passing it through the pre-fi iter and PM2.5 fi Iter. The dehumidifi er function is disabled.

The air passes through the PM2.5 fi liter in all modes, cleaning the air even if the AIR PURIFIER lamp is not lit.
●Cigarette smoke and toxins found in smoke, such as carbon monoxide, cannot be removed with these fi Iters.
Replacement Parts
The PM2.5 filter is a consumable part. Please replace the filter regularly.
Replacing PM2.5 filter
The PM2.5 fi iter is a consumable part.
If the filter is dirty, replace it with a new one. (The filter cannot be reused even if it is washed)
Conditions to replace
The PM2.5 filter has turned yellow or black due to cigarette smoke or dust.
The lifetime of the PM2.5 filter is one year. (It varies depending on the usage conditions)
Remove the pre-fi Iter and replace the PM2.5 fi Iter.
Removing the filter P9
PM2.5 fi Iter for replacement
● Type: MJPR-EHPFT-HK
For these items contact your nearest Mitsubishi Electric dealer.
Using Child Lock
The switches can be locked.
To prevent children from operating this unit, use this function.

● The child lock indicator is displayed. (Example)

■ If you lock the unit when the POWER is OFF.
The unit will not turn on, even if you press the POWER switch to turn it on. The LCD backlight and child lock indicator will blink.
■ If you lock the unit when the POWER is ON.
The unit will not turn off, even if you press the POWER switch to turn it off. Only the child lock indicator will blink.
Information
- When the child lock is set, only the CHILD LOCK switch can be used. When the child lock is activated, other switches are not operable. Deactivate the child lock to use the other switches.
● The child lock is cancelled when the power cord is unplugged.
Press for 3 seconds or more. CHILD LOCK (3 SEC)
● The child lock indicator goes out.
(Example)

The louvre can be made to swing. Select from the 4 possible settings to suit the purpose.
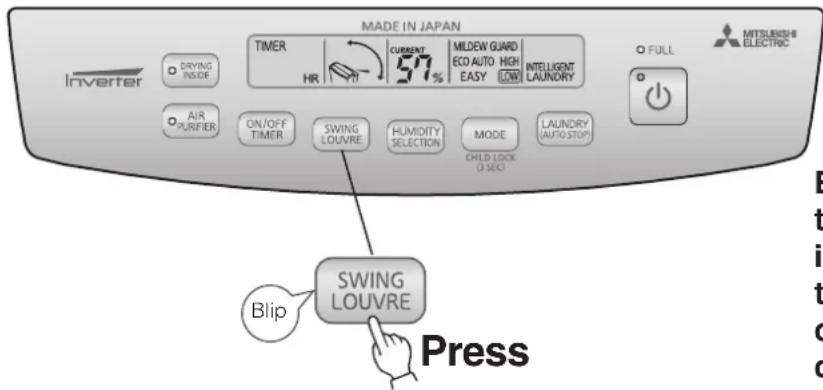
• Automatic louvre starts
• The monitor displays louvre direction
Remove the plug from the power socket and connect again, automatic louvre stops.
Displays louvre swing range (The louvre and monitor do not move in synchronization.)
Each time the switch is pressed, the swing direction changes.

flowchart
graph TD
    A["Louvre stopped"] --> B["Rear"]
    B --> C["Upward"]
    C --> D["Wide"]
    style A fill:#f9f,stroke:#333
    style B fill:#ccf,stroke:#333
    style C fill:#cfc,stroke:#333
    style D fill:#fcc,stroke:#333
| Objective | Recommended swing mode | Explanation of swing |
| To stop the louvre at the desired angle | Louvre stopped | Louvre stops in a vertical position, and louvre display screen will disappear.To change louvre to a desired angle, adjust the louvre angle by hand. |
| To dehumidify closets | Rear  Approximately 50° Approximately 50° | The louvre swings to send air to the back of the unit. |
| To dry the laundry | Upward  Approximately 60° Approximately 60° | The louvre swing speed is automatically controlled so that there is even distribution of air supply to the laundry. The louvre moves slowly through the last 20°of the swing, as it takes shorter time to traverse the upward arc than the rear arc when louvre moves at a constant speed. The louvre moves slowly through the last 20°of the swing, as it takes shorter time to traverse the upward arc than the rear arc when louvre moves at a constant speed. |
| To cover the entire room |  Approximately 120° Approximately 120° | The louvre swings from the upward position to the rear position to send air to all corners of the room. |
● The level of noise emitted from the unit varies depending on the air-blowing direction.
● To locate the position, the air outlet may stop up to 8 seconds and then start operating again.
- If the louvre is touched by hand or object, the louvre angle will change, so readjust the louvre by pressing the louvre switch.
- If air is blown directly onto a wall, the wall may become dirty because of dust in the air.
- This dehumidifier memorizes the swing direction but not the desired angle at which the louvre was stopped. The next time you start it, it returns to the default setting (upward).
When drying your shoes, put them in a position slightly higher from the floor so that the air from the dehumidifier is directed to them.
OFF TIMER operation
The OFF TIMER can be set between 1 to 12 hours. Set the timer when the power is switched on.

Setting OFF TIMER
1 Switch the power ON.
- Select operation mode. P10-14
- Select the louvre swing direction. P16
2 Set the operation time.
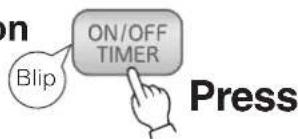
- Press once to display “/” OFF
● Each press will change the display in the sequence of 1 to 12 hours.
(Holding the switch will cause the display to change continuously.)

→The OFF TIMER is set.
● The remaining time will decrease one hour after each hour elapses.
- When the set time is reached, the unit stops automatically and the louvre closes automatically.
DRYING INSIDE (auto) operation will start if it has been activated. P18
Cancellation
Press and hold the ON/OFF TIMER switch until the remaining time disappears from the display.
Empty the water tank before operating. During operation, if the tank becomes full, the FULL lamp lights and the unit stops.
●The OFF TIMER and ON TIMER cannot be set at the same time.
- the OFF TIMER mode is used with the INTELLIGENT LAUNDRY or MILDEW GUARD, the unit may stop before the laundry or the bathroom is dry.
●The OFF TIMER cannot be set during DRYING INSIDE operation.
ON TIMER operation
The ON TIMER can be set between 1 to 12 hours. Set the timer when the POWER is off.

Setting ON TIMER
1 Switch the power OFF.
2 Set the time you wish the unit to turn ON.

- Press once, the operation mode indicator and “/” on the digital display flash, and “ON” is displayed.
● Each press will change the display in the sequence of 1 to 12 hours.
(Holding the switch will cause the display to change continuously)

- Select operation mode. P10-14
Set the DRYING INSIDE (auto) operation as desired. P18
- Select the louvre swing direction. P16
3 Confirm the time setting by pressing the POWER switch.

● The timer display lights. → The ON TIMER is set.
If both the timer display and operation mode indicator blink, it means the POWER switch is not pressed. (An alarm "blip blip" sounds for 1 minute.)
● The remaining time will decrease one hour after each hour elapses.
- When the set time is reached, the unit automatically starts.
Cancellation
Press POWER switch → OFF
- When the ON TIMER is set during the DRYING INSIDE operation, the operation is stopped.
- The ON TIMER function is not operable using a commercially-available timer plug.
Drying Inside Operation
The inside of the unit can be dried to suppress mildew growth on the cooler.
The DRYING INSIDE operation is recommended after each use of the unit (approx. 1 hour).
When continuous operation is being performed by continuous drainage (setting hose), there is no need to perform the
DRYING INSIDE operation every day. However it is recommend that DRYING INSIDE operation is used after every two weeks.
Automatic Operation
To activate DRYING INSIDE operation after each use
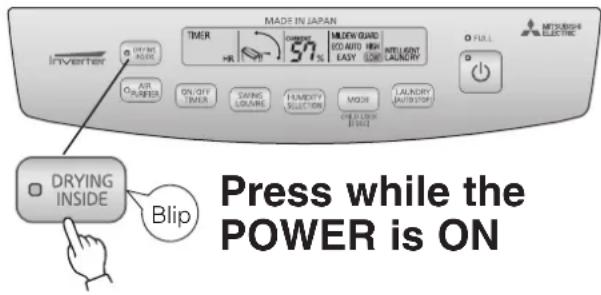
● DRYING INSIDE operation standby (DRYING INSIDE lamp lights.)
DRYING INSIDE operation starts when dehumidifying ends.
● DRYING INSIDE operation starts.
The DRYING INSIDE lamp flashes, the humidity indicator turns off, and the louvre stops in the vertical position.
DRYING INSIDE Operation
● DRYING INSIDE operation ends.
The DRYING INSIDE lamp turns off and the louvre closes.
Press when the PO (The DRYING INSID
Manual Operation
The DRYING INSIDE operation can only start when the POWER is OFF.

● DRYING INSIDE operation starts. The DRYING INSIDE lamp flashes, the humidity indicator turns off, and the louvre stops in the vertical position.
DRYING INSIDE Operation
● DRYING INSIDE operation ends. The DRYING INSIDE lamp turns off and the louvre closes.
To abort DRYING INSIDE operation
Press while the unit is performing the DRYING INSIDE operation (the DRYING INSIDE lamp turns off).
Press to abort the DRYING INSIDE operation and resume the regular operation.
- Disconnecting the power plug will stop the automatic operation.
- This function does not remove existing mildew. Also, aborting the DRYING INSIDE operation may cause the benefits to diminish.
- During DRYING INSIDE operation, do not close the louvre. It will cause noise.
● The moisture expelled from inside the unit may cause the room humidity level to rise.
● The air emitting from the unit may appear white depending on the humidity or temperature of the room. - The moisture expelled from inside the unit may have a smell due to odorants, which have not been caught by the filter and dissolve in water.
● During DRYING INSIDE operation, the OFF TIMER cannot be set. - If operation is stopped while the FULL lamp is lit, the DRYING INSIDE operation cannot be set unless the power is turned off.
When the tank is full (approximately 5.5 L), the unit automatically stops and the FULL lamp lights. Please empty the tank.
When the water tank becomes full, the FULL lamp lights.

- FULL lamp lights.
(There will be continuous sounds "bleep bleep bleep".)
- Airflow stops.
(Louvre stops.)
- LCD indicators go out.
Information
● After pouring out the water, replace the water tank, and the FULL lamp will go out. The unit restarts.
- When the FULL lamp is on, other operations are forbidden except for pressing the POWER switch.
- In OFF TIMER operation, the FULL lamp is ON as indicator.
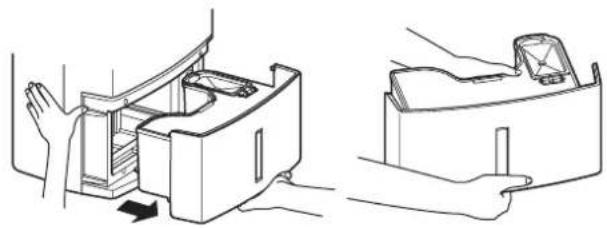
1 Remove the water tank.
natural_image
Line drawing showing two views of a device with hands operating it, no text or symbols presentPlace your hand on the handle and carefully pull the water tank out straight to prevent water from spilling.
Hold the water tank.
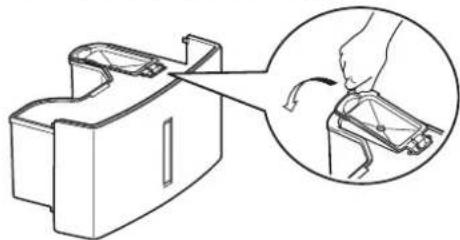
2 Open the tank lid, and pour out the water.

3 Close the tank lid.
natural_image
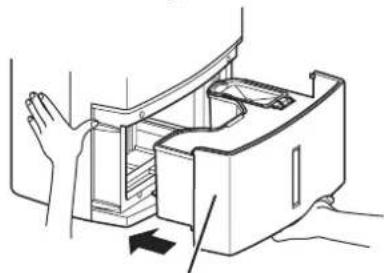
Diagram of a mechanical device with a hand operating a tool, showing a close-up of the component (no text or symbols present)4 Check the tank, and firmly push it all the way in.
natural_image
Line drawing of a hand pressing down on a mechanical component with arrows indicating motion (no text or symbols)Tank
Make sure the tank is not broken or cracked.
Confirm that the tank lid and the tank guard are securely attached, and push the tank in. (Sounds "Blip".)
Information
- If the tank is not installed correctly, the FULL lamp will come on, and the unit will not operate.
Note
- Secure the tank lid and tank guard properly or else the tank may become stuck. - Do not remove or dismantle the floating element from the tank. If it is removed, the unit cannot detect the water level, and this could result in leakage.
Continuous Drainage
If a drain is available, the unit can continuously drain water by attaching a commercially available hose (with an internal diameter of 15 mm) to the drain. As the unit does not stop due to the water tank being full, it can be operated for a long period of time without the need to empty the water tank. If there is power outage during operation, once power is restored, the unit resumes in the mode it was operating before power outage.
Items to prepare
- Commercially available hose (ID 15 mm) Long enough to reach the drain from the dehumidifier.
CAUTION

Do not drain water continuously if there is a possibility that temperature around the hose could drop to freezing point.
Water inside the hose may freeze and prevent the water in the tank from flowing out. The water may leak from the unit and damage surrounding objects.

When draining water continuously or left unattended for long periods, inspect the unit every two weeks.
When the filter or hose is clogged with foreign materials or dirt, the dehumidification operation is disabled and may cause leakage.
Turn off the power switch and unplug the power cord.
1 Remove the water tank.

natural_image
Line drawing of a mechanical device with hands operating it (no text or symbols)2 Open the power cord storage case.
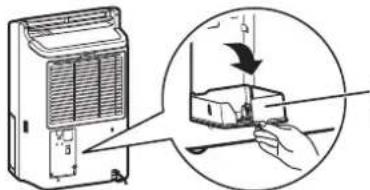
Power cord Storage case
3 Pull the drainage outlet stopper.

4 Insert the hose.
① Keep the stopper pulled out, and push in the commercially available hose firmly and straight into the drainage outlet.
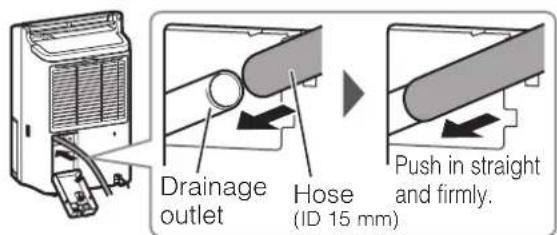
② Pull lightly to confirm that the hose does not come out.
5 Close the power cord storage case.
① Fix the continuous drainage outlet.
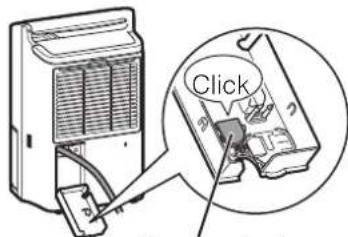
Continuous drainage outlet

② Close the power cord storage case.

natural_image
Diagram showing a device with ventilation slots and cable connections, including a magnified inset of its internal structure (no text or symbols present)6 Attach the tank to the unit, and set the end of the hose into the drain.
If the tank is not reattached, the FULL lamp remains ON and operation is not possible.
Drainage Hose Installation Example
Correct Incorrect

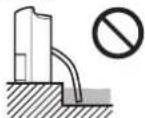
Hose is immersed in water.

Hose is higher than the drainage outlet.

Hose is going over a step.
• Water will not be drained
• Water will be collected in the water tank. When the tank becomes full, the unit operation will stop.
Note
● Make sure the hose is in good condition free of bends and cracks.
- If it is hard to insert the hose, put it in water and then insert it. Do not use oils or lubricants. It may damage the unit.
● To stop continuous drainage, remove the hose, put the tank and use.
- Do not use the power plug with the power plug being stored in the power cord storage case.
Maintenance
Do not use detergents, cleaning agents for heat exchange equipment, decontaminative powders, chemically treated cloth, gasoline, volatile oil, thinners, etc. They can damage the water tank or main body, which may result in leakage.
Once Every Two Weeks
Rear air intake • pre-filter • PM2.5 filter • sensor
Clogged pre-filter will reduce the effectiveness of dehumidifying. Clean it every two weeks is desirable. Pre-filter needs not to be replaced unless it is damaged or broken.
1 Remove the pre-filter P9 and use a vacuum cleaner to suck up the dirt from the rear air intake and sensor.

2 Remove the PM2.5 filter from the pre-filter.

PM2.5
filter
Pre-filter
The PM2.5 filter cannot be
washed. If the PM2.5 filter
is dirty, replace it. P15
3 Use a vacuum cleaner to suck up the dirt.


If the pre-filter is very dirty, wash it with normal or lukewarm water and dry it thoroughly.
4 Set the PM2.5 filter and pre-filter. P9
When Cleaning the Unit
Water tank • Main body Wipe with a soft cloth.
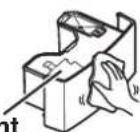

Floating element
Do not remove or dismantle.
- Because the dust in the air may cause the tank lid and water tank to become dirty. If the dirt cannot be removed, wash with water then wipe with a dry cloth.
- Mildew may form in the water tank when the dirt is not removed thoroughly.
Storage
After switching the unit POWER off, leave for one day until any residual water inside is removed. Then carry out the following steps.
1 Perform the DRYING INSIDE operation. P18
DRYING INSIDE operation is recommended for prevention of mildew growth inside the unit.
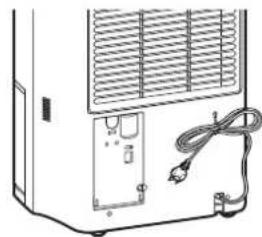
2 Hang the power cord on the storage hook or put it into the power cord storage case.
natural_image
Diagram of a portable air conditioner unit with attached cable and socket (no text or symbols)
natural_image
Diagram showing a device connected to an electrical socket with cables, highlighting the cable connection (no text or symbols present)3 Drain out the water.
Drain any water from the water tank and wipe off any remaining water. P19

4 Clean the pre-filter and PM2.5 filter.
Use a vacuum cleaner to suck up dirt.

natural_image
Two hand-drawn illustrations showing a tool interacting with a grid device and a measuring tool (no text or symbols present)5 Store the unit.
● Dry the unit fully and cover it with a cloth or similar item to protect the unit from dust.
- Store the unit in a place not exposed to direct sunlight and with less humid, and keep it in upright position.
- For the symptoms listed below, refer to the remedies listed right.
Symptom Cause/Remedy
The unit blows warm air.
Water does not collect in the water tank (minimal dehumidifying results).
The unit does not operate (no air comes out and the louvre does not swing).
The unit stops.
Stops after a short time.
☐ FULL lights.
The unit blows out warm air because dehumidified air passes through the re-heater. (There is no cooler function.) This is not a malfunction.
- check to see if the temperature/humidity is low. At first, confirm the current humidity. Low humidity reduces dehumidifying effectiveness. (In winter, the dry air makes the humidity low, and the amount of water collected is decreased.) This is not a malfunction.
- Check to see whether the power cord is off. → Plug the power cord fully into the power socket.
- Check to see if anything is blocking the air intake or outlet. → Remove the obstruction.
- check to see if the operation is performed in ECO AUTO and EASY mode. → The unit automatically switches from dehumidification to air blowing and stops.
- check to see if operation is being performed in the MILDEW GUARD mode. This operation ends automatically when the humidity drops and will stop in 4 hours as minimum.
- Check to see if the pre-filter is clogged. → Clean according to the "Maintenance" procedures.
- Check to see if operation is being performed in the INTELLIGENT LAUNDRY mode. + the room temperature drops to approximately 5°C or below, the operation will stop in approximately one hour. The reason for this is that if the room temperature is too low, it becomes difficult to remove moisture from the laundry and humidity does not change. P1
- Check to see whether water tank is full. Empty the water tank and return the water tank to its original position.
- Check to see if the water tank is inserted properly. → Adjust the position of the water tank.
- Check to see if the unit is in DRYING INSIDE operation. The unit starts DRYING INSIDE operation automatically after ending normal operations.
- Check to see if the room is too large. → Use the unit for the specified area range.
- Check to see if the windows and doors are opened too often. → Try to keep the room closed during operation.
- Check to see if steam producing appliances such as kerosene heaters are on in the vicinity.
- Hygrometer readings differ from place to place even if in the same room. Use the unit humidity reading as an estimate.
- Press the SWING LOUVRE switch again.
- When the power lamp is ON, it operates intermittently. - When the operation ends, the louvre closes.
- The residue is from final product testing at the factory and is not a malfunction.
- The residue is from the dirt in the air. → Clean according to the "Maintenance" procedures.
The unit continues to operate even though it is turned OFF.
The humidity level does not drop to the set level easily.
The hygrometer reading on the unit differs from other hygrometers in the room.
The louvre does not work as set.
The louvre remains open when it stops.
The water tank contains liquid or white water residue.
There is black residue on the inside of the water tank and lid.
Symptom Cause/Remedy
| The unit makes noises. | The operating noise is loud/reverberates. | ● Check to see if the unit is on a slope or uneven surface which causes the unit to tilt or wobble.→ Move to a safe and even surface.P4● Check to see if the pre-filter is clogged.→ Clean according to the methods specified in the "Maintenance" section.P21● Operating the unit on a wood board or in a small room is likely to cause acoustic resonance.→ Placing a soft mat underneath the unit can reduce the acoustic resonance.P5 |
| The operating sound suddenly increases in volume. | ● Sound increases when the compressor starts operation. (Approximately three minutes after turning on the unit, or during ECO AUTO and EASY operation.) | |
| The air blowing sound changes in volume. | ● The volume of the sound differs depending on the louvre angleP16 | |
| The unit produces a simmering sound. | ● This is the sound of the refrigerant flow. The sound can be heard when the unit is turned on, during operation, or when operation stops. No sound can be heard when the refrigerant flow stabilizes. | |
| The unit produces a buzz that sounds intermittently (or the compressor does not activate). | ● This is the sound of the compressor when it starts up. In ECO AUTO and EASY modes, the compressor operates intermittently, so there is compressor startup sound. The compressor does not start when the operation ends or until 3 minutes has passed after the unit is turned on. This is to protect the compressor from damage. | |
| The unit produces an odor. | When first used | ● The temperature of heat exchanger goes up rapidly, causing transient odor. |
| During DRYING INSIDE operation | ● The discharged moisture may emit an odor. It is common that the PM2.5 filter cannot eliminate all the odors and the odors can be absorbed by moisture inside the unit. | |
| The power plug or power socket generates abnormal heat. | ● Stop operation and seek service assistance using the number on the next page. | |
- Error message (Humidity indicator)
Digital Display Cause/Remedy
| b1 or b7 appears. | ● Check to see if the power cord is plugged properly.→ Correctly plug the power cord into the power socket. |
| U1 appears. | ● Is the room temperature too high?Press the POWER switch again when the room temperature becomes 40°C or less. |
| P4, F, or FF appears. | ● Check to see if anything is blocking the air outlet.Remove the obstruction and plug the power cord into the power socket again.● Check to see if the pre-filter is clogged.→ Clean according to the “Maintenance” procedures. P21 |
| A6, A8, b2, C1, C4, CA, CE, E0–E9–EA–EC, F0 F2 FC or Fd appears. | ● Malfunction→ Take note of error message, unplug the power cord, and seek service assistance using the number on the next page. |
- If the symptoms persist even after following the prescribed remedies, or the error message does not disappear, unplug the power cord, and seek service assistance using the number on the next page. When unplugging and plugging back the power cord into the power socket, wait at least one minute before plugging it in.
Specifications
| Model MJ-EV38HR-A | |
| Power supply Single phase 230-240 V 50 Hz | |
| Dehumidifying capacity*1 | 38 L/day |
| Power consumption 500 W | |
| Water tank capacity Stops automatically at approx. 5.5 L | |
| Weight 18.1 kg | |
| Dimensions (H × W × D) 630 mm × 410 mm × 299 mm | |
- The dehumidifying capacity is a value obtained when the dehumidifier is continuously run at a room temperature of 30^ and relative humidity of 80% . It indicates the amount of dehumidification per day (24 hours).
Disposal
Dispose according to the garbage regulations in your district.
- PM2.5 filter
Material: PET and PS
Unit
Do not disassemble. Dispose according to the garbage regulations in your district.
SOLE AGENT in Australia
MITSUBISHI ELECTRIC AUSTRALIA PTY LTD.
(Incorporated in New South Wales) ABN 58 001 215 792
348 Victoria Road, Rydalmere NSW 2116
For more information and support contact
Website: www.mitsubishielectric.com.au
Call 1300 651 808
SOLE AGENT in New Zealand
BLACK DIAMOND TECHNOLOGIES LIMITED (BDT)
Website: https://www.mitsubishi-electric.co.nz
Wellington Office (Head Office)
1 Parliament Street, Lower Hutt, PO Box 30772, Lower Hutt 5040 Phone: (04) 560 9147, Fax: (04) 560 9133
Auckland Office
Unit 1, 4 Walls Road, Penrose, PO Box 12726, Penrose, Auckland 1061 Phone: (09) 526 9347, Fax: (09) 526 9348
Christchurch Office
44 Halwyn Drive, Hornby, PO Box 16904, Hornby, Christchurch 8441 Phone: (03) 341 2837, Fax: (03) 341 2838
For after sales and service
Phone: 0800 737 842, Fax: 0800 845 632
Please complete the following form for your future reference.
| Place of purchase: Telephone number: | ||
| Authorised Service Centre: Telephone number: | ||
| Date of purchase: Day | Month | Year |
MITSUBISHI ELECTRIC CORPORATION
Website: https://www.mitsubishielectric.com

- Recommended Ways of Using the Unit
- When you want to dry laundry
- When you want to dehumidify
- When you are worried about mildew in the bathroom
- When you want to clean the air
- Frequently Asked Questions
- Why is there still condensation on the windows in the morning?
- Can I leave my Dehumidifier turned on 24 hours a day?
- Precautions
- WARNING
- CAUTION
- Tips on Dehumidification
- Installing your dehumidifier
- Operating noise
- Features of This Dehumidifier
- ● Room temperature may rise 2–6°C during operation.
- How does the dehumidifier work?
- - Inverter
- ● The unit can operate in a room temperature range of 5–35°C.
- ● The humidity reading on the unit may differ from a hygrometer in the same room.
- ● The amount of dehumidifying becomes less in winter.
- ● Defrosting operation
- Names and Functions of Parts
- NOTE
- What is the PM2.5 filter?
- Accessory
- ● PM2.5 filter
- Control Panel
- Inverter Indicator
- LCD Display
- Humidity Indicator
- Before Using Your Dehumidifier
- Setting the PM2.5 filter
- Inserting the water tank correctly
- Plugging the power cord into the power socket
- Carrying the Unit
- Hold the handle and move it.
- Drying Laundry
- 1
- Press
- 2
- INTELLIGENT LAUNDRY.
- 3
- Press and select the swing direction. P16
- Information
- • INTELLIGENT LAUNDRY
- Operating each operation mode
- Operation mode Automatic stop
- Tips on Drying Laundry
- How to Hang Clothes
- Placing the Dehumidifier
- How to Blow Air at Clothes
- About the Room for Hanging Clothes
- Using the unit to dry clothes hung in a room is recommended on days such as the following.
- ●Cloudy and rainy days
- ● Days with a lot of pollen and dust in the air
- ● Days you are unable to bring in the laundry during daylight hours
- to begin operation.
- Select the operation mode.
- Press and select the swing direction.
- EASY
- Installing the dehumidifier
- ECO AUTO
- HIGH
- LOW
- MILDEW GUARD
- About MILDEW GUARD mode
- How is mildew growth suppressed?
- Cleaning the Air (AIR PURIFIER)
- AIR PURIFIER
- Replacement Parts
- Replacing PM2.5 filter
- Using Child Lock
- OFF TIMER operation
- Setting OFF TIMER
- Switch the power ON.
- Set the operation time.
- Cancellation
- ON TIMER operation
- Setting ON TIMER
- Switch the power OFF.
- Set the time you wish the unit to turn ON.
- Confirm the time setting by pressing the POWER switch.
- Drying Inside Operation
- Automatic Operation
- DRYING INSIDE operation starts when dehumidifying ends.
- Manual Operation
- To abort DRYING INSIDE operation
- When the water tank becomes full, the FULL lamp lights.
- Remove the water tank.
- Open the tank lid, and pour out the water.
- Close the tank lid.
- Check the tank, and firmly push it all the way in.
- Continuous Drainage
- Items to prepare
- Drainage Hose Installation Example
- Maintenance
- Once Every Two Weeks
- Rear air intake • pre-filter • PM2.5 filter • sensor
- When Cleaning the Unit
- Water tank • Main body Wipe with a soft cloth.
- Floating element
- Storage
- Symptom Cause/Remedy
- Specifications
- Disposal
- MITSUBISHI ELECTRIC CORPORATION
Brand : MITSUBISHI
Model : MJ-EV38HR
Category : Humidifier