
CLT-D6622 - Laser printer SANYO - Free user manual and instructions
Find the device manual for free CLT-D6622 SANYO in PDF.


| Product Type | Digital Cordless Phone |
| Brand | SANYO |
| Model | CLT-D6622 |
| Display | LCD Display with Backlight |
| Keypad | Touch Keys with Intelligent Lock |
| Phonebook | 60 Contacts (name and number) |
| Caller ID | 40 Entries with Call Waiting |
| Redial | Last 20 Dialed Numbers |
| Voice Features | Speakerphone, Intercom, Conference (up to 3) |
| Standby Time | 120 Hours |
| Talk Time | 7 Hours |
| Battery Type | NiMH 3.6V 650 mAh (AAA) |
| Power Supply | AC Adapter 6V DC, 300 mA (Class 2) |
| Number of Supported Handsets | Up to 4 (Pre-registered: 2 handsets) |
| Ring Tones | 10 Polyphonic Melodies and 4 Traditional Ring Tones |
| Display Languages | 11 Languages (French, English, Spanish, etc.) |
| Package Contents | Base, 2 Handsets, Charger, 2 Batteries, 2 Adapters, Telephone Line Cord, 2 Belt Clips, Cleaning Cloth, Manual |
| Maintenance | Clean with a soft cloth; avoid solvents; clean charging contacts with an eraser |
| Safety | Use only the supplied adapter; do not expose to water; keep away from heat sources; unplug during thunderstorms |
| Warranty | 1 year (parts and labor) - SANYO Comfort Warranty |
| Country of Use | USA and Canada Only |
Frequently Asked Questions - CLT-D6622 SANYO
User questions about CLT-D6622 SANYO
0 question about this device. Answer the ones you know or ask your own.
Ask a new question about this device
Download the instructions for your Laser printer in PDF format for free! Find your manual CLT-D6622 - SANYO and take your electronic device back in hand. On this page are published all the documents necessary for the use of your device. CLT-D6622 by SANYO.
USER MANUAL CLT-D6622 SANYO
Expandable Cordless Telephone with Touch Sensitive Keypad
CLT-D6620 CLT-D6620(WH)
Dual Handset Models CLT-D6622 CLT-D6622(WH) Triple Handset Models CLT-D6623 CLT-D6623(WH)
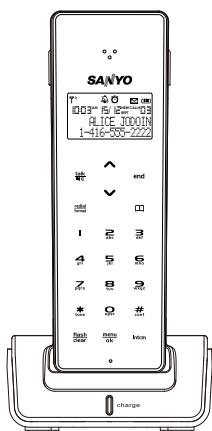
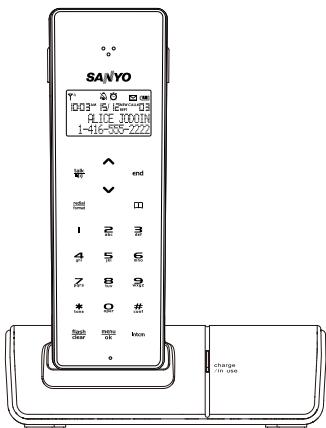
The picture depicts dual handset model
Important Charge the handset battery for 15 continuous hours prior to first use.
SANYO Canada Inc.
www.sanyo.ca
TABLE OF CONTENTS
INTRODUCTION 4
Main features 4
Package contents 5
NAMES AND CONTROLS 6
Touch handset 6
Base unit(cradle) 7
LCD display symbols 7
TOUCH PHONE USE AND HANDLING 8
SAFETY AND CARE 8
Safety and care 8
Caring for your product 9
Caution 9
GETTING STARTED 10
Choose the best location 10
Connecting the base unit 10
Connecting the charger (For multi-handsets model) 11
Handset battery pack 11
Activating and charging the handset battery pack 11
Telephone line connection 12
Low battery warning. 12
Attaching the belt clip 13
BASIC FUNCTIONS 13
Standby mode and sleep mode 13
Making and receiving calls. 13
PHONEBOOK 16
Storing numbers 16
Deleting numbers 17
Editing numbers 18
Calling stored numbers 19
CALLER ID DISPLAY 19
Caller ID with call waiting. 19
Call log 19
Viewing/calling Caller ID records 20
Saving Caller ID records in phonebook 20
Formatting Caller ID numbers 21
Deleting Caller ID records 21
TABLE OF CONTENTS
Deleting all Caller ID records 21
Missed calls 22
Message waiting 22
HANDSET SETTINGS 23
Navigate handset menus 23
List of submenus. 24
Change display settings 25
To assign a name to a handset 25
Change ring and key tones 26
Handset reception 26
HANDSET SPECIAL FEATURES 27
Phone setup 27
Smart key lock and manual key lock 27
Area code 28
Baby call 28
Auto answer 28
Clock and alarm settings 29
MULTI HANDSETS FUNCTIONS 30
Registration 30
RESET 32
DEFAULT SETTINGS 33
TROUBLESHOOTING 33
CHANGING THE BATTERY 35
POWER FAILURE 35
RECYCLING NICKEL-METAL HYDRIDE BATTERIES 36
HEADSET JACK 36
MAINTENANCE 36
MAXIMIZE BATTERY PERFORMANCE 37
TECHNICAL INFORMATION 38
SANYO COMFORT WARRANTY 40
SOS HELP LINE 42

The exclamation point within the triangle is a warning sign alerting you of important instructions accompanying the product.
INTRODUCTION
Congratulations on your purchase of this SANYO Digital cordless telephone with TOUCH keypad. Your stylish SANYO expandable cordless telephone is a fine-quality home communications product. It is carefully designed to provide a clear and interference-free calling experience and incorporates features that make phone company services like Caller ID and Call Waiting easier to use. With proper maintenance and care, it will provide you with years of enjoyment and convenience.
Main features
- Touch Keypad with Smart Key Lock
- Multiple Base and Handset Capability
-
60 Phonebook Records with Search and Edit Function
20 Record Last Number Redial Records
40 Incoming Caller ID Records
10 Polyphonic Melodies and 4 Traditional Ring Tones -
Handset Speakerphone
- Intercom / Call Transfer / Conference Call Capability(For multi handset models)
- Mute / Redial Functions
- Message Waiting / Missed Calls Notification
Clock / Alarm Functions
Multiple Language Display - Standby Time - 120 hours
- Talk Time - 7 hours
INTRODUCTION
Package contents
Make sure your package includes the following items.
For CLT-D6620/CLT-D6620(WH)
- Base unit (1)
Handset (1) - Rechargeable battery pack (pre-installed)(1)
- AC adapter (1)
Telephone line cord (1) - Belt clip (1)
- Cleaning cloth (1)
This user manual
For CLT-D6622/CLT-D6622(WH)
- Base unit (1)
Handset (2) - Charging cradle (1)
- Rechargeable battery pack (pre-installed) (2)
- AC adapter (2)
Telephone line cord (1) - Belt clip (2)
- Cleaning cloth (1)
This user manual
For CLT-D6623/CLT-D6623(WH)
- Base unit (1)
Handset (3) - Charging cradle (2)
- Rechargeable battery pack (pre-installed) (3)
- AC adapter (3)
Telephone line cord (1) - Belt clip (3)
- Cleaning cloth (1)
This user manual
NOTE: Keep this manual handy as you use your new product. It contains practical step-by-step instructions, as well as technical specifications and warnings.
NAMES AND CONTROLS
Touch handset
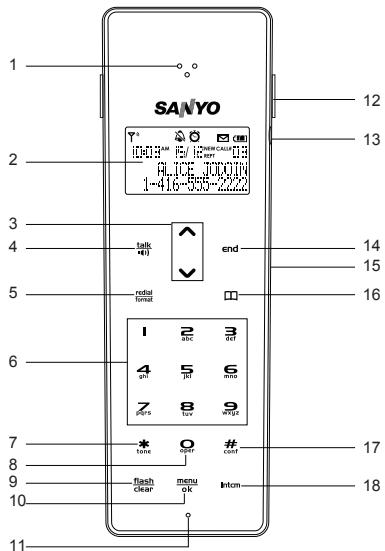
- Receiver
- LCD Display
- CID / VOL / 🚥 🚥 🚥 Keys: volume control; view caller ID log; navigate menus and settings
- talk: answer and dial calls; activate speakerphone
- radial: view, dial previous calls; format: format area code/long distance numbers
- 1 - 9: enter numbers and characters
- tone: enter special characters
-
O enter numbers and special characters
-
flash:activate call waiting; clear:delete text; exit submenu
- menu: go to menu; enter setting and confirm ok; mute function during a call
- Microphone
- Detachable belt clip
- Headset jack
- end: end calls; exit to standby mode
- Speaker
- enter phonebook
- conf: CONFERENCE / #: toggle capitals and small letters when entering text
- Intcm: INTERCOM: dial internal line
NAMES AND CONTROLS
Base Unit (cradle)
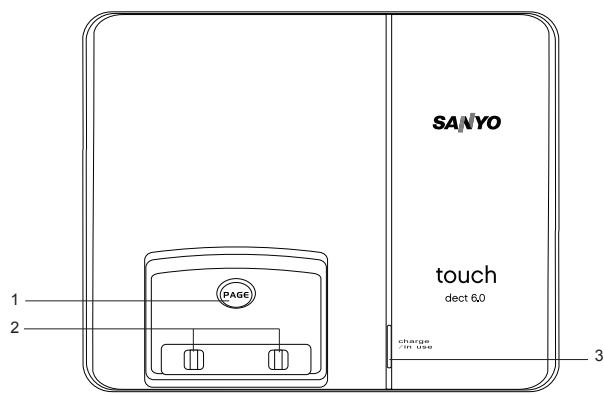
- PAGE: pages handset
- Charging contacts
- Charge/In use LED: Line status and voice message indicator
LCD Display symbols
| SYMBOL | DESCRIPTION |
| Y | Signal within range |
| R | Key lock activated |
| R | Ringer silenced |
| O | Alarm set |
| a | Small letters activated |
| M | Message waiting |
| [ ] | Battery full |
TOUCH PHONE USE AND HANDLING
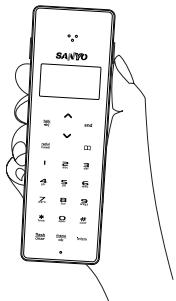
- The touch panel handset offers a new experience in telephone communication. This Touch keypad technology is very sensitive and may take a little time to get used to. To avoid accidental key contact while talking, first lift the handset to touch your ear, pause a brief moment, and then move the lower portion of the phone closer to your mouth.
- The keypad will automatically disable when the receiver first touches your ear. This feature reduces the risk of accidental keypad activation while the phone is held against the side of your face.
- To properly use your Touch phone, pick it up from the back and sides and cradle it in your hand. While talking, avoid touching the key pad area unnecessarily to prevent accidental triggering of the keypad.
- It is very easy to tell when the keypad is disabled, as the keypad backlight will be off.
- To turn keypad backlight on and activate the keypad, touch any of the number keys, wait for the backlight to come on and then dial normally.
NOTE: If more than one key area is touched, the keypad may not activate.
- During a call, the keypad will automatically disable and the backlight will turn off. When the backlight turns off and when you want to end the call, the first key-press of the end key will only wake up the keypad, and a second press of the end key will be required to terminate the call.
- When dialing digits, hold the handset away from the LCD area as shown. Touching the LCD display may trigger the automatic keypad lock sensor and prevent you from dialing. If the keypad lock sensor is triggered, a small key will appear in the top left corner of the display.
- To maximize the touch keypad performance, use the cleaning cloth that supplied with the phone to keep the keypad clean.
SAFETY AND CARE
Observe the following safety precautions and warnings when setting up and using this product.
Safety and care
- LCD panel - The LCD panel is made of glass, and may break if the unit is dropped. Place the unit securely on a stable surface.
SAFETY AND CARE
- Heat sources - Keep the product away from heat sources, such as radiators, stoves, heaters, and other heat-generating products.
- Water and moisture - Do not use the product in or near water or in high moisture areas, such as a bathroom.
Caring for your product
- Do not clean any part of your phone with benzene, thinner or other solvent chemicals as this may cause permanent damage that is not covered by the warranty. When necessary, clean it with a damp cloth.
- Keep your phone away from hot, humid conditions or strong sunlight.
- Never immerse the unit in water or use your phone outdoors in the rain, or handle it with wet hands.
- Do not subject the base unit to extreme force, shock, or fluctuations in humidity.
- Do not tamper with the internal components or disassemble the unit.
- Every effort has been made to ensure the highest standards of reliability for your phone. However, if something does go wrong, do not try to repair it yourself – consult your supplier.
Caution
- Dispose of old, defective batteries in an environmentally friendly manner in accordance with the relevant legislation. For information, go to www.rbrc.ca
- No exposed flames, such as lighted candles, should not be placed near the apparatus.
- Never use your phone in the open air during a thunderstorm – unplug the base unit from the phone line and the main socket when there are storms in your area.
- Do not install the base unit near a sink, bath or shower, or anywhere else where it could get wet. Electrical equipment can cause serious in jury if used while you are wet or standing in water.
- If the base unit ever falls into water, do not retrieve it until you have unplugged the power lead from the mains and the phone line plug from the phone socket; then pull it out by the unplugged cables.
- When handling batteries exercise care. Contact with conductive materials can short the batteries. To avoid the risk of fire, never use non-rechargeable batteries.
SAFETY AND CARE
- Use only the power source marked on the power supply (adapter). If you are unsure of the power supplied to your home consult your power company. Do not place objects on the power cord.
- Never use this unit near a gas leak as this can cause explosions.
- Occasional loss of synchronization between the handset and base unit is normal if there is significant interference from the surrounding environment.
- Disconnect the telephone line from the wall-outlet before replacing battery.

CAUTION:
You must use a Class 2 power source that supplies 6V DC and delivers at least 300mA . Its plug must fit the phone's DC IN jack. The supplied adaptor meets these specifications. Using an adaptor that does not meet these specifications could damage the phone or the adaptor.
Always connect the AC adaptor to the phone before you connect it to AC power. When you finish, disconnect the adaptor from AC power before you disconnect from the phone.
GETTING STARTED
Choose the best location
When choosing a location for your new phone, here are some import guidelines you should consider:
- The location should be close to both a phone jack and a continuous power outlet ( one which is not connected to a switch).
- The base and handset should be kept away from sources of electrical noise such as motors, microwave ovens, and fluorescent lighting.
- For better reception, place the base as high as possible.
- The base should be placed in an open area for optimum range and reception.
Connecting the base unit
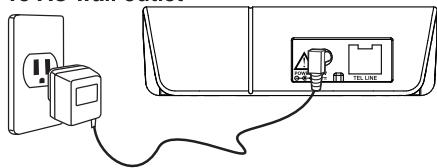
Plug the AC adapter into the POWER DC 6V jack on the back of the base. Plug the other end into a standard 120V AC wall outlet.
To AC wall outlet
GETTING STARTED
Connecting the charger ( For multi-handset model)
Plug the AC adapter into the POWER DC 6V jack on the back of the charger. Plug the other end into a standard 120V AC wall outlet.
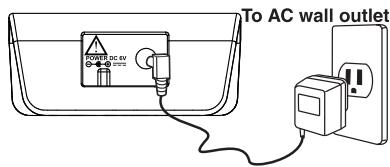
CAUTION: Use only the SANYO AC adapter that is supplied with this phone. Using another AC adapter may damage the phone.
Handset battery pack
The handset uses 1 x NiMH 650 mAh 3.6V (AAA) rechargeable battery pack. The removable battery pack is already pre-installed in the handset for you.
NOTE: Before using the handset and to prolong battery life, place the handset in the base handset cradle and charge for at least 15 hours.
WARNING: There is a risk of explosion if battery pack is replaced with the incorrect battery pack type. Dispose of the used battery pack according to the instructions.
Activating and charging the handset battery pack
To activate and charge the handset battery pack:
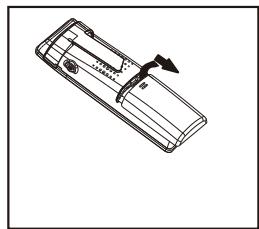
- Pull the battery contact tab out slowly and remove as shown.
- Place the handset in the cradle of the base unit.
- 1 → 0 → 0 The battery icon on the display will flash and the base indicator light will turn on to indicate the handset is charging.
- Charge battery pack for at least 15 hours prior to first use.
- When the battery is fully charged, the battery icon will stop flashing and will appear.
GETTING STARTED
Telephone line connection
Once the handset battery is fully charged, connect the telephone line cord to the THE LINE jack on the back of the base. Plug the other end into a telephone outlet.
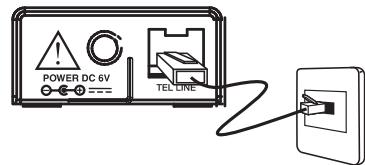
Low battery warning
The battery icon indicates the battery status:

FULL


EMPTY
- If the battery power is low, and the phone is in TALK mode, a warning tone will sound from the handset and 'LOW BATTERY' will appear on the screen.
- If the battery is low and the phone is in STANDBY mode, ' LOW BATTERY' will appear on the screen.
Removing and replacing handset battery pack
After years of use, all NiMH rechargeable batteries loose the ability to hold a full charge and may need to be replaced. The handset uses 1 NiMH 650 mAh 3.6V (AAA) rechargeable battery pack. Only replace with an approved battery pack available through SANYO. Contact the SANYO Customer Service Center at 1-800-263-2244 to order.
WARNING: There is a risk of explosion if battery pack is replaced with an incorrect type. Disposse of used battery pack according to your local waste management guidelines.
To install a replacement handset battery pack:
- Remove the battery door cover on the telephone handset.
- Insert the battery pack according to polarity engraved as shown.
- Slide the cover back on so that it clicks firmly into place.
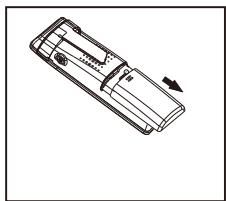
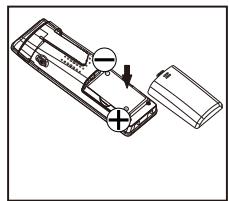
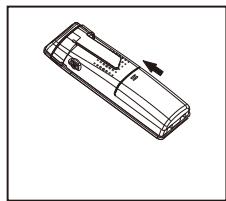
GETTING STARTED
NOTE: Before using the handset and to prolong battery life, place the handset in the base handset cradle and charge for at least 15 hours.
Attaching the belt clip
Belt clip installation
- Attach the belt clip by inserting the sides of the belt clip into the slots.
- Snap the ends of the belt clip into place.
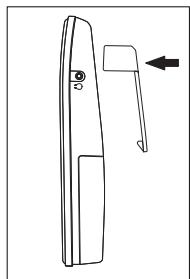
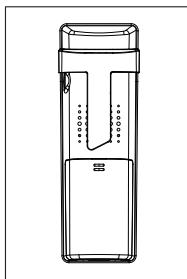
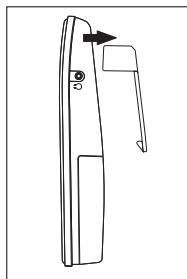
BASIC FUNCTIONS
Standby mode and sleep mode
When the handset has been inactive for a while, it will enter sleep mode and the LCD backlight and key lights will switch off. Touch any key to return to standby mode. The LCD backlight and key lights will activate to indicate standby mode.
To adjust the time from standby to sleep mode, please refer to HANDSET SETTINGS - CHANGE DISPLAY SETTINGS (page 25).
NOTE: If keylock is on you will need to unlock phone to enter standby mode.
Making and receiving calls
To make a call:
- Touch talk to get a dial tone.
- Enter destination phone number using 0 - 9. If you make an error, touch end to cancel.
BASIC FUNCTIONS
To pre-dial a call
- Enter destination phone number using 0 - 9. If you make an error, touch end to cancel or touch flash to delete the wrong numbers and re-enter.
- You can touch redial to insert a 3 second pause in the dialing. "P" will appear on the screen to indicate where the pause will occur.
- Touch talk to dial.
To answer a call:
- Remove the handset from the base unit and touch talk.
NOTE: When making or answering calls bring the top of handset (receiver) to your ear before speaking. Once the receiver has made contact with your ear, the unit's Smart Key Lock function will automatically lock the handset keys and you may bring the bottom of the handset (microphone) closer to your lips and speak into the microphone. Handle the handset with care to avoid accidentally triggering the keys.
To activate speakerphone during a call:
- While in Talk mode, touch talk. 'SPKR' will appear on the handset display to indicate speakerphone is activated.
- Touch again to deactivate speakerphone and return to Talk mode during a call. 'TALK' will appear on the handset display to indicate talk mode is activated.
To end a call:
- Touch [end].
OR
- Place the handset into the base cradle.
To redial a call:
To redial the last dialed number, touch talk, then touch radial format OR
- Touch to access a list of the previous 20 dialed numbers.
- Use or to scroll through and select the desired number.
- Touch [talk]
BASIC FUNCTIONS
Flash key:
Use the flash/clear key to activate custom calling services such as Call Waiting.
- Touch flash clear to answer the incoming call and place your existing call on hold.
- Touch flash to toggle between calls.
NOTE: You must subscribe to Caller ID with Call Waiting Service from your local telephone company.
To adjust volume during call:
- Touch or to raise or lower the volume.
To mute the microphone during call:
To have a private, off-line conversation, use the MUTE feature. The caller on the other end of the line cannot hear you, but you can still hear them.
- Touch menu to activate mute, 'MUTE' shows on the screen.
- Touch [menu] again to return to your phone conversation.
Temporary touch-tone access (* TONE)
This feature enables Pulse service phone users to access touch-tone services offered by banks, credit card companies, etc.
- Dial the desired number.
- Touch tone after your call is answered.
- Follow the voice instructions to complete your desired action.
- Hang up when finished. The phone returns to Pulse service.
Handset locator (Paging function)
This feature helps to locate a misplaced handset.
- Press PAGE on the base, the screen shows 'PAGING'. The handset beeps continuously for about 2 minutes or until you touch any key on the handset.
-
To stop the paging, do one of the following:
-
Press PAGE on the base.
- Touch to enter talk mode.
- Touch any key on the handset.
PHONEBOOK
The phonebook can store up to 60 phone numbers (of up to 24 digits) and names (up to 16 characters).
Storing numbers
- Touch
- Touch menu .The cursor is pointing to "ADD RECORD".
- Touch menu again to confirm. ok
NOTE: When the memory is full, you will hear a beep and 'PHONEBOOK' FULL' appears. You cannot store names and numbers.
- Enter the name using 1 - 9 (see TO INPUT NAMES below).
- Touch menu/ok to confirm and save name.
- Enter the number using 1 - 9, *, #. If you wish to add a pause, touch * key at the desired location. 'P' will appear on the screen. Each pause counts as one digit.
- Touch menu to confirm and save entry.
NOTE: A number can be saved without entering a name.
To input names:
- Touch a number key (0-9) repeatedly within one second until the desired character appears.
- Touch a different key to input the next character or if the next character uses the same number key, you must wait for 1 second until the cursor move to next digit and then touch the same number key to input character.
- Repeat steps 1 and 2 until the name is entered.
PHONEBOOK
Using handset keys to enter text
Characters are entered by touching the 0 - 9 keys. A consecutive touch of the same key will enter a different character according to the table below:
| KEY | CAPITAL LETTERS | SMALL LETTERS |
| 1 | SPACE 1 _ - + = ^ . , ; : | SPACE 1 _ - + = ^ . , ; : |
| 2 | ABC2AÀÄÄÄÄÄÉç | abc2àáããäæç |
| 3 | DEF3ÈÉÉÉD | def3èéēd |
| 4 | GHI4IÎI | ghi4IÎI |
| 5 | JKL5 | jkl5 |
| 6 | MNO6ÓÓðÖØÑ | mno6òóðöøñ |
| 7 | PQRS7 | pqrs7 |
| 8 | TUV8UUÜU | tuv8uúù |
| 9 | WXYZ9þ | wxyz9þ |
| 0 | 0' "() [< >{} | 0' "() [< >{} |
| *tone | * # ? ! &% / \ | | * # ? ! &% / \ | ~ |
| #conf | Change between capital and small letters | |
| flashclear | To delete the previous character | |
| menuok | To enter text | |
| end | To exit to the main menu | |
Deleting numbers
To delete 1 entry:
- Touch
- Touch or or alphabetic search to select the entry you wish to delete.
- Touch menu ok
- Use or to select 'DELETE RECORD'.
PHONEBOOK
- Touch menu to confirm selection, "DELETE ?" shows on screen. ok
-
Touch menu to confirm delete. OK OR
-
Touch
- Touch and or alphabetic search to select the entry you wish to delete.
- Touch flash clear.
- Touch menu to confirm delete. ok
To delete all entries:
- Touch [O].
- Touch menu ok
- Use and to select 'DELETE ALL'.
- Touch menu to confirm, "DELETE ALL?" shows on screen.
- Touch [menu] again to delete all.
Editing numbers
- Touch
- Touch and or alphabetic search to select the entry you wish to edit.
- Touch menu ok
- Use and to select 'EDIT RECORD'.
- Touch menu to confirm. ok
- Touch flash key to delete characters and then use 0-9 keys to re-enter the name, touch menu to confirm. If the name does not need to be modified, touch menu to edit the number.
- Use 0 - 9 keys and flash key to edit the number, Touch or to move the cursor left or right to edit the number..
- Touch menu to confirm. OK
PHONEBOOK
Calling stored numbers
- Touch
- Touch and to scroll to the entry you wish to dial. OR
Touch the 1 - 9 key corresponding to the 1st letter of the entry and use and to select name you are seeking; for example names beginning with "R" touch 7 three times. The first location that begins with the letter you entered appears.
- Touch talk to dial.
CALLER ID DISPLAY
You must subscribe to Caller ID service through you local telephone company to use these feature. If a caller number matches one of the number in the phonebook, the display will show the name information in the stored memory even if the incoming call does not have the name.
NOTE: Check with your local telephone company regarding name service.
Caller ID with call waiting
When you subscribe to Caller ID with Call Waiting service from your telephone company, you are able to see who is calling when you hear the Call Waiting beep. Caller identification information appears on screen after you hear the beep.
Touch flash key to put the current call on hold so that you can answer the incoming call. To return to the first call, touch flash again.
Call log
The incoming caller information transmitted from the telephone company is received by your phone between the first and second ring and stored in the Call log. If you answer a call before the second ring the caller information may not be stored.
When the Call log memory is full, a new call automatically replaces the oldest call in memory.
CALLER ID DISPLAY
Viewing / calling Caller ID records
The call log records the caller name, number and the date / time for the previous 40 calls.
To view the call log:
- Touch or to enter the call log during standby mode. The number of new and total calls will be displayed.
- Use or to review individual call details.
NOTE: The call record is updated in ascending order. The most recent call will be assigned the highest number in the call log.
To dial the reviewed number:
- Use or to scroll to the desired Caller ID entry.
-
Touch talk to call back. OR
-
To edit the number before dialing, touch menu ok
- Use and to select 'EDIT TO DIAL'. Touch menu ok confirm.
- Edit the number using 0 - 9 and flash clear
- Touch talk to dial.
NOTE: The 'NEW' icon indicates that the call details have not previously been reviewed. The 'REPT' icon indicates that you have received repeat calls from the same number.
Saving Caller ID records in phonebook
- Touch or to review the call log. The number of new and total calls will be displayed.
- Use or to select the number you wish to save.
- Touch menu to confirm. 'ADD RECORD' will appear. OK
- Touch menu to confirm.
- Touch menu to confirm name, if there is no name, use 1-9 keys to enter name.
- Touch menu to confirm number. If necessary use 1-9 and flash to edit number before saving. Touch or to move the cursor left or right. The entry is now saved.
NOTE: For details on how to edit phonebook entries please see PHONEBOOK section.
CALLER ID DISPLAY
Formatting Caller ID numbers
- Use or to select a phone number in the Caller ID memory.
- Touch the radial format. The number you selected can now be formatted by touching the radial format. For example, if the Caller ID number appears 1-416-222-5555 but it is not a long distance number, touch the radial key until it shows 416-222-5555, without 1.
Deleting Caller ID records
- Touch or to review the call log. The number of new and total calls will be displayed.
- Use or to select the Caller ID record you wish to delete.
- Touch menu ok
- Touch or to select 'DELETE RECORD'.
- Touch menu to confirm.'DELETE?' shows on screen.
-
Touch menu to confirm and delete the Caller ID record. OR
-
Touch or to review the call log. The number of new and total calls will be displayed.
- Use or to select the Caller ID record you wish to delete.
- Touch flash clear to delete.
- Touch menu to confirm.
Deleting all Caller ID records
- Touch or to review the call log. The number of new and total calls will be displayed.
- Use or to select any record.
- Touch {menu} ok
- Touch or to select ' DELETE ALL'.
- Touch menu to confirm. 'DELETE ALL?' shows on screen.
- Touch menu to confirm and delete all Caller ID records.
CALLER ID DISPLAY
Missed calls
If you miss a call, ' MISSED CALL' will appear on screen during standby mode. To view your missed calls use and to enter and browse the call log (see VIEWING / CALLING CALLER ID RECORDS page 20). After you reviewed the call log, ' MISSED CALL' will disappear.
When you view the Caller ID of your missed calls the following notifications will appear:
- 'NEW' indicates that the calls have not been reviewed.
- 'REPT' indicates that you have received repeat calls from this same number.
Message waiting
If you subscribe to a Voice Mail service offered by your local telephone company, the phone alerts you when a voice mail message has been received.
- will appear on the screen and the backlight will flash.
The base unit LED will flash.
NOTE: 一 will disappear and the LED will stop flashing automatically once all messages have been checked and deleted.
NOTE: You must subscribe to this service from your local telephone company.
To manually clear the message waiting indicators:
- Touch menu and select the SECURITY SET menu and then the CLEAR MSG WAIT submenu.
- Use or to select 'YES'.
- Touch menu to confirm. OK
HANDSET SETTING
Navigate handset menus
| KEY | FUNCTION |
| ^ | To scroll up through current menu and submenu |
| √ | To scroll down through current menu and submenu |
| menu ok | To confirm selection |
| flash clear | To exit to previous menu |
| end | To exit and return to standby mode |
How to navigate menus:
During Standby mode
- Touch menu to enter a menu or submenu.
- Use and to select the setting or menu. indicates selected menu or setting.
- Touch menu to confirm or select the next menu. Use flash to exit to the previous menu.
TIP
- You cannot enter the menu if you are making a call or have pre-dialed any part of a phone number.
- When you have changed a setting the handset will beep and exit the menu.
HANDSET SETTING
List of submenus:
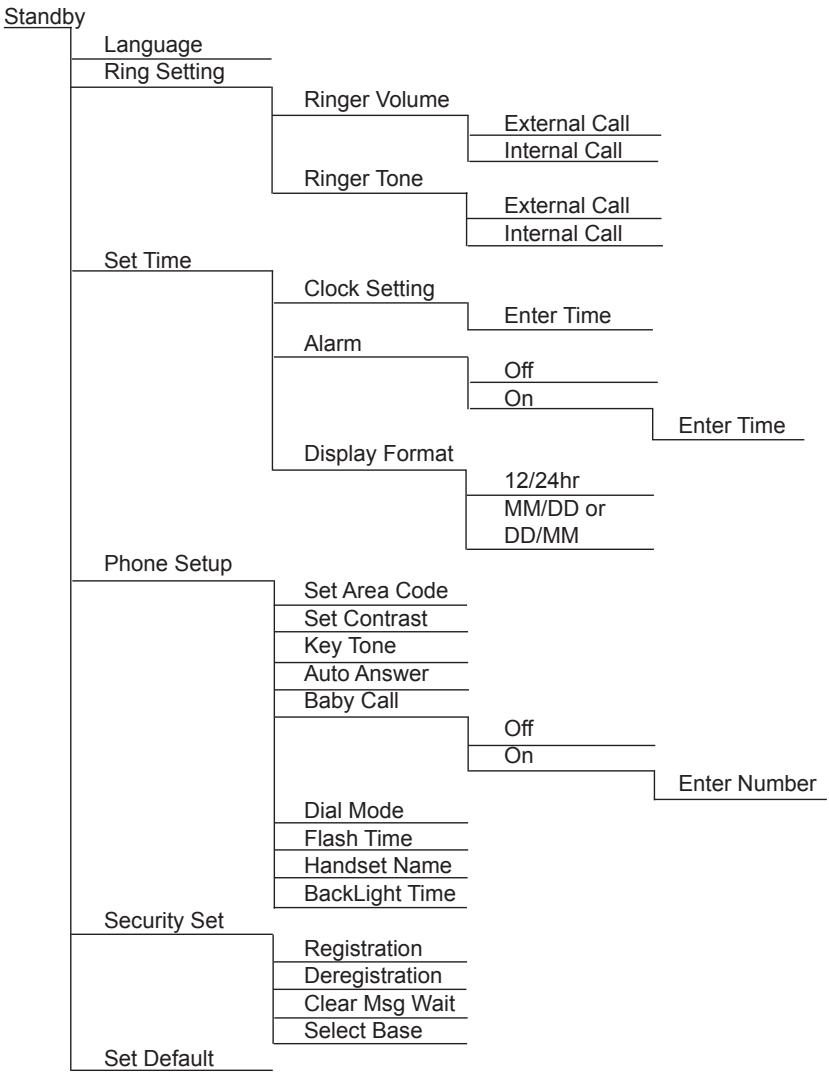
HANDSET SETTING
Change display settings
The handset can display information in English, Spanish, French, Portuguese, Italian, Dutch, German, Danish, Swedish, Norwegian and Finnish.
To c hange language:
- Touch menu and select Language submenu.
- Use and to select desired language.
- Touch menu to confirm.
To adjust screen contrast:
- Touch menu and select the PHONE SETUP menu and then the SET CONTRAST submenu.
- Use or to change contrast.
- Touch menu to confirm.
To alter backlight time:
- Touch menu and select the PHONE SETUP menu and then the BACKLIGHT TIME submenu.
- Use or to change selected backlight time (20, 30, 40, 50 or 60 seconds).
- Touch menu to confirm.
To assign a name to a handset
- Touch menu and select the PHONE SETUP menu and then the HANDSET NAME submenu.
- Use 1-9 keys to enter a name. (see TO INPUT NAMES Page 16)
- Touch menu to confirm.
HANDSET SETTING
Change ring and key tones
There is a choice of 10 polyphonic ring melodies and 4 ring tones. You can also choose from 4 key tones.
To adjust ring volume:
- Touch menu and select the RING SETTING menu and then the RING VOLUME submenu.
- Use or to select 'EXTERNAL CALL' or 'INTERNAL CALL'. Touch menu ok to confirm.
- Use or to select volume level. (Select 'OFF' to silence the ring tone).
- Touch menu to confirm.
NOTE: will appear to indicate external ring tone is silenced if 'OFF' is selected.
To adjust ring tone:
- Touch menu and select the RING SETTING menu and then the RING TONE submenu.
- Use or to select ' EXTERNAL CALL ' or ' INTERNAL CALL '. Touch menu ok to confirm.
- Use or to select ring tone.
- Touch [menu] to confirm.
To adjust key tone:
- Touch menu and select the PHONE SETUP menu and then the KEY TONE submenu.
- Use and to select key tone.
- Touch menu to confirm.
Handset reception
Interference from other electrical appliances such as televisions, microwave oven or computer should be avoided. If you are out of range or the signal is interrupted a will disappear and 'OUT OF RANGE' will be displayed.
NOTE: Due to radio interference occasional loss of synchronization between the handset and base unit may occur. If this happens the base unit will very quickly switch to another channel automatically to restore synchronization.
HANDSET SPECIAL FEATURES
In addition to the basic functions, your handset also has a number of special features.
Phone setup
To set the dial mode:
If you have Touch-Tone service, do nothing as your phone has been set to Tone prior to shipment. If you do not know which type of service you have, contact your local telephone company.
- Touch menu and select the PHONE SETUP menu and then the DIAL MODE submenu.
- Use or to select 'PULSE' or 'TONE'.
- Touch menu to confirm.
To change flash time:
- Touch menu and select the PHONE SETUP menu and then the FLASH TIME submenu.
- Use or to change selected flash time (100, 270, 300 or 600ms).
- Touch menu to confirm.
Smart key lock and manual key lock
Smart Key Lock prevents the accidental activation of keys during a call. A sensor inside the top of handset where the receiver is located senses when your ear touches the receiver and automatically locks the keypad. To ensure the Smart Key Lock function is activated, make sure to place the handset receiver to your ear first before speaking into the handset microphone and avoid touching the keypad with your fingers until the handset receiver rests on your ear. Smart Key Lock will disengage as soon as you remove the handset receiver from your ear. A manual key lock can also be activated to prevent the accidental triggering of keys during standby mode or sleep mode.
To activate / deactivate manual key lock:
- In standby mode touch menu OK then immediately touch tone, will appear to indicate key lock is activated. To deactivate manual key lock, touch menu OK then immediately tone.
NOTE:
- When the keypad is locked, Only the menu key functions and the emergency call (911) can be made, enter the emergency number and touch talk directly.
HANDSET SPECIAL FEATURES
- When the keypad is locked, you will still be able to answer incoming calls, once the call has ended the keypad will remain locked.
Area code
To set area code:
- Touch menu and select the PHONE SETUP menu and then the SET AREA CODE submenu.
- Use 0-9 to enter your 3-digit area code.
- Touch menu to confirm. ok
Baby call
Baby call allows you to set a number to automatically dial when any key (apart from ) is touched.
To set baby call:
- Touch menu and select the PHONE SETUP menu and then the BABY CALL submenu.
- Use and to select 'ON'.
- Touch [menu] to confirm.
- Use 0 - 9 to enter the baby call number. Touch flash to delete numbers if an error is made.
- Touch menu to confirm. ok
If you want to dial other numbers you will need to switch baby call off. To deactivate baby call repeat steps 1 to 3, selecting 'OFF' instead of 'ON'.
Auto answer
When the AUTO ANSWER is set to 'ON', simply remove the handset from the cradle and the phone automatically answers the call.
To set auto answer:
- Touch menu and select the PHONE SETUP menu and then the AUTO ANSWER submenu.
- Use or to select 'ON' or 'OFF'.
- Touch [menu] to confirm.
HANDSET SPECIAL FEATURES
Clock and alarm setting
If you subscribe to Caller ID service from your local telephone company, the time will be updated automatically when received a call.
If you do not subscribe to Caller ID service, you will need to set the time manually.
To set the time:
- Touch menu and select the SET TIME menu and then the CLOCK SETTING submenu.
- Use 0 - 9 to enter the time. If you make a wrong enter, use or to move the cursor to the incorrect digit and re-enter.(Use # to toggle AM / PM if 12 hour display format is selected).
- Touch [menu] to confirm.
To change time display format
- Touch menu and select the SET TIME menu and then the DISPLAY FORMAT submenu.
- Use or to select 12/24 hour format.
- Touch menu to confirm. ok
- Use or to select day-month format 'MM/DD' or 'DD/MM'.
- Touch menu to confirm. OK
To set the alarm
- Touch menu and select the SET TIME menu and then the ALARM submenu.
- Use or to select 'ON'.
- Touch menu to confirm. ok
- Use 0 - 9 to enter alarm time.
- Touch menu to confirm. ok
To switch the alarm to off, repeat steps 1-3, selecting 'OFF' instead of 'ON'.
NOTE: indicates alarm is set.
- When the reminder occurs, your phone will ring. To stop alarm tone, simply touch the keypad. If the keypad is not touched, alarm will ring for 1 minute and then automatically turn off.
- If the alarm is activated during a call, you will hear two alarm tone and alarm icon flashes.
MULTI HANDSETS FUNCTIONS
If you have more than one handset, you can enjoy an intercom call between handsets. You can also establish a conference call (between two handsets and outside).
Registration
The handset and base unit are factory pre-registered with each other. Therefore, the unit should be in full working order out of the box. When you purchase an additional handset, you have to register it to the base unit in order to make and answer calls.
You can register up to 3 more handsets to make and answer calls via the same base unit. Handsets are numbered 1 to 4.
If your handset is not registered to the base "NOT REGISTERED" will display on the handset. The handset must first be registered to the base to be used.
To register a new handset:
- Touch menu and select the SECURITY SET menu and then the REGISTRATION submenu.
- Use or to select the base number you wish to register to.
- Touch menu to confirm.
- Enter the 4 digit PIN code (default 0000) and touch menu ok, you will see the message: 'REGISTERING'.
- Press and hold the PAGE key on the base until the Charge/In use LED flashes.
- 'REGISTRATION ACCEPTED' indicates that handset is registered. 'RETRY?' indicates that registration has failed. Touch menu to retry or end to quit.
To select a base unit on your handset:
Your telephone supports up to 4 base units. After you register 1 handset to 4 base units, bases are numbered 1 to 4, you may select which one to use.
- Touch menu and select the SECURITY SET menu and then the SELECT BASE submenu.
- Use or to select the base number or 'AUTO' (automatically selects the nearest base).
- Touch [menu] to confirm.
- 'ACCEPTED' indicates that base has been selected. 'RETRY?' indicates that selection has failed. Touch to retry or end to quit.
MULTI HANDSETS FUNCTIONS
To de-register a handset:
- Touch menu and select the SECURITY SET menu and then the DEREGISTRATION submenu.
- Use or to select the handset number for de-registration.
- Touch menu to confirm. Wait for handset to de-register from the base unit.
- 'DEREGISTRATION ACCEPTED' indicates that handset is de-registered.
To make an internal call:
- Touch Intcm
- Use or to select the handset you wish to call and touch talk or enter handset number directly.
- The called handset rings and can touch talk to answer the call. If you turn AUTO ANSWER on, simply pick up the handset from the cradle.
- To end the call, touch end on either handset.
NOTE: If an external call is received during an internal call, you will hear a ringer tone from the receiver. Touch end to terminate the internal call and touch talk to answer the external call.
- If the called handset does not answer within two minutes, the operation is canceled.
- If the called handset is out of range, the calling handset return to standby mode.
To transfer an external call:
- Touch Intcm during a call.
- Use or to select a handset you wish to call and touch talk or enter the handset number directly. If the selected handset is not available or the called handset does not answer the call within 2 minutes, will return to the external call automatically.
NOTE: To cancel the transfer, touct intcm on the calling handset, will return to the external call.
- The called handset can touch talk to answer. If you turn AUTO ANSWER on, simply pick up the handset from the cradle.
NOTE: To toggle between the internal and external call, touch Intcm on the calling handset.
- To transfer the call, touch end on the calling handset or place the handset in the cradle.
MULTI HANDSETS FUNCTIONS
To establish a conference call:
The phone permits 3-way conversations between 2 handsets and an outside line.
- During an external call, touch Intcm
- Use or to select a handset you wish to call and touch talk or enter the handset number directly.
- The called handset can touch talk to answer. If you turn AUTO ANSWER on, simply pick up the handset from the cradle.
- The calling handset can touch to start the conference call, 'CONFERENCE CALL' shows on screen.
- Touch end key on either handset to finish the conference call. The connection will remain between the remaining handset and the external line.
RESET
To reset the handset default settings:
- Touch menu and select the Set Default menu.
- Use and to select 'YES'.
- Touch menu to confirm. ok
NOTE: All the settings you have made will be restored to the default factory settings if you reset.
DEFAULT SETTINGS
| SETTING | DEFAULT VALUE |
| Language | English |
| Internal & External Ring Volume | 3 |
| External Ring Tone | Ring Tone 3 |
| Internal Ring Tone | Tone 1 |
| Alarm | Off |
| Alarm time | 12:00AM |
| Display format | 12-hour |
| Month-Date display format | MM / DD |
| Key Click Tone | Pattern 2 |
| Smart Key lock | On |
| Auto Answer | Off |
| Baby call | Off |
| Baby call number | Clear |
| Dial Tone | Tone Dial |
| Flash Time | 600ms |
| Handset Name | Clear |
| Backlight Time | 60 seconds |
| Handset volume | Vol. 1 |
| Speaker phone volume | Vol. 3 |
| Set contrast | 8 |
| Area Code | clear |
TROUBLESHOOTING
See below for some common problems and their remedies. Whatever the problem, you should first check that:
- The base unit is connected to the power supply and phone line.
The main power is switched on at the socket. - The handset battery is installed and has not run out of power.
DO NOT attempt any repairs yourself. This will invalidate your warranty.
TROUBLESHOOTING
| PROBLEM | POSSIBLE CAUSES / REMEDIES |
| Can't make a call / OUT OF RANGE appears on the handset. | • Out of range of base unit- move your handset closer to the base unit. • Interference due to environment- position base unit to reduce interference (move base unit away from other electrical appliances). • De-synchronization has occurred. The base unit will reset synchronization automatically. • Handset may not be registered to base unit (see REGISTRATION section Page 30). |
| Can't enter the submenus. | • Ensure unit is not in cradle. • Return to standby mode by pressing end. |
| Every button I press calls a preset number. | • Phone is in Baby Call mode. To deactivate see BABY CALL section page 28. |
| Caller ID is not displayed. | • Check your network subscription to Caller ID. • Full name and number (incl. STD code) need to be stored in phonebook for name display. |
| Handset does not ring. | • Ring Volume 'OFF' (see CHANGE RING AND KEY TONES section page 26). |
| When I'm talking on the phone I keep activating other keys. | • Make sure that your ear is touching the top section of the handset (receiver) when you are talking. |
| Batteries are low, even if recharged. | • Batteries may need to be replaced. |
| I can't register my new one handset. | • A maximum of 4 units can be registered at time. De-register a handset and try again. • Make sure you select a base number that has not been assigned. |
| I can't make an internal call. | • Only one external call and one internal can take place at once. Make sure no other handset is making a call. |
CHANGING THE BATTERY
Battery replacement and handling
When the operating time becomes short even after a battery is recharged, please replace the battery.
With normal usage, your battery should last approximately one year.
For a replacement battery, please contact your place of purchase or fill out and mail the enclosed form.
CAUTION:
- Use only the specified battery pack type (Ni-MH 3.6V, 650mAh).
- Do not remove the battery from the handset to charge it.
- Never throw the battery into a fire, disassemble it, or heat it.
- Do not remove or damage the battery casing.
- Remove battery if storing the phone for over 30 days.
Make sure the telephone is off before you replace the battery.
- Slide off the battery compartment cover.
- Remove the battery pack from the compartment.
- Insert the new battery pack according to the polarity engraved.
NOTE: Please refer to the TO INSTALL A REPLACEMENT BATTERY PACK section Page 12.
- Put the battery compartment cover back on.
- Place handset on the base to charge for 15 hours.
Charge the handset battery for 15 continuous hours prior to first use. The initial battery charge is important for best performance.
CAUTION: To reduce the risk of fire or personal injury, use a NI-MH 3.6 V, 650mAh battery.
Replacement part number: 3SN-AAA
POWER FAILURE
When power is off, you will not be able to make or receive calls with the telephone.
RECYCLING NICKEL-METAL HYDRIDE BATTERIES
NICKEL-METAL HYDRIDE BATTERIES MUST BE DISPOSED OF PROPERLY.
Please take your used battery pack to a store that recycles
Ni-MH batteries.Call 1-800-822-8837 or go to www.rbrc.ca

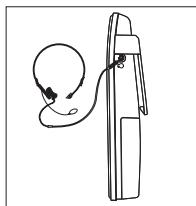
HEADSET JACK
Headset connection (Headset not included)
For hands free conversation, connect the headset (not included) to the HEADSET jack. The handset earpiece and microphone are disabled when the headset is connected. Touch talk to answer or place a call while using the headset.
For purchasing, servicing or replacement please contact our service center. SANYO Canada Inc.
1-300 Applewood Cres.
Concord, Ont. L4K 5C7
(905) 760-9944
1-800-263-2244
www.sanyo.ca
MAINTENANCE
To keep your telephone working and looking good, follow these guidelines:
- Avoid putting the phone near heating appliances and devices that generate electrical noise (for example, motors or fluorescent lamps).
- Do not expose to direct sunlight or moisture.
- Avoid dropping the phone, and other rough treatment to the phone.
- Clean the phone with a soft cloth.
- Never use a strong cleaning agent or abrasive powder because this will damage the finish.
- Periodically clean the charge contacts on the handset and base with a clean pencil eraser.
- Retain the original packaging and your original sales receipt in case you need to ship the phone at a later date.
MAXIMIZE BATTERY PERFORMANCE
The freedom that your cordless telephone can offer is fully dependent on the performance of the rechargeable battery in the handset. To maximize the battery performance, follow these guidelines:
Charge it for a full 15 hours
Before initial use of your new battery, charge it for 15 hours continuously. The proper initial charging is very important to maximize the battery performance.
Keep the contacts clean
You can never fully recharge the battery if the contacts are dirty. Clean all the contacts - two at the bottom of the handset and two in the base cradle - periodically. Use a clean pencil eraser or superfine steelwool to clean the charging contacts. Avoid touching the cabinet area of the phone, or scratches may occur.
Refresh battery
If your battery seems to need recharging more often than usual, it may have lost part of its charging capacity. To bring back its full capacity, try "refreshing" the battery:
- First discharge the battery by leaving the handset in TALK mode until Battery Low indication turns on. (Disconnect the base from the telephone line, so that your line is not busy all the time.)
- Then charge it for 15 continuous hours.
- Repeat the above once more. As your phone use a Ni-MH battery you are free to leave your handset in the base charger for as long as you like, without affecting the performance of the battery life.
TECHNICAL INFORMATION
REN Number:
The Ringer Equivalence Number (REN) assigned to each terminal's device provides an indication of the maximum number of terminals allowed to be connected to a telephone interface.
The REN number of this phone is located on the bottom of the base unit. The termination on an interface may consist of any combination of device subject only to the requirement that the sum of the Ringer Equivalence Numbers of all the devices does not exceed 5.
CAUTION
This product is intended for use in the USA and CANADA only. Sale or use in other countries may violate local laws.
Cordless telephones use radio frequencies to allow mobility. This affects the performance of your phone.
1. NOISE
Electrical pulse noise is present in most homes at one time or another. This is most intense during electrical storms. Certain kinds of electrical equipment, such as light dimmers, fluorescent bulbs, motors, fans, etc., also generate pulse noise.
Because radio frequencies are susceptible to this, you may on occasion hear pulse noise through
the handset. This is usually only a minor annoyance and should not be interpreted as a defect of the phone.
2. RANGE
Because radio frequencies are used, the location of the base station can affect the operating range of the phone. Try several locations and choose the one that gives the clearest signal to the handset. Generally, a central area on the highest floor in a multi-floor residence yields best results.
3. INTERFERENCE
Electronic circuits activate a relay to connect the unit to your telephone line. These electronic circuits operate in the radio frequency spectrum. While several protection circuits are used to prevent unwanted signals, there may be periods when these unwanted signals enter the base station. You may hear a click or hear the relay activate when you are not using the cordless handset. If this occurs frequently, or relocating the base station.
4. RADIO EQUIPMENT
The term "IC:" before the radio certification number only signifies that Industry Canada technical specifications were met. Operation is subject to the following two conditions (as set by Industry Canada): (1) this device may not cause interference, and (2) this device must accept any
TECHNICAL INFORMATION
interference, including interference that may cause undesired operation of the device.
NOTICE:
Cordless telephones are radio devices. Communications between the handset and base of your cordless telephone are accomplished by means of radio waves which are broadcast over the open airways. Because of the inherent physical properties of radio waves, your communications can be received by radio receiving devices other than your own cordless telephone unit. Consequently, any communications using your cordless telephone may not be private.
The Industry Canada Label identifies certified equipment. This certification means that the equipment meets certain telecommunications network protective, operational and safety requirements. The ministry does not guarantee that the equipment will operate to the user's satisfaction.
Before installing this equipment, users should ensure that it is permissible to be connected to the facilities of the local telecommunications company. The equipment must also be installed using an acceptable method of construction. In some cases, the company's inside wiring associated
with single-line individual service may be extended by means of a certified connector assembly (telephone extension cord). The customer should be aware that compliance with the above conditions may not prevent degradation of service in some situations.
Repairs to certified equipment should be made by an authorized Canadian maintenance facility designated by the supplier. Any repairs or alterations made by the user to this equipment, or equipment malfunctions, may give the telecommunications company cause to request that the user disconnect the equipment.
The user should ensure for his own protection that the electrical ground connections of the power utility, telephone lines and internal metallic water pipe system, if present, are connected together. This precaution may be particularly important in rural areas.
CAUTION
Users should not attempt to make such connections themselves, but should contact the appropriate electrical inspection authority, or electrician, as appropriate.
The exclamation point within an equilateral triangle is intended to alert the user to the presence of important operating and maintenance (servicing) instructions in the literature
TECHNICAL INFORMATION
accompanying the product.
This symbol on the product is used to identify the following important information. Use only with specified SANYO power adaptor.
NOTICE: This equipment meets the applicable Industry Canada Terminal Equipment Technical Specifications. This is confirmed by the registration
number. The abbreviation, IC, before registration number signifies that registration was performed based on a Declaration of Conformity indicating that Industry Canada technical specifications were met. It does not imply that Industry Canada approved the equipment.
This Class B digital apparatus complies with Canadian ICES-003.
SANYO COMFORT WARRANTY
WARRANTY APPLICATION
SANYO Communications products purchased new, unused in Canada through a SANYO Authorized Dealer are warranted against manufacturing defects in materials and workmanship for ONE YEAR covering parts and labour, from the date of purchase by the original retail purchaser. This warranty only applies in favour of the original retail purchaser of the warranted product.
SANYO CANADA INC.'S RESPONSIBILITY
During the warranty period, SANYO Canada Inc. will repair, or at our option, replace a Communications product which shows evidence of a manufacturing defect in materials or workmanship. Replacement PARTS are warranted for the remaining portion of the warranty period.
WHAT IS NOT COVERED
a. Communications products
purchased outside Canada.
b. Communications products purchased in a used condition.
c. Communications products purchased from non SANYO authorized dealer.
d. Communications products not intended for Canadian usage or products without appropriate Canadian regulatory approvals.
e. Problem due to product set-up and installation.
f. Adjustments that are outlined in the Operating Manual.
g. Accessory items including antenna and batteries.
h. Damage in or due to transportation.
i. Damage due to improper maintenance, accident, abuse, misuse or negligence.
j. Damage caused by lightning and power surges.
SANYO COMFORT WARRANTY
ORIGINAL RETAIL PURCHASER'S RESPONSIBILITY
You, the original retail purchaser, must present your original, dated bill-of-sale together with this warranty to SANYO Canada Inc. or to an authorized SANYO Service Depot when you make a claim under this warranty.
You, the original retail purchaser, are responsible for any costs of TRANSPORTING the product to and from SANYO Canada Inc. or an authorized SANYO Service Depot. You also are responsible for the cost of any MAINTENANCE necessary in respect of the product.
WARRANTY BECOMES VOID
This warranty becomes void if the product's serial numbers are altered or removed or if any repair to the product is made other than by SANYO Canada Inc. or by an authorized SANYO Service Depot.
LIMITATIONS
a. SANYO Canada Inc. reserves the right to change or improve the design of the model of the product warranted hereunder without incurring any obligation to make any modifications to or to install any improvement in or on the product.
b. In no event shall SANYO Canada Inc. or any of its Authorized Dealers be liable for special or consequential damage arising from the use of this product.
STATUTORY WARRANTY
The above provisions do not preclude the operation of any applicable provincial statute which in certain circumstances may not allow some of the limitations and exclusions described in this warranty. Where any terms of this warranty are prohibited by such a statute, they shall be deemed null and void but the remainder of this warranty shall remain in effect.
HOW TO OBTAIN WARRANTY SERVICE
Please contact the SANYO Authorized Dealer from whom the product was purchased, or contact us directly at:
SANYO Canada Inc.
1-300 Applewood Cres. Concord, Ont. L4K 5C7 (905) 760-9944 1-800-263-2244
SOS HELP LINE
At SANYO, fulfilling the needs of our customers is a priority. That's why we created our SOS customer service program that guarantees satisfaction.
NATIONWIDE CUSTOMER SUPPORT
SOS is there to help you. Our friendly and knowledgeable product specialists will quickly answer your questions about setup and use of SANYO telephone products. Simply call toll free from anywhere in Canada to connect to our no-charge, SOS support and service network:
1-800-263-2244
Or visit our website at www.sanyoservice.com, and click the Customer Relations button to get access to our FAQ's (Frequently Asked Questions) and other helpful features.
It's a nuisance making another trip to the store when you're stuck. Now with SOS, all that's necessary is a quick call for your home for product assistance.
HASSLE-FREE EXCHANGE
Should your SANYO telephone require servicing due to a manufacturing defect during the warranty period. SANYO Canada will ship prepaid a replacement unit* within two business days after receiving your defective unit.
Consumers are responsible for the shipping costs of the unit back to SANYO.
For older, non-current models, replacement units may not be available, in which case our regular warranty conditions will apply.
GUARANTEED QUALITY
All SOS replacement sets are checked and serviced by factory-authorized technicians before being sent out.
SOS means you never have to worry.
C.O.D. and/or Collect shipments will not be accepted.
Unit must be returned to SANYO in its original box with all accessories, i.e.: owner's manual, battery, adaptor, telephone cord, etc.


- TABLE OF CONTENTS
- INTRODUCTION 4
- NAMES AND CONTROLS 6
- TOUCH PHONE USE AND HANDLING 8
- SAFETY AND CARE 8
- GETTING STARTED 10
- BASIC FUNCTIONS 13
- PHONEBOOK 16
- CALLER ID DISPLAY 19
- HANDSET SETTINGS 23
- HANDSET SPECIAL FEATURES 27
- MULTI HANDSETS FUNCTIONS 30
- INTRODUCTION
- MAIN FEATURES
- PACKAGE CONTENTS
- NAMES AND CONTROLS
- TOUCH HANDSET
- BASE UNIT (CRADLE)
- TOUCH PHONE USE AND HANDLING
- SAFETY AND CARE
- CARING FOR YOUR PRODUCT
- CAUTION
- GETTING STARTED
- CHOOSE THE BEST LOCATION
- CONNECTING THE BASE UNIT
- CONNECTING THE CHARGER ( FOR MULTI-HANDSET MODEL)
- HANDSET BATTERY PACK
- ACTIVATING AND CHARGING THE HANDSET BATTERY PACK
- TO ACTIVATE AND CHARGE THE HANDSET BATTERY PACK
- TELEPHONE LINE CONNECTION
- LOW BATTERY WARNING
- REMOVING AND REPLACING HANDSET BATTERY PACK
- TO INSTALL A REPLACEMENT HANDSET BATTERY PACK
- ATTACHING THE BELT CLIP
- BELT CLIP INSTALLATION
- BASIC FUNCTIONS
- STANDBY MODE AND SLEEP MODE
- MAKING AND RECEIVING CALLS
- TO MAKE A CALL
- TO PRE-DIAL A CALL
- TO ANSWER A CALL
- TO ACTIVATE SPEAKERPHONE DURING A CALL
- TO END A CALL
- TO REDIAL A CALL
- FLASH KEY
- TO ADJUST VOLUME DURING CALL
- TO MUTE THE MICROPHONE DURING CALL
- TEMPORARY TOUCH-TONE ACCESS (* TONE)
- HANDSET LOCATOR (PAGING FUNCTION)
- PHONEBOOK
- STORING NUMBERS
- TO INPUT NAMES
- USING HANDSET KEYS TO ENTER TEXT
- DELETING NUMBERS
- TO DELETE 1 ENTRY
- TO DELETE ALL ENTRIES
- EDITING NUMBERS
- CALLING STORED NUMBERS
- CALLER ID DISPLAY
- CALLER ID WITH CALL WAITING
- CALL LOG
- VIEWING / CALLING CALLER ID RECORDS
- TO VIEW THE CALL LOG
- TO DIAL THE REVIEWED NUMBER
- SAVING CALLER ID RECORDS IN PHONEBOOK
- FORMATTING CALLER ID NUMBERS
- DELETING CALLER ID RECORDS
- DELETING ALL CALLER ID RECORDS
- MISSED CALLS
- MESSAGE WAITING
- TO MANUALLY CLEAR THE MESSAGE WAITING INDICATORS
- HANDSET SETTING
- HOW TO NAVIGATE MENUS
- DURING STANDBY MODE
- TIP
- LIST OF SUBMENUS
- CHANGE DISPLAY SETTINGS
- TO C HANGE LANGUAGE
- TO ADJUST SCREEN CONTRAST
- TO ALTER BACKLIGHT TIME
- TO ASSIGN A NAME TO A HANDSET
- CHANGE RING AND KEY TONES
- TO ADJUST RING VOLUME
- TO ADJUST RING TONE
- TO ADJUST KEY TONE
- HANDSET RECEPTION
- HANDSET SPECIAL FEATURES
- PHONE SETUP
- TO SET THE DIAL MODE
- TO CHANGE FLASH TIME
- SMART KEY LOCK AND MANUAL KEY LOCK
- TO ACTIVATE / DEACTIVATE MANUAL KEY LOCK
- NOTE
- AREA CODE
- TO SET AREA CODE
- BABY CALL
- TO SET BABY CALL
- AUTO ANSWER
- TO SET AUTO ANSWER
- CLOCK AND ALARM SETTING
- TO SET THE TIME
- TO CHANGE TIME DISPLAY FORMAT
- TO SET THE ALARM
- NOTE: INDICATES ALARM IS SET
- MULTI HANDSETS FUNCTIONS
- REGISTRATION
- TO REGISTER A NEW HANDSET
- TO SELECT A BASE UNIT ON YOUR HANDSET
- TO DE-REGISTER A HANDSET
- TO MAKE AN INTERNAL CALL
- TO TRANSFER AN EXTERNAL CALL
- TO ESTABLISH A CONFERENCE CALL
- RESET
- TO RESET THE HANDSET DEFAULT SETTINGS
- DEFAULT SETTINGS
- TROUBLESHOOTING
- CHANGING THE BATTERY
- BATTERY REPLACEMENT AND HANDLING
- MAKE SURE THE TELEPHONE IS OFF BEFORE YOU REPLACE THE BATTERY
- POWER FAILURE
- RECYCLING NICKEL-METAL HYDRIDE BATTERIES
- HEADSET JACK
- MAINTENANCE
- MAXIMIZE BATTERY PERFORMANCE
- CHARGE IT FOR A FULL 15 HOURS
- KEEP THE CONTACTS CLEAN
- REFRESH BATTERY
- TECHNICAL INFORMATION
- REN NUMBER
- NOISE
- RANGE
- INTERFERENCE
- RADIO EQUIPMENT
- NOTICE
- SANYO COMFORT WARRANTY
- WARRANTY APPLICATION
- SANYO CANADA INC.'S RESPONSIBILITY
- WHAT IS NOT COVERED
- ORIGINAL RETAIL PURCHASER'S RESPONSIBILITY
- WARRANTY BECOMES VOID
- LIMITATIONS
- STATUTORY WARRANTY
- HOW TO OBTAIN WARRANTY SERVICE
- SANYO CANADA INC
- SOS HELP LINE
- NATIONWIDE CUSTOMER SUPPORT
- 1-800-263-2244
- HASSLE-FREE EXCHANGE
- GUARANTEED QUALITY
Brand : SANYO
Model : CLT-D6622
Category : Laser printer